

Cool find Phil. No doubt a vac canopy will be a huge improvement over the original anyway. I'll be watching with interest.
I missed out on a Matchbox Cobra last week by 5 bloody minutes. Better luck next time I hope.
Air Campaigns
Want to start or join a group build? This is where to start.
Want to start or join a group build? This is where to start.
Hosted by Frederick Boucher, Michael Satin
OFFICIAL Matchbox Flying Nostalgia Campaign

phantom_phanatic309

#372

Joined: March 10, 2010
KitMaker: 2,568 posts
AeroScale: 1,619 posts

Posted: Monday, June 11, 2012 - 11:56 AM UTC

phantom_phanatic309
#372
Joined: March 10, 2010
KitMaker: 2,568 posts
AeroScale: 1,619 posts
Posted: Tuesday, June 12, 2012 - 08:03 AM UTC
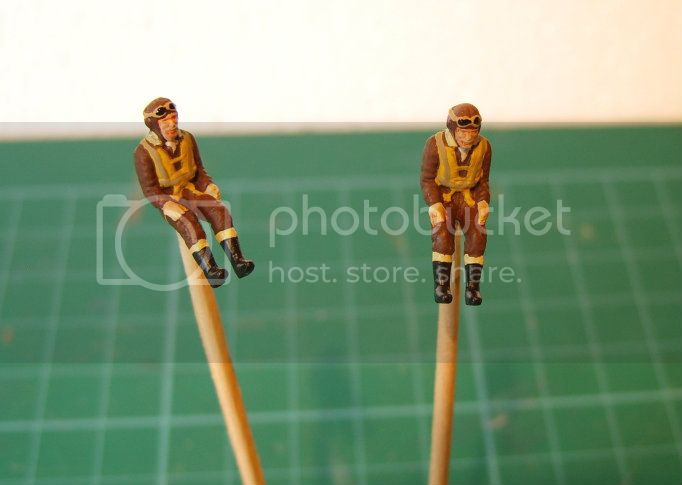
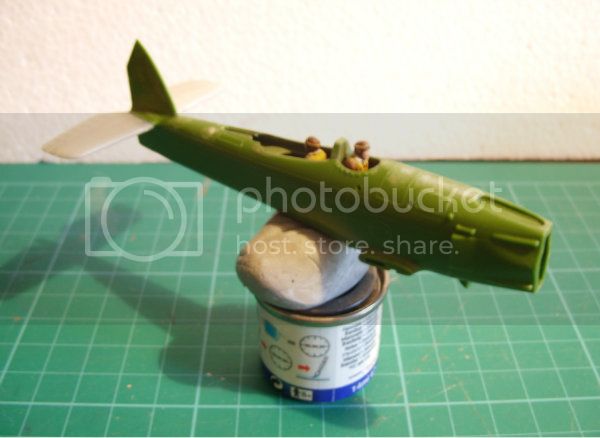
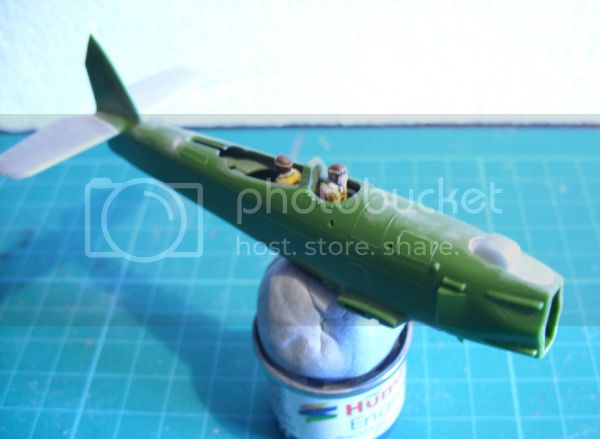
Update on the Seafox:
Crew are now painted and ready to be fitted. I wanted to do as good a job as possible on these guys as there is stuff all in the cockpits and should help to make it look a bit busier.
I couldnt find an reference to pre and early war FAA flying gear so I painted them in RAF kit.
Comments welcome.
If anyone fancies some more Matchbox madness later in the year, I've proposed a Matchbox Ships campaign over on the model shipwrights forum. Anyone who's interested please pop over and give it a look.
Ste
Removed by original poster on 06/12/12 - 20:48:37 (GMT).
SGTJKJ

#041

Joined: July 20, 2006
KitMaker: 10,069 posts
AeroScale: 3,788 posts

Posted: Wednesday, June 13, 2012 - 07:09 AM UTC
Nice looking figures, Stephen. They will look good in the cockpit. Especially considering there is probably nothing else in the cockpit 


phantom_phanatic309
#372
Joined: March 10, 2010
KitMaker: 2,568 posts
AeroScale: 1,619 posts
Posted: Wednesday, June 13, 2012 - 08:23 AM UTC
Thanks Jesper. Its a challenge painting figures this small but I think they were worth it. Beides from a flat section for the intsrument panel and shelf running along either side there is nothing in the cockpit. The observer does have a fairly decent (if short) Vickers K gun in the back.
Hoping to get the fuselage glued together tomorow. Spent most of tonight cleaning up the wings although it is not easy to see the mould seam on that bright silver plastic!
Hoping to get the fuselage glued together tomorow. Spent most of tonight cleaning up the wings although it is not easy to see the mould seam on that bright silver plastic!

squidgy
#144

Joined: February 18, 2005
KitMaker: 268 posts
AeroScale: 10 posts

Posted: Wednesday, June 13, 2012 - 02:06 PM UTC
sorry chaps have to drop out, did not even start campaign, had no time to start my kit due to loss in family, wish you guys all the best on finishing your kits

Tomcat31
#042

Joined: November 18, 2006
KitMaker: 2,828 posts
AeroScale: 1,720 posts

Posted: Wednesday, June 13, 2012 - 09:54 PM UTC
Only a quick update from me... the rest of the decals are on and a coat of Future/Klear has been applied to seal them in. Next up will be a light oil wash when i next get near the bench.


AussieReg
#007

Joined: June 09, 2009
KitMaker: 8,156 posts
AeroScale: 3,756 posts
Posted: Wednesday, June 13, 2012 - 10:24 PM UTC
Quoted Text
sorry chaps have to drop out, did not even start campaign, had no time to start my kit due to loss in family, wish you guys all the best on finishing your kits
Mark I'm so sorry to hear of your misfortune. I hope you can find time to visit and post a comment now and then.
My build here (in fact all of my builds) have stalled due to real life entanglements, but I really hope to get back on track soon.
Stephen, really nice work on those figures mate. Nobody will even notice the barren cockpit with those guys in the seats !
Andrew, welcome aboard sir. Looking forward to the HP build.
Tomcat, glad to hear that progress is being made there, you'll be the next across the line perhaps.
Cheers, D

phantom_phanatic309
#372
Joined: March 10, 2010
KitMaker: 2,568 posts
AeroScale: 1,619 posts
Posted: Thursday, June 14, 2012 - 07:52 AM UTC
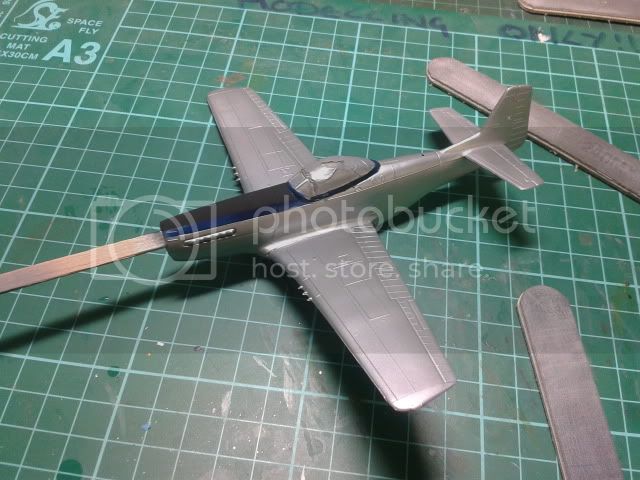
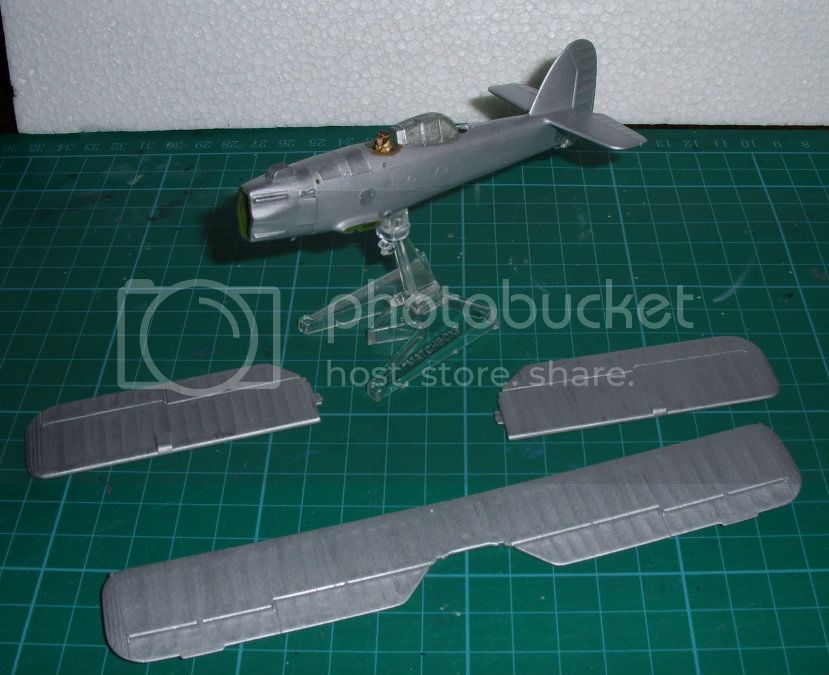
Fuselage is now assembled and its starting to look like an aeroplane.
I did a test fit of the crew seats and found they were WAY too low down. The crew would barely have been able to see over cockpit. I glued the pilot seat a little higher on the bulkhead and used a bit of scrap plasticard to boost the observers seat. Happy with this I glued the fuselage halves together. Amazingly the fit was brilliant and I don't think I will need any filler at all to smooth the seam down. How often do we say that of Airfix kits of a similar vintage?
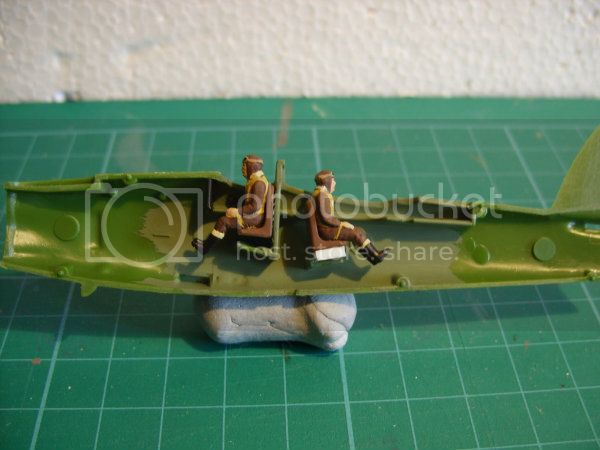
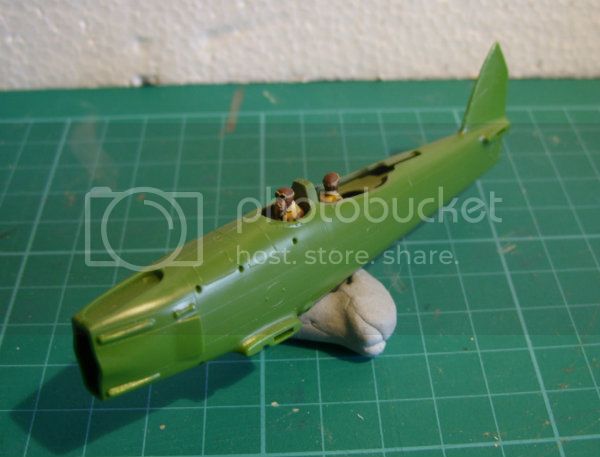
I did a test fit of the crew seats and found they were WAY too low down. The crew would barely have been able to see over cockpit. I glued the pilot seat a little higher on the bulkhead and used a bit of scrap plasticard to boost the observers seat. Happy with this I glued the fuselage halves together. Amazingly the fit was brilliant and I don't think I will need any filler at all to smooth the seam down. How often do we say that of Airfix kits of a similar vintage?

McIvan

Joined: November 18, 2009
KitMaker: 64 posts
AeroScale: 34 posts
Posted: Saturday, June 16, 2012 - 10:49 AM UTC
Righty-ho, after a bit of a delay I have got my ducks in order. I really wanted to do my Halifax but, unaccountably, the bloody thing has gone missing. After searching high and low over the last month or two, I've given up on it and selected the venerable He70:
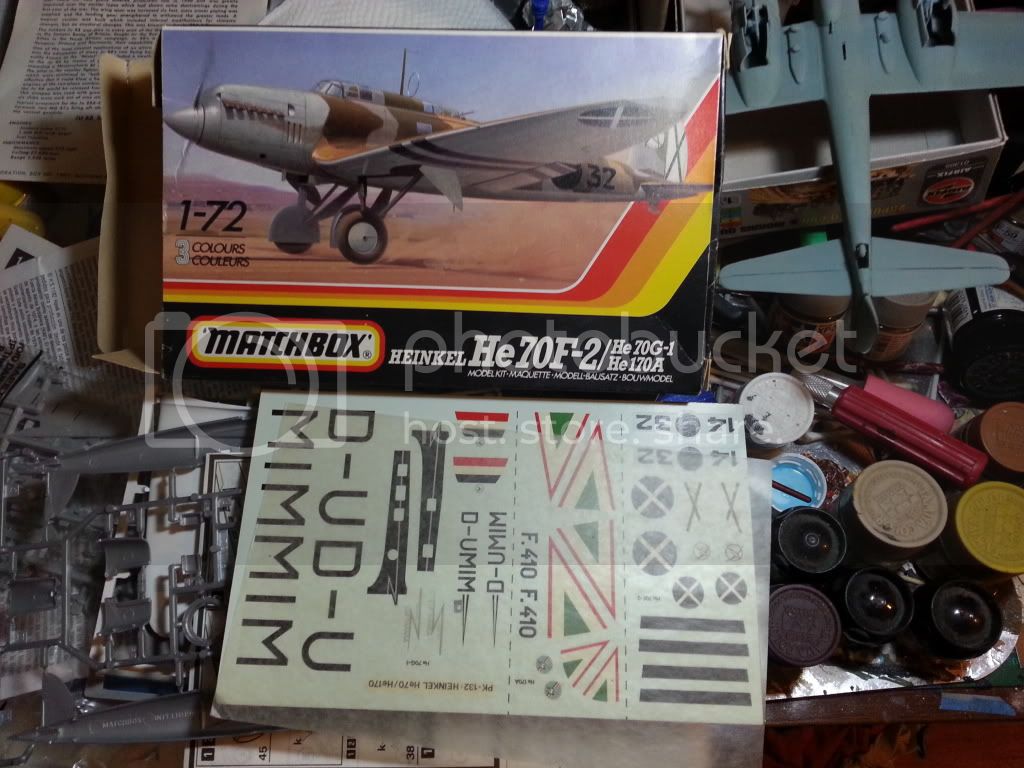
Will be getting stuck in this week. Only real decision now is what version......I'm leaning towards the black and silver airliner.
Will be getting stuck in this week. Only real decision now is what version......I'm leaning towards the black and silver airliner.
phantom_phanatic309
#372
Joined: March 10, 2010
KitMaker: 2,568 posts
AeroScale: 1,619 posts
Posted: Saturday, June 16, 2012 - 11:39 AM UTC
I'd go for either of the inline engined versions its much better looking, the radial is just ugly!
Lookinbg forward to seeing this one. I've got the Revell reissue in the stash and can't decide between the Lufthansa or Spanish Civil War schemes either.
Lookinbg forward to seeing this one. I've got the Revell reissue in the stash and can't decide between the Lufthansa or Spanish Civil War schemes either.
phantom_phanatic309
#372
Joined: March 10, 2010
KitMaker: 2,568 posts
AeroScale: 1,619 posts
Posted: Sunday, June 17, 2012 - 08:34 AM UTC
Have to say a big thanks to everyone who commented on my figures. They were a lot of fun to do and I may have to do more in future builds.
Anyway quck update:
Fuselage cleaned up and tailplanes fixed on. A little bit of filler was needed above the nose and to get rid of some sink marks but other than that no problems.
Anyway quck update:
Fuselage cleaned up and tailplanes fixed on. A little bit of filler was needed above the nose and to get rid of some sink marks but other than that no problems.

camogirl
Joined: October 20, 2005
KitMaker: 1,045 posts
AeroScale: 622 posts

Posted: Monday, June 18, 2012 - 07:18 AM UTC
Well after having a major model building burnout in April I have not been near the bench in ages all of a sudden on Sunday I found myself at the bench knocked the dust off the mustang and it went to the spray bay.

Looks like next is a couple of coats of klear and then onto the decaling stage
Looks like next is a couple of coats of klear and then onto the decaling stage

phantom_phanatic309
#372
Joined: March 10, 2010
KitMaker: 2,568 posts
AeroScale: 1,619 posts
Posted: Thursday, June 21, 2012 - 09:20 AM UTC
Wow that Mustang brings back some memories, another one I remember building when I was younger. I also remember the kits decals not behaving themselves, particularly the checks around the nose. Hope your luckier than I was.
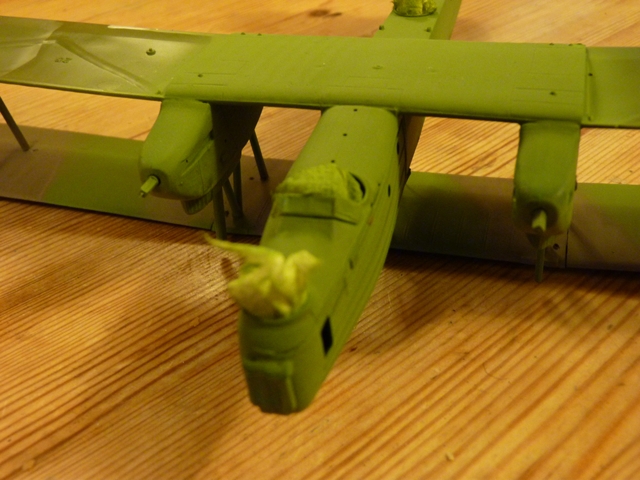
Only managed a little bit of work on the Seafox last few nights as I've had a lot of other stuff going on and started two other builds. Managed to sand smooth the filler around the tailplanes and oil cooler above the nose. Apologies for the bad photo, the flash reflected a lot more than usual off the silver plastic. I think in future I'll photo in daylight with the flash turned off. Next step is to add the lower wings. A fun job as I will have to match the dihedral of the upper in order to get the struts to fit right. Any suggestions on that?
Only managed a little bit of work on the Seafox last few nights as I've had a lot of other stuff going on and started two other builds. Managed to sand smooth the filler around the tailplanes and oil cooler above the nose. Apologies for the bad photo, the flash reflected a lot more than usual off the silver plastic. I think in future I'll photo in daylight with the flash turned off. Next step is to add the lower wings. A fun job as I will have to match the dihedral of the upper in order to get the struts to fit right. Any suggestions on that?

Jessie_C

Joined: September 03, 2009
KitMaker: 6,965 posts
AeroScale: 6,247 posts

Posted: Thursday, June 21, 2012 - 09:37 AM UTC
Quoted Text
Next step is to add the lower wings. A fun job as I will have to match the dihedral of the upper in order to get the struts to fit right. Any suggestions on that?
Put the upper wing on your work surface and shim the wingtips so that the centre section is just touching while the wingtips are level with each other. Then lift up the upper wing and place in the freshly glued model. You'll probably need to rig up tail shims as well, to keep it level while the wings dry.
SGTJKJ
#041
Joined: July 20, 2006
KitMaker: 10,069 posts
AeroScale: 3,788 posts
Posted: Wednesday, June 27, 2012 - 04:02 PM UTC
Nice progress, Stephen. The wings can be a little tricky, but usually not a big problem with the matchbox kits since they are not very delicate. Jessica's advice should work.
camogirl
Joined: October 20, 2005
KitMaker: 1,045 posts
AeroScale: 622 posts
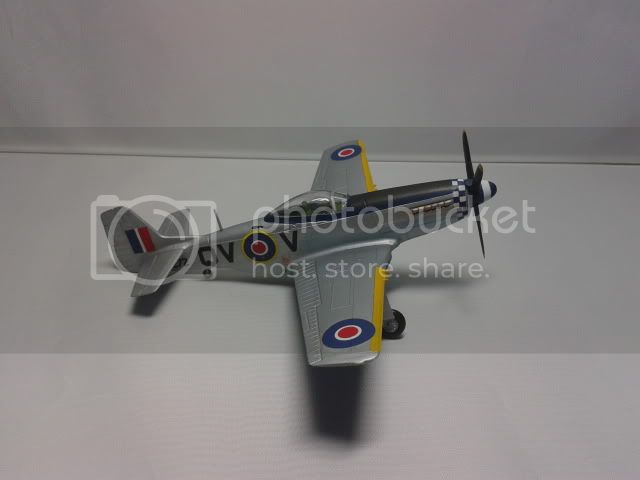
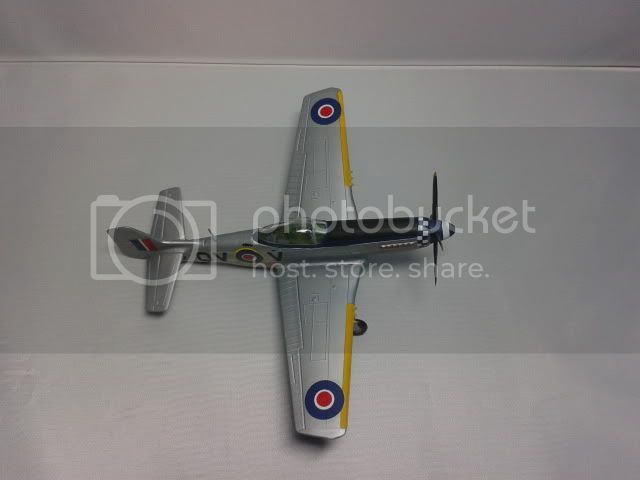
Posted: Monday, July 02, 2012 - 12:24 AM UTC
Im calling mine done

SGTJKJ
#041
Joined: July 20, 2006
KitMaker: 10,069 posts
AeroScale: 3,788 posts
Posted: Wednesday, July 04, 2012 - 09:54 AM UTC
Nice build, Sam. Interesting to see a Mustang in British markings.

Naseby

Joined: October 15, 2010
KitMaker: 825 posts
AeroScale: 476 posts

Posted: Friday, July 06, 2012 - 10:39 AM UTC
Bad news folks, Im out of this campaign. I missmanaged the dihedral on the Walrus and ow the wings dont fit together. Im so frustrated I put the build on hold. Thats the second campaign in row Im bailing. 


almonkey

Joined: March 23, 2003
KitMaker: 2,124 posts
AeroScale: 788 posts

Posted: Saturday, July 07, 2012 - 09:32 PM UTC
i'm back at the bench!
yesterday i got the decals on-

then turned my attention to the cockpit glazing.....
and hit a bit of a problem!
it seems that if you build the cockpit as intended (well, just slap the two seats in!) the rear gunner/radio op's head is right where the stock of the upper gun is!
to solve this i took out the seat and cut off the little leg giving me just enough space to squeeze the gun in.

he's more or less sat on the floor and twisted around somewhat, but both he and his gun are in!
yesterday i got the decals on-
then turned my attention to the cockpit glazing.....
and hit a bit of a problem!
it seems that if you build the cockpit as intended (well, just slap the two seats in!) the rear gunner/radio op's head is right where the stock of the upper gun is!
to solve this i took out the seat and cut off the little leg giving me just enough space to squeeze the gun in.
he's more or less sat on the floor and twisted around somewhat, but both he and his gun are in!

AussieReg
#007
Joined: June 09, 2009
KitMaker: 8,156 posts
AeroScale: 3,756 posts
Posted: Sunday, July 08, 2012 - 01:43 AM UTC
Hi folks, yes I'm still alive !
Stephen, great progress. It's always a good feeling to get the fuselage buttoned up !
Ivan, welcome aboard. I'm looking forward to seeing some progress pics of your He-70.
Camo, congrats on getting finished, that's a sweet little P-51 to add to the display.
Naseby, I'm very sorry to see you go, I hope you get the Walrus finished sometime down the track. If and when you do, please post some pics in this thread for us. I'm sure I can arrange a ribbon for you !
Phil, your 188 is looking really good. There's nothing like a gun-butt in your face on those long flights !
As for yours truly, I have some masking in front of me, then it's off to the paint shop . . . . . .


I'm going to leave the cockpit centre section and all of the engine covers removable, to display all of the super-accurate and highly detailed bits and bobs.
That's all for now, hopefully next time I see you I will have some colour to show !
Cheers, D
Stephen, great progress. It's always a good feeling to get the fuselage buttoned up !
Ivan, welcome aboard. I'm looking forward to seeing some progress pics of your He-70.
Camo, congrats on getting finished, that's a sweet little P-51 to add to the display.
Naseby, I'm very sorry to see you go, I hope you get the Walrus finished sometime down the track. If and when you do, please post some pics in this thread for us. I'm sure I can arrange a ribbon for you !
Phil, your 188 is looking really good. There's nothing like a gun-butt in your face on those long flights !
As for yours truly, I have some masking in front of me, then it's off to the paint shop . . . . . .
I'm going to leave the cockpit centre section and all of the engine covers removable, to display all of the super-accurate and highly detailed bits and bobs.
That's all for now, hopefully next time I see you I will have some colour to show !
Cheers, D

amegan
#243
Joined: March 21, 2008
KitMaker: 996 posts
AeroScale: 915 posts

Posted: Friday, July 13, 2012 - 08:01 AM UTC
Heyford finally under way. Usual strange colored sprues. Get past that and the fits are surprisingly good, no filler required, no tricks, it has just gone together really well
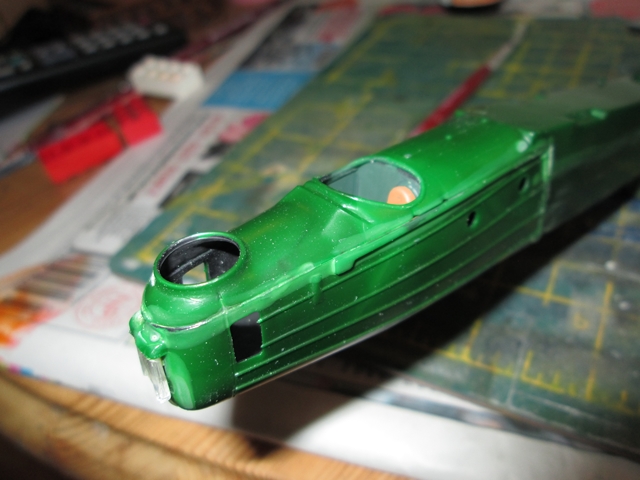
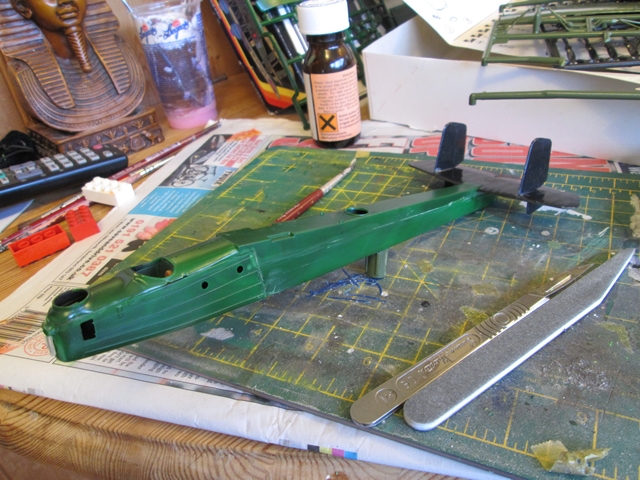
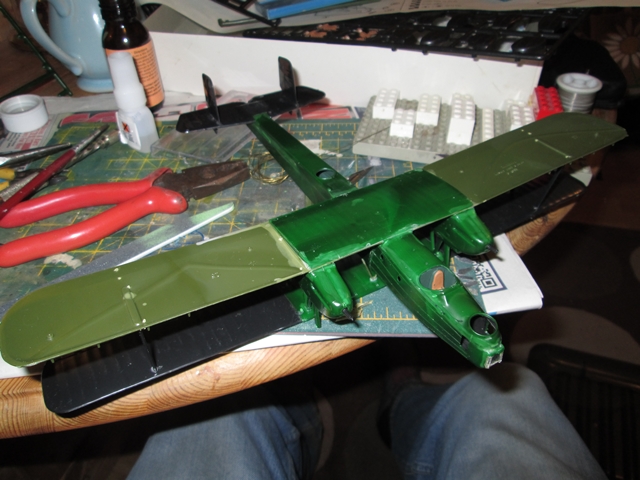
Painted the area between the wings and left the tops of the top wings and the bottom of the lower wing off so that I can do some rigging without leaving holes in the outer surfaces. Inner panels are drilled. I'm not going for a full rig, representation will be enough.
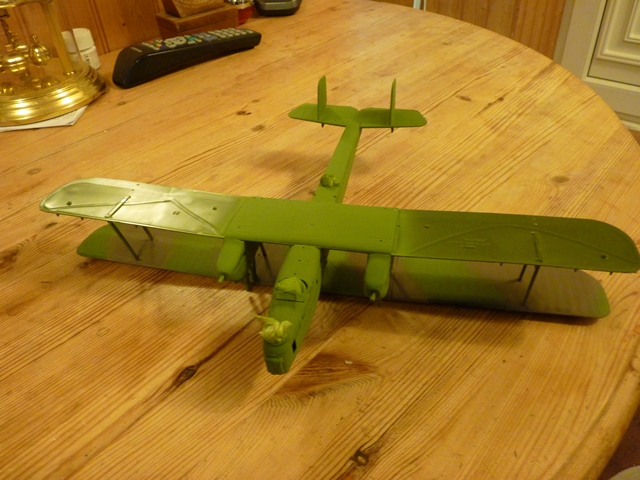
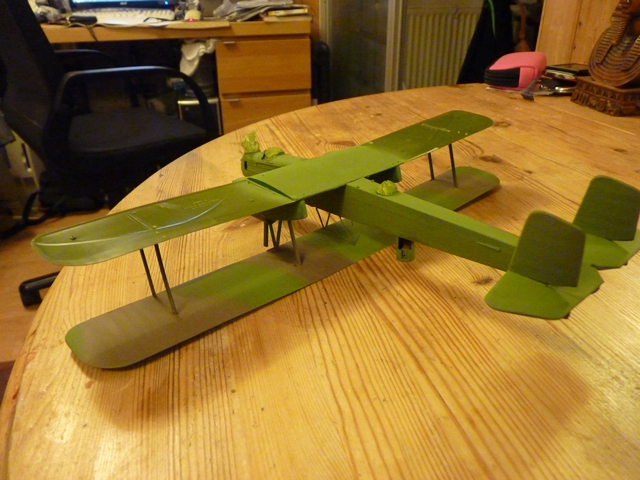

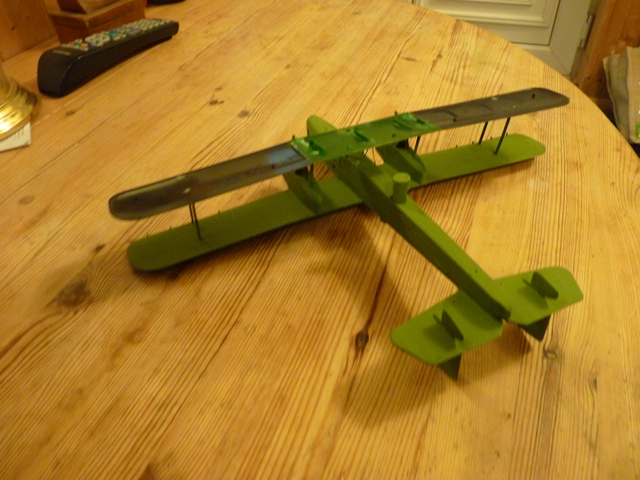
Painted the area between the wings and left the tops of the top wings and the bottom of the lower wing off so that I can do some rigging without leaving holes in the outer surfaces. Inner panels are drilled. I'm not going for a full rig, representation will be enough.
SGTJKJ
#041
Joined: July 20, 2006
KitMaker: 10,069 posts
AeroScale: 3,788 posts
Posted: Saturday, July 14, 2012 - 01:06 PM UTC
Nice progress, Damian. The Me 109 is shaping up well.
Great looking Heyford, Andrew. The fit is almost always good on Matchbox kits. Obviously a lot of missing details, but the fit seems to work almost every time. Very cool considering the age of these kits.
Looking forward to see the rigging.
Great looking Heyford, Andrew. The fit is almost always good on Matchbox kits. Obviously a lot of missing details, but the fit seems to work almost every time. Very cool considering the age of these kits.
Looking forward to see the rigging.
AussieReg
#007
Joined: June 09, 2009
KitMaker: 8,156 posts
AeroScale: 3,756 posts
Posted: Monday, July 16, 2012 - 06:33 PM UTC
Great progress on the Heyford Andrew, looking good mate !
More progress from me today, masking and RLM65 thrown on (Gunze H67 acrylic).


My plan is to put the decals on over the RLM65, give it a light clear coat, then mask them off with post-it notes (super-low tack) and spray on the RLM70 and white nose. That's the plan anyway, I'll let you know how it pans out
Cheers, D
More progress from me today, masking and RLM65 thrown on (Gunze H67 acrylic).
My plan is to put the decals on over the RLM65, give it a light clear coat, then mask them off with post-it notes (super-low tack) and spray on the RLM70 and white nose. That's the plan anyway, I'll let you know how it pans out
Cheers, D
phantom_phanatic309
#372
Joined: March 10, 2010
KitMaker: 2,568 posts
AeroScale: 1,619 posts
Posted: Monday, July 23, 2012 - 07:29 AM UTC
Apologies for not being around these last few weeks. My internet connection has been terrible and I've also had a lot going on with work (end of term and all that). At least I now have about 4 weeks at home before my actual holiday to get a few things done and all going well one finished Seafox.
Fuselage and wings are now painted and awaiting decals. Floats have been primed white ready to have the fronts painted red before the rest are painted alluminium. With that done its onto final assembly.
Sam, great work on the Mustang. Did the nose decals give you any trouble?
Andrew, great to see the Heyford being done. I will admit thats its on my wishlist.
Damian, can't wait to see the Me109 finished.
 |

WEB HOSTING BY


Copyright ©2021 AeroScale and Kitmaker Network, a subsidiary of Silver Star Enterprises
All Rights Reserved. Please read our Conditions of Use and Privacy Policy.
All Rights Reserved. Please read our Conditions of Use and Privacy Policy.