OFFICIAL: Douglas Parade of Propeller Power

#259
Massachusetts, United States
Joined: October 23, 2011
KitMaker: 2,265 posts
AeroScale: 1,715 posts
Posted: Thursday, January 16, 2014 - 09:22 PM UTC
Quoted Text
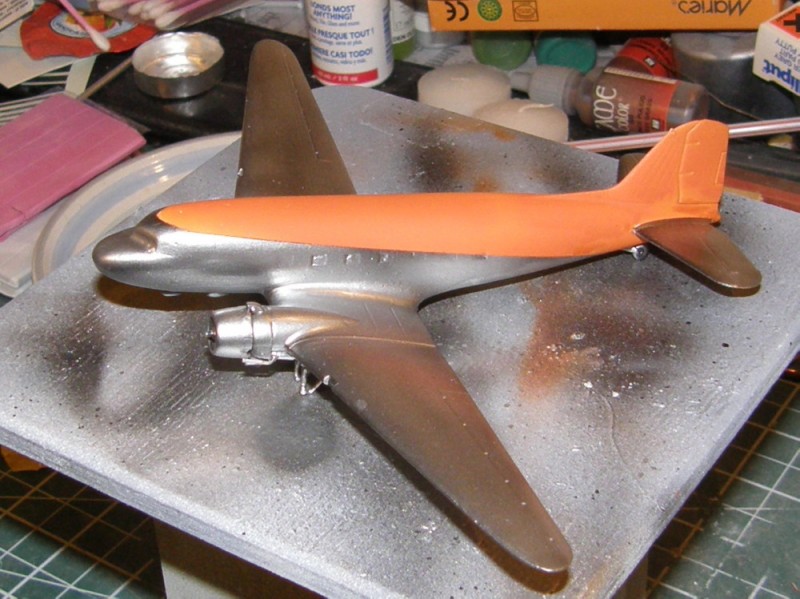
I tried buffing in some SNJ powder, but that just made it look worse. I'll leave it to dry and try some gentle sanding. Meanwhile, we learn why CP Air's marketing slogan was "Orange is Beautiful"
Orange is beautiful, and fast! adding the red stripe will make that thing stunning.
What makes an airbrush spatter? moisture in the air? I bet it will buff out ok. I hope so. thats a nice metal job.
I got this painted. These are Tamiya rattle can enamels, "haze gray" and "pure white"
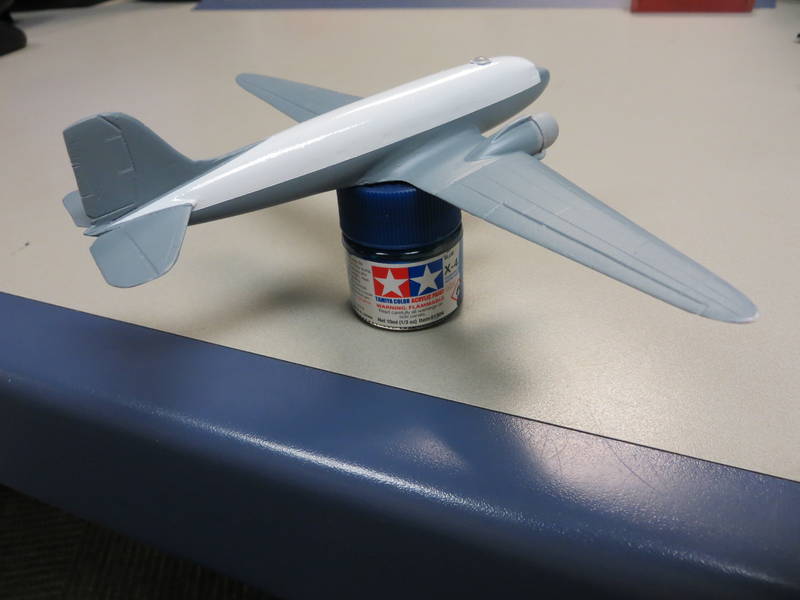
pulling off a mask is one of the most rewarding parts of this game. Im fairly pleased with this result.
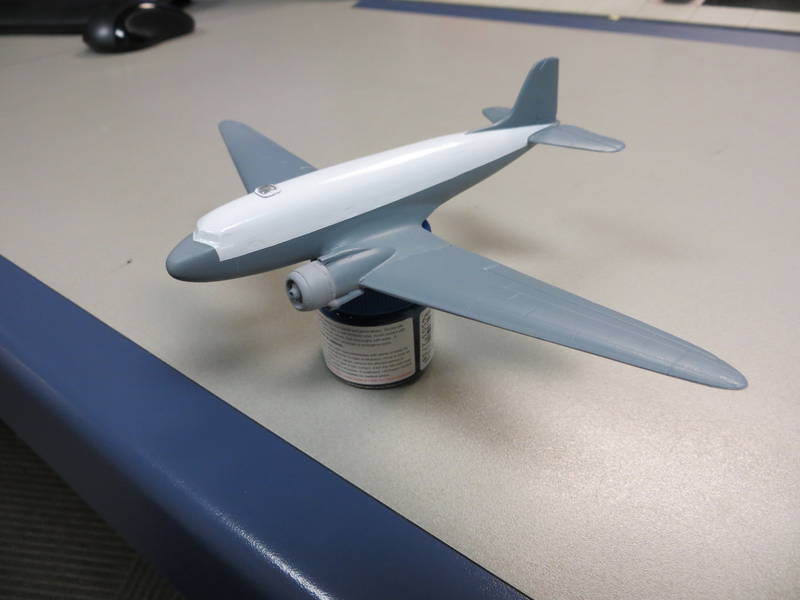
the rudder and engine cowlings will get flat aluminum dope.
the grey is alot darker and bluer than I was expecting, but its growing on me. its also not nearly as glossy as the white. Im going to have to add a coat of gloss before decalling this weekend.
Ontario, Canada
Joined: February 04, 2008
KitMaker: 2,507 posts
AeroScale: 1,814 posts
Posted: Thursday, January 16, 2014 - 11:10 PM UTC
Keep up the good work every one, 15 day to go!

" The Die Hards"
43rd MIDDLESEX REGIMENT
MACHINE GUN CORPS
XXX CORP
The most effective way to do it, is to do it.
- Amelia Earhart
British Columbia, Canada
Joined: September 03, 2009
KitMaker: 6,965 posts
AeroScale: 6,247 posts
Posted: Friday, January 17, 2014 - 03:15 AM UTC
Quoted Text
What makes an airbrush spatter? moisture in the air?
There are two prongs on the nozzle which protect the needle. Paint seems to like to build up on these, and then blow off in the airstream. If I remember to wipe them off every few seconds I can stop the splattering but in this case I missed it.
When once you have tasted flight you will walk the Earth with your eyes turned skyward.
For there you have been, and there you will always long to return.
-Leonardo Da Vinci
Joel_W
 Associate Editor
New York, United States
Joined: December 04, 2010
KitMaker: 11,666 posts
AeroScale: 7,410 posts
Posted: Friday, January 17, 2014 - 05:24 AM UTC
Jonathan, the Tamiya rattle cans are lacquer based paints, which is why the gloss paints look so smooth.
Jessica, Double action Air Brushes with the type of nozzle you have, does have a tendency to build up paint. When there is enough build up of paint to get caught in the air stream, you get a blob of paint flying off. But that shouldn't happen every few min as a general rule. A few reasons for that to happen so quickly is that your paint mixture is too thick and you compensate for it with a higher then normal psi. Another issue could be the type of paint. You once mentioned that you use the old Testors enamel based paints in those little bottles. The paint pigment is rather thick. If you like using them, try thinning 2 parts paint to 3-4 parts Lacquer Thinner. The LC will break down the paint particles so that your finish is smoother. For enamel paints you shouldn't need a psi higher then 15 psi as a general rule.
Joel
On my Workbench:
Monogram 1/24 scale 427 Shelby Cobra
Just Completed:
Beemax 1/24 scale BMW M3 E30 1992 Evolution II
British Columbia, Canada
Joined: September 03, 2009
KitMaker: 6,965 posts
AeroScale: 6,247 posts
Posted: Friday, January 17, 2014 - 05:33 AM UTC
I was spraying Alclad, which is supposed to be formulated to spray without thinning. It doesn't seem to matter what pressure I spray it at, it still splatters. I was spraying this batch at about 14 psi then went down to 10 because the last batch I sprayed at 18 and it splattered just as much. One of these days I'll discover which pressure to use...
Most of the Testors paints I use are the Model Master enamels, but I use Humbrol at least as much if not more.
When once you have tasted flight you will walk the Earth with your eyes turned skyward.
For there you have been, and there you will always long to return.
-Leonardo Da Vinci
Joel_W
Associate Editor New York, United States
Joined: December 04, 2010
KitMaker: 11,666 posts
AeroScale: 7,410 posts
Posted: Friday, January 17, 2014 - 05:54 AM UTC
Jessica,
I airbrush Alcad II also straight from the bottle, over a base coat of their gloss black. My air pressure gauge isn't that accurate at low psi numbers, but it looks like 12-15 psi max. I apply it in light even coats.
Do you have those blog issues with other paints too?
I've seen videos from some top builders who remove the nozzle for fine work for the very issues you have. Have you tried that fix?
Joel
On my Workbench:
Monogram 1/24 scale 427 Shelby Cobra
Just Completed:
Beemax 1/24 scale BMW M3 E30 1992 Evolution II
#259
Massachusetts, United States
Joined: October 23, 2011
KitMaker: 2,265 posts
AeroScale: 1,715 posts
Posted: Friday, January 17, 2014 - 06:10 AM UTC
Hopefully you all wont hate me for larding this thread with massive animated gifs, but this is relevant to my project.
I was recently turned on to this bit of 8mm film taken on Kwajalein around 1964.

These C-47s, about five of them altogether, were operated by the Navy at NAS Kwajalein from around 1950 until 1964 when they were handed over to the Army. They were all retired by 1968.
Here, judging from what I can make out of the cheat lines, they are in Navy livery.

and yeah, now I need a 1/144 Cessna Skymaster. There is a Shapeways kit....
Alberta, Canada
Joined: April 07, 2010
KitMaker: 1,028 posts
AeroScale: 939 posts
Posted: Friday, January 17, 2014 - 07:56 PM UTC
A bright yellow Air North DC-3 will be landing in here soon enough. Just waiting for enamel to dry before giving her a bath and then applying decals.

To prevent being called an 'expert', screw something up good every now and again.
#392
Hessen, Germany
Joined: January 09, 2013
KitMaker: 696 posts
AeroScale: 608 posts
Posted: Saturday, January 18, 2014 - 10:52 AM UTC
On the bench:
EE(BAC) Lightning F.2A (Airfix 1:72)
British Columbia, Canada
Joined: September 03, 2009
KitMaker: 6,965 posts
AeroScale: 6,247 posts
Posted: Sunday, January 19, 2014 - 05:54 PM UTC
Orange is Beautiful
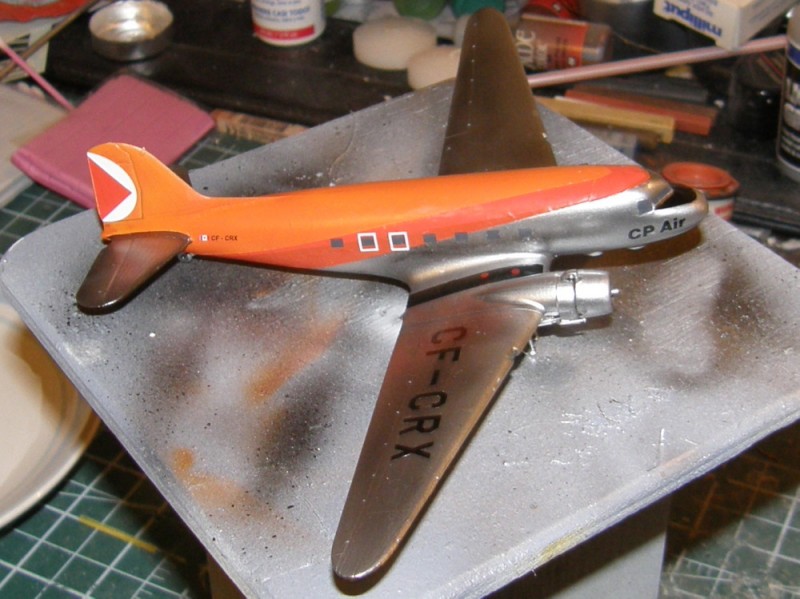
I'll let that lot dry and then get on with applying the deicing boot decals.
When once you have tasted flight you will walk the Earth with your eyes turned skyward.
For there you have been, and there you will always long to return.
-Leonardo Da Vinci
#259
Massachusetts, United States
Joined: October 23, 2011
KitMaker: 2,265 posts
AeroScale: 1,715 posts
Posted: Sunday, January 19, 2014 - 11:17 PM UTC
That great big red stripe looks pretty good. wow, that could easily have gone pear shaped...

I always loved the Pac Man scheme. I still have my lunch box from middle school -

MichaelSatin
Campaigns Administrator Colorado, United States
Joined: January 19, 2008
KitMaker: 3,909 posts
AeroScale: 2,904 posts
Posted: Monday, January 20, 2014 - 03:26 AM UTC
Lots of excellent builds out here. Just a reminder everyone, this campaign ends on January 31 so only 11 more days. And don't forget to post your finished product to the
gallery!
Michael

On the bench:
Sorta depends on your definition of "on the bench"...
#259
Massachusetts, United States
Joined: October 23, 2011
KitMaker: 2,265 posts
AeroScale: 1,715 posts
Posted: Thursday, January 23, 2014 - 12:07 AM UTC
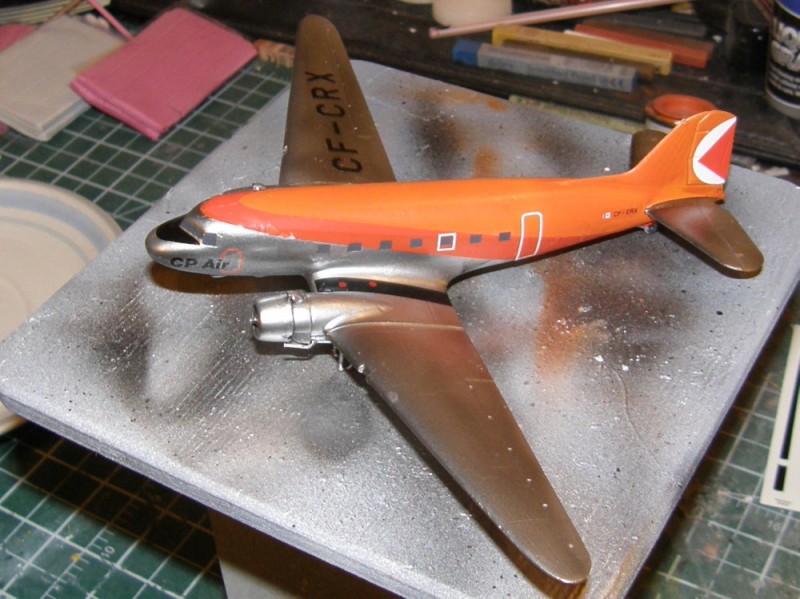
The end is in sight. Decals done.

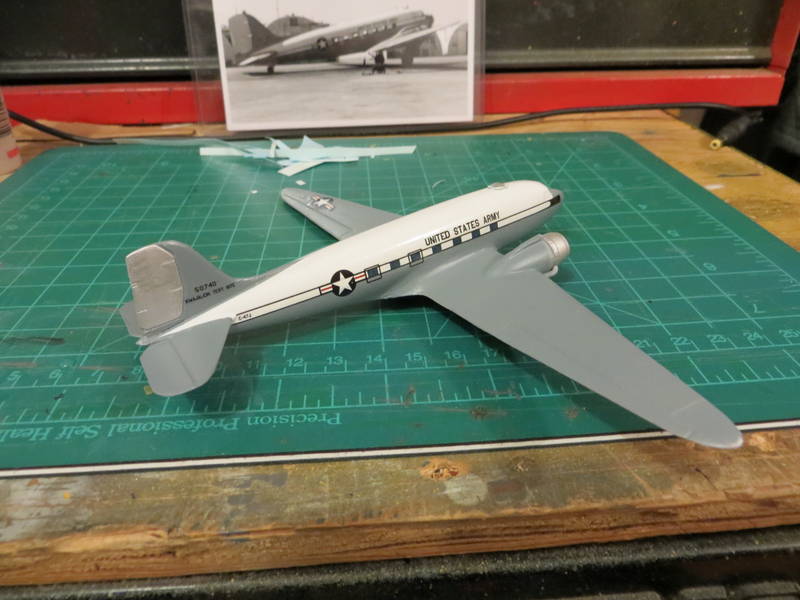
The cargo door outline worked pretty well.

just some detail painting, the anti-glare back nose, and the landing gear left to do.
Joel_W
Associate Editor New York, United States
Joined: December 04, 2010
KitMaker: 11,666 posts
AeroScale: 7,410 posts
Posted: Thursday, January 23, 2014 - 03:47 AM UTC
Jonathan, Looks fantastic with the decals on.
Joel
On my Workbench:
Monogram 1/24 scale 427 Shelby Cobra
Just Completed:
Beemax 1/24 scale BMW M3 E30 1992 Evolution II
Alberta, Canada
Joined: April 07, 2010
KitMaker: 1,028 posts
AeroScale: 939 posts
Posted: Thursday, January 23, 2014 - 03:54 AM UTC
She's looking great, Jonathan.
Mine is coming along as well.

I just have to paint on the de-iceing boots and some slight touch ups before I can begin decaling. I might discolor the ailerons as well.
Six days left, should be lots of time

To prevent being called an 'expert', screw something up good every now and again.
#259
Massachusetts, United States
Joined: October 23, 2011
KitMaker: 2,265 posts
AeroScale: 1,715 posts
Posted: Friday, January 24, 2014 - 12:14 AM UTC
I love the green and yellow!
I see you did a nice two tone on the bare metal wings as well, very sharp!
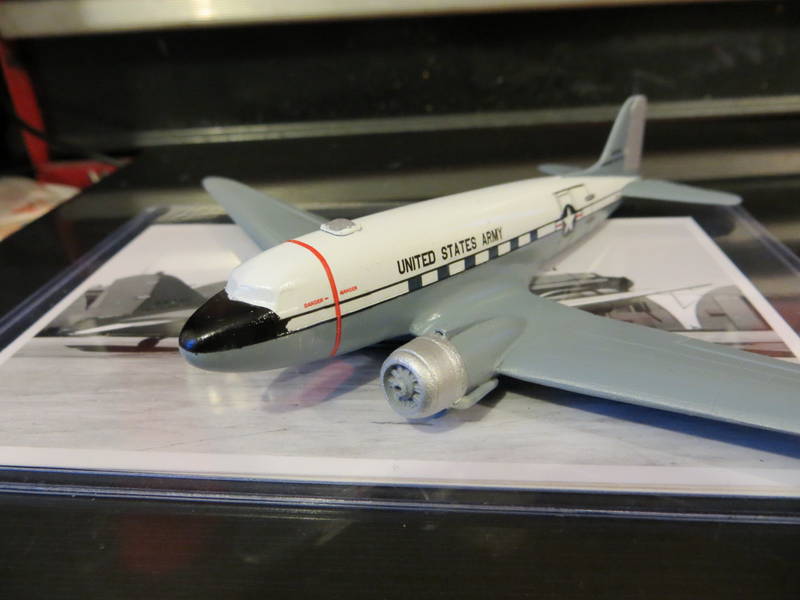
the elves in the shoe shop got the nose of this guy done overnight. less than perfect at high mag.
still need to find a cockpit window decal, I can rob one out of minicraft kit, I guess.
Alberta, Canada
Joined: April 07, 2010
KitMaker: 1,028 posts
AeroScale: 939 posts
Posted: Friday, January 24, 2014 - 03:52 AM UTC
Your's will be in the gallery before mine, Jonathan. Well done!
I was just wondering if anyone knew what a DC-3 wheel well colors might have usually been?
To prevent being called an 'expert', screw something up good every now and again.
British Columbia, Canada
Joined: September 03, 2009
KitMaker: 6,965 posts
AeroScale: 6,247 posts
Posted: Friday, January 24, 2014 - 10:05 AM UTC
Dirty
Zinc chromate or bare metal is likely your best bet, but remember they're usually very oily and dusty.
When once you have tasted flight you will walk the Earth with your eyes turned skyward.
For there you have been, and there you will always long to return.
-Leonardo Da Vinci
#073
Pennsylvania, United States
Joined: October 05, 2002
KitMaker: 2,659 posts
AeroScale: 209 posts
Posted: Friday, January 24, 2014 - 11:07 AM UTC
Howdy, Just showing I'm still in build..
had to concentrate on another build for a bit to get it done.
Here is my DC4 painted and ready to start decaling it.
lot of decals and some are fairly large..

later
Delbert
If all goes well I should finish up in time.
Just Your Everyday Average Model Builder
Joel_W
Associate Editor New York, United States
Joined: December 04, 2010
KitMaker: 11,666 posts
AeroScale: 7,410 posts
Posted: Friday, January 24, 2014 - 11:15 AM UTC
Delbert, Nice NMF. Sure hope that you don't hit any snafu's in the road, and can finish up before the end of the campaign.
Joel
On my Workbench:
Monogram 1/24 scale 427 Shelby Cobra
Just Completed:
Beemax 1/24 scale BMW M3 E30 1992 Evolution II
Ontario, Canada
Joined: February 04, 2008
KitMaker: 2,507 posts
AeroScale: 1,814 posts
Posted: Friday, January 24, 2014 - 11:22 AM UTC
Good work every one!
Lots of time left.
" The Die Hards"
43rd MIDDLESEX REGIMENT
MACHINE GUN CORPS
XXX CORP
The most effective way to do it, is to do it.
- Amelia Earhart
British Columbia, Canada
Joined: September 03, 2009
KitMaker: 6,965 posts
AeroScale: 6,247 posts
Posted: Friday, January 24, 2014 - 11:46 AM UTC
Delbert, if you're doing the United Airlines version (it looks like it, from the blue nosecone), watch out for the two decals which go on top of the cockpit roof. I paid too much attention to the fit at the top of the windscreen, and as a result, they don't meet at the fuselage centre line they way they should. Line them up there first, and then massage the fit to the windscreen. (my other mistake was to do one side completely, let it dry and then tackle the other. As a result, I couldn't move the dried decal to meet the other one.) I'm going to have to patch it with paint, and it's going to look a bit wrong as a result.
When once you have tasted flight you will walk the Earth with your eyes turned skyward.
For there you have been, and there you will always long to return.
-Leonardo Da Vinci
Alberta, Canada
Joined: April 07, 2010
KitMaker: 1,028 posts
AeroScale: 939 posts
Posted: Friday, January 24, 2014 - 12:28 PM UTC
Jessie - Thanks for the wheel well advice. I'm going with an aluminum enamel.
Delbert - I admire folks who try the big decal thing. Never had much luck myself, so I paint nearly everything.
Mine is totally painted other than the wheel wells. Before I do that, though, I want to apply future so as to protect the paint. So far, there's Alclad, Tamiya, Humbrol enamel, and PollyScale acrylic on there. She's easy to scratch right now.
I put on the de-icing boots today, and added a third Alclad color, for the ailerons.


Obviously, nothing in my modelling world is perfect. I'm still very happy with it.
The black anti-glare thats supposed to be on the nose will be a decal. I hope to be decaling by Sunday, latest.
To prevent being called an 'expert', screw something up good every now and again.
Alberta, Canada
Joined: April 07, 2010
KitMaker: 1,028 posts
AeroScale: 939 posts
Posted: Saturday, January 25, 2014 - 11:57 AM UTC
EEEEEEeeeeeeAAAAAaaaggggghhhhhh!!!!


I gently washed her with Dawn and luke warm water, prepping for a coat of Future. Nothing wrong with that. Just my heavy sponge-bob hand.
Now, I have to remask and re-apply the Alclad. Oh, Well! All in the world of modelling.
This bird has fought and spit at me every inch of the way, but, I mean to win.

To prevent being called an 'expert', screw something up good every now and again.
#392
Hessen, Germany
Joined: January 09, 2013
KitMaker: 696 posts
AeroScale: 608 posts
Posted: Saturday, January 25, 2014 - 12:32 PM UTC
Hi there,
just encountered a major problem. My old decals are probably prone to disintegrate after being soaked in the water At least the first one I tried. I put it back together somehow and it has to dry now. Tomorrow it gets a clear coating as I gave the others yet. Hope it will work, otherwise I have to search for these on the net. But I doubt if I get some in time for our deadline

On the bench:
EE(BAC) Lightning F.2A (Airfix 1:72)


