OFFICIAL: Overshadowed Fighters of WWII
Merlin
 Senior Editor
#017
United Kingdom
Joined: June 11, 2003
KitMaker: 17,582 posts
AeroScale: 12,795 posts
Posted: Sunday, March 15, 2015 - 05:22 AM UTC
Hi Paul
Very nice job! And thanks for the heads-up on the wheels.

I did a little bit on the Reppu after work today, priming the joints and adding lamp covers. With the joints, almost predictably, the ones I was worried about looked fine after priming, but the primer highlighted a couple that I was confident were fine as actually being real stinkers that need more work!

All the best
Rowan
BEWARE OF THE FEW...
As I grow older, I regret to say that a detestable habit of thinking seems to be getting a hold of me. - H. Rider Haggard
#041
Kobenhavn, Denmark
Joined: July 20, 2006
KitMaker: 10,069 posts
AeroScale: 3,788 posts
Posted: Sunday, March 15, 2015 - 08:25 PM UTC
Nice paint job, Paul. The preshading shows in just the right way.
Nice progress on the galdiator, Richard. A rig is really necessary for that bird

Looking forward to see more.

Campaign'oholic - 252+ campaigns completed
Merlin
Senior Editor #017
United Kingdom
Joined: June 11, 2003
KitMaker: 17,582 posts
AeroScale: 12,795 posts
Posted: Sunday, March 15, 2015 - 09:47 PM UTC
Hi again
Just a quick update showing the lamp covers.
I'm not sure about the one of the leading edge - there was a small panel that looked like it could be either a landing lamp or gun camera, so I just glazed it for a bit of interest. Equally, I don't know whether the wingtip lamps had coloured bulbs or covers, so I put a drop of clear colour in the drilled-out "bulbs" to be on the safe side.
Al the best
Rowan
BEWARE OF THE FEW...
As I grow older, I regret to say that a detestable habit of thinking seems to be getting a hold of me. - H. Rider Haggard
Oregon, United States
Joined: January 13, 2014
KitMaker: 107 posts
AeroScale: 105 posts
Posted: Tuesday, March 17, 2015 - 05:37 AM UTC
On the WIF Workbench: 1/72 IL-2 Sturmovik (Cuban Air Force)
"I shall either find a way or I shall make one." - supposedly, Hannibal Barca
#363
Pennsylvania, United States
Joined: January 08, 2014
KitMaker: 425 posts
AeroScale: 401 posts
Posted: Tuesday, March 17, 2015 - 06:32 AM UTC
Eduard 1/48 P-400 Limited EditionLooking good Martyn! Dutch aircraft have such colorful camouflage and markings.
I knocked out working on all the little parts while I waited for the enamels to cure. My warming mat should be here tomorrow so hopefully that speeds things up. I am thinking I will put her on her landing gear before I do gloss and decals so I can Future the whole thing at once. With only a week and a half left I don't think I have time to do one side at a time and wait for it to cure like I normally would.
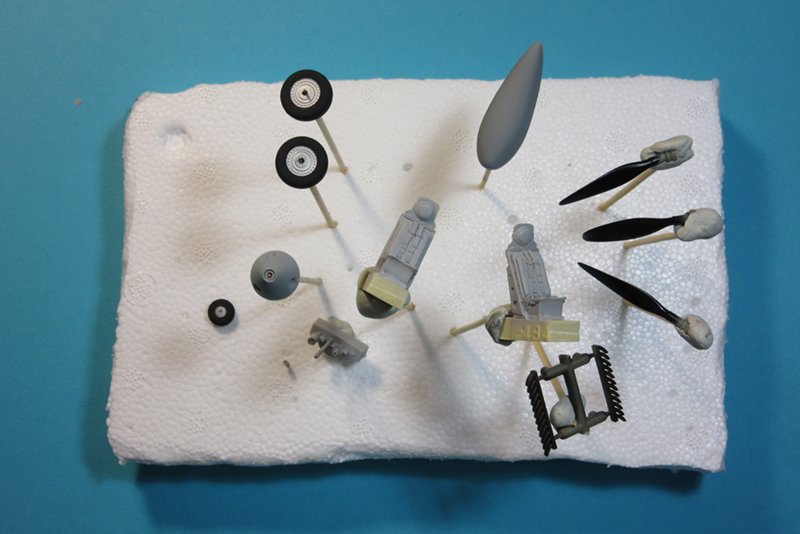 Small parts on sticks in honor of Magnus. Ignore the 2 P-51 seats, they are for the Mustang 75th Year campaign.
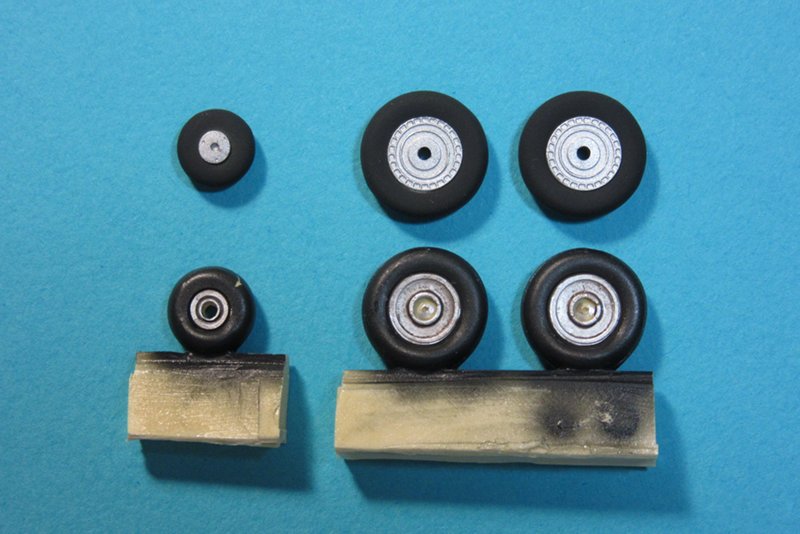 Here's a nice close-up to illustrate my point about the True Details wheels being a waste. The Eduard are on top. Looking at them side by side I am not even sure why I bought the resin wheels now. The Eduard wheels will look even better after I hit them with a wash and some stains.
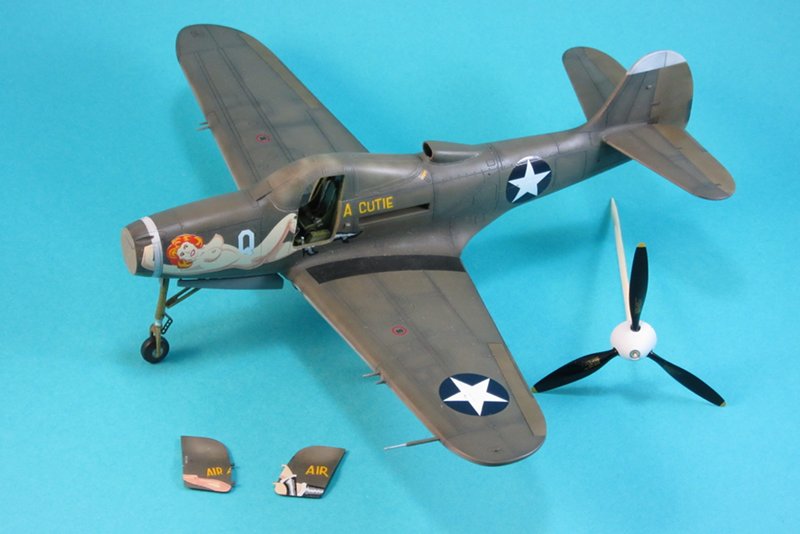
I picked up a replacement nose set by SBS Models, mainly because it was A.) Cheap ($6) and B.) included not one but four different cannon barrels in addition to the spinner and excellent Curtiss prop blades. The very nice 20mm barrel with muzzle brake and the curved, delicate prop blades are a really great enhancement to the nose of Air-A-Cutie. I wanted some great detail to pop since the huge pinup art will draw the attention to the nose. I'll save the 37mm barrels for my next P-39 project.
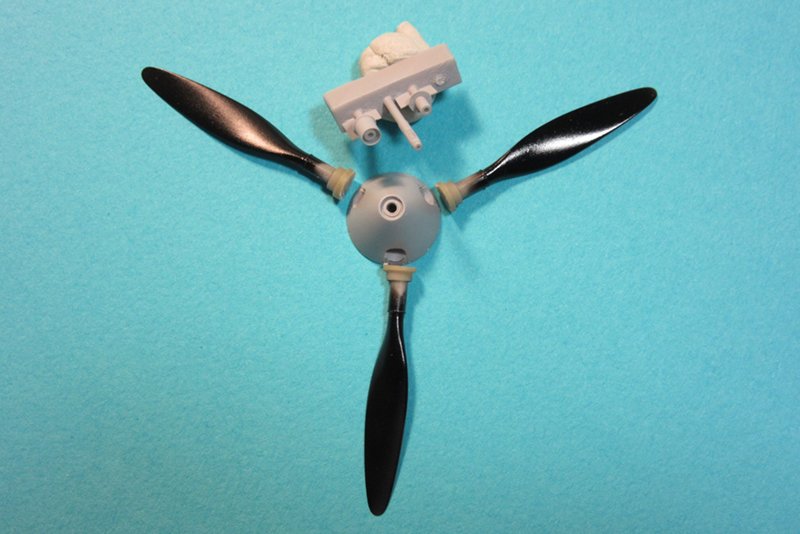 The SBS Models set. The barrels really put Eduard's crude efforts to shame. Look at that shrouded 37mm!
I'm hoping to mount the wheels and finish detailing the gear legs before the weekend. Then I just need to do the decals and final touches to the paint job. If I make it by the deadline this will be my fastest build ever, LOL.
On the Bench:
The Big Three: Eduard 1:48 Bf 109G-2 Trop
Radial Fighters: Hasegawa 1:48 Ki84 Frank
The Mighty Eighth: Eduard 1:48 P-51D-10
Merlin
Senior Editor #017
United Kingdom
Joined: June 11, 2003
KitMaker: 17,582 posts
AeroScale: 12,795 posts
Posted: Wednesday, March 18, 2015 - 01:56 AM UTC
Hi again
@ Richard - Great progress on the Gladiator. Sorry, I missed your post before.
@ Martin - Nice job on the Fokker! It makes me want to have a crack at the 1:48 version all the more.
@ Paul - Thanks for the heads-up on the True Details wheels. I see what you mean about them. SBS consistently produce beautiful resin accessories - and their move into complete kits is really exciting.
No progress to report on the Reppu - work got in the way. I've got a messy day tomorrow too, but then I hope to make some progress. Realistically, I may have left it a week or so too late to start this build if I want to meet the deadline. Totally my fault for forgetting the campaign!

All the best
Rowan
BEWARE OF THE FEW...
As I grow older, I regret to say that a detestable habit of thinking seems to be getting a hold of me. - H. Rider Haggard
#041
Kobenhavn, Denmark
Joined: July 20, 2006
KitMaker: 10,069 posts
AeroScale: 3,788 posts
Posted: Wednesday, March 18, 2015 - 02:01 PM UTC
Rowan, solid attention to details with the colored lamps. Nice!
Paul, looks good. I would also stick to the Eduard wheels. With the incredible improvements in styrene casting quality the socalled PE and resin imprvements are sometimes not really improvements at all. Same thing with tanks.
All that said, the prop is definitely a great improvement to the kit. Good choice.
Martyn, great little Fokkers. The combination of colorful markings and colorful camouflage is great.
Campaign'oholic - 252+ campaigns completed
Merlin
Senior Editor #017
United Kingdom
Joined: June 11, 2003
KitMaker: 17,582 posts
AeroScale: 12,795 posts
Posted: Wednesday, March 18, 2015 - 08:56 PM UTC
Cheers Jesper
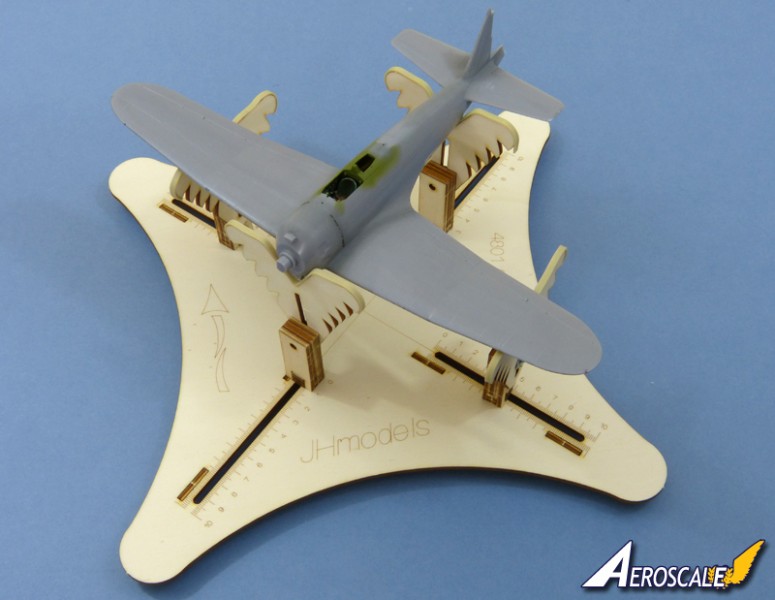
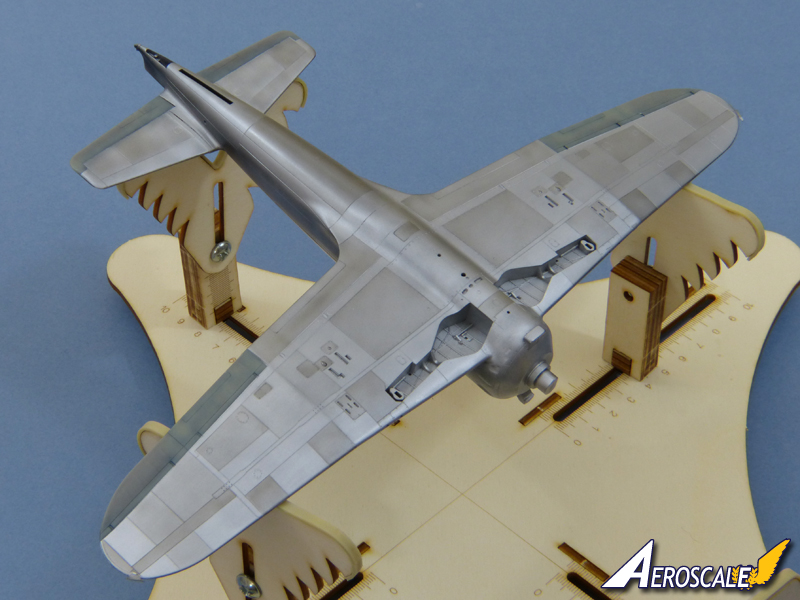
This afternoon's appointments evaporated, so I'll be able to get a bit of work done on the Reppu after all.
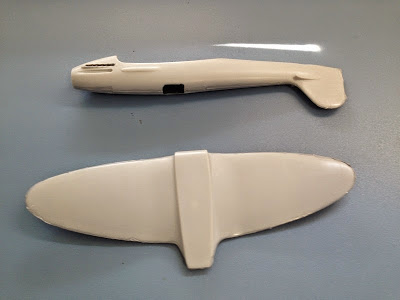
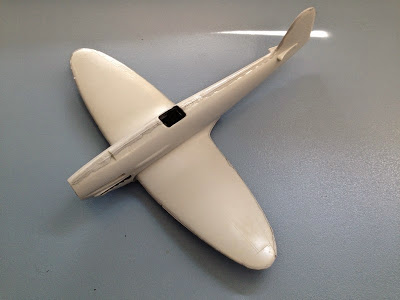
It's now sat, looking a very proud peacock, on it's new modelling stand.
All the best
Rowan
BEWARE OF THE FEW...
As I grow older, I regret to say that a detestable habit of thinking seems to be getting a hold of me. - H. Rider Haggard
#363
Pennsylvania, United States
Joined: January 08, 2014
KitMaker: 425 posts
AeroScale: 401 posts
Posted: Friday, March 20, 2015 - 03:45 AM UTC
Eduard 1/48 P-400 Limited EditionI decided to risk taping on the enamels today. My seed warmer arrived yesterday so I let it sit in that all night. There was very little odor remaining after one night. Thanks for the idea on that, Rowan.
I did all of the trim and fading work with Tamiya acrylics to keep things moving quickly. I was a little overzealous on the fabric fading but I think I can tone it down with weathering stains and blend it in some before I'm finished. Eduard provided masks for the nose trim and the wing walks, for the rest I turned to Tamiya tape.
 This should be all of the paint work. Now she just needs clear gloss, decals, and wash work.
 On the Bench:
The Big Three: Eduard 1:48 Bf 109G-2 Trop
Radial Fighters: Hasegawa 1:48 Ki84 Frank
The Mighty Eighth: Eduard 1:48 P-51D-10
#305
Christchurch, New Zealand
Joined: February 01, 2006
KitMaker: 1,673 posts
AeroScale: 1,517 posts
Posted: Friday, March 20, 2015 - 05:55 AM UTC
Rowan I like the look of the Reppu, the control surfaces look good and the way the Japanese had the stabilizer surfaces set forward of the tail have always intrigued me.
Looking great PeeJay! I look forward to seeing the decals on and the weathering complete.
#363
Pennsylvania, United States
Joined: January 08, 2014
KitMaker: 425 posts
AeroScale: 401 posts
Posted: Saturday, March 21, 2015 - 02:12 AM UTC
Eduard 1/48 P-400 Limited EditionShe's standing on her own three feet and looking shiny. I'll do some decaling Monday after giving the Future 48hrs to cure.
I'm pretty sure I am home free on time now. I even took some time to touch up the fabric surfaces with an ultra thin spray of Tamiya olive drab; I am much happier with the contrast between the metal and fabric areas now.
On the Bench:
The Big Three: Eduard 1:48 Bf 109G-2 Trop
Radial Fighters: Hasegawa 1:48 Ki84 Frank
The Mighty Eighth: Eduard 1:48 P-51D-10
#298
Hong Kong S.A.R. / 繁體
Joined: August 08, 2002
KitMaker: 1,182 posts
AeroScale: 351 posts
Posted: Saturday, March 21, 2015 - 10:54 AM UTC
#041
Kobenhavn, Denmark
Joined: July 20, 2006
KitMaker: 10,069 posts
AeroScale: 3,788 posts
Posted: Saturday, March 21, 2015 - 02:00 PM UTC
Looking good, Paul. Looking forward to see her with decals.
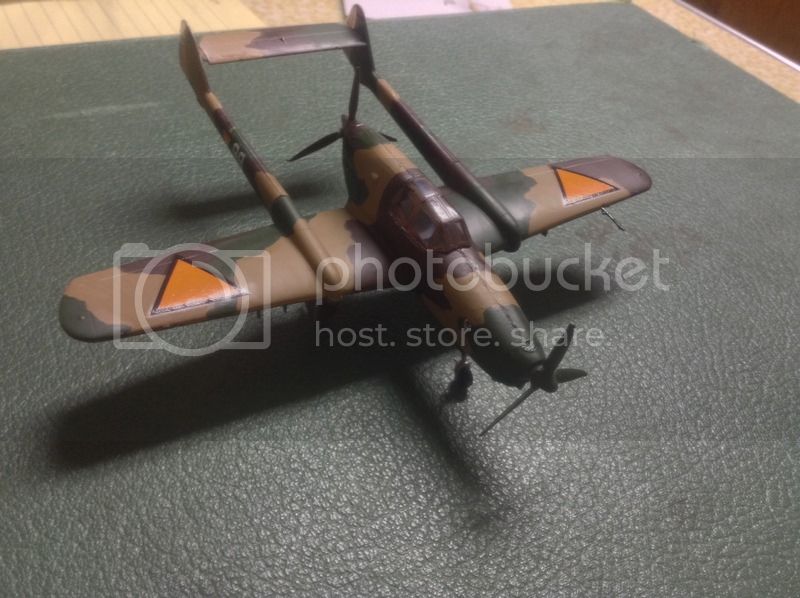
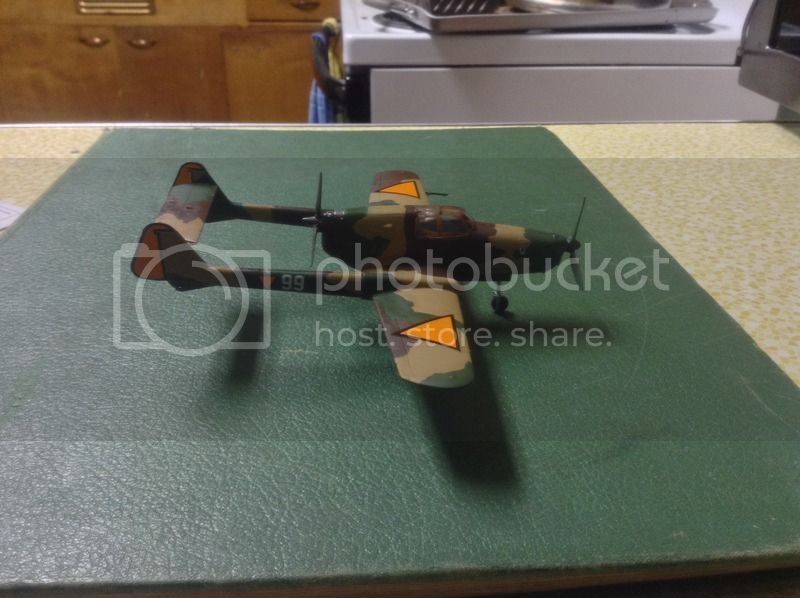
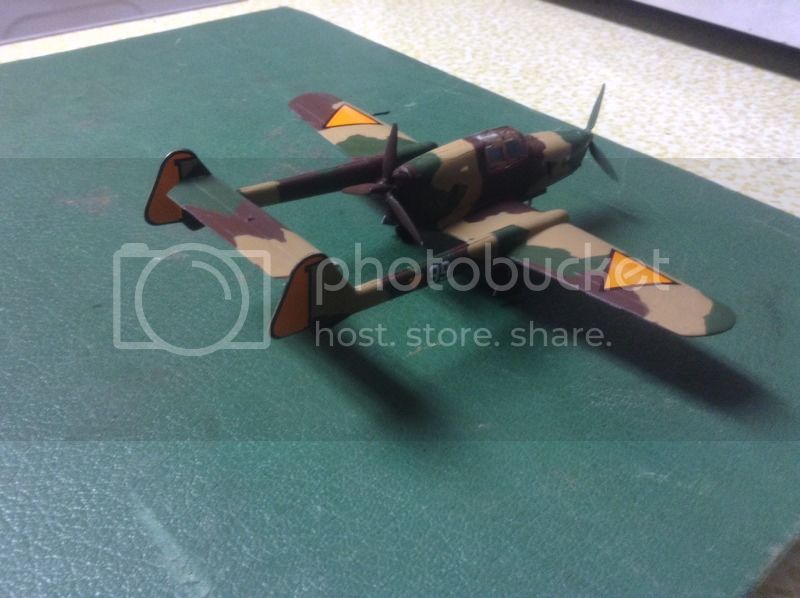
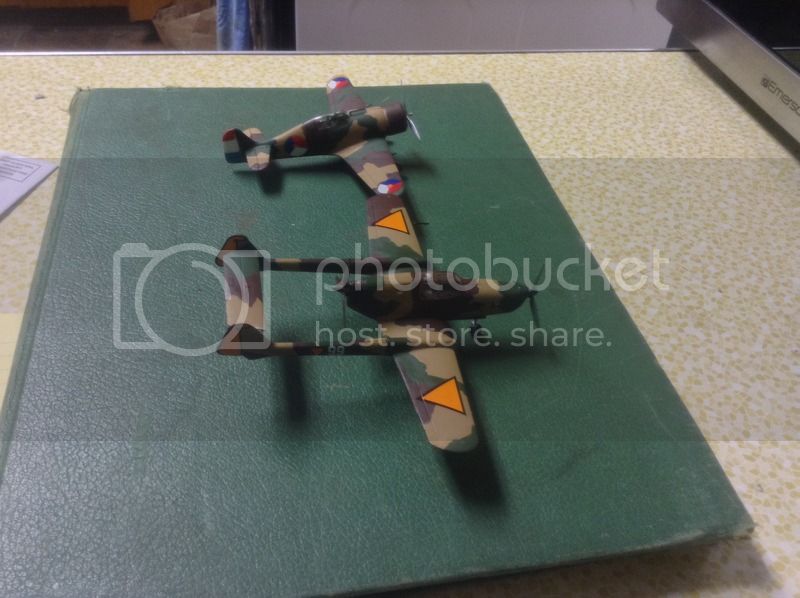
Lap man, nice choice. What camouflage and markings are you going for?
Campaign'oholic - 252+ campaigns completed
Merlin
Senior Editor #017
United Kingdom
Joined: June 11, 2003
KitMaker: 17,582 posts
AeroScale: 12,795 posts
Posted: Saturday, March 21, 2015 - 02:23 PM UTC
Hi again
Nice going guys!
@ Paul - I think the contrast between the metal and fabric surfaces looks great now you've knocked it back a bit. Nice touch.
I'll try to do a bit to the Reppu after work today. The undersurfaces are prepped ready for a coat of aluminium, with the fabric control surfaces in grey dope.
All the best
Rowan
BEWARE OF THE FEW...
As I grow older, I regret to say that a detestable habit of thinking seems to be getting a hold of me. - H. Rider Haggard
#523
Idaho, United States
Joined: February 28, 2014
KitMaker: 342 posts
AeroScale: 250 posts
Posted: Saturday, March 21, 2015 - 10:48 PM UTC
OK, I ma getting to push time. I added 2 gloss coats and then applied decals. I gave it a quick and dirty wash of burnt umber then another gloss coat followed by a 50/50 semi-Gloss-Flat coat. Now on to landing gear. and other finishing parts.

Merlin
Senior Editor #017
United Kingdom
Joined: June 11, 2003
KitMaker: 17,582 posts
AeroScale: 12,795 posts
Posted: Monday, March 23, 2015 - 12:09 AM UTC
Hi Jeff
That looks superb!
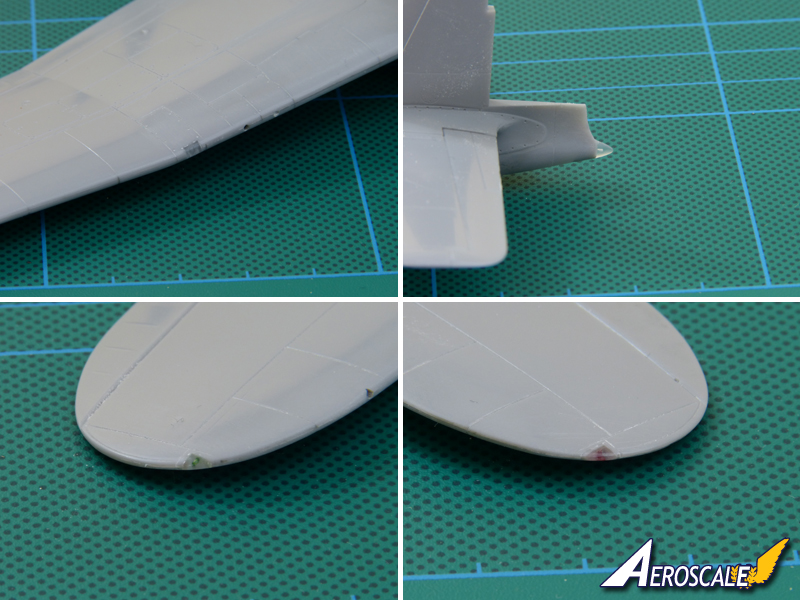
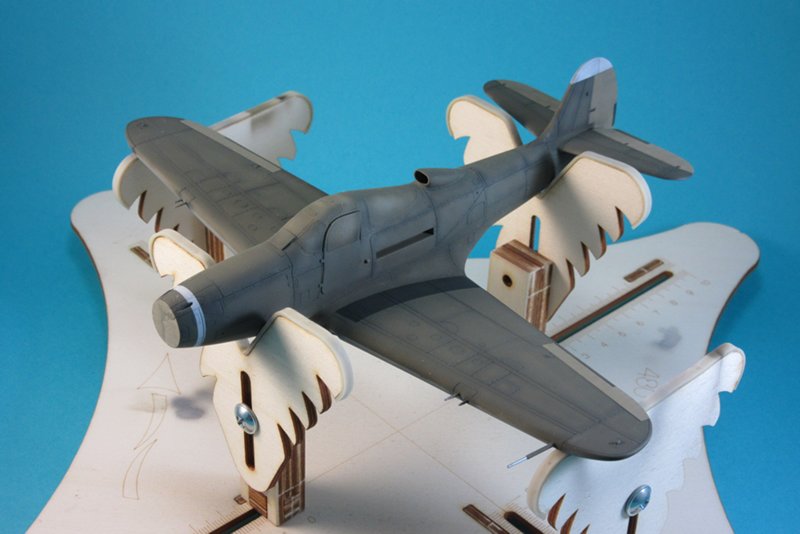
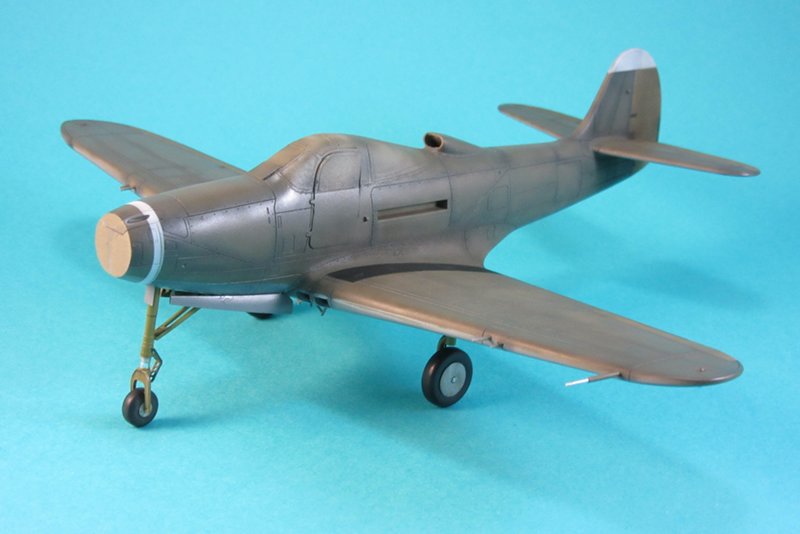
The Reppu is starting to come to life with an attempt at some n/m on the undersides:
I spotted a gap under the tail that I'll need to fix - it didn't show up until too late. Doh! LOL!
All the best
Rowan
BEWARE OF THE FEW...
As I grow older, I regret to say that a detestable habit of thinking seems to be getting a hold of me. - H. Rider Haggard
#523
Idaho, United States
Joined: February 28, 2014
KitMaker: 342 posts
AeroScale: 250 posts
Posted: Monday, March 23, 2015 - 12:26 AM UTC
Thanks Rowan,
Yours is coming along nicely as well.
I like the Different shades of panels on the underside.
I still am avoiding metallic finishes.
Jeff D
#363
Pennsylvania, United States
Joined: January 08, 2014
KitMaker: 425 posts
AeroScale: 401 posts
Posted: Monday, March 23, 2015 - 12:39 AM UTC
Eduard 1/48 P-400 Limited EditionNice work Jeff and Rowan, they are both looking gorgeous.
I did all of the major markings decals today, but have decided to skip most of the stencils. Eduard provides a complete set of stencils for the P-39 but honestly, black print on top of olive drab paint is very difficult to make out for the incredibly tedious work it requires. I did use the ones that contrast well and stand out, like the fuel filler caps and the prop blade data blocks. There are a large number of decals slightly out of register as well, so I skipped using as many of those as I could. I had to replace the national insignias with a set from Aeromaster's Airacobras at War because of register issues.
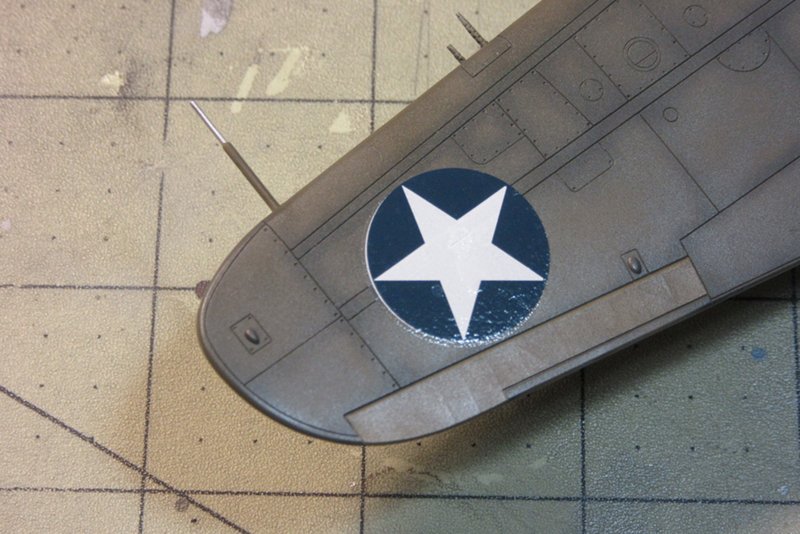 All four of the provided national insignias have the exact same issue illustrated here. Just slightly out of register, the white sliver was an eyesore and had to be replaced.
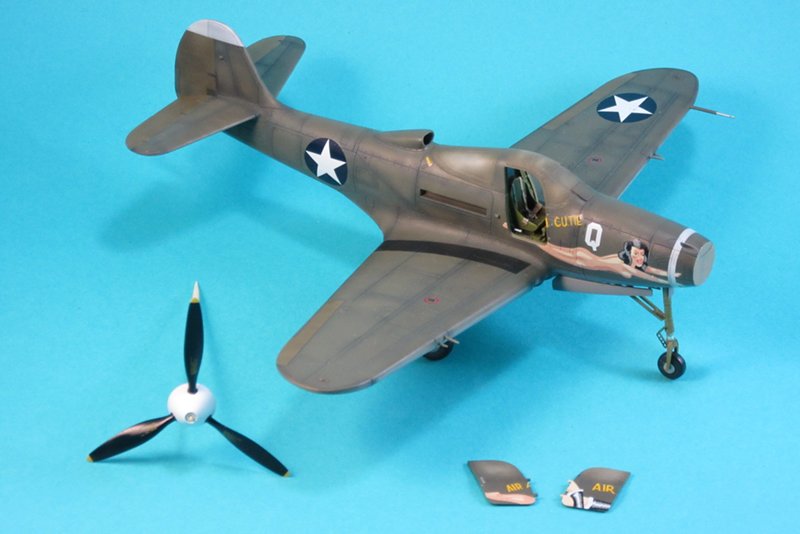
 Eduard's nose art was another issue, but look amazing after some careful trimming and a little Solvaset.
The nose art is provided in two complete sets, one as a single solid decal and the other subdivided into sections to fit the open doors. I started using the divided decals but they did not fit properly, being just a tiny bit off or too long to fit correctly. I ended up scrapping them completely, and then using the single piece decal after securing the doors shut and flush to the sides. After they had time to snug down nice and tight, I went over the lines with a new #11 blade and sliced the decals apart to pose the doors open.
Despite the register issues on many of the decals, I have to credit Eduard on the quality of the nose art pieces. They were extremely thin, opaque, and settled down into all of the detail perfectly. Even under close up inspection they come off looking like painted details, I just wish there hadn't been issues with so many of them.
On the Bench:
The Big Three: Eduard 1:48 Bf 109G-2 Trop
Radial Fighters: Hasegawa 1:48 Ki84 Frank
The Mighty Eighth: Eduard 1:48 P-51D-10
Merlin
Senior Editor #017
United Kingdom
Joined: June 11, 2003
KitMaker: 17,582 posts
AeroScale: 12,795 posts
Posted: Monday, March 23, 2015 - 03:11 AM UTC
Beautiful work Paul!
It's a shame to see Eduard's decals out of register, because they are usually very good. Sadly, duds do happen.
Quoted Text
I still am avoiding metallic finishes.
Hi Jeff, I have to admit I don't often do them myself. Not that that I'm consciously avoiding them - I just don't seem to go for subjects that need them. That will all change with Kitty Hawks' Sabre Dog, so the Reppu is useful practice!
The effect is probably a bit overstated, but I kind of like it. I probably will change the fabric surfaces though - I used WEM's Mitsubishi Navy Grey, but I'm tempted to try their Underside Grey-Green - maybe lightened a bit.
The instructions state the wheel wells should be n/m, but I think I'll go for a thin coat of aotake to add a splash of colour.
All the best
Rowan
BEWARE OF THE FEW...
As I grow older, I regret to say that a detestable habit of thinking seems to be getting a hold of me. - H. Rider Haggard
Merlin
Senior Editor #017
United Kingdom
Joined: June 11, 2003
KitMaker: 17,582 posts
AeroScale: 12,795 posts
Posted: Tuesday, March 24, 2015 - 03:19 AM UTC
Hi again
Nothing to show, but I did a bit more prep tonight for the topsides and painting some details. Realistically, I won't meet the deadline, but I hope I'm not too far off
All the best
Rowan
BEWARE OF THE FEW...
As I grow older, I regret to say that a detestable habit of thinking seems to be getting a hold of me. - H. Rider Haggard
#041
Kobenhavn, Denmark
Joined: July 20, 2006
KitMaker: 10,069 posts
AeroScale: 3,788 posts
Posted: Tuesday, March 24, 2015 - 03:04 PM UTC
Quoted Text
All four of the provided national insignias have the exact same issue illustrated here. Just slightly out of register, the white sliver was an eyesore and had to be replaced
Yes, it is interesing how that has happened for sme Eduard kits lately. My Eduad I-16 for this campaign had the same issue and I had to carefully paint some of the decals later.
Campaign'oholic - 252+ campaigns completed
#363
Pennsylvania, United States
Joined: January 08, 2014
KitMaker: 425 posts
AeroScale: 401 posts
Posted: Thursday, March 26, 2015 - 05:51 AM UTC
Eduard 1/48 P-400 Limited Edition
I finished the panel lines tonight using Tamiya Dark Brown Panel Line Accent. I love that stuff, I have tried making my own wash from oil paints but apparently suck at it. It never flows well for me so I turned to Tamiya. I should have her finished in another day or two, I'll get up some final pics then.
On the Bench:
The Big Three: Eduard 1:48 Bf 109G-2 Trop
Radial Fighters: Hasegawa 1:48 Ki84 Frank
The Mighty Eighth: Eduard 1:48 P-51D-10
Buenos Aires, Argentina
Joined: September 07, 2006
KitMaker: 918 posts
AeroScale: 688 posts
Posted: Friday, March 27, 2015 - 08:22 PM UTC
#523
Idaho, United States
Joined: February 28, 2014
KitMaker: 342 posts
AeroScale: 250 posts
Posted: Saturday, March 28, 2015 - 09:22 AM UTC
Ok Folks. Got some time today to finish up. Yeah!
Here is the finished Tauro Macchi 205 Veltro.
88th Squadriglia, 6th Gruppo of 1st Stormo, Sicily 1943
The side squadron decals and numbers I printed on a LaserJet color printer.
I decided to add a collage of pictures in one to save some room hopefully it will look ok.
I had to do a pretty good deal of scratch items on this. Most of the cockpit interior. all the wheel well plumbing and engine work. I did use Eduard PE Seatbelts.


#305
Christchurch, New Zealand
Joined: February 01, 2006
KitMaker: 1,673 posts
AeroScale: 1,517 posts
Posted: Saturday, March 28, 2015 - 02:02 PM UTC
BoiseBlade fantastic Mc205 mine is in ANR markings and still not complete after many a month just waiting on getting resin exhausts for her as my engine was a tad deformed in the casting. Congrats on all that detail I had no end of trouble trying to fit it all in and in the end I just closed everything up out of frustration.
PeeJay nice work on the P39 looking forward to seeing it complete. I like the weathering you've applied and it gives me ideas for my next build of this kit.
Daniel nice work on the He112 look forward to seeing you finish it. This and the He100 are a couple of Luftwaffe also rans that are on my must build list.