

I'll getcha a few links when I get home from work...in about 9 hours...they're drab color....
http://www.aircraftresourcecenter.com/AWA1/301-400/walk331_h-6/walk331.htm
http://rides.webshots.com/photo/2895813730028907901rlNINp
http://www.vhpamuseum.org/aircraft/images/killeregg.jpg
http://www.vhpamuseum.org/aircraft/images/pic17.jpg
Air Campaigns
Want to start or join a group build? This is where to start.
Want to start or join a group build? This is where to start.
Hosted by Frederick Boucher, Michael Satin
"Vietnam War Campaign" - Official Thread

bounce19712
Joined: February 21, 2007
KitMaker: 80 posts
AeroScale: 59 posts
KitMaker: 80 posts
AeroScale: 59 posts
Posted: Friday, March 30, 2007 - 06:41 AM UTC

Busybeas

Joined: January 26, 2007
KitMaker: 102 posts
AeroScale: 96 posts
Posted: Friday, March 30, 2007 - 09:22 PM UTC
Cheers Bounce 
Some of those links I hadn't got
The seatbelt straps on some pics still look a silver / grey to me... so am still pondering on what colour to paint them...

Thanks for the input anyways,
Stevie B
Some of those links I hadn't got
The seatbelt straps on some pics still look a silver / grey to me... so am still pondering on what colour to paint them...
Thanks for the input anyways,
Stevie B
bounce19712
Joined: February 21, 2007
KitMaker: 80 posts
AeroScale: 59 posts
KitMaker: 80 posts
AeroScale: 59 posts
Posted: Saturday, March 31, 2007 - 03:57 PM UTC
..I think the light grey seatbelt pic I gave you was from a museum refurb job...but I'm not totally sure.....
here's some more olive drab seat harness photos...
http://bravotroop.my100megs.com/1_photos.html
http://www.flying-circus.org/albums/1968-B/FV-024.jpg
http://www.flying-circus.org/albums/1969-B/RG-5.jpg
here's some more olive drab seat harness photos...
http://bravotroop.my100megs.com/1_photos.html
http://www.flying-circus.org/albums/1968-B/FV-024.jpg
http://www.flying-circus.org/albums/1969-B/RG-5.jpg
Busybeas
Joined: January 26, 2007
KitMaker: 102 posts
AeroScale: 96 posts
Posted: Saturday, March 31, 2007 - 04:41 PM UTC
Thanks for all the links Bounce
From all the pics I have seen, seems to me they can be anything from "new " white thro to silvery grey or even drab..
I am going for what I have seen most of, the silvery /light grey.. so I can at least get the seats finished.
Once again, thanks to all for your input.. what a great place /resource Aeroscale is
Now ,where's my paint brush !
Stevie B
Red4

Joined: April 01, 2002
KitMaker: 4,287 posts
AeroScale: 1,164 posts

Posted: Saturday, March 31, 2007 - 06:18 PM UTC
I had picked up this F-105 at a garage sale with no landing gear awhile back. What to do? Build it gear up of course! I rummaged thru my spares box and came up with a Standard Arm, a Shrike, and an ECM Pod. The markings represent the a/c flown by Leo Thorsness 19 April 1967 in which he was awarded the Medal of Honor for his actions. Not my best work, by any means, but I'm under a time crunch. Hard to photograph too as it is such a large aircraft.  I'm going to try and get something else built for this campaign too. Keeping my fingers crossed! Thanks, "Q"


I rummaged thru my spares box and came up with a Standard Arm, a Shrike, and an ECM Pod. The markings represent the a/c flown by Leo Thorsness 19 April 1967 in which he was awarded the Medal of Honor for his actions. Not my best work, by any means, but I'm under a time crunch. Hard to photograph too as it is such a large aircraft. I'm going to try and get something else built for this campaign too. Keeping my fingers crossed! Thanks, "Q" SGTJKJ

#041

Joined: July 20, 2006
KitMaker: 10,069 posts
AeroScale: 3,788 posts

Posted: Sunday, April 01, 2007 - 11:07 AM UTC
Looks great, Stevie. That is going to be one cool Cayuse when you are finished. All the nice details can be enjoyed when the bird is finished because they can actually be seen. Looking forward to see more.
That is going to be one cool Cayuse when you are finished. All the nice details can be enjoyed when the bird is finished because they can actually be seen. Looking forward to see more. 
SGTJKJ
#041
Joined: July 20, 2006
KitMaker: 10,069 posts
AeroScale: 3,788 posts
Posted: Sunday, April 01, 2007 - 11:11 AM UTC
Looks good, Matthew
Interesting, so now we have another war hero in the campaign as well In addition to the my F-4 "Arkansas Traveller"
You want me to add you on the list with this build or you want to submit something else as your "official" entry?
Quoted Text
The markings represent the a/c flown by Leo Thorsness 19 April 1967 in which he was awarded the Medal of Honor for his actions.
Interesting, so now we have another war hero in the campaign as well
In addition to the my F-4 "Arkansas Traveller"Quoted Text
I'm going to try and get something else built for this campaign too. Keeping my fingers crossed! Thanks, "Q"
You want me to add you on the list with this build or you want to submit something else as your "official" entry?
Red4
Joined: April 01, 2002
KitMaker: 4,287 posts
AeroScale: 1,164 posts
Posted: Sunday, April 01, 2007 - 04:43 PM UTC
Quoted Text
You want me to add you on the list with this build or you want to submit something else as your "official" entry?
I already signed on for the campaign, so I guess this one will cover the entry. I was going to try and get something else to add in addition to this, but not sure if I will be able to as yet..."Q"
Busybeas
Joined: January 26, 2007
KitMaker: 102 posts
AeroScale: 96 posts
Posted: Monday, April 02, 2007 - 04:46 PM UTC
Quoted Text
Looks great, Stevie.
Thanks Jesper
Here's a little more progress...
Stevie B
Busybeas
Joined: January 26, 2007
KitMaker: 102 posts
AeroScale: 96 posts
Posted: Monday, April 02, 2007 - 08:03 PM UTC
A few days "enforced" annual leave, whilst my car is in repair, has allowed a little more progress
The Cayuse / Loach, now has a pilot, and he's strapped in too


Either he's a little overweight, or ( more likely) the Eduard waist straps to his harness are a little short on length. Looks okay, I think.
Next up, I shall add some wire harness looms to the rear of the dashboard, looks a bit barren at the moment. As this will be seen through the windscreen /bubble, I think the effort will be worth it
I must say, I am thoroughly enjoying this plastic modelling now, thanks for all the encouragement guys,,, it keeps me motivated !
Cheers
Stevie B
The Cayuse / Loach, now has a pilot, and he's strapped in too
Either he's a little overweight, or ( more likely) the Eduard waist straps to his harness are a little short on length. Looks okay, I think.
Next up, I shall add some wire harness looms to the rear of the dashboard, looks a bit barren at the moment. As this will be seen through the windscreen /bubble, I think the effort will be worth it
I must say, I am thoroughly enjoying this plastic modelling now
, thanks for all the encouragement guys,,, it keeps me motivated ! Cheers
Stevie B
Busybeas
Joined: January 26, 2007
KitMaker: 102 posts
AeroScale: 96 posts
Posted: Monday, April 02, 2007 - 08:13 PM UTC
err ? just a thought, are you guys okay with me posting all these pics ?
I don't want to overwhelm the thread with my progress pics, no offence taken if you'd like me to reduce the frequency of my updates,
Steve
I don't want to overwhelm the thread with my progress pics, no offence taken if you'd like me to reduce the frequency of my updates,
Steve

lampie
#029

Joined: December 23, 2005
KitMaker: 6,249 posts
AeroScale: 3,270 posts

Posted: Monday, April 02, 2007 - 08:54 PM UTC
Quoted Text
err ? just a thought, are you guys okay with me posting all these pics ?
Of course we are ok,,,its progress pics and photos of the finished models that are the life blood of Aeroscale!
Looking great so far
Keep building and keep on posting
Nige


Busybeas
Joined: January 26, 2007
KitMaker: 102 posts
AeroScale: 96 posts
Posted: Monday, April 02, 2007 - 11:32 PM UTC
Thanks Nige
Test fitted the bubble screen to see how the new dashboard looms look.. and they look okay Better than nothing at all as per the kit, I think.
The Dragon bubble /screen however, isn't very clear...
( My little bird version of this model has a similar quality screen /bubble). These are a bit of a disappointment.
I am hoping my first experience with Klear / Future dipping will improve the visibility thro it..


At this rate, I shall be firing up my airbrush soon , (that too will be my first experience), but I shall get some practise in before I attempt to spray the Cayuse !
Stevie B
Test fitted the bubble screen to see how the new dashboard looms look.. and they look okay
Better than nothing at all as per the kit, I think.The Dragon bubble /screen however, isn't very clear...
( My little bird version of this model has a similar quality screen /bubble). These are a bit of a disappointment.
I am hoping my first experience with Klear / Future dipping will improve the visibility thro it..
At this rate, I shall be firing up my airbrush soon
, (that too will be my first experience), but I shall get some practise in before I attempt to spray the Cayuse !Stevie B
bounce19712
Joined: February 21, 2007
KitMaker: 80 posts
AeroScale: 59 posts
KitMaker: 80 posts
AeroScale: 59 posts
Posted: Tuesday, April 03, 2007 - 06:43 AM UTC
good luck with the air brush practicing!!!....
I found that beginning your spray run before hitting the target and then overshooting past your model keeps those occassional spatters from hitting...
I've only used the airbrush around 7 or eight times though.....
the Loach is looking good...I'm interested to see how the Future dipping goes with the canopies...
and I see some extra curricular stuff going on behind that instrument panel!!! way to go!!!!

propnut_66
Joined: March 19, 2006
KitMaker: 53 posts
AeroScale: 10 posts
Posted: Tuesday, April 03, 2007 - 07:08 AM UTC
Hi Folks
I just finished my SLUFF, but I'm not sure where to post the finished pictures.
I just finished my SLUFF, but I'm not sure where to post the finished pictures.
Removed by original poster on 04/04/07 - 09:42:12 (GMT).
SGTJKJ
#041
Joined: July 20, 2006
KitMaker: 10,069 posts
AeroScale: 3,788 posts
Posted: Tuesday, April 03, 2007 - 11:22 AM UTC
Quoted Text
Hi Folks
I just finished my SLUFF, but I'm not sure where to post the finished pictures.
You can post you finished pictures in this tread. Looking forward to see it
SGTJKJ
#041
Joined: July 20, 2006
KitMaker: 10,069 posts
AeroScale: 3,788 posts
Posted: Tuesday, April 03, 2007 - 11:28 AM UTC
Looks great, Stevie. That pilot is really adding some realism and "in action" feel to the Cayuse. As Nige said feel free to update as much as you like.
The glazing seems to be a little unclear. It will be interesting to see how this works out. However, you might want to test it on a piece of the clear sprue first before you try on the cockpit glazing as this is a crucial part of the Cayuse.
I am also a little new to the whole airbrush thing. My main problem is cleaning it, not spraying with it
Keep us updated.
propnut_66
Joined: March 19, 2006
KitMaker: 53 posts
AeroScale: 10 posts
Posted: Wednesday, April 04, 2007 - 05:20 AM UTC
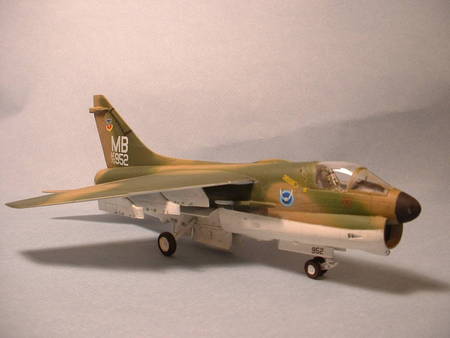
My lighting is a little off, but here it is. With a little more bad weather, I hope to add some ordnance
Jerry
Intruderbass

Joined: October 06, 2005
KitMaker: 67 posts
AeroScale: 27 posts
Posted: Wednesday, April 04, 2007 - 07:38 AM UTC
Stevie,
I hope its not too late for a little advise about clearing your OH-6 canopy...
Before diping it into Future try to polish it - it helps a lot! There several ways to polish canopies:
- using nail polishing stick (VERY fine sanding stick, can be bought in any pharmacy or can be "borowed" from girlfriend's (wife's) purse)))))
- using polishing compaund and a soft cloth. Tamiya has 3 kinds of polishing compaunds - course, fine and finish. They last forever and work awesome!
Its not hard to do, just time consuming. I usually do that while whaching some movie or TV show.
When I was building my AH-6J the situation with its "clear" part was even worse then in your case.
Here is my result after 1 hour of polishing it:


Andy
P.S.
Fit wasnt the best ether. I glued it in 2 steps - first the upper part, then after 24 hours the bottom part.
Good luck!
I hope its not too late for a little advise about clearing your OH-6 canopy...
Before diping it into Future try to polish it - it helps a lot! There several ways to polish canopies:
- using nail polishing stick (VERY fine sanding stick, can be bought in any pharmacy or can be "borowed" from girlfriend's (wife's) purse)))))
- using polishing compaund and a soft cloth. Tamiya has 3 kinds of polishing compaunds - course, fine and finish. They last forever and work awesome!
Its not hard to do, just time consuming. I usually do that while whaching some movie or TV show.
When I was building my AH-6J the situation with its "clear" part was even worse then in your case.
Here is my result after 1 hour of polishing it:
Andy
P.S.
Fit wasnt the best ether. I glued it in 2 steps - first the upper part, then after 24 hours the bottom part.
Good luck!
Busybeas
Joined: January 26, 2007
KitMaker: 102 posts
AeroScale: 96 posts
Posted: Wednesday, April 04, 2007 - 10:02 AM UTC
Wow Andy ! 
What a fab looking Little Bird you go there.
Thanks for the advice, I have slowed down the build to get this right .. and I shall do what you recommend
Just a few questions
1) do you polish inside /or outside the glazing part or both ?
2) If using the polishing paste, do use all of em working to the fine stuff, or just the fine stuff straight off?
Apologies if they seem silly questions, this is all new to me..
Your canopy /bubble is crystal clear, super finish, I am impressed.
Once again Andy,
Cheers !
Stevie B
SGTJKJ
#041
Joined: July 20, 2006
KitMaker: 10,069 posts
AeroScale: 3,788 posts
Posted: Wednesday, April 04, 2007 - 10:51 AM UTC
Quoted Text
My lighting is a little off, but here it is. With a little more bad weather, I hope to add some ordnance
Jerry
Looks great, Jerry. With some ordenance it will really be a bird looking for trouble
Great cockpit, Andy.
Thanks for the tips on the cockpit. I might use those for smaller cockpit glazing as well. 
Tomcat31
#042

Joined: November 18, 2006
KitMaker: 2,828 posts
AeroScale: 1,720 posts

Posted: Wednesday, April 04, 2007 - 05:29 PM UTC
You could also try using the micro mesh polishing kit (Part No: Mmcraft) from http://www.little-cars.com it comes with 9 pads ranging from 2400 grit to 12000 grit, 3 files with different grades on either side(100, 150, 240, 320, 400, 600 I think), micro gloss polish and a polishing cloth for only £11.80 I've been using these for the last few years now and they work a charm.

Intruderbass
Joined: October 06, 2005
KitMaker: 67 posts
AeroScale: 27 posts
Posted: Wednesday, April 04, 2007 - 08:20 PM UTC
You are welcome!
answering your questions:
1. you can polish both sides if you want - it will work even better.
2. You can use just finish paste...but it will take more time. I would suggest to pass on the midium one and use coarse and finish paste.
Cheers
Andy
answering your questions:
1. you can polish both sides if you want - it will work even better.
2. You can use just finish paste...but it will take more time. I would suggest to pass on the midium one and use coarse and finish paste.
Cheers
Andy
Busybeas
Joined: January 26, 2007
KitMaker: 102 posts
AeroScale: 96 posts
Posted: Wednesday, April 04, 2007 - 09:21 PM UTC
Sincere thanks to both Andy and Allen
I have ordered both some tamiya polishing paste and a micro mesh craft set for my tool box..
I hope to get this bubble licked into shape as soon as I get the items delivered ,after Easter holidays.
Once again, confirmation that Aeroscale has so much experience to pass on to everyone...
Great place and great people
Thanks
StevIe B
 |

WEB HOSTING BY


Copyright ©2021 AeroScale and Kitmaker Network, a subsidiary of Silver Star Enterprises
All Rights Reserved. Please read our Conditions of Use and Privacy Policy.
All Rights Reserved. Please read our Conditions of Use and Privacy Policy.