Colorado, United States
Joined: January 25, 2004
KitMaker: 11,669 posts
AeroScale: 11,011 posts
Posted: Sunday, August 12, 2007 - 07:55 AM UTC
Topic originally titled "Never say never gain to PE machine guns".
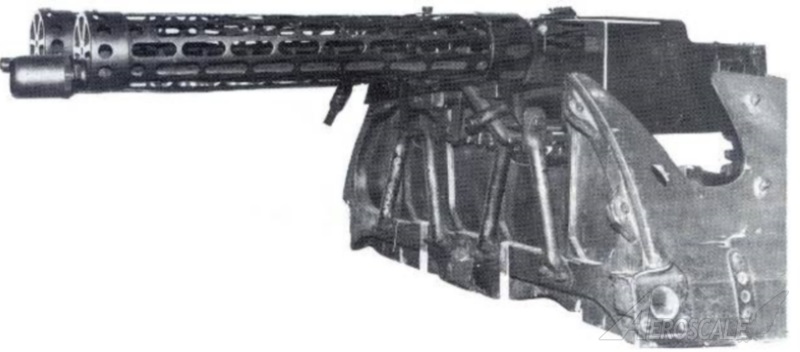
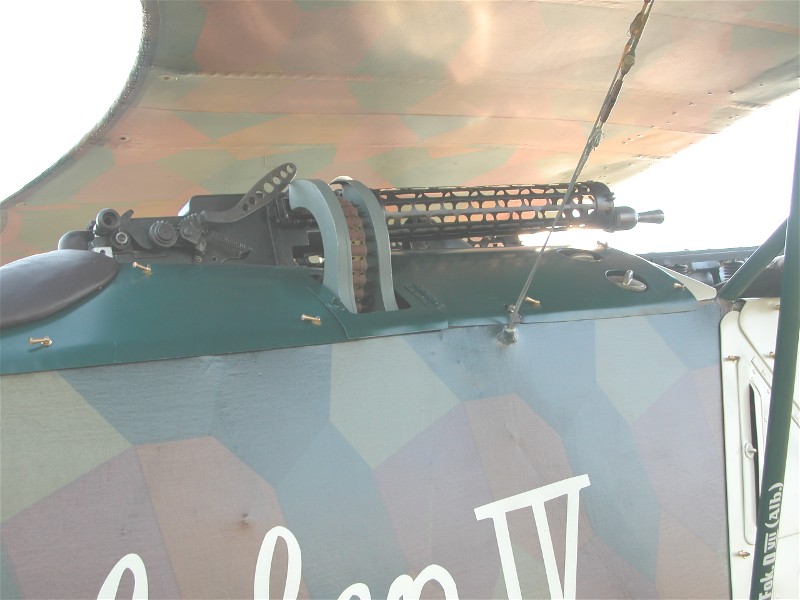
The above (slightly retouched) image is of a set of Spandau Maxims from an Albatros D.III in the possesion of the Imperial War Museum.
Knowing that the most common use for photoetch on WWI aircraft kits is machine guns and turnbuckles, we will begin with the German Spandau Maxim machine guns. Noteably there have been recent displays of various attempts to do these simulated fangs / teeth on model kits it is best if we begin with an Aeroscale Review.
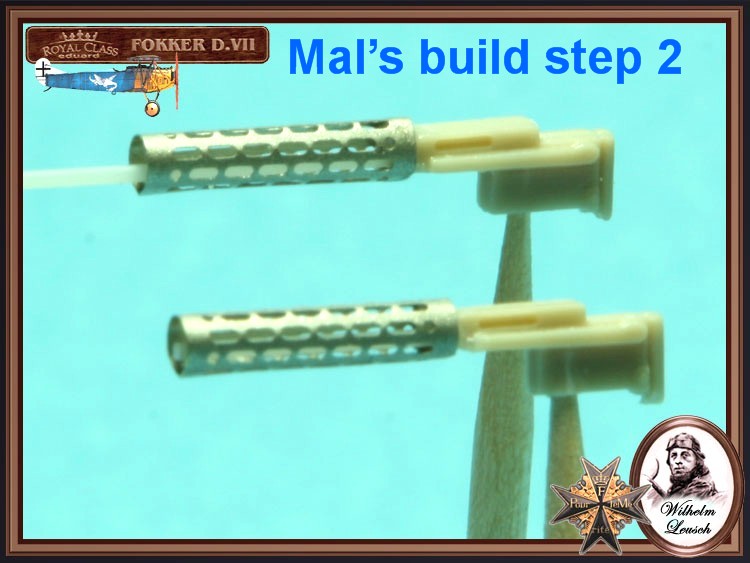
From the Eduard Royal build ; Master Modeler Mal Mayfield shows us his take.


". . .The most important thing is to know why you build and then get the most that you can out of building." via D.D.
Colorado, United States
Joined: January 25, 2004
KitMaker: 11,669 posts
AeroScale: 11,011 posts
Posted: Sunday, August 12, 2007 - 07:59 AM UTC
Our Good Rowan Baylies shows his efforts with Eduard's earlier issue kit

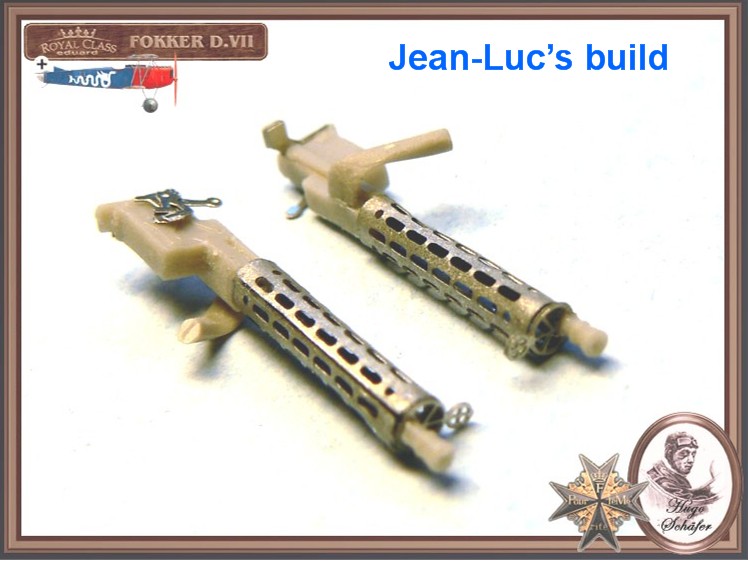
Jean-Luc's work for the Royal build.
". . .The most important thing is to know why you build and then get the most that you can out of building." via D.D.
Colorado, United States
Joined: January 25, 2004
KitMaker: 11,669 posts
AeroScale: 11,011 posts
Posted: Sunday, August 12, 2007 - 08:05 AM UTC
Here are a slightly larger (1/28) scale versions from Copper State Models on a heavily modified Revell Fokker D. VII.
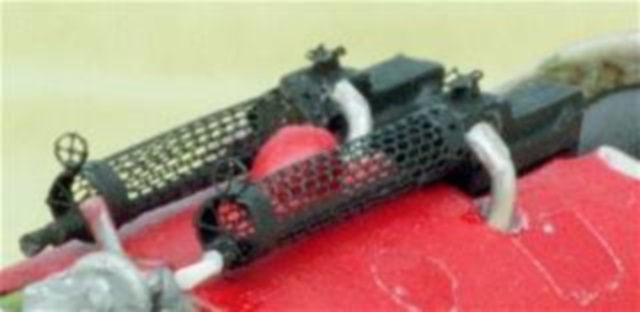

These are a set of full sized mock ups for a full sized replica Fokker D.VII being built at this time.

". . .The most important thing is to know why you build and then get the most that you can out of building." via D.D.
Colorado, United States
Joined: January 25, 2004
KitMaker: 11,669 posts
AeroScale: 11,011 posts
Posted: Sunday, August 12, 2007 - 08:35 AM UTC
The main source of my discussion here will be the article: "Spandau Machine Gun" by Mr. David Watts, WWI Aero,1998. He is the finest authority I know on the subject. Bit of a Plug he for Dave he is the owner of Watts Train shop back eat in the USA. Top notch place for model rail roaders. Dave also has the only license from Diamler to rebuild the Mercedes D.III type motors in the USA.
Most of you will also be familiar with the following images from the Eduard Royal build.:
". . .The most important thing is to know why you build and then get the most that you can out of building." via D.D.
Indiana, United States
Joined: May 14, 2007
KitMaker: 3,117 posts
AeroScale: 2,270 posts
Posted: Monday, August 13, 2007 - 05:05 AM UTC
Those little buggers are hard to do. I have extremely large hands and fingers. But it really is worth the extra work to put that photoetch on your Spandaus.
Those Eduard D.VII kits have a lot of PE. The detail on the dials and gauges is wonderful. You can make a fantastic kit without using it. But using it really makes your build stand out.
"Treat 'em Rough", Current Builds--Wingnut Rumpler
I am frequently seen with blood shot eyes from staying up past my nap time to get the right colour scheme on my latest WWI model?
Colorado, United States
Joined: January 25, 2004
KitMaker: 11,669 posts
AeroScale: 11,011 posts
Posted: Monday, August 13, 2007 - 07:45 AM UTC
Greetings CaptainA;
Not so hard when you use more than your fingers. We modelers are used to "handling" the kit parts. Photoetch on the other hand was not meant to be handled with fingers alone. As I have mentioned before tweezers and the plastic bag that it comes in are your best ally when working with PE. Needle nose pliers, clear plastic or metal rulers are helpful as well. The smaller the part the easiier the part is to deal with. Most of the time these need the smallest amount of glue and to simply be touched in place. Most modern PE parts come with attachment stems that can be used to hold the part and not touch any glue. when dry these stems can be snipped off close to the part. If a part is bent 90 degrees from the attachment point then thet bent portion can be used.
Here is a typical diagram from some of the earliest WWI aviation PE from Harry Woodman. These detail the other popular German machine gun, the Parabellum

". . .The most important thing is to know why you build and then get the most that you can out of building." via D.D.
Colorado, United States
Joined: January 25, 2004
KitMaker: 11,669 posts
AeroScale: 11,011 posts
Posted: Monday, August 13, 2007 - 07:58 AM UTC
PE is not meant to stand alone. It is meant to be mounted on a similar shaped block of plastic. The photocut items and the Tom's Modelworks pieces are so thin you do not need to anneal them. The DML / Dragon items you have to anneal to bend correctly.
Modern PE is made from the softer silver nickel (which is made of neither by the way.) This substance bends easily without annealing. I tend to slightly anneal them anyway, as it improves the surface for paint adherance.
". . .The most important thing is to know why you build and then get the most that you can out of building." via D.D.
New York, United States
Joined: December 15, 2006
KitMaker: 365 posts
AeroScale: 344 posts
Posted: Monday, August 13, 2007 - 01:21 PM UTC
Stephen,
If this is anything like previous tutorials I will be on cloud nine! This is one of the areas of modeling that I would call an Achillies heel. Talk about getting more glue on my fingers than on the parts and just when you think you got it in the right place the piece lifts away from the model because its now glued to your finger! Obi Wan, you are my last hope.
Dwayne
Gelderland, Netherlands
Joined: July 20, 2006
KitMaker: 258 posts
AeroScale: 256 posts
Posted: Monday, August 13, 2007 - 10:00 PM UTC
Quoted Text
Stephen,
If this is anything like previous tutorials I will be on cloud nine! This is one of the areas of modeling that I would call an Achillies heel. Talk about getting more glue on my fingers than on the parts and just when you think you got it in the right place the piece lifts away from the model because its now glued to your finger! Obi Wan, you are my last hope.
Dwayne
I know just what you are talking about! I used to hate working with PE-parts, and even a bit more then year ago I simply skipped them. But more or less it's simply a job of trial and error. Once you are used having applied Maxim's with PE parts instead of plastic ones, you can't live without them anymore.
Greetings, Nico
Indiana, United States
Joined: May 14, 2007
KitMaker: 3,117 posts
AeroScale: 2,270 posts
Posted: Tuesday, August 14, 2007 - 05:42 AM UTC
Yes Obi-Wan, I do use an array of tools and do try to avoid touching PE parts. Touching them causes dents and oils to form. THe oils make painting more difficult. But it is difficult for me even with the tools. My military service left me with peripheral neuropathy which means I have very litle feeling in my fingers. The big hands syndrome is something I was genetically predisposed to. Amazingly, my most handy tool when working with small PE and Painting small details is a 30 power microscope. When you learn to work under the scope, you would be amazed at how much detail you can actually attain.
"Treat 'em Rough", Current Builds--Wingnut Rumpler
I am frequently seen with blood shot eyes from staying up past my nap time to get the right colour scheme on my latest WWI model?
Colorado, United States
Joined: January 25, 2004
KitMaker: 11,669 posts
AeroScale: 11,011 posts
Posted: Wednesday, August 22, 2007 - 06:25 PM UTC
Ok were almost back on track. More to come soon.
". . .The most important thing is to know why you build and then get the most that you can out of building." via D.D.
Colorado, United States
Joined: January 25, 2004
KitMaker: 11,669 posts
AeroScale: 11,011 posts
Posted: Saturday, September 01, 2007 - 10:03 AM UTC
Here is Tom's Modelworks diagram. The idea here as well as with other manufacturers is to "hang or attach the brass on a plastic shape like a facade." The fretted gun jacket at left is to be rolled over a drill bit, dowel or rod. Use the plastic item on the gun you are replacing. Again Tom's brass etch is usually too thin to heat is very easy and work with.
1. Pass the brass over an open flame til rehot -BRIEFLY-.
2. Plunge the piece into water. . . This actually makes the piece more plyable.
To detail this further. Brass that is covered in nickel "vs" steel or harder white metal. The reason model companies cover their PE in nickel is that it makes them look more uniform especially when they use metals that tarnish easy. Burning off the nickel and then putting the part into water is the most efective way of making the part plyable.3. Roll the piece or wrap it around the dowl / rod.
4. Pull the dowl / rod out of the now cylinderical formed jacket.
Due to the very scale issue of 1/72 the brass used is often thin and plyable enought to skip Steps 1 &2.

". . .The most important thing is to know why you build and then get the most that you can out of building." via D.D.
Victoria, Australia
Joined: August 23, 2007
KitMaker: 629 posts
AeroScale: 539 posts
Posted: Saturday, September 01, 2007 - 01:07 PM UTC
This thread just jogged my memory about something. After a 1 hour search through boxes i found it...it didn't go missing through 5 or 6 moves when i was in the military.
It is a 1/48 etch set for twin Spandaus from 1984, made by Burl Burlingame for IPMS-USA. 1984? I didn't know photo etch was even thought of for models back then. Each Spandau has about 22 tiny little parts and it looks pretty good, but scary too. Some of the bits almost can't be seen with the naked eye.
Andrew
Current Projects:
Eduard 1/48 F6F-3 Hellcat
Hasegawa 1/350 Yukikaze
1/6 JJ Models Sarah "Gothic"
Colorado, United States
Joined: January 25, 2004
KitMaker: 11,669 posts
AeroScale: 11,011 posts
Posted: Saturday, September 01, 2007 - 02:34 PM UTC
Burl is a good fellow. He lives in Kailua Hawaii and goes by the callsign "buzz1941." He and I are in the throws of co-researching the 6th Aero and their duties as the only AEF unit in the South Pacific. He originally did those Spandaus for give-aways at an IPMS Nationals. They came in 1/72, 1/48 and 1/28. He did a short write up on another forum back in May 2005.
". . .Back in the dawn of time, I designed an etched-brass Spandau sheet for IPMS-USA (the instruction drawings for which were widely pirated!).
Anyway, while cleaning up, I found a 1/28 test-shot sheet with something like four dozen "kits." The ring-gunsight had etched too much, but the rest of the parts were fine. . ."
Burl is still very active today in photoetch. He was the one that did the Spad XIII ply-wood pocket extentions for Tom's Modelworks, that I reviewed not too long ago here.
". . .The most important thing is to know why you build and then get the most that you can out of building." via D.D.
Victoria, Australia
Joined: August 23, 2007
KitMaker: 629 posts
AeroScale: 539 posts
Posted: Saturday, September 01, 2007 - 04:04 PM UTC
Yes, those are the ones that i meant. The one i have is 1/48. I like step "C" of the intructions best: "Those building in 1/48 or 1/72 might want to skip some of these parts; they'll disapear!"
I agree.
Andrew
Current Projects:
Eduard 1/48 F6F-3 Hellcat
Hasegawa 1/350 Yukikaze
1/6 JJ Models Sarah "Gothic"
Colorado, United States
Joined: January 25, 2004
KitMaker: 11,669 posts
AeroScale: 11,011 posts
Posted: Sunday, September 09, 2007 - 08:13 AM UTC
Aeroscale member and man for all scales, Brad Cancian has provided us with yet another fine example of PE Machine gun assembly. He notes that Roden had the foresight to provide all plastic versions AND those without the solid plastic gun jackets so the modeler could have a choice and install Eduard aftermarket PE set. In this case the competion between Roden and Eduard compliment each other. The modeler benefits greatly.
". . .The most important thing is to know why you build and then get the most that you can out of building." via D.D.
Colorado, United States
Joined: January 25, 2004
KitMaker: 11,669 posts
AeroScale: 11,011 posts
Posted: Sunday, September 09, 2007 - 08:20 AM UTC
Another Polish modeler, Callsign "wojtek_fajga" has completed a 1/48 scale Eduard Nieuport in a grand fashion. Note the aftermarket Vicker Machine gun and its vents.

Again the jacket is rolled onto a dowel or section of sprue and everything is hung on the breech.

". . .The most important thing is to know why you build and then get the most that you can out of building." via D.D.
New York, United States
Joined: December 15, 2006
KitMaker: 365 posts
AeroScale: 344 posts
Posted: Monday, September 10, 2007 - 01:05 PM UTC
Stephen,
You mention the use of a dowel or sprue when forming the cooling jackets. Do you happened to know the diameter for the differing scales? Is there a particular sprue from any kit or manufacturer that you use?
Dwayne
Colorado, United States
Joined: January 25, 2004
KitMaker: 11,669 posts
AeroScale: 11,011 posts
Posted: Monday, September 10, 2007 - 03:26 PM UTC
Quoted Text
Stephen, You mention the use of a dowel or sprue when forming the cooling jackets. Do you happened to know the diameter for the differing scales? Is there a particular sprue from any kit or manufacturer that you use? Dwayne
Greetings Dwayne, That has been taken care of, for you. Look at the circlular end caps to the jackets. Your dowel / sprue has to be that size.
The round , fretted end caps have to fit tightly in the end of the rolled up jackets. Also DML provides a nice plastic tool with their kits.
". . .The most important thing is to know why you build and then get the most that you can out of building." via D.D.
Colorado, United States
Joined: January 25, 2004
KitMaker: 11,669 posts
AeroScale: 11,011 posts
Posted: Monday, July 21, 2008 - 03:15 PM UTC
After work tonight I have scheduled more PE for coming projects I will do the 1/48 Eduard Spandau set. I have wanted to finish this thread for a looonngg time. I finally got my desk cleared of several pending projects, household and financial paper work. Hopefully things proceed smoothly.
About a year ago Eduard began using a softer base metal. The base metal is encased in a dull white metal and results in an item that is easy to work with. The finished result is what the industry terms as silver nickel. Which I have on good authority is neither.
". . .The most important thing is to know why you build and then get the most that you can out of building." via D.D.
Alberta, Canada
Joined: January 19, 2008
KitMaker: 6,743 posts
AeroScale: 6,151 posts
Posted: Monday, July 21, 2008 - 03:38 PM UTC
I have a few sets Left of the Tom's Models Works and I'm most pleased with them . It did take me some time to learn how to use these super little detail kits . I saved my plastic bit's when I did a few of dragons kit's and find them most helpful . Lacquer works very well for attacting the smaller parts , gives you more time to line the parts up . I do find Rodens castings are better then the Eduard ones . It's just to bad that Roden doesn't inclued them in there kits . Looking forward on the rest Stephen .
Merlin
 Senior Editor
#017
United Kingdom
Joined: June 11, 2003
KitMaker: 17,582 posts
AeroScale: 12,795 posts
Posted: Tuesday, July 22, 2008 - 08:40 AM UTC
Hi all
Here's Eduard's latest way of tackling etched guns from the new 1/48 scale Fokker Dr.1:

All the best
Rowan

BEWARE OF THE FEW...
As I grow older, I regret to say that a detestable habit of thinking seems to be getting a hold of me. - H. Rider Haggard
Indiana, United States
Joined: May 14, 2007
KitMaker: 3,117 posts
AeroScale: 2,270 posts
Posted: Tuesday, July 22, 2008 - 12:28 PM UTC
I think this is much, much, much better than the "old" way. Much.
"Treat 'em Rough", Current Builds--Wingnut Rumpler
I am frequently seen with blood shot eyes from staying up past my nap time to get the right colour scheme on my latest WWI model?
Ontario, Canada
Joined: January 03, 2007
KitMaker: 1,505 posts
AeroScale: 595 posts
Posted: Tuesday, July 22, 2008 - 01:17 PM UTC
I agree...It is a logical,and clean evolutionary step.....looks easy to make a good looking machine gun now
Projects:
K44 Anti Tank gun
Diana
Albatros DIII
Colorado, United States
Joined: January 25, 2004
KitMaker: 11,669 posts
AeroScale: 11,011 posts
Posted: Thursday, July 31, 2008 - 07:14 AM UTC
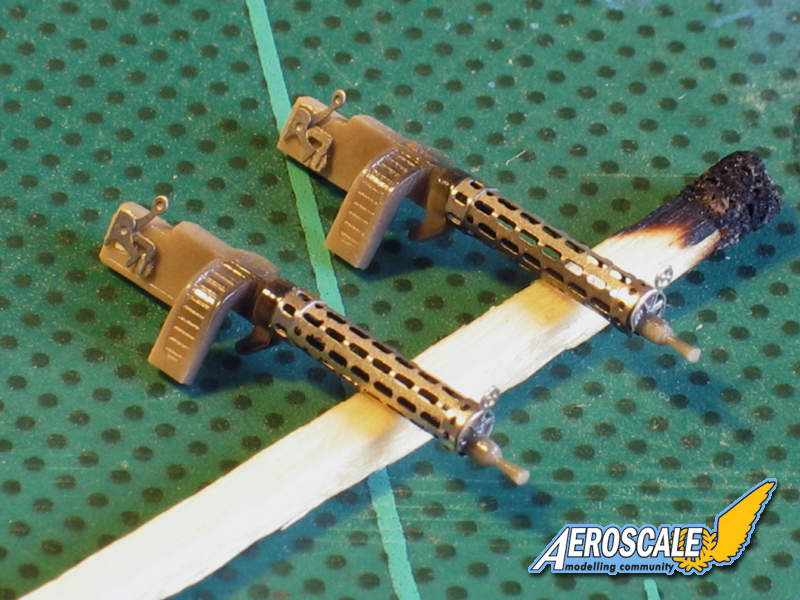
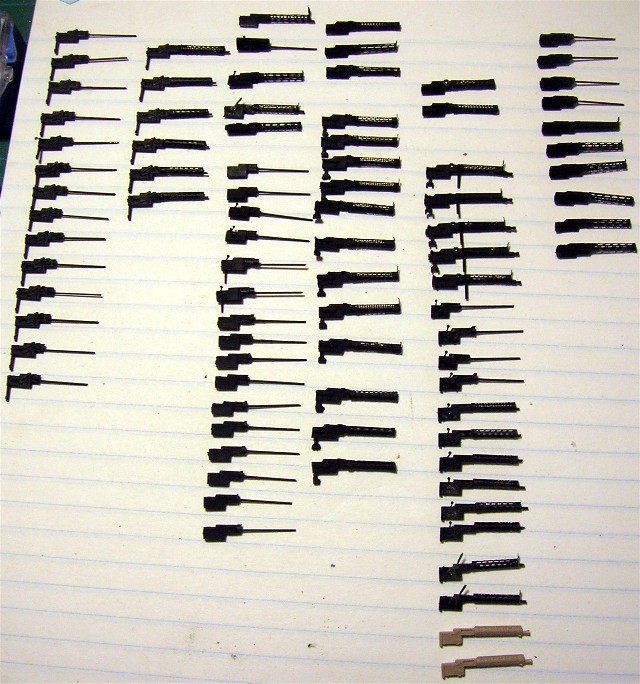
Greetings all.
Working with the Eduard Fokker D.VIIF Weekend kit I thought you might like to see my Spandau armoury.
". . .The most important thing is to know why you build and then get the most that you can out of building." via D.D.


