Early Aviation
Discuss World War I and the early years of aviation thru 1934.
1/32 Roden GB 2008 Fok.F.I - Hugh
BradCancian
_VISITCOMMUNITY
Queensland, Australia
Joined: August 30, 2006
KitMaker: 285 posts
AeroScale: 281 posts
Posted: Friday, August 01, 2008 - 09:02 PM UTC
Steel wool??! You are a braver man than I... I would have tried some drybrushing. Still, looks like the steel woll was effective.

The overspray looks good on the darker surfaces - one suggestion though - (in my opinion only) it does look a little overdone on the lighter surfaces (the light blue and white), perhaps a light overspray may help to tone down the look a little? (This is one of the reasons why I use a combination of both preshading and postshading on my models). Just a suggestion

BC
MerlinV
_VISITCOMMUNITY
Victoria, Australia
Joined: November 26, 2006
KitMaker: 608 posts
AeroScale: 602 posts
Posted: Friday, August 01, 2008 - 10:27 PM UTC
Thanks Brad,

I thought that my self... The photos do make it look worse than it is.

I was wondering how I was going to tone it down. Thanks for the tip.

Cheers,

Hugh

JackFlash
_VISITCOMMUNITY
Colorado, United States
Joined: January 25, 2004
KitMaker: 11,669 posts
AeroScale: 11,011 posts
Posted: Saturday, August 02, 2008 - 01:16 AM UTC
Most impressive Hugh! One of the things that always has my jaw drop is your fine painting technique. Even down to the crosses & cockades. Model on Hugh!

PS Here is that light bulb smiley you asked for.
MerlinV
_VISITCOMMUNITY
Victoria, Australia
Joined: November 26, 2006
KitMaker: 608 posts
AeroScale: 602 posts
Posted: Saturday, August 02, 2008 - 01:21 PM UTC
Thanks Sephen.

I should point out that none of my painting from one build to the next is of a similar technique. I am still experimenting and learning what works and what does not.
I have dabbled with preshading, postshading, masking, filtering... etc. etc.
I am still playing with washes and dry brushing. Brad said that he would look to dry brushing to create a worn effect... I am still unsure in my mind as to how this could be achieved effectively... Using the original Bleached linnen to dry brush with? But that is acrylic and I have never had success dry brushing with acrylics (other than with metallics). Brad, your input here?

Anyway... I am millimeters away from actually stripping it all back and starting again... I will give that a few days of cogitation...

Cheers,

Hugh
BradCancian
_VISITCOMMUNITY
Queensland, Australia
Joined: August 30, 2006
KitMaker: 285 posts
AeroScale: 281 posts
Posted: Saturday, August 02, 2008 - 02:12 PM UTC
Hugh - definately don't strip it down, there is some mighty fine work there!

If it were me, all I would look to do as I said is perhaps tone down the postshading on some of the surfaces and it would be perfect.

As for drybrushing, I never dry brush with acrylics - in fact, the only thing I do with acrylics is spray them as I have never had any luck brush painting acrylics - they dry too quickly. I would mix up some enamel colours that come close to matching the CDL, wet the brush, then wipe the brush down so there is almost no paint on it at all, then lightly drag the brush across the surface. This effect should only be very light initially - you can build it up in layers. The other thing to consider on these Fokker aircraft is that the dope Fokker used was of very low quality, so the chances are that the dope likely began to "flake" off the aircraft - perhaps representing this chipping my small well placed dots of CDL may work the same way.

Lucky for me I am planning on modelling my F.I on a relatively fresh aircraft

BC
MerlinV
_VISITCOMMUNITY
Victoria, Australia
Joined: November 26, 2006
KitMaker: 608 posts
AeroScale: 602 posts
Posted: Saturday, August 02, 2008 - 06:12 PM UTC
Hey Brad,

The plan (assuming that I did strip it back) would be to try to replicate exactly that feature... Chipping.
Notice in the photo that our beloved leader had kindly posted above, that the dope has actually chipped away from above the ribs on the horizontal stabiliser, and on the edges of same.
Another thing that I interpret from that photo - contrary to Stephens assurance that control surfaces were streaked seperately from the main flying surfaces - is that they were in fact done together. The darker streaks seem to follow over to the control surfaces in almost all cases! Note particularly on the Horizontal Stab and the Elevator. I welcome contrary opinions here, but In my opinion, this is the case.
Yes, I know that using one photo for a reference to particular feature is dangerous.

So far as the arguments for an against stripping the whole lot back; If truth be told, the only part that I am truly happy with (pre-weathering) is the fuselage. The other parts seem too... Regular.

So, how would I go about replicating the chipped effect? I am still contemplating that, but I am tending towards the old Masking fluid applied by means of torn sponge method. I have seen some amazing armour models done using this (Winter or tropical schemes over Gray), and I think that it bears thinking about at the very least... Aside from anything else, I am finding flaws in the finish that I would really like to address... and most of them will need raw plastic to do so...

Cheers,

Hugh
MerlinV
_VISITCOMMUNITY
Victoria, Australia
Joined: November 26, 2006
KitMaker: 608 posts
AeroScale: 602 posts
Posted: Sunday, August 03, 2008 - 12:46 AM UTC
OK. Tonight I conducted a little experiment.

I stripped back the port side of the Horizontal Stab with the straight leading edge (the one not to use on this build!), and recoated it in Bleached Linnen (Top and bottom).


I then, using a bit of torn sponge, applied some Humbrol Maskall along the rib lines. Top and Bottom. (Notice that I am holding the item with Tweezers. The Masking fluid is very fragile (even when dry) and is easily lifted.


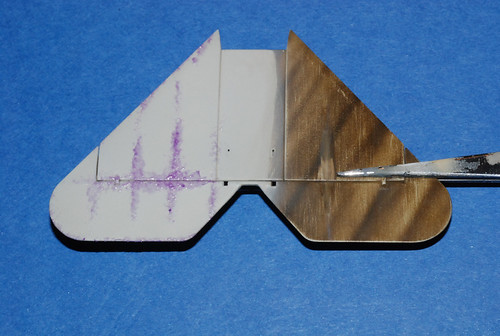
I then sprayed the streaked Olive Drab on the top and Light Blue on the bottom.


When the paint had dried, I then removed the masking fluid by rubbing along the edge or rib line with a tissue. You could use a cotton bud too I guess.


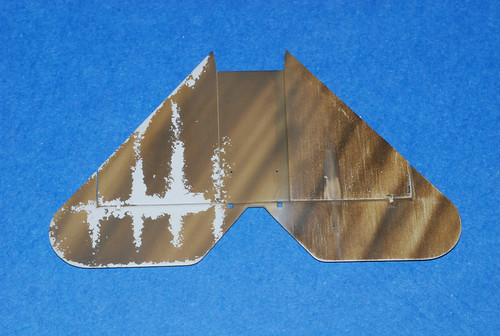
Now, this is a little over done (Obviously), but to my mind, it was a successful experiment.

It does show chipping along the rib lines and edges as I intended... I know now not to overdo the masking application...

I think that a spray of Tamiya Smoke here and there to blend things in a little would help.

All in all, this took me about 30 minutes, with paint changes, airbrush cleaning and paint drying time included.

I am now even more keen to strip the whole build back and use this method (a little more suruptitiously) over the whole project.

Cheers,

Hugh
thegirl
_VISITCOMMUNITY
Alberta, Canada
Joined: January 19, 2008
KitMaker: 6,743 posts
AeroScale: 6,151 posts
Posted: Monday, August 04, 2008 - 04:55 AM UTC
I really like the effect of the chipping makes a big difference in the appearance . i'm enjoying your work on this build and looking forward on seeing the kit done , fantastic work !
MerlinV
_VISITCOMMUNITY
Victoria, Australia
Joined: November 26, 2006
KitMaker: 608 posts
AeroScale: 602 posts
Posted: Monday, August 04, 2008 - 11:30 AM UTC
Hi Terri,

Thanks. It needs dirtying up. Any chipping was probably caused either by movement of the fabric surface or contact with other objects. Either way, the Bleached linnen underneath would not have been pristine. Might have to try out some pastel application.

This test piece is going to be stripped back again for another attempt. I want to get it right before I try it on the build.

This is all harking back to my thread on consistency and why some builds get finished and others do not. I have to finish this one, so I have to be happy with the overall result. If it takes a couple of goes to get there, great! All the more experience for my next builds.

Cheers,

Hugh
RAGIII
_VISITCOMMUNITY
North Carolina, United States
Joined: June 19, 2007
KitMaker: 604 posts
AeroScale: 600 posts
Posted: Wednesday, August 06, 2008 - 02:19 AM UTC
I am following your thread on this build with great interest. Your artistic treatment of the camo has been fun to watch as it developes. Just for the record one of the things I like about using artists oils for the streaking is that just a small swipe with a brush loaded with thinner and you are down to the CDL. I may try some chipping using that method in a future triplane build. Looking good keep up the great work!
RAGIII
JackFlash
_VISITCOMMUNITY
Colorado, United States
Joined: January 25, 2004
KitMaker: 11,669 posts
AeroScale: 11,011 posts
Posted: Thursday, August 21, 2008 - 08:13 AM UTC
How is it going? Has it come together yet?
MerlinV
_VISITCOMMUNITY
Victoria, Australia
Joined: November 26, 2006
KitMaker: 608 posts
AeroScale: 602 posts
Posted: Thursday, August 21, 2008 - 11:35 AM UTC
Well, I have not stripped anything back yet,
I could assemble it as is and have it finished, but I will not be happy with it. And I really do want to be happy with this build.
I have been consentrating on the Alby DVa this last couple of weeks, as I have a drop dead deadline of September 28 for that. The Fuselage is a poofteenth from being closed up (this will happen tonight) after which, that build should be rapidly brought to fruition.

So far as our subject here. I am going to strip the paint back and start again. Don't stress too much though, because all the development work has been done. The plan is now in final draft and progress thereafter ought to be rapid.

Expect to see very different results from Brad and Myself.

Cheers,

Hugh
JackFlash
_VISITCOMMUNITY
Colorado, United States
Joined: January 25, 2004
KitMaker: 11,669 posts
AeroScale: 11,011 posts
Posted: Friday, August 22, 2008 - 04:38 AM UTC
Hugh, that is the great thing about having two talented modelers do the kit. Two views on the look. Another note from Roden today. They are just coming back from vacations. They do seem to like what we are doing. Where else could one go to see all this action? Model On!
MerlinV
_VISITCOMMUNITY
Victoria, Australia
Joined: November 26, 2006
KitMaker: 608 posts
AeroScale: 602 posts
Posted: Monday, August 25, 2008 - 10:52 PM UTC
Back again...

I have stripped the paint back. On the Main Planes, I have added rib tapes in the form of Tamiya Masking tape.

Over this I have sprayed several coats of Tamiya Surface Primer (Rattle Can).
I figure that if Eduard can get away with overdoing Rib tapes, so can I


More soon.

Cheers,

Hugh
MerlinV
_VISITCOMMUNITY
Victoria, Australia
Joined: November 26, 2006
KitMaker: 608 posts
AeroScale: 602 posts
Posted: Tuesday, September 09, 2008 - 03:04 PM UTC
Back to it!

Last night saw me needing a break from decalling. So I fired up the airbrush and gave the flying surfaces a coat of Bleached Linnen (i actually adjusted my recipe slightly and added a tad more Deck Tan to make the ratio about 60-40 Deck Tan - White... It looks better after spraying when dry) top and bottom (I'll tell you why later).

I will now mask conservatively with Humbrol Maskol to crate my chipping effect in the areas that I feel will have experienced structural stress or trauma associated with burnt caster oil and the removal of same by ground crews.

I hope to have some photos to post of this soon.

Cheers,

Hugh
thegirl
_VISITCOMMUNITY
Alberta, Canada
Joined: January 19, 2008
KitMaker: 6,743 posts
AeroScale: 6,151 posts
Posted: Wednesday, September 10, 2008 - 02:25 AM UTC
Looking forward on seeing the results Hugh .
Mobious
_VISITCOMMUNITY
Indiana, United States
Joined: May 18, 2008
KitMaker: 210 posts
AeroScale: 80 posts
Posted: Saturday, September 20, 2008 - 02:56 AM UTC
Hello Hugh,
Just catching up on your build. Very impressinve work. A lot of neat info on weathering techniques. The chipping effect will look great. I've used a similar masking method on several armor builds and was pleased with the effects. The technique you employed to achieve the streak camo is new to me. The attention to what you are trying to achieve and the work you have invested to obtain those results truely mark this build as a winner. Above and beyond. Greatly appreciate the details of the post.
Mo,
MerlinV
_VISITCOMMUNITY
Victoria, Australia
Joined: November 26, 2006
KitMaker: 608 posts
AeroScale: 602 posts
Posted: Monday, September 29, 2008 - 11:33 AM UTC
This build is going hell for leather now!

I am currently repainting the crosses.

I reckon I will have the wings all fitted to the fuselage by next weekend.

I have to say that I was a bit worried about the extreme nature of my rib tapes... But after painting they look pretty cool (I think)...

Photos tonight!

Cheers,

Hugh
thegirl
_VISITCOMMUNITY
Alberta, Canada
Joined: January 19, 2008
KitMaker: 6,743 posts
AeroScale: 6,151 posts
Posted: Monday, September 29, 2008 - 11:43 AM UTC
Hugh , I'm looking forward on seeing the new results !
MerlinV
_VISITCOMMUNITY
Victoria, Australia
Joined: November 26, 2006
KitMaker: 608 posts
AeroScale: 602 posts
Posted: Tuesday, September 30, 2008 - 12:08 AM UTC
So, here is the restult of a few hours immersed in Acrylic paint fumes...

Remeber please that I am looking for VERY weathered affect. And that further shading and weathering will be done before we are finished.

An over all view...


And some closeups...


An attempt to show the "Plywood skinning" on the Undercarraige wing...


Why I painted the undersides Bleached Linnen as well...


The front of the fuselage will have suffered most from the affects of burnt castor oil...


Tonight I have made up some more masks for the Maltese crosses on the wings and will spray them.

Weathering will also start with thinned Black Brown and Tamiya Smoke.

The intention is to give the wings a thin oil wash to highlight the rib tapes a little.

Cheers,

Hugh
Hatter50
_VISITCOMMUNITY
North Carolina, United States
Joined: June 17, 2006
KitMaker: 478 posts
AeroScale: 391 posts
Posted: Tuesday, September 30, 2008 - 01:19 AM UTC
Hey Hugh,

Hail damage? Kidding! I like. Is that daubed on? Really interesting wheel wing with the plywood showing though. Now that can't be daubed on.

I also like the dispersal of the "chipping".

Question........and i don't know nothing from nothing on this subject......Was that Camo field applied or factory applied?

Alos.....what do you use for masking markings?

Regards
Steve
MerlinV
_VISITCOMMUNITY
Victoria, Australia
Joined: November 26, 2006
KitMaker: 608 posts
AeroScale: 602 posts
Posted: Tuesday, September 30, 2008 - 11:20 AM UTC
Hey Steve,

Thanks buddy. I know a lot of people are going to think that the effect is over done. But I like it. It will look better after some more weathering.

The technique is detailed earlier in this thread. Humbrol mask all applied with a sponge and then sprayed over and removed when dry.

Factory applied.

The Undercarraige wing was painted first with the wood effect, Maskall applied and then the green sparyed on top.

I was using Tamiya Tape, but that is pretty fragile.
We have been doing a program here at my work involving masking tape... some mob other than the one we are using (3M) got wind of it and decided to try to get in on the act... In the process of trying to win us over, they were throwing rolls of low tack tape around. I managed to catch one 50 mm wide. Super stuff. I will confirm the brand when I get home tonight and let you know.

Cheers,

Hugh
Hatter50
_VISITCOMMUNITY
North Carolina, United States
Joined: June 17, 2006
KitMaker: 478 posts
AeroScale: 391 posts
Posted: Tuesday, September 30, 2008 - 11:37 AM UTC
Actually no, I wasn't thinking that it was "overdone". I know your at step #1. Well, maybe #47, but the weathering hasn't begun yet. And I did go look and see the writeup on how you did it.........reason for steps #1-46.

I know what you mean by YOU have to be happy with the progress. Been there, done that.

Thats why the day can't end without a POSITIVE step. Sometimes work all night to get that step..... As Stephen says about Bloodshot Eyes...........

I keep watching this build.

Regards
Steve
JackFlash
_VISITCOMMUNITY
Colorado, United States
Joined: January 25, 2004
KitMaker: 11,669 posts
AeroScale: 11,011 posts
Posted: Wednesday, October 01, 2008 - 12:53 PM UTC
Excellent progress. It makes me wonder what Werner would have done had he lived longer. He always had a rather dauper appearance on his previous machines. The later images of this one show a good deal of wear and tear and repair. He was due to go on leave with his two brothers that Sept. 1917 evening he did not return. If he had lived and gone on leave, who knows what his crew had been given as orders to paint before he returned.
MerlinV
_VISITCOMMUNITY
Victoria, Australia
Joined: November 26, 2006
KitMaker: 608 posts
AeroScale: 602 posts
Posted: Tuesday, October 07, 2008 - 10:30 AM UTC
Hi Guys and Gals,

Lots of detail stuff happening at the moment. Struts and Cowels being painted up (With Chips), Guns assembled, painted and dry brushed.

Not sure yet how to go forward with Weathering the work done so far:

Tamiya Smoke definitely, and an oil wash... But I am tempted to mix up a very dark brown and go to town as well... Maybe I will do the smoke and the wash first and then do some subtle finishing with the Dark brown filtering...

I will post some shots tonight.

Cheers,

Hugh