World War II
Discuss WWII and the era directly before and after the war from 1935-1949.
Hosted by Rowan Baylis
P-47D "FAT CAT"
csch
_VISITCOMMUNITY
Buenos Aires, Argentina
Joined: December 27, 2002
KitMaker: 1,941 posts
AeroScale: 1,040 posts
Posted: Thursday, July 03, 2008 - 09:09 AM UTC
Hi Matthew:

Fantastic job youŽre doing. That cockpit looks amazing.
Interesting technique you have for the preshading ! IŽll give it a try.
Now IŽm finishing two 1/48 Spitfires and a 1/72 Mossie, and after these three birds IŽll start with a 1/48 Tamiya P 47D Razorback (ZemkeŽs Wolfpack). IŽll be following your build.
Congratulations
lampie
#029
_VISITCOMMUNITY
England - East Midlands, United Kingdom
Joined: December 23, 2005
KitMaker: 6,249 posts
AeroScale: 3,270 posts
Posted: Friday, July 04, 2008 - 06:02 AM UTC
Hi Matt.
The cats looking great.
I cant wait to see how this shading method works out under a NMF.
2 more weeks and I'll be home. Should have the Bostwick P-47 finished in a couple of days after that.
I must be close to finishing as Im mulling over in my mind what to build next.
Really looking forward to seeing yours come together.
Nige
f1matt
_VISITCOMMUNITY
Manitoba, Canada
Joined: August 13, 2006
KitMaker: 1,021 posts
AeroScale: 184 posts
Posted: Saturday, July 05, 2008 - 04:58 AM UTC
Hello again everyone. I couldn't add an update yesterday as my internet was down so here's two days worth of work.

But first.

Thanks Rick. Ever since I saw Adam Wilder's feature at Armorama I've been wanting to give modulation a try and this seemed like an interesting opportunity. When the metallic paint starts flying I want to play around with lighter and darker shades.

Thanks for looking Carl.

Good luck on all your builds Carlos. Two Spitfires at once, sounds like fun.

Hi Nige. Personally, I think about the next one almost as much as the current one. Probably why I hardly get anything done.

On to painting!

The "distinctive markings" have been masked. I figure it'll be easier to mask over them and spray the Alclad instead of the other way 'round. Tamiya flat white was sprayed on at just under 20psi this time. The pressure was too low before. Since D-day stripes are famous for being painted in a quick and often crude manner I am trying to avoid painting perfect stripes. Although trying to achieve a balance between historical accuracy and a nice looking model can be tricky. The white was sprayed on in a random fashion much like the preshading. After a base layer of white was on a second coat of white was added. This time (to try to replicate an uneven coat and to a degree, brush strokes) The white was sprayed on making vertical strokes.


As you can see the canopy was also masked and painted. It was first given a thin base coat of white. Then Tamiya flat red went on. It may be a little too bright and have to be toned down with a darker red.


So that's it for what got done Friday morning. Now here's what I just finished up.

The stripes were masked. It was mostly done by eye. The stripes were very often not straight or even the correct size. But if this is overdone it will just look silly so once again I try to achieve a balance.

First a mottled coat of Tamiya NATO black is sprayed on. Then as with the white, straight black goes on in vertical streaks.


This picture is blurry but you can see the actual strokes made by the airbrush on the masking tape.


Now time to remove all that tape. ta-DA!


I think it turned out pretty good.


A shot of the windscreen.


This is starting to look like something.

-Matt
CaptainA
_VISITCOMMUNITY
Indiana, United States
Joined: May 14, 2007
KitMaker: 3,117 posts
AeroScale: 2,270 posts
Posted: Sunday, July 06, 2008 - 12:41 PM UTC
Super, Keep the pics coming.
f1matt
_VISITCOMMUNITY
Manitoba, Canada
Joined: August 13, 2006
KitMaker: 1,021 posts
AeroScale: 184 posts
Posted: Tuesday, July 08, 2008 - 03:44 PM UTC

Quoted Text

Super, Keep the pics coming.


Well Carl since you asked here you go.

I decided to focus on the cowling today. The real Fat Cat had a large red tongue painted over a thick black stripe. The decal sheet does provide the tongue but I decided to paint it on. That way it not only conforms perfectly to the cowl but I can also play with the shading as well.

Step 1. Mask off the tongue. The decal was cut out and used as a stencil. A pencil was used to draw the outline. Very thin strips of masking tape (similar to Tamiya's) was used to mask the outline of the tongue. Thin tape is useful here because it is flexible and can follow the shape of the tongue. Go slowly here. And don't try to mask it all in one go. Several pieces of tape were used.


Step2. When the canopy and windscreen were painted red I first sprayed on some white. To make sure the red matches everywhere I did the same here as well. The flat white was sprayed on only where I wanted it.


Step 3. Spray on a thin layer of red. This allows the carefully applied pre-shading to remain visible.


Step 4. Remove the masking. Easy!


Step 5. Re apply the masking. Not so easy. In preparation for the black, the red tongue must be covered. At this point the decal didn't seem like a bad idea.


Step 6. A thin layer of black goes on. It may be tough to see but in person the pre-shading shows through. It's subtle but that's what we want.


Step 7. Remove the masking tape....again.


The plain jane side. My monitor is very dark so I'm not sure if you can see the shading or not in this picture. How's it look out there?


Watch your head!


Hi Rick. About the wings Spencer was working on over at Mig's forum. I'm still waiting for my account to be activated. It seems until then I can't view threads. Oh and I love the little Sturmhaubitze you completed recently. Can't wait to see what comes next.

As for me I think it's back to do some more painting before the night is done.

-Matt
f1matt
_VISITCOMMUNITY
Manitoba, Canada
Joined: August 13, 2006
KitMaker: 1,021 posts
AeroScale: 184 posts
Posted: Tuesday, July 08, 2008 - 07:01 PM UTC
Don't you just love computers. I get my next update all ready to go and BAM. You hit the wrong key and it all goes by by.

Calm blue ocean. Calm blue ocean. Breath in. Exhale.

All right let's try this again.

Ah yes. The anti-glare panel. Bring on the tape!


Since I'll have the airbrush out why not mask the tail so the three black stripes can be painted.


Time for some colour. As per standard spraying procedure, a thin layer of Aircraft Colors 3041 US OD 41 faded was sprayed on at about 20 psi. This went on nice but it just looked a little too brown for me. So for the next layer some Aircraft Colors 6119 Slate gray was mixed in. This looked better but the extra colour managed to completely cover all of the pre-shading. Oh well. That's why we have post-shading. The same mix of OD and slate gray had a few drops of Gunze flat black added. This was mostly sprayed over the panel lines. Some of it was sprayed in random splotches all over to represent grease and grime. Next up, the highlights. The OD/SG mix had some Tamiya flat white added. A drop of black as well. This lighter shade was sprayed on in a mottled fashion focusing on the centers of panels. This looked interesting but there was too much contrast. The base colour was lightly misted over the whole panel to tone things down a bit. Now there wasn't enough contrast. This is another good reason to apply thin layers of paint. If it had gone on thick I wouldn't have any panel lines left.

Well I made my darker shade again, only this time not quite as dark. And I repeated my highlight shade, only not quite so bright. Now that looks better.


So after spending almost half an hour spraying OD it was on to the tail.

Gunze flat black was sprayed on in streaks. Much like the D-day stripes only this time the streaks follow the airflow instead of going on vertically. This took almost a minute. By spraying streaks (instead of a solid layer) the paint looks a little more interesting. Plus it looks like it has been weathered already.


Now to remove all that tape.


I think that's enough for today.

-Matt
GVoakes
_VISITCOMMUNITY
Manitoba, Canada
Joined: September 04, 2007
KitMaker: 193 posts
AeroScale: 32 posts
Posted: Wednesday, July 09, 2008 - 03:45 AM UTC
Looking good to date, Matt! I'm interested in seeing how your Alclad experience turns out.
lampie
#029
_VISITCOMMUNITY
England - East Midlands, United Kingdom
Joined: December 23, 2005
KitMaker: 6,249 posts
AeroScale: 3,270 posts
Posted: Thursday, July 10, 2008 - 04:53 AM UTC
Hi Matt.
This is rapidly becoming something really special.
I especially like the way your using "armour" techniques crossing over into the Aero world.
Im very interested to see how you get along with the Alclad, and the way youve painted the cowling and anti glare panels before the base NMF coat is intriguing.
Personally, I would have done it the other way round, but thats just how its seems to work best for me.
I cant wait to see how the Cat looks when youve blown some Alclad at it!
Nige
f1matt
_VISITCOMMUNITY
Manitoba, Canada
Joined: August 13, 2006
KitMaker: 1,021 posts
AeroScale: 184 posts
Posted: Friday, August 08, 2008 - 09:45 AM UTC
My internet connection has been tentative at best the last few days so posting has been almost impossible. If you can read this then I got lucky today. A few days ago I got my modeling itch back so I masked up Fat Cat in preparation for the Alclad.


Now one thing to keep in mind is that I've never successfully completed an NMF model before. In fact the last two attempts ended in complete disaster. Fingers crossed while knocking on wood.

While spraying the Alclad (straight Auminum) I learned that it is a very opaque paint. It's tricky to know when enough is enough. After the first coat the model looked.....odd. From one angle it looked all silver. With no pre-shading visible at all. From a different angle the same P-47 looked like it had received almost no silver at all. After a couple more coats it looked a little better. To add some variety Dark Aluminum (or Aluminium for those across the pond) was sprayed on the undersides of the wings, fuselage and along panel lines. It was also sprayed on in a random, mottled fashion all over to help break up the silver. White Aluminum was sprayed in the centers of panels and again in a spotty random coat over the whole plane. I'm surprised at how quickly this stuff dries. All sub-assemblies that will require Alclad were also painted at this time. This model is very much an experiment for me so I might not do things they way you would normally for this type of finish. For example I decided not to gloss over the model before spraying. One reason is because I want a veteran looking fighter. Not one that looks like it came straight from the factory. Also I was just curious as to how the Alclad would react to a flat base coat. Well without further delay ( if my internet connection holds ) here's how Fat Cat looks in her new coat. The weather is gorgeous today here in Winnipeg so I took the pictures outside.


Here are the drop tanks that were kindly donated by Nige.


After looking at my model with a coat of silver on it I now appreciate "clean builds" a lot more now. I thought I had a near perfect finish on my P-47. It turns out it's much rougher then I thought. NMF is a harsh critic. The finish does look a little grainy up close. No doubt because it's over a flat base coat. But I may be able to fix this. The model will still need a gloss coat for the decals so that might smooth it out a bit. Next up is some weathering. And maybe some day I'll get around to working on the engine. Someday.

-Matt
Tomcat31
#042
_VISITCOMMUNITY
England - North East, United Kingdom
Joined: November 18, 2006
KitMaker: 2,828 posts
AeroScale: 1,720 posts
Posted: Friday, August 08, 2008 - 11:12 AM UTC
Looking Good so far Matt, I like the idea of different shades of Alclad for fading the centers of panels

Quoted Text

For example I decided not to gloss over the model before spraying. One reason is because I want a veteran looking fighter. Not one that looks like it came straight from the factory. Also I was just curious as to how the Alclad would react to a flat base coat.


Quoted Text

The finish does look a little grainy up close. No doubt because it's over a flat base coat.

I never gloss of the kit when using Alclad. I normally just spray over Halford's Grey Primer (Halfords is a car parts chain over here in the UK that do their own spray paint) that has been lightly sanded. The only time I use a gloss base (Black) is when I use Alclads Polished Aluminium and Chrome. So I'm not sure what might be causing the grainy look apart for not smoothing the underlying paint with some fine (12000 grit) wet and dry. If I can I'll dig out the small instruction sheet I got with a bottle once and post them up here somewhere.

Cheers

Allen
lampie
#029
_VISITCOMMUNITY
England - East Midlands, United Kingdom
Joined: December 23, 2005
KitMaker: 6,249 posts
AeroScale: 3,270 posts
Posted: Friday, August 08, 2008 - 10:58 PM UTC
Hi Matt.
The Cats looking really good!
Interesting angle on the Alclad. I cant wait to see how it looks when its finished. It a fading techinque I use with acrylics but Ive never tried it with Alaclad.
Get the masking off and lets see how it looks
Glad the drop tanks are working out, they'll look so much better on your P-47 than sitting in my spares box
Nige
beepboop
_VISITCOMMUNITY
England - South East, United Kingdom
Joined: May 23, 2004
KitMaker: 144 posts
AeroScale: 7 posts
Posted: Saturday, August 09, 2008 - 03:59 AM UTC
Don't know if this might be of help, but it covers some of the ins and outs of using Alclads:

http://www.aircraftresourcecenter.com/tnt1/001-100/TNT009_Alclad/TNT009.htm

lampie
#029
_VISITCOMMUNITY
England - East Midlands, United Kingdom
Joined: December 23, 2005
KitMaker: 6,249 posts
AeroScale: 3,270 posts
Posted: Saturday, August 09, 2008 - 05:03 AM UTC
The Alclad Website has some good hints and tips.
Theres also this article on Aeroscale.
ALCLAD ADVENTURES
Nige
Tomcat31
#042
_VISITCOMMUNITY
England - North East, United Kingdom
Joined: November 18, 2006
KitMaker: 2,828 posts
AeroScale: 1,720 posts
Posted: Saturday, August 09, 2008 - 08:11 AM UTC
Well as promised here's a scan of the instructions that I got wrapped round a bottle of Alclad


Cheers

Allen
f1matt
_VISITCOMMUNITY
Manitoba, Canada
Joined: August 13, 2006
KitMaker: 1,021 posts
AeroScale: 184 posts
Posted: Saturday, August 09, 2008 - 03:13 PM UTC
Thanks for the info guys.

"apart for not smoothing the underlying paint with some fine (12000 grit) wet and dry"

Hi Allen. I believe that's exactly the reason. And after reading the instructions you posted it seems that the standard Alclad paints can be buffed with Micromesh. I'll probably do just that once I've finished with the Alclad.

Thanks for posting the link Ian. Lot's of helpful info at that site.

I've read your article a couple time now Nige. Glad you took the time to put it together. I particularly like the line: "Indeed, a comment often seen in the forums on Aeroscale goes along the lines of “ I’ve tried a NMF before but never managed to finish one”." Seems so familiar.

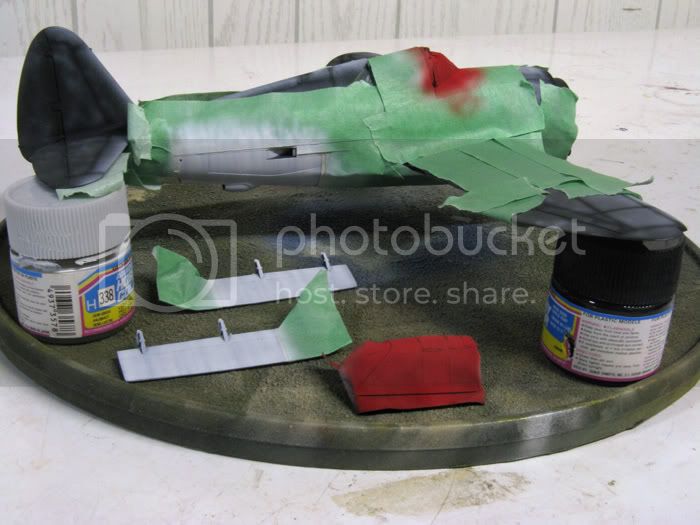
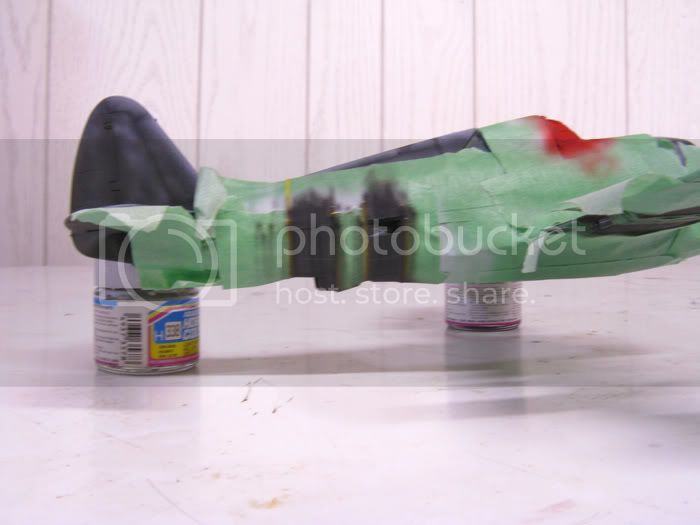
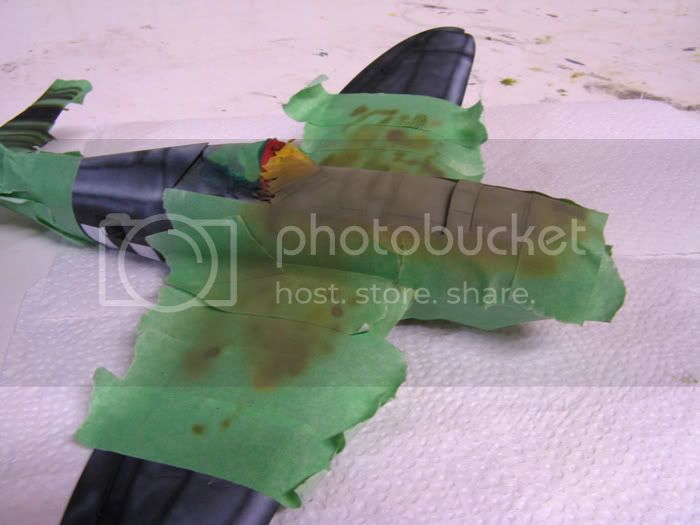
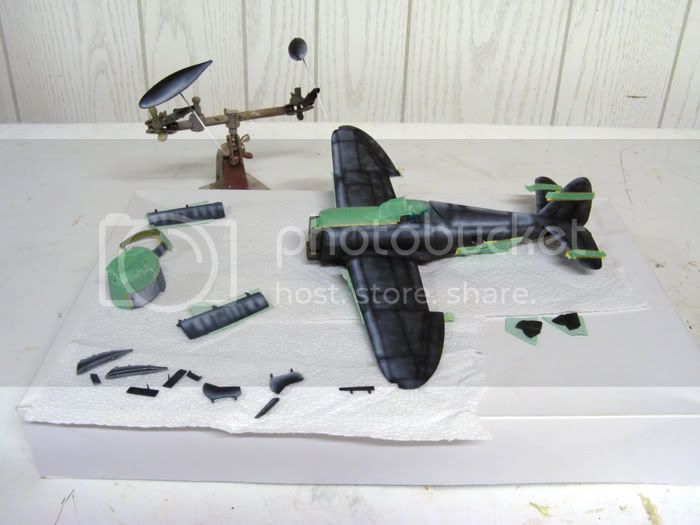
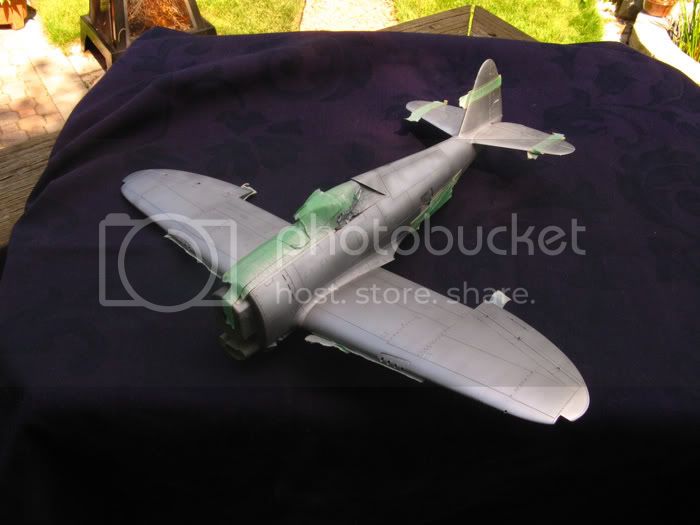
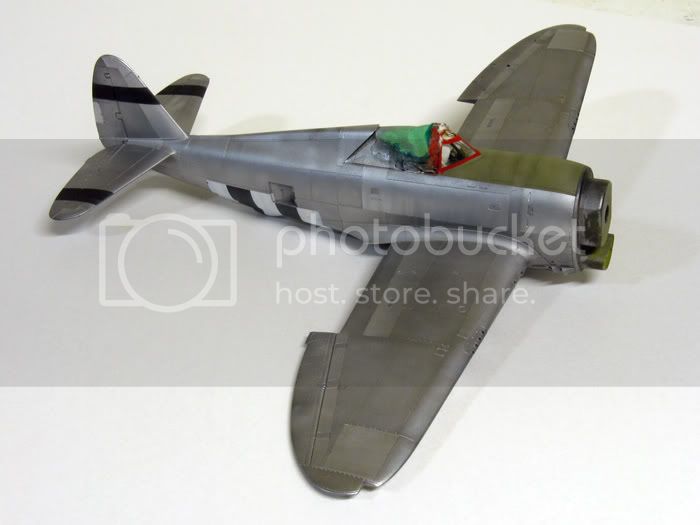
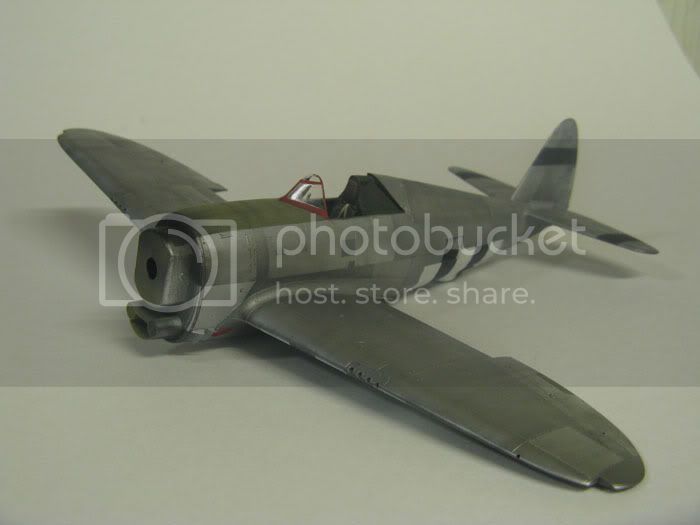
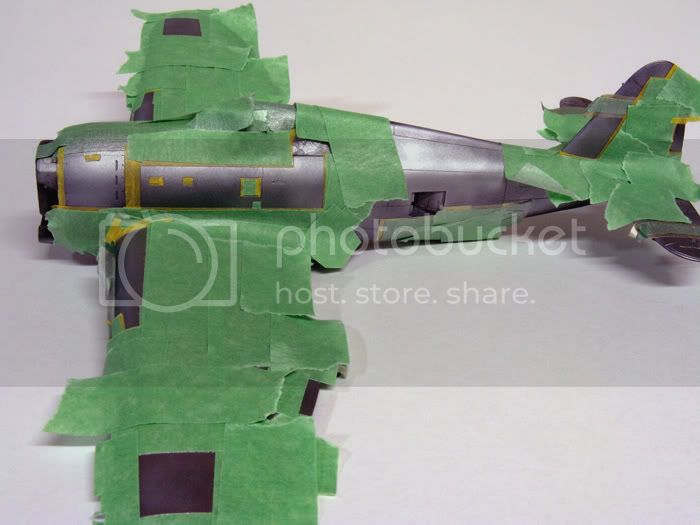
After another Saturday at the ol' hobby shop I came home and continued work on Fat Cat. Popped in a Band of Brothers DVD and started masking the fuselage, wings and cowl. I got ahead of myself when I stated that weathering was next. I almost forgot to spray various panels in different shades of Alclad. .

Skip ahead a couple hours and now she looks like a mess. Ready for some White Aluminum.


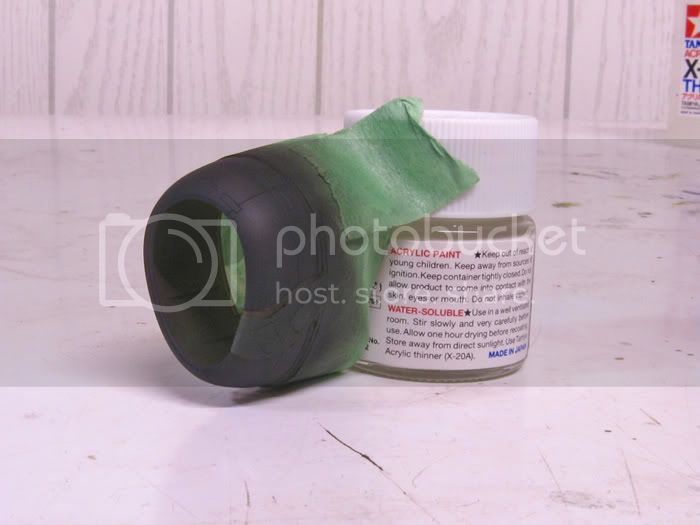
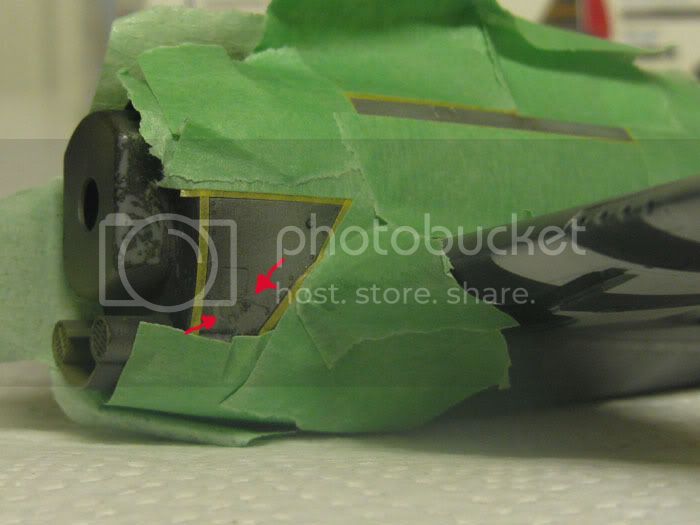
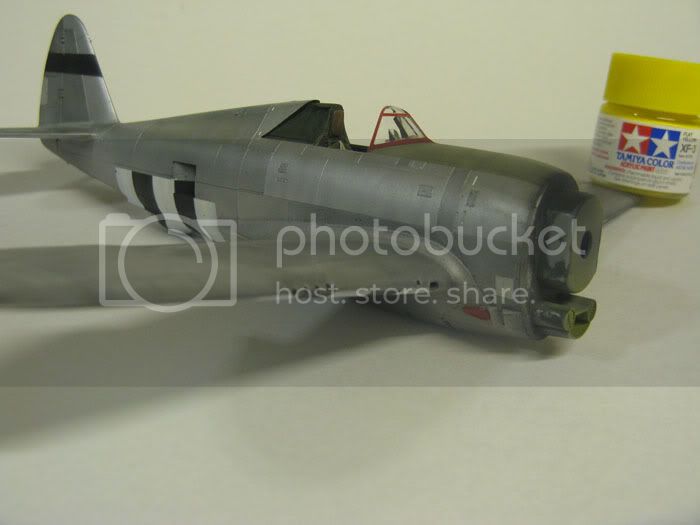
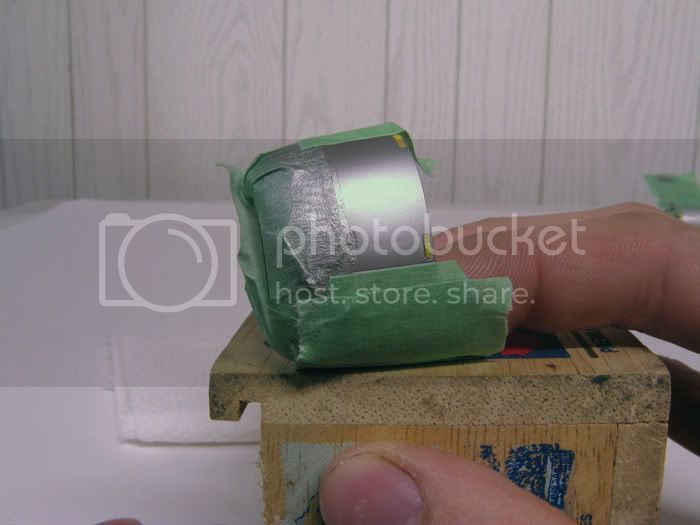
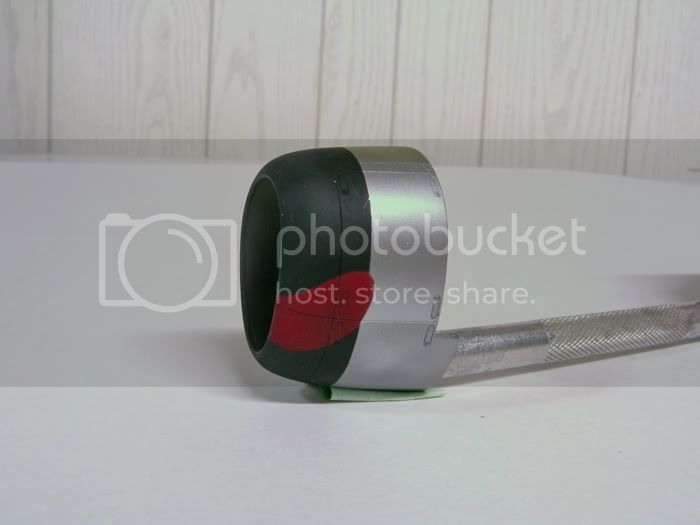
Here's the cowl, masked up and ready to go.


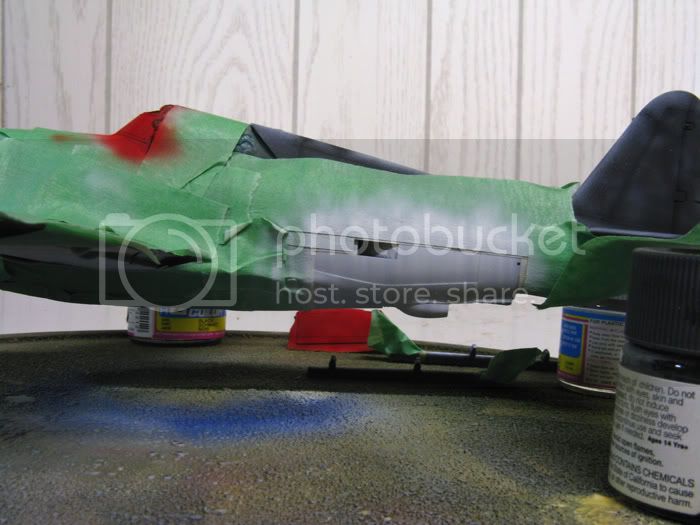
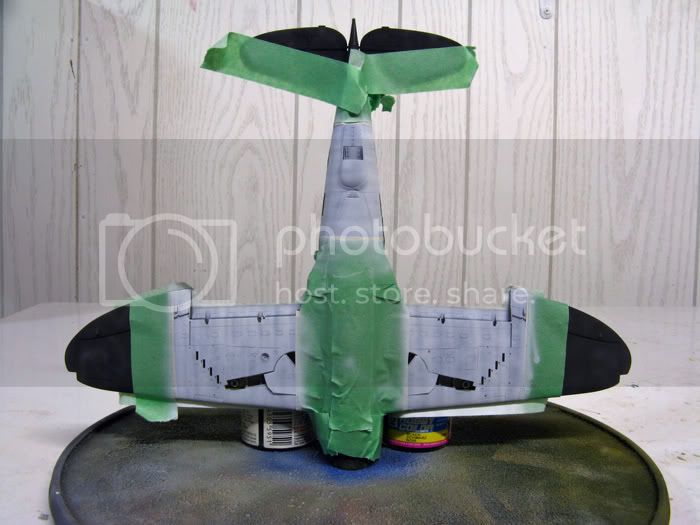
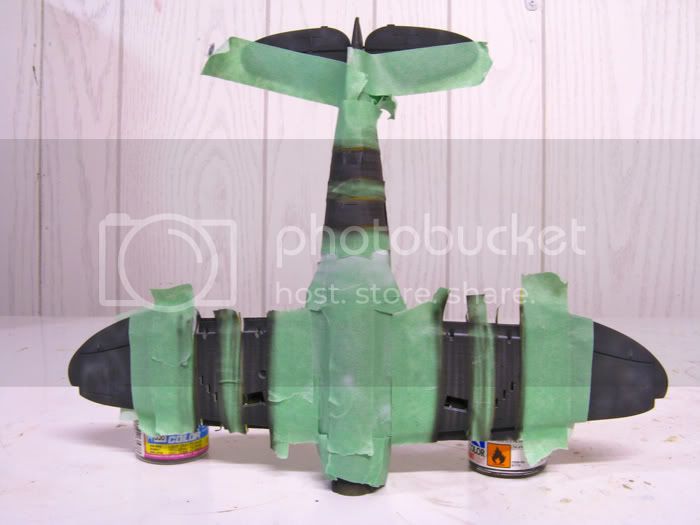
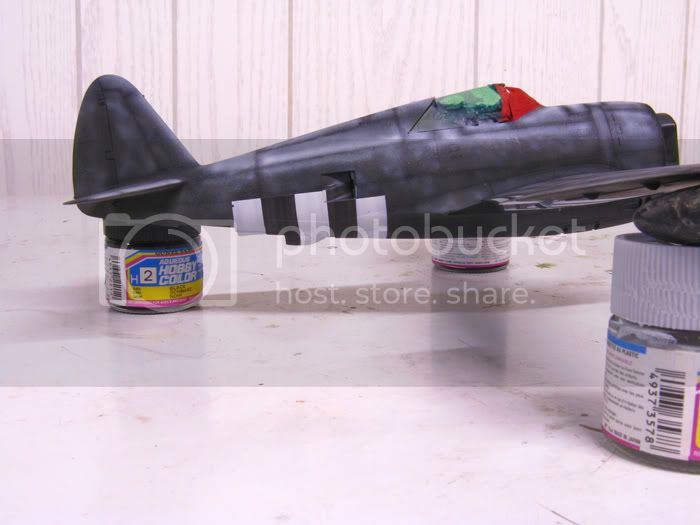
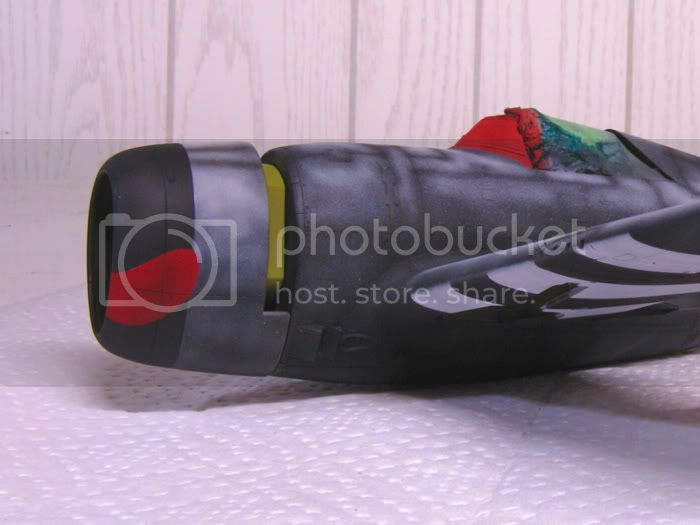
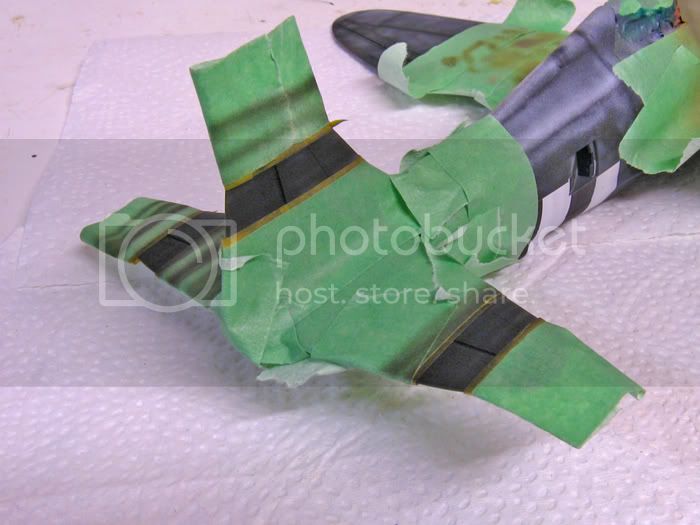
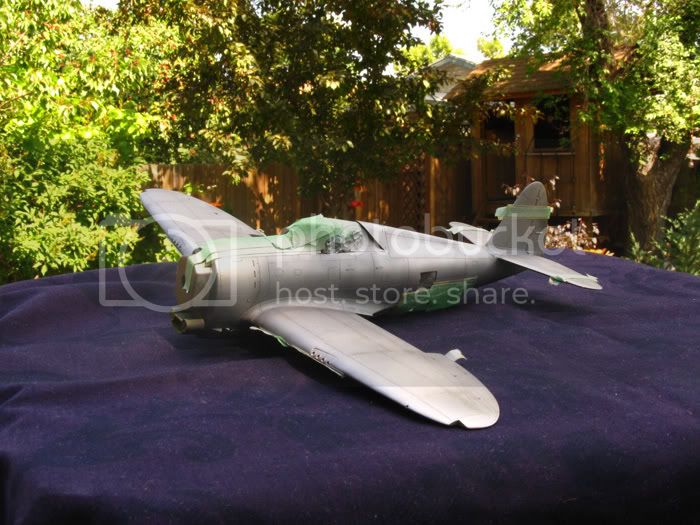
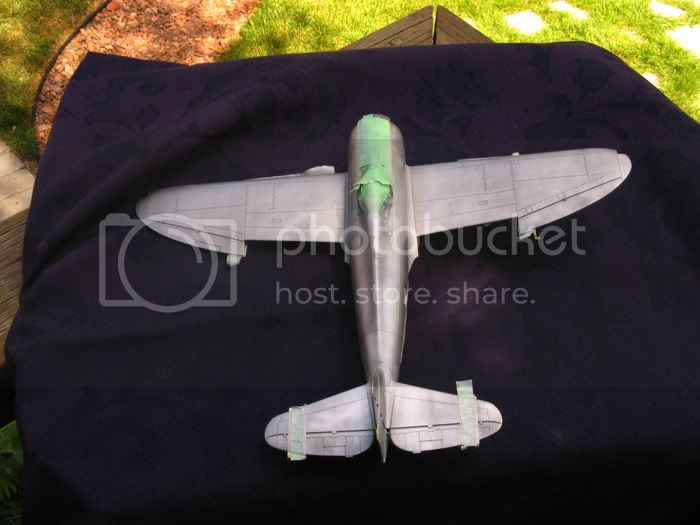
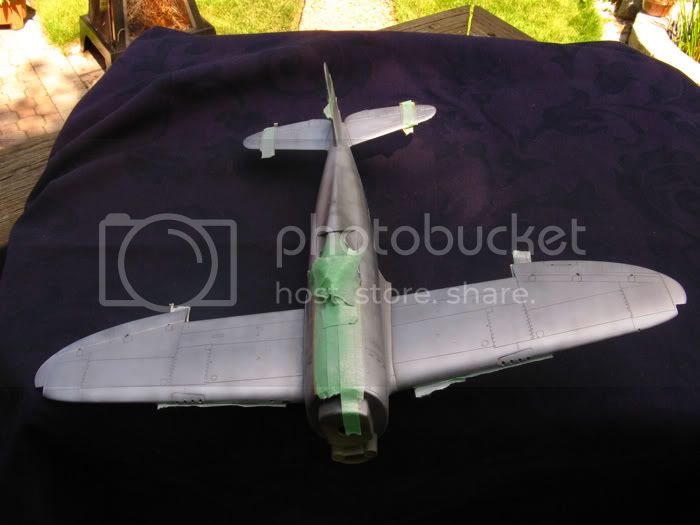
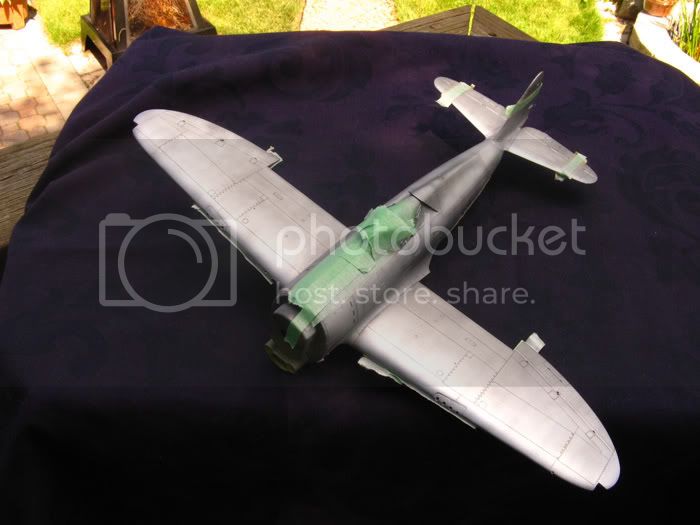
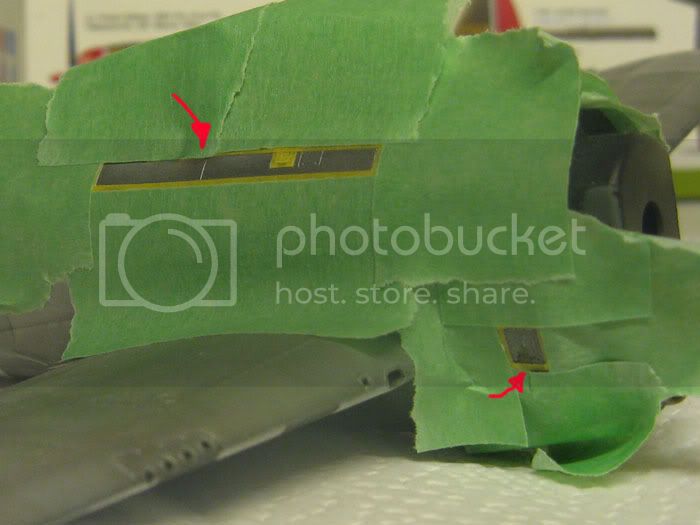
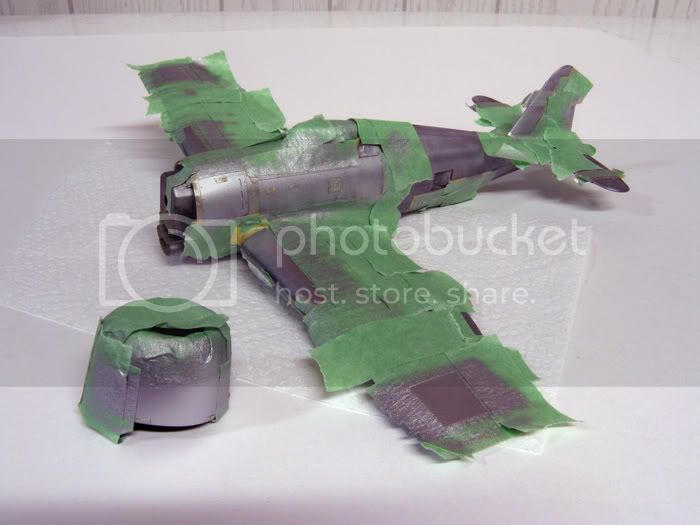
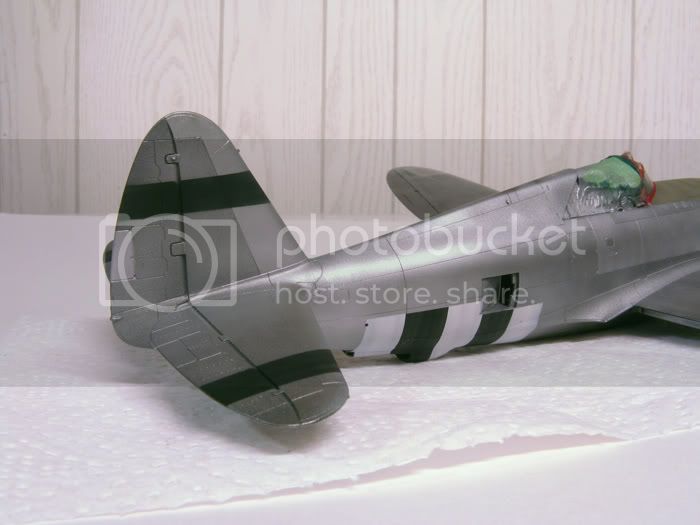
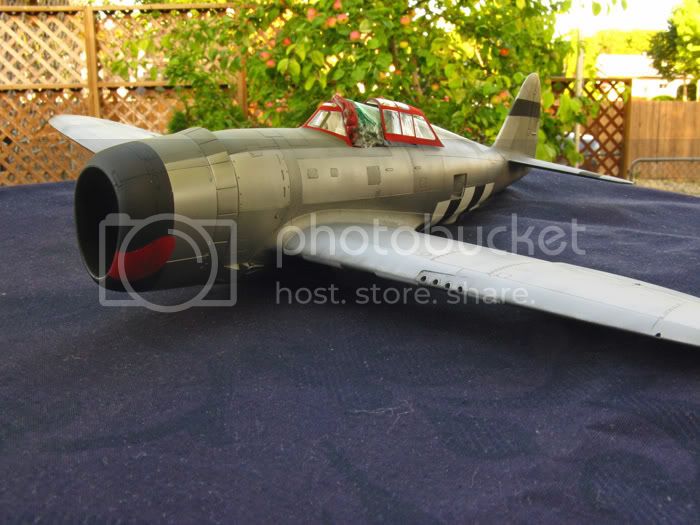
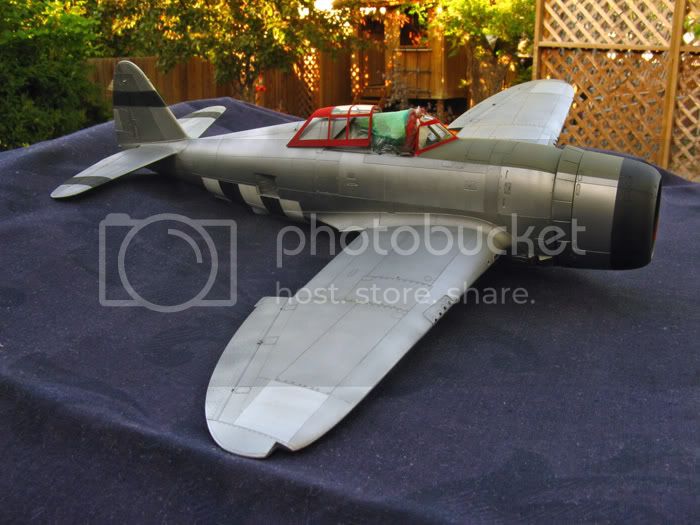
The White Aluminum was sprayed vertically on the fuselage and cowl panels. On the wing panels the Alclad was sprayed from front to back using quick strokes. The pressure was around 20 psi and the airbrush was held very close to the surface to create fine streaks in the finish. You can see some of the streaks in the next picture. Especially on the masking tape. Note that on the spine you can still see some preshading.


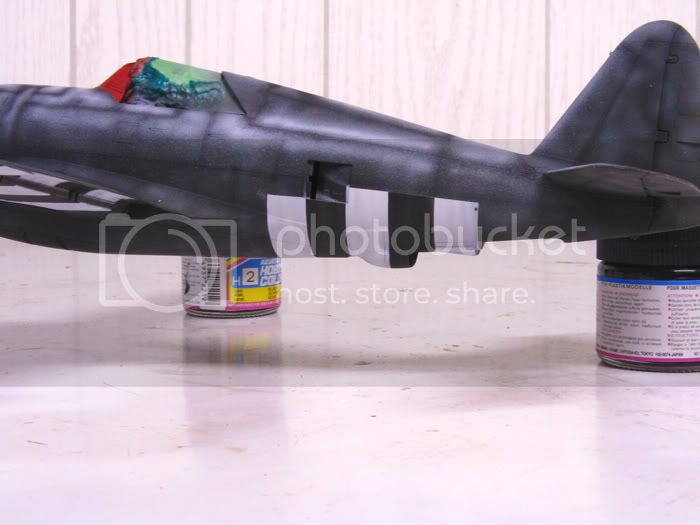
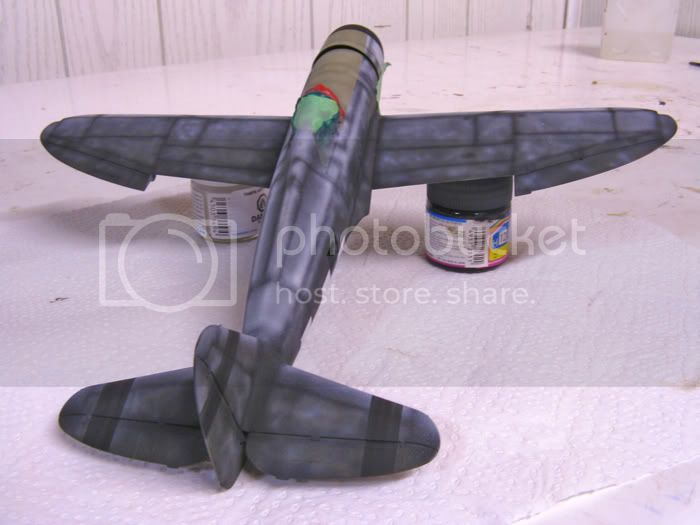
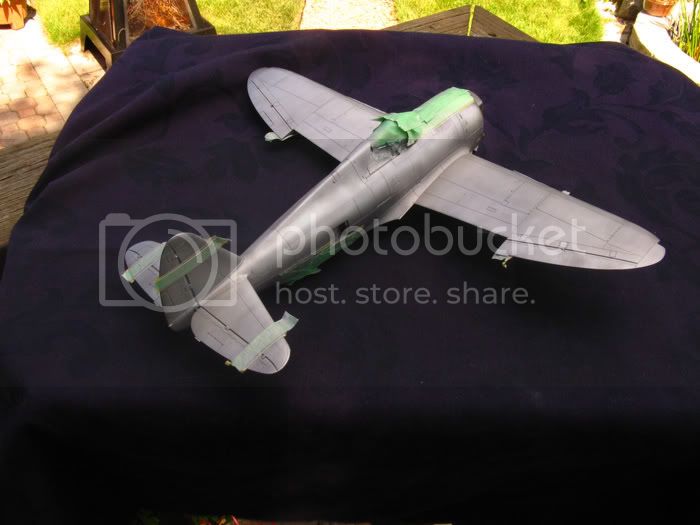
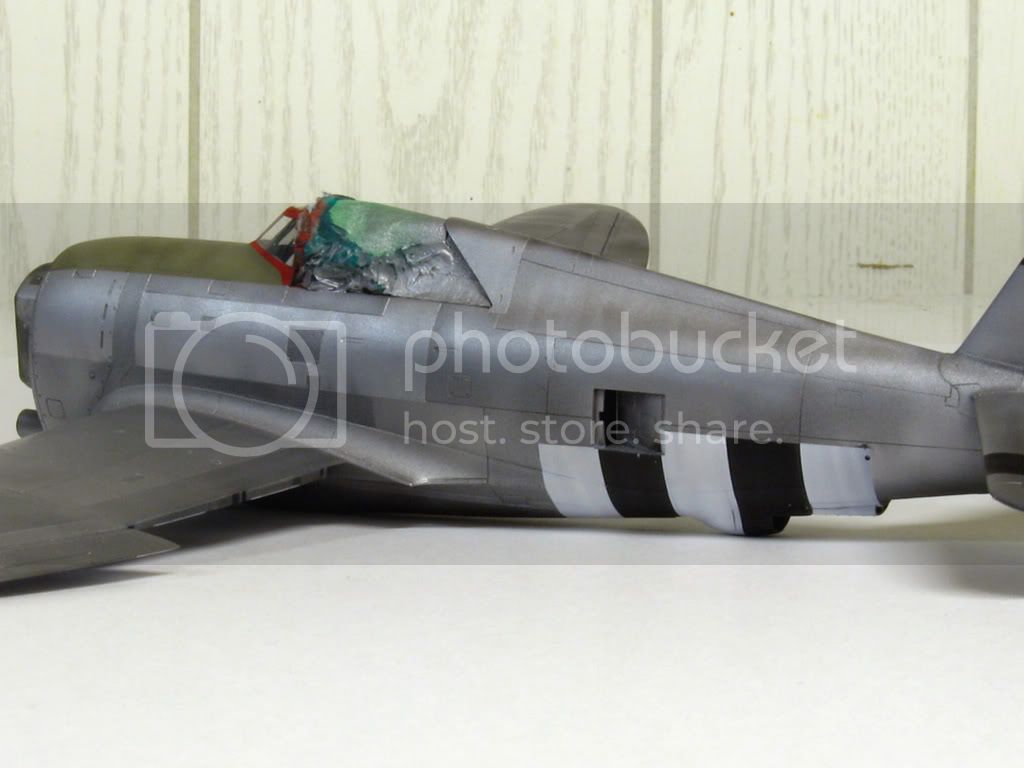
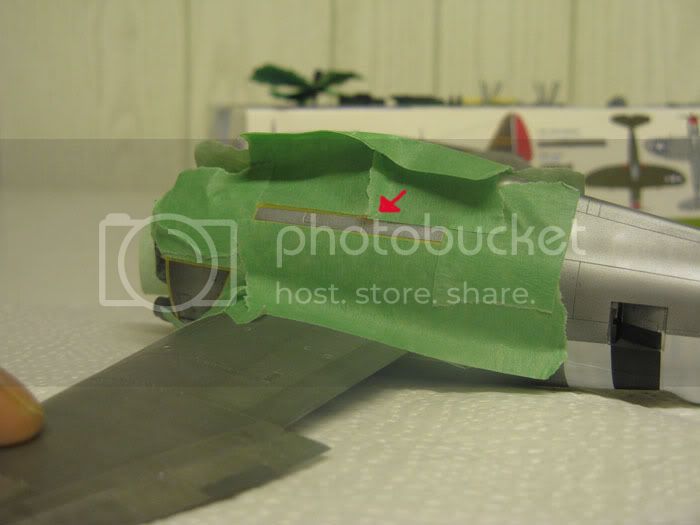
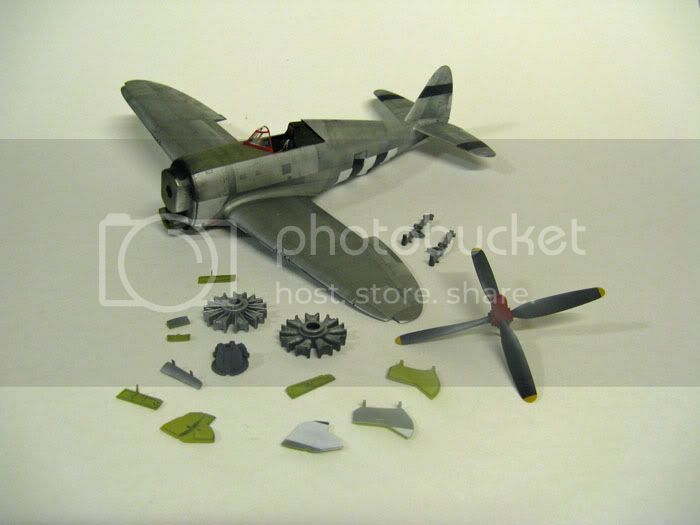
And now. The moment I was dreading and looking forward to all day. Removing all that sticky tape. Gasp. Ask and you shall receive Nige.


Ta-daa! Not one little piece of paint came off.


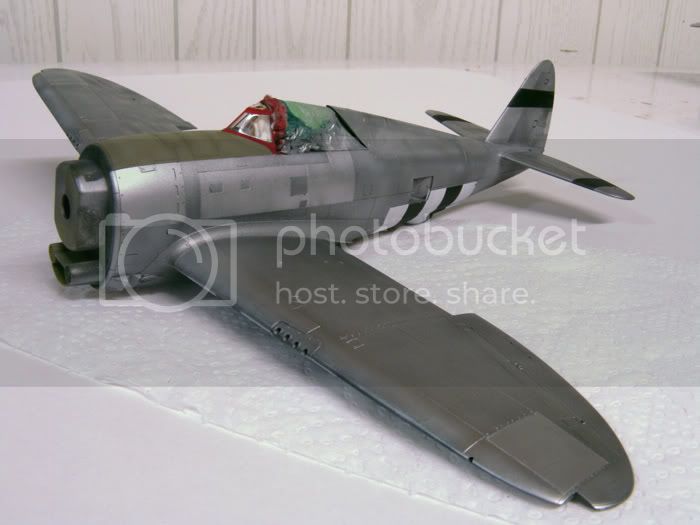
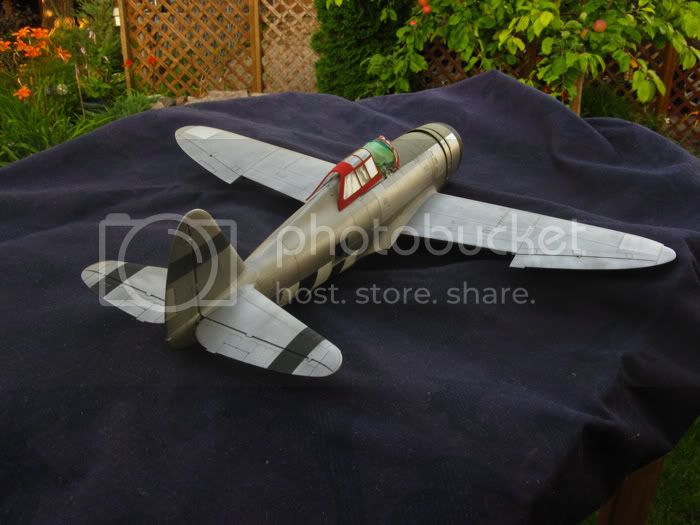
Even though the canopy masks had been on for over a month they came off without a hitch.


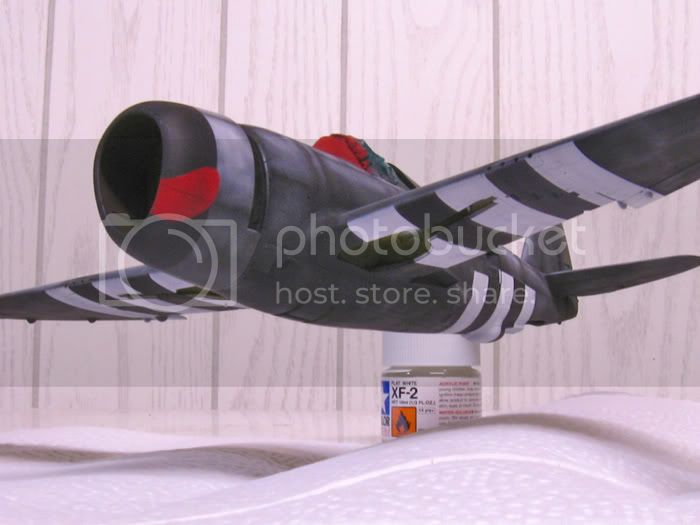
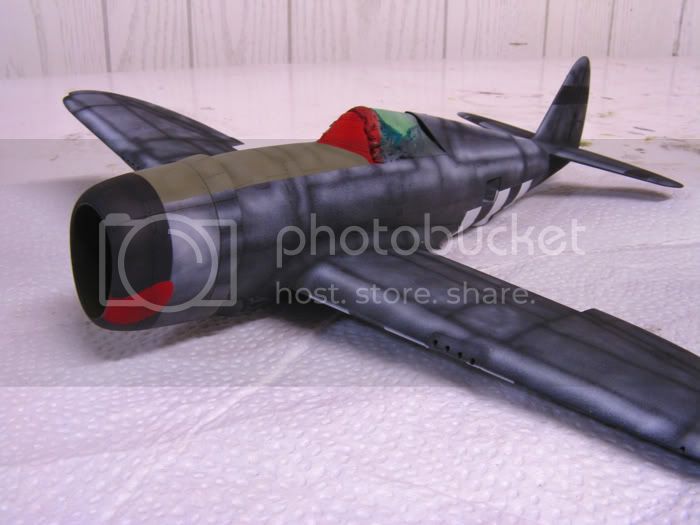
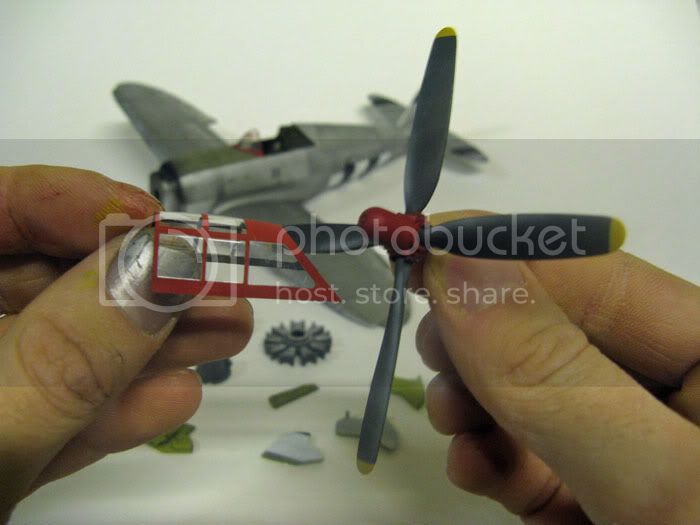
Here's a closer look. Even over a flat finish it looks pretty good too me.
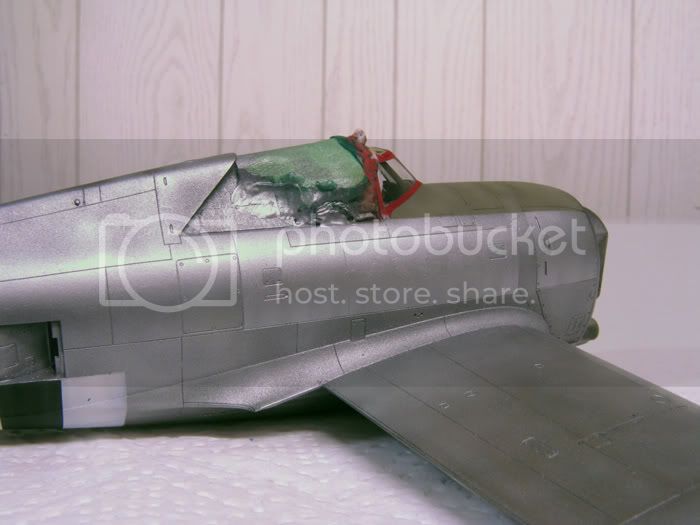
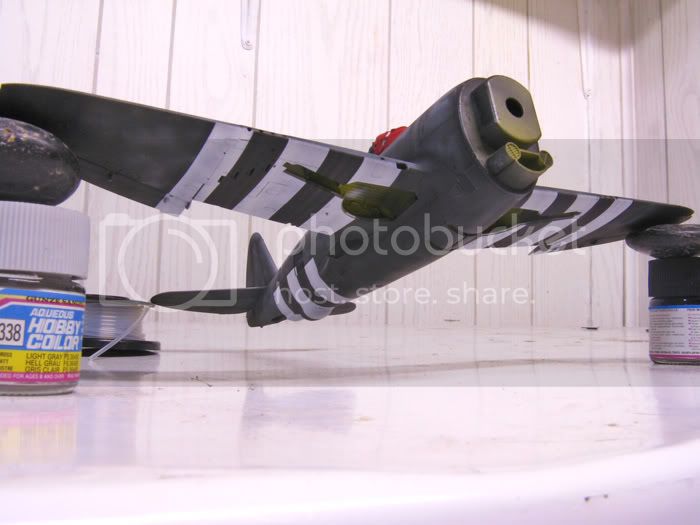
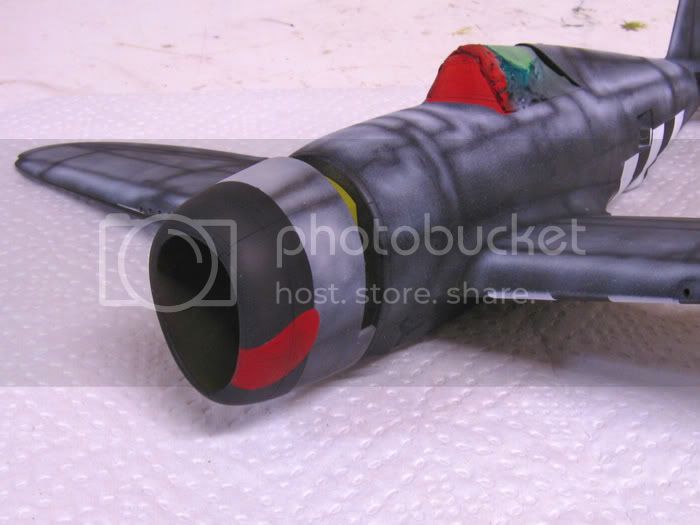


And the cowl again.


I couldn't resist.


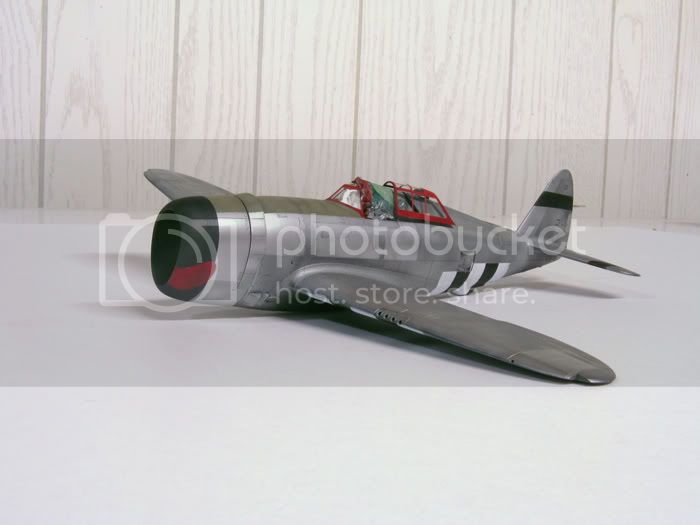
Ah heck. Why not take her outside. You just can't beat natural light for photos.


I'm building an NMF model and I'm actually....having fun. Didn't expect that.


Gonna let her sit over night and maybe do some more spraying tomorrow.

-Matt
deepstriker
_VISITCOMMUNITY
England - East Midlands, United Kingdom
Joined: November 26, 2006
KitMaker: 162 posts
AeroScale: 4 posts
Posted: Saturday, August 09, 2008 - 08:53 PM UTC
Excellent work and thanks for the very explanatory pics on your masking process, just in time for my next build !

ric
Tomcat31
#042
_VISITCOMMUNITY
England - North East, United Kingdom
Joined: November 18, 2006
KitMaker: 2,828 posts
AeroScale: 1,720 posts
Posted: Saturday, August 09, 2008 - 09:21 PM UTC
Simply Stunning work there Matt, I'm almost tempted to try some of these techniques on my next NMF P-47. Glad the instructions were of some help

Cheers

Allen
WingTzun
_VISITCOMMUNITY
Illinois, United States
Joined: February 01, 2006
KitMaker: 853 posts
AeroScale: 137 posts
Posted: Sunday, August 10, 2008 - 11:29 AM UTC
Matt your plane keeps looking better & better! And your yard makes me want to come over and relax in its beauty and tranquility. Looking forward to seeing your progress.
lampie
#029
_VISITCOMMUNITY
England - East Midlands, United Kingdom
Joined: December 23, 2005
KitMaker: 6,249 posts
AeroScale: 3,270 posts
Posted: Sunday, August 10, 2008 - 11:52 AM UTC
Hi Matt.
That is looking very VERY good!
Im going to have to try that method of spraying Alclad myself
Carry on!
Nige
f1matt
_VISITCOMMUNITY
Manitoba, Canada
Joined: August 13, 2006
KitMaker: 1,021 posts
AeroScale: 184 posts
Posted: Sunday, August 10, 2008 - 01:57 PM UTC
Hi Guys. Glad everyone is enjoying the build so far. And my backyard.

Today I continued masking various panels and spraying different shades of aluminum. I used white Al, dark Al and some duraluminum. I'm still amazed at just how tough this metal paint is. It simply won't come off. I sprayed the d-day stripes and anti-glare panel before the Alclad because I was afraid to mask over it. Apparently I had nothing to worry about. Guess I'll have to squeeze in another NMF build sometime in the future. Any excuse to use this wonderful product. And it lasts to. I still have plenty left. Which is good cause it ain't cheap. But in this case I believe you get what you pay for. Here are the latest pics.


I'm not worried about doing much work to the underside. But two long, thin panels beneath the wing roots were masked off and painted white aluminum.


Now I plan to give the paint a couple of days to dry and then I'll hit it with some very fine Micromesh buffing cloths.

-Matt
f1matt
_VISITCOMMUNITY
Manitoba, Canada
Joined: August 13, 2006
KitMaker: 1,021 posts
AeroScale: 184 posts
Posted: Wednesday, October 29, 2008 - 03:52 AM UTC
After a short break it's back to work on Fat Cat.

Hello? Anybody remember this one?

She's almost ready for a gloss coat. But before that I better make sure everything is ship shape. And it ain't.

A few panels were damaged by raw Tamiya thinner. I'll show why a little later.

In this picture you can see where the paint is completely gone in a small area.


The small panel near the bottom on this side was also damaged by excess thinner. Also there is some overspray from the windscreen that needs to be fixed.


More overspray from when I was touching up the red on the windscreen.


Since I'm getting my lazy butt back to the spray booth for the first time in quite a while I might as well work on some sub assemblies too. The wheels, engine, propeller, landing gear doors and struts all got some paint.


The masked off panels on the fuselage were given a coat of Alclad white aluminum. It looks a little bright right now but weathering should tone this area down. At least the overspray is gone and the bare plastic is covered.


So just how did those panels get damaged with paint thinner? I was doing some weathering a while back. I had sprayed a very thin layer of Tamiya flat black around the front of the aircraft to dirty up the area just behind the engine. Then using a q-tip that was dipped in Tamiya thinner (remove excess before proceeding), it was pulled across the fairly fresh paint in the direction of the airflow. It's easy to do, just don't use too much thinner and don't streak one area too often as it will weaken the base paint. Tamiya thinner is awfully strong stuff. Here's how it turned out.


An easy way to get some nice looking streaks. Just be careful.

Here are the subassemblies all painted up. Some still need some more work. Hmm. Seems a few parts were absent from the scene when I took the picture.


Looks like I have to spray another coat of red on the propeller. It doesn't quite match the red on the rest of Fat Cat. It's a little too dark right now but that's an easy fix.


Just about ready for that gloss coat. Then it's just decals, final weathering, clear flat coat and final assembly.


Matt


Blueheeler
_VISITCOMMUNITY
New South Wales, Australia
Joined: March 18, 2008
KitMaker: 347 posts
AeroScale: 223 posts
Posted: Wednesday, October 29, 2008 - 07:23 AM UTC
Great job. Weathering so far looks brilliant!
f1matt
_VISITCOMMUNITY
Manitoba, Canada
Joined: August 13, 2006
KitMaker: 1,021 posts
AeroScale: 184 posts
Posted: Wednesday, October 29, 2008 - 06:31 PM UTC
Thanks Nick. Once the decals are on I want to try the "dot" technique to help with the weathering. This is commonly used on armour models. Haven't seen it used on an NMF finish but I think it should work.

Now that I've gotten the modeling juices flowing again I expect the next update will likely come this weekend. And not two months from now.

Matt
chukw1
_VISITCOMMUNITY
California, United States
Joined: November 28, 2007
KitMaker: 817 posts
AeroScale: 729 posts
Posted: Thursday, October 30, 2008 - 02:46 AM UTC
That looks preety darn good to me, Matt! Excellent work on all the different panel shades- and the dirtiness sets it apart from "just another silver airplane". Looks like you'll be reducing the parts count next- adding all those delightful sub-assemblies- cheers!

chuk
f1matt
_VISITCOMMUNITY
Manitoba, Canada
Joined: August 13, 2006
KitMaker: 1,021 posts
AeroScale: 184 posts
Posted: Thursday, October 30, 2008 - 03:40 AM UTC

Quoted Text

Looks like you'll be reducing the parts count next- adding all those delightful sub-assemblies- cheers!

chuk


Yes that stage is quickly approaching (finally). I'm looking forward to making it a whole lot dirtier too. Thanks Chuk.

Matt