

You're killing me, Matt. Your painting/weathering is out of this world.
This is soooo Sweeeet.
Rick
World War II
Discuss WWII and the era directly before and after the war from 1935-1949.
Discuss WWII and the era directly before and after the war from 1935-1949.
Hosted by Rowan Baylis
P-47D "FAT CAT"
RickLawler

Joined: October 22, 2008
KitMaker: 48 posts
AeroScale: 7 posts
Posted: Sunday, November 30, 2008 - 01:19 PM UTC


f1matt

Joined: August 13, 2006
KitMaker: 1,021 posts
AeroScale: 184 posts

Posted: Tuesday, March 17, 2009 - 09:35 PM UTC
Soooooo. After a short break...
Hello? Anybody there?
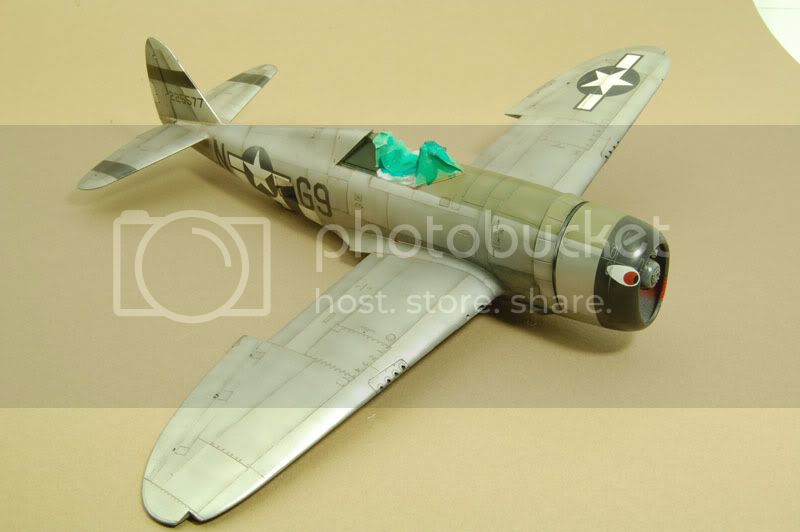
Ok so it's been a while since I've updated my blog. What can I say. It's just me being me. I build when I feel like it and if I don't. I don't. Anyway since my last update I finally finished messing around with the damaged/chipped paint on the lower cowl. Actually I did that probably a month ago now. But nothing else really till these past few days. finally got around to playing with my oils. And it's been fun. So how bout some pictures?
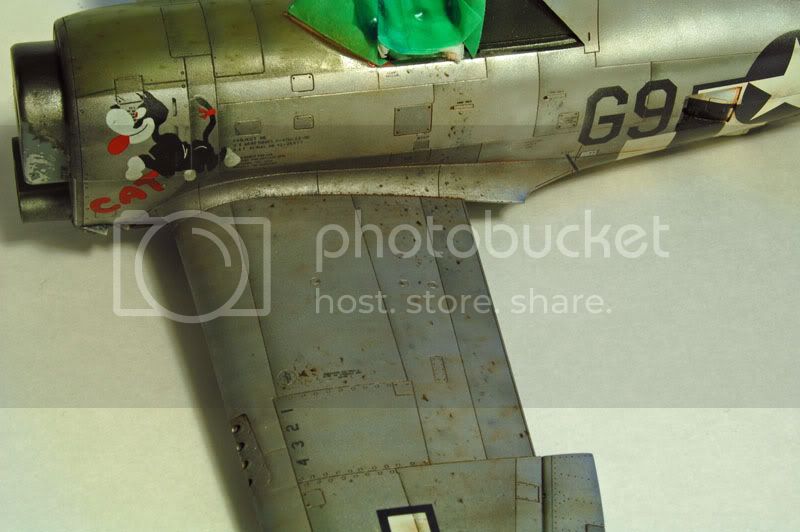
Well a few days ago I applied a panel wash using raw umber, Vandyke brown, Paynes gray, white, light red and lamp black. The majority of the airframe received a changing mix of raw umber, Vandyke brown and light red. Only a little light red as it's a rather potent colour and my beast shouldn't look like it's based out of DaNang. The closer I got to the engine the more I mixed Paynes gray and finally black into the panel mix. This should represent oil and other engine grime that slowly makes it's way out. Which it certainly will, especially when powered by a radial that's maintained under difficult frontline conditions. To help bring out detail on areas painted black I used a combination of Paynes gray and white. This let's the detail be seen while still making the panel line look sufficiently dirty.
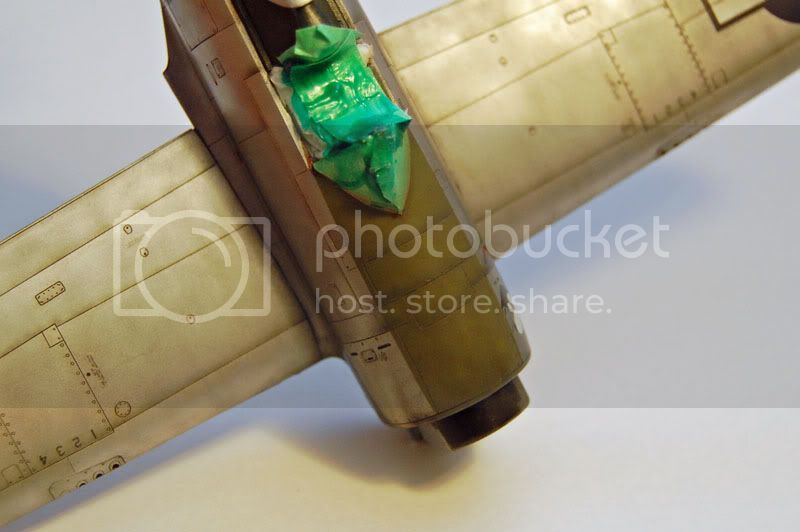
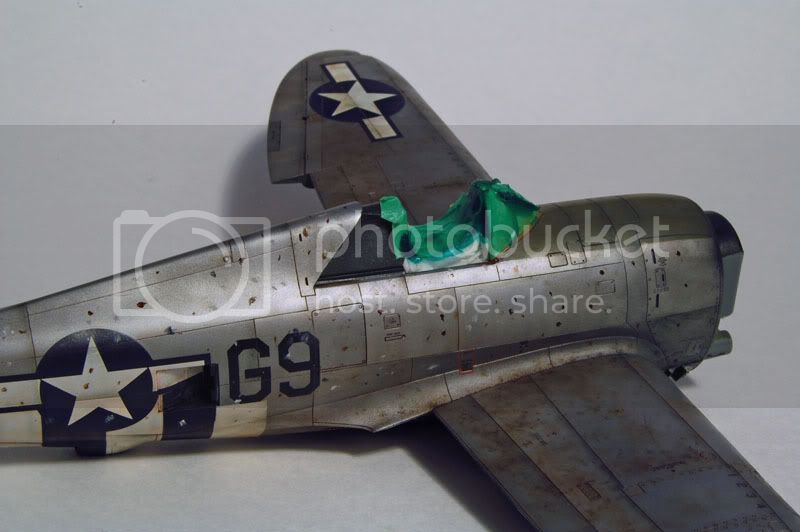
This didn't go without incident however. While using a soft cloth to remove excess oil paint I must have pressed to hard as I managed to inflict some light scratches on the right wing. Follow the red arrow.
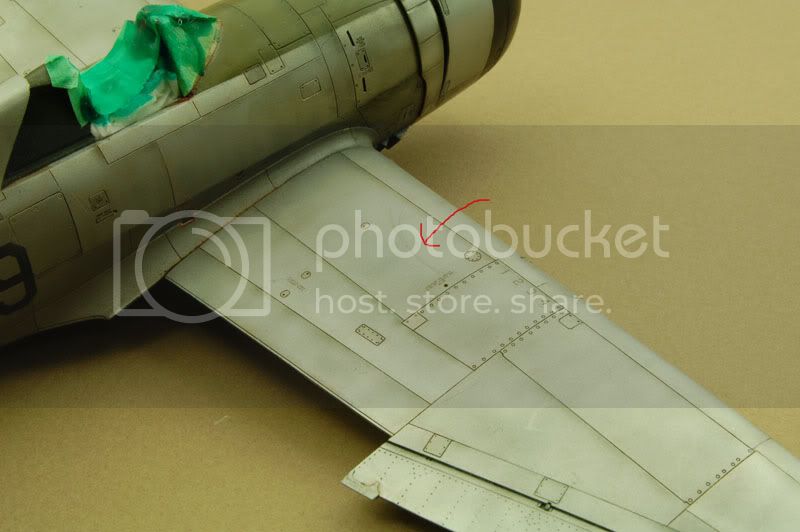
After much deliberation (loud cursing) I came to the conclusion that if I repainted the wing panel it could never match the others. I suppose I could have gone for the replacement part routine but I just didn't think it would look convincing. The scratches aren't overly obvious (nor all that subtle) so I'm just gonna leave it be and move on. That wing is gonna get awfully dirty soon so that should help hide it. Maybe it'll just look like a scratch I intended to add. Ya. That's it.
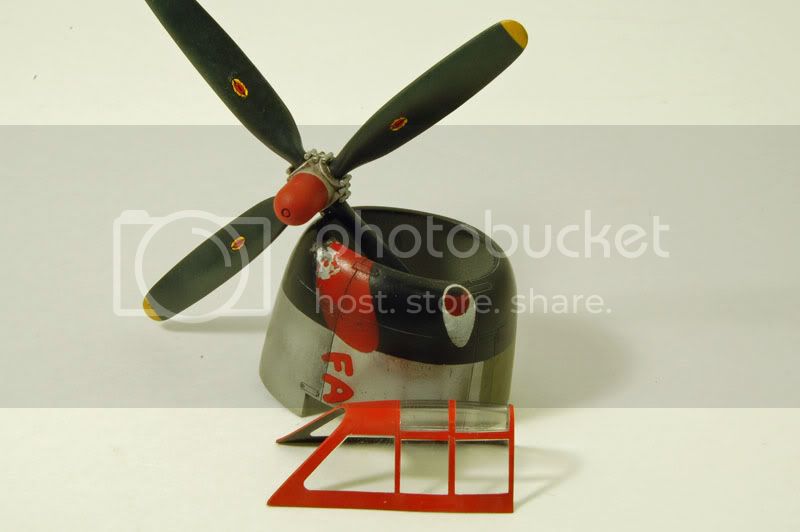
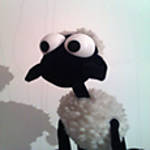
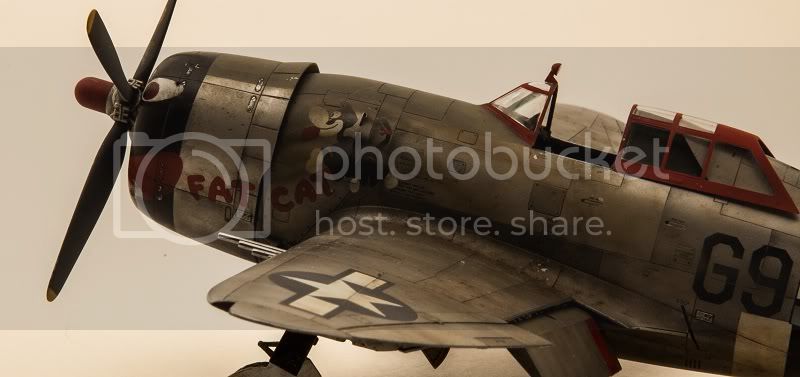
Well here's the cowl. The damaged paint was trickier than I thought it would be. After my first attempt I repainted the cowl so it looked like new. Gave it a fresh coat of Polly Scale satin (which has been working great so far) and started to re mask the damaged area. I used a fine sponge to apply the liquid mask. This helped give me an irregular chipped look. The panel was sprayed light silver and the masking removed. Hey not bad. Except that some of the clear coat came off with the mask. Loud cursing ensues. Since I really like how the chipped paint came out this time I'm not about to paint over it again. So with sanding stick in hand I carefully sand the cowl where the clear coat so rudely came off. Now it's smooth but still looks like crap. To fix the sanded black paint I very slowly free hand Tamiya flat black through my Iwata Eclipse at the lowest air pressure I can with the thinnest paint I can. It works. And the little amount of overspray that did occur just looks like weathering. Too bad I stuck my thumb on the cowl after I unknowingly stuck my thumb in the same thinned black paint mix. Some quick scrubbing under running water (while cursing ) got rid of most of the unwanted black paint. What remained again looked like more weathering. Another happy mistake. So after all that here's the cowl. Note the small black marks on the bright silver panel. They look like little specks. That's what remains of my thumbprint.
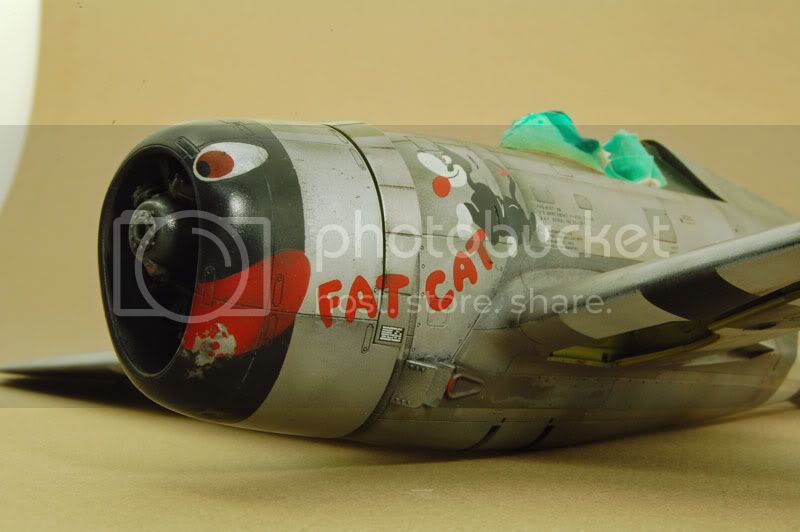
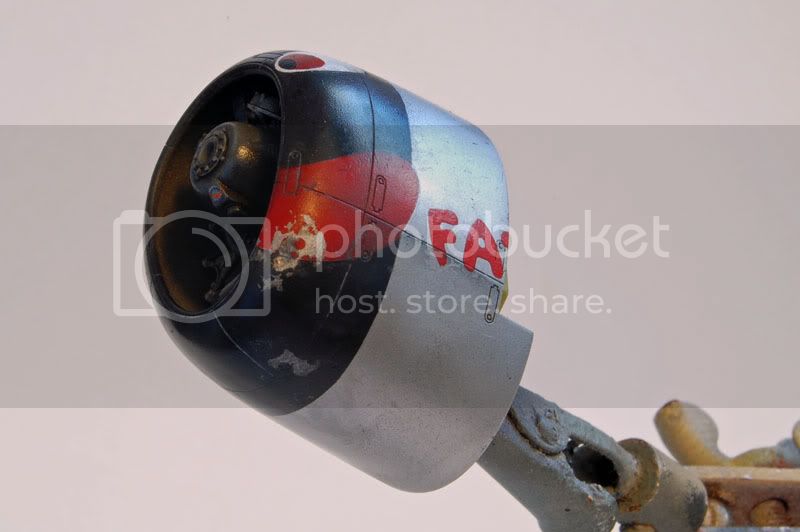
At another angle. Note the second paint chip on the bottom of the cowl. I did this because I sanded a little to much here and figured, why not one more chip?
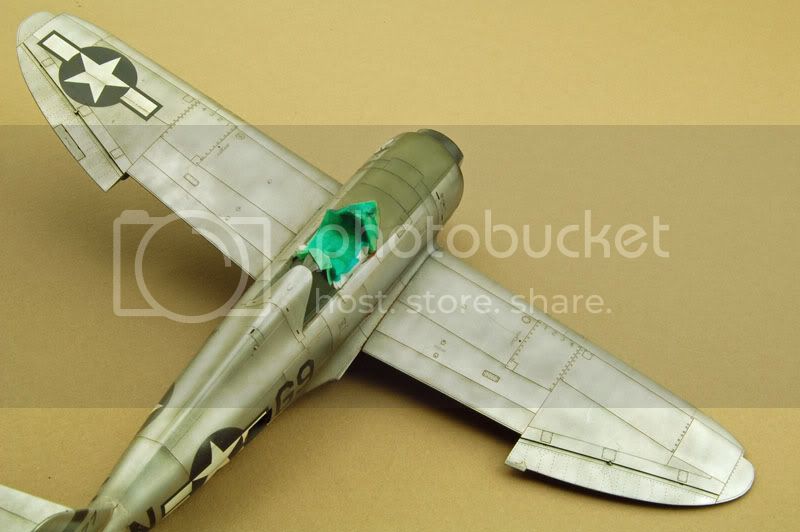
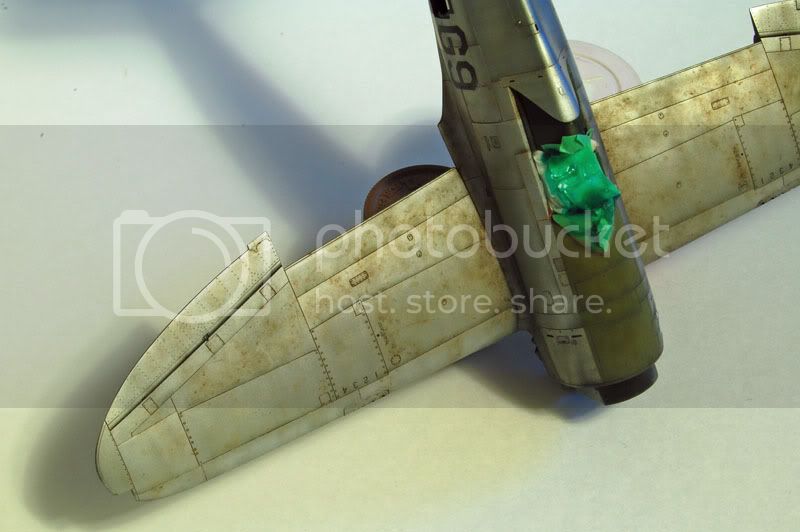
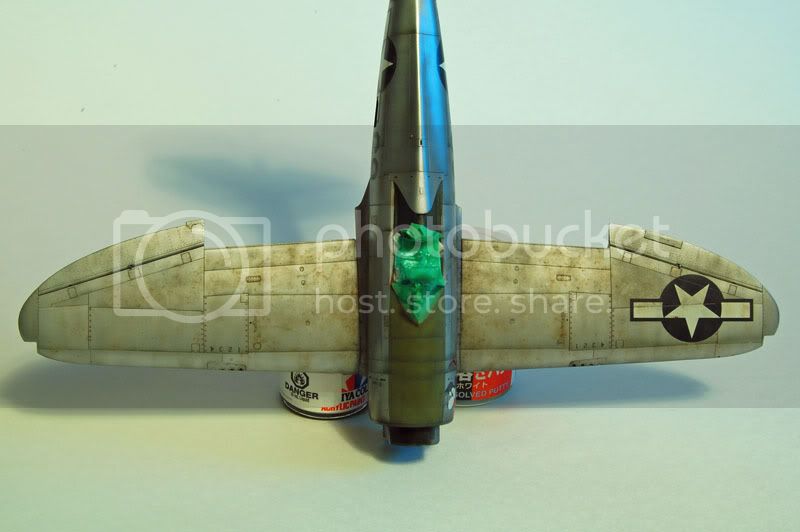
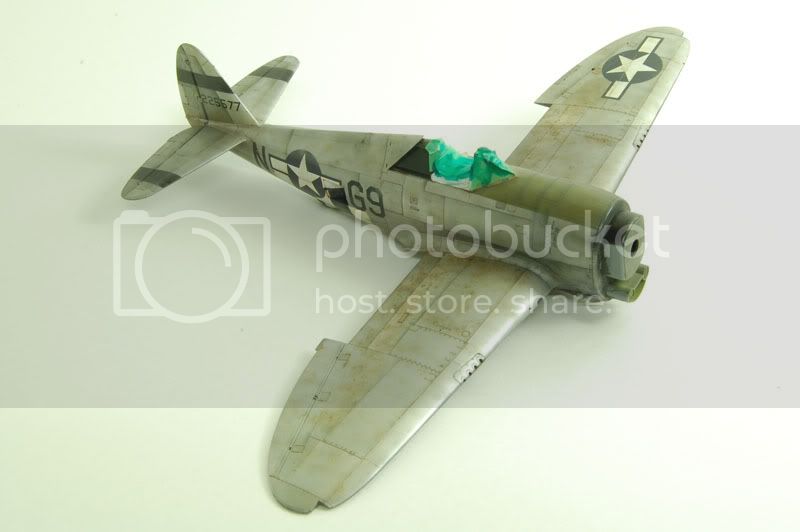
Now it's time to play with a technique I've seen used on both armour and aircraft. The "dot" filters. Now since I had never attempted this before I figured i would start where no one would ever see it. The undersides of the horizontal stabs. First the area was given a light coat of thinner. Then tiny dots of Paynes gray, white, raw umber and blue oils were added in a random fashion. Then using a wide brush that had been dipped in thinner I wiped across the surface in the direction of the airflow. Well the filters dissapeared and I was less then happy. The only colour that remained was blue. This colour was no longer used as it is simply too strong. Even in tiny amounts. Maybe it would work on a darker colour, but not over bare aluminum. Unless you were trying to replicate heat staining say, on a P-51.
So again the dots went on only this time no blue. And this time I decided to blend the colours in as if I was working on a figure. Using a small stiff brush I dabbed and rotated the brush against the oil paint. This made the paint slowly fade away. In a pleasingly controlled fashion to. Some streaking was done using a soft cloth and brush, only this time the bulk of the thinner was dabbed off. After my experiments I moved onto the undersides of the wings and fuselage.
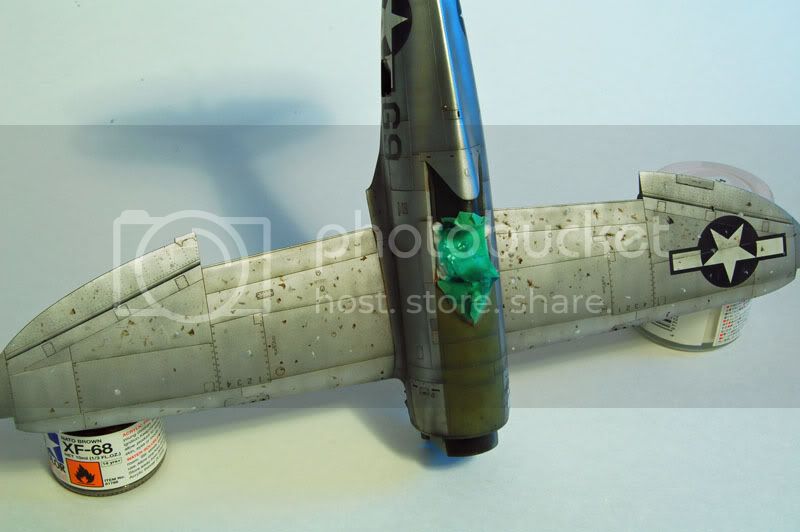
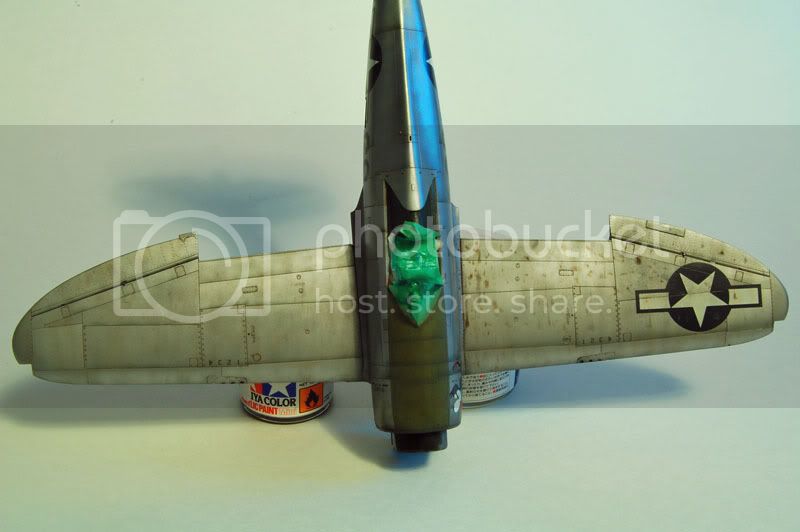
Here's how it turned out. Note the more pronounced dots used to represent splatter from the wet, muddy wheels over the invasion stripes.
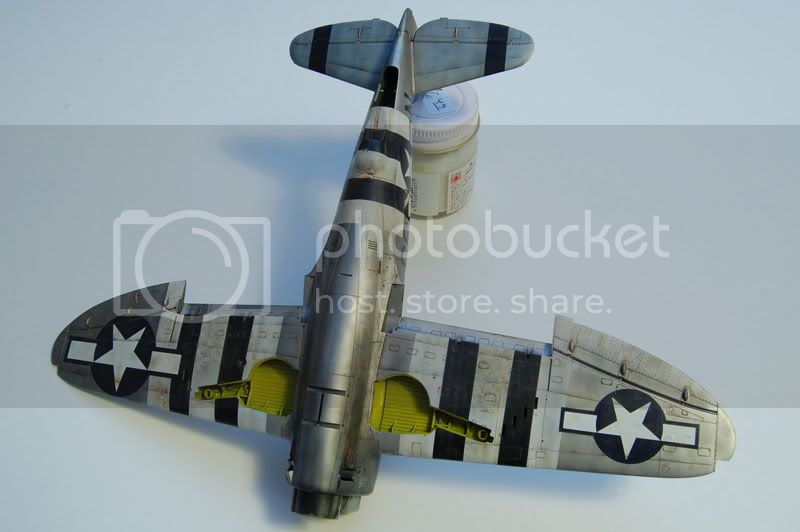
Can't forget the flaps.
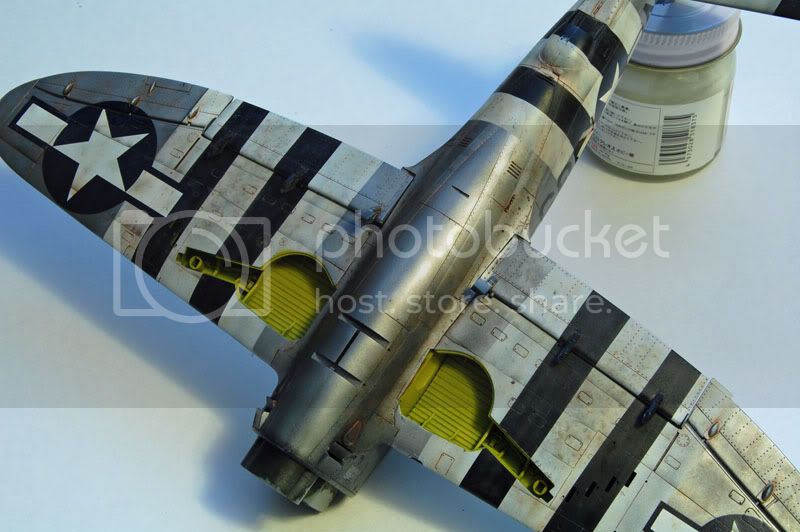
Oil dots were also used to represent oil splatter that came from the exhaust wastegate valve which then streaks along the underbelly. The wastegate should be painted a dirty red to match the real aircraft and this will be done later.
Intermission!!!!!!
Let's all go to the lobby....
Hello? Anybody there?
Ok so it's been a while since I've updated my blog. What can I say. It's just me being me. I build when I feel like it and if I don't. I don't. Anyway since my last update I finally finished messing around with the damaged/chipped paint on the lower cowl. Actually I did that probably a month ago now. But nothing else really till these past few days. finally got around to playing with my oils. And it's been fun. So how bout some pictures?
Well a few days ago I applied a panel wash using raw umber, Vandyke brown, Paynes gray, white, light red and lamp black. The majority of the airframe received a changing mix of raw umber, Vandyke brown and light red. Only a little light red as it's a rather potent colour and my beast shouldn't look like it's based out of DaNang. The closer I got to the engine the more I mixed Paynes gray and finally black into the panel mix. This should represent oil and other engine grime that slowly makes it's way out. Which it certainly will, especially when powered by a radial that's maintained under difficult frontline conditions. To help bring out detail on areas painted black I used a combination of Paynes gray and white. This let's the detail be seen while still making the panel line look sufficiently dirty.
This didn't go without incident however. While using a soft cloth to remove excess oil paint I must have pressed to hard as I managed to inflict some light scratches on the right wing. Follow the red arrow.
After much deliberation (loud cursing) I came to the conclusion that if I repainted the wing panel it could never match the others. I suppose I could have gone for the replacement part routine but I just didn't think it would look convincing. The scratches aren't overly obvious (nor all that subtle) so I'm just gonna leave it be and move on. That wing is gonna get awfully dirty soon so that should help hide it. Maybe it'll just look like a scratch I intended to add. Ya. That's it.
Well here's the cowl. The damaged paint was trickier than I thought it would be. After my first attempt I repainted the cowl so it looked like new. Gave it a fresh coat of Polly Scale satin (which has been working great so far) and started to re mask the damaged area. I used a fine sponge to apply the liquid mask. This helped give me an irregular chipped look. The panel was sprayed light silver and the masking removed. Hey not bad. Except that some of the clear coat came off with the mask. Loud cursing ensues. Since I really like how the chipped paint came out this time I'm not about to paint over it again. So with sanding stick in hand I carefully sand the cowl where the clear coat so rudely came off. Now it's smooth but still looks like crap. To fix the sanded black paint I very slowly free hand Tamiya flat black through my Iwata Eclipse at the lowest air pressure I can with the thinnest paint I can. It works. And the little amount of overspray that did occur just looks like weathering. Too bad I stuck my thumb on the cowl after I unknowingly stuck my thumb in the same thinned black paint mix. Some quick scrubbing under running water (while cursing
) got rid of most of the unwanted black paint. What remained again looked like more weathering. Another happy mistake. So after all that here's the cowl. Note the small black marks on the bright silver panel. They look like little specks. That's what remains of my thumbprint.At another angle. Note the second paint chip on the bottom of the cowl. I did this because I sanded a little to much here and figured, why not one more chip?
Now it's time to play with a technique I've seen used on both armour and aircraft. The "dot" filters. Now since I had never attempted this before I figured i would start where no one would ever see it. The undersides of the horizontal stabs. First the area was given a light coat of thinner. Then tiny dots of Paynes gray, white, raw umber and blue oils were added in a random fashion. Then using a wide brush that had been dipped in thinner I wiped across the surface in the direction of the airflow. Well the filters dissapeared and I was less then happy. The only colour that remained was blue. This colour was no longer used as it is simply too strong. Even in tiny amounts. Maybe it would work on a darker colour, but not over bare aluminum. Unless you were trying to replicate heat staining say, on a P-51.
So again the dots went on only this time no blue. And this time I decided to blend the colours in as if I was working on a figure. Using a small stiff brush I dabbed and rotated the brush against the oil paint. This made the paint slowly fade away. In a pleasingly controlled fashion to. Some streaking was done using a soft cloth and brush, only this time the bulk of the thinner was dabbed off. After my experiments I moved onto the undersides of the wings and fuselage.
Here's how it turned out. Note the more pronounced dots used to represent splatter from the wet, muddy wheels over the invasion stripes.
Can't forget the flaps.
Oil dots were also used to represent oil splatter that came from the exhaust wastegate valve which then streaks along the underbelly. The wastegate should be painted a dirty red to match the real aircraft and this will be done later.
Intermission!!!!!!
Let's all go to the lobby....
f1matt
Joined: August 13, 2006
KitMaker: 1,021 posts
AeroScale: 184 posts
Posted: Tuesday, March 17, 2009 - 10:19 PM UTC
Intermission OVER!!!!!!
Oh man it's late. Screw it. if I don't type this now I won't for two days. Lousy work. SO last time we covered the cowl damage. Panel lines. Starting the dot method. Although I like to call them "spot filters" as it feels more accurate and makes me sound like a big shot.
Oh yeah. Even before I did the panel wash I free handed some more Alclad over the aircraft. Even a little over a couple markings. Just to help blend in the panel shading a bit.
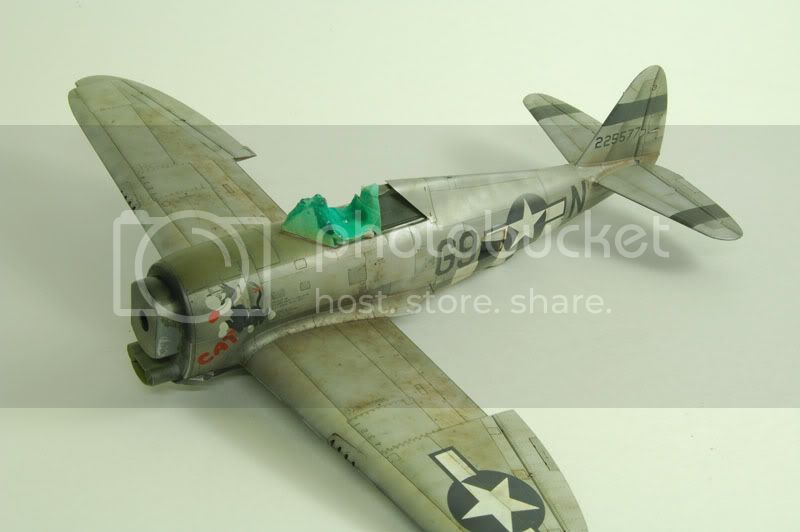
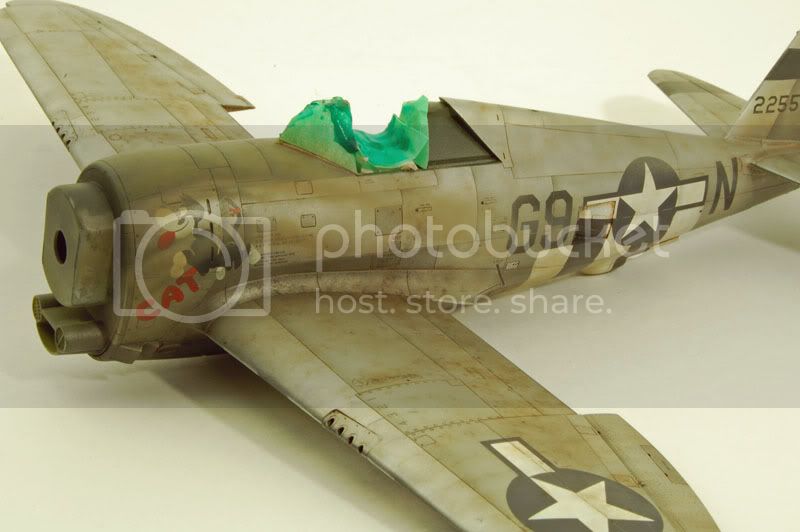
So back to business. On top the olive drab panel (on the cowl, cowl flaps and of course in front of the windscreen) received the "spot filters". Or how about "micro modulation"? Whatever. The colours used on the O.D. were cadmium yellow, permanent green light, raw umber, Paynes gray and white. These colours were streaked back with a wide brush in the direction of the airflow. but I only did that in one pass. After that I just took my short brush and dabbed and turned it to blend the paint.
One thing I didn't mention is that so far each area received multiple layers of filters. Three or four minimum. But this really depends on what look you're going for. I want a realistically filthy bird. One that's clearly been operating in adverse weather for some time at a forward air base. You taxi or land a plane through wet muck, walk on a plane after it's parked in wet muck, it's gonna get dirty. Fast.
Here is the wing after the first dots have gone on.
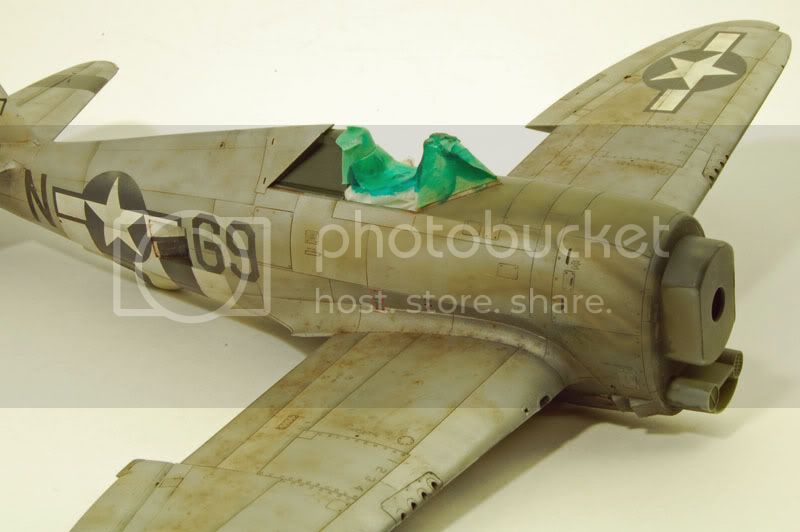
At first I'm just trying to add some variety to the finish. Here's the wing after the left side has been blended. The right side is in the early stages of blending.
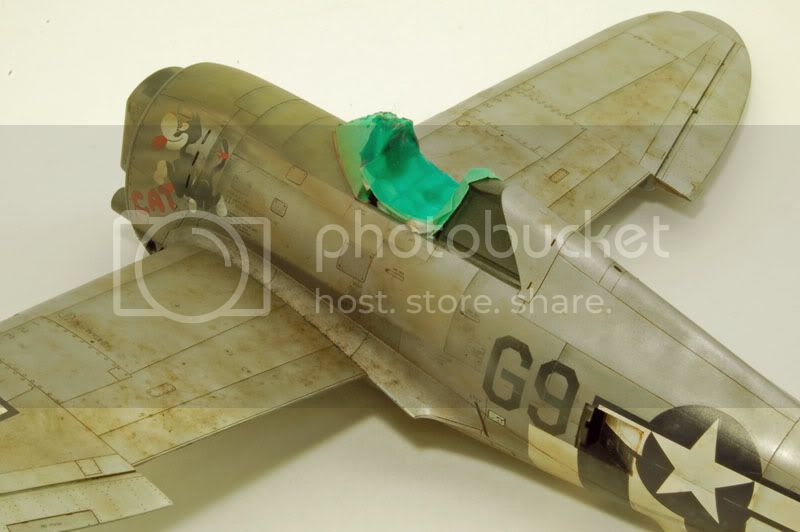
Now to add some mud/dirt and scuff marks from the crew. I tried to think about where the crew would walk. Near the cockpit and along the root for maintenance. And near the fuel and ammo panels.
After blending and about three more layers of oils this is how the wing looks now. I tried to add a few random dots as well. Also the dots are applied in different sizes too. Mostly small. Some tiny and still while others were relatively large. I really like how it turned out. It looks like a mess, but in a good way.

Yup. I think that's almost exactly the look I was after. You may be thinking that it isn't exactly symmetrical on both sides and that's true. But I think that only makes it more realistic. It was a long time coming but I think I want to get this one done now. For real. After all I've got a Staghound vignette that's begging for some attention.
Matt
Oh man it's late. Screw it. if I don't type this now I won't for two days. Lousy work. SO last time we covered the cowl damage. Panel lines. Starting the dot method. Although I like to call them "spot filters" as it feels more accurate and makes me sound like a big shot.
Oh yeah. Even before I did the panel wash I free handed some more Alclad over the aircraft. Even a little over a couple markings. Just to help blend in the panel shading a bit.
So back to business. On top the olive drab panel (on the cowl, cowl flaps and of course in front of the windscreen) received the "spot filters". Or how about "micro modulation"? Whatever. The colours used on the O.D. were cadmium yellow, permanent green light, raw umber, Paynes gray and white. These colours were streaked back with a wide brush in the direction of the airflow. but I only did that in one pass. After that I just took my short brush and dabbed and turned it to blend the paint.
One thing I didn't mention is that so far each area received multiple layers of filters. Three or four minimum. But this really depends on what look you're going for. I want a realistically filthy bird. One that's clearly been operating in adverse weather for some time at a forward air base. You taxi or land a plane through wet muck, walk on a plane after it's parked in wet muck, it's gonna get dirty. Fast.
Here is the wing after the first dots have gone on.
At first I'm just trying to add some variety to the finish. Here's the wing after the left side has been blended. The right side is in the early stages of blending.
Now to add some mud/dirt and scuff marks from the crew. I tried to think about where the crew would walk. Near the cockpit and along the root for maintenance. And near the fuel and ammo panels.
After blending and about three more layers of oils this is how the wing looks now. I tried to add a few random dots as well. Also the dots are applied in different sizes too. Mostly small. Some tiny and still while others were relatively large. I really like how it turned out. It looks like a mess, but in a good way.
Yup. I think that's almost exactly the look I was after. You may be thinking that it isn't exactly symmetrical on both sides and that's true. But I think that only makes it more realistic. It was a long time coming but I think I want to get this one done now. For real. After all I've got a Staghound vignette that's begging for some attention.
Matt
warlock0322
Joined: January 13, 2003
KitMaker: 1,036 posts
AeroScale: 286 posts

Posted: Saturday, March 21, 2009 - 02:47 AM UTC
Dang Matt that is one Gem of a Bolt. The weathering looks outstanding.
Cannot wait to see more of this one
Paul
Cannot wait to see more of this one
Paul


Nito74

Joined: March 04, 2008
KitMaker: 5,386 posts
AeroScale: 635 posts
Posted: Saturday, March 21, 2009 - 10:26 AM UTC
Just checked this build log... it's an amazing piece of work !!!
Great photos of the whole build, amazing painting skills
Great photos of the whole build, amazing painting skills

sweaver
Joined: April 19, 2007
KitMaker: 759 posts
AeroScale: 184 posts
Posted: Saturday, March 21, 2009 - 11:48 AM UTC
It's good to see you working on this one again, Matt. This is definitely the best NMF paint and weathering job I have ever seen.
How about a feature article when you're done? Your posts are so detailed that you could just pull them all together, do a little editing for continuity, and you'd be done. A build like this deserves a permanent home.
I too hope to see this one finished soon. Keep it up.
How about a feature article when you're done? Your posts are so detailed that you could just pull them all together, do a little editing for continuity, and you'd be done. A build like this deserves a permanent home.
I too hope to see this one finished soon. Keep it up.
f1matt
Joined: August 13, 2006
KitMaker: 1,021 posts
AeroScale: 184 posts
Posted: Friday, March 27, 2009 - 08:55 PM UTC
Many thanks guys. Always makes the job easier when you have all this positive support. I'll have an update soon. Quite a bit of work has been done since the last update. Only the last few pieces need to be painted, weathered and installed now. This thing should be all wrapped up shortly after the weekend. I will be building a base but that won't begin for probably a week or two. Some rather important pieces are coming by mail. Photo-etch perforated steel planking (psp) and Tamiya's lovely little Jeep. Sorry. 1/4 ton truck.
A feature Sam? I wouldn't bet against it.
Pics soon
Matt
A feature Sam? I wouldn't bet against it.
Pics soon
Matt
f1matt
Joined: August 13, 2006
KitMaker: 1,021 posts
AeroScale: 184 posts
Posted: Sunday, March 29, 2009 - 08:41 PM UTC
I've fallen behind with my blog a little. Time to get you guys and gals up to speed.
This certainly is my best aircraft ever. Although for a while earlier today ( I actually wrote this several days ago) I was afraid I had ruined it. But I'll get to that later.
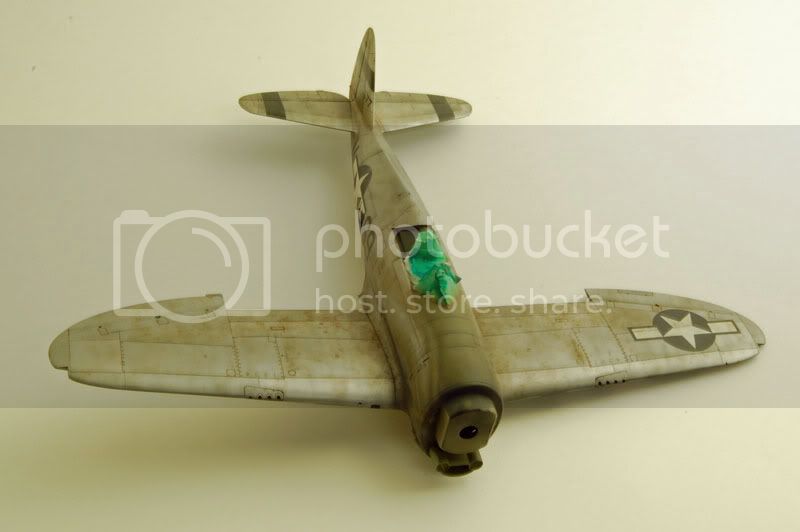
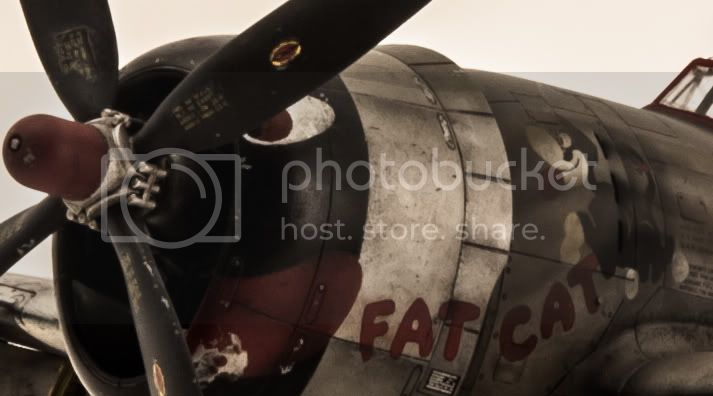
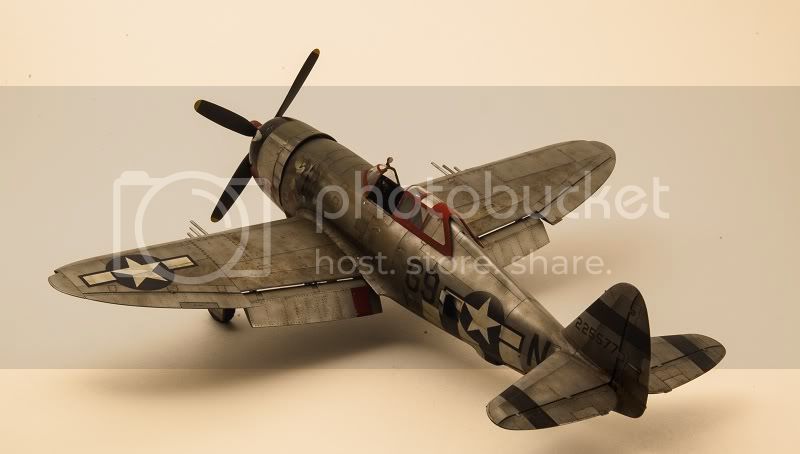
Friday (correction, last Friday) was spent adding more dot filters, only this time to the fuselage and tail.
And here she is after blending.
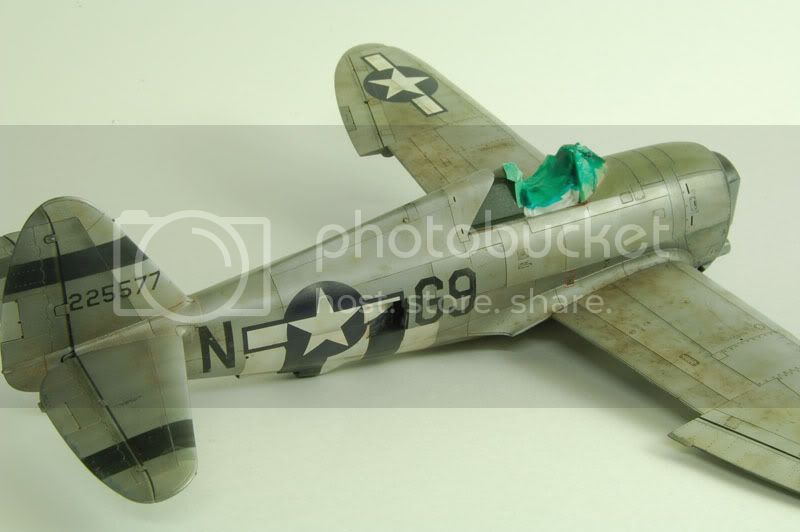
I think this helps to add a little more interest to the fuselage. Especially along the spine which was kinda dull. These dots were blended until almost nothing was left. Although a few dots were left to stand out a little more. But only a few. And even these were blended more then my muddy wings.
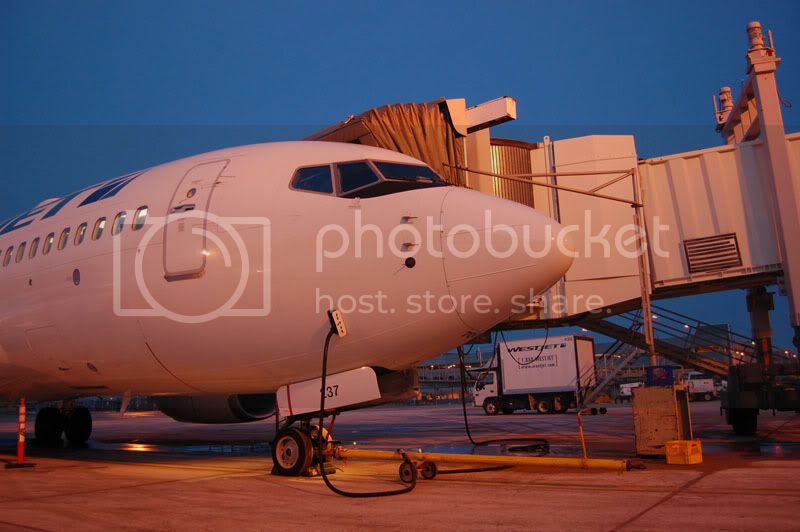
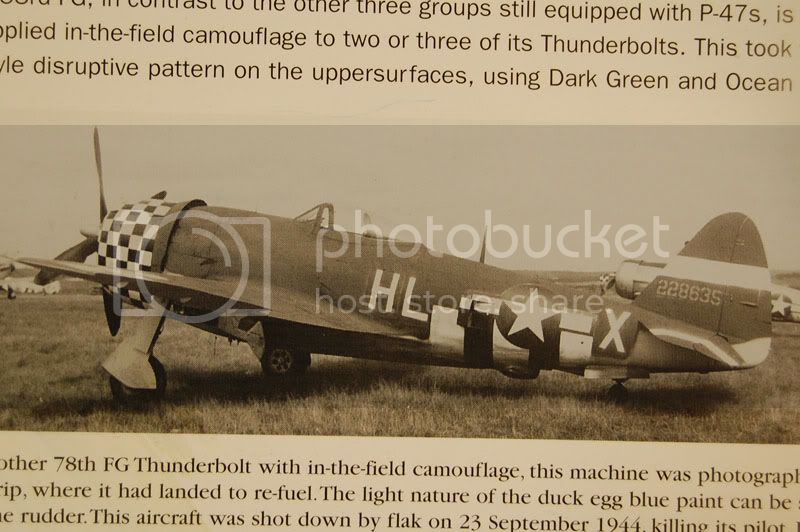
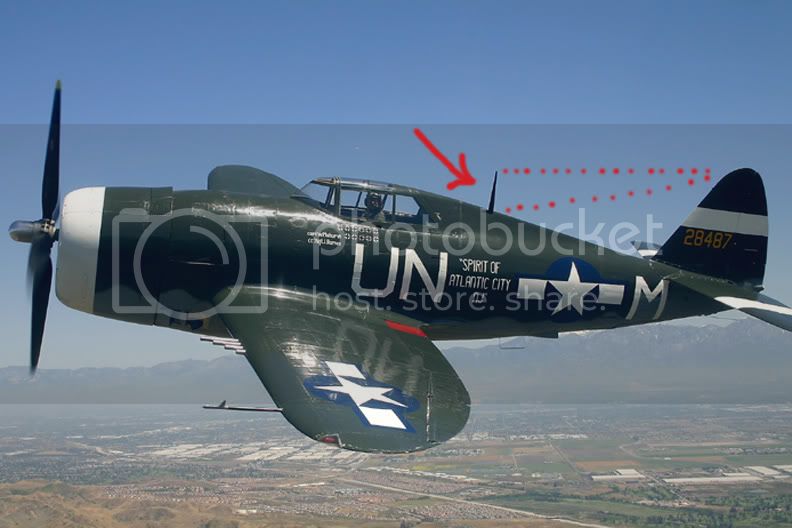
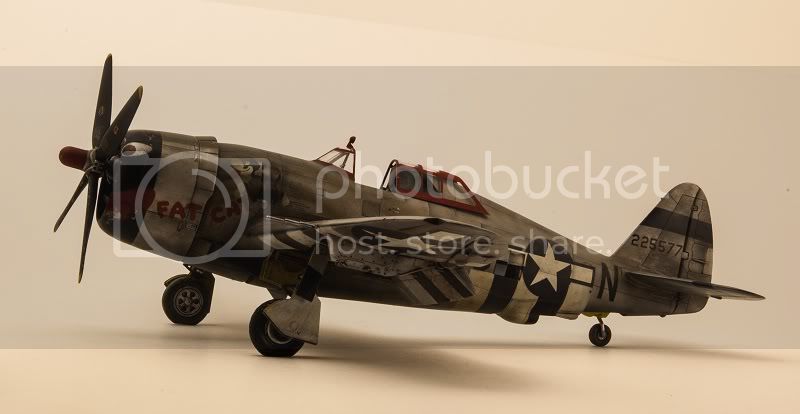
So now we come to the work I did Sunday (yes, last Sunday). I wasn't sure what to do. Leave the weathering basically as is. Or should I keep going and risk overdoing it? I had been pondering this all weekend actually. One aspect of weathering the P-47 that peaked my interest was the thought of adding wide bands of browny-black, streaking back from behind the cowl. Now this doesn't appear to be the norm with p-47's but I have seen a few pictures of Jugs displaying this feature. I figured this would look really cool...if I could pull it off. Here are some pictures that inspired me.
It's quite subtle here but you can still make out these light coloured streaks from behind the engine. My guess is it's oil residue that leaks out and gets taken for a ride by the wind.
Here's a colour photo showing more oily residue. It's interesting because the oil on top looks blue and the crap near the bottom looks brown.
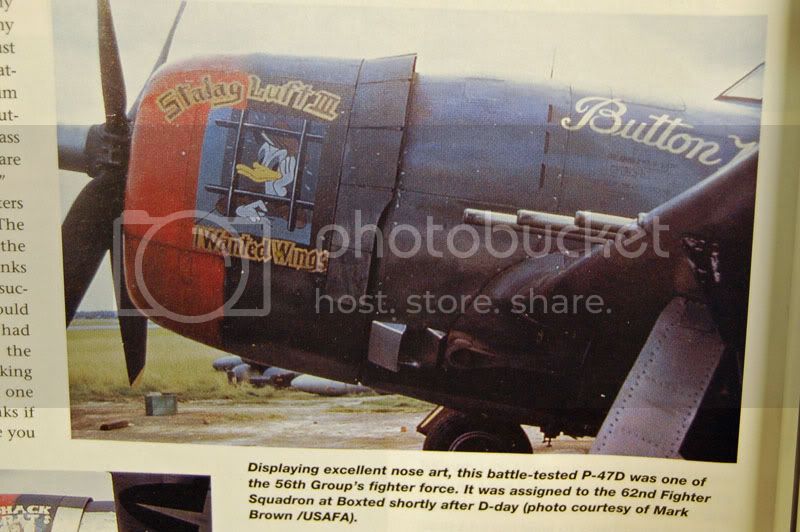
My other colour photos (that show some streaking) indicate it is more often brown, buff, or almost black coloured. The patterns also vary. I wonder if it changes colours because of the heat?
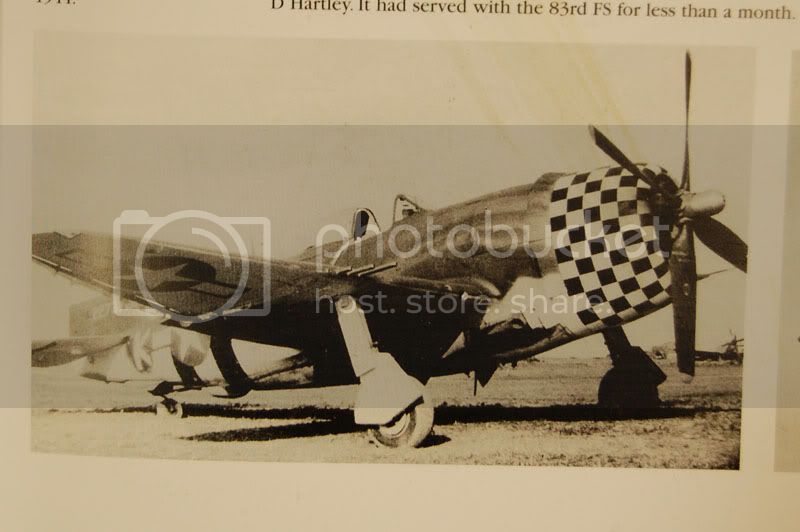
This next picture shows the light streaks very well.
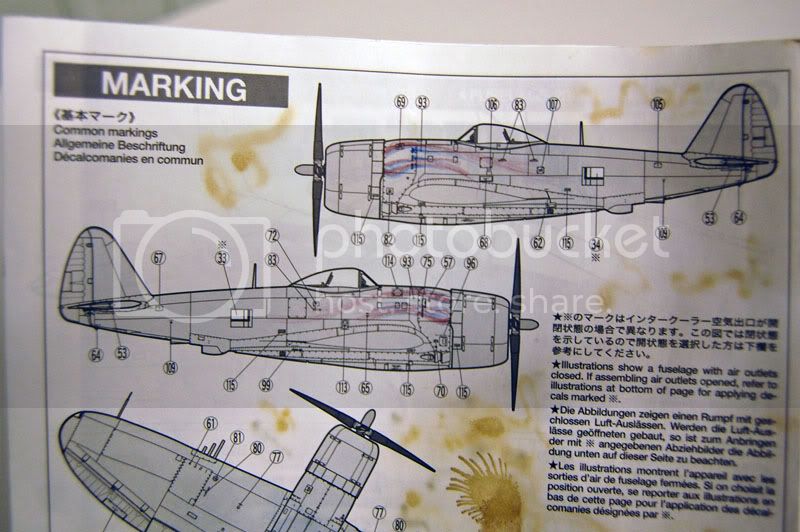
After looking at these and other references I drew a guide to make painting easier. The red indicates brown areas and the blue is for darker colours. This is the pattern I will try to follow.
My main concern was not applying the paint too thick as this could completely cover the wonderful nose art. I wanted to use my airbrush but I had never done such intricate work before. Several hours on Saturday and Sunday (a week ago) were used as practice sessions. Painting on scrap models, pieces of paper, even my hand. I wasn't getting the control I required so my Iwata Eclipse was stripped down and given a thorough cleaning. This was a big help. Now she worked nice and smooth.
I was still rather tense. Here I go. About to completely bugger up my best model to date. It was just fine but noooooo. I wanted more weathering. If it wasn't for the compressor and ventilation fan you could have heard a pin drop. I was terrified.
The paint I used was Tamiya and Aircraft Colours Acrylic. I think this is the same stuff as the old Aeromaster brand of paint. They were thinned very heavily with Tamiya's own thinner. Something like 30% paint to 70% thinner. This would let me add the colour at a very controlled pace. By controlled I mean s..l..o..w..l..y. That way if I made a mistake it wouldn't be as obvious. Spraying the right side (non nose art side) was relatively easy as the wing did not get in the way too much. But to spray the side with the nose art meant I had to turn the model upside down to keep the wing from impeding my work. You know because it wasn't tricky enough already.
So the first colour to go on was Aircraft Colours 6110 Dk. Earth. I started at the nose and worked back across the fuselage. The initial work was done in short strokes, VERY close to the model. Less than a cm away. These would define the tighter darker stripes. Air pressure was just under 20psi. Since the paint was so extremely thin it took a while before anything was visible. once the base colour had paved the way, some highlights were sprayed on with Tamiya Buff. A mix of Tamiya NATO Black and Aircraft Colours 2031 RLM 81 Braunviolett were used for darker streaks. As the streaks got farther from the front I sprayed the model from farther away. This made the weathering wider and softer. I must have made over a hundred passes with my AB once it was done.
While adding the weathering to the sides I also added a few streaks on the top. These were very small and just helped to blend the olive drab further. The dark mix I used on the sides was also sprayed right around the front few millimeters of the model. Enough with all this chatter. Time for some pics so you guys can see how it turned out. So disaster or success? What do you think?


Uh oh. All that screaming can't be good.
I want to do some more tweaking. The nose art side could use a little more definition. While the opposite side could probably be softened up a little. Now that I've gotten the feel for it I should be able to touch it up fairly easily.
That was scarier than applying the Alclad! But I think (hope) it looks alright. One area I do like is the anti-glare panel. While painting my side stripes I used my uber thin paints to help soften the olive drab. After my last round of oil dots on that area I still wasn't quite satisfied. But this last step finally got the look I was after. That anti-glare panel must have taken about 30 layers of paint to get to where I like it. Counting all the colours used and multiple painting sessions, that's probably fairly accurate. I like to make my modeling life difficult.
Last pics for now. I almost forgot that while painting the bands of brown along the side I also added some subtle streaks along the wing, horizontal and vertical stabs. These were sprayed following the direction of the airflow and sprayed very close to the model to keep the streaks thin.
Well another update done (finally). Another step closer to the finish line.
Matt
This certainly is my best aircraft ever. Although for a while earlier today ( I actually wrote this several days ago) I was afraid I had ruined it.
But I'll get to that later. Friday (correction, last Friday) was spent adding more dot filters, only this time to the fuselage and tail.
And here she is after blending.
I think this helps to add a little more interest to the fuselage. Especially along the spine which was kinda dull. These dots were blended until almost nothing was left. Although a few dots were left to stand out a little more. But only a few. And even these were blended more then my muddy wings.
So now we come to the work I did Sunday (yes, last Sunday). I wasn't sure what to do. Leave the weathering basically as is. Or should I keep going and risk overdoing it? I had been pondering this all weekend actually. One aspect of weathering the P-47 that peaked my interest was the thought of adding wide bands of browny-black, streaking back from behind the cowl. Now this doesn't appear to be the norm with p-47's but I have seen a few pictures of Jugs displaying this feature. I figured this would look really cool...if I could pull it off. Here are some pictures that inspired me.
It's quite subtle here but you can still make out these light coloured streaks from behind the engine. My guess is it's oil residue that leaks out and gets taken for a ride by the wind.
Here's a colour photo showing more oily residue. It's interesting because the oil on top looks blue and the crap near the bottom looks brown.
My other colour photos (that show some streaking) indicate it is more often brown, buff, or almost black coloured. The patterns also vary. I wonder if it changes colours because of the heat?
This next picture shows the light streaks very well.
After looking at these and other references I drew a guide to make painting easier. The red indicates brown areas and the blue is for darker colours. This is the pattern I will try to follow.
My main concern was not applying the paint too thick as this could completely cover the wonderful nose art. I wanted to use my airbrush but I had never done such intricate work before. Several hours on Saturday and Sunday (a week ago) were used as practice sessions. Painting on scrap models, pieces of paper, even my hand. I wasn't getting the control I required so my Iwata Eclipse was stripped down and given a thorough cleaning. This was a big help. Now she worked nice and smooth.
I was still rather tense. Here I go. About to completely bugger up my best model to date. It was just fine but noooooo. I wanted more weathering. If it wasn't for the compressor and ventilation fan you could have heard a pin drop. I was terrified.
The paint I used was Tamiya and Aircraft Colours Acrylic. I think this is the same stuff as the old Aeromaster brand of paint. They were thinned very heavily with Tamiya's own thinner. Something like 30% paint to 70% thinner. This would let me add the colour at a very controlled pace. By controlled I mean s..l..o..w..l..y. That way if I made a mistake it wouldn't be as obvious. Spraying the right side (non nose art side) was relatively easy as the wing did not get in the way too much. But to spray the side with the nose art meant I had to turn the model upside down to keep the wing from impeding my work. You know because it wasn't tricky enough already.
So the first colour to go on was Aircraft Colours 6110 Dk. Earth. I started at the nose and worked back across the fuselage. The initial work was done in short strokes, VERY close to the model. Less than a cm away. These would define the tighter darker stripes. Air pressure was just under 20psi. Since the paint was so extremely thin it took a while before anything was visible. once the base colour had paved the way, some highlights were sprayed on with Tamiya Buff. A mix of Tamiya NATO Black and Aircraft Colours 2031 RLM 81 Braunviolett were used for darker streaks. As the streaks got farther from the front I sprayed the model from farther away. This made the weathering wider and softer. I must have made over a hundred passes with my AB once it was done.
While adding the weathering to the sides I also added a few streaks on the top. These were very small and just helped to blend the olive drab further. The dark mix I used on the sides was also sprayed right around the front few millimeters of the model. Enough with all this chatter. Time for some pics so you guys can see how it turned out. So disaster or success? What do you think?
Uh oh. All that screaming can't be good.
I want to do some more tweaking. The nose art side could use a little more definition. While the opposite side could probably be softened up a little. Now that I've gotten the feel for it I should be able to touch it up fairly easily.
That was scarier than applying the Alclad! But I think (hope) it looks alright. One area I do like is the anti-glare panel. While painting my side stripes I used my uber thin paints to help soften the olive drab. After my last round of oil dots on that area I still wasn't quite satisfied. But this last step finally got the look I was after. That anti-glare panel must have taken about 30 layers of paint to get to where I like it. Counting all the colours used and multiple painting sessions, that's probably fairly accurate. I like to make my modeling life difficult.
Last pics for now. I almost forgot that while painting the bands of brown along the side I also added some subtle streaks along the wing, horizontal and vertical stabs. These were sprayed following the direction of the airflow and sprayed very close to the model to keep the streaks thin.
Well another update done (finally). Another step closer to the finish line.
Matt
f1matt
Joined: August 13, 2006
KitMaker: 1,021 posts
AeroScale: 184 posts
Posted: Sunday, March 29, 2009 - 09:02 PM UTC
Okay so that's what happened last weekend. Now here's what went on during this past week.
(I would have posted this when I first typed it but that was after a long day of building/painting and it was already very very late. So after typing this whole thing at around 4am for a different blog I just didn't have the juice to stay up a little bit longer and update my blog here. Anyway, enough moaning here's the latest.)
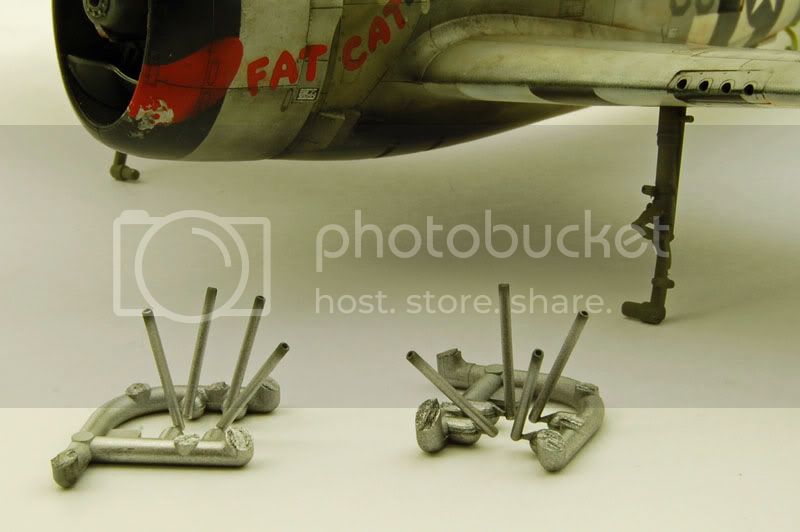
The colour photo I posted in the last update showed some subtle cordite stains on the tips of the barrels. To replicate this I just sprayed a tiny amount of Tamiya flat black near the edges.
Landing gear struts?! I'll get to that later.
I've done a lot of spraying/tweaking/sanding/priming/more spraying these last few days. Even some assembly. I think I see the light at the end of the tunnel. And it's been a long damn tunnel. Especially for what was intended to be a "quick build".
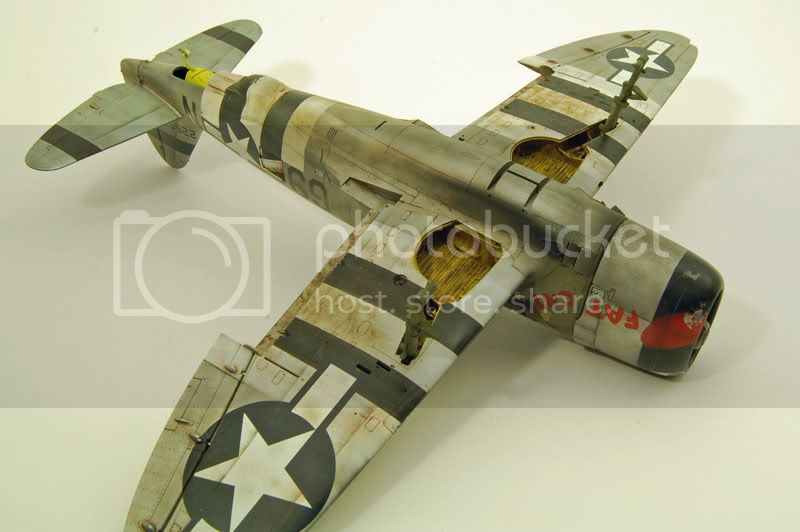
Almost every part has had some paint work done. Believe it or not even more oil filters. On the cowl, cowl flaps, windscreen, propeller, canopy and main flaps. I added more mud effects to the wing flaps with thinned burnt umber that was dabbed on. This gives the look of wet mud that's been splattered on by the wheels.
What's that? A nearly complete Jug in the background? Just hold your horses.
Oh yeah. I wasn't satisfied with the red. The red on the cowl (tongue), windscreen, canopy and propeller boss. They didn't quite match and were a little dull and monotone compared to the rest of the model. So out came several bottles of red paint along with paints to weather and shade the mix like white, brown and NATO black. And that was AFTER I gave those three parts the "oil dot" treatment.
Yeah I can get a little picky with my models these days.
It doesn't show well in the photo, but I sprayed about 5 more layers of red paint. Each a slightly different shade and applied in a random, splotchy pattern (which if done right doesn't resemble a pattern at all). In person you can see very subtle shifts in colour over the red areas. No masking was done. It was all free hand with very thin paint, low pressure and sprayed extremely close to the parts surface. I love my Iwata!
The wheels wells were dirtied up with a thick wash of brown and black oils. The wide oily brown streaks down the fuselage were touched up. A little more and they'll be done. While I had my thin brown paint mix in my spray gun I dusted a light layer of paint over the O.D. parts of the cowl and cowl flaps to flatten them out a bit. Just as I had done on the fuselage portion of the olive drab.
One thing I'm paying more attention too is the surface finish of each area. By that I mean how glossy or matte an area looks. I used to just spray an even coat of matte (or flat) clear over the whole model and call it done. Not anymore. I've been inspired by the work of Rick Lalwer and others to add more interest and variation into my models. On a real airplane (or tank) not everything is all flat or all glossy, but rather a wide range of finishes. Flat paint on the original aircraft slowly develops a subtle sheen caused by either weathering, maintenance or just a leaky engine. And likewise gloss paints can lose their shine over time for the same reasons. This is why I love working with oils. When you put them on they give the surface a shiny look. But the more you work them, the more they flatten out. Now by altering how much you work the oils you can have a panel that changes from satin to flat to gloss in a small area.
Busy busy. And this doesn't include my oil paints.
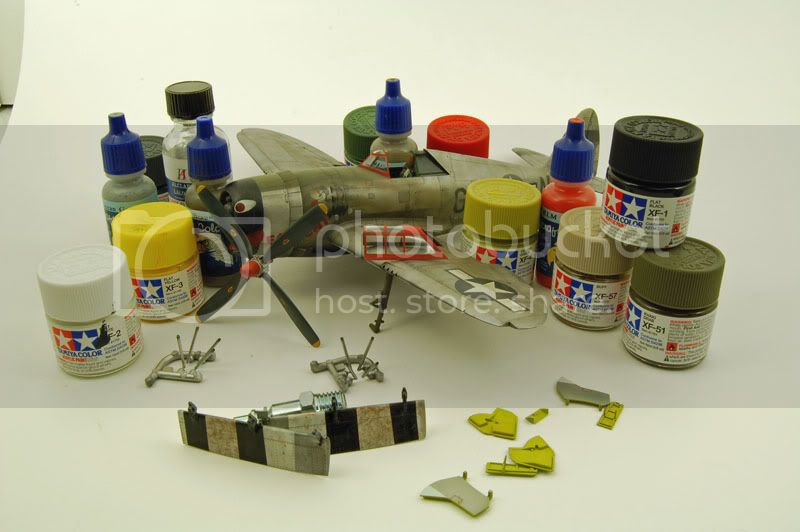
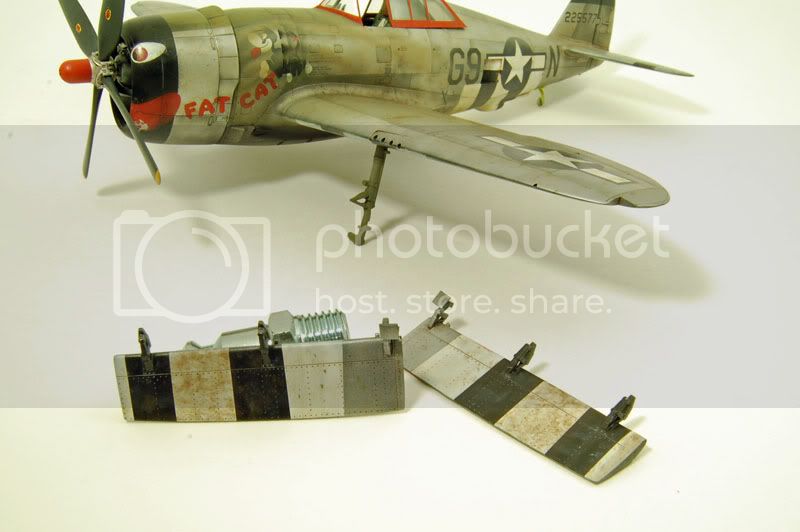
Ah yes. I painted the main gear struts a few shades of olive drab. Then I figured why not dry fit them for now. I won't glue them on till later otherwise they'll just get broken off. I can guarantee that. Same with the pitot tube and gun barrels.
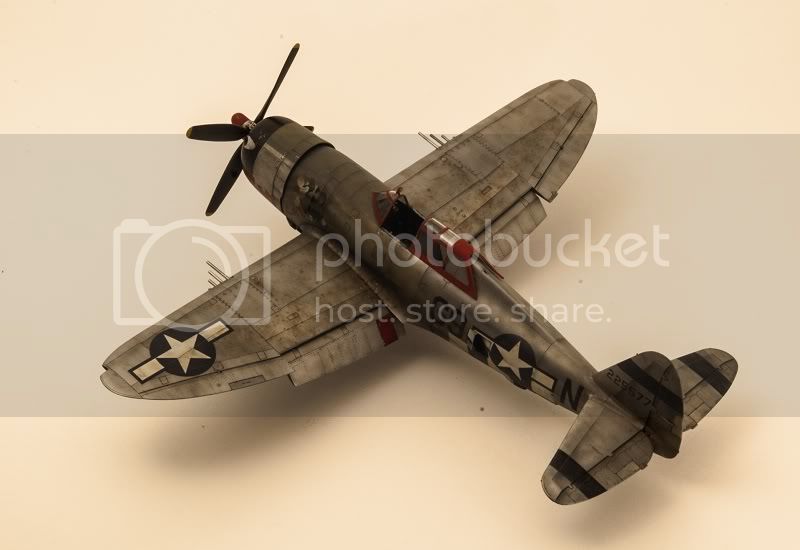
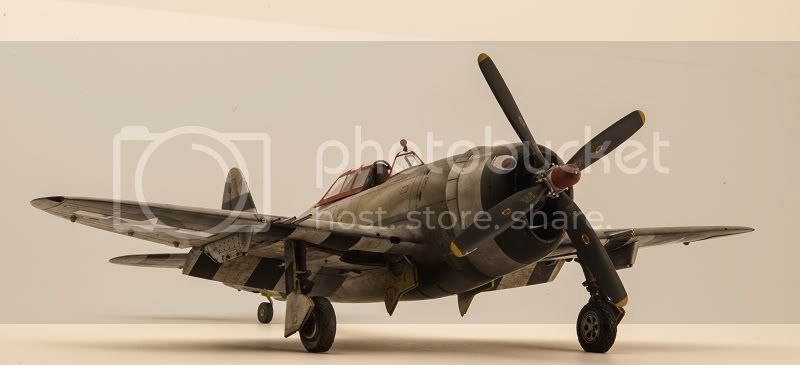
We have lift off. The engine, cowl and cowl flap sub assembly have been glued to the fuselage.
Ah what the heck. Let's get a better idea of what she'll look like.
Here's the exhaust. Nice and dirty now.
So that's it for now. The to-do list is getting shorter and the plane is getting bigger. Now I can start thinking about a base. Perhaps with a Jeep and a mechanic? (well you already know the answer to this question)
Oh and I just love my new camera. My Canon Powershot was good, but man My Nikon D40 just loves taking pictures of models. I still need to get some better bulbs though. These are way too yellow.
So now everybody is finally and completely up to date. Seriously. At least it's only 3am this time.
Matt
(I would have posted this when I first typed it but that was after a long day of building/painting and it was already very very late. So after typing this whole thing at around 4am for a different blog I just didn't have the juice to stay up a little bit longer and update my blog here. Anyway, enough moaning here's the latest.)
The colour photo I posted in the last update showed some subtle cordite stains on the tips of the barrels. To replicate this I just sprayed a tiny amount of Tamiya flat black near the edges.
Landing gear struts?! I'll get to that later.
I've done a lot of spraying/tweaking/sanding/priming/more spraying these last few days. Even some assembly. I think I see the light at the end of the tunnel. And it's been a long damn tunnel. Especially for what was intended to be a "quick build".
Almost every part has had some paint work done. Believe it or not even more oil filters. On the cowl, cowl flaps, windscreen, propeller, canopy and main flaps. I added more mud effects to the wing flaps with thinned burnt umber that was dabbed on. This gives the look of wet mud that's been splattered on by the wheels.
What's that? A nearly complete Jug in the background? Just hold your horses.
Oh yeah. I wasn't satisfied with the red. The red on the cowl (tongue), windscreen, canopy and propeller boss. They didn't quite match and were a little dull and monotone compared to the rest of the model. So out came several bottles of red paint along with paints to weather and shade the mix like white, brown and NATO black. And that was AFTER I gave those three parts the "oil dot" treatment.
Yeah I can get a little picky with my models these days.
It doesn't show well in the photo, but I sprayed about 5 more layers of red paint. Each a slightly different shade and applied in a random, splotchy pattern (which if done right doesn't resemble a pattern at all). In person you can see very subtle shifts in colour over the red areas. No masking was done. It was all free hand with very thin paint, low pressure and sprayed extremely close to the parts surface. I love my Iwata!
The wheels wells were dirtied up with a thick wash of brown and black oils. The wide oily brown streaks down the fuselage were touched up. A little more and they'll be done. While I had my thin brown paint mix in my spray gun I dusted a light layer of paint over the O.D. parts of the cowl and cowl flaps to flatten them out a bit. Just as I had done on the fuselage portion of the olive drab.
One thing I'm paying more attention too is the surface finish of each area. By that I mean how glossy or matte an area looks. I used to just spray an even coat of matte (or flat) clear over the whole model and call it done. Not anymore. I've been inspired by the work of Rick Lalwer and others to add more interest and variation into my models. On a real airplane (or tank) not everything is all flat or all glossy, but rather a wide range of finishes. Flat paint on the original aircraft slowly develops a subtle sheen caused by either weathering, maintenance or just a leaky engine. And likewise gloss paints can lose their shine over time for the same reasons. This is why I love working with oils. When you put them on they give the surface a shiny look. But the more you work them, the more they flatten out. Now by altering how much you work the oils you can have a panel that changes from satin to flat to gloss in a small area.
Busy busy. And this doesn't include my oil paints.
Ah yes. I painted the main gear struts a few shades of olive drab. Then I figured why not dry fit them for now. I won't glue them on till later otherwise they'll just get broken off. I can guarantee that. Same with the pitot tube and gun barrels.
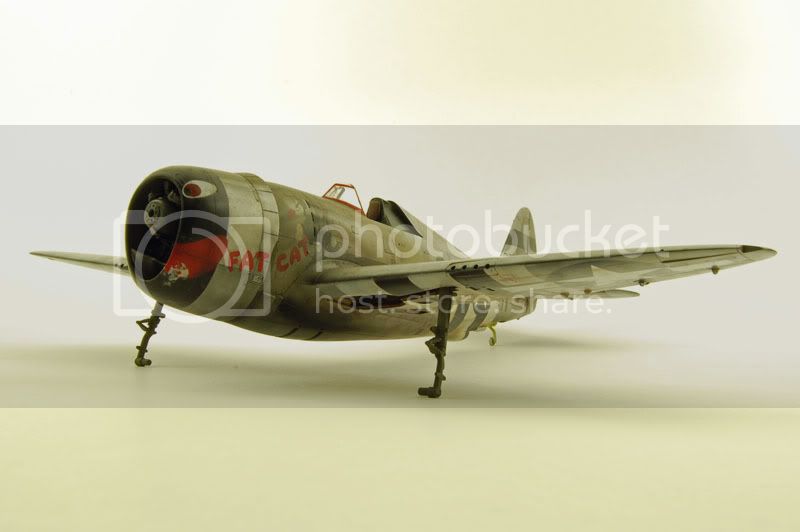
We have lift off. The engine, cowl and cowl flap sub assembly have been glued to the fuselage.
Ah what the heck. Let's get a better idea of what she'll look like.
Here's the exhaust. Nice and dirty now.
So that's it for now. The to-do list is getting shorter and the plane is getting bigger. Now I can start thinking about a base. Perhaps with a Jeep and a mechanic? (well you already know the answer to this question)
Oh and I just love my new camera. My Canon Powershot was good, but man My Nikon D40 just loves taking pictures of models. I still need to get some better bulbs though. These are way too yellow.
So now everybody is finally and completely up to date. Seriously. At least it's only 3am this time.
Matt

lampie

#029

Joined: December 23, 2005
KitMaker: 6,249 posts
AeroScale: 3,270 posts

Posted: Monday, March 30, 2009 - 12:14 AM UTC
This is without a doubt the best weathering I've ever seen.
Just a bonus that its on a P-47!
Dont worry,, a feature article has been booked for a long time now. It will be on the Aeroscale P-47 site.
Probably in a year or so if Matt takes another extended coffee break
Jaw Droppingly Good!
Nige
Just a bonus that its on a P-47!
Dont worry,, a feature article has been booked for a long time now. It will be on the Aeroscale P-47 site.
Probably in a year or so if Matt takes another extended coffee break
Jaw Droppingly Good!
Nige

f1matt
Joined: August 13, 2006
KitMaker: 1,021 posts
AeroScale: 184 posts
Posted: Monday, March 30, 2009 - 07:40 AM UTC
Aw Nige, you know me too well.  Once this is all said and done I'd love to send in a feature.
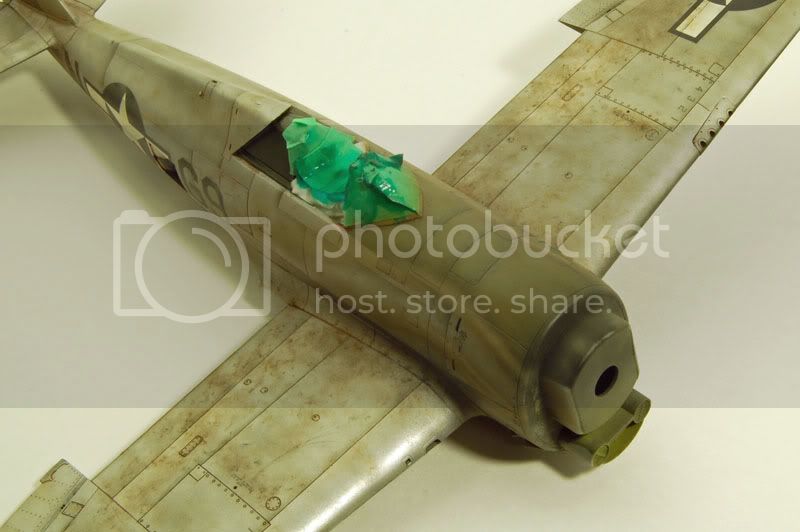
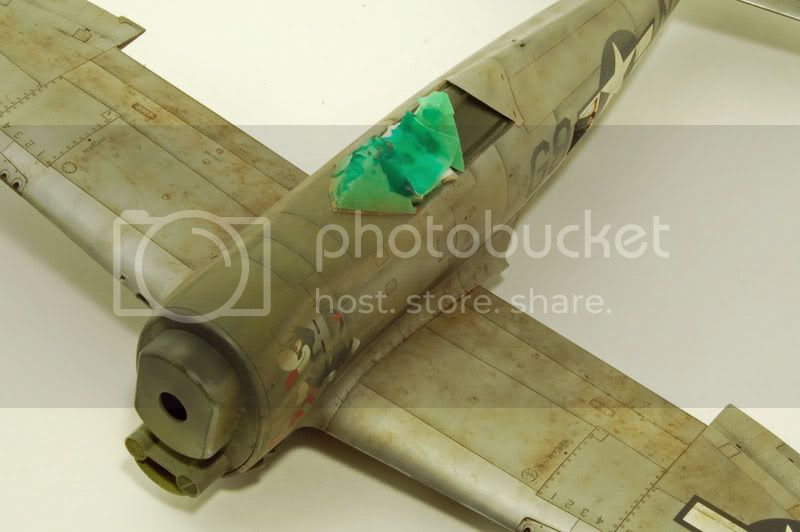
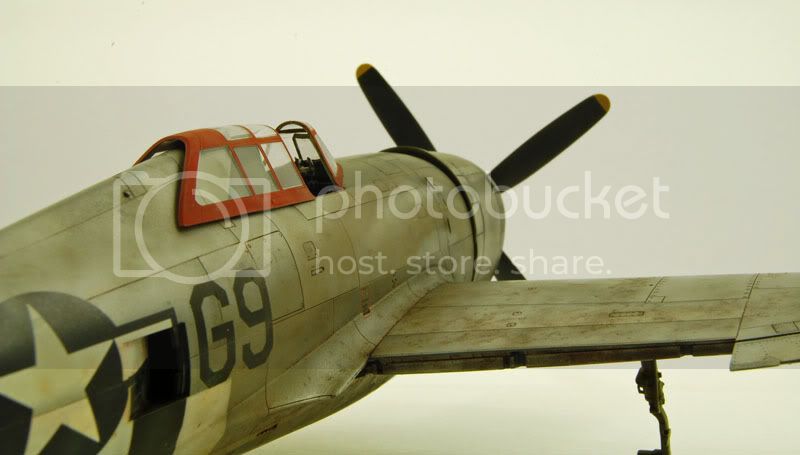
Work continues today on various sub-assemblies. I want to add a few small paint chips and scratches here and there. Maybe a couple fine streaks of oil underneath. One area I'm not entirely sure about is the antenna layout. Do I attach the tall triangle looking thingy to the spine or do some bolts not have this? And where does the antenna wire connect to? I've heard there can be some variety in the setup. A drawing I found indicates the antenna connects from the vertical stab to the top of the tall mount. But another fellow suggested it may connect to a small bump located on the fuselage. Here's a pic with the two options. Can anyone shed some light on this?
Later
Matt
Once this is all said and done I'd love to send in a feature. Work continues today on various sub-assemblies. I want to add a few small paint chips and scratches here and there. Maybe a couple fine streaks of oil underneath. One area I'm not entirely sure about is the antenna layout. Do I attach the tall triangle looking thingy to the spine or do some bolts not have this? And where does the antenna wire connect to? I've heard there can be some variety in the setup. A drawing I found indicates the antenna connects from the vertical stab to the top of the tall mount. But another fellow suggested it may connect to a small bump located on the fuselage. Here's a pic with the two options. Can anyone shed some light on this?
Later
Matt
lampie
#029
Joined: December 23, 2005
KitMaker: 6,249 posts
AeroScale: 3,270 posts
Posted: Monday, March 30, 2009 - 08:47 AM UTC
Hi Matt.
The easy answer is.............
There is no easy answer.
As you may have read, the early P-47's in the ETO suffered terribly with radio problems.
While fitting better insulated ignition harnesses probably solved the problem eventually, there were other types of radio instalations tried.
Its very common to see photos of P-47's in 1943 fitted with thin "whip" ariels, as opposed to the type of radio mast included in the Tamiya kit.
The style of radio mast found in the Tamiya kit would appear to be fitted to all the other P-47s.
Later war photos, say for example the P-47M dont show any ariel wire, in fact, the wire isnt visible in the vast majority of P-47 photos from the ETO.
This is probably due to the type of radio system fitted, which Im not familiar with.
So, IF an antenna wire was fitted, where would it run from and to?
The most commonly seen route is the bottom one in your photo of the restored Razorback, running from the tail fin to the attachment point on the fight hand side of the fusalage.
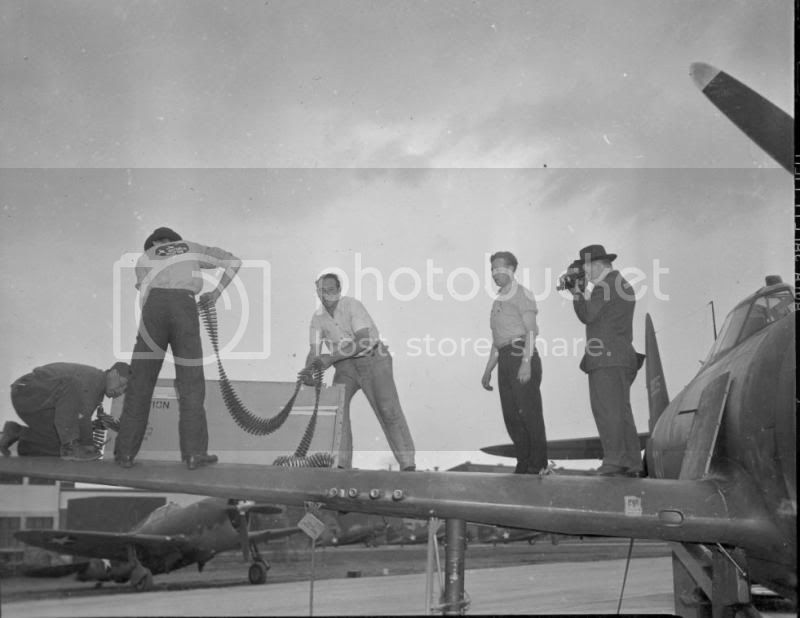
Heres a photo from the Republic factory showing the wire attached to the rudder and heading down towards that attachment point.

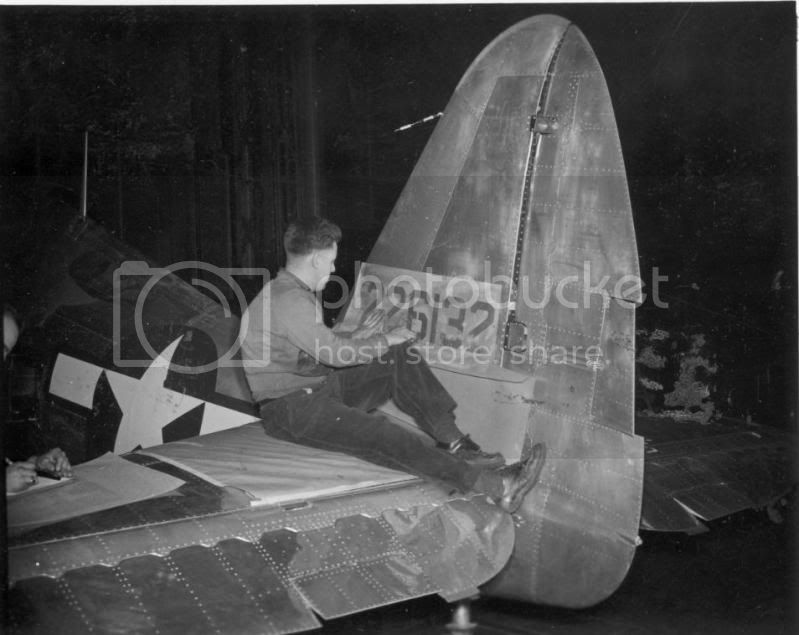
On another restored example of a Razorback, heres a close up of the area on first the tail fin and secondly the side of the fusalage.


Naturally, these are photos of restored aircraft and are posted purely to show the area the wire runs to and from.
You may note that on the bottom photo the wire runs to the top of the ariel mast and then another wire runs down to the attachment point.
Heres a photo, again from Republic, where you can see that style of wire attachment.(just)
Very unusual imho.
So to sum up.
Apart from the early P-47's around mid 1943 which were fitted with whip ariels, the radio mast would be present.( its not uncommon to see photos of the same aircraft with different style ariels from around this time.
The most common route I see on photos where a wire is attached are from the tail fin to the attachment point on the right hand side of the fusalage.
Most commonly though, an ariel wire isnt visible (but it doesnt neccessarily mean it isnt there)
Some P-47's were fitted with a loop style ariel but I havent seen any photos of P-47s in service in the ETO with this type.
Err,,hope this makes sense???
Basically check your references as much as you can,I'm afraid.
Nige
EDIT. The P-47 shown having its serial number applied is a D-22-RE, same as Fat Cat. This doesnt necessarily mean Fat Cat retained that style of ariel wire, but very likely left the factory with it.
The easy answer is.............
There is no easy answer.
As you may have read, the early P-47's in the ETO suffered terribly with radio problems.
While fitting better insulated ignition harnesses probably solved the problem eventually, there were other types of radio instalations tried.
Its very common to see photos of P-47's in 1943 fitted with thin "whip" ariels, as opposed to the type of radio mast included in the Tamiya kit.
The style of radio mast found in the Tamiya kit would appear to be fitted to all the other P-47s.
Later war photos, say for example the P-47M dont show any ariel wire, in fact, the wire isnt visible in the vast majority of P-47 photos from the ETO.
This is probably due to the type of radio system fitted, which Im not familiar with.
So, IF an antenna wire was fitted, where would it run from and to?
The most commonly seen route is the bottom one in your photo of the restored Razorback, running from the tail fin to the attachment point on the fight hand side of the fusalage.
Heres a photo from the Republic factory showing the wire attached to the rudder and heading down towards that attachment point.
On another restored example of a Razorback, heres a close up of the area on first the tail fin and secondly the side of the fusalage.
Naturally, these are photos of restored aircraft and are posted purely to show the area the wire runs to and from.
You may note that on the bottom photo the wire runs to the top of the ariel mast and then another wire runs down to the attachment point.
Heres a photo, again from Republic, where you can see that style of wire attachment.(just)
Very unusual imho.
So to sum up.
Apart from the early P-47's around mid 1943 which were fitted with whip ariels, the radio mast would be present.( its not uncommon to see photos of the same aircraft with different style ariels from around this time.
The most common route I see on photos where a wire is attached are from the tail fin to the attachment point on the right hand side of the fusalage.
Most commonly though, an ariel wire isnt visible (but it doesnt neccessarily mean it isnt there)
Some P-47's were fitted with a loop style ariel but I havent seen any photos of P-47s in service in the ETO with this type.
Err,,hope this makes sense???
Basically check your references as much as you can,I'm afraid.
Nige
EDIT. The P-47 shown having its serial number applied is a D-22-RE, same as Fat Cat. This doesnt necessarily mean Fat Cat retained that style of ariel wire, but very likely left the factory with it.
f1matt
Joined: August 13, 2006
KitMaker: 1,021 posts
AeroScale: 184 posts
Posted: Monday, March 30, 2009 - 09:28 AM UTC
Absolutely smashing job Nige. If I ever visit England, I'm buying! I think I'll go this route.
The wire looks like it would be a fun detail to add. There's a bunch more going on than just a wire stuck through a hole. Time to get to work.
Thanks
Matt
I think I'll go this route. The wire looks like it would be a fun detail to add. There's a bunch more going on than just a wire stuck through a hole. Time to get to work.
Thanks
Matt
f1matt
Joined: August 13, 2006
KitMaker: 1,021 posts
AeroScale: 184 posts
Posted: Tuesday, March 31, 2009 - 12:23 PM UTC
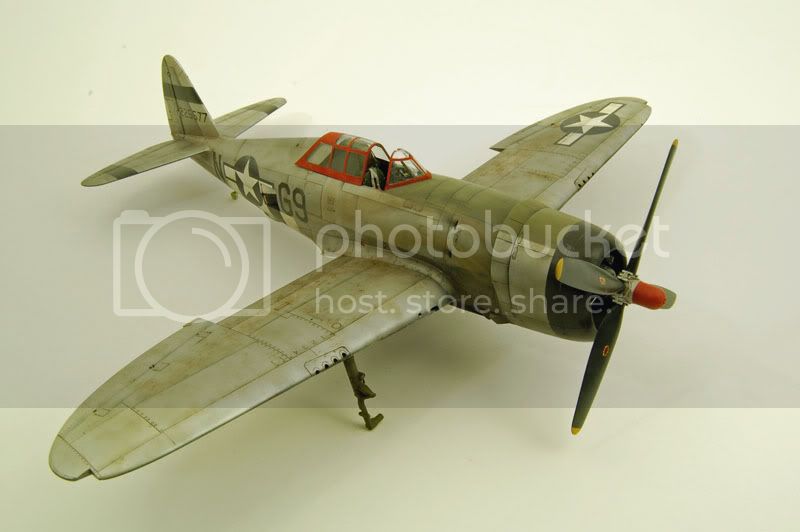
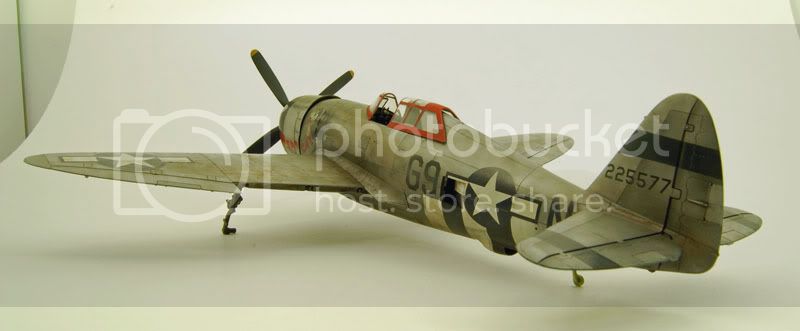
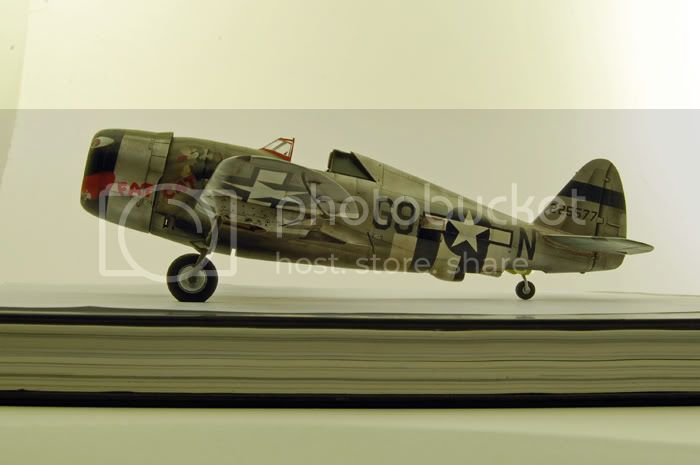
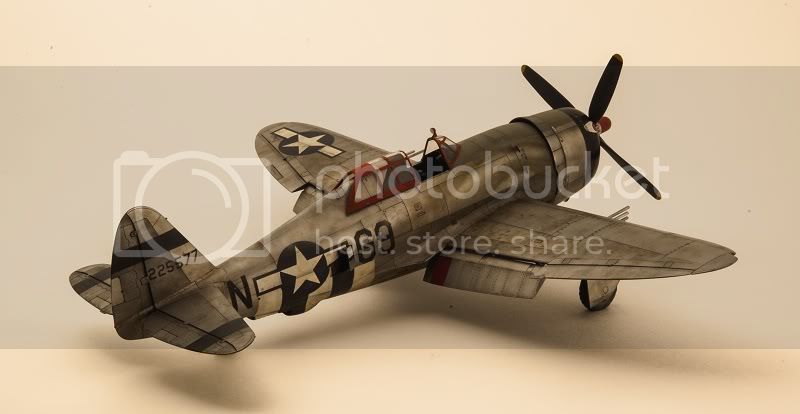
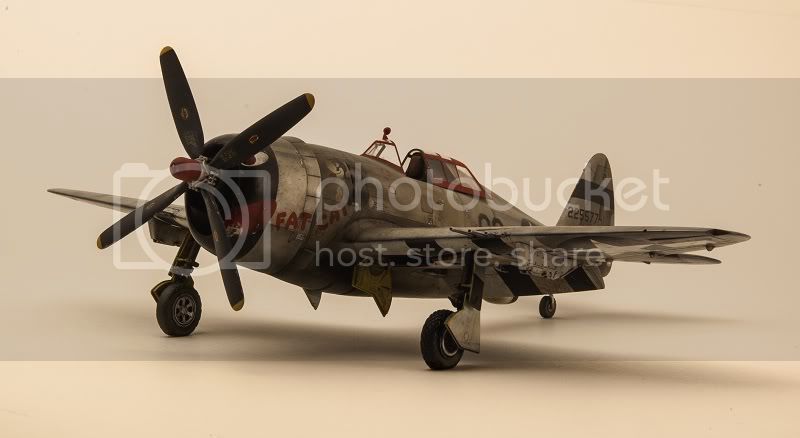
Nothing too crazy today. But I did manage to get Fat Cat on her toes. The tail wheel has been glued on. No problems there.
The main gear was also attached. Then the Ultracast wheels went on. With a few pictures of the landing gear nearby I tried to get everything lined up as per the real thing. It can be tough to judge.
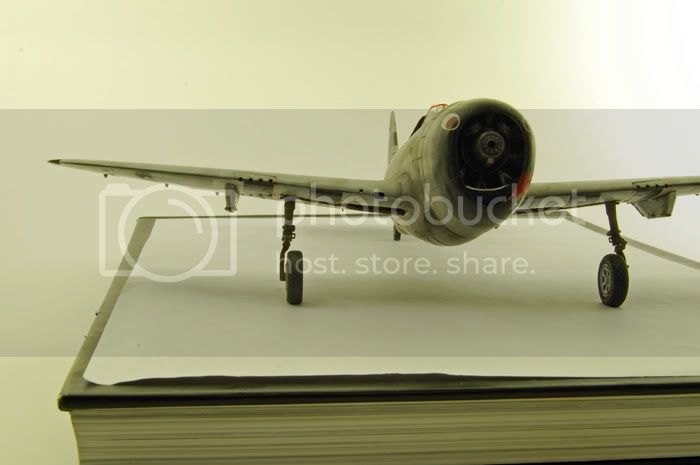
Tripod wasn't exactly straight for this one.
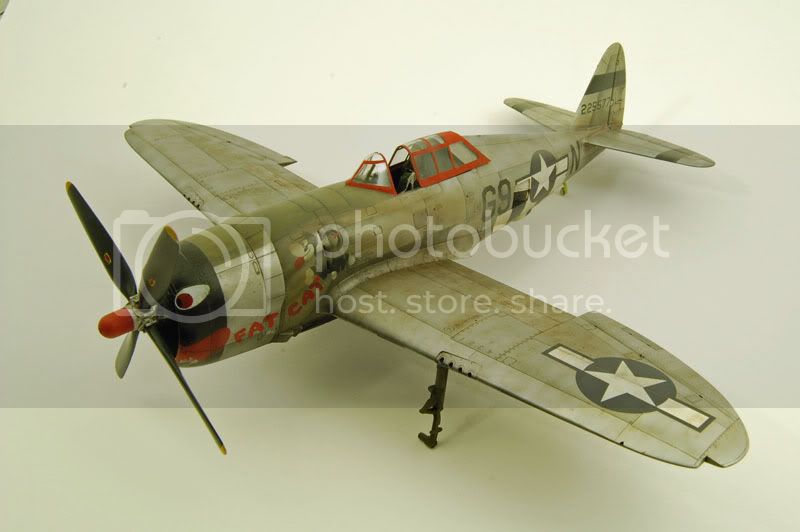
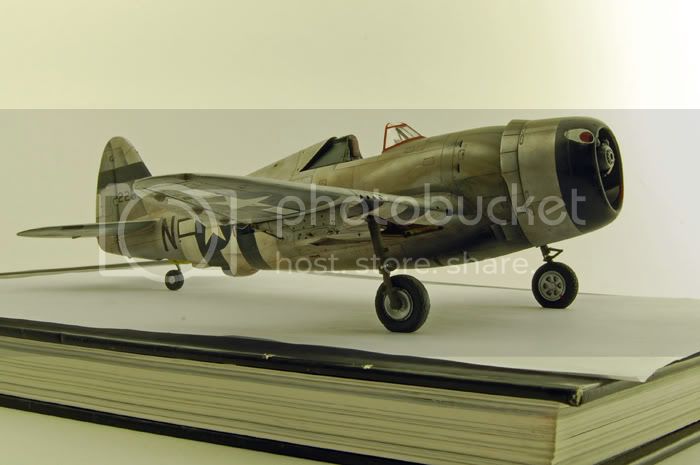
It's starting to look like a plane.
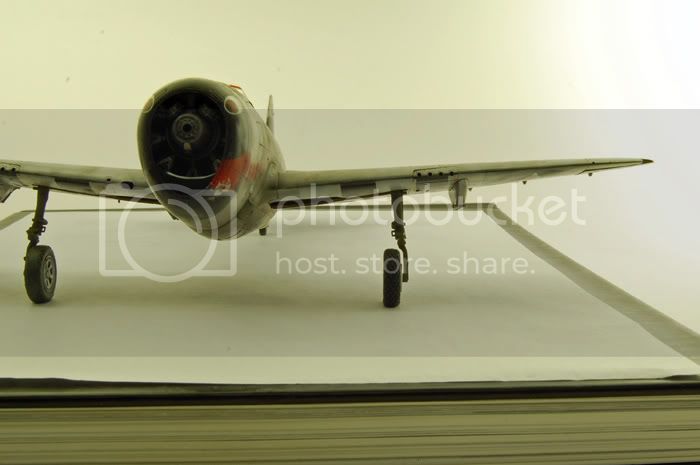
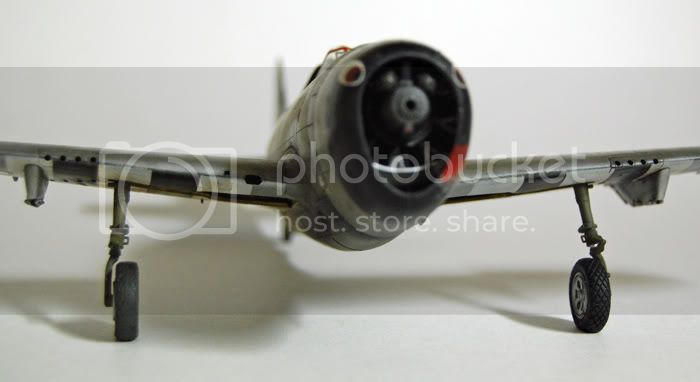
While typing this update and looking some more at the pics, the main gear didn't look quite right.
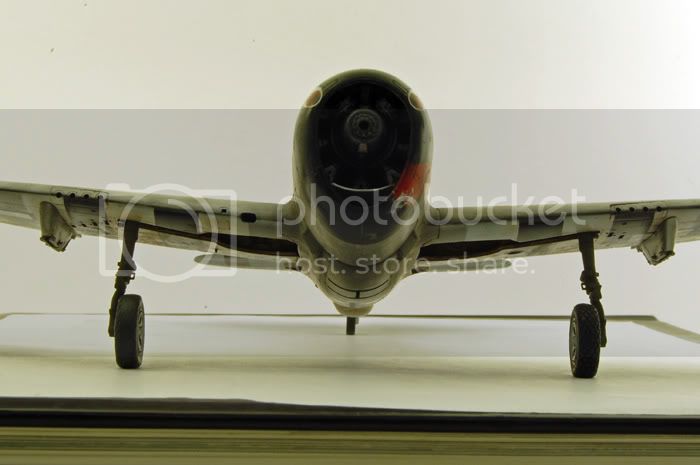
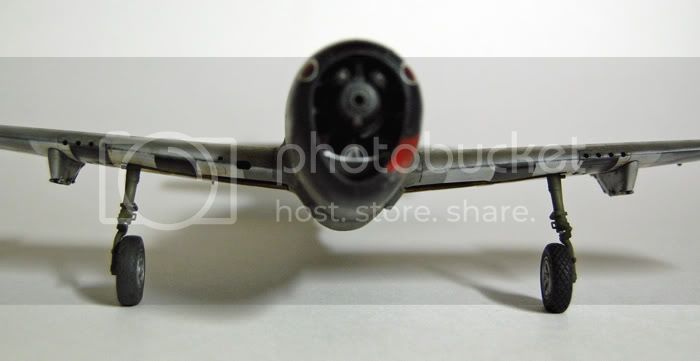
I put down the pizza and looked at the instructions for help. Yeah, a good idea. Tamiya include a small line drawing of the main gear viewed from the front. The gear should lean out a bit with the wheels nice and straight. I just used my fingers to try and adjust everything to help match the diagram. I think it's better now. I'll add a little more CA to make everyting a little more secure.
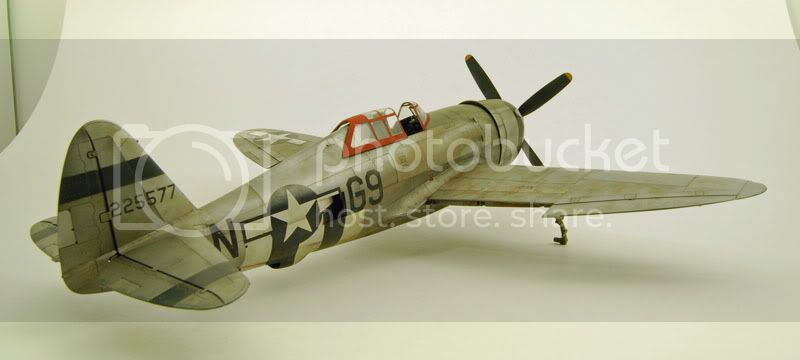
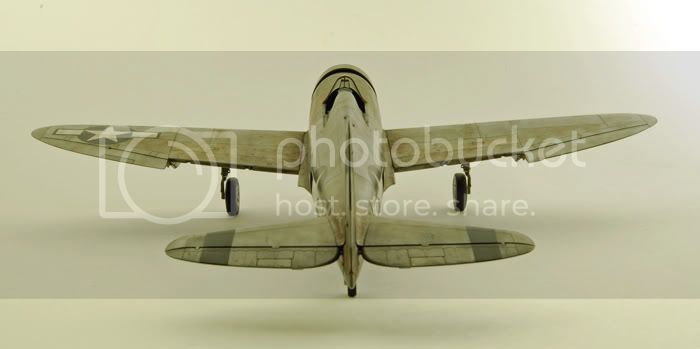
Here's a couple quick pics I took after the mods.
And a parting shot. Till next time.
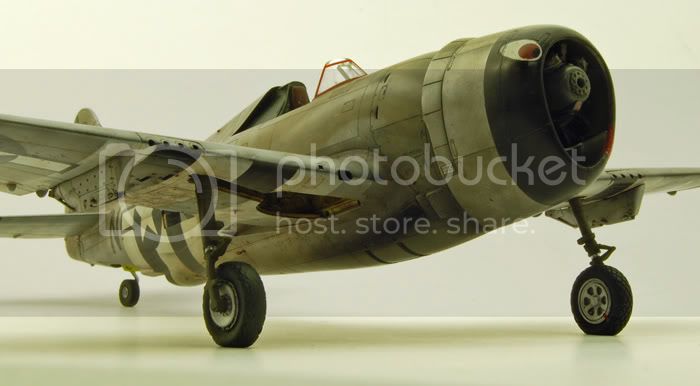
Oh yeah. I painted one wheel straight Tamiya NATO black. The other wheel had the tread sanded lightly to give it a worn look. This tire was painted NATO black mixed with some light brown. This helps the tire look a little older.
Matt :-)
The main gear was also attached. Then the Ultracast wheels went on. With a few pictures of the landing gear nearby I tried to get everything lined up as per the real thing. It can be tough to judge.
Tripod wasn't exactly straight for this one.
It's starting to look like a plane.
While typing this update and looking some more at the pics, the main gear didn't look quite right.
I put down the pizza and looked at the instructions for help. Yeah, a good idea. Tamiya include a small line drawing of the main gear viewed from the front. The gear should lean out a bit with the wheels nice and straight. I just used my fingers to try and adjust everything to help match the diagram. I think it's better now. I'll add a little more CA to make everyting a little more secure.
Here's a couple quick pics I took after the mods.
And a parting shot. Till next time.
Oh yeah. I painted one wheel straight Tamiya NATO black. The other wheel had the tread sanded lightly to give it a worn look. This tire was painted NATO black mixed with some light brown. This helps the tire look a little older.
Matt :-)
lampie
#029
Joined: December 23, 2005
KitMaker: 6,249 posts
AeroScale: 3,270 posts
Posted: Wednesday, April 01, 2009 - 04:43 AM UTC
Lovely!
Keep going,,finishing post is closer every day.
Nige
Keep going,,finishing post is closer every day.
Nige
f1matt
Joined: August 13, 2006
KitMaker: 1,021 posts
AeroScale: 184 posts
Posted: Thursday, April 26, 2012 - 09:25 PM UTC
What is it with this blog and April? Started this "quick build" in April of 2008. Nearly had it done by April of 2009. Then... nothing. She got put on the back burner. And in mid 2010 I finally moved out of my parents basement and into a house with a friend.
Planned on building more models. But the spray booth was still at my folks place. Never got a work area organized.
Fat Cat waited. Waited. For three more years.
Recently I got an email from my old club, IPMS Winnipeg. Said that the local convention was coming up. And I should go. You know what? I should! I am. And I`m bringing Fat Cat.
Will post the final pictures later today. I promise.
matt

AussieReg
#007

Joined: June 09, 2009
KitMaker: 8,156 posts
AeroScale: 3,756 posts
Posted: Friday, April 27, 2012 - 12:03 AM UTC
Wow Matt, I mean WOW !!!!
This is the first time I've seen your build here, and it's a knockout. Superb weathering and a great thread to trawl through and steal ideas and techniques.
Cheers, D
This is the first time I've seen your build here, and it's a knockout. Superb weathering and a great thread to trawl through and steal ideas and techniques.
Cheers, D

Dimitar

Joined: November 08, 2011
KitMaker: 414 posts
AeroScale: 126 posts
Posted: Friday, April 27, 2012 - 12:23 AM UTC
This is absolutely stunning!!!
No other words! Give me the boost to finish my P-47.
No other words! Give me the boost to finish my P-47.
lampie
#029
Joined: December 23, 2005
KitMaker: 6,249 posts
AeroScale: 3,270 posts
Posted: Friday, April 27, 2012 - 01:19 AM UTC
About time too!
I thought I was a slow builder but you've taken the biscuit with this one Matt.
One thing about a 3 year wait is that it looks like there's no need to add any ariel wire from what I've learnt over the years.
Been waiting for this and had given up hop of ever seeing it finished.
To be honest I thought You'd packed it all in, ( or expired )
)
Get on with it,,
Nige
I thought I was a slow builder but you've taken the biscuit with this one Matt.
One thing about a 3 year wait is that it looks like there's no need to add any ariel wire from what I've learnt over the years.
Been waiting for this and had given up hop of ever seeing it finished.
To be honest I thought You'd packed it all in, ( or expired
)Get on with it,,
Nige

Siderius
Joined: September 20, 2005
KitMaker: 1,747 posts
AeroScale: 1,673 posts
Posted: Friday, April 27, 2012 - 11:05 AM UTC
Very, very nice work there. Russell


GhostHawk

Joined: January 27, 2011
KitMaker: 268 posts
AeroScale: 264 posts
Posted: Friday, April 27, 2012 - 12:52 PM UTC
Hi,
Really, really good...!!!!
It was a learning experience Matt... Thanks...!
Diego
Really, really good...!!!!
It was a learning experience Matt... Thanks...!
Diego

WingTzun
Joined: February 01, 2006
KitMaker: 853 posts
AeroScale: 137 posts

Posted: Friday, April 27, 2012 - 02:40 PM UTC
Nice job of keeping us in suspense I must say....
Can't wait to see more.
Can't wait to see more.
sweaver
Joined: April 19, 2007
KitMaker: 759 posts
AeroScale: 184 posts
Posted: Friday, April 27, 2012 - 02:47 PM UTC
Can't wait to see it, Matt. I've been following this one from the beginning.
This plane ranks (in my mind) as one of the best aircraft models I've ever seen. In fact, during my recent 2-3 year hiatus from modeling, I would still check this site just to see if you had made any progress (you hadn't! ).
This will become a long, detailed feature article with lots of pictures after you're done, right?
This plane ranks (in my mind) as one of the best aircraft models I've ever seen. In fact, during my recent 2-3 year hiatus from modeling, I would still check this site just to see if you had made any progress (you hadn't!
).This will become a long, detailed feature article with lots of pictures after you're done, right?
f1matt
Joined: August 13, 2006
KitMaker: 1,021 posts
AeroScale: 184 posts
Posted: Friday, April 27, 2012 - 06:00 PM UTC
My apologies for such a long absence. But thanks for such a warm welcome back! Don't know if I will turn this into an article but I'm not ruling anything out.
I'm glad to hear about the aeriel Nige! I'm still busting my butt to get it done in time. The less I need to do the better
So as I said it's still not quite done but here is an update. Tomorrow is going to be a very busy day so the final gallery might not be up till Sunday.
I've applied some fine chipping to select areas. Good old Testors silver. This was applied using a very fine brush with a small amount of thinner to help the paint flow. The bare metal wings and fuselage got some silver scratches and chips too. This is to replicate the dirty surface being scuffed by the crews as they walk over it.
The main landing gear doors are on and have received a dirty wash of black/brown oil paints. The tiny rear view mirror has been attached above the windscreen.
The propeller is on. It has been decaled and weathered. Sadly I didnt' notice till just now. One of the decals on the prop is backwards (the yellow data stencil). Dang. Can't do much bout it now. Seems to be some silvering too round a few of the props decals. Crud. But I just gotta live with it at this point.
Also, I managed to muck up the large decals that go over the landing gear struts. These setbacks suck. But I just gotta learn from it and move forward.
I want to do a little more oil streaking over the cowl. Couple more paint chips here and there. Add the last few delicate bits. Wing tip lights, etc.
I did remember to re paint and install the gun barrels in the correct direction at least! That Alclad chrome is sensational stuff.
The finish line is near!
lampie
#029
Joined: December 23, 2005
KitMaker: 6,249 posts
AeroScale: 3,270 posts
Posted: Friday, April 27, 2012 - 06:10 PM UTC
Slow down there tiger,,,
The gear doors are on backwards
Nige
The gear doors are on backwards
Nige
 |

WEB HOSTING BY


Copyright ©2021 AeroScale and Kitmaker Network, a subsidiary of Silver Star Enterprises
All Rights Reserved. Please read our Conditions of Use and Privacy Policy.
All Rights Reserved. Please read our Conditions of Use and Privacy Policy.