Scotland, United Kingdom
Joined: February 07, 2008
KitMaker: 1,699 posts
AeroScale: 1,384 posts
Posted: Thursday, January 08, 2009 - 11:22 AM UTC
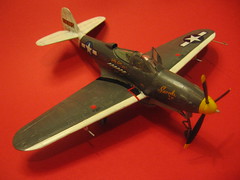
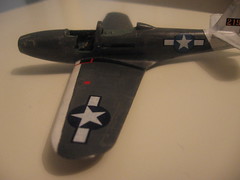
nice progress magnus, gotta keep this campaign ticking over. So here is my effort.
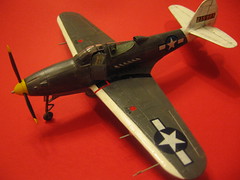
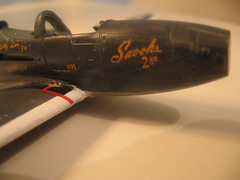
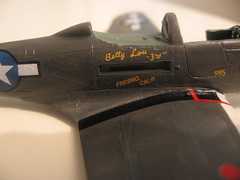
Put the stickers on.
After all the criticism academy decals have been getting these ones are OK.
Forewarned is forearmed I guess I applied them onto wet future. Only the
upper star was a problem. I've had worse decals.
I've also painted most of the small parts and will detail them and add them on
over the next week or so.
Till then here is some snaps clickable for larger images.
Stockholm, Sweden
Joined: May 02, 2006
KitMaker: 1,953 posts
AeroScale: 1,902 posts
Posted: Saturday, January 10, 2009 - 09:51 AM UTC
Hi all!
JP! Some nice progress, I've yet to get to the painting... I've also had mixed fortunes with Academy decals, in some cases I suspect they make them from recycled plastic bags. Really hot water helps!
That Arado of mine is moving forward:

Belly gun pack will be added from a Revell Ar-240 whenever it turns up in the post. And I hope I can make it fit, I don't really think I need an Ar-240 for any other reason :-) !
Build blog is
here! 
Magnus
Press banner to the right to follow my trail to the new forums!
Scotland, United Kingdom
Joined: February 07, 2008
KitMaker: 1,699 posts
AeroScale: 1,384 posts
Posted: Saturday, January 10, 2009 - 11:54 AM UTC
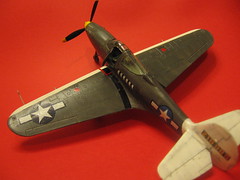
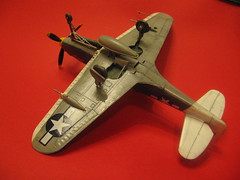
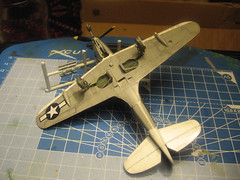
got the wheels on and the p-39 is only just a nose sitter. Phew.
just don't breathe near it. Actually it is ok with the prop on. Panic over.
Somehow I don't think Bjorn will need to worry about that. Might need
some reinforcement of the front u/c there

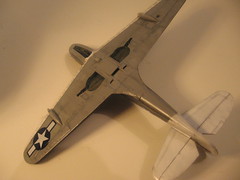
Need to build a camera and finish up.
This is what was installed in the radio compartment

Big bugger aint it?
That is a nice looking camera port Magnus.
Also i like the quick and dirty belts. What scale are you in?
as I model almost exclusively in 1/72 i might try that on enclosed
cockpits and save a lot of tears.
Stockholm, Sweden
Joined: May 02, 2006
KitMaker: 1,953 posts
AeroScale: 1,902 posts
Posted: Saturday, January 10, 2009 - 06:53 PM UTC
Quoted Text
That is a nice looking camera port Magnus.
Also i like the quick and dirty belts. What scale are you in?
as I model almost exclusively in 1/72 i might try that on enclosed
cockpits and save a lot of tears.
Thanks JP!
I'm a 72-guy myself so yes, this is 1/72! Those belts turned out a bit more clumsy than they have to be since the back rest was hard to reach with all cockpit detail in place. If the belts are painted on the seat before it is installed it can get a lot better.
I get further and further away from cockpit super detailing and heaps of etch and resin. Some of my best cockpit works are locked inside some of my most boring models: the ones where I ran out of energy when I came to the part of the aircraft that is visible: the outside! So whenever I think I can get away with a drop of paint and a steady hand I use that instead. Apart from that it is a lot cheaper as well
!
Magnus
Press banner to the right to follow my trail to the new forums!
Jönköping, Sweden
Joined: April 25, 2006
KitMaker: 831 posts
AeroScale: 688 posts
Posted: Saturday, January 10, 2009 - 11:08 PM UTC
JP: The Cobra is coming along nicely. I really like the white tail. It's a colourful touch to the main O/D, but still you got the used look to it. Nice.
Magnus: The pit is really nice for the scale. It's going to look good even though there is little more than glass panels around it. And I do see the cameras through the glass, so send any doubtful critics to me

Cheers
Tony
Scotland, United Kingdom
Joined: February 07, 2008
KitMaker: 1,699 posts
AeroScale: 1,384 posts
Posted: Monday, January 12, 2009 - 09:14 PM UTC
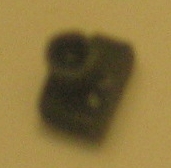
Scratched a K-24 camera. two bits of .40 card sandwiched. Is roughly about 2 scale foot square.
two small discs punched and bit of stretched cotton bud. Here it is. That's the best resolution I could get with my camera sorry.
Also added a vane in the engine intake with a bit of 0.1 card
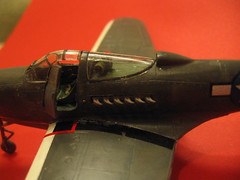
Installed it in the radio compartment and added gear doors and canopy. A bit of light weathering and we are done.
Left the car door open so the interior is better seen. Snaps are clickable for bigger pics.
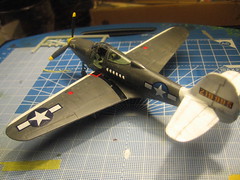
I've really enjoyed this build. Scratching the foward u/c bay, and a few other bits and bobs, first go with an airbrush for the white of the tail. First use of humbrol acrylics, brushed on for the OD. My painting still needs a lot of practice. I never was the most artistic though
Still a few things to add in, guns, antenna and pitot. Pretty much done though.

#041
Kobenhavn, Denmark
Joined: July 20, 2006
KitMaker: 10,069 posts
AeroScale: 3,788 posts
Posted: Tuesday, January 13, 2009 - 09:26 AM UTC
Nice build, JP. It is coming along nicely. When it is completely finished could you share a couple of bigger pictures?
Looking forward to see this one flashing away in the sky

Campaign'oholic - 252+ campaigns completed
Scotland, United Kingdom
Joined: February 07, 2008
KitMaker: 1,699 posts
AeroScale: 1,384 posts
Posted: Tuesday, January 13, 2009 - 10:32 AM UTC
Thanks jesper, all my pics you can click on and it will take you to flickr.com
where there are different sizes available. Right up to the originals 1600x1200.
Enjoy my shoddy paint and construction in full Technicolor.
I'm aware there are a few faults in the construction and many more in the painting
but please any direction is more than welcome I've already picked up so much
from this site.
#041
Kobenhavn, Denmark
Joined: July 20, 2006
KitMaker: 10,069 posts
AeroScale: 3,788 posts
Posted: Wednesday, January 14, 2009 - 05:56 AM UTC
Ahh... fantastic technology never seen before. I will crawl out of my cave and remember to check for clickable photos next time. Even when seeing bigger photos, it is a very nice build.
Campaign'oholic - 252+ campaigns completed
Stockholm, Sweden
Joined: May 02, 2006
KitMaker: 1,953 posts
AeroScale: 1,902 posts
Posted: Wednesday, January 14, 2009 - 08:13 AM UTC
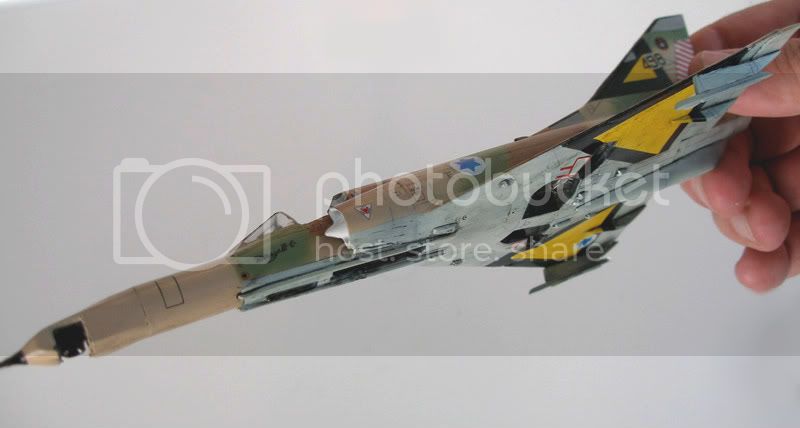
Tonight's update:

Cockpit glazing has been fitted.
Magnus
Press banner to the right to follow my trail to the new forums!
Lisboa, Portugal
Joined: March 04, 2008
KitMaker: 5,386 posts
AeroScale: 635 posts
Posted: Friday, January 16, 2009 - 10:41 PM UTC
Great job on the Arado !
My Su-12 is still on the WBench, I guess I enlisted in too many campaigns...

With the extension I guess I'll make it !
Active Builds: 0
Active Campaigns: 0
Västra Götaland, Sweden
Joined: February 23, 2005
KitMaker: 820 posts
AeroScale: 629 posts
Posted: Monday, January 19, 2009 - 06:05 AM UTC
Hi all!
I'm back from sunny Florida

and I'm happy to see some progress here! I'll notify the rest of you! Less than a month to go!!!
Personally, I tried some freehand camoflaging - The colours of the Agama paints look on the spot, but the paint is very difficult to work with. Even when mixed 50/50 with the Agama thinner, they clog the airbrusch almost instantly. Furthermore, this was my first attempt at freehand camo!!! You've got to start somewhere!
Ps. I'm going for the late 70's markings, so most of the wings will be covered with big yellow triangles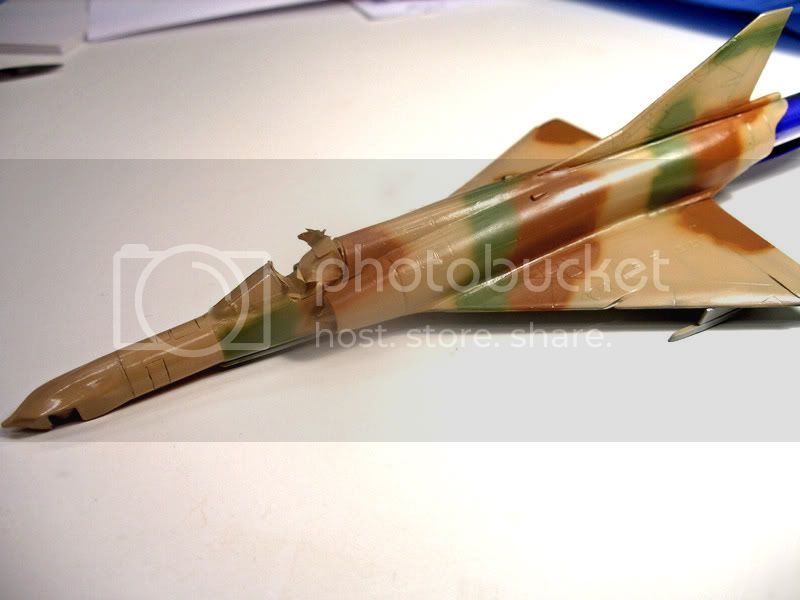
I'll comment on everyones progress and post more pics as soon as possible!
Cheers !!! // PolarBear

Stockholm, Sweden
Joined: May 02, 2006
KitMaker: 1,953 posts
AeroScale: 1,902 posts
Posted: Tuesday, January 20, 2009 - 09:22 PM UTC
Quoted Text
Personally, I tried some freehand camoflaging - The colours of the Agama paints look on the spot, but the paint is very difficult to work with. Even when mixed 50/50 with the Agama thinner, they clog the airbrusch almost instantly. Furthermore, this was my first attempt at freehand camo!!! You've got to start somewhere!
Hi Björn!
Nice freehanding, even if it was troublesome there is nothing wrong with the result!
For airbrushing acrylics freehand there is one brand of paint that is far ahead of the rest: Gunze acrylics. I have tried most of the brands on the market and I use them all but for freehand camo I only use Gunze thinned with alcohol. Availability in Sweden is a problem but I think Hobbyfixaren has them in Malmö. Otherwise LuckyModel happily will send you a box, at a very good price!
Did you get my offer for a new bang seat?
Magnus
Press banner to the right to follow my trail to the new forums!
#041
Kobenhavn, Denmark
Joined: July 20, 2006
KitMaker: 10,069 posts
AeroScale: 3,788 posts
Posted: Tuesday, January 20, 2009 - 10:02 PM UTC
Looks great, Bjoern. The problems with clogging is not visible. No splatters as I see it
It is going to be a cool and colourful aircraft - looking forward to see more
Campaign'oholic - 252+ campaigns completed
Västra Götaland, Sweden
Joined: February 23, 2005
KitMaker: 820 posts
AeroScale: 629 posts
Posted: Monday, January 26, 2009 - 05:28 AM UTC
A quick update on the Mirage:
Very large, and very brittle, decals have been added. I'm happy to announce that they covered most of the splatter!

The AML decals did not take any of the pylons into consideration. I opted to remove them temporarilly, instead of having to cut and fit the brittle decals. In addition, the decals did not work well with Microsol.
 JP
JP: Until now, I always considered the P-39 as one ugly looking bird. Your excellent model actually made me see the beauty in the aircraft! Thanks!!!
The rest of you: It looks like I'm going to make the deadline. How about the rest of you??
Jönköping, Sweden
Joined: April 25, 2006
KitMaker: 831 posts
AeroScale: 688 posts
Posted: Monday, January 26, 2009 - 07:31 AM UTC
That was a suttle and stealthy aircraft Björn
. But how do you get the ´post wash to stick on the decals? Have you put a clear coat on top of them, or is it just the pictures that makes it look shiny?
Tony
Stockholm, Sweden
Joined: May 02, 2006
KitMaker: 1,953 posts
AeroScale: 1,902 posts
Posted: Monday, January 26, 2009 - 08:43 PM UTC
Quoted Text
It looks like I'm going to make the deadline. How about the rest of you??
I'm still on schedule, no worries mate! As long as the masking doesn't bore me to death at least...

Build blog is
here! Magnus
Press banner to the right to follow my trail to the new forums!
Stockholm, Sweden
Joined: May 02, 2006
KitMaker: 1,953 posts
AeroScale: 1,902 posts
Posted: Tuesday, January 27, 2009 - 07:52 PM UTC

Another step closer to completion! Right on schedule...
Build blog is
here! Magnus
Press banner to the right to follow my trail to the new forums!
Västra Götaland, Sweden
Joined: February 23, 2005
KitMaker: 820 posts
AeroScale: 629 posts
Posted: Thursday, January 29, 2009 - 06:41 AM UTC
I don't know why, but somehow I always believe that I'm close to the finish line once I flat or satin varnish the model... But then I realize the myriad of little shores that remain, details that need painting, etc. In other words - there is a lot of work ýet to be done! And the camera need some work, given the theme of this campaign!
I wish express a big thanks to
Magnus for the (blue) supersonic fuel tanks (I believe there are fuel tanks underneath all the filler
) and the seat. They will fit perfecty in this build. As for the seat - Of course I found the long lost, already painted kit seat that I had been searching for the day before your package arrived. If you want your seat back I can mail it together with the spare Tznuit nose.
 Stefan
: I'm not sure I understood your question, but the decals and the grit were covered with future on the previous pics. Here's the belly with satin varnish.
More updates next week!
Cheers!! /PolarBear
Stockholm, Sweden
Joined: May 02, 2006
KitMaker: 1,953 posts
AeroScale: 1,902 posts
Posted: Thursday, January 29, 2009 - 07:13 AM UTC
Quoted Text
If you want your seat back I can mail it together with the spare Tznuit nose.
The seat is all yours for keeping Björn, it might come in handy some time!
Regarding all those small parts: I try to get them finished BEFORE the rest of the model. I don't always succeed but my happiest projects are usually when the only thing that remains when the model is decalled is pure assembly work!
Magnus
Press banner to the right to follow my trail to the new forums!
South Australia, Australia
Joined: August 14, 2007
KitMaker: 5,926 posts
AeroScale: 2,201 posts
Posted: Monday, February 02, 2009 - 05:22 PM UTC
I have a funny feeling I may have left this just a LITTLE too late. I found that my old 1/32 Revell Mirage III kits have the option of a photo recon version so I thought I would start one. Only problem is someone started it before me (I was given it for nothing) and the standard was a little lower than mine construction wise. I won't mention how bad the fit is of most of the major pieces.. wing to fuselage, urgh... nose to fuselage - crude at best. But at least I have the wings on. There is so much filler needed I think I may buy shares in the filler company!
But i will struggle on and hopefully end up with a Swiss Air Force Mirage IIIR in a few weeks at the most.
Ciao!!
You may be right, I may be crazy.
Västra Götaland, Sweden
Joined: February 23, 2005
KitMaker: 820 posts
AeroScale: 629 posts
Posted: Tuesday, February 03, 2009 - 02:51 AM UTC
Sacre Bleu, one more recon Mirage III!
Please, please do!!!
Cheers! // PolarBear!
Stockholm, Sweden
Joined: May 02, 2006
KitMaker: 1,953 posts
AeroScale: 1,902 posts
Posted: Wednesday, February 04, 2009 - 09:35 AM UTC

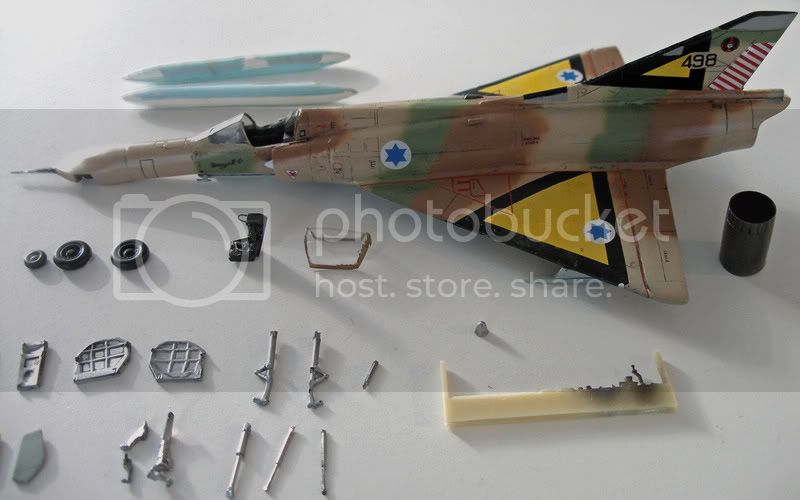
Decalling has started!
Build blog is
here! Magnus
Press banner to the right to follow my trail to the new forums!
Scotland, United Kingdom
Joined: February 07, 2008
KitMaker: 1,699 posts
AeroScale: 1,384 posts
Posted: Wednesday, February 04, 2009 - 11:02 AM UTC
South Australia, Australia
Joined: August 14, 2007
KitMaker: 5,926 posts
AeroScale: 2,201 posts
Posted: Wednesday, February 04, 2009 - 11:37 AM UTC
You may be right, I may be crazy.