Early Aviation
Discuss World War I and the early years of aviation thru 1934.
Discuss World War I and the early years of aviation thru 1934.
Hosted by Jim Starkweather
Eduard's Fokker Dr.I

JackFlash

Joined: January 25, 2004
KitMaker: 11,669 posts
AeroScale: 11,011 posts

Posted: Tuesday, July 15, 2008 - 10:53 AM UTC
Colour me Triplane green with envy! Rowan your build is very cool and mostly OOB. By the way the other instrument was meant to be a tach. Dr.I types did not have these to my knowledge but I have some time set aside tonight to check and make sure. It gives me another excuse to crack open Mr. Imrie's fine Triplane book. (As if I needed one.) 

CaptainA

Joined: May 14, 2007
KitMaker: 3,117 posts
AeroScale: 2,270 posts

Posted: Thursday, July 17, 2008 - 12:13 PM UTC
Quoted Text
Apologies for these no being the most exciting pics in the world, but I thought I'd better post something lest you all think I've given up already - a fair assumption, given my recent reputation!
Yeah, What happened to that D.VII you started, oh, about 3 years ago?


That interior looks great.
DAK66

Joined: April 28, 2006
KitMaker: 286 posts
AeroScale: 45 posts

Posted: Thursday, July 17, 2008 - 12:39 PM UTC
Nice build Rowan that interior looks really good definetly better than Dragons Dr.I
thegirl

Joined: January 19, 2008
KitMaker: 6,743 posts
AeroScale: 6,151 posts

Posted: Thursday, July 17, 2008 - 05:17 PM UTC
Rowan , looks terrfic so far . 
Cheers


Cheers


jaypee

Joined: February 07, 2008
KitMaker: 1,699 posts
AeroScale: 1,384 posts

Posted: Friday, July 18, 2008 - 04:51 AM UTC
Nice touches, esp like the leather satchel v convincing.

Bratushka

Joined: May 09, 2008
KitMaker: 1,019 posts
AeroScale: 17 posts

Posted: Friday, July 18, 2008 - 05:44 AM UTC
[quote]
i may be a bit out of my league here, but wasn't it that the LeRhone required castor oil rather than regular petroleum based oil because it was the only lubicant that could take the internal conditions of that particular engine without breaking down or becoming explosive? and at that point in the war that type of oil was very difficult to get in quantity which is what prompted the need to try to find different engines?
Quoted Text
...as the German oil was much worse than the Allied/Entente stuff.
i may be a bit out of my league here, but wasn't it that the LeRhone required castor oil rather than regular petroleum based oil because it was the only lubicant that could take the internal conditions of that particular engine without breaking down or becoming explosive? and at that point in the war that type of oil was very difficult to get in quantity which is what prompted the need to try to find different engines?
Posted: Friday, July 18, 2008 - 06:06 AM UTC
Hi Jim
what I've read is, that the Germany mostly used Rhizinus oil (lacking the proper english word here) which was quite aggressive and bad for the engines but I am no expert on this.
cheers
Steffen
what I've read is, that the Germany mostly used Rhizinus oil (lacking the proper english word here) which was quite aggressive and bad for the engines but I am no expert on this.
cheers
Steffen

JackFlash

Joined: January 25, 2004
KitMaker: 11,669 posts
AeroScale: 11,011 posts

Posted: Friday, July 18, 2008 - 07:34 AM UTC
Greetings all;
The reason Rhizinus oil was used was because castor was tough to get due to the British Naval blockade. The nature of the rotary is that the fuel was mixed with the oil in the crankcase where centrifical force of the motor forced the fuel out to the cylinder heads through internal chanels. The oils had to be resistant to the fuel so not to loose its viscosity.
The reason Rhizinus oil was used was because castor was tough to get due to the British Naval blockade. The nature of the rotary is that the fuel was mixed with the oil in the crankcase where centrifical force of the motor forced the fuel out to the cylinder heads through internal chanels. The oils had to be resistant to the fuel so not to loose its viscosity.
Posted: Friday, July 18, 2008 - 09:54 AM UTC
Hi again
Sorry for the lull - I obviously tempted Fate in promising an early update! I have been tinkering, but today was a totally weird day where everything went wrong from the word go. So, I managed to damage the Fokker slightly working on it before leaving for work (nothing serious), and then spent the whole day facing one problem after another with the docco I'm working on. Things that "couldn't go wrong" did just that, and everything proved such a c*ck-up that I've got to back in tomorrow and start from scratch.
So - and I'm not making any promises! - I hope I'll get a chance to do a bit more to the kit on Sunday.
All the best
Rowan
Sorry for the lull - I obviously tempted Fate in promising an early update! I have been tinkering, but today was a totally weird day where everything went wrong from the word go. So, I managed to damage the Fokker slightly working on it before leaving for work (nothing serious), and then spent the whole day facing one problem after another with the docco I'm working on. Things that "couldn't go wrong" did just that, and everything proved such a c*ck-up that I've got to back in tomorrow and start from scratch.
So - and I'm not making any promises!
 - I hope I'll get a chance to do a bit more to the kit on Sunday.
 All the best
Rowan

thegirl

Joined: January 19, 2008
KitMaker: 6,743 posts
AeroScale: 6,151 posts

Posted: Friday, July 18, 2008 - 03:12 PM UTC
No worries Rowan , I have had days like that and I'm sure everyone else has and will continue to do so . , just remember to put on that happy face !!!!!! and have a beer or two , or three.......Cheers 


MerlinV

Joined: November 26, 2006
KitMaker: 608 posts
AeroScale: 602 posts

Posted: Friday, July 18, 2008 - 11:13 PM UTC
Wasn't castor oil used because of behaviour at altitude? I always thought that... And that it was used in in-lines as well as Radials.
I may be wrong of course. Almost certainly actually!
Cheers,
Hugh
I may be wrong of course. Almost certainly actually!
Cheers,
Hugh

jaypee

Joined: February 07, 2008
KitMaker: 1,699 posts
AeroScale: 1,384 posts

Posted: Saturday, July 19, 2008 - 07:44 AM UTC
Must've been unlucky Friday the 18th as I had the reverse Midas touch in work too. Keep on smiling. Just to keep from crying 


JackFlash

Joined: January 25, 2004
KitMaker: 11,669 posts
AeroScale: 11,011 posts

Posted: Saturday, July 19, 2008 - 07:48 AM UTC
Greetings Hugh;
Castor oils were used in rotaries only used becaue they could mix with fuels and not loose their viscosity. The result was that the castor oil went through the combustion / burn process with the fuel. It was the burned castor oil in the exhaust that was the main reason that the fuselage and lower wing areas had to be scrapped off as part of the post flight maintenance. For inlines and radial normal oils were used as there was no mixing of the lubericants or fuels at any time (unless a piston ring or seal was malfunctioning}.
Castor oils were used in rotaries only used becaue they could mix with fuels and not loose their viscosity. The result was that the castor oil went through the combustion / burn process with the fuel. It was the burned castor oil in the exhaust that was the main reason that the fuselage and lower wing areas had to be scrapped off as part of the post flight maintenance. For inlines and radial normal oils were used as there was no mixing of the lubericants or fuels at any time (unless a piston ring or seal was malfunctioning}.
Posted: Saturday, July 19, 2008 - 07:50 AM UTC
Quoted Text
Must've been unlucky Friday the 18th as I had the reverse Midas touch in work too. Keep on smiling. Just to keep from crying
Cheers JP
I re-did the work today (and managed to do some Aeroscale admin stuff while video files were transferring
 ) so, hopefully, that's put to bed and I can look forward to a lucky Sunday the 20th getting on with the Triplane.
 All the best
Rowan

Posted: Sunday, July 20, 2008 - 08:43 AM UTC
Hi all
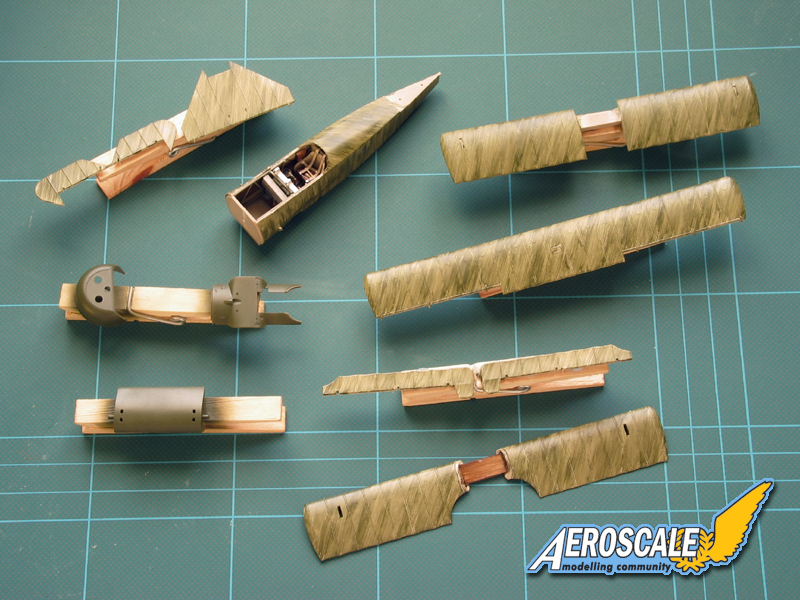
Back underway, but Help!! Someone stole my neat little Triplane and put this streaky mess in its place!

After spending so long trying to perfect smooth airbrushed finishes on most builds, it's a bizarre feeling going for a deliberately streaky brush-finish! This is the first stage, with WEM RLM 81 applied over Elfenbein. Once it's dry, I'll go back and refine a few areas.
I'm trying to paint the Dr.I as I imagine the original was finished - so that means sub-assemblies, with the streaking applied before the undersurface colour. That allows a neat demarcation line (there'll be a thin blue border at the base of the fuselage and around the stabilizer), For the underside colour, I'm going to try WEM's BS1 Sky Blue, which is actually designed as one of the RAF's Battle of Britain "Sky" variations, but also seems to match Windsock's description of German WWI "turquoise" pretty well. Anyway - it's worth a try and I'll leave you to judge how successful it is...
Of course, once that's done, half of the standard Dr.I camouflage will be semi-hidden under Lothar's Yellow colour scheme.
I've sprayed the axle wing, top decking and cowling (Eduard don't show the axle-wing in their painting instructions, but Windsock state that it was solid doped, not streaked). I painted the cowling too because, although it'll be Red eventually, I don't want that to be too pure - and it'll give the option for showing a little "wear and tear" on this exposed part of the airframe.
More soon...
All the best
Rowan
Back underway, but Help!! Someone stole my neat little Triplane and put this streaky mess in its place!


After spending so long trying to perfect smooth airbrushed finishes on most builds, it's a bizarre feeling going for a deliberately streaky brush-finish! This is the first stage, with WEM RLM 81 applied over Elfenbein. Once it's dry, I'll go back and refine a few areas.
I'm trying to paint the Dr.I as I imagine the original was finished - so that means sub-assemblies, with the streaking applied before the undersurface colour. That allows a neat demarcation line (there'll be a thin blue border at the base of the fuselage and around the stabilizer), For the underside colour, I'm going to try WEM's BS1 Sky Blue, which is actually designed as one of the RAF's Battle of Britain "Sky" variations, but also seems to match Windsock's description of German WWI "turquoise" pretty well. Anyway - it's worth a try and I'll leave you to judge how successful it is...
Of course, once that's done, half of the standard Dr.I camouflage will be semi-hidden under Lothar's Yellow colour scheme.
I've sprayed the axle wing, top decking and cowling (Eduard don't show the axle-wing in their painting instructions, but Windsock state that it was solid doped, not streaked). I painted the cowling too because, although it'll be Red eventually, I don't want that to be too pure - and it'll give the option for showing a little "wear and tear" on this exposed part of the airframe.
More soon...
All the best
Rowan

CaptainA

Joined: May 14, 2007
KitMaker: 3,117 posts
AeroScale: 2,270 posts

Posted: Sunday, July 20, 2008 - 09:09 AM UTC
It is looking real nice, but how is it going together. And what technique did you use to streak it?

JackFlash

Joined: January 25, 2004
KitMaker: 11,669 posts
AeroScale: 11,011 posts

Posted: Sunday, July 20, 2008 - 09:10 AM UTC
Excellent Rowan!
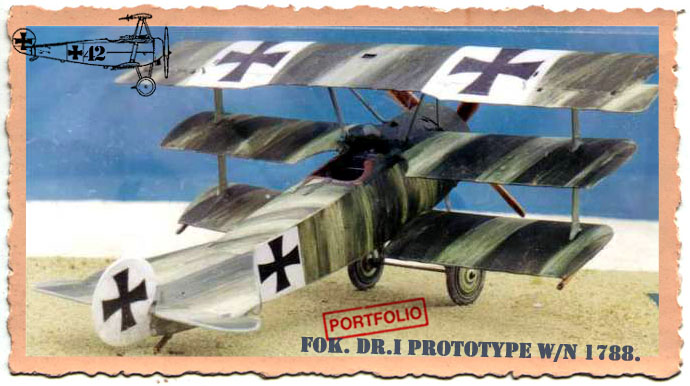
Youe method has formed a great base. Note also the nose of the triplane, just back of the cowling, featured fairly dark streaking, becoming progressively lighter as you move toward the rear. Then the brush was loaded again. The streaking started forward (with loaded brushes) and got lighter as the brush gave up its green paint/dope. The same was true with the wings. You are familar with my portfolio om the subject of my Dr.I builds. This may help. The Subject is Fok. Dr.I 451/17. You are doing Dr.I 454/17.
w/n 2076, Fok. Dr.I 451/17 was flown during March - June1918 by various pilots at Jastaschule I. This is a DML kit with decals from the spares box..

This is Fokker's V.7 w/n 1788 is a Dr.I prototype and was flown in this configuration during November1917 by various pilots at the Fokker factory at Schwerin/ Gorries. This is a DML kit with decals from the spares box.

Youe method has formed a great base. Note also the nose of the triplane, just back of the cowling, featured fairly dark streaking, becoming progressively lighter as you move toward the rear. Then the brush was loaded again. The streaking started forward (with loaded brushes) and got lighter as the brush gave up its green paint/dope. The same was true with the wings. You are familar with my portfolio om the subject of my Dr.I builds. This may help. The Subject is Fok. Dr.I 451/17. You are doing Dr.I 454/17.
w/n 2076, Fok. Dr.I 451/17 was flown during March - June1918 by various pilots at Jastaschule I. This is a DML kit with decals from the spares box..

This is Fokker's V.7 w/n 1788 is a Dr.I prototype and was flown in this configuration during November1917 by various pilots at the Fokker factory at Schwerin/ Gorries. This is a DML kit with decals from the spares box.

Posted: Sunday, July 20, 2008 - 09:11 AM UTC
Hi again
Another question concerning the colour scheme. Eduard show a dark panel overpainted with yellow around the fuselage cross:

Wouldn't it be more logically a lighter area, with the yellow applied over the original white fuselage patch, leaving a white outline to the cross?
All the best
Rowan
Another question concerning the colour scheme. Eduard show a dark panel overpainted with yellow around the fuselage cross:

Wouldn't it be more logically a lighter area, with the yellow applied over the original white fuselage patch, leaving a white outline to the cross?
All the best
Rowan

Posted: Sunday, July 20, 2008 - 09:20 AM UTC
Cheers guys
As for the technique - I applied a gloss-coat over the Elfenbein to make sure the green didn't "take" too well - and WEM enamels are quite thin out of the pot (they need less thinning than many paints for airbrushing) so it was easy to make the RLM 81streaky.
Thanks Stephen - that explains the "banding" evident in many photos. I'll go over with a second layer to try create effect.
All the best
Rowan


JackFlash

Joined: January 25, 2004
KitMaker: 11,669 posts
AeroScale: 11,011 posts

Posted: Sunday, July 20, 2008 - 09:21 AM UTC
Greetings Rowan; Here are some croppings from page one.
Quoted Text
First the(wing and fuselage) cross fields were not yellow but had been overpainted in the field upon arrival (before being assembled.) to cut down the white areas. The unit received supplies of the camouflage paint to use for repairs. It was these stocks that were used. The colour authority Dan san Abbott has said.
". . .Translate to 'Richthofen's fall on 13 March 1918.' The photo distinctly shows the upper left aileron and wing tip in the streaked Fokker camouflage. The cross field on the aileron is over painted a dark color, probably olive brown.. ."
Langdon Badger of Boolcoolmata comments next.
". . .I have a copy of Ed Ferko's photo of this plane at the crash site taken from front on with a gaurd standing on the right side of the photo. Of interest is the cross field on the upper wing which is painted in a streaky manner in a shade similar to the fusealge streaking that can be seen between the cockpit and the yellow tail section (also lower wings). As you know the upper wing cross is surrounded by the narrow white border but outside of this is a thinner border (about half the thickness of the white border) which is noticibly darker than the rest of the overpainted field, have you considered what colour this might be?. . . I considered that this area might be a little overexposed but it does contrast markedly against the cross field colour you have described as being "probably olive brown" which should be similar, in its tonal value, to the olive brown of the standard camouflage. . ."
Posted: Sunday, July 20, 2008 - 09:31 AM UTC
Thanks Stephen
Interesting... I wonder if the white fuselage panels were treated in same manner as the upper wing's? It would make sense... even if you can't really tell in the photos. Looking again at my earlier photo, there definitely is a dark outline to the fuselage cross:

Stephen - do you have a better quality version of this picture too?
Anyway, I might try it that way, with a brushed outline to the crosses to explain the dark border (evident on the wings). If it proves to be the wrong conclusion - but helps the debate - that's fine by me.
All the best
Rowan
Interesting... I wonder if the white fuselage panels were treated in same manner as the upper wing's? It would make sense... even if you can't really tell in the photos. Looking again at my earlier photo, there definitely is a dark outline to the fuselage cross:

Stephen - do you have a better quality version of this picture too?
Anyway, I might try it that way, with a brushed outline to the crosses to explain the dark border (evident on the wings). If it proves to be the wrong conclusion - but helps the debate - that's fine by me.
All the best
Rowan

CaptainA

Joined: May 14, 2007
KitMaker: 3,117 posts
AeroScale: 2,270 posts

Posted: Sunday, July 20, 2008 - 09:36 AM UTC
Is there anybody out there who is not thoroughly confused? Go ahead, raise your hands. 


JackFlash

Joined: January 25, 2004
KitMaker: 11,669 posts
AeroScale: 11,011 posts

Posted: Sunday, July 20, 2008 - 10:20 AM UTC
Hey Carl;
Think of it this way. White fields of the crosses were applied at the factory level. Then shortly after arrival at the depot the white fields were overpainted olive green just leaving a 10cm white border around the crosses. Then possibly the wing and fuselage was partially overpainted yellow at the unit level. Note, most of this would have been accomplished before the machine was finally assembled for duty at the unit level.
Think of it this way. White fields of the crosses were applied at the factory level. Then shortly after arrival at the depot the white fields were overpainted olive green just leaving a 10cm white border around the crosses. Then possibly the wing and fuselage was partially overpainted yellow at the unit level. Note, most of this would have been accomplished before the machine was finally assembled for duty at the unit level.
Posted: Sunday, July 20, 2008 - 08:15 PM UTC
Hi again
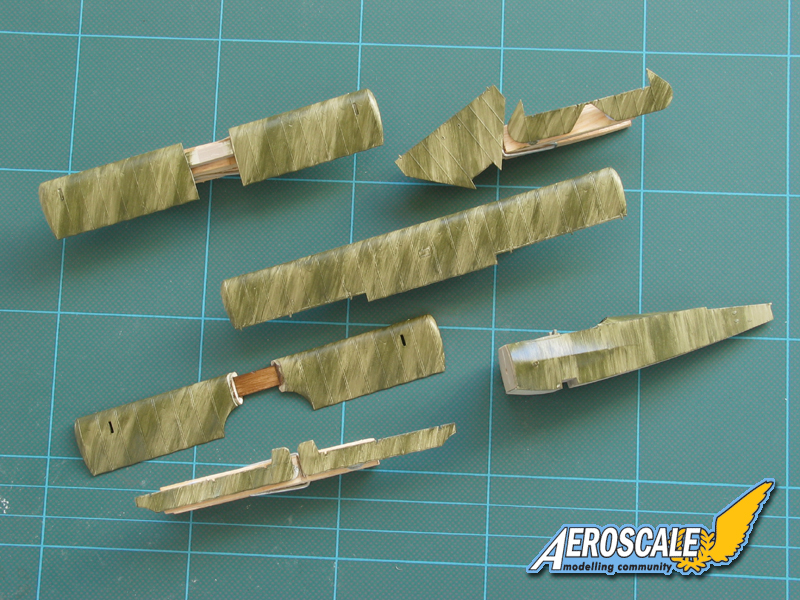
A quick lick of paint before breakfast - I've added a bit more streaking to try to give the effect of the painter charging his brush:

Sorry, Carl - I missed your question before. No problems so far - I've eased the fit of the lower wing spar slightly but, other than that, everything is fitting together beautifully...
All the best
Rowan
A quick lick of paint before breakfast - I've added a bit more streaking to try to give the effect of the painter charging his brush:

Quoted Text
...how is it going together
Sorry, Carl - I missed your question before. No problems so far - I've eased the fit of the lower wing spar slightly but, other than that, everything is fitting together beautifully...
All the best
Rowan


JackFlash

Joined: January 25, 2004
KitMaker: 11,669 posts
AeroScale: 11,011 posts

Posted: Sunday, July 20, 2008 - 08:53 PM UTC
Perfect Rowan! You have a talent for this!
 |


