_GOTOBOTTOM
Early Aviation
Discuss World War I and the early years of aviation thru 1934.
Eduard's Fokker Dr.I
Merlin
Staff MemberSenior Editor
AEROSCALE
#017
_VISITCOMMUNITY
United Kingdom
Joined: June 11, 2003
KitMaker: 17,582 posts
AeroScale: 12,795 posts
Posted: Saturday, July 12, 2008 - 08:26 AM UTC
Hi there

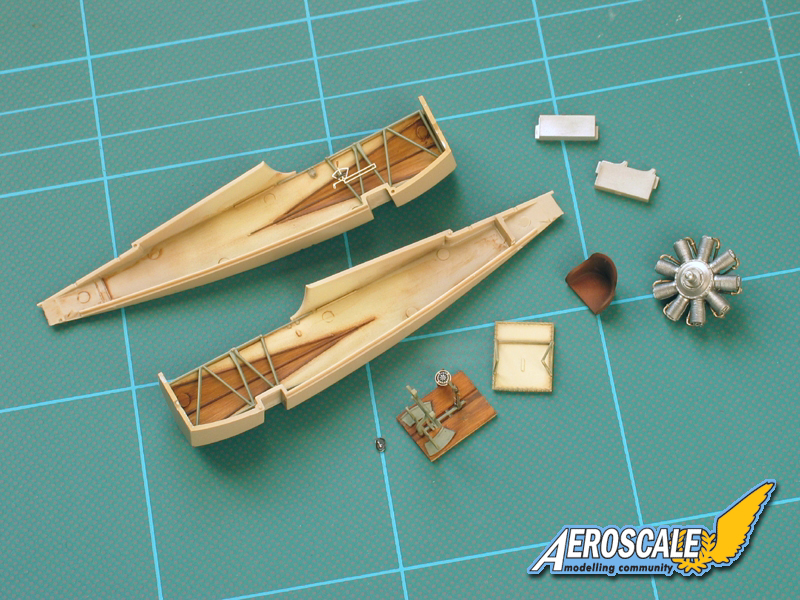
Eduard have very kindly sent a replacement sample after the original package disappeared in the post, so it seems the least I can do to repay the favour by trying to break the "builder's block" that's afflicted me lately and take a timid step into uncharted territory by tackling the Triplane.

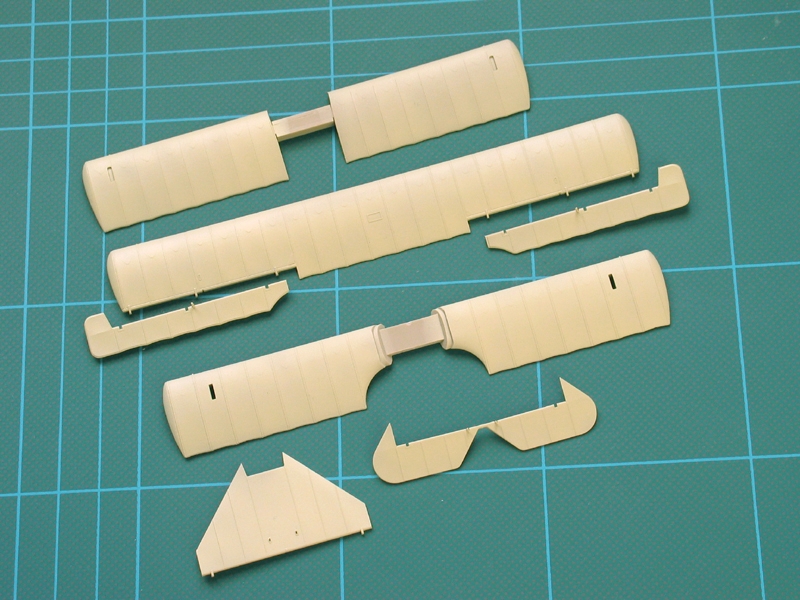
I made a reasonable start today (no total disasters - just a few near-misses through being so out of practice! ) - and I hope to post some pics tomorrow.

But first a question for you all: Can you help on the colour scheme? I'm planning on building Lothar von Richthoven's Dr.1 (so I can keep the resin figure of Manfred for an Albatros to follow) and have done a bit of the obligatory web-trawling. The seems to be a lack of consensus on whether the top wing of his triplane was painted yellow or not.
A contemporary crash report that describes the overall colour scheme makes no mention of a yellow top wing

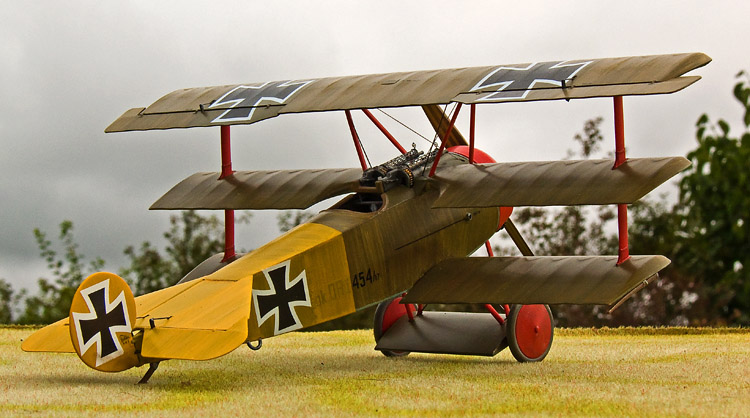
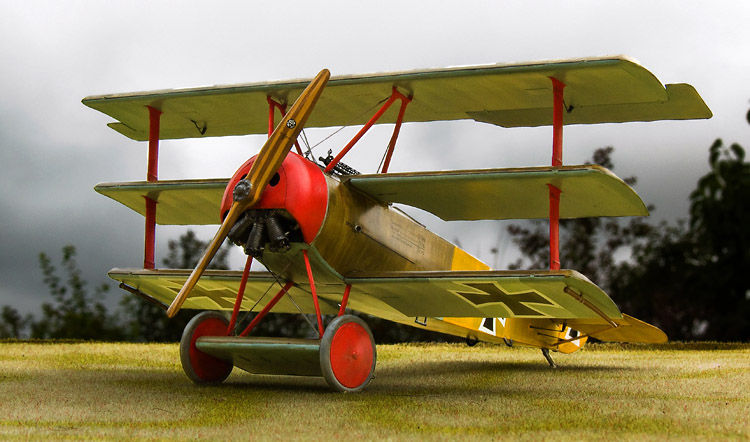
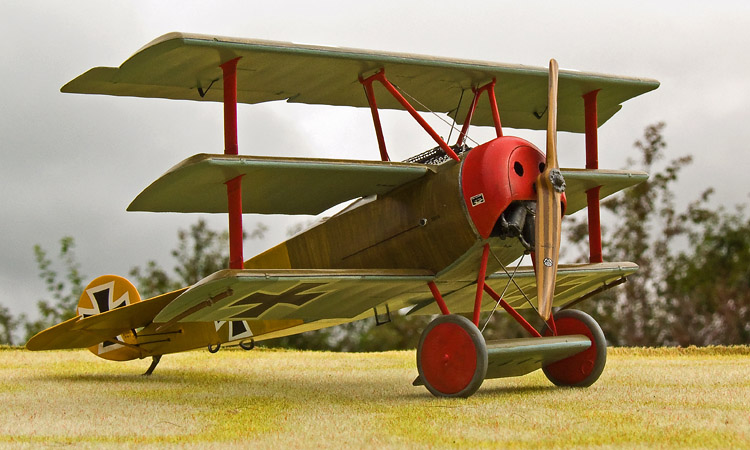
Eduard depict the scheme like this, with a coat of yellow partly obscuring the standard streaked camouflage:


I can see where the confusion has arisen - two photos of the original aircraft could be used to back either conclusion:


The only point that seems fairly conclusive (and I use the term with caution... LOL!) is that the area around the crosses was overpainted much darker than Eduard show.

Any help in pinning down the scheme ahead of painting would be much appreciated.

All the best

Rowan
CaptainA
_VISITCOMMUNITY
Indiana, United States
Joined: May 14, 2007
KitMaker: 3,117 posts
AeroScale: 2,270 posts
Posted: Saturday, July 12, 2008 - 08:45 AM UTC
"Richthofen's Circus" by Osprey has this aircraft on the front cover. It has a yellow upper wing. But there is no color profile in the book.

The 1/32 Hobbycraft kit has this aircraft as an option. It also shows the upper wing to be yellow.

So, if you have any remaining doubt, ask Stephen.
alpha_tango
_VISITCOMMUNITY
Germany
Joined: September 07, 2005
KitMaker: 5,609 posts
AeroScale: 5,231 posts
Posted: Saturday, July 12, 2008 - 09:03 AM UTC
Hi Rowan

strange things happen with orthochromatic film (or glass tiles)!

My interpretation is that there were white squares below the "Tatzenkreuze" and thus the yellow (chrome yellow!) is much brighter ... and ... as red and yellow are very very dark on the ortho-chromatic stuff, this is more yellow than the rest of the wing. Another great example is Hans Klein's Pfalz which has a yellow stripe along the fuselage ... on the pix it is "black"

my 2 ct

cheers

Steffen
Merlin
Staff MemberSenior Editor
AEROSCALE
#017
_VISITCOMMUNITY
United Kingdom
Joined: June 11, 2003
KitMaker: 17,582 posts
AeroScale: 12,795 posts
Posted: Saturday, July 12, 2008 - 09:05 AM UTC

Quoted Text

...So, if you have any remaining doubt, ask Stephen.


Cheers Carl

Part of my aim in this build is to make it a vehicle for Stephen's expert advice. I'll be tackling it very much as a WW1 "newbie" and building basically OOB, but applying a bit of modeller's common sense where necessary (e.g. Eduard's instructions call for an Olive Drab interior - I'm guessing that has to be a typo... anyway, I've gone for linen, with wooden panels and grey metal). Hopefully, if I stick pretty much to the kit as presented, Stephen can add details and fill in the gaps.

When I first got "serious" about modelling in the '70s, there were a lot of debates over the colour(s) of Manfred von Richthofen's aircraft. I plumped for Lothar's triplane because I thought it would be a less obvious choice (and leave the resin Manfred figure free for a future build) so it's ironic to find it's at the centre of another dispute over the colour scheme!

All the best

Rowan
Merlin
Staff MemberSenior Editor
AEROSCALE
#017
_VISITCOMMUNITY
United Kingdom
Joined: June 11, 2003
KitMaker: 17,582 posts
AeroScale: 12,795 posts
Posted: Saturday, July 12, 2008 - 09:15 AM UTC
Hi Stephen

I fully agree about the perils of interpreting orthochromatic film.

I presume the rudder was also yellow - painted over white - and that's paler than the dark panels on the wings. (Actually, I was going go exactly for your analysis and paint a "pure" yellow on those areas until I found the photos...)

As regards it being a "chrome yellow", I'm going to dull it down a little bit to reflect the natural pigments that would have been used at the time - that, plus it's generally agreed that the covering capacity (colour density) of dopes was less than we now take for granted.

All the best

Rowan
CaptainA
_VISITCOMMUNITY
Indiana, United States
Joined: May 14, 2007
KitMaker: 3,117 posts
AeroScale: 2,270 posts
Posted: Saturday, July 12, 2008 - 09:20 AM UTC
Just another thing to worry about in my opinion. My builds rarely make it outside my home. And there is no contrversy there.

Chrome yellow sounds great to me. That is what I will use when I build this one.
alpha_tango
_VISITCOMMUNITY
Germany
Joined: September 07, 2005
KitMaker: 5,609 posts
AeroScale: 5,231 posts
Posted: Saturday, July 12, 2008 - 09:31 AM UTC

Quoted Text

Hi Stephen


Hello Rowan

well, Stephen has not answered yet and he is surely more knowledgeable than myself.

cheers

Steffen
JackFlash
_VISITCOMMUNITY
Colorado, United States
Joined: January 25, 2004
KitMaker: 11,669 posts
AeroScale: 11,011 posts
Posted: Saturday, July 12, 2008 - 02:17 PM UTC
Greetings all;

Sorry for this tardy response. I have been dealing with a troublesome vehicle issue of late. Too depressing to discuss. I am mourning the loss of my Little black Pontiac GTP. Now on to the subject. LvR' Fokker dr.I 454/17. Here is another profile to throw into the mix.

Click here.

The question is whether or not this aircraft's top wing was overpainted yellow. First the (wing and fuselage) cross fields were not yellow but had been overpainted in the field upon arrival (before being assembled.) to cut down the white areas. The unit received supplies of the camouflage paint to use for repairs. It was these stocks that were used. The colour authority Dan san Abbott has said.

". . .There are some who contend the upper wing was painted yellow because he was the Jastafuhrer of Jasta11 (at the time). Well the fact of the matter is the upper wing was NOT yellow, it was finished in the standard Fokker Flugzeugwerke streaked finish. This is very clearly shown in a photo graph that appears in a biography of LvR titled, 'Der kampfflieger Lothar Frhr von Richthofen' by D.Schweckendiek, published by Hanseatische Verlagsanstalt Hamburg 1938. A photograph opposite page 48 captioned 'Richthofen's absturz am 13 März 1918.' Translate to 'Richthofen's fall on 13 March 1918.' The photo distinctly shows the upper left aileron and wing tip in the streaked Fokker camouflage. The cross field on the aileron is over painted a dark color, probably olive brown.. ."


Langdon Badger of Boolcoolmata comments next.
". . .I have a copy of Ed Ferco's photo of this plane at the crash site taken from front on with a gaurd standing on the right side of the photo. Of interest is the cross field on the upper wing which is painted in a streaky manner in a shade similar to the fusealge streaking that can be seen between the cockpit and the yellow tail section (also lower wings). As you know the upper wing cross is surrounded by the narrow white border but outside of this is a thinner border (about half the thickness of the white border) which is noticibly darker than the rest of the overpainted field, have you considered what colour this might be?

The wing out board of the cross field area looks much lighter than the rest of the original streaky camouflage. Unfortunately I do not have access to the book you quote but are you sure this area is not yellow? I considered that this area might be a little overexposed but it does contrast markedly against the cross field colour you have described as being "probably olive brown" which should be similar, in its tonal value, to the olive brown of the standard camouflage. . ."

Not only is orthochromatic film tough to read at times but, each time any photograph is copied, i.e. original, copied, copy copied, copy copied, details are lost. What is wanted is the first copy or, if possible the original photograph. Most of what is published are multi-generation photographs. The photo of Lothar's crash is one these 3rd, 4th or 5th generation photographs. In our generation its like taking a 3MB BMP to a 20kb jpg.

For me two things are important here.
1. LvR was the Jasta 11 commander at the time.
2. The photographs in the public domain are not clear on this.

Conclusion: Either could be correct depending on the time of service. For the time immediately before the crash I wold go with a translucent yellow. Thinly applied. except over the previously overpainted camouflage green crossfields.


JackFlash
_VISITCOMMUNITY
Colorado, United States
Joined: January 25, 2004
KitMaker: 11,669 posts
AeroScale: 11,011 posts
Posted: Saturday, July 12, 2008 - 03:02 PM UTC


Model built by Keld Kofoed Hansen of Bornholm, Denmark. As seen on Rodfen website and represents machine flown by Ltn. Lothar von Richthofen, Dr.I 454/17.


Merlin
Staff MemberSenior Editor
AEROSCALE
#017
_VISITCOMMUNITY
United Kingdom
Joined: June 11, 2003
KitMaker: 17,582 posts
AeroScale: 12,795 posts
Posted: Saturday, July 12, 2008 - 08:22 PM UTC
Hi Stephen

I wonder whether the dark border around the cross might be a result of the unit-painters first outlining the cross carefully and then "filling in" more roughly around it? It's a plausible explanation, so I might try for that effect on the model.

As for the wing itself... thinly applied yellow sounds a fair compromise. Of course, there'll be some who argue the wing wasn't yellow at all, and others who'll moan the yellow is too thin! With or without the yellow top wing, it's certainly a striking scheme, as Keld's beautiful model shows (I only hope mine turns out half as good...)!

All the best

Rowan
CaptainA
_VISITCOMMUNITY
Indiana, United States
Joined: May 14, 2007
KitMaker: 3,117 posts
AeroScale: 2,270 posts
Posted: Sunday, July 13, 2008 - 02:06 AM UTC
Good arguments for either side. I do think a thinly applied yellow overcoat is what I will do when I build this one. You convinced me. On the other hand, a subtle scheme from a von Richthofen
Merlin
Staff MemberSenior Editor
AEROSCALE
#017
_VISITCOMMUNITY
United Kingdom
Joined: June 11, 2003
KitMaker: 17,582 posts
AeroScale: 12,795 posts
Posted: Sunday, July 13, 2008 - 09:12 AM UTC
Hi again

Apologies for these no being the most exciting pics in the world, but I thought I'd better post something lest you all think I've given up already - a fair assumption, given my recent reputation!

I didn't make quite as much progress today as I'd hoped because of the sudden influx of samples (it's nice to be able to "complain" about spending time writing reviews ) but, anyway, here's a shot of the basic status quo:


As you can see. there's a bit to do - I want add some wiring and control cables and dull down some of the etched parts. The wood-effect is almost certainly too dark / overdone, but we live and learn with every build... (it's poster paints done in a rush - not as subtle as oils, but haste makes allowances... oil efficianados might call it "quick and nasty"...

Question for Stephen: What colour should the seat be? Eduard say "Wood Brown" - Windsock say it was a metal seat with a fabric covering. As you can see, I've gone for a dark brown that matches (from wonky memory) a restored Albatros seat I once saw. It's not too late for a correction.

I've used WEM enamels throughout - they don't do any WW1 colours (yet ), but I've mixed and matched from their existing range. So, while the cockpit dried, I made a start on the flying surfaces and gave them a base-coat of Elfenbein (it looks quite a bit more yellow in the pic than in real life).


The reason for the rather boring picture is a question for Stephen: Were the control surfaces "streaked" before or after they were attached to the wings and tail? There are profiles in the Windsock book that show different streaking on the ailerons to the wings, but I haven't found a conclusive photo yet.

The guns... ahh the guns. As you can tell, I've spent the day darting about a bit!


The nice thing is that Eduard have moulded them in a way that makes attaching the alternative etched barrels much easier than in their previous kits (solid-barrelled versions are included for anyone who isn't confident with etched metal). That said, I struggled matching the instructions with the actual etched parts! Eventually, I went web-browsing and found one of Mark Millar's wonderful 3-D renders that makes me think Eduard have the part reversed in the diagram:


This way 'round, the raised detail is on the outside - which makes sense! - but I'll leave it to the experts for the final conclusion.

It's fun so far! I'm enjoying building WW1-style! More to follow soon (promise! )

All the best

Rowan
alpha_tango
_VISITCOMMUNITY
Germany
Joined: September 07, 2005
KitMaker: 5,609 posts
AeroScale: 5,231 posts
Posted: Sunday, July 13, 2008 - 09:51 AM UTC
Hi Rowan

Looking very very good so far (I like the wood effekt).

I have a question as I also want to do WvRs Dr.I: What engine had he mounted? Oberursel, leRhone, Clerget, Bentley ?

...... Rowan? ... Stephen? .. Dan-san?

TIA

cheers

Steffen
Merlin
Staff MemberSenior Editor
AEROSCALE
#017
_VISITCOMMUNITY
United Kingdom
Joined: June 11, 2003
KitMaker: 17,582 posts
AeroScale: 12,795 posts
Posted: Sunday, July 13, 2008 - 10:23 AM UTC

Quoted Text

I have a question as I also want to do WvRs Dr.I: What engine had he mounted? Oberursel, leRhone, Clerget, Bentley ?

...... Rowan? ... Stephen? .. Dan-san?

TIA

cheers

Steffen


Hi Steffen

I've been so concerned with the colour scheme, I didn't even realise there was a question over the engine! On that one one, I'll definitely plead ignorance and go with the kit parts in the noble cause of actually finishing this one...

All the best

Rowan
thegirl
_VISITCOMMUNITY
Alberta, Canada
Joined: January 19, 2008
KitMaker: 6,743 posts
AeroScale: 6,151 posts
Posted: Sunday, July 13, 2008 - 12:34 PM UTC
Looking really great so far Rowan , very nice wood grain .
JackFlash
_VISITCOMMUNITY
Colorado, United States
Joined: January 25, 2004
KitMaker: 11,669 posts
AeroScale: 11,011 posts
Posted: Sunday, July 13, 2008 - 02:53 PM UTC

Quoted Text

Hi Rowan Looking very very good so far (I like the wood effekt). I have a question as I also want to do WvRs Dr.I: What engine had he mounted? Oberursel, leRhone, Clerget, Bentley ? ...... Rowan? ... Stephen? .. Dan-san? TIA cheers Steffen


Wolfram von Richthofen was a new member to Jasta 11 when his cousin Manfred was KIA. As a matter of protocol MvR frowned on engine exchanges. None of the Jasta 11 Dr.I types I have seen have anything other than the Oberursel Ur.II.

The LeRhône was a nice replacement but not without its price.
The Clerget was employed by Ltn. Jacobs of Jasta 7 but later in the war. he seems the only one we know of todate.
The Bentley was too big for the Dr.I and it would need one of the larger cowls found on the few experimental airframes back home in Berlin.
JackFlash
_VISITCOMMUNITY
Colorado, United States
Joined: January 25, 2004
KitMaker: 11,669 posts
AeroScale: 11,011 posts
Posted: Sunday, July 13, 2008 - 03:04 PM UTC

Quoted Text

Hi again . . .Question for Stephen: What colour should the seat be? Eduard say "Wood Brown" - Windsock say it was a metal seat with a fabric covering. As you can see, I've gone for a dark brown that matches (from wonky memory) a restored Albatros seat I once saw. It's not too late for a correction. . . .It's fun so far! I'm enjoying building WW1-style! More to follow soon (promise! ) All the best Rowan


Greetings Rowan, quoting from my review on the kit ;

". . .According to the seat from 425/17 in Canada’s Royal Military institute you should add .040 to the underside of the seat (PP C 23.) Use a motor tool cutter to thin the inner face of the back and arm rest of the seat (PP C 23). The back of the aluminum seat ( PP C 23) was evidently covered in unbleached fabric on the inner face and the seat cushion (PP C 13) was the parachute pack. I add a section to the underside of the seat to get the depth and then simulate the parachute pack texture and harness rings on the kit seat itself. The outer face would be aluminum. I will usually replace the seat supports ( PP C 3 X 2 ) with bent brass rod and add a cross brace to rest the front edge of the seat ( PP C 23 ) on. The harness assembly ( PE 1 & 2 X 2 ) are easily pressed in place but add a clear dull coat to the pre-painted faces them first and let dry. Begin with the harness buckles and work out to the other ends. Once shaped the item can be glued into place again starting with the buckles and working outward. The screen / bulkhead ( PP C 12 ) can be painted to represent unbleached / clear doped fabric. The reinforcement edge was leather. The horizontal bar on the screen/bulkhead ( PP C 12 ) is where the back of the seat rests. This was attached with seven pop rivets. . ."

See full review here.
Merlin
Staff MemberSenior Editor
AEROSCALE
#017
_VISITCOMMUNITY
United Kingdom
Joined: June 11, 2003
KitMaker: 17,582 posts
AeroScale: 12,795 posts
Posted: Sunday, July 13, 2008 - 07:45 PM UTC
Cheers Stephen

I've changed the seat to aluminium with a linen interior. Lacking refs for a parachute (and in the interest of moving on) I'll keep the cushion - it'll be largely hidden by the harness anyway.

All being well, I'll be able to work on the kit again this evening, so I'll try to get the fuselage closed-up.

All the best

Rowan
alpha_tango
_VISITCOMMUNITY
Germany
Joined: September 07, 2005
KitMaker: 5,609 posts
AeroScale: 5,231 posts
Posted: Sunday, July 13, 2008 - 10:26 PM UTC

Quoted Text

Wolfram von Richthofen was a new member to Jasta 11 when his cousin Manfred was KIA. As a matter of protocol MvR frowned on engine exchanges. None of the Jasta 11 Dr.I types I have seen have anything other than the Oberursel Ur.II.

The LeRhône was a nice replacement but not without its price.
The Clerget was employed by Ltn. Jacobs of Jasta 7 but later in the war. he seems the only one we know of todate.
The Bentley was too big for the Dr.I and it would need one of the larger cowls found on the few experimental airframes back home in Berlin.


Thank you very much Stephen!!

I have read that it was very common to search the frontlines for useable engines (maybe some kind of urban ledgend??) and that they needed some more of those as the German oil was much worse than the Allied/Entente stuff.

I think a LeRhone would not be a problem, as the Oberursel engine is a clone of that. I do not really know how a Clerget engine should look, but it was different .. will need to find one

As for the Bentley: I have seen a pic somewhere where the engine of a Dr.1 hat 2 pushrods per cylinder which is typical for the Bentley .. but it could well be that my mind is playing tricks here.

Stephen, if you have a little time, could you comment on my above text .. I'd like to improve my WW1 knowledge

cheers

Steffen
Merlin
Staff MemberSenior Editor
AEROSCALE
#017
_VISITCOMMUNITY
United Kingdom
Joined: June 11, 2003
KitMaker: 17,582 posts
AeroScale: 12,795 posts
Posted: Monday, July 14, 2008 - 10:18 AM UTC
Hi again

Only one pic - but at least it's proof I'm still at it!

So, complete with re-painted aluminium seat test fitted (thanks Stephen!), one thing I couldn't resist adding was fuselage bracing. It's clear on the Windsock plans and a quick check shows it will be visible on the completed model, so it's worth adding:


Eduard show a magneto (part PE4) at the pilot's feet. It doesn't show in any of my references and, going by Stephen's post in Brad's superb Fokker F.1 build , I'm presuming this is superfluous:


Hopefully, I'll get a better crack at things tomorrow and close up the fuselage.

All the best

Rowan

DAK66
_VISITCOMMUNITY
Tennessee, United States
Joined: April 28, 2006
KitMaker: 286 posts
AeroScale: 45 posts
Posted: Monday, July 14, 2008 - 11:28 AM UTC
Nice build Rowan lookin forward to the rest of the build
JackFlash
_VISITCOMMUNITY
Colorado, United States
Joined: January 25, 2004
KitMaker: 11,669 posts
AeroScale: 11,011 posts
Posted: Monday, July 14, 2008 - 03:42 PM UTC

Quoted Text

Hi again. . .


Hopefully, I'll get a better crack at things tomorrow and close up the fuselage.

All the best Rowan


In your kit the starting magneto is the object at the pilot's left shoulder. The "Bosch" starting magneto (PE 4 ) they include (that they tell you to put at the pilot's left foot) is bogus. It was designed for inline motors. You will find this echoed in the Fokker F.I thread by Brad Cancian but they told him to put it on the other side by the foot.
Merlin
Staff MemberSenior Editor
AEROSCALE
#017
_VISITCOMMUNITY
United Kingdom
Joined: June 11, 2003
KitMaker: 17,582 posts
AeroScale: 12,795 posts
Posted: Tuesday, July 15, 2008 - 09:45 AM UTC
Hi again

With or without the spurious Bosch magneto, Eduard provide plenty of detail to squeeze into the small cockpit. The good news is that it all fits!


I've added control cables and a couple of electrical cables that show in the Windsock Datafile. With everything in place, the fuselage halves fit together well. With the cockpit area quite open at the moment, I'll do a bit more to "dirty-up" the seat harness and pick out the details better, before adding the top decking.


I'll let everything dry overnight and then add the final cross-brace. Eduard provide an optional instrument (an RPM indicator?) to mount on this, but I haven't found it yet in my references so I'll probably leave it off - unless Stephen says to do otherwise.

After that, the time is fast approaching to begin to think about tackling the camouflage...

All the best

Rowan
betheyn
Staff MemberSenior Editor
AEROSCALE
#019
_VISITCOMMUNITY
England - South East, United Kingdom
Joined: October 14, 2004
KitMaker: 4,560 posts
AeroScale: 2,225 posts
Posted: Tuesday, July 15, 2008 - 10:00 AM UTC
Hi Rowan,
This is starting to look really good.
I must say knowing your desire to "fiddle" with kits, you are tackling this well for an OOB build.
I thought I would never hear myself say this, but your speed building .
Andy
Merlin
Staff MemberSenior Editor
AEROSCALE
#017
_VISITCOMMUNITY
United Kingdom
Joined: June 11, 2003
KitMaker: 17,582 posts
AeroScale: 12,795 posts
Posted: Tuesday, July 15, 2008 - 10:31 AM UTC
Thanks for the encouraging words Andy!

Speed building? For me - maybe... but that probably translates into normal pace for anyone else!

But I must admit I'm relishing this build. It's great to work on something outside my normal area of interest and it's also the first chance I've had to get to work-bench in months, coinciding with short lull between documentary projects. I'd better make the most of it...

Hopefully another update tomorrow - and how often do you hear that from me!

All the best

Rowan
 _GOTOTOP