_GOTOBOTTOM
Early Aviation
Discuss World War I and the early years of aviation thru 1934.
1/32 Roden GB 2008 Pfalz DIII
Repainted
_VISITCOMMUNITY
Östergötland, Sweden
Joined: April 04, 2006
KitMaker: 1,058 posts
AeroScale: 1,004 posts
Posted: Monday, September 15, 2008 - 01:09 AM UTC
Hi Folks
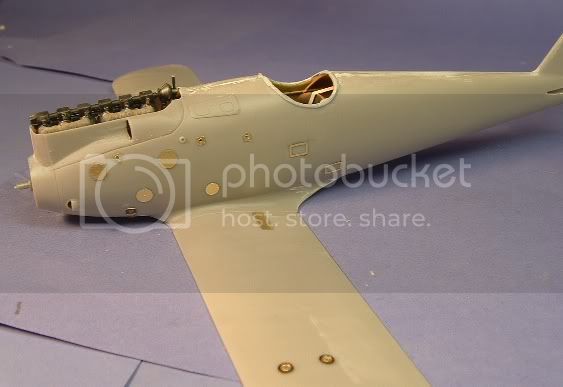
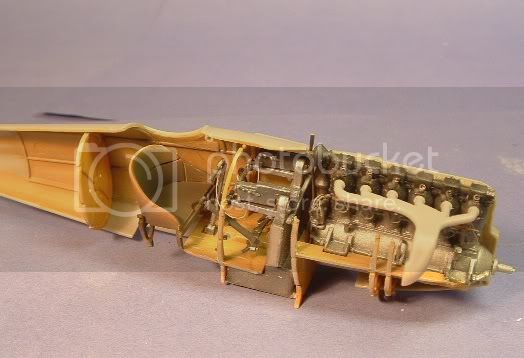
This is what I'm been doing beside the Albatros and Nieuportbuild. This kit is Rodens 613kit and it’s not a shake and bake. Among the first builder off this kit Stephen told us there was some difficulties about this one, therefore I decided to go slow with this one. The kit is not bad but it takes the builder attention. As far as I come with it I just can say that I been grinding some plastic on the inside off the fuselage too make everything to fit inside this slim fuselage.

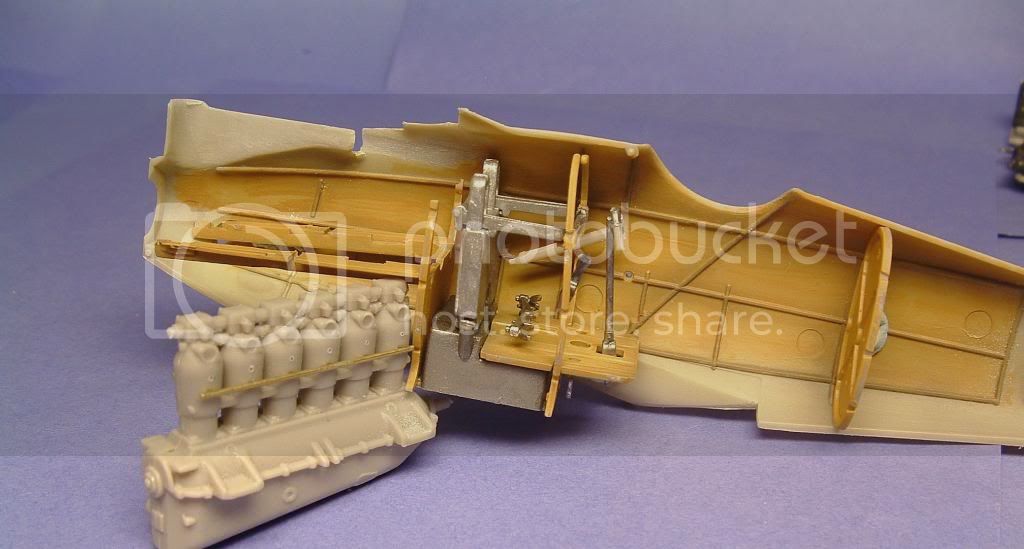
You would not need to tell me that the Pfalz should be gray on the inside, I just like to woodgrian so bare with me.

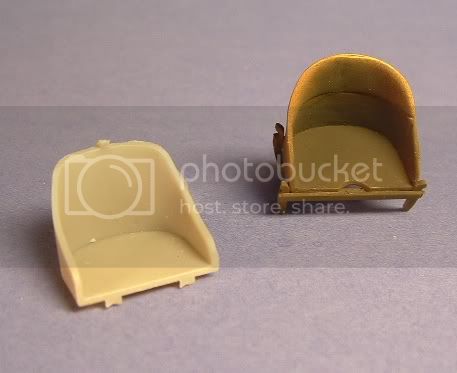
Just like me, I had to make just another seat for this one too.


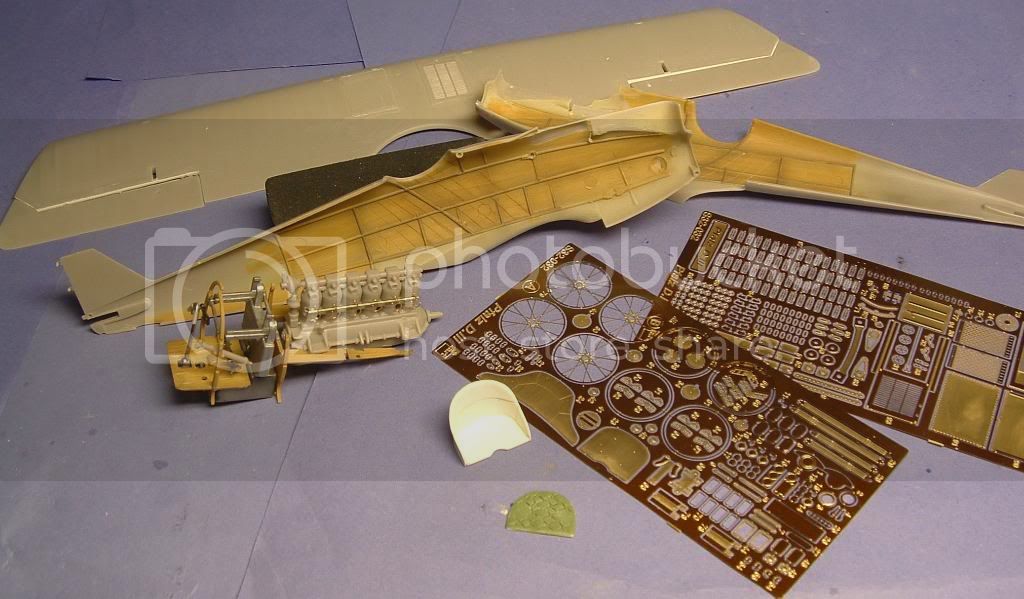
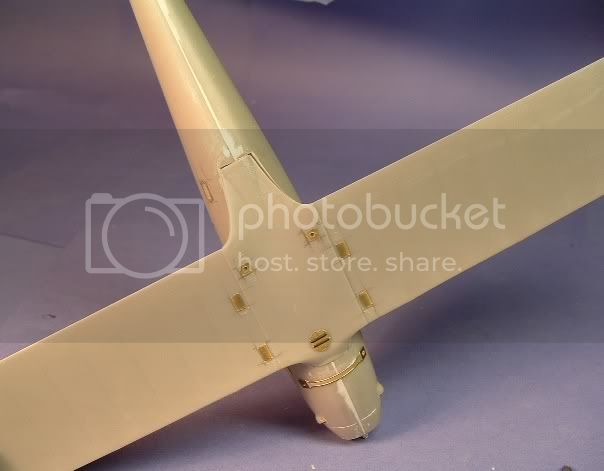
The ailerons were cut off on the upper wing and tail. I did not like the big gap so I lined up the ailerons with a piece off plasticard.
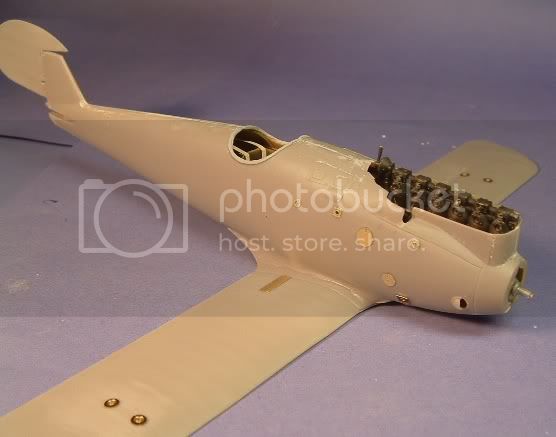
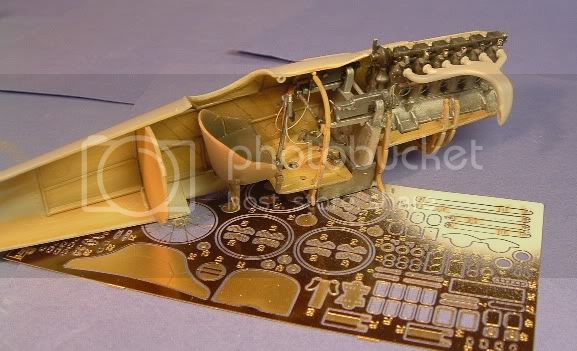
Also I'm got the Part etch 32-032 for this build and I must say I have spare etch parts for the rest off my life as a builder off these nice kits. I can never use all those bits anyway. There is Rockers and spring for the engine, the smallest things I´ve seen. Seat wire wheels and a lot off cosmetics to add on the outside off the fuselage.

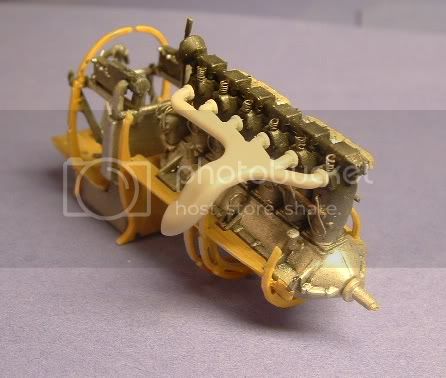
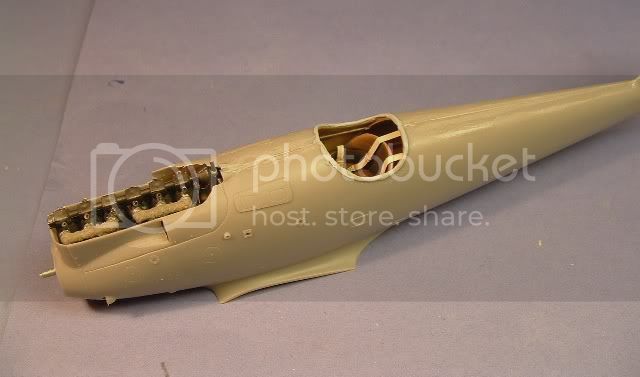
The engine you saw at the Albatros D1 thread.Now installed.

Last the fuselage is glued togehter and some minor filler needed( sorry Terri run out off nail remover, so had to go the old schoolway)


for this time

Larsa Q
thegirl
_VISITCOMMUNITY
Alberta, Canada
Joined: January 19, 2008
KitMaker: 6,743 posts
AeroScale: 6,151 posts
Posted: Monday, September 15, 2008 - 03:16 AM UTC
Nicely done Lars , even if you are out of nail polish remover ( no you can't have my either ! )
About time some one did a Pfalz D.III . One of my favorite aircraft . Looking forward on seeing more of this project
Repainted
_VISITCOMMUNITY
Östergötland, Sweden
Joined: April 04, 2006
KitMaker: 1,058 posts
AeroScale: 1,004 posts
Posted: Monday, September 15, 2008 - 03:49 AM UTC
Thanks Terri
Yep, the Pfalz is just awesome, both as a kit and the real thing. Was hoping for that guy Stephen talked about. He was mowing to Texas or something, so Why can´t I show this to you guys,You´ve already had a pip on the enging on the D1 thread.

ps Now I hawe a new bottle of nail (polish)removers
Larsa Q
Repainted
_VISITCOMMUNITY
Östergötland, Sweden
Joined: April 04, 2006
KitMaker: 1,058 posts
AeroScale: 1,004 posts
Posted: Monday, September 15, 2008 - 06:37 AM UTC
Hi
The lower wing had some grinding with the Dremel in the centre just to get the wing to fix nice into the fuselage. The most off all the cosmetics from Part are added to the fuselage. I can´t say if this will improve the build but


For this time
Larsa Q
Hatter50
_VISITCOMMUNITY
North Carolina, United States
Joined: June 17, 2006
KitMaker: 478 posts
AeroScale: 391 posts
Posted: Monday, September 15, 2008 - 06:54 AM UTC
I think I might have to add one of these to my "Stash". I'm gonna have to work on my "Wood" skills some.

I'm "right-click" "Saving" here.

Regards
Steve
Repainted
_VISITCOMMUNITY
Östergötland, Sweden
Joined: April 04, 2006
KitMaker: 1,058 posts
AeroScale: 1,004 posts
Posted: Monday, September 15, 2008 - 06:58 AM UTC
Feel free to right click anytime
where´s the beernuts

Larsa Q
CaptainA
_VISITCOMMUNITY
Indiana, United States
Joined: May 14, 2007
KitMaker: 3,117 posts
AeroScale: 2,270 posts
Posted: Monday, September 15, 2008 - 08:19 AM UTC
Looks great so far. How are you going to get those Spandaus in there? Color scheme?

Live long and prosper.
Repainted
_VISITCOMMUNITY
Östergötland, Sweden
Joined: April 04, 2006
KitMaker: 1,058 posts
AeroScale: 1,004 posts
Posted: Monday, September 15, 2008 - 09:16 AM UTC
Hi Carl
The plan is to push the guncowling in from the outside.About colourscheme I have not decided yet, but silverdope is a good horse to bet on

Larsa Q
thegirl
_VISITCOMMUNITY
Alberta, Canada
Joined: January 19, 2008
KitMaker: 6,743 posts
AeroScale: 6,151 posts
Posted: Monday, September 15, 2008 - 09:24 AM UTC
I just might have to get this kit ! I think I will along with the part PE set as well .
That's a nasty gap on the underside though , is that the kit or from to many beers !
looks awesome Lars .
JackFlash
_VISITCOMMUNITY
Colorado, United States
Joined: January 25, 2004
KitMaker: 11,669 posts
AeroScale: 11,011 posts
Posted: Tuesday, September 16, 2008 - 08:20 AM UTC
Wow! another 1/32 build . . . I feel an addition coming on!
Extruder
_VISITCOMMUNITY
British Columbia, Canada
Joined: September 10, 2008
KitMaker: 24 posts
AeroScale: 4 posts
Posted: Tuesday, September 16, 2008 - 02:14 PM UTC
Lars, maybe it takes lot of work but it looks awesome!
If I just could have 1/10 of your skills (not to talk about Big Steve's!!) I would be sooooo happy!
I'm going to follow all your works, guys and girl
Jimisown
_VISITCOMMUNITY
Virginia, United States
Joined: September 19, 2008
KitMaker: 2 posts
AeroScale: 1 posts
Posted: Thursday, September 18, 2008 - 04:00 PM UTC
I'm new here, but nice work. I am just getting back into modeling and I haven't seen these kits. Where can I get them?

Jim
thegirl
_VISITCOMMUNITY
Alberta, Canada
Joined: January 19, 2008
KitMaker: 6,743 posts
AeroScale: 6,151 posts
Posted: Friday, September 19, 2008 - 03:45 AM UTC
Hi James , welcome . You can get Roden kit's through Roll Models who advertise on this site . Can also get them at www.squadron.com . Your LH should be able to order them for you as well .
thegirl
_VISITCOMMUNITY
Alberta, Canada
Joined: January 19, 2008
KitMaker: 6,743 posts
AeroScale: 6,151 posts
Posted: Friday, September 26, 2008 - 02:16 AM UTC
Okay Lars , now I blame you this time for getting the 32 bug . Was able to get the Part PE set for this kit , now just have to get the kit !
Repainted
_VISITCOMMUNITY
Östergötland, Sweden
Joined: April 04, 2006
KitMaker: 1,058 posts
AeroScale: 1,004 posts
Posted: Friday, September 26, 2008 - 03:13 AM UTC

Quoted Text

Okay Lars , now I blame you this time for getting the 32 bug . Was able to get the Part PE set for this kit , now just have to get the kit !


Hi Terri
I can live with that blame. This is a real nice kit, it´s have it´s share off troubles but iff you dryfit everything inside the cockpit before gluing you´l don´t going down on this.
Did you get the etch from Jadar?

Talking to thesupport yesterday and hopefully I´ll have my computer back next week( and I order a new par off handcuffs for my son )


Cheers
Larsa
thegirl
_VISITCOMMUNITY
Alberta, Canada
Joined: January 19, 2008
KitMaker: 6,743 posts
AeroScale: 6,151 posts
Posted: Tuesday, September 30, 2008 - 04:31 PM UTC
Hi Lars ! no the set hasn't arrived yet . I didn't get it from Jadar , online trade . Was even able to get the Roden kit as well . So the Part Pe set will have a friend !

I don't think handcuffs will work , so or later they will find away out of them !
CaptainA
_VISITCOMMUNITY
Indiana, United States
Joined: May 14, 2007
KitMaker: 3,117 posts
AeroScale: 2,270 posts
Posted: Wednesday, October 01, 2008 - 09:13 AM UTC
When I built this one, I needed a straight jacket.

After a month long hiatus when it was banished to the bottom of the pile, I pulled it out and finished it. I did the red and blue scheme. Overall, I was really happy with the results. It is a good kit that will build up into a great representation. It is also great practice for dry fitting.

Terri, I have done 4 of these big Roden kits. Two Dr.Is, a D.III, and the Pfalz. You might as well go ahead and budget for the other kits, because you will probably end up getting them soon, anyway. I have the ones I have not built waiting in my stash. You might even see one of them in the Stripe Campaign.

Great job Lars. Be careful with the vertical join in front of the engine. There is not much there for the glue to hold on to. It will break loose very easily. (Does this sound like the voice of experience, or what?)
JackFlash
_VISITCOMMUNITY
Colorado, United States
Joined: January 25, 2004
KitMaker: 11,669 posts
AeroScale: 11,011 posts
Posted: Wednesday, October 01, 2008 - 12:38 PM UTC
Greeting all;

While Larsa is building his in all varnished wood simulation, there is evidence that many interiors were simply overpainted in the silver dope/ paint mixture seen on the outershell of the fuselage. There is also evidence that says on some, only the inner shells were painted in the silbergraü and the wood formers were left in clear varnish. Since these fixtures were manufacturer separately the various shops may have run low on one type of sealant or the other at various times. To keep delivery contracts on schedule it was not unusual for aircraft manufacturers t have more than one way to skin a cat.
Repainted
_VISITCOMMUNITY
Östergötland, Sweden
Joined: April 04, 2006
KitMaker: 1,058 posts
AeroScale: 1,004 posts
Posted: Friday, October 03, 2008 - 10:34 PM UTC
Thanks Stephen. I was a little worry about that woodgraining.I was hoping that the slap on my fingers would not be that hard

Larsa
Hatter50
_VISITCOMMUNITY
North Carolina, United States
Joined: June 17, 2006
KitMaker: 478 posts
AeroScale: 391 posts
Posted: Friday, October 03, 2008 - 10:45 PM UTC
Ahhhhhhhhhhh yes........but woodgrain just looks so much better than silver dope when done well. And the cross planking is done so well also. Got an up close shot of that?

No slap on fingers here......


Regards
Steve
Repainted
_VISITCOMMUNITY
Östergötland, Sweden
Joined: April 04, 2006
KitMaker: 1,058 posts
AeroScale: 1,004 posts
Posted: Friday, October 03, 2008 - 11:01 PM UTC
Hi Steve
I had that phot before my son touched the computer Now the hard drive is clean from all nice pics, the only on I´ll still have is thoose I loaded up to photobucket
as punish for my son I´ll going to have him build an ww1build with all woodgrain and all, This will be a good lession for him

What can I say, he´s a son off a butcher, and I still love him, there will be more pics coming

Larsa
thegirl
_VISITCOMMUNITY
Alberta, Canada
Joined: January 19, 2008
KitMaker: 6,743 posts
AeroScale: 6,151 posts
Posted: Saturday, October 04, 2008 - 01:21 PM UTC
Well Lars , Got my Part PE set for this kit and WOW ! That is a lot of metal parts to add . The detail on them are just awesome .
Repainted
_VISITCOMMUNITY
Östergötland, Sweden
Joined: April 04, 2006
KitMaker: 1,058 posts
AeroScale: 1,004 posts
Posted: Monday, October 06, 2008 - 01:59 AM UTC
Hi Terri
Don’t you stop using your head here!!!
Parts are the best etch manufacture in giving the modeler plenty off etched things and stuff. I know the feeling off WOW when I first got my set yep. But when I started to checking out what I can or want to use from this set I’ll discovered that there will be plenty off gadgets left over on this fret to.

There´s stuff on this set I’ll never want to try to get together or else want to have on my model, for example in stage “E” Parts want you to sandwich 5 pieces off discs to make the starter, Why? What’s wrong with the kit item, the kit item even have an round handle to go with it, so why replacing the handle with an flat etched one?

Next insanity will be section “T” Parts want you to sandwich three tiny discs to make the rocker springs beneath the rocker arm. Repeat this six times on every side and do not dare to drop any tiny disc on the floor. The floor will turn into the biggest ocean you ever had in your livingroom.

Section “U” gives you etched turnbuckles. I’ll never heard about any modeler trying to get these on. Every month the local hobby mob have ours meeting in the Swedish Airforce Museum, There is no plane there with flat turnbuckles. In my word there is just hard enough to get a model rigged without this kind of help. I can’t get the thread thru the tiny etched hole.

Okey I’m not in a bad mode here, just spreading my wisdom Never replace a round thing with a flat thing and believe it will get your model any better, use your head and go for the things you like and think can improve the build. The set still includes very useful things, still enough for getting this from Parts

Now I just hope that I still have some friends on this forum

Larsa

thegirl
_VISITCOMMUNITY
Alberta, Canada
Joined: January 19, 2008
KitMaker: 6,743 posts
AeroScale: 6,151 posts
Posted: Monday, October 06, 2008 - 05:28 AM UTC
I'm still your friend Lars ! I hear you on using flat PE parts to make up replacements for the valve springs etc, etc............I won't be using those items on the fret . I wouldn't use the disc for the valve springs , not realistic at all . Wire is for easier to work with and if I lose one durning construction -I have a endless supply . Yah , flat turnbuckles they don't belong on a model . I like the Q-tip method works very well for me . I used flat turnbuckles once and didn't like them at all . To hard to work with and you are right , It's like trying to thread a needle ! So Lars I'm using my head or at least when I don't lose it in that ocean called a floor !

Have a beer on me !
Repainted
_VISITCOMMUNITY
Östergötland, Sweden
Joined: April 04, 2006
KitMaker: 1,058 posts
AeroScale: 1,004 posts
Posted: Monday, October 06, 2008 - 05:32 AM UTC
Hi Terri
I´ll take that beer and sending the empty can to Steve

Cheers

Larsa
 _GOTOTOP