_GOTOBOTTOM
Early Aviation
Discuss World War I and the early years of aviation thru 1934.
WNW 2009 -10 Alb. D.Va Brad C
BradCancian
_VISITCOMMUNITY
Queensland, Australia
Joined: August 30, 2006
KitMaker: 285 posts
AeroScale: 281 posts
Posted: Saturday, April 17, 2010 - 12:20 AM UTC
Hi all - I decided to join this fine WnW group build with yet another Albatros DVa!

I tend to stick to 1:48 so this is slightly different for me. I also vowed to keep the construction strictly Out of Box, with the exception of maybe the final colour scheme.

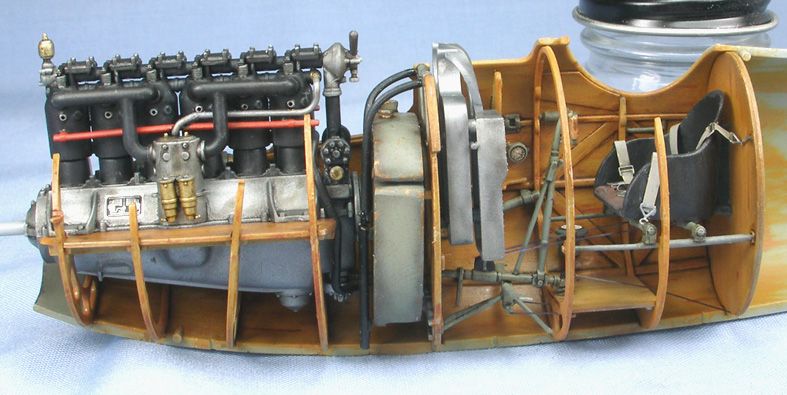
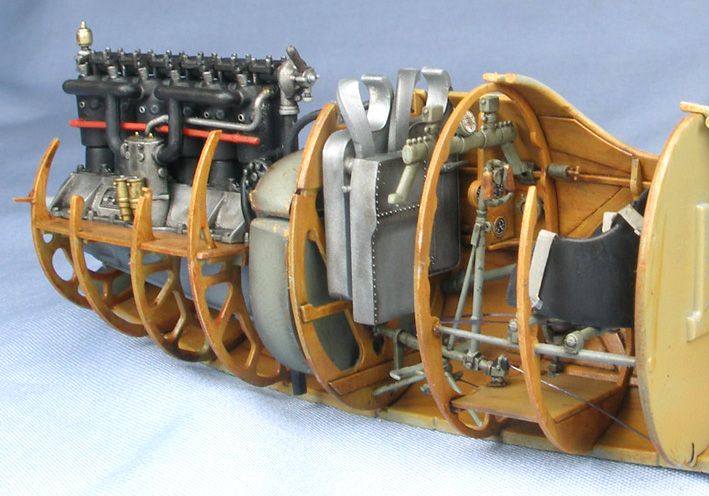
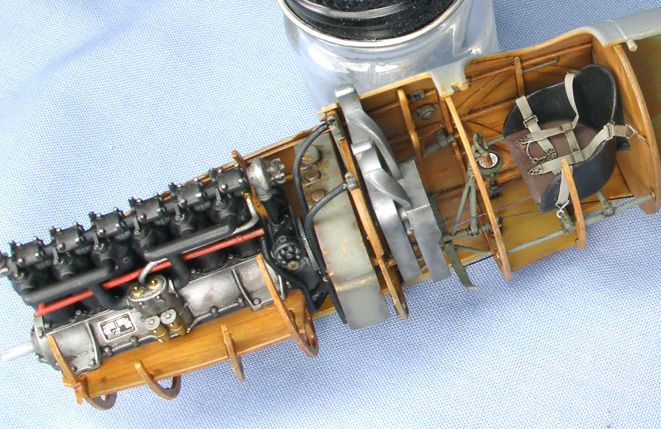
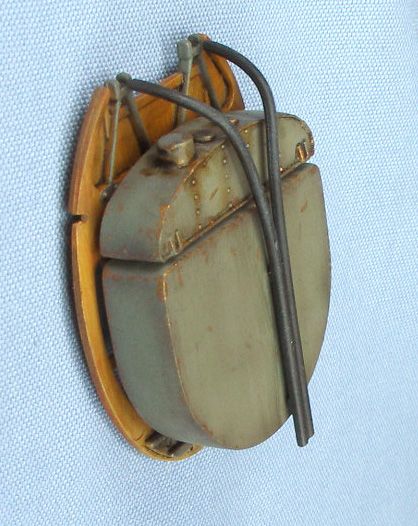
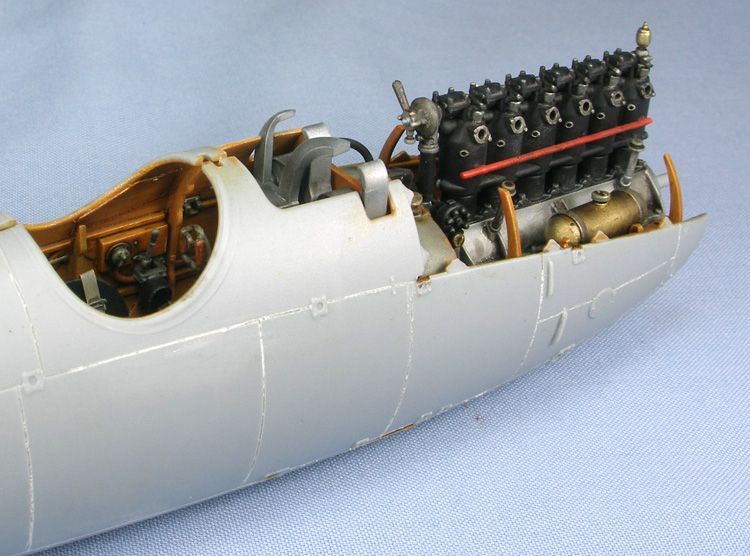
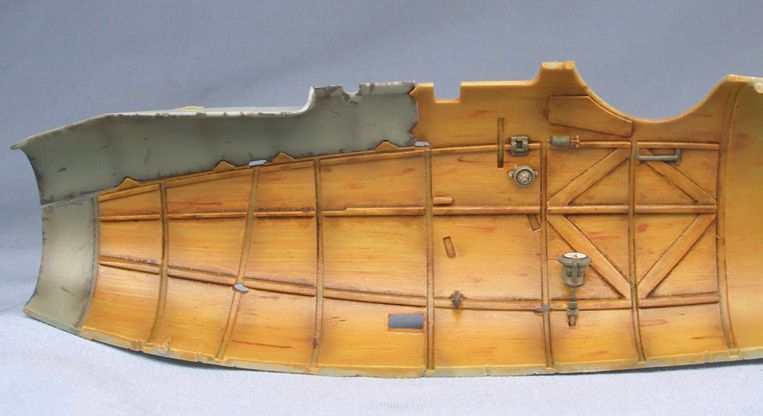
So far I have the interior done. It was sooooo tempting to add spark plug wires and other details, but I held firm and kept it all straight out of the box. Here are some pics:


Some areas to watch out for are the pipes over the front of the fuel tank - they interfere with the fit of the engine. I will probably have the cowls closed on this one anyways.... Other than that, it all seems to fit together very well.

Next is closing the fuselage halves, then I think things will proceed quite rapidly....

All feedback welcome!

BC
wombat58
_VISITCOMMUNITY
New South Wales, Australia
Joined: March 26, 2009
KitMaker: 366 posts
AeroScale: 309 posts
Posted: Saturday, April 17, 2010 - 12:53 AM UTC
Beautiful work Brad, your wood grain looks fantastic.
Seeing the way you are building this model there is no need to add any extra detail, you do that with your perfect choice of colours and your expert paint application - very well done.

Des.

http://www.ww1aircraftmodels.com
Merlin
Staff MemberSenior Editor
AEROSCALE
#017
_VISITCOMMUNITY
United Kingdom
Joined: June 11, 2003
KitMaker: 17,582 posts
AeroScale: 12,795 posts
Posted: Saturday, April 17, 2010 - 02:05 AM UTC
Hi Brad

Absolutely stunning work as usual! Can we book this one for a Frontpage Feature now!

All the best

Rowan
JackFlash
_VISITCOMMUNITY
Colorado, United States
Joined: January 25, 2004
KitMaker: 11,669 posts
AeroScale: 11,011 posts
Posted: Saturday, April 17, 2010 - 02:18 AM UTC
Excellent Brad!
thegirl
_VISITCOMMUNITY
Alberta, Canada
Joined: January 19, 2008
KitMaker: 6,743 posts
AeroScale: 6,151 posts
Posted: Saturday, April 17, 2010 - 02:47 AM UTC
Beautiful done so far Brad , very well executed
OEFFAG_153
_VISITCOMMUNITY
Västra Götaland, Sweden
Joined: February 19, 2010
KitMaker: 1,473 posts
AeroScale: 1,450 posts
Posted: Saturday, April 17, 2010 - 04:40 AM UTC
Really great progress Brad. I do like your painting and detailing, the worn paint on tank looks fantastic.

Impressed regards

Mikael
Kornbeef
_VISITCOMMUNITY
England - South East, United Kingdom
Joined: November 06, 2005
KitMaker: 1,667 posts
AeroScale: 1,551 posts
Posted: Saturday, April 17, 2010 - 05:28 AM UTC
Looking very sweet indeed...the paintwork is outstanding

Keith
gajouette
_VISITCOMMUNITY
Texas, United States
Joined: February 01, 2007
KitMaker: 365 posts
AeroScale: 356 posts
Posted: Saturday, April 17, 2010 - 12:23 PM UTC
Brad,
As always my friend outstanding project.Love the paint and details.
Highest Regards,
Gregory Jouette
BradCancian
_VISITCOMMUNITY
Queensland, Australia
Joined: August 30, 2006
KitMaker: 285 posts
AeroScale: 281 posts
Posted: Saturday, April 17, 2010 - 01:46 PM UTC
Thanks for your kind words folks! Fuselage halves are now together, though the fit is very tight and there are some areas that I couldn't avoid having to use fillers. Nothing too major though, not as bad as the Roden D.III for example (those that have built the D.III know how much of a squeeze it is to get everything in there and keep your sanity - this kit is much much better).

BC
RAGIII
_VISITCOMMUNITY
North Carolina, United States
Joined: June 19, 2007
KitMaker: 604 posts
AeroScale: 600 posts
Posted: Sunday, April 18, 2010 - 06:12 AM UTC
Brad, Truly incredible paint work! I think this is the first almost OOB build I have seen from you in quite some time! Your artistry certainly highlights what comes in the kit!
RAGIII
zipmeister
_VISITCOMMUNITY
United States
Joined: March 24, 2010
KitMaker: 3 posts
AeroScale: 1 posts
Posted: Sunday, April 18, 2010 - 01:57 PM UTC
Wow that is truly awesome! Excellent job!
edoardo
_VISITCOMMUNITY
Milano, Italy
Joined: November 30, 2007
KitMaker: 642 posts
AeroScale: 382 posts
Posted: Sunday, April 18, 2010 - 08:42 PM UTC
Brad,
Very beautiful job! Nothing to add to what all the others have already said!
keep on posting!
ciao
Edo
CaptainA
_VISITCOMMUNITY
Indiana, United States
Joined: May 14, 2007
KitMaker: 3,117 posts
AeroScale: 2,270 posts
Posted: Monday, April 19, 2010 - 01:32 AM UTC
Peanut butter and chocolate, beer and brats, bread and butter, Brad and Albatros. Perfect combinations.
edoardo
_VISITCOMMUNITY
Milano, Italy
Joined: November 30, 2007
KitMaker: 642 posts
AeroScale: 382 posts
Posted: Monday, April 19, 2010 - 01:35 AM UTC
very well said!
BradCancian
_VISITCOMMUNITY
Queensland, Australia
Joined: August 30, 2006
KitMaker: 285 posts
AeroScale: 281 posts
Posted: Thursday, April 29, 2010 - 03:24 PM UTC
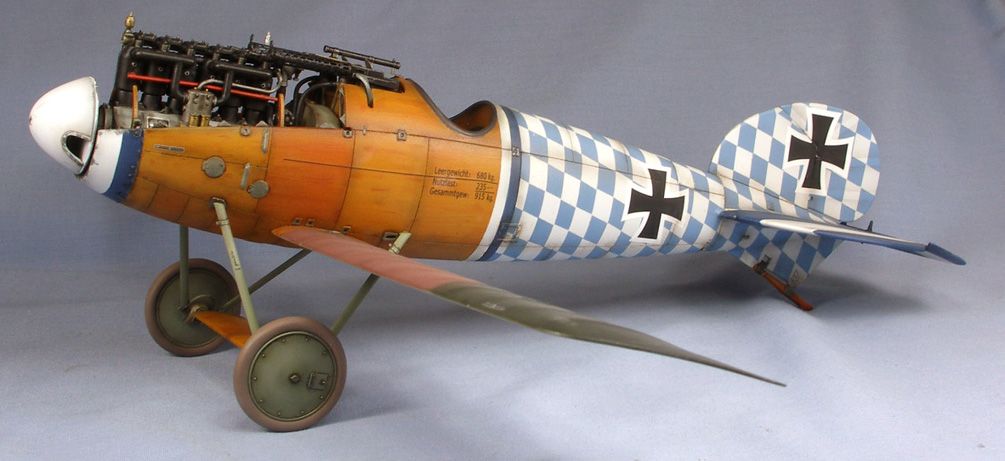
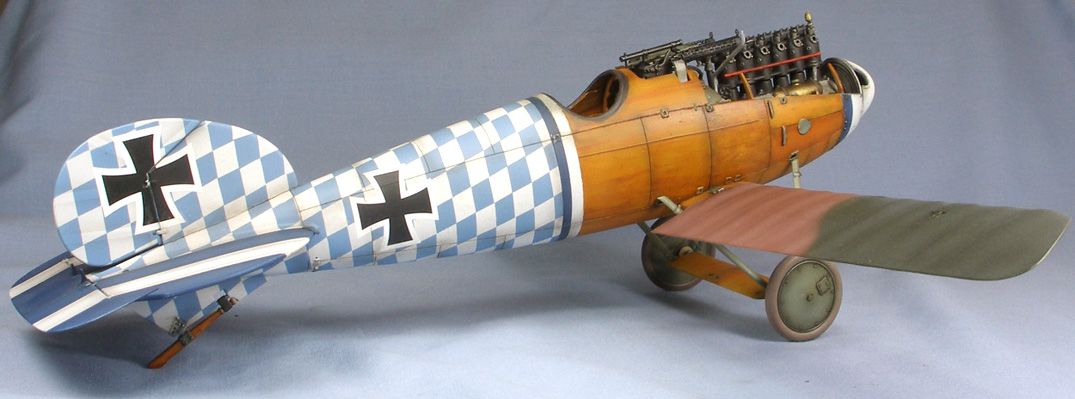
Current status - some paint is on. I went for a fairly heavily weathered look. He she is very roughly dry fitted to her undercarriage.


The decals went on without too many problems, though they didn't quite settle over some of the details. They actually went a little "stretchy" under decal softener. That said, they were still very easy to use.

Usually things go pretty fast from here, so should be finished some time soon.

Comments and criticisms/ feedback welcomed!

BC
wombat58
_VISITCOMMUNITY
New South Wales, Australia
Joined: March 26, 2009
KitMaker: 366 posts
AeroScale: 309 posts
Posted: Thursday, April 29, 2010 - 07:06 PM UTC
Absolutely brilliant Brad, your paint work is second to none, just stunning, and your weathering is perfect, very well done.

Des.

http://www.ww1aircraftmodels.com
OEFFAG_153
_VISITCOMMUNITY
Västra Götaland, Sweden
Joined: February 19, 2010
KitMaker: 1,473 posts
AeroScale: 1,450 posts
Posted: Thursday, April 29, 2010 - 07:33 PM UTC
Hi Brad

Very, very, very, nice indeed Your painting is absolutely brilliantly executed. And you've choosen one of my favourite DV paintjobs too – very Bavarian. Hoping this one or a similar one of Jasta 5 will be available sometime soon as aftermarket decals. I don't have your courrage to paint and mask it all

Impressed regards

Mikael
JackFlash
_VISITCOMMUNITY
Colorado, United States
Joined: January 25, 2004
KitMaker: 11,669 posts
AeroScale: 11,011 posts
Posted: Thursday, April 29, 2010 - 08:17 PM UTC

Quoted Text

Current status - some paint is on. I went for a fairly heavily weathered look. He she is very roughly dry fitted to her undercarriage.

The decals went on without too many problems, though they didn't quite settle over some of the details. They actually went a little "stretchy" under decal softener. That said, they were still very easy to use.

Usually things go pretty fast from here, so should be finished some time soon.

Comments and criticisms/ feedback welcomed!

BC


Oh you don't get off that easy. Talk to us about the Bavarian Waffenrock pattern and its application. And while your at it the wood panel simulation.
MrMox
_VISITCOMMUNITY
Aarhus, Denmark
Joined: July 18, 2003
KitMaker: 3,377 posts
AeroScale: 115 posts
Posted: Thursday, April 29, 2010 - 09:05 PM UTC
Very - very convincing work !

Your weathering is very attractive and your use of modulation to make single panels vary ads a lot to the visual impact - she´s a real beauty!

Cheers/jan
robot_
_VISITCOMMUNITY
United Kingdom
Joined: March 08, 2009
KitMaker: 719 posts
AeroScale: 691 posts
Posted: Thursday, April 29, 2010 - 09:21 PM UTC
That is a stunning paint job! Can't wait to see it all finished. How on earth was the chequered fuselage painted? The subtle orange-toned panel on one side of the wooden section, and the olive-tined panel on the other are so realistic! Do you have any progress shots of the painting?

Very, very nice- thanks for sharing!
Removed by original poster on 04/30/10 - 08:33:32 (GMT).
FigureMad
_VISITCOMMUNITY
England - South East, United Kingdom
Joined: May 09, 2006
KitMaker: 118 posts
AeroScale: 89 posts
Posted: Thursday, April 29, 2010 - 09:37 PM UTC
Stunning Paint work, great patterning work, can I ask did you have a problem with miss alignment on the blue diamonds at all. Love the subtle airbrushing of the edges of the ply wood sheeting, very effective, this is going to be a beauty when finished.

Dave
Moeggo
_VISITCOMMUNITY
Wellington, New Zealand
Joined: March 15, 2005
KitMaker: 169 posts
AeroScale: 132 posts
Posted: Thursday, April 29, 2010 - 10:32 PM UTC
Outstanding work there Brad! Please do share your method on the exterior wood paneling. Its Fantastic!
BradCancian
_VISITCOMMUNITY
Queensland, Australia
Joined: August 30, 2006
KitMaker: 285 posts
AeroScale: 281 posts
Posted: Friday, April 30, 2010 - 12:12 AM UTC
Hi all - I am indeed humbled by your nice words

To answer the queries:

First, the plywood. This was done the same way as the interior using my usual technique. I didn't take any progress shots for this build, so I will use progress shots and description from my last build, the 1:48 Jager Albatros CX, to illustrate my technique. The only difference with this build is that I used a slightly more orange final coloring for the wood prior to panel line shading.

Firstly, the fuselage is painted a uniform light colour - in this case, Gunze "Sail Colour". I then mix up some yellow ochre, burnt sienna, and white windsor and newton oil paints, slightly thinned, and streak these back in the direction of the grain. I also add a little linseed oil to help drying (though this does also add more yellow to the paints). I try and keep the colours and texture different for each panel. I also like to dob small dots of burnt sienna on some panels and streak them back in the direction of the grain to give the impression of different plywood batches. I try to have variation in colour, tone and texture across and between each panel. This is what it looks like once this is done:


You can see there is quite a marked difference between the panels, which looks ugly and overdone. This is actually what I try to aim for, as it will help with the final look. Once the oil paints are dry (can take up to a week), I then spray a number of coats of Tamiya clear yellow over the panels. This gives the wood the nice yellow tone and helps to blend the different panels in together. I try to aim for the final coats to be heavy enough to look uniform but also give the hint of differently coloured panels.

I then clear coat, apply remaining paint and decals, then lightly spray thinned Tamiya Smoke around the panel lines. I find this helps to visually "bind" everything together. Then another clear coat, and an oil wash, then done.


The technique is the same as on my DVa, though the final clear yellow coat had some clear orange mixed in.

The diamonds were also fairly easy, though a little tedious. Firstly, some notes on the pattern. I cheated with the diamonds - no matter how I tried there was no way they could wrap them around the fuselage completely and continuously whilst maintaining the same diamond size. The inside cover page and a picture on page 83 of Osprey's Albatros Aces Part 1 shows the painter kept everything reasonably uniform on the port side, with some gradual reductions in diamond size (but not much), but had to make some substantial compromises on the starboard side with lots of different shaped diamonds (though this is based on an almost rear on shot so things are not easy to see). I guess he didn't figure it out either… I thought that if I tried to replicate this, then it would look like a mistake more than anything else, even with what I can see in the photos. So I decided to make the diamonds mirror image on both sides. That way everything is even, and much easier to mask, if not actually accurate. But hey, no one will ever know, right....?

The first step was to spray the fuselage white. The diamond masks were mass produced using strips of Tamiya 6mm tape, all laid parallel, with the lines for the diamonds all cut parallel to each other, but at an angle to the length of tape, with a straight edge, measuring to make sure the cuts were all roughly evenly spaced. I had to cut the angle in the opposite direction for opposite sides given I mirrored the diamonds on either side of the fuselage.

The diamonds were each placed on by hand (hence why it took so long to mask!) - once a few are "locked" in place, the pattern is relatively easy to produce. However, there are indeed some areas where the diamonds were "altered" slightly to fit, so everything is not 100% uniform, but as close to it as I could get. This is the most apparent at the top and bottom of the fuselage where the patterns meet - in some cases they do not meet exactly. Masking took a good two and a half hours.
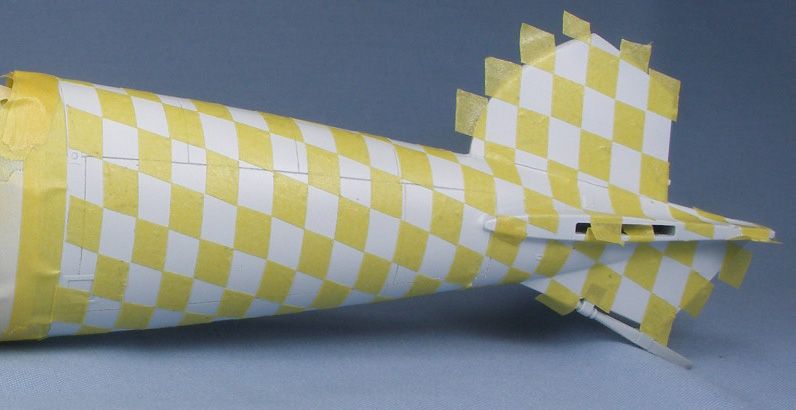


Then it was a simple 5 minutes of spraying, and the tedious removal of the masks, and done.
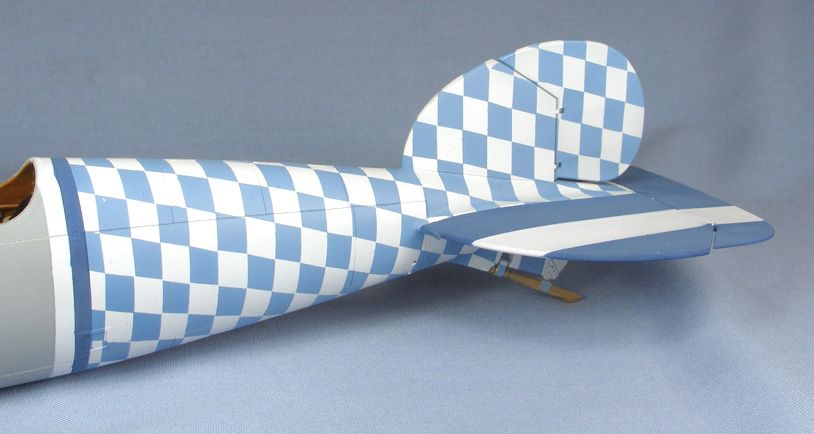


I painted the diamonds before the wood grain - that way, if they didn't work out, I could remove them and try another scheme.

Sorry for the long winded explanations! Hope this all makes sense.

Thanks again!

BC
guitarlute101
_VISITCOMMUNITY
West Virginia, United States
Joined: December 18, 2006
KitMaker: 1,121 posts
AeroScale: 1,063 posts
Posted: Friday, April 30, 2010 - 12:32 AM UTC


Masterful work, Brad. Very stunning presentation. Your explanations are very helpful. Thank you for your willingness to share them.

cheers,

Mark
 _GOTOTOP