WNW GB 2009- 10 SE.5a - Des
New South Wales, Australia
Joined: March 26, 2009
KitMaker: 366 posts
AeroScale: 309 posts
Posted: Friday, April 23, 2010 - 08:15 PM UTC
If it's OK with everyone would like to sign up for another WNW GB, this time I will be doing the Wingnuts SE.5a.
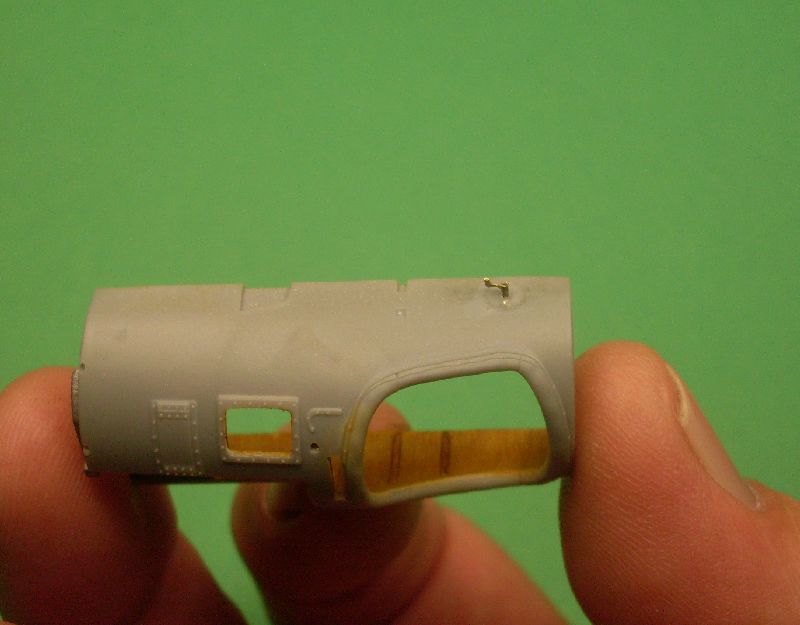
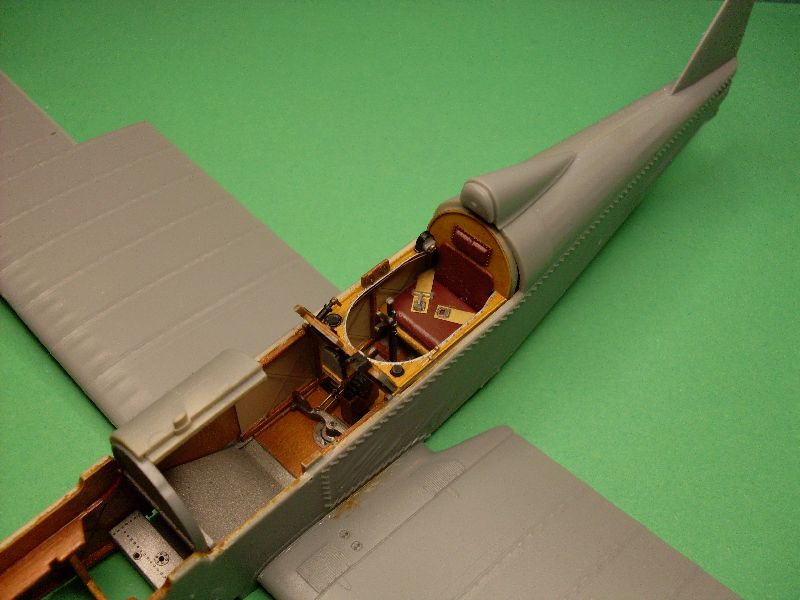
The photos below show what i have been doing. I did the fuselage bracing wires using 0.1mm mono in smoke colour and fitted 0.3mm brass ends. I hollowed out the pistol box and added the control cables from the rudder bar, I also added turnbuckles to these cables, I used 1.2mm mono for these cables. I still need to fix the instrument decals to the instrument panel. So far everything has gone together very well, some of the fit of parts is very tight so all paint on the mating surfaces has to be removed before assembly. I made the starting magneto which sits to the right of the pilot, I am also making the winding handle for the magneto which sits on the outside of the fuselage coaming.
Des.
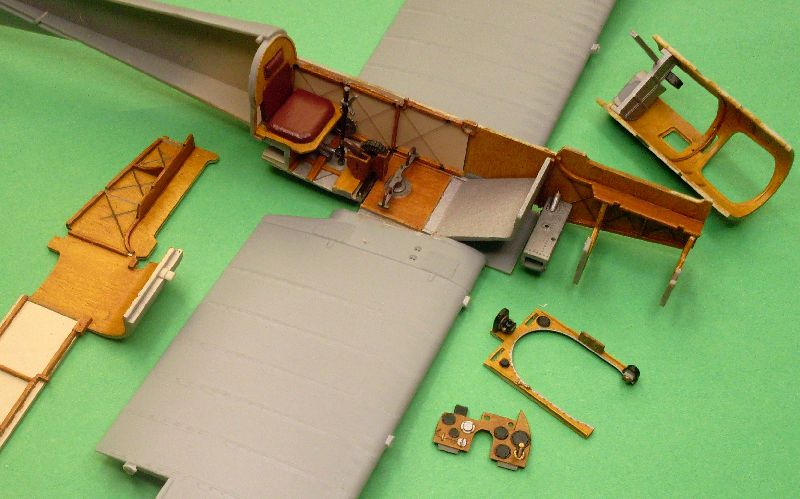
A full build log of this model can be found on my web site.
http://www.ww1aircraftmodels.com Check my site for 1:32 scale WW1 aircraft model build logs, build techniques, how to make turnbuckles and eyelets plus much more, plenty of photos of my finished models
New South Wales, Australia
Joined: March 26, 2009
KitMaker: 366 posts
AeroScale: 309 posts
Posted: Saturday, April 24, 2010 - 12:04 AM UTC
As mentioned earlier, Wingnuts did not supply a starting magneto or the winding handle, so I made both. Here are two photos of the handle I made, it is made from 0.5mm, 0.4mm and 0.3mm brass tube, the plate is 0.16 clear plastic sheet.
Des.
A description on how I made it can be found on my web site.
http://www.ww1aircraftmodels.com 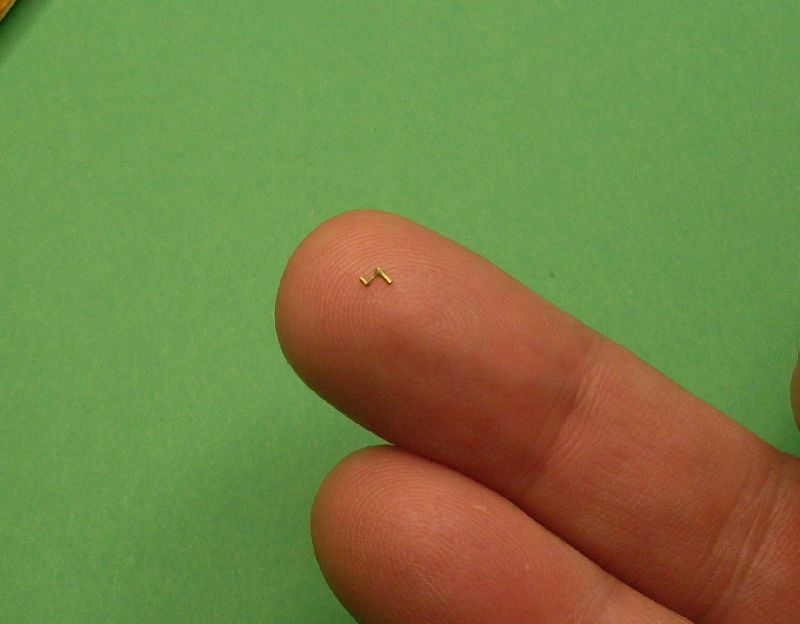
Check my site for 1:32 scale WW1 aircraft model build logs, build techniques, how to make turnbuckles and eyelets plus much more, plenty of photos of my finished models
England - South East, United Kingdom
Joined: November 06, 2005
KitMaker: 1,667 posts
AeroScale: 1,551 posts
Posted: Saturday, April 24, 2010 - 01:15 AM UTC
I can't say the words that I uttered when I sawy the mag handle...they started witha F but instead I'll say, "Outstanding"

Still can't cure the AMS even with sausage finger implants & olde eyes.
Alberta, Canada
Joined: January 19, 2008
KitMaker: 6,743 posts
AeroScale: 6,151 posts
Posted: Saturday, April 24, 2010 - 02:16 AM UTC
Nice to see you building this one Des , as always nice attention to the smaller details and super painting of the wood ! Don't forget to add the control lines for the tail skid


Indiana, United States
Joined: May 14, 2007
KitMaker: 3,117 posts
AeroScale: 2,270 posts
Posted: Saturday, April 24, 2010 - 08:32 AM UTC
"Treat 'em Rough", Current Builds--Wingnut Rumpler
I am frequently seen with blood shot eyes from staying up past my nap time to get the right colour scheme on my latest WWI model?
Colorado, United States
Joined: January 25, 2004
KitMaker: 11,669 posts
AeroScale: 11,011 posts
Posted: Saturday, April 24, 2010 - 08:41 AM UTC
". . .The most important thing is to know why you build and then get the most that you can out of building." via D.D.
New South Wales, Australia
Joined: March 26, 2009
KitMaker: 366 posts
AeroScale: 309 posts
Posted: Thursday, April 29, 2010 - 03:19 PM UTC
Due to the lack of detail on the fin and rudder I will be replacing them and using the Pheon update items. These look very good and I think will enhance the overall appearance of the model. A full build log is on my web site, it is a build in progress so more will be added as the build advances. I will detail the adding of the Pheon update items once I reach that stage.
Des.
http://www.ww1aircraftmodels.com Check my site for 1:32 scale WW1 aircraft model build logs, build techniques, how to make turnbuckles and eyelets plus much more, plenty of photos of my finished models
Arizona, United States
Joined: December 12, 2008
KitMaker: 1,423 posts
AeroScale: 1,319 posts
Posted: Friday, April 30, 2010 - 01:12 AM UTC
Hi Des:
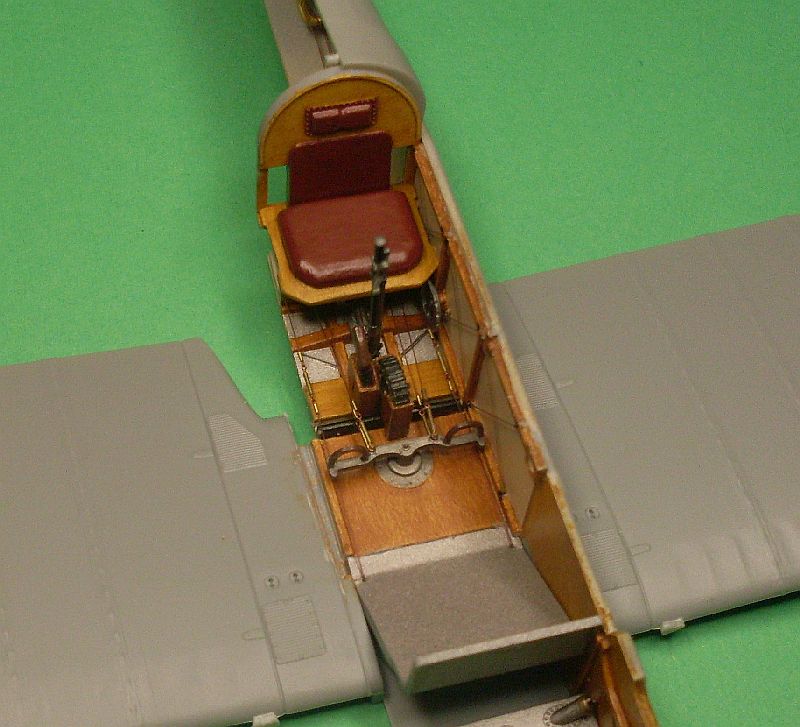
Really looking good Des. I didn't think that the right side of the fuselage could be assembled with the left on the wing. Your example proves it can be done, thereby encouraging the modeler to rig the pedals, an otherwise almost unattainable task.
I agree that the kit decals look every bit as good as the PE instruments provided with the Eduard PE set. If I did another one, I would forego using the Eduard PE and stick with mostly out of the box.
I like your build blogs, very instructional, thank you.
Best
Mark
We few, we happy few........
New South Wales, Australia
Joined: March 26, 2009
KitMaker: 366 posts
AeroScale: 309 posts
Posted: Friday, April 30, 2010 - 01:51 AM UTC
Thanks Mark for your kind words, much appreciated.
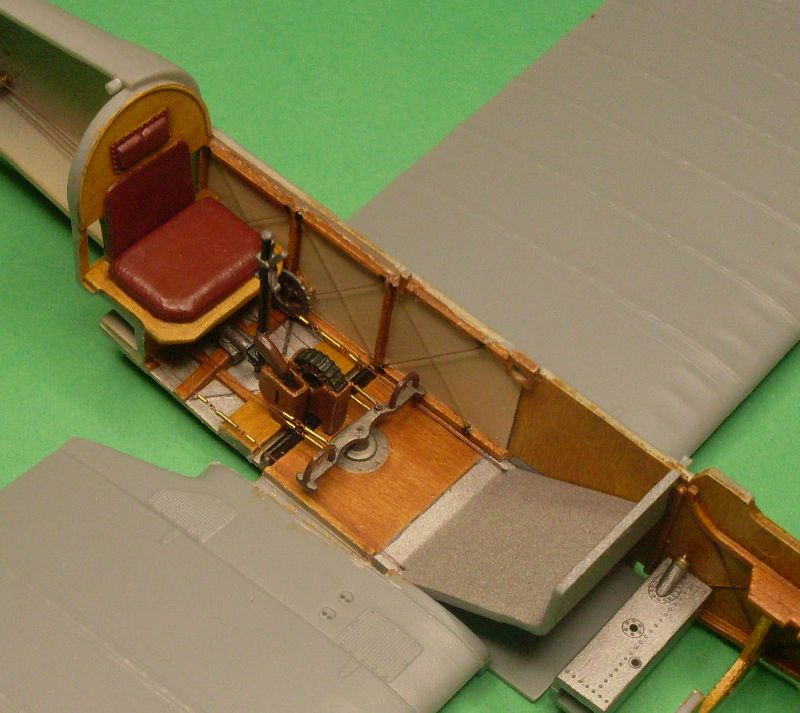
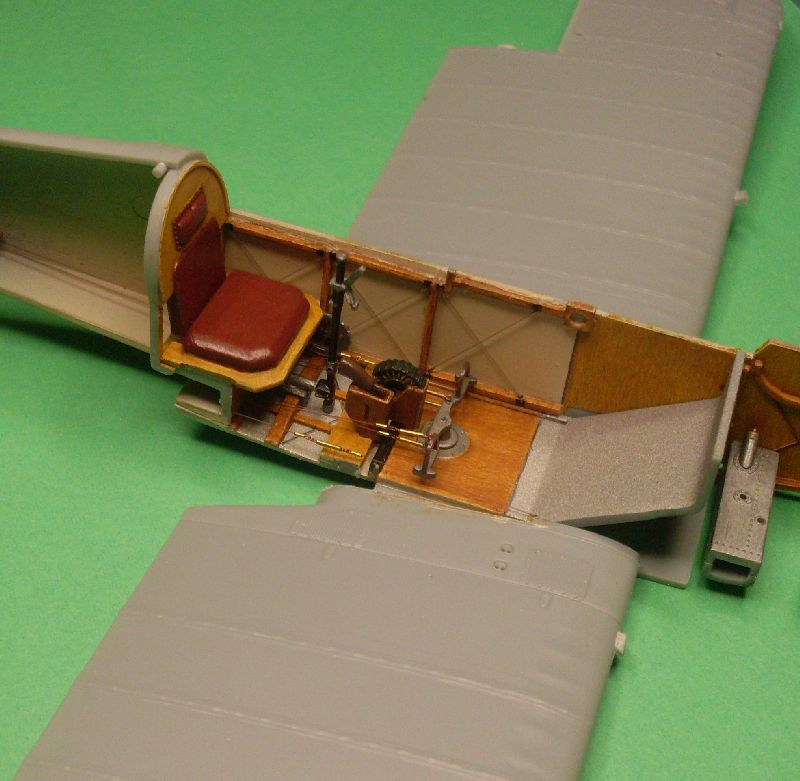
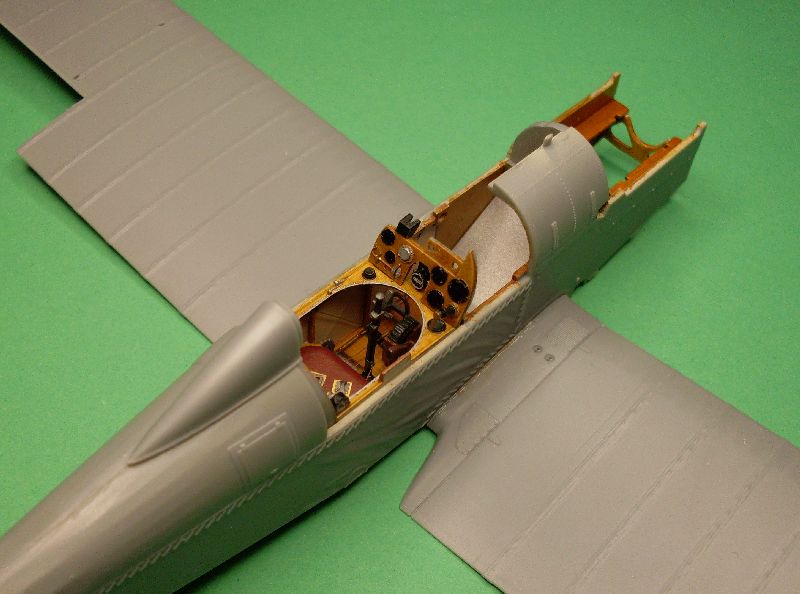
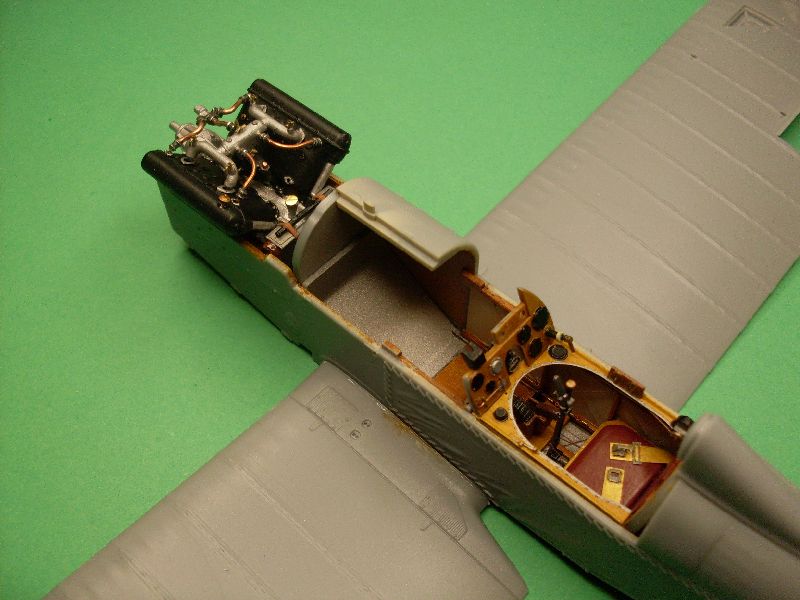
The right side of the fuselage went on very easily, by leaving it till last it does make rigging the rudder bar a lot easier.I completed all the interior details before adding the right fuselage, the head rest and fairing is only placed just for the photo I'm still waiting for my new punch set to arrive so I can do the instrument decals, so it is just sitting there for photo purposes. I like the instrument panel supplied with the kit, it paints up very well and I feel does not need added PE, but that is only my opinion.
So far the kit has gone together very well but like all the Wingnut kits, the fit of parts is very tight, sometimes a little too tight.
Des.
http://www.ww1aircraftmodels.com 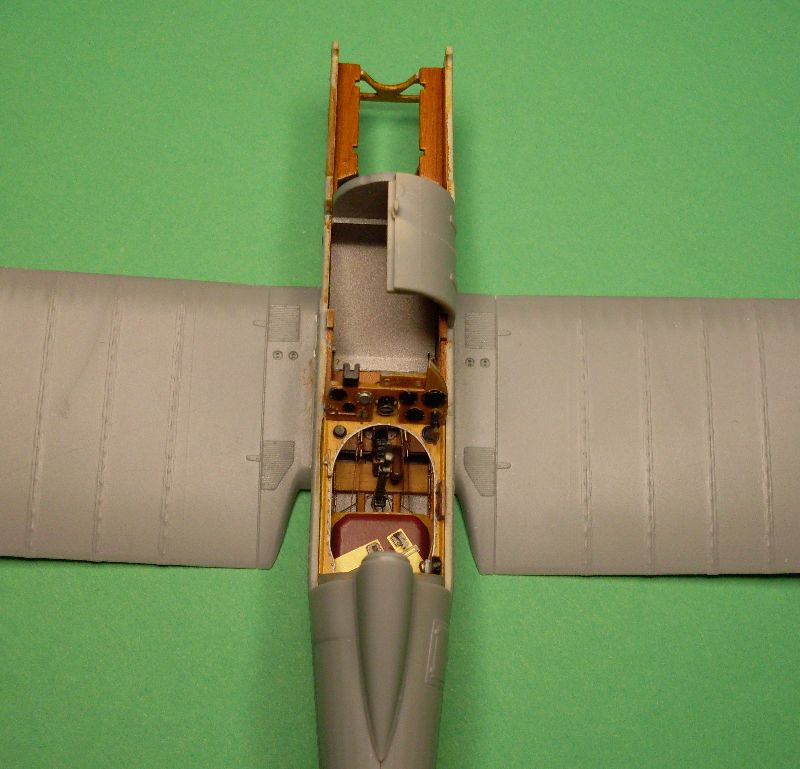
Check my site for 1:32 scale WW1 aircraft model build logs, build techniques, how to make turnbuckles and eyelets plus much more, plenty of photos of my finished models
Alberta, Canada
Joined: January 19, 2008
KitMaker: 6,743 posts
AeroScale: 6,151 posts
Posted: Friday, April 30, 2010 - 02:47 AM UTC
Looking very nice Des ! When I painted the cockpit in my build I just notice that I missed paint part of the floor just in front of the seat CDL

I left it as wood , yes I'm bad

Will you be leaving the cowl off ?
New South Wales, Australia
Joined: March 26, 2009
KitMaker: 366 posts
AeroScale: 309 posts
Posted: Friday, April 30, 2010 - 09:53 AM UTC
Thanks Terri for your nice comments.
I want to detail the engine as much as I can so if it all turns out OK I will leave the cowling off. The flooring directly in front of the seat is aluminium with timber framework over top and bracing wires.
Des.
http://www.ww1aircraftmodels.com Check my site for 1:32 scale WW1 aircraft model build logs, build techniques, how to make turnbuckles and eyelets plus much more, plenty of photos of my finished models
New South Wales, Australia
Joined: March 26, 2009
KitMaker: 366 posts
AeroScale: 309 posts
Posted: Monday, May 03, 2010 - 03:47 PM UTC
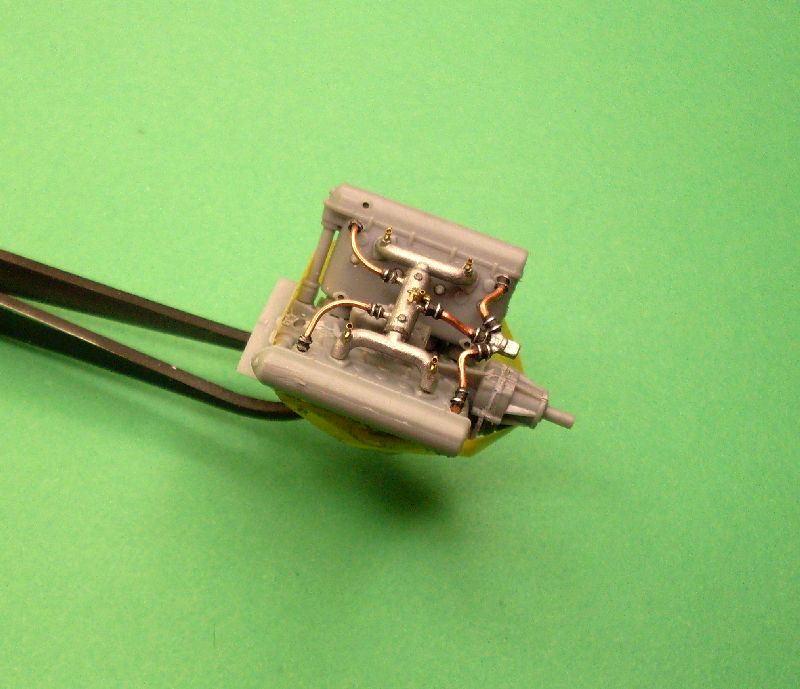
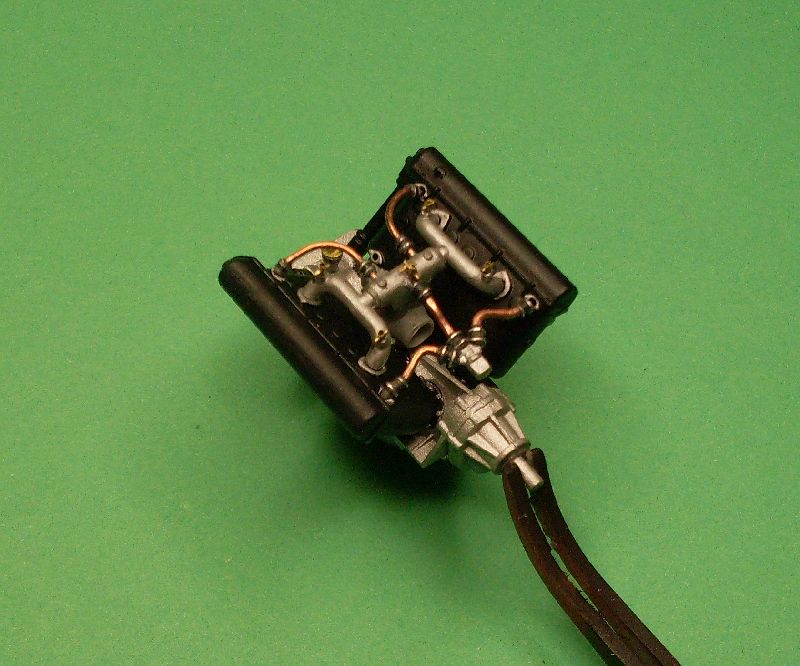
I've come to a stand still with the fuselage while I await the arrival of my new punch set so I can finish the instrument decals. I have started work on the engine to fill in time. I replaced the plastic pipes with copper wire the same diameter, I added hose clamps to all connections and also made priming taps from brass tube, four in total and one mounted at each corner of the manifold. There is another small tap in the centre of the manifold which is also made from small brass tube. The manifold itself is painted with Humbrol Aluminium. I still need to polish the copper wire but I will wait until the asembly is fitted to the engine, it will make it a lot stronger.
Des.
http://www.ww1aircraftmodels.com 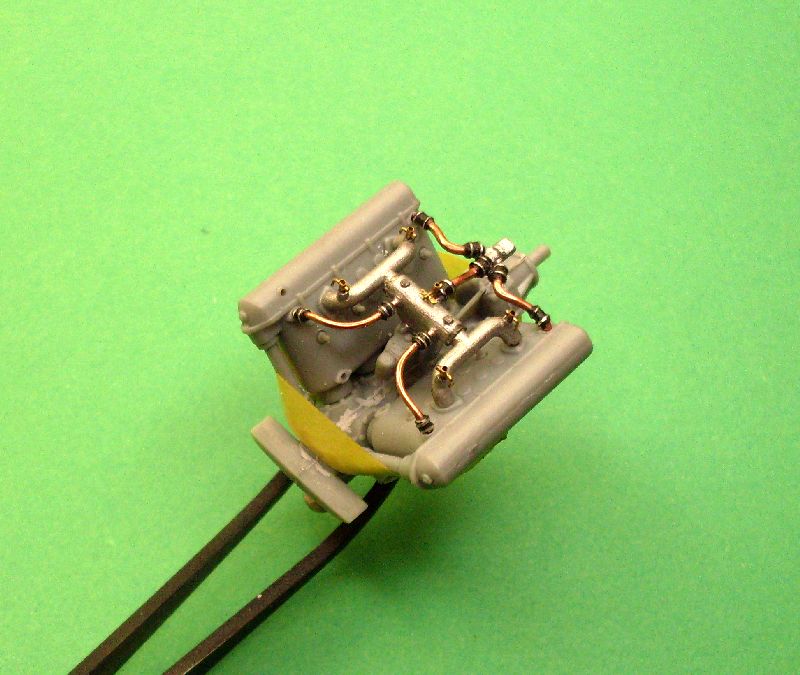
Check my site for 1:32 scale WW1 aircraft model build logs, build techniques, how to make turnbuckles and eyelets plus much more, plenty of photos of my finished models
England - South East, United Kingdom
Joined: November 06, 2005
KitMaker: 1,667 posts
AeroScale: 1,551 posts
Posted: Monday, May 03, 2010 - 07:39 PM UTC
Okay, admit it you are only 1'6"tall, I can't see any other reason that you could work in such intricate detail!
absolutely beautiful....I take it she is going to be cowl less?
Keith
Still can't cure the AMS even with sausage finger implants & olde eyes.
Milano, Italy
Joined: November 30, 2007
KitMaker: 642 posts
AeroScale: 382 posts
Posted: Monday, May 03, 2010 - 08:40 PM UTC
Yes! I have to agree with Keith otherwise your fingers had to be way too sharp...

ciao
Edo
New South Wales, Australia
Joined: March 26, 2009
KitMaker: 366 posts
AeroScale: 309 posts
Posted: Monday, May 03, 2010 - 10:28 PM UTC
Thanks guys for your nice words.
Just to give you a size comparison of the manifold to my hand, for those who have not seen the kit, it makes those ptiming taps look small.
Des.
http://www.ww1aircraftmodels.com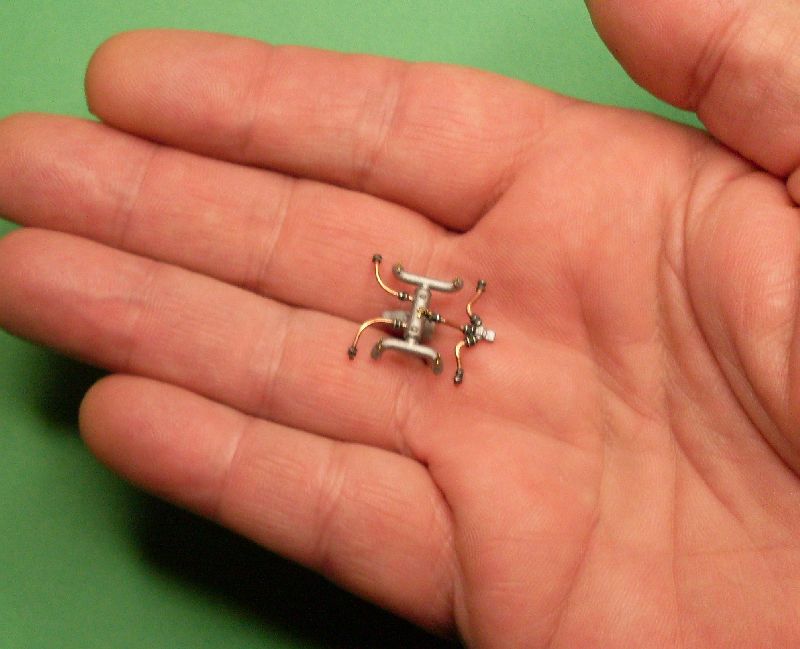
Check my site for 1:32 scale WW1 aircraft model build logs, build techniques, how to make turnbuckles and eyelets plus much more, plenty of photos of my finished models
West Virginia, United States
Joined: December 18, 2006
KitMaker: 1,121 posts
AeroScale: 1,063 posts
Posted: Tuesday, May 04, 2010 - 01:06 AM UTC
Very nice detailing, Des. Just what it needed. I'm really anxious to see what Wingnuts releases for PE for their aircraft.
Mark
Arizona, United States
Joined: December 12, 2008
KitMaker: 1,423 posts
AeroScale: 1,319 posts
Posted: Tuesday, May 04, 2010 - 08:26 AM UTC
The intake manifold really looks good. I am surprised that the fuselage halves will fit like that, one on the wing at a time. Makes detailing the cockpit that much easier. I just may have to get another one of these.
We few, we happy few........
New South Wales, Australia
Joined: March 26, 2009
KitMaker: 366 posts
AeroScale: 309 posts
Posted: Tuesday, May 04, 2010 - 11:21 PM UTC
Thanks guys for your comments.
Fitting half the fuselage to the bottom wing certainly does make cockpit detailing a lot easier, and the other half of the fuselage goes on very easily, not the normal way of doing things but then, Í aint normal.........
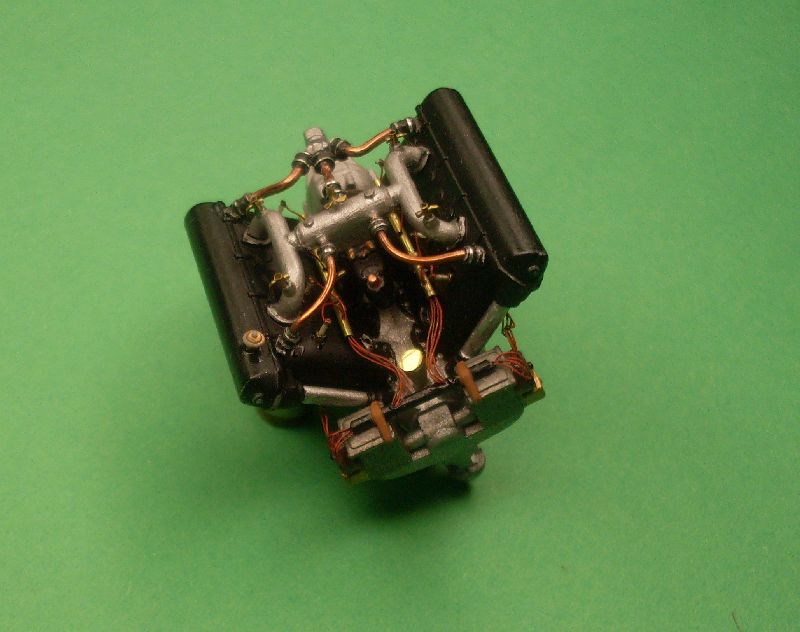
Here are two photos of the engine with the parts dry fitted, just to see what it is going to look like. All the hose connection flanges on the cylinder blocks have been painted aluminium. Next up are the spark plugs.
Des.
http://www.ww1aircraftmodels.com 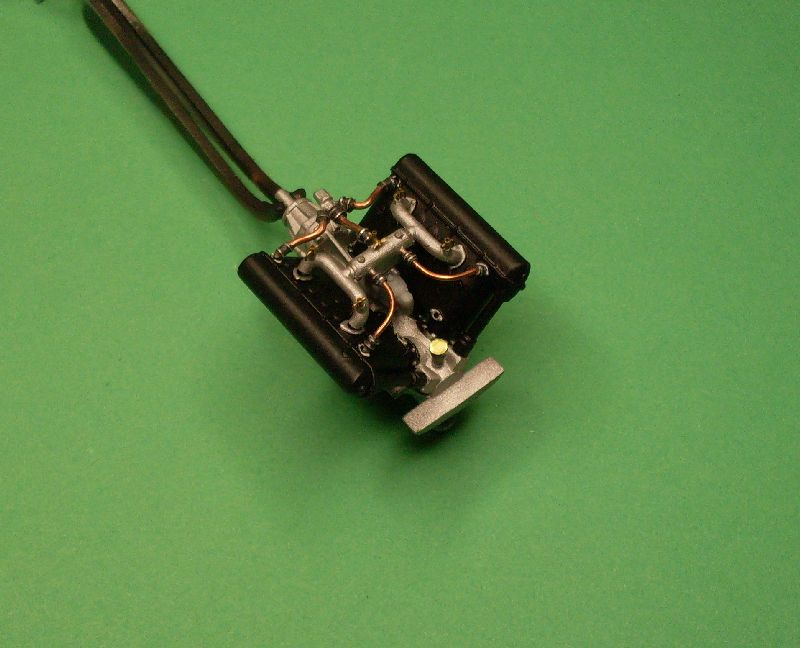
Check my site for 1:32 scale WW1 aircraft model build logs, build techniques, how to make turnbuckles and eyelets plus much more, plenty of photos of my finished models
New South Wales, Australia
Joined: March 26, 2009
KitMaker: 366 posts
AeroScale: 309 posts
Posted: Friday, May 07, 2010 - 10:22 PM UTC
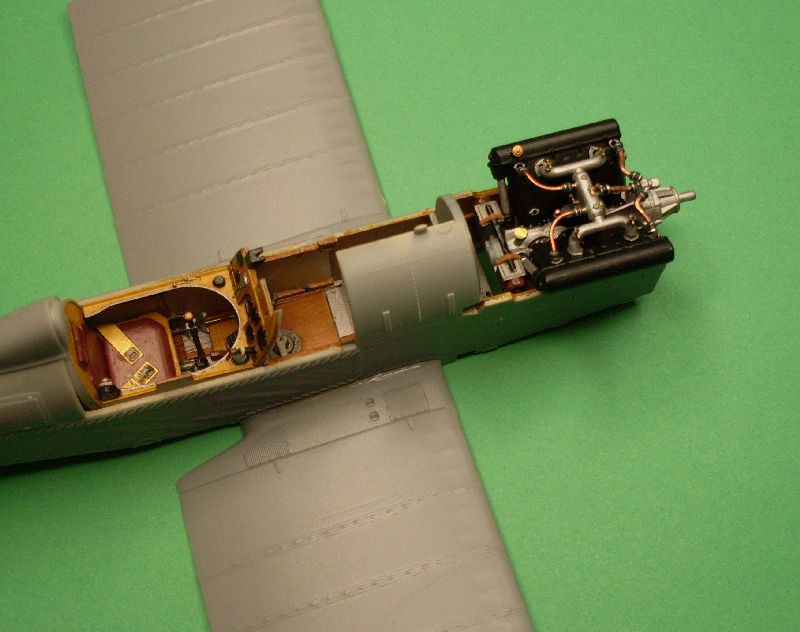
This is the unfinished engine sitting in the fuselage for a trial fit. I still need to do the spak plugs and leads, the instrument decals still need to be fixed then I can close the fuselage completely.
Des.
http://www.ww1aircraftmodels.com 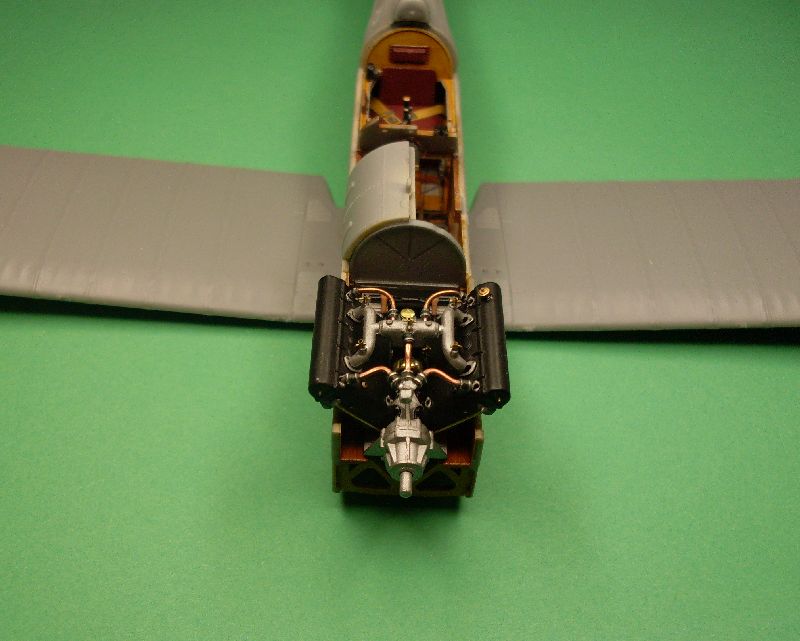
Check my site for 1:32 scale WW1 aircraft model build logs, build techniques, how to make turnbuckles and eyelets plus much more, plenty of photos of my finished models
Aarhus, Denmark
Joined: July 18, 2003
KitMaker: 3,377 posts
AeroScale: 115 posts
Posted: Monday, May 10, 2010 - 09:28 PM UTC
Pure Eye-candy, I took a trip around your site - nice tuctorials and tips!
Cheers/Jan
It´s happy days for modellers...
Alberta, Canada
Joined: January 19, 2008
KitMaker: 6,743 posts
AeroScale: 6,151 posts
Posted: Tuesday, May 11, 2010 - 01:55 AM UTC
Looking most excellent Des , looking forward to more progress

New South Wales, Australia
Joined: March 26, 2009
KitMaker: 366 posts
AeroScale: 309 posts
Posted: Friday, May 14, 2010 - 01:51 AM UTC
I completed the spark plugs, plug lead tubes and the spark plug leads. The centre manifold assembly is also fixed in position, I made a butterfly valve and fitted it to the carby intake. Next up will be the plumbing on the bottom of the engine.
Des.
http://www.ww1aircraftmodels.com 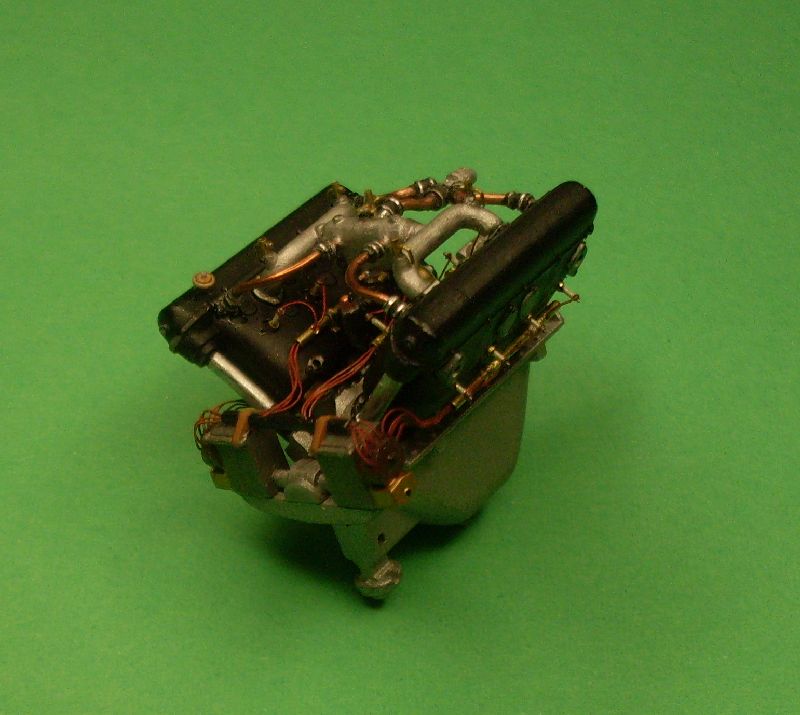
Check my site for 1:32 scale WW1 aircraft model build logs, build techniques, how to make turnbuckles and eyelets plus much more, plenty of photos of my finished models
Alberta, Canada
Joined: January 19, 2008
KitMaker: 6,743 posts
AeroScale: 6,151 posts
Posted: Friday, May 14, 2010 - 03:26 AM UTC
Very nice work done to the engine Des . Just need to add the fuel

This really helps me on how the wiring was done for the lead wires . Looking forward to more of your progress Des .
West Virginia, United States
Joined: December 18, 2006
KitMaker: 1,121 posts
AeroScale: 1,063 posts
Posted: Friday, May 14, 2010 - 09:38 AM UTC
Looking great Des. One of the best engines I've ever seen.
Mark
Texas, United States
Joined: February 01, 2007
KitMaker: 365 posts
AeroScale: 356 posts
Posted: Friday, May 14, 2010 - 01:05 PM UTC
Des,
Absolutely beautiful Hisso my friend.Keep those wonderful updates coming.
Regards,
Gregory Jouette


