Roden 1:32 Spad VII c.1 Lafayette Escadrille
New South Wales, Australia
Joined: March 26, 2009
KitMaker: 366 posts
AeroScale: 309 posts
Posted: Friday, July 02, 2010 - 01:25 AM UTC
I would like to share my latest build with you good people.
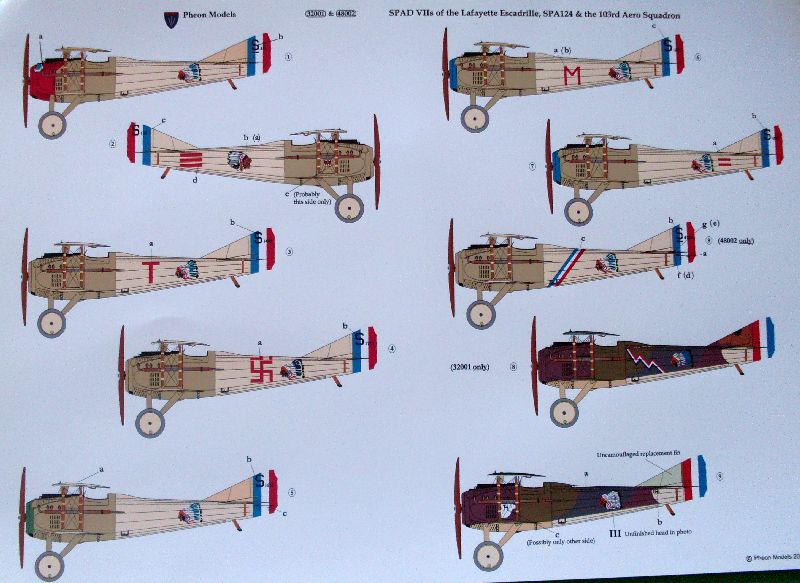
The Roden 1:32 scale Spad VII c.1 is a pretty good kit, not for the beginner but the average modeller should have little difficulty constructing this model. This kit has been around for quite a while now but this time I will be depicting the Lafayette Escadrille by using Pheon Models decals. The decals are superb with excellent graphics and brilliant colours, a great little booklet with a brief history and explanation of each scheme, there are plenty of options to choose from, and beautifully printed full colour sheets with decal application directions.
Many thanks must go to Rowan Broadbent for supplying the decals and Richard Andrews from theaviattic.com for organising the Roden kit for me.
Here are the options available on the Pheon Models decal sheet.

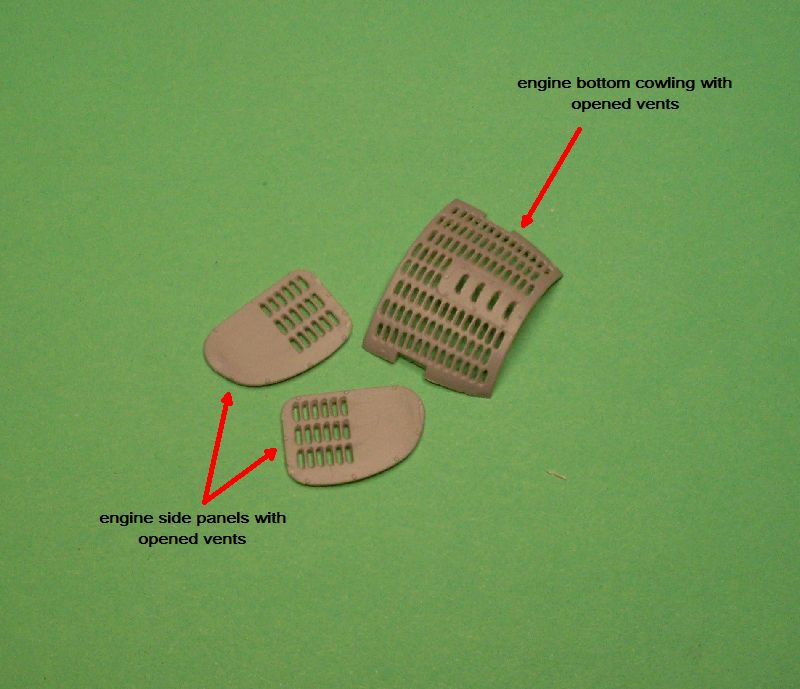
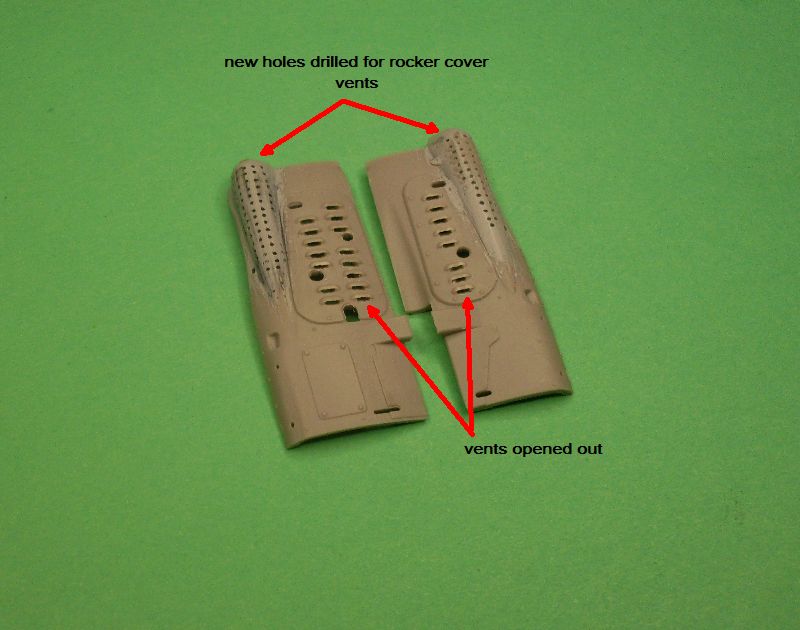
I started the build by firstly opening up all the vents around the engine compartment. I drilled three holes in each vent then cleaned them up with a very sharp scalpel. The plastic Roden has used is quite soft so the job was pretty easy, but there are a lot of vents. I also filled in all the indentations Roden had on the rocker cover blisters and drilled them, with the plastic being so soft it was hard to stop the drill bit from wandering so straight lines were difficult to maintain.
Des.
A full build log can be found on my website (in progress)
www.ww1aircraftmodels.com 
Check my site for 1:32 scale WW1 aircraft model build logs, build techniques, how to make turnbuckles and eyelets plus much more, plenty of photos of my finished models
New South Wales, Australia
Joined: March 26, 2009
KitMaker: 366 posts
AeroScale: 309 posts
Posted: Friday, July 02, 2010 - 01:31 AM UTC
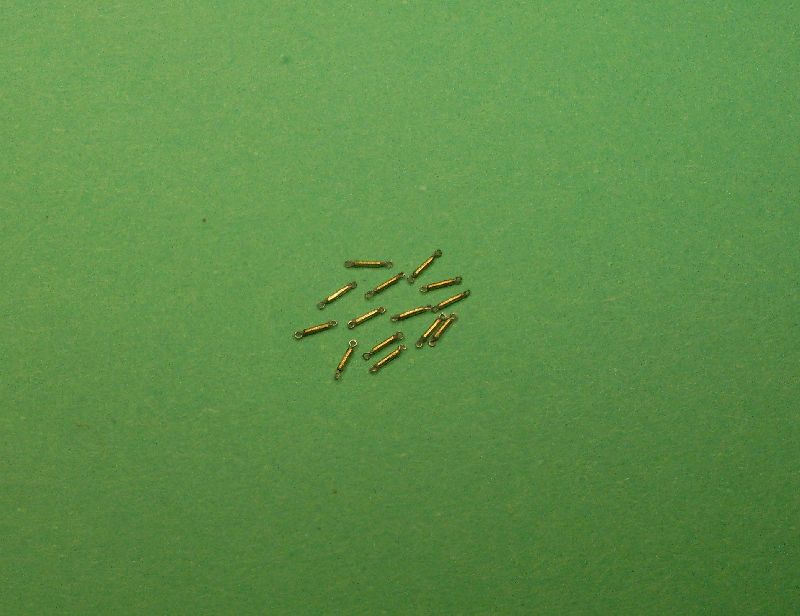
The fuselage frames had bracing wires with turnbuckles as did the rudder control cables. so I made some small turnbuckles to do the job, these turnbuckles are a lot smaller than the ones I made for my Bristol so it took some time just to do 14 of them. As you can see in the photo, the turnbuckles are very small.
Des.
http://www.ww1aircraftmodels.com 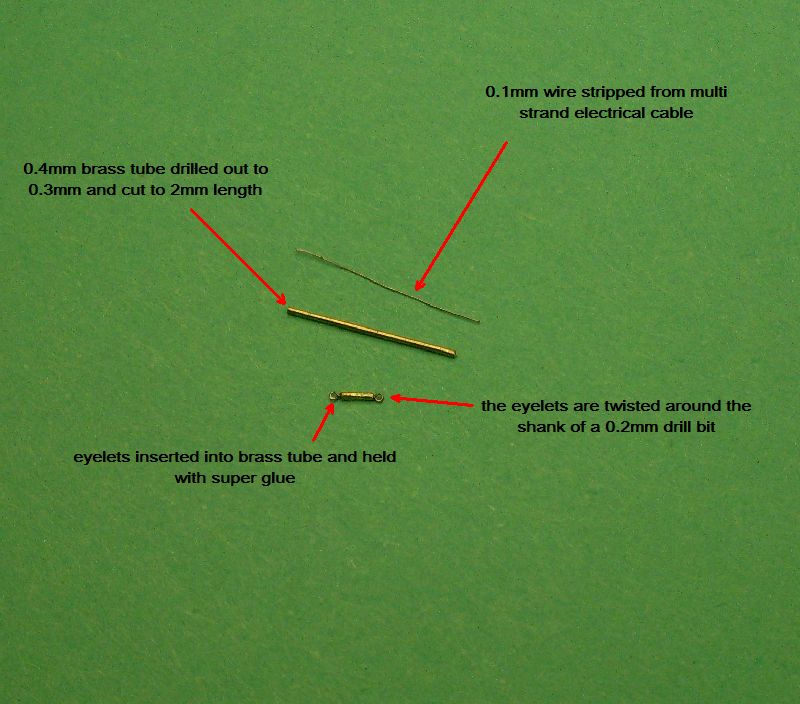

Check my site for 1:32 scale WW1 aircraft model build logs, build techniques, how to make turnbuckles and eyelets plus much more, plenty of photos of my finished models
Alberta, Canada
Joined: January 19, 2008
KitMaker: 6,743 posts
AeroScale: 6,151 posts
Posted: Friday, July 02, 2010 - 02:34 AM UTC
That was a lot of holes to open up ! looking forward to this porject unfolding here Des

Arizona, United States
Joined: December 12, 2008
KitMaker: 1,423 posts
AeroScale: 1,319 posts
Posted: Friday, July 02, 2010 - 02:45 AM UTC

HI Des:
I echo Terri's sentiment. I have this kit and the decals, it will be a winter project here in the great upper midwest this winter. My gosh! I had a heck of a time seeing that turnbuckle in your hand!!!!!!!! I like the drilling out of the holes, really adds to the appearance. Looking forward for more.
We few, we happy few........
Colorado, United States
Joined: January 25, 2004
KitMaker: 11,669 posts
AeroScale: 11,011 posts
Posted: Friday, July 02, 2010 - 06:59 AM UTC
". . .The most important thing is to know why you build and then get the most that you can out of building." via D.D.
Texas, United States
Joined: February 01, 2007
KitMaker: 365 posts
AeroScale: 356 posts
Posted: Friday, July 02, 2010 - 09:32 AM UTC
Des,
My friend you're off to another outstanding project.For some reason the SPAD VII kit doesn't appear to often in build threads.Anyway I glad to see you're building the SPAD,I've had the same kit in the stash for awhile now myself.No doubt following your thread with inspire me to get my SPAD to the bench.Looking forward to your next update.
Highest Regards,
Gregory Jouette
New South Wales, Australia
Joined: March 26, 2009
KitMaker: 366 posts
AeroScale: 309 posts
Posted: Friday, July 02, 2010 - 10:26 AM UTC
Thank you for looking and adding your kind words.
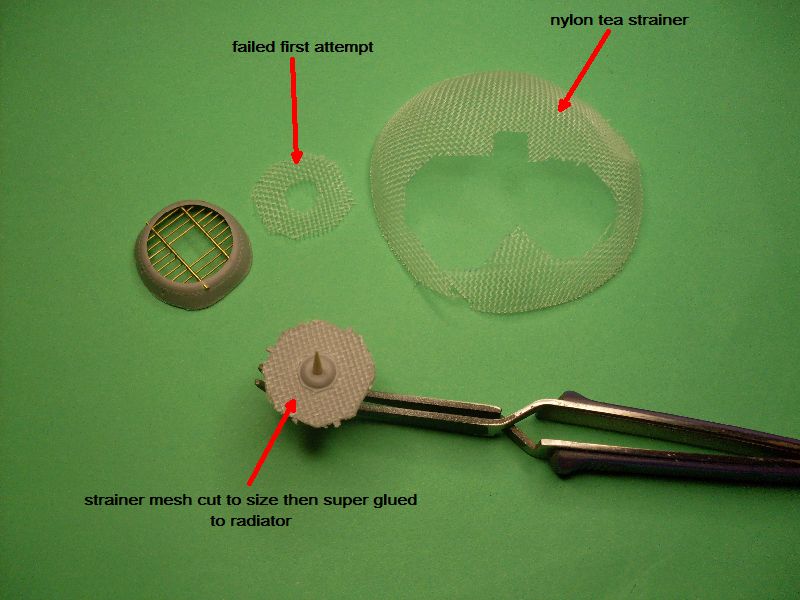
I needed to add a grille to the radiator so using materials on hand I made one from brass tube, 0.5mm for the smaller size and 0.8mm for the two larger ones, they are all held together with CA. For the radiator mesh I "borrowed" my wife's tea strainer and attacked it with my scalpel, CA holds it well to the plastic. A coat of black paint then highlighted with aluminium gives the affect I was after. The mesh is a little coarse but I like to use what materials I can find lying around. I'm done with the tea strainer so the wife can have it back now.........
Des.
http://www.ww1aircraftmodels.com 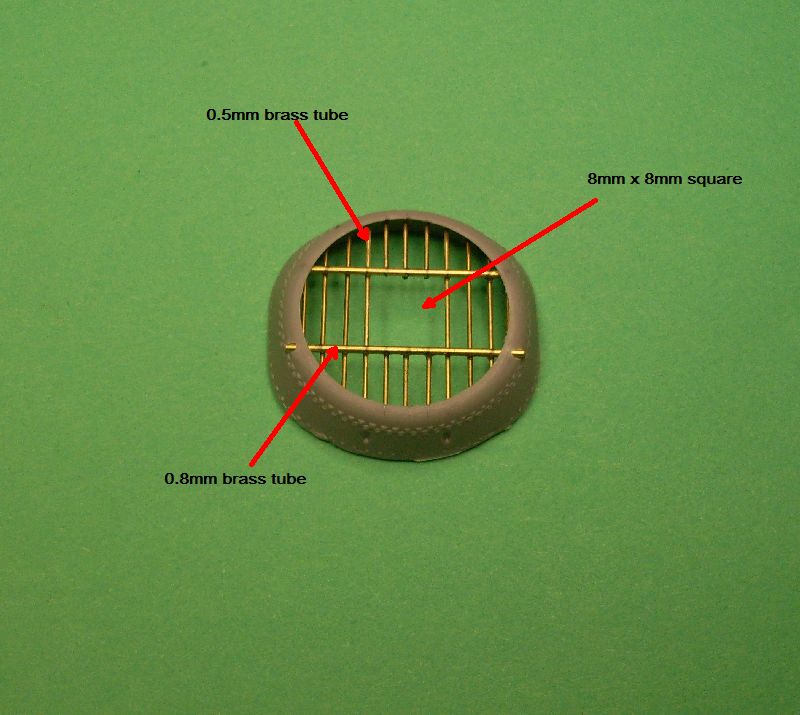

Check my site for 1:32 scale WW1 aircraft model build logs, build techniques, how to make turnbuckles and eyelets plus much more, plenty of photos of my finished models
New South Wales, Australia
Joined: March 26, 2009
KitMaker: 366 posts
AeroScale: 309 posts
Posted: Friday, July 02, 2010 - 11:00 AM UTC
Here are those little turnbuckles used for the bracing of the fuselage frames. I used 0.1mm smoke coloured invisible (monofilament) thread for the wires, they are looped through the turnbuckles then threaded back through a 0.4mm brass sleeve. The little brass sleeve has been drilled out to 0.3mm and cut to a length of 0.5mm, it is all secured with a small drop of CA. The remainder of the turnbuckles will be used on the control cables inside the cockpit.
Des.
http://www.ww1aircraftmodels.com 

Check my site for 1:32 scale WW1 aircraft model build logs, build techniques, how to make turnbuckles and eyelets plus much more, plenty of photos of my finished models
North Carolina, United States
Joined: June 19, 2007
KitMaker: 604 posts
AeroScale: 600 posts
Posted: Friday, July 02, 2010 - 02:46 PM UTC
You ARE A MADMAN! But what a beautiful job you are doing!!
I hope you have better luck with the engine cover/cowling fit than those who have preceeded you in attempting this kit!
Great start,
RAGIII
New South Wales, Australia
Joined: March 26, 2009
KitMaker: 366 posts
AeroScale: 309 posts
Posted: Monday, July 05, 2010 - 05:45 PM UTC
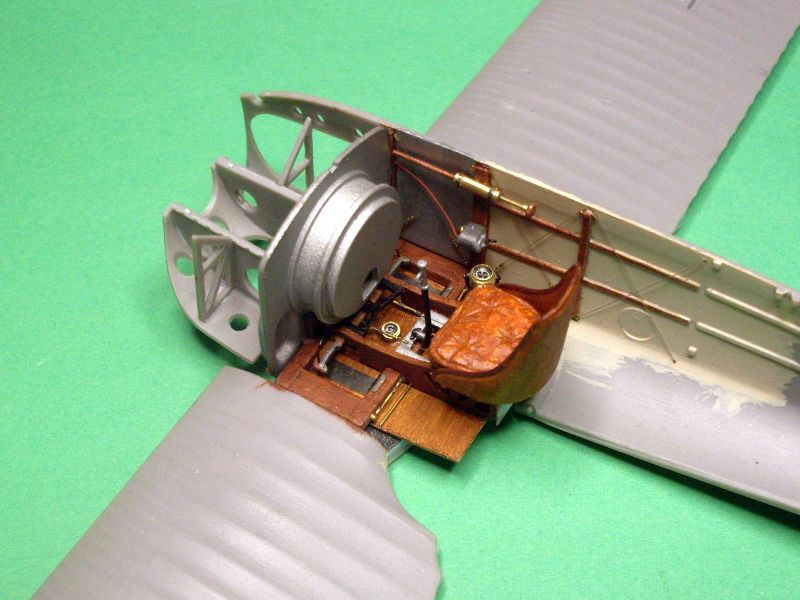
Three more photos of my progress so far. I was not impressed with the kit supplied priming pump so I made a new one, details are on my website. Most of the cockpit area is now complete with rudder and aileron turnbuckles fitted. I made a compass and gimbal from brass bits and pieces and mounted it on a stand on the cockpit floor. This was my first attempt at making a seat cushion, I used Milliput. I used the kit supplied starting magneto but added a small winding handle. The metal plates on the floor aft of the rudder bar are made from 3mm PE fret waste.
Des.
there is a build log on my website;
http://www.ww1aircraftmodels.com 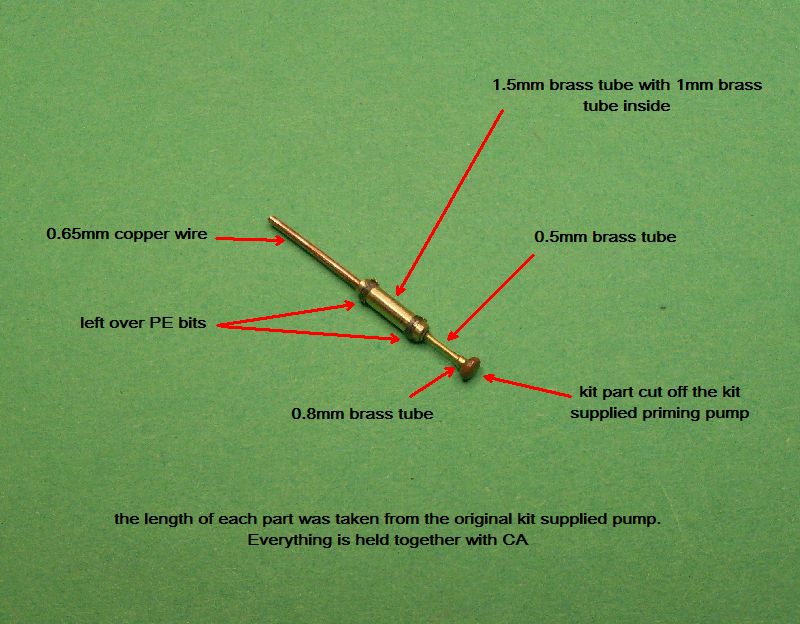
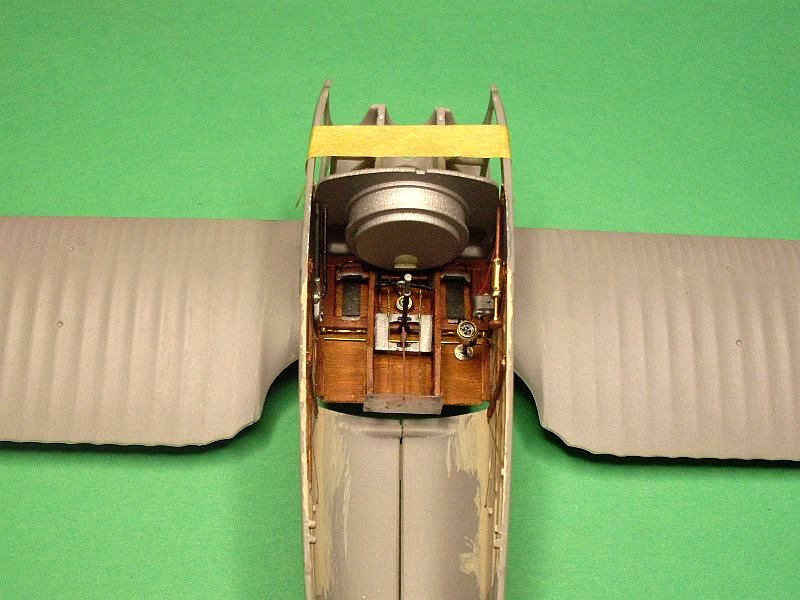
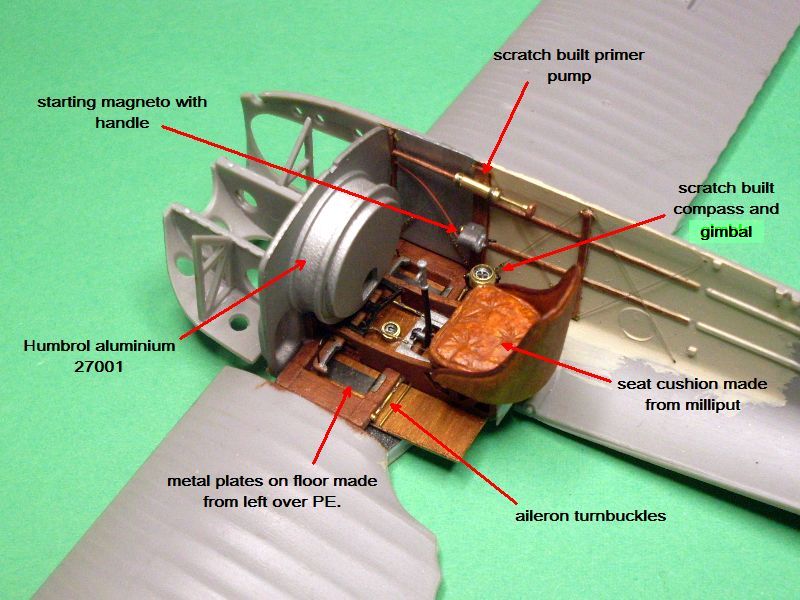
Same photo as above but without all the arrows and text
Check my site for 1:32 scale WW1 aircraft model build logs, build techniques, how to make turnbuckles and eyelets plus much more, plenty of photos of my finished models
Milano, Italy
Joined: November 30, 2007
KitMaker: 642 posts
AeroScale: 382 posts
Posted: Monday, July 05, 2010 - 08:14 PM UTC
Des,
you always succede to amaze me!
Your results are great, consistent in time and always moving the bar up a noch each time!
Strange the effect you cause to me too: after seing your buids, even aircraft I don't like much become my favourites!
Keep us updated!
Ciao
Edo
Attica, Greece / Ελλάδα
Joined: May 01, 2008
KitMaker: 1,437 posts
AeroScale: 1,241 posts
Posted: Monday, July 05, 2010 - 10:46 PM UTC
Texas, United States
Joined: February 01, 2007
KitMaker: 365 posts
AeroScale: 356 posts
Posted: Tuesday, July 06, 2010 - 03:56 AM UTC
Des,
Outstanding progress my friend.I hope tp start my own SPAD in the near future,this is already proving highly valuable.I'll be following with the greatest interest.I wonder how you'll handle the cowl and Hisso fit.
Highest Regards,
Gregory Jouette
Colorado, United States
Joined: January 25, 2004
KitMaker: 11,669 posts
AeroScale: 11,011 posts
Posted: Tuesday, July 06, 2010 - 09:28 AM UTC
Beautiful work! A well stocked brass rod and tube supply is just as important as a spares box.
". . .The most important thing is to know why you build and then get the most that you can out of building." via D.D.
New South Wales, Australia
Joined: March 26, 2009
KitMaker: 366 posts
AeroScale: 309 posts
Posted: Tuesday, July 06, 2010 - 11:02 PM UTC
Thanks guys for all your kind words, they are much appreciated.
EDO. The Spad is not my most favorite aircraft but I believe all the aeroplanes from that era deserve to be recognised and preserved, albeit as a model. There are a lot of little known and obscure aircraft that never reached the status like a handful of popular makes, but they still warrant the attention to make sure they don't just disappear from history. They all had their place and all did their little bit to advance aviation technology and as such should be recognised. I am passionate about WW1 aircraft regardless of nationality and I envy those who flew them.
Des.
http://www.ww1aircraftmodels.com Check my site for 1:32 scale WW1 aircraft model build logs, build techniques, how to make turnbuckles and eyelets plus much more, plenty of photos of my finished models
Colorado, United States
Joined: January 25, 2004
KitMaker: 11,669 posts
AeroScale: 11,011 posts
Posted: Wednesday, July 07, 2010 - 08:38 AM UTC
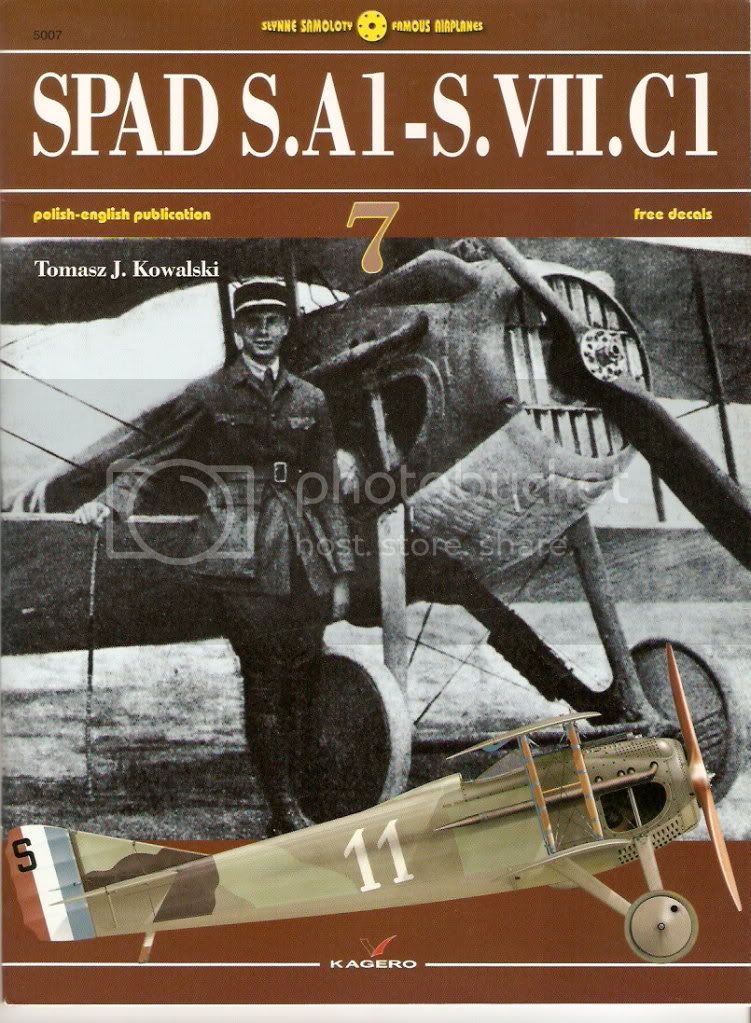
 My review of a book from May 2004
"My copy of Spad VII C.1 by Tomasz Gronczewski, Seweryn M. Fleischer has arrived. First let me say, that to call this work a monograph is a bit of an understatement. Anyone who is lucky enough to get this work as a reference will be confronted with 166 pages of great material. Along with English and Polish text you will find 14 pages of plan views of every variant known from the parent company and other licensed builders. Color profiles and a walk around of a restored Italian museum piece. The finest examples of factory and front line original photos both interior and exterior. Other country and various camouflage applications are great topics of discussion here. Many of these I have not seen until today. My first read through (about 1 hour) has produced only 2 typographical errors. Gauging the aircraft profiles that are available I would expect a 50-60 dollar price tag on this book and it is worth every penny. There is even an online errata site for this book offered in its inside cover.
Anyone who is the least bit interested in this aircraft type does themselves a terrible dis-service by not purchasing it straight away. The website has corrections to the Special hobby kit. I used it to make corrections on my builds."
To my knowlege at this writing the book is OOP and the website is closed.
". . .The most important thing is to know why you build and then get the most that you can out of building." via D.D.
Kentucky, United States
Joined: July 02, 2010
KitMaker: 175 posts
AeroScale: 174 posts
Posted: Thursday, July 08, 2010 - 05:09 AM UTC
I have the French version of this kit, and plan on doing Guynemers mount. I am interested to see how you handle the engine-I hear that it does not fit well.
"I took German in school...but I can't understand the way these foreigners speak it." The Dawn Patrol (1938)
Dennis O'C
Texas, United States
Joined: February 01, 2007
KitMaker: 365 posts
AeroScale: 356 posts
Posted: Thursday, July 08, 2010 - 06:01 AM UTC
Quoted Text
My review of a book from May 2004
"My copy of Spad VII C.1 by Tomasz Gronczewski, Seweryn M. Fleischer has arrived. First let me say, that to call this work a monograph is a bit of an understatement. Anyone who is lucky enough to get this work as a reference will be confronted with 166 pages of great material. Along with English and Polish text you will find 14 pages of plan views of every variant known from the parent company and other licensed builders. Color profiles and a walk around of a restored Italian museum piece. The finest examples of factory and front line original photos both interior and exterior. Other country and various camouflage applications are great topics of discussion here. Many of these I have not seen until today. My first read through (about 1 hour) has produced only 2 typographical errors. Gauging the aircraft profiles that are available I would expect a 50-60 dollar price tag on this book and it is worth every penny. There is even an online errata site for this book offered in its inside cover.
Anyone who is the least bit interested in this aircraft type does themselves a terrible dis-service by not purchasing it straight away. The website has corrections to the Special hobby kit. I used it to make corrections on my builds."
To my knowlege at this writing the book is OOP and the website is closed.
Stephen and the Gang,
Here's another great reference for anyone building the SPAD VII from Kagero.Many excellent detailed photos are included for the interior spaces as well as some very good color plates.The book also come with a set of decals in two scales.
Highest Regards,
Gregory Jouette
New South Wales, Australia
Joined: March 26, 2009
KitMaker: 366 posts
AeroScale: 309 posts
Posted: Friday, July 09, 2010 - 07:49 PM UTC
Just a quickie update.
I drilled out all the moulded instruments and replaced them with various size brass tube, CA holds them in place. I punched the instrument faces from an instrument decal sheet and leaving the backing paper on I pushed them into each of the brass tubes, a small drop of CA on the rear side holds them very well, a drop of clear gloss acts as the "glass".
The rest of the bits are ready for assembly, all I'm waiting for now is for the seat belt to turn up, hopefully the next day or two.
Des.
http://www.ww1aircraftmodels.com 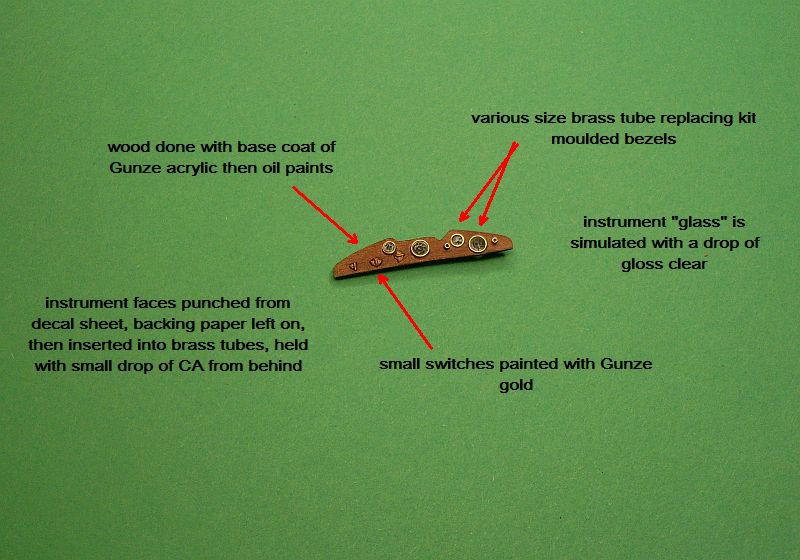

Check my site for 1:32 scale WW1 aircraft model build logs, build techniques, how to make turnbuckles and eyelets plus much more, plenty of photos of my finished models
Colorado, United States
Joined: January 25, 2004
KitMaker: 11,669 posts
AeroScale: 11,011 posts
Posted: Friday, July 09, 2010 - 07:57 PM UTC
Beautiful work! You say the bezels are moulded? If its brass tube could you just tap the end and curl back the end?
". . .The most important thing is to know why you build and then get the most that you can out of building." via D.D.
New South Wales, Australia
Joined: March 26, 2009
KitMaker: 366 posts
AeroScale: 309 posts
Posted: Friday, July 09, 2010 - 08:14 PM UTC
Thanks Stephen for your kind words, they are always much appreciated.
The kit supplied instrument panel has the instruments moulded (molded) with the panel, these are what I drilled out. I measured the moulded instruments before drilling and found the correct size brass tube, these were cut to a short length then slipped into the holes left in the panel where the instruments once were, a small amount of the tube is left protruding past the face of the panel, I used CA to hold the tubes in place.
Des.
http://www.ww1aircraftmodels.com Check my site for 1:32 scale WW1 aircraft model build logs, build techniques, how to make turnbuckles and eyelets plus much more, plenty of photos of my finished models
Alberta, Canada
Joined: January 19, 2008
KitMaker: 6,743 posts
AeroScale: 6,151 posts
Posted: Saturday, July 10, 2010 - 02:45 AM UTC
Excellent progress Des . Neat idea with the brass tubing on the dash . I have tried using copper wire wrap around a drill bit then cutting the links and flatting a link with needle nose pilers . Turned out well , but then there is this seem which doesn't look right . Will have to give this a try on future builds , much easier way of doing it .

Kentucky, United States
Joined: July 02, 2010
KitMaker: 175 posts
AeroScale: 174 posts
Posted: Saturday, July 10, 2010 - 11:20 AM UTC
Superb! Wonderful tips and ideas! I love it-I can hardly wait for the next update.
"I took German in school...but I can't understand the way these foreigners speak it." The Dawn Patrol (1938)
Dennis O'C
England - South East, United Kingdom
Joined: November 06, 2005
KitMaker: 1,667 posts
AeroScale: 1,551 posts
Posted: Saturday, July 10, 2010 - 09:09 PM UTC
Beautiful inspiring work and a wealth of tips too.
My only venture into SPAD's was the old Revell offering which of course never got finished and being years ago was built with *coughs* modellers licence.
Thanks for sharing
Keith
Still can't cure the AMS even with sausage finger implants & olde eyes.
Indiana, United States
Joined: May 14, 2007
KitMaker: 3,117 posts
AeroScale: 2,270 posts
Posted: Sunday, July 11, 2010 - 06:34 AM UTC
Be sure to get a close up of that wonderful seat cushion before you close it up. Your priming pump and other interior modifications are fantastic. Drilling out all those little vents shows just how dedicated you are to Early Aviation.
Wonderful
"Treat 'em Rough", Current Builds--Wingnut Rumpler
I am frequently seen with blood shot eyes from staying up past my nap time to get the right colour scheme on my latest WWI model?


