F-80/T-33 Duo Review Build (1:32)
Merlin
 Senior Editor
#017
United Kingdom
Joined: June 11, 2003
KitMaker: 17,582 posts
AeroScale: 12,795 posts
Posted: Friday, August 27, 2010 - 12:33 AM UTC
Hi Jean-Luc
You posted your pics at exactly the same time as me!

That looks superb! Thanks for the heads up on the wing roots.

I haven't added anything to the nose-bay (for one thing, I don't have any detailed enough references to do so) - that's all as moulded.
Twins again! I tackled the jet-pipe exactly the same way about half an hour ago!

All the best
Rowan

BEWARE OF THE FEW...
As I grow older, I regret to say that a detestable habit of thinking seems to be getting a hold of me. - H. Rider Haggard
Merlin
 Senior Editor
#017
United Kingdom
Joined: June 11, 2003
KitMaker: 17,582 posts
AeroScale: 12,795 posts
Posted: Friday, August 27, 2010 - 03:06 AM UTC
Hi again
While looking at walkaround pics of an F-80 to prepare for doing the nacelles, I spotted a little fix that would have been a lot easier if I'd done it earlier.

The splitters inside the nacelles are open-backed and lead straight into the depths of the fuselage:
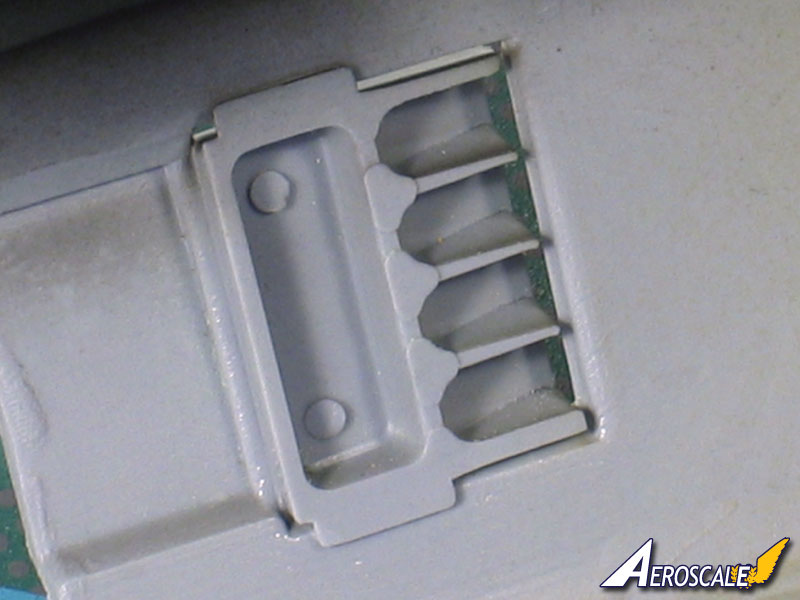
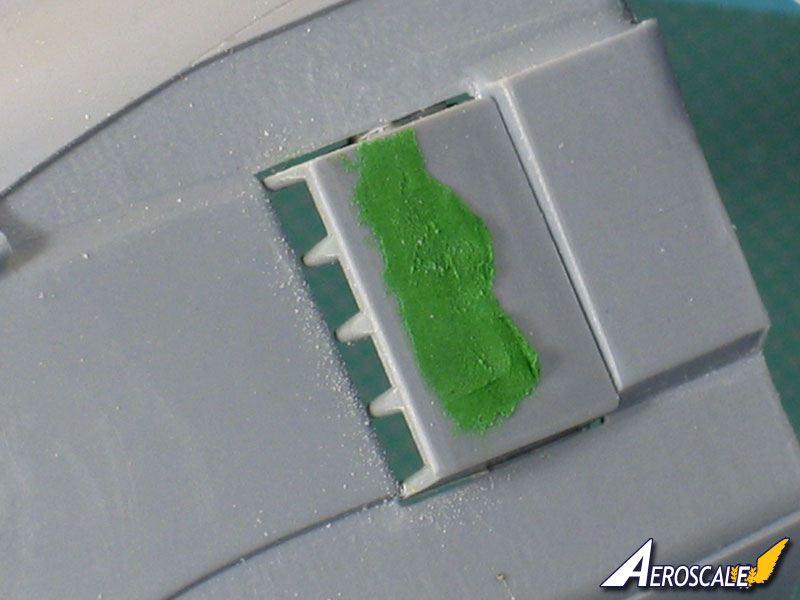
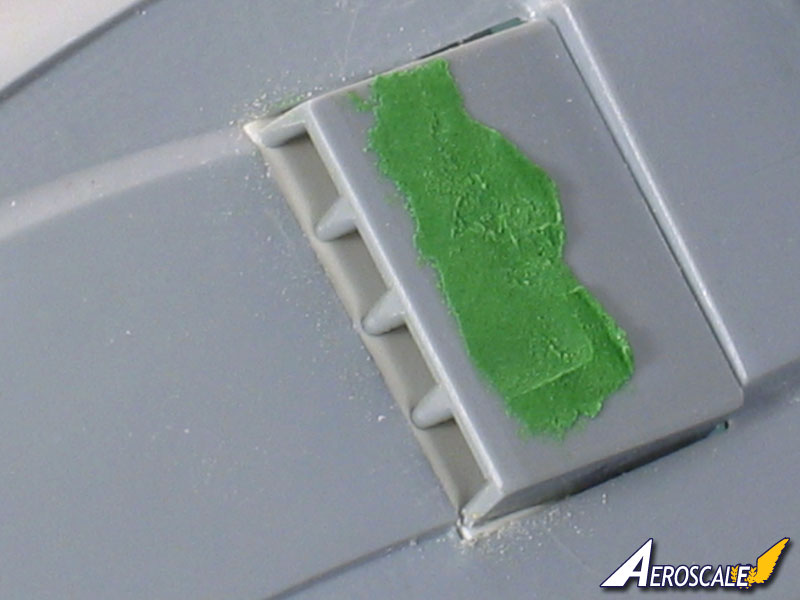
Looking at pictures of the real thing, the fuselage line should continue basically smoothly behind them (but there is a panel line), so I've chiselled the vanes down to inset a piece of plastic card and hide the unrealistic "holes".
All the best
Rowan

BEWARE OF THE FEW...
As I grow older, I regret to say that a detestable habit of thinking seems to be getting a hold of me. - H. Rider Haggard
North Carolina, United States
Joined: November 28, 2005
KitMaker: 2,216 posts
AeroScale: 1,080 posts
Posted: Friday, August 27, 2010 - 05:30 AM UTC
I've been watching along since day 1 and I have to say that this dual build is awsome. There is no better way to learn new techniques than to watch two masters of the hobby having fun and building together. One of the many reasons I love Aeroscale. Thanks, both of you, for taking the time to share this with all of us. I'm loving every minute of your builds!

Hermon

"Those who would give up Essential Liberty
to purchase a little Temporary Safety,
deserve neither Liberty nor Safety."
Benjamin Franklin
Merlin
 Senior Editor
#017
United Kingdom
Joined: June 11, 2003
KitMaker: 17,582 posts
AeroScale: 12,795 posts
Posted: Friday, August 27, 2010 - 09:38 AM UTC
Many thanks Hermon!

I think I can speak for both Jean-Luc and I here - this is a
really enjoyable build. It's difficult when all we seem to be talking about is niggles here and there, and filling and rescribing, but every time I come back to kit (and I apologise for being
so slow getting up to speed on this one!

) I just say to myself "Wow! This is going to be a beauty when it's done!"
It doesn't build itself, and I'm well outside my "comfort zone" in terms of both scale and subject, but it's definitely more than worth the effort - and at the end of the day, isn't that what modelling is all about?

All the best
Rowan

PS - Ohh, and by the way - all that "trempe l'oeil" business inside the nose... a total waste of time! You can't see a bit of it when the resin's in there!

BEWARE OF THE FEW...
As I grow older, I regret to say that a detestable habit of thinking seems to be getting a hold of me. - H. Rider Haggard
litespeed
 News Reporter
England - North West, United Kingdom
Joined: October 15, 2009
KitMaker: 1,976 posts
AeroScale: 1,789 posts
Posted: Friday, August 27, 2010 - 09:47 AM UTC
Fantastic stuff guys. really enjoying the builds so far.
This is what modelling is all about. keep up the good work.
tim
Moselle, France
Joined: May 15, 2005
KitMaker: 5,653 posts
AeroScale: 4,347 posts
Posted: Sunday, August 29, 2010 - 04:06 AM UTC
Hi all,
Sorry but I haven't made any real progress on the T-33 this weekend. I have only added a coat of Klir over the decals. Nothing spectacular.
I was distracted by another project: a huge diorama!
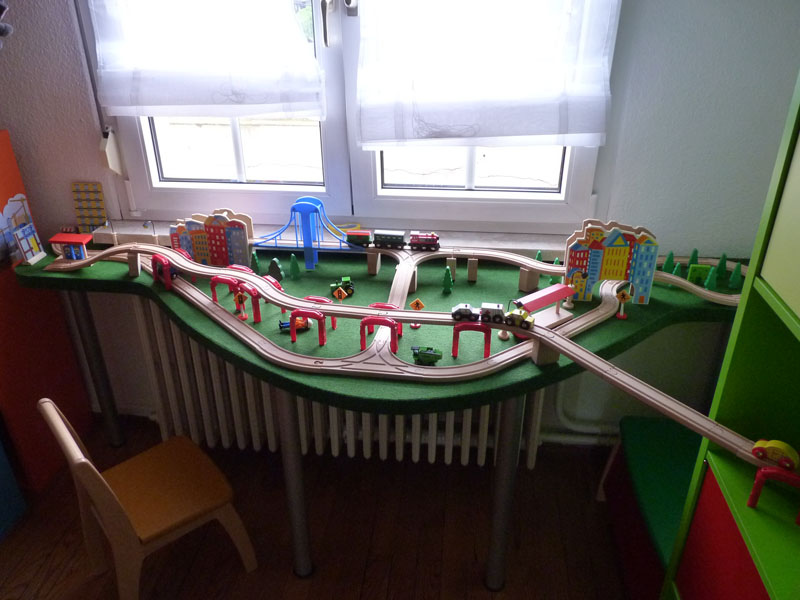
Ok, it's not really aircraft related but I though it would be interesting nevertheless. In fact I only built the table. I can't guarantee it is 100% accurate and the detail is basic but my three and half year son likes it a lot...

I will resume work on the T-33 tomorrow. I will apply an oil wash.
Jean-Luc

Better think one hour and build five minutes...
Than think five minutes and build an hour!
Merlin
 Senior Editor
#017
United Kingdom
Joined: June 11, 2003
KitMaker: 17,582 posts
AeroScale: 12,795 posts
Posted: Sunday, August 29, 2010 - 05:29 AM UTC
Hi Jean-Luc
I see Vincent's already taking after his dad... he like's BIG dioramas!

All the best
Rowan

BEWARE OF THE FEW...
As I grow older, I regret to say that a detestable habit of thinking seems to be getting a hold of me. - H. Rider Haggard
Merlin
 Senior Editor
#017
United Kingdom
Joined: June 11, 2003
KitMaker: 17,582 posts
AeroScale: 12,795 posts
Posted: Sunday, August 29, 2010 - 10:15 PM UTC
Hi again
We have intakes!

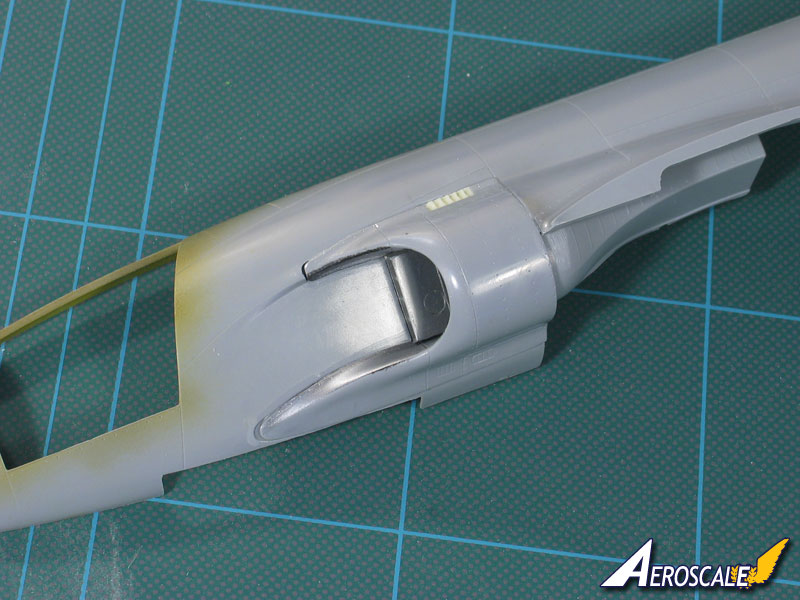
As you can see, there's a bit to do - they don't quite match the shape of the cutouts on the fuselage - but the overall fit is a bit better than I thought it would be at one stage.
Target for the week: get the basic airframe cemented together. (I've said that before, haven't I?!


)
All the best
Rowan

BEWARE OF THE FEW...
As I grow older, I regret to say that a detestable habit of thinking seems to be getting a hold of me. - H. Rider Haggard
Merlin
 Senior Editor
#017
United Kingdom
Joined: June 11, 2003
KitMaker: 17,582 posts
AeroScale: 12,795 posts
Posted: Sunday, August 29, 2010 - 10:40 PM UTC
Hi again
Well, I can see one
massive sanding job ahead!:
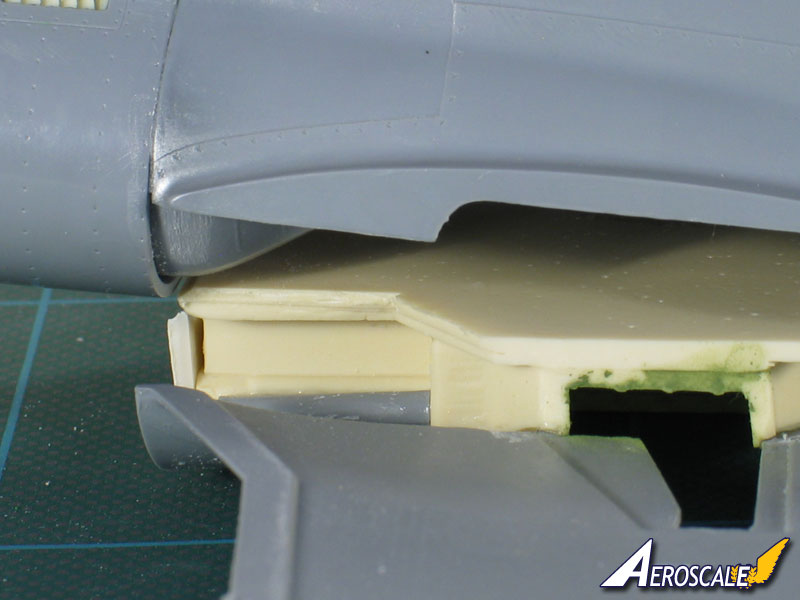
Nothing to do with the design of the kit - this is because of the replacement resin wheel well. I didn't bother sanding off any of the casting block before fitting it, so I could tell what needed doing later - the answer is... a lot!

I seldom use motor tools, but I think it's called for this time. So, this being resin, I'll work in the garden (thank heavens it's finally stopped raining in the UK!) and still wear a proper full-filter mask.

All the best
Rowan

BEWARE OF THE FEW...
As I grow older, I regret to say that a detestable habit of thinking seems to be getting a hold of me. - H. Rider Haggard
Joined: December 23, 2007
KitMaker: 1,596 posts
AeroScale: 1,275 posts
Posted: Sunday, August 29, 2010 - 10:43 PM UTC
I don't see any airstrip for your T-33 here...
Merlin
 Senior Editor
#017
United Kingdom
Joined: June 11, 2003
KitMaker: 17,582 posts
AeroScale: 12,795 posts
Posted: Monday, August 30, 2010 - 12:15 AM UTC
Hi again
Well, the nasty job is done! The garden looks like there's been an early snowfall, but the wheelwell just clears the internal ducting now:
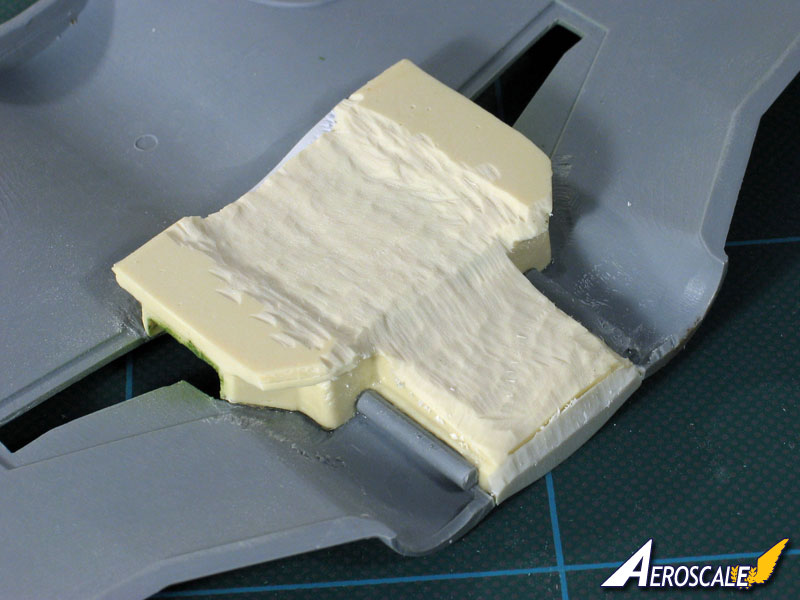
I managed to break all the CA glue bonds in the process, so I'll reset the well with 5-minute epoxy that might (hopefully) have more shear-strength - because there's still a bit of work to do...
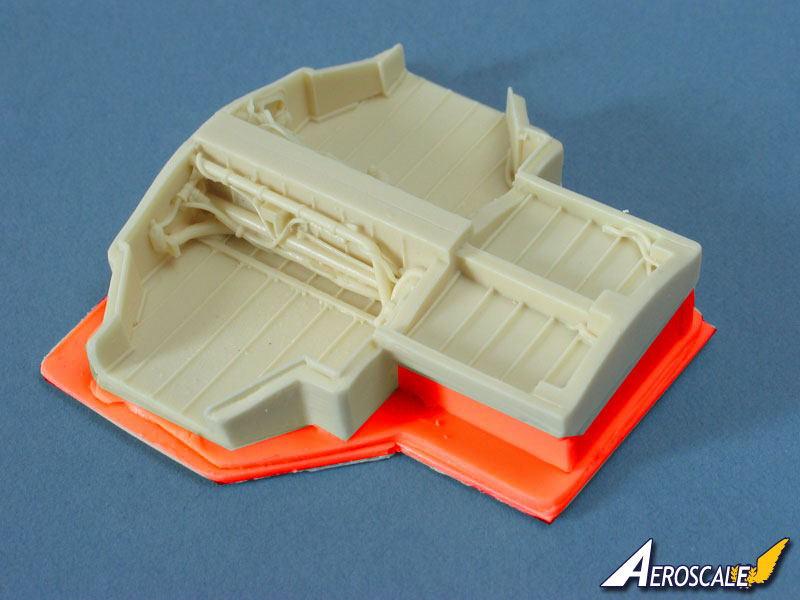
If I was starting from scratch, I'll remove all the casting block with a combination of wet sanding and a razor saw before fitting the wheelwell, something like this:
All the best
Rowan

BEWARE OF THE FEW...
As I grow older, I regret to say that a detestable habit of thinking seems to be getting a hold of me. - H. Rider Haggard
Moselle, France
Joined: May 15, 2005
KitMaker: 5,653 posts
AeroScale: 4,347 posts
Posted: Monday, August 30, 2010 - 01:21 AM UTC
Hi Michal,
Quoted Text
don't see any airstrip for your T-33 here...
No, I forgot...

But the aircraft would have been too large anyway ("wrong scale!" would say Steffen). I can still fix it on the ceiling with invisible thread and let it fly over the landscape!

Rowan, that's a nice modern artwork you've achieved here with the wheel wells!

I have applied the oil wash with my now usual method: Dark Brown oil paint mixed with White Courtrai Drier on the underside and plain black on the upperside. After one hour the excess was eliminated with cotton buds moistened with Courtrai Drier. It worked like a charm...


I will let the wash alone for 24 hours and then apply a satin varnish over the whole model.
Jean-Luc

Better think one hour and build five minutes...
Than think five minutes and build an hour!
Merlin
 Senior Editor
#017
United Kingdom
Joined: June 11, 2003
KitMaker: 17,582 posts
AeroScale: 12,795 posts
Posted: Monday, August 30, 2010 - 02:55 AM UTC
Hi Jean-Luc
Wow! Very nice! And it's actually encouraging to see the empty standard wheelwell - it makes my battle with resin dust this morning seem a bit more worthwhile.

Talking of which - seeing as the resin well had fallen out due to the stress of all that motor-tooling

, I did what a should have done in the first place and wet sanded more of the casting block off, losing a bit of the "modern art" look. But I think there's still a certain Henry Moore quality about the front section.

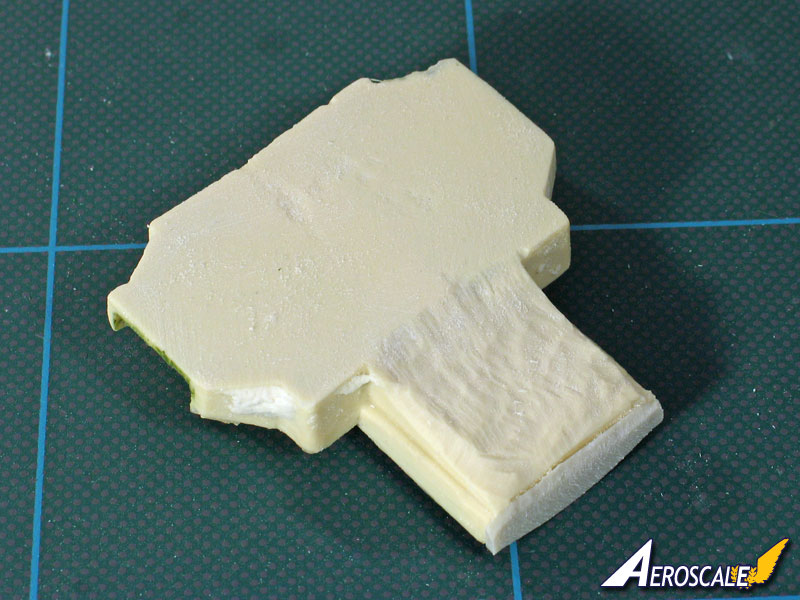
The result is actually quite a decent fit, but you can see the size of the spacer needed where the resin air-brakes section was shorter than the standard one:
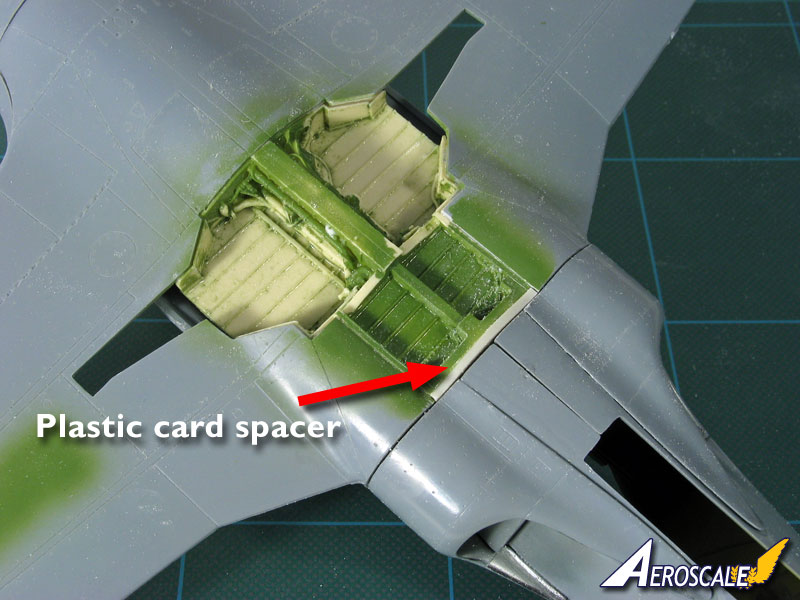
And the tatty green? That was one of my "use any paint that's handy as a primer" efforts. I think there must have still been some release agent on the resin, because it didn't take at all well and I've already stripped most of it off, but it served its purpose at the time for highlighting where work was needed.
All the best
Rowan

BEWARE OF THE FEW...
As I grow older, I regret to say that a detestable habit of thinking seems to be getting a hold of me. - H. Rider Haggard
Merlin
 Senior Editor
#017
United Kingdom
Joined: June 11, 2003
KitMaker: 17,582 posts
AeroScale: 12,795 posts
Posted: Monday, August 30, 2010 - 11:10 PM UTC
Hi again
As usual, being a bear of very little brain, I'm darting around the build in no particularly logical order!

I've back-tracked to the cockpit and straightened up the rear edge with plastic card:
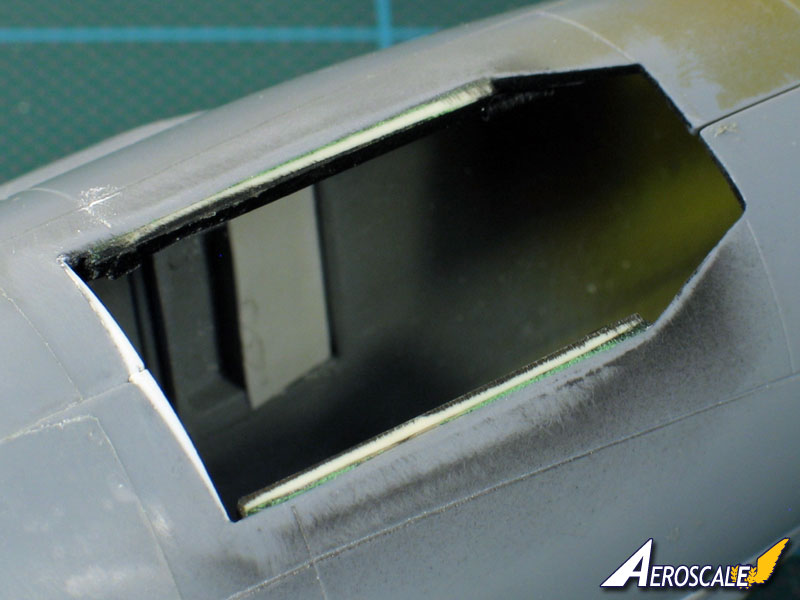
I'm not sure how much will be visible in the end, because there's a canopy mechanism to fit behind the headrest, but it's easier to do now than find out later that it looks crooked.
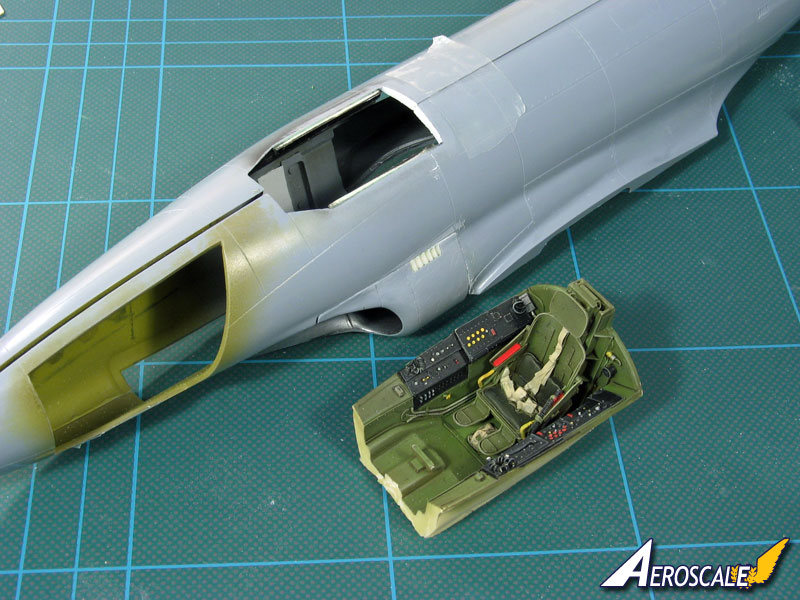
So, I'll get on with finishing the cockpit tub and see if the lovely Eduard pre-coloured instrument panel will fit in the resin cockpit, and then - shock! horror! - quite possibly start assembling the main airframe! There is half a chance I'll hit my target for the week...

All the best
Rowan

BEWARE OF THE FEW...
As I grow older, I regret to say that a detestable habit of thinking seems to be getting a hold of me. - H. Rider Haggard
Joined: December 23, 2007
KitMaker: 1,596 posts
AeroScale: 1,275 posts
Posted: Monday, August 30, 2010 - 11:48 PM UTC
Quoted Text
Hi again
As usual, being a bear of very little brain, I'm darting around the build in no particularly logical order!  I've back-tracked to the cockpit and straightened up the rear edge with plastic card:
You're doing good Winnie, don't surrender and hang on with this build.
Merlin
 Senior Editor
#017
United Kingdom
Joined: June 11, 2003
KitMaker: 17,582 posts
AeroScale: 12,795 posts
Posted: Tuesday, August 31, 2010 - 03:42 AM UTC
Cheers Michal
Don't worry - I'm determined to keep going. I owe it to poor Jean-Luc - I'm sure he's going especially slowly just to encourage me to continue. I bet he could have finished weeks ago!

All the best
Rowan

BEWARE OF THE FEW...
As I grow older, I regret to say that a detestable habit of thinking seems to be getting a hold of me. - H. Rider Haggard
North Carolina, United States
Joined: November 28, 2005
KitMaker: 2,216 posts
AeroScale: 1,080 posts
Posted: Tuesday, August 31, 2010 - 05:23 AM UTC
Rowan, seeing your struggles with this one so far kind of puts a smile on my face. It's nice to know that even the "old hands" run into a bit of trouble once in a while. I'd REALLY like to see this kit in 1/48 scale.
Jean-Luc, beautiful paint my friend. If I didn't know better, I'd think you were an art teacher in real life.

Hermon

"Those who would give up Essential Liberty
to purchase a little Temporary Safety,
deserve neither Liberty nor Safety."
Benjamin Franklin
Moselle, France
Joined: May 15, 2005
KitMaker: 5,653 posts
AeroScale: 4,347 posts
Posted: Tuesday, August 31, 2010 - 07:27 AM UTC
Hi all,
Quoted Text
... it's actually encouraging to see the empty standard wheelwell - it makes my battle with resin dust this morning seem a bit more worthwhile.
Yes, the wheel wells are really the weak point of the kit detail wise. If I had to do this again, I would keep the resin replacement for me...

I have sprayed a coat of mat varnish (GSI Hobby Color H20 + some Klir) and while the model was left aside to dry I have worked a little on the landing gear legs. Since I have used the resin parts for the tyres, I had to drill a hole to be able to glue them to the legs. The later don't have an axle so I have made one with a plastic rod...

Tomorrow I will get the T-33 on its feets!

Thanks Hermon...

Jean-Luc

Better think one hour and build five minutes...
Than think five minutes and build an hour!
Merlin
 Senior Editor
#017
United Kingdom
Joined: June 11, 2003
KitMaker: 17,582 posts
AeroScale: 12,795 posts
Posted: Tuesday, August 31, 2010 - 10:55 AM UTC
Hi Hermon
I don't think my struggle is with the kit, so much as finding any time to work on it!

To be honest, I'd be just as bogged down with a mainstream build (in fact I've shelved several to manage what little I've done on this). But I did finish a snap-together kit for ModelGeek - which reminds me... I still need to write the review!

All the best
Rowan

BEWARE OF THE FEW...
As I grow older, I regret to say that a detestable habit of thinking seems to be getting a hold of me. - H. Rider Haggard
Merlin
 Senior Editor
#017
United Kingdom
Joined: June 11, 2003
KitMaker: 17,582 posts
AeroScale: 12,795 posts
Posted: Tuesday, August 31, 2010 - 11:16 PM UTC
Hi again
Onwards and downwards!

The nosewheel well isn't a bad fit after a swipe with a sanding stick, but the actual locating are inside the nose is a little vague.
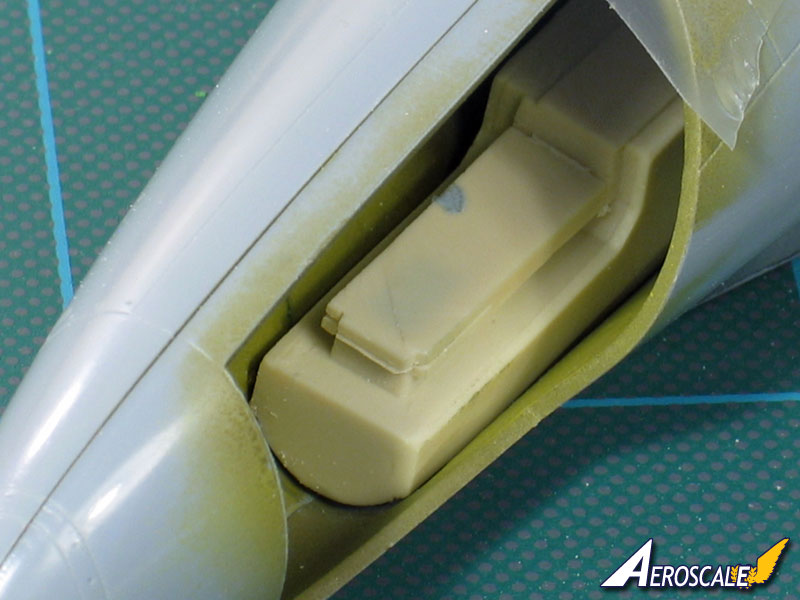
With so little surface area to use CA on, there's no way I'm going to trust it to stand the weight of a hefty kit like this, so I've tacked it in place with superglue and I'll then pack around it with styrene supports and epoxy resin. I haven't had a chance to find the centre of gravity on the kit yet, but it might be a good idea to add some noseweights at the same time...
All the best
Rowan

BEWARE OF THE FEW...
As I grow older, I regret to say that a detestable habit of thinking seems to be getting a hold of me. - H. Rider Haggard
Merlin
 Senior Editor
#017
United Kingdom
Joined: June 11, 2003
KitMaker: 17,582 posts
AeroScale: 12,795 posts
Posted: Tuesday, August 31, 2010 - 11:47 PM UTC
Quoted Text
...I haven't had a chance to find the centre of gravity on the kit yet, but it might be a good idea to add some noseweights at the same time...
Hi again
Forget that - a quick test with all the extra resin onboard shows the F-80 is nicely nose-heavy.

All the best
Rowan

BEWARE OF THE FEW...
As I grow older, I regret to say that a detestable habit of thinking seems to be getting a hold of me. - H. Rider Haggard
Merlin
 Senior Editor
#017
United Kingdom
Joined: June 11, 2003
KitMaker: 17,582 posts
AeroScale: 12,795 posts
Posted: Wednesday, September 01, 2010 - 01:55 AM UTC
Hi there
Don't get too excited - it's only a test-fit!

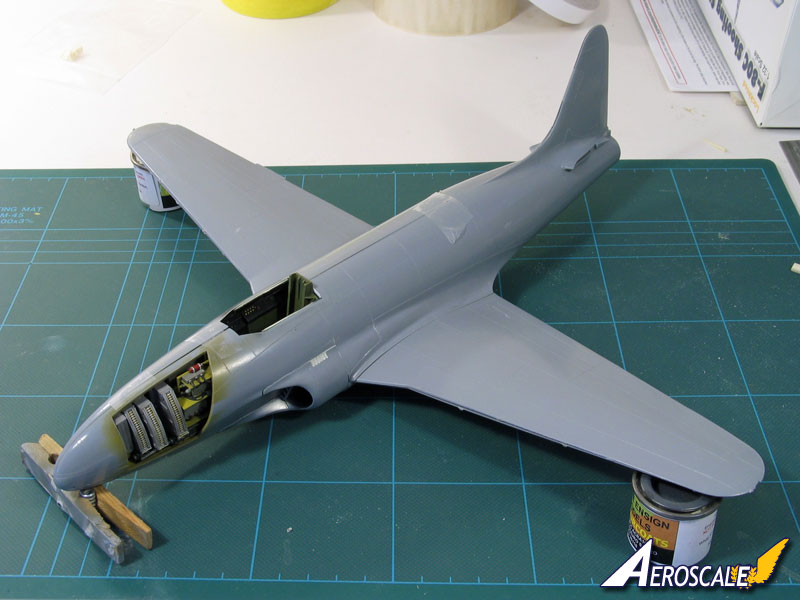
The wings aren't even glued together yet, let alone attached to the fuselage, but the resin is all in there (the gun bay and cockpit are still dry-fitted) and I'm delighted by the generally good fit. The underside of the intakes is another matter - that will take a bit of work - but it's definitely encouraging to see something so aircraft-shaped on the workbench!

All the best
Rowan

BEWARE OF THE FEW...
As I grow older, I regret to say that a detestable habit of thinking seems to be getting a hold of me. - H. Rider Haggard
AussieReg
 Associate Editor
#007
Victoria, Australia
Joined: June 09, 2009
KitMaker: 8,156 posts
AeroScale: 3,756 posts
Posted: Wednesday, September 01, 2010 - 02:31 AM UTC
Quoted Text
Cheers Michal
Don't worry - I'm determined to keep going. I owe it to poor Jean-Luc - I'm sure he's going especially slowly just to encourage me to continue. I bet he could have finished weeks ago! 
All the best
Rowan 
Rowan, J-L DID finish weeks ago, he's just dropping progress pics in piecemeal to make you feel better !!

This thread is living right up to my initial expectations, superb work on both accounts.
Cheers, D
ON the bench
Revell 1/24 '53 Corvette (building as '54)
Revell 1/24 BMW 507 Coupe and Cabrio
Italeri 1/48 Me262 B-1a/U1 Nightfighter
Monogram 1/24 '57 Chevy Nomad
Dragon 1/350 USS Frank Knox DD-742
Merlin
 Senior Editor
#017
United Kingdom
Joined: June 11, 2003
KitMaker: 17,582 posts
AeroScale: 12,795 posts
Posted: Wednesday, September 01, 2010 - 03:44 AM UTC
Hi Damian
I'm almost certain he did - but I didn't want to say that and spoil the pretence for everyone.

To be honest, knowing the speed he builds, if he
hasn't finsihed already I'll be worried about him!

All the best
Rowan

BEWARE OF THE FEW...
As I grow older, I regret to say that a detestable habit of thinking seems to be getting a hold of me. - H. Rider Haggard
Joined: December 23, 2007
KitMaker: 1,596 posts
AeroScale: 1,275 posts
Posted: Wednesday, September 01, 2010 - 03:48 AM UTC
Remember Rowan, glue is your friend, you don't have to worry and avoid using it.


