_GOTOBOTTOM
Cold War (1950-1974)
Discuss the aircraft modeling subjects during the Cold War period.
Hosted by Tim Hatton
F-80/T-33 Duo Review Build (1:32)
TedMamere
_VISITCOMMUNITY
Moselle, France
Joined: May 15, 2005
KitMaker: 5,653 posts
AeroScale: 4,347 posts
Posted: Tuesday, August 03, 2010 - 09:27 PM UTC
Hi all,

This is the start of the F-80/T-33 Duo Review Build thread. Rowan will build the F-80 (see review here) enhanced with some aftermarket references ( Avionix cockpit and True Details wheel wells) while I will take it easier and build my T-33 (see review here) out of the box.


All the best,

Jean-Luc
Merlin
Staff MemberSenior Editor
AEROSCALE
#017
_VISITCOMMUNITY
United Kingdom
Joined: June 11, 2003
KitMaker: 17,582 posts
AeroScale: 12,795 posts
Posted: Tuesday, August 03, 2010 - 09:41 PM UTC
Cheers there

This should really be fun - a real change of subject and scale for me!

I'll be adding the resin nose gun-bay in the review above too. Unfortunately, it'll be a little while before I have any free time for modelling and can make a start on my half of our Dual-Build, so don't be surprised if it's next week before I can post any progress.

All the best

Rowan
AussieReg
Staff MemberAssociate Editor
AUTOMODELER
#007
_VISITCOMMUNITY
Victoria, Australia
Joined: June 09, 2009
KitMaker: 8,156 posts
AeroScale: 3,756 posts
Posted: Tuesday, August 03, 2010 - 09:44 PM UTC
WooHoo, another exciting episode from the Dynamic Duo, I love this concept and I'm really looking forward to the running commentary as well as the finished products.

Outstanding !!

Cheers, D
TedMamere
_VISITCOMMUNITY
Moselle, France
Joined: May 15, 2005
KitMaker: 5,653 posts
AeroScale: 4,347 posts
Posted: Tuesday, August 03, 2010 - 09:45 PM UTC
Hi again...

I have started my build already. First step was to get as much plastic and resin parts together before applying the first coats of paint. The wings for example can be already glued together, as well as other sub-assemblies like the wing-tip fuel tanks, the cockpit tub (see photo below), the wheel wells, the intakes, the horizontal stabilizers, etc...


Once this was done, I have applied the basic colors to all parts following the kit's instructions and internet walkaround photos: Dark Gull Gray (Tamiya XF25) for the cockpit interior, Light gray for the main wheel wells, the inside of the landing gear covers and the inside of the air intakes (Tamiya XF-80), silver for the landing gears, nose wheel well and intake trunking (Revell Aqua Color 90 Silver) and black (Tamiya XF-1) for the instrument panels.


Later I have dry-brushed and washed the parts to give them a light used appearance.

That's all for today...

Jean-Luc
litespeed
Staff MemberNews Reporter
AEROSCALE
_VISITCOMMUNITY
England - North West, United Kingdom
Joined: October 15, 2009
KitMaker: 1,976 posts
AeroScale: 1,789 posts
Posted: Tuesday, August 03, 2010 - 09:56 PM UTC
Hi
Very much looking forward to these builds. Enjoy the both of you.
tim
Merlin
Staff MemberSenior Editor
AEROSCALE
#017
_VISITCOMMUNITY
United Kingdom
Joined: June 11, 2003
KitMaker: 17,582 posts
AeroScale: 12,795 posts
Posted: Wednesday, August 04, 2010 - 08:37 AM UTC
Nice start Jean-Luc

I can see straight away that the F-80 will look very different - there's lot's of Interior Green in it.

All the best

Rowan
TedMamere
_VISITCOMMUNITY
Moselle, France
Joined: May 15, 2005
KitMaker: 5,653 posts
AeroScale: 4,347 posts
Posted: Thursday, August 05, 2010 - 08:36 AM UTC
Hi all,

Here's my daily update...

The cockpit interior was finished using my usual techniques: dry-brushing with Prince August paint, a wash of tinted Klir (french Future) and the detail painting made with a small brush once again with Prince August paints. I don't know if the colors are 100% right but the more I've looked at pictures of the T-33 interior, the more differences I found between each machine.

The instrument panels are pre-colored photo-etched parts probably made by Eduard. To reproduce the glass of the dials I have simply applied a transparent tape. It's very effective and realistic. The seats are resin parts and though not the best I've seen they look good once painted...


Getting the cockpit to fit inside the fuselage was not a piece of cake. Not that the fit was bad, but the locators inside each fuselage halves where not really helpful and the whole process was a little frustrating. This is clearly a design problem of the kit and one of it's weak points. However, with some persuasion (and a lot of tape!) I managed to get a decent result...


Let's see how the fit will be for the other parts...

Jean-Luc
Merlin
Staff MemberSenior Editor
AEROSCALE
#017
_VISITCOMMUNITY
United Kingdom
Joined: June 11, 2003
KitMaker: 17,582 posts
AeroScale: 12,795 posts
Posted: Thursday, August 05, 2010 - 09:17 AM UTC
Hi Jean-Luc

Beautiful work as always!

I can't promise a daily update - but I hope to make a start sanding off resin casting blocks tomorrow afternoon...

All the best

Rowan
AussieReg
Staff MemberAssociate Editor
AUTOMODELER
#007
_VISITCOMMUNITY
Victoria, Australia
Joined: June 09, 2009
KitMaker: 8,156 posts
AeroScale: 3,756 posts
Posted: Thursday, August 05, 2010 - 01:26 PM UTC

Quoted Text

The cockpit interior was finished using my usual techniques: dry-brushing with Prince August paint, a wash of tinted Klir (french Future)


That office looks superb J-L. A quick question (or three) if I may, can you expand on your tinted Klir wash. What paint do you use to tint, what ratio, and how do you apply it ??

Many thanks, Damian.
IronMark
_VISITCOMMUNITY
Texas, United States
Joined: December 27, 2009
KitMaker: 71 posts
AeroScale: 69 posts
Posted: Thursday, August 05, 2010 - 04:05 PM UTC
Hi Jean-Luc,

Your cockpit is magnificent. Beautiful paint work!

Cheers,
Mark
Merlin
Staff MemberSenior Editor
AEROSCALE
#017
_VISITCOMMUNITY
United Kingdom
Joined: June 11, 2003
KitMaker: 17,582 posts
AeroScale: 12,795 posts
Posted: Thursday, August 05, 2010 - 08:08 PM UTC
Hi again Jean-Luc

I'll add a question of my own regarding the painting. What are Prince August paints? I've never seen them in this country, and their company web site shows Vallejo paints. Is the own-brand stuff a discontinued range?

All the best

Rowan
Merlin
Staff MemberSenior Editor
AEROSCALE
#017
_VISITCOMMUNITY
United Kingdom
Joined: June 11, 2003
KitMaker: 17,582 posts
AeroScale: 12,795 posts
Posted: Friday, August 06, 2010 - 05:26 AM UTC
Hi again

As promised I got to work sanding resin this afternoon. The Avionix cockpit tub is a direct replacement for the kit part and, as such, is identical in length:


This is no problem unless you also want to fit the nose gun-bay:


Now it becomes clear that the original tub is a little too long. There's a panel line which shows where the internal bulkhead should lie, so the front of the tub will need trimming back a little to make room:


All the best

Rowan
Merlin
Staff MemberSenior Editor
AEROSCALE
#017
_VISITCOMMUNITY
United Kingdom
Joined: June 11, 2003
KitMaker: 17,582 posts
AeroScale: 12,795 posts
Posted: Saturday, August 07, 2010 - 09:10 PM UTC
Hi again

Following a bit of surgery to the front of the tub, the resin interior all fits in (including the new nosewheel well that I'd forgotten all about! )


Time permitting, I'll try to get at least some of it painted this week...

All the best

Rowan
TedMamere
_VISITCOMMUNITY
Moselle, France
Joined: May 15, 2005
KitMaker: 5,653 posts
AeroScale: 4,347 posts
Posted: Sunday, August 08, 2010 - 04:49 AM UTC
Hi Rowan,

Nice start! There is not much space left to fit some weight. Do you think your model will be a tail sitter? Do the instructions of the F-80 mention something about this? In the T-33 instructions there is nothing and I think the model won't need any extra weight.

I must apologize not to have posted any progress in the past days. Friday I have made some 1:1 scale modeling in the basement and yesterday we were at a wedding. My wife and I we slept only 2 hours this morning until our children already woke up... and we are still under the effects of the toxic products we drank and ate yesterday!

Anyway, back on topic, here is my progress on the T-33 over the past days...

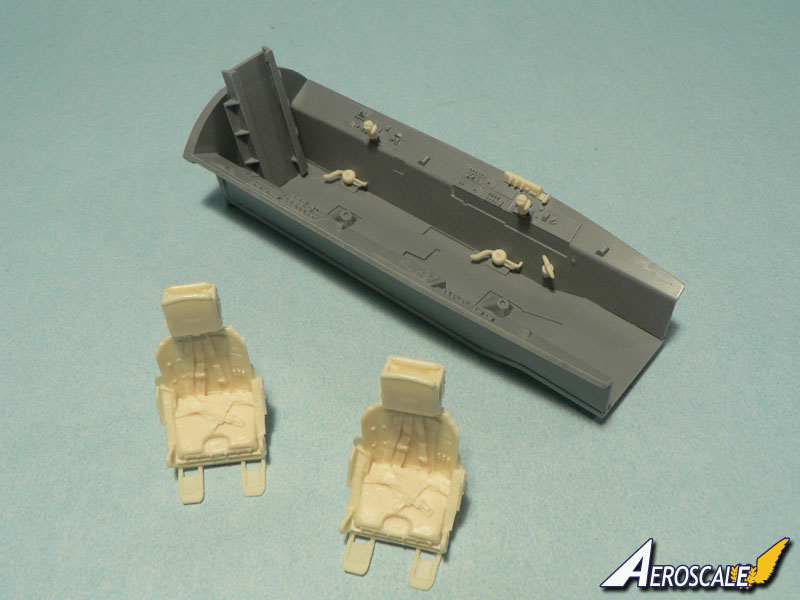
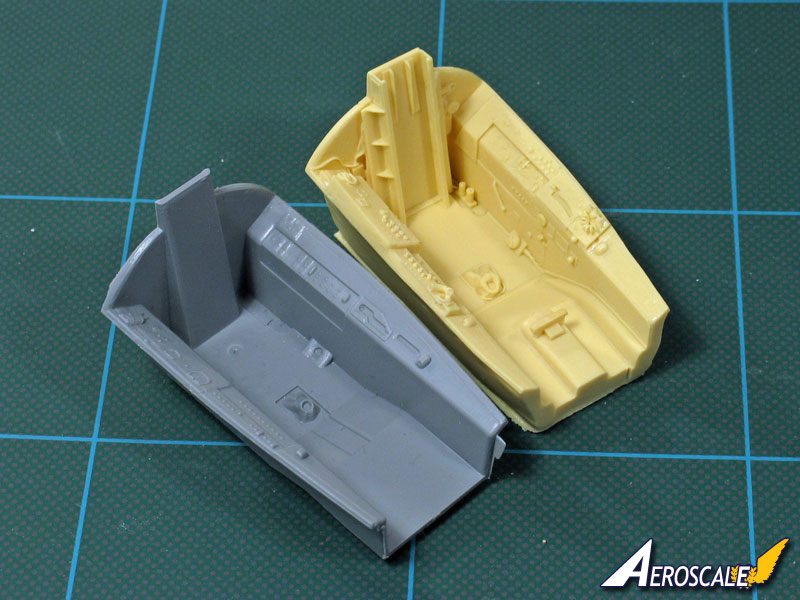
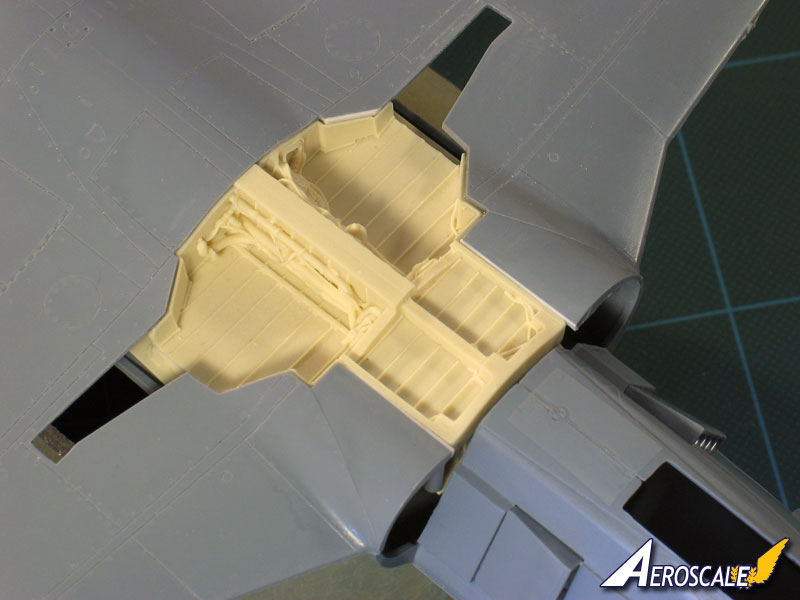
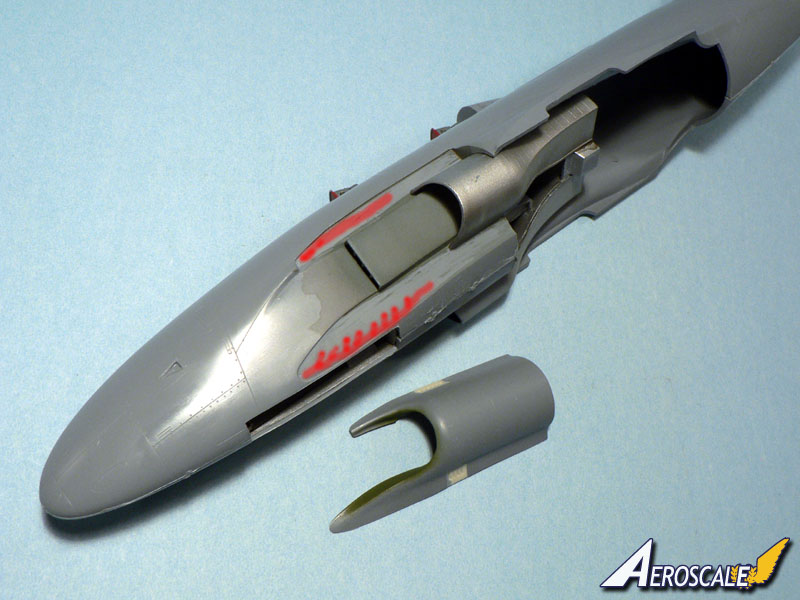
I have glued the fuselage air intakes which are composed of two plastic parts and two small resin inserts each. I have painted the inside of the intakes in grey and masked the area to apply some green as I believe it will be impossible to do properly once they are in place...


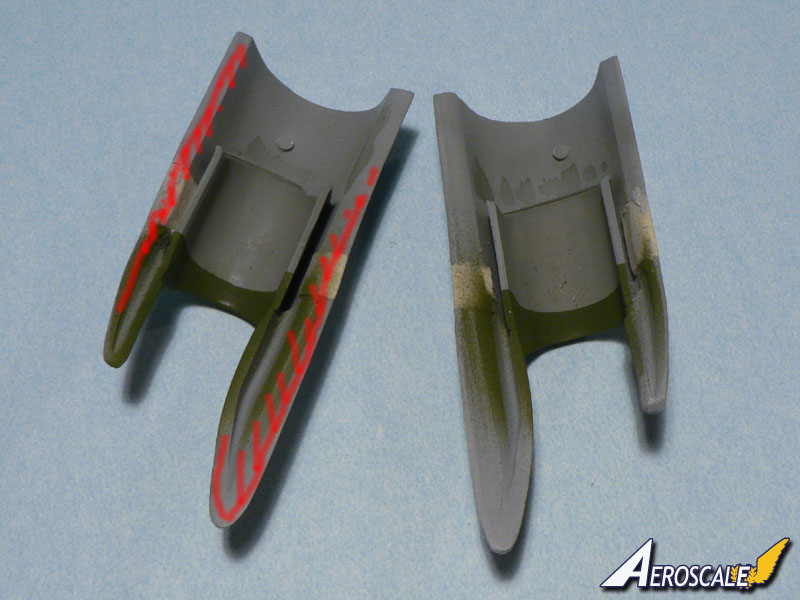
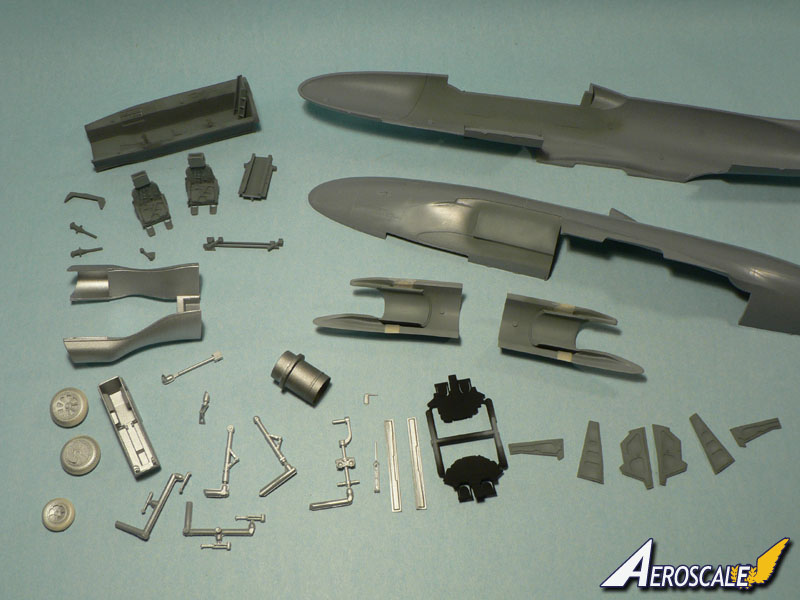
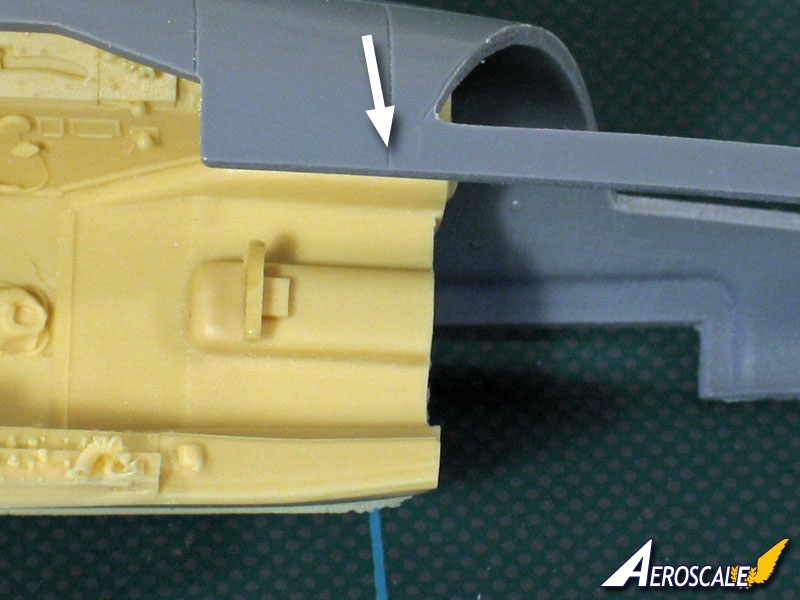
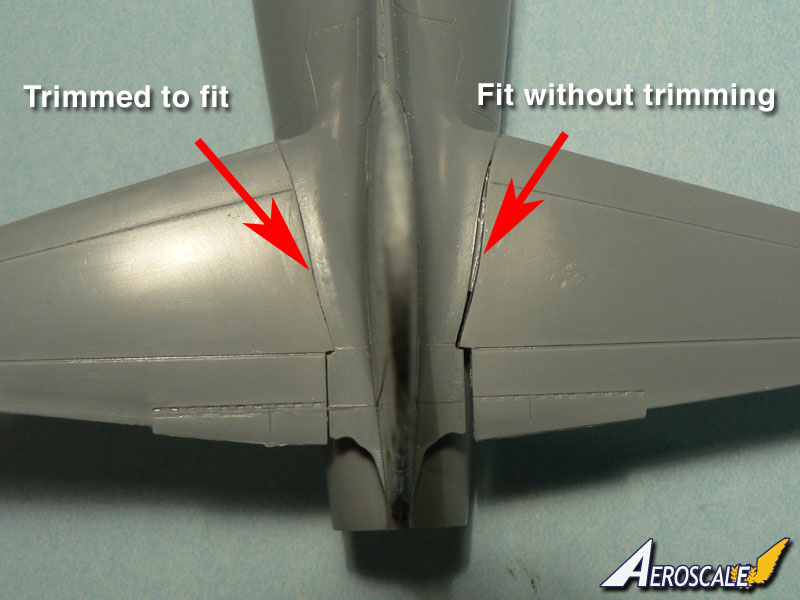
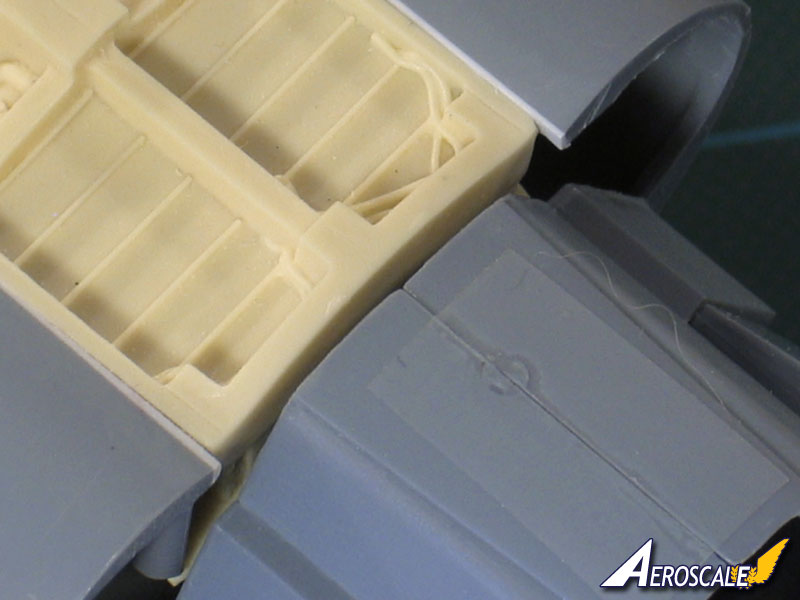
Before fitting the air intakes, a lot of preparation work is needed. One has to trim the parts (red areas) in order to get a decent result. If you try to fit the parts without doing this, you will end up with gaps which are quite huge! A small scalpel blade is perfect to scratch the plastic away in some places...


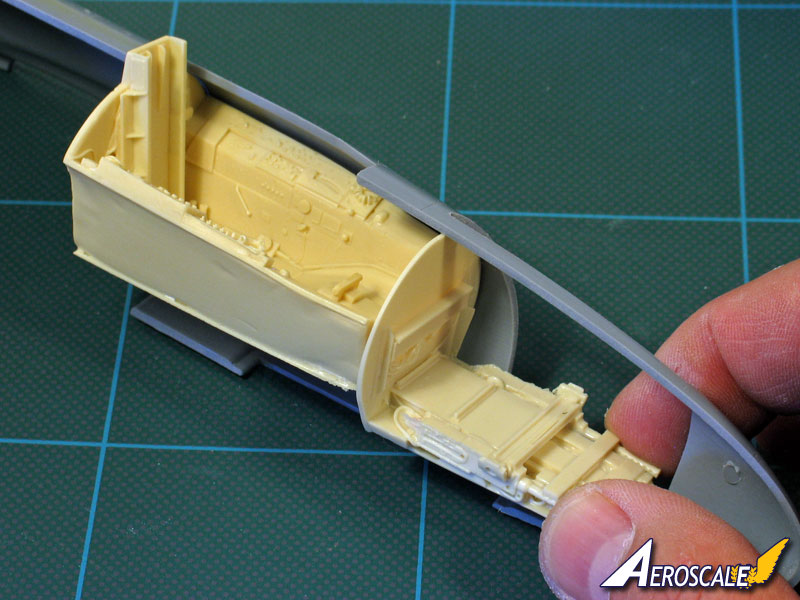
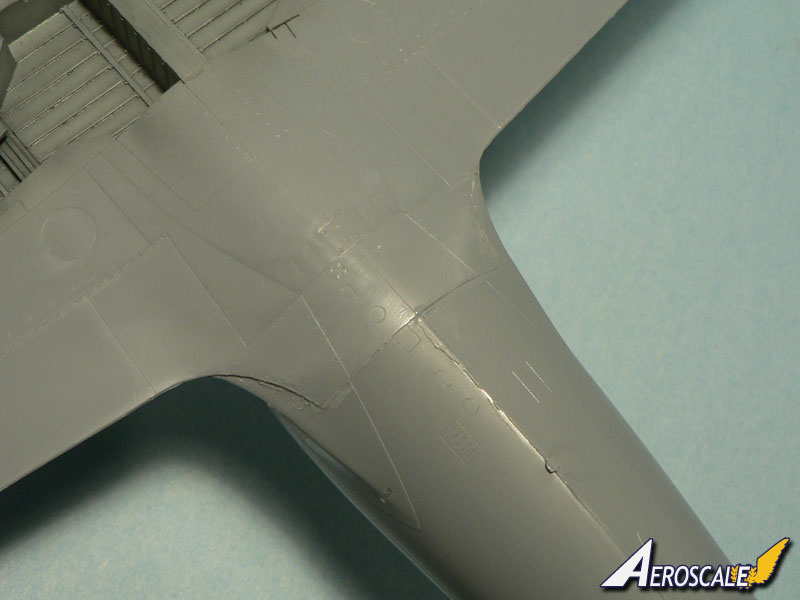
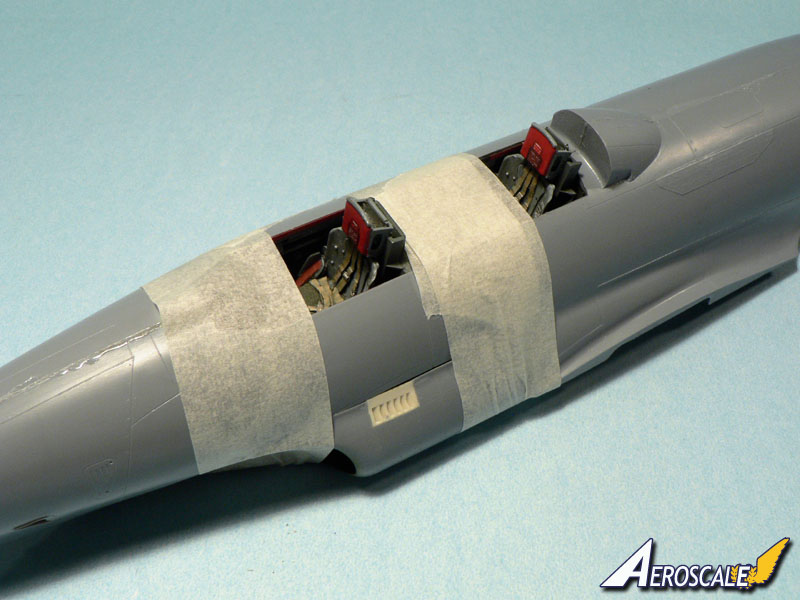
Once this is done, with a fair amount of glue and again some persuasion (tape), a decent fit can be obtained...


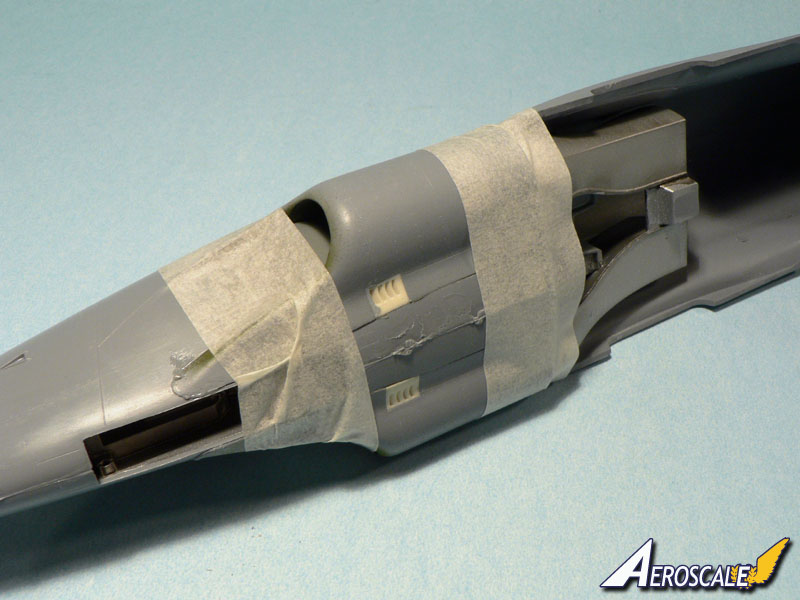
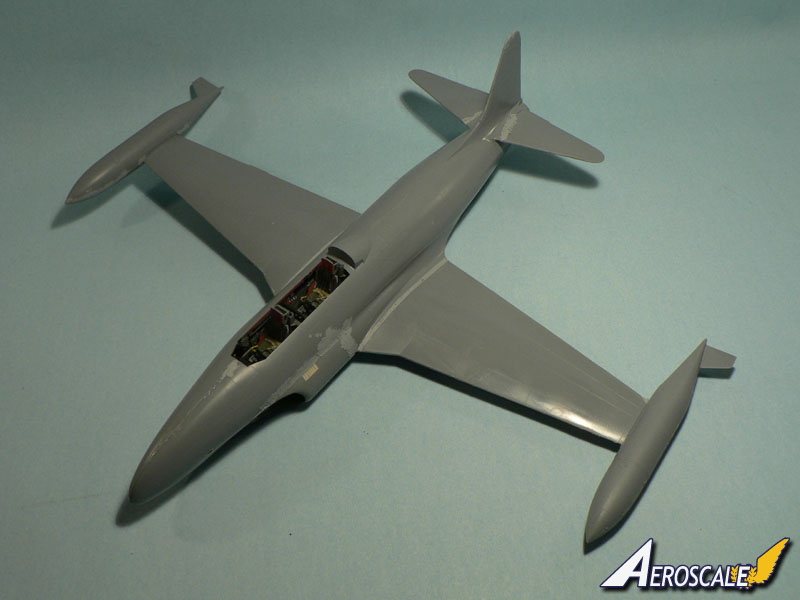
Now I will have to blend everything together with filler. I suppose some rescribing won't be to avoid but this is something one has to expect with short run kits I suppose.


Quoted Text

A quick question (or three) if I may, can you expand on your tinted Klir wash. What paint do you use to tint, what ratio, and how do you apply it ??


I use Tamiya or Prince August paint to mix with Klir/Future. I usually have two small jars ready: one with a plain black mix (works well on aluminium or very dark colors) and one with a dark brown mix. The Klir/paint ratio depends on the effect I want to achieve. Heavily diluted if it has to remain subtle or more paint if I want it more pronounced. In any case I always apply quite a lot of the wash on the surface of the parts with a soft brush. The surplus can be eliminated with a cotton bud or a dry paint brush.


Quoted Text

What are Prince August paints? I've never seen them in this country, and their company web site shows Vallejo paints. Is the own-brand stuff a discontinued range?


These are the paints I use...


On the pictures you can see all the bottles I have. I don't need more. I can mix everything I need with these references. It is possible that they are discontinued. The store where I buy them don't seem to get new ones anymore. It is also possible that the Vallejo paints are in fact the same. I don't know.

All the best,

Jean-Luc
Merlin
Staff MemberSenior Editor
AEROSCALE
#017
_VISITCOMMUNITY
United Kingdom
Joined: June 11, 2003
KitMaker: 17,582 posts
AeroScale: 12,795 posts
Posted: Sunday, August 08, 2010 - 06:06 AM UTC
Hi Jean-Luc

Out partying! Whatever next!...

I think there's half a chance the F-80 will balance on its wheels without weight added. There is a little room if it needs some. What does worry me is that the nose area ahead of the guns is totally empty - I'm sure there should be some bits and pieces in there on the real aircraft.

Test-fitting the intakes on the F-80 shows I'm going to have a bit of fun blending them in smoothly too...

Those Prince August paints certainly look like Vallejo - the bottles are identical, just different labels.

All the best

Rowan
TedMamere
_VISITCOMMUNITY
Moselle, France
Joined: May 15, 2005
KitMaker: 5,653 posts
AeroScale: 4,347 posts
Posted: Tuesday, August 10, 2010 - 07:41 AM UTC
Hi Rowan,


Quoted Text

Out partying! Whatever next!...


Yes, now that I'm no Staff Member anymore, I can abandon myself to luxury. But I managed to make some progress on the T-33 nevertheless...

The fit of the air intakes is not very good so a good amount of filler is needed. It looks terrible on the photos but I always apply a lot of Tamiya Putty because this stuff eats itself through the plastic so there is always a lot of shrinkage. Note that it is not necessary to glue the Intake Trunking sub assembly as it won't move once in place...


I will glue the wings and horizontal tail planes tomorrow...

Jean-Luc
Merlin
Staff MemberSenior Editor
AEROSCALE
#017
_VISITCOMMUNITY
United Kingdom
Joined: June 11, 2003
KitMaker: 17,582 posts
AeroScale: 12,795 posts
Posted: Tuesday, August 10, 2010 - 09:43 AM UTC
Nice going Jean-Luc!

I don't think there's any doubt - you'll be finished long before I manage to make a proper start!

I'm hoping... and yeah, it is a bit in the balance, because I've got a bundle of reviews to work on... but I'm hoping I might start painting the interior of my half of our Dual Build tomorrow.

All the best

Rowan
TedMamere
_VISITCOMMUNITY
Moselle, France
Joined: May 15, 2005
KitMaker: 5,653 posts
AeroScale: 4,347 posts
Posted: Thursday, August 12, 2010 - 03:11 AM UTC
Hi all,

Here is the current status of the build...


Of course, to reach this point, one has to work a little on the fit of the parts. The horizontal tailplanes need some trimming or there will be a big gap left to fill...


To glue the wings in place, it is best to eliminate the area shown in red on the picture below. this will allow you to bend the plastic so the curvature matches with the one of the fuselage...


Here are other pictures which show that the fit is not so good in some places and a lot of filler is necessary here as well..


Now I will probably need a couple of days to get a decent surface finish...

Jean-Luc
md72
#439
_VISITCOMMUNITY
Washington, United States
Joined: November 05, 2005
KitMaker: 4,950 posts
AeroScale: 3,192 posts
Posted: Thursday, August 12, 2010 - 03:42 AM UTC
Jean-Luc, It's looking good. Thanks for the photos, I might never build a kit this large, but it good to be reminded that not all my seam problems are self induced..
Merlin
Staff MemberSenior Editor
AEROSCALE
#017
_VISITCOMMUNITY
United Kingdom
Joined: June 11, 2003
KitMaker: 17,582 posts
AeroScale: 12,795 posts
Posted: Thursday, August 12, 2010 - 09:02 AM UTC
Hi Jean-Luc

Nice going! That's a great job trimming the tailplanes to fit!

As for my own poor late-starter... well, needless to say, I haven't had a chance to do any painting yet, but I have been tinkering with the replacement wheel-well...

Remember the old song... how did it go? - "There may be trouble ahead...". The new wheel-well is stunningly detailed compared with the empty kit version, and it fits without too much fuss (I had to line the cutout in a couple of places):


But it's about 2mm shorter front to back, leaving an awkward gap to fill:


I think it's going to take a fair bit of work to blend all this together with the intakes, which aren't a great fit in themselves... just what we want for a n/m finish.

More when I get a chance.

All the best

Rowan
TedMamere
_VISITCOMMUNITY
Moselle, France
Joined: May 15, 2005
KitMaker: 5,653 posts
AeroScale: 4,347 posts
Posted: Friday, August 13, 2010 - 08:12 AM UTC
Hi Rowan,

The resin wheel well insert looks very nice indeed. In the T-33 kit it's the only thing I would replace in any case as the original plastic insert is very simple. The cockpit of the two-seater looks good though and I wouldn't buy a resin replacement.

Sadly I haven't had the time to make some more progress today. Maybe tomorrow...

Jean-Luc
Merlin
Staff MemberSenior Editor
AEROSCALE
#017
_VISITCOMMUNITY
United Kingdom
Joined: June 11, 2003
KitMaker: 17,582 posts
AeroScale: 12,795 posts
Posted: Friday, August 13, 2010 - 10:40 AM UTC

Quoted Text

Sadly I haven't had the time to make some more progress today. Maybe tomorrow...

Jean-Luc


Hi Jean-Luc

I'm glad I'm not the only one for a change! Actually, I did manage to do a little bit more to the wheel well.

I don't expect to have any time free for modelling this weekend, so it'll be next week before my next update - and then I really do hope I manage to do some painting at last!

All the best

Rowan
TedMamere
_VISITCOMMUNITY
Moselle, France
Joined: May 15, 2005
KitMaker: 5,653 posts
AeroScale: 4,347 posts
Posted: Tuesday, August 17, 2010 - 10:41 AM UTC
Hi all,

I'm still sanding, Yeah, Yeah, Yeah!

Jean-Luc
Merlin
Staff MemberSenior Editor
AEROSCALE
#017
_VISITCOMMUNITY
United Kingdom
Joined: June 11, 2003
KitMaker: 17,582 posts
AeroScale: 12,795 posts
Posted: Tuesday, August 17, 2010 - 09:00 PM UTC

Quoted Text

I'm still sanding, Yeah, Yeah, Yeah!


Hi Elton!

Well, I sprayed an undercoat of Interior Green on the cockpit parts yesterday, so at least that's a start! I'll try to do a bit more work today.

Filling... I used the leftover paint to highlight any work needed to blend in the weel-well neatly. Hmmm - I think there's a fair bit to do...

All the best

Rowan
TedMamere
_VISITCOMMUNITY
Moselle, France
Joined: May 15, 2005
KitMaker: 5,653 posts
AeroScale: 4,347 posts
Posted: Wednesday, August 18, 2010 - 03:07 AM UTC
Hi Rowan,


Quoted Text

Hi Elton!


I don't know why, but his song came to my mind while working on the kit...

Jean-Luc
 _GOTOTOP