F-80/T-33 Duo Review Build (1:32)
Moselle, France
Joined: May 15, 2005
KitMaker: 5,653 posts
AeroScale: 4,347 posts
Posted: Wednesday, September 01, 2010 - 04:11 AM UTC
Hi all,
Rowan, I have added 10gr of weight in my model just in case but I'm sure it isn't necessary in yours with all the resin embarked. By the way, you did make some spectacular progress!

I'm almost done myself and no the model isn't finished since weeks...

I hope to finish it this weekend. Unfortunately the school vacations are over here in France and I'm working again since today...

I have sprayed two black lines that were missing as decals but cleary visible on the pictures of most Luftwaffe T-33s I've seen...

The Model is already on its feets but I still have to glue the canopy in place as well as some smaller pieces, mainly the formation lights. I'm style undecided about how to weather the model though...

Jean-Luc

Better think one hour and build five minutes...
Than think five minutes and build an hour!
Merlin
 Senior Editor
#017
United Kingdom
Joined: June 11, 2003
KitMaker: 17,582 posts
AeroScale: 12,795 posts
Posted: Wednesday, September 01, 2010 - 05:25 AM UTC
Hi Jean-Luc
I think you do need to weather the model a bit to go with the patchy paintwork. Maybe just a few paint-chips and streaks of oil etc. to show a well used trainer?
I've got back to to finishing the cockpit. Seeing as I'm using the resin version, I kept wondering if I should use the very nicely cast resin instruments, but there's simply no way I could hope to match the incredible detail Eduard have produced for the kit version!:
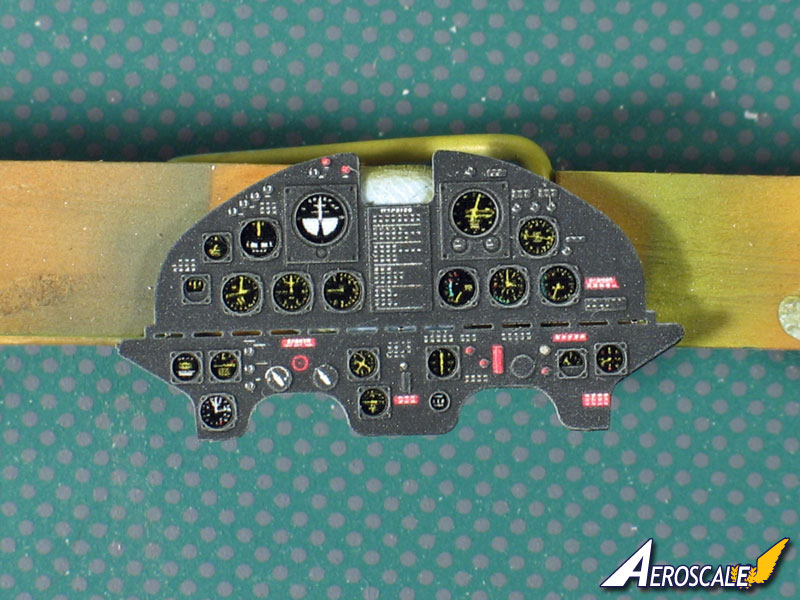
I sprayed a matt-coat onto the panel and drybrushed it with light grey to pick out the bezels. The rear layer is attached with a coat of clear to glaze the instruments and make them "pop" out.
All the best
Rowan

BEWARE OF THE FEW...
As I grow older, I regret to say that a detestable habit of thinking seems to be getting a hold of me. - H. Rider Haggard
Merlin
 Senior Editor
#017
United Kingdom
Joined: June 11, 2003
KitMaker: 17,582 posts
AeroScale: 12,795 posts
Posted: Friday, September 03, 2010 - 12:50 AM UTC
Hi again
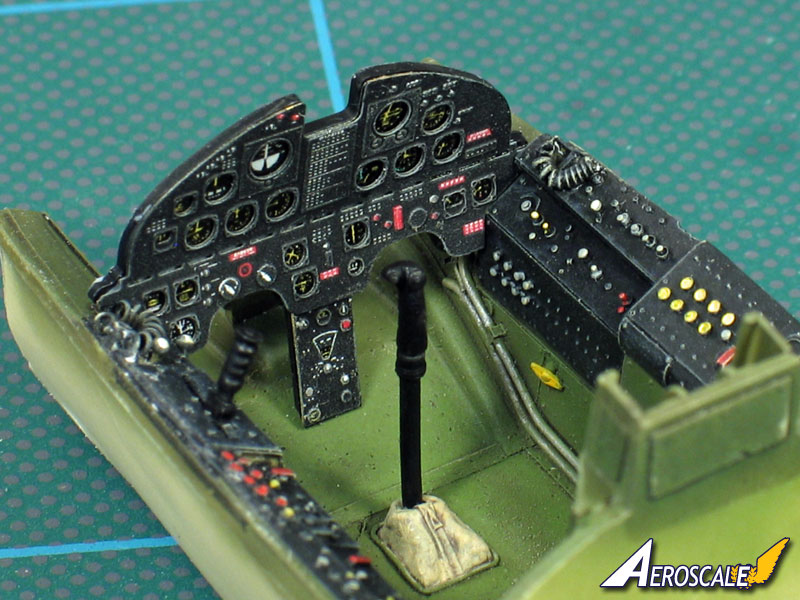
I couldn't work on the kit yesterday, but I'm making a bit of progress today. The etched instruments fit the resin cockpit fine:
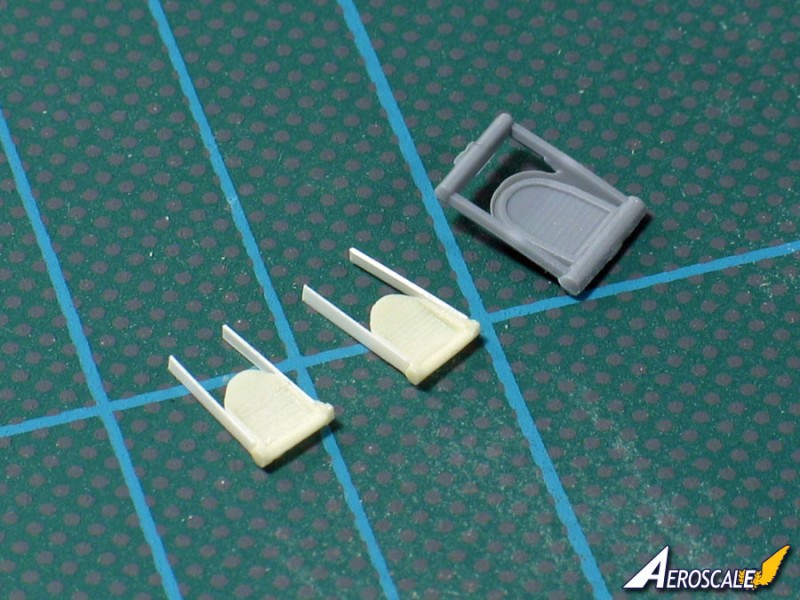
But the rudder pedals need a bit of help. The resin versions are cast a bit short and won't sit under the panel properly, but the styrene versions are simply too big to fit. So I've filed off the attachments on the resin pedals and added new ones from plastic card:
I'm doing a bit of work on the wings (I've used some glue Michal

). First job is to re-profile the leading edges to get rid of the odd blunt wedge-shape. I've used a coarse file and smoothed everything out with a MasterCasters padded sander (this has got to be in my top 10 of most useful modelling tools - as you can tell from how well-worn my one looks!

):
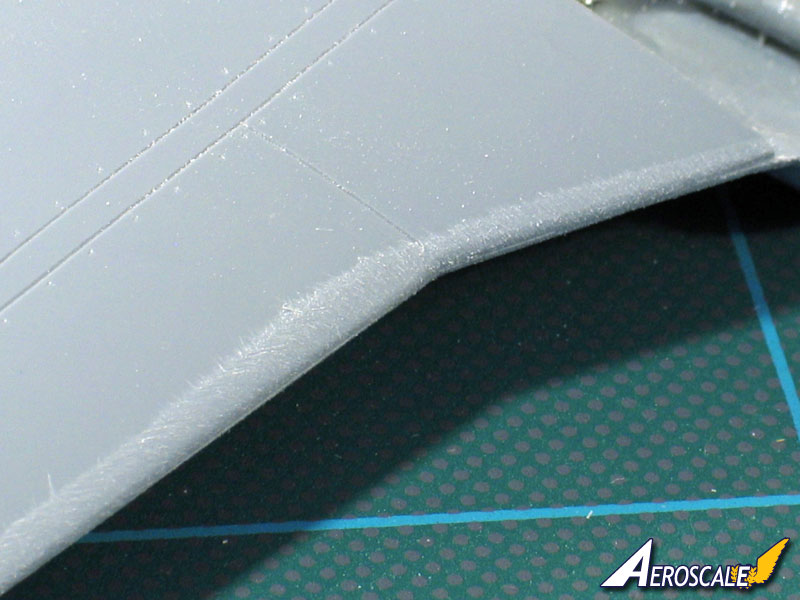
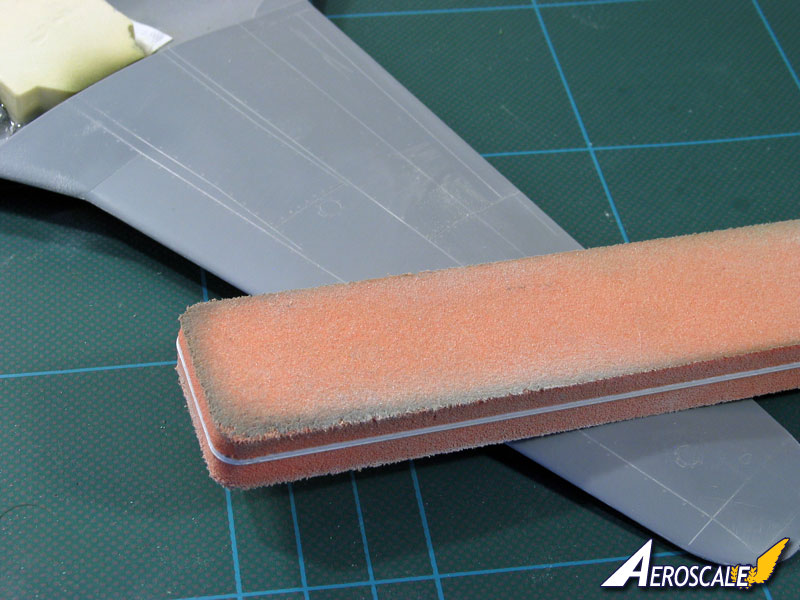
The starboard wing's trailing edge is a bit ragged and there's a chunk out of the tip. A short-shot or damage? I don't know, but I didn't notice it before:
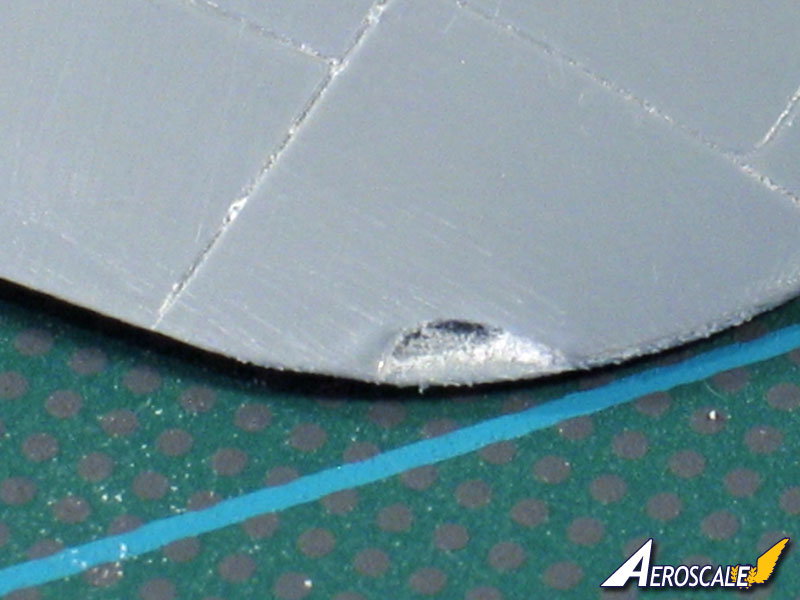
Anyway, it's cleaning up OK and I think I'll be on target to assemble the basic airframe over the weekend.

All the best
Rowan

BEWARE OF THE FEW...
As I grow older, I regret to say that a detestable habit of thinking seems to be getting a hold of me. - H. Rider Haggard
United Kingdom
Joined: March 08, 2009
KitMaker: 719 posts
AeroScale: 691 posts
Posted: Friday, September 03, 2010 - 02:02 AM UTC
Cockpit is looking great Rowan- will be great to see those nice resin wheel wells painted.
Jean-Luc- an impressive-looking build already- any tips on achieving the patchy faded-looking paint? Does the Courtrai Drier help with keeping bits of dust off the oil washes? I am plagued by tiny hairs falling on the model, even if I try to keep the model in a plastic bag while it is drying.
Merlin
 Senior Editor
#017
United Kingdom
Joined: June 11, 2003
KitMaker: 17,582 posts
AeroScale: 12,795 posts
Posted: Friday, September 03, 2010 - 08:51 AM UTC
Hi Ben
Many thanks for the kind words. I've got the rudder pedals fitted now, so I'll paint the last few details and add a few scuffs and chips tomorrow before sealing everything inside the fuselage.
All the best
Rowan

BEWARE OF THE FEW...
As I grow older, I regret to say that a detestable habit of thinking seems to be getting a hold of me. - H. Rider Haggard
Moselle, France
Joined: May 15, 2005
KitMaker: 5,653 posts
AeroScale: 4,347 posts
Posted: Saturday, September 04, 2010 - 04:30 AM UTC
Hi Ben,
Quoted Text
Jean-Luc- an impressive-looking build already- any tips on achieving the patchy faded-looking paint? Does the Courtrai Drier help with keeping bits of dust off the oil washes?
As I've said earlier, I have achieved the patchy faded-looking paint effect by randomly applying a darker and a lighter tone of each color (underside light grey, upperside dark grey and green). I'm not sure (I'm not a specialist) but since I haven't seen a lot of paint chipping on the photos of German T-33s (in fact none), I assume that when the aluminium started to show through the camouflage, a fresh coat of paint must have been quickly sprayed over the old paint sheme in some places, so the aircraft would soon have this patchy look.
Quoted Text
I think you do need to weather the model a bit to go with the patchy paintwork. Maybe just a few paint-chips and streaks of oil etc. to show a well used trainer?
That's what I've tried to do. But not really paint chipping, rather paint wear for the reasons I've exposed above.
You've made some great progress and I'm looking forward to see the next step. Your cockpit interior looks superb and the extra work on the instrument panel really paid off!

I have finished my model...


From a certain distance the paint wear doesn't appear but if you look closer on the model it is more noticable. This is an effect I wanted to achieve but I don't know if it is effective?


I will work on a display base now...

Jean-Luc

Better think one hour and build five minutes...
Than think five minutes and build an hour!
Merlin
 Senior Editor
#017
United Kingdom
Joined: June 11, 2003
KitMaker: 17,582 posts
AeroScale: 12,795 posts
Posted: Saturday, September 04, 2010 - 09:00 PM UTC
Hi Jean-Luc
That's just stunning!

I love the way you do the weathering around the panel lines and fasteners - I think it's the same technique you used on your Tamiya Spitfire, isn't it? I definitely want to try to achieve something similar one day, because I think the effect is wonderful.

All the best
Rowan

BEWARE OF THE FEW...
As I grow older, I regret to say that a detestable habit of thinking seems to be getting a hold of me. - H. Rider Haggard
Merlin
 Senior Editor
#017
United Kingdom
Joined: June 11, 2003
KitMaker: 17,582 posts
AeroScale: 12,795 posts
Posted: Saturday, September 04, 2010 - 09:32 PM UTC
Hi again
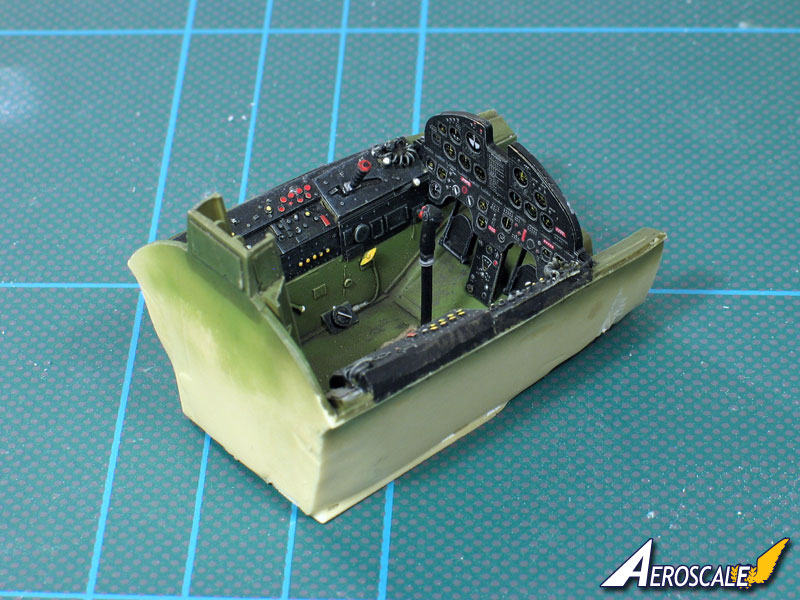
My own progress yesterday was a lot more modest, but I fitted the cockpit:
and glued together the fuselage and wings:
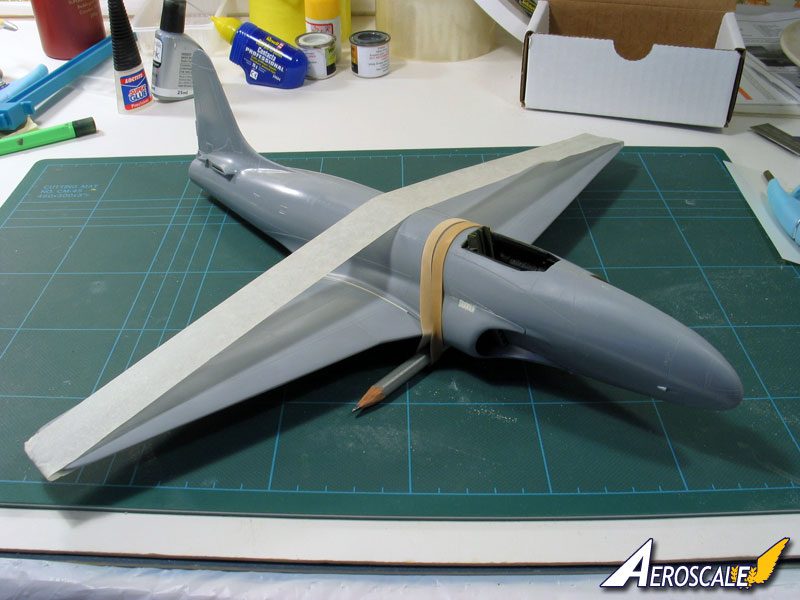
I'll add a bit of filler today if I have time. My target for this week is to have the intakes and main wheel-well block blended together and, hopefully, the basic airframe completed and primed for its n/m finish. It might be a few days before my next update.
Quoted Text
... I will work on a display base now... 
Jean-Luc 
I think I can guarantee my model
won't have a display base - I don't have a shelf big enough to put it on!

All the best
Rowan

BEWARE OF THE FEW...
As I grow older, I regret to say that a detestable habit of thinking seems to be getting a hold of me. - H. Rider Haggard
Moselle, France
Joined: May 15, 2005
KitMaker: 5,653 posts
AeroScale: 4,347 posts
Posted: Saturday, September 04, 2010 - 09:49 PM UTC
Hi Rowan,
Quoted Text
My own progress yesterday was a lot more modest
I think it's is an important step you have behind you!

Quoted Text
I think it's the same technique you used on your Tamiya Spitfire, isn't it?
Thanks for the kind words. Yes it is the same technique...
I have scratchbuilt some wheel chocks to go on the display base...

Jean-Luc

Better think one hour and build five minutes...
Than think five minutes and build an hour!
North Carolina, United States
Joined: November 28, 2005
KitMaker: 2,216 posts
AeroScale: 1,080 posts
Posted: Sunday, September 05, 2010 - 03:20 AM UTC
Jean-Luc, since you are retired from Aeroscale and only have 2 children........I was wondering if you would mind painting all of my future aircraft builds. It would give you something to do in all of your free time.


Another beautiful bird. The painting is so realistic it's scary.

Rowan, I like your steady pace. You're actually working faster on your build than I am on any of mine, only yours is turning out much nicer than anything I've done lately.

Hermon

"Those who would give up Essential Liberty
to purchase a little Temporary Safety,
deserve neither Liberty nor Safety."
Benjamin Franklin
Moselle, France
Joined: May 15, 2005
KitMaker: 5,653 posts
AeroScale: 4,347 posts
Posted: Monday, September 06, 2010 - 02:13 AM UTC
Better think one hour and build five minutes...
Than think five minutes and build an hour!
Merlin
 Senior Editor
#017
United Kingdom
Joined: June 11, 2003
KitMaker: 17,582 posts
AeroScale: 12,795 posts
Posted: Monday, September 06, 2010 - 05:18 AM UTC
Hi Jean-Luc
The photos may well give a false impression, but personally, I think the colour of the base could do with toning down a bit. Is supposed to be rust or red soil? Either way, I think it's a bit vivid and rather distracts from the model.
I've made a start sanding. I think it's almost a prerequisite to begin with a horror shot! Aaaaghh!

:
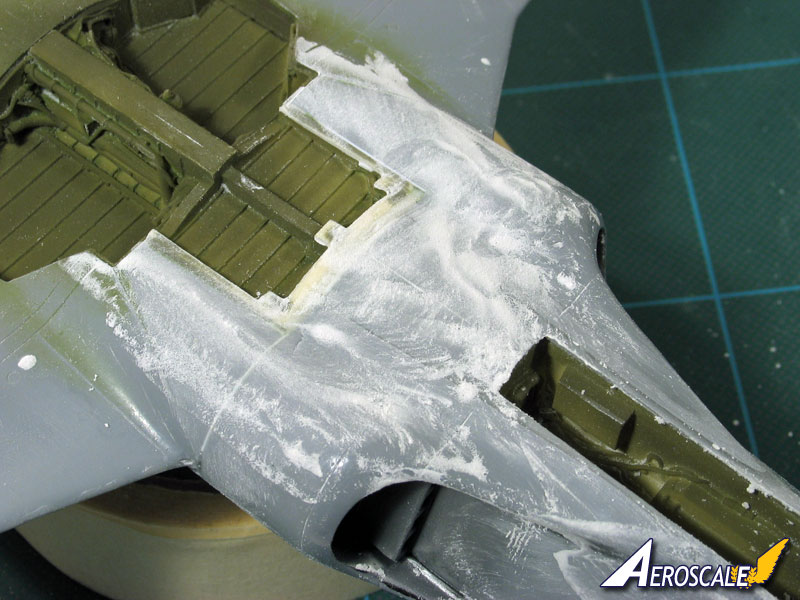
In fact, once the sludge from wet-sanding is cleaned off, the result of the first pass isn't bad at all. I'm usiing "Supafilla" (a mix of CA and talcum powder), so that's what my build will have to be dedicated to.

:
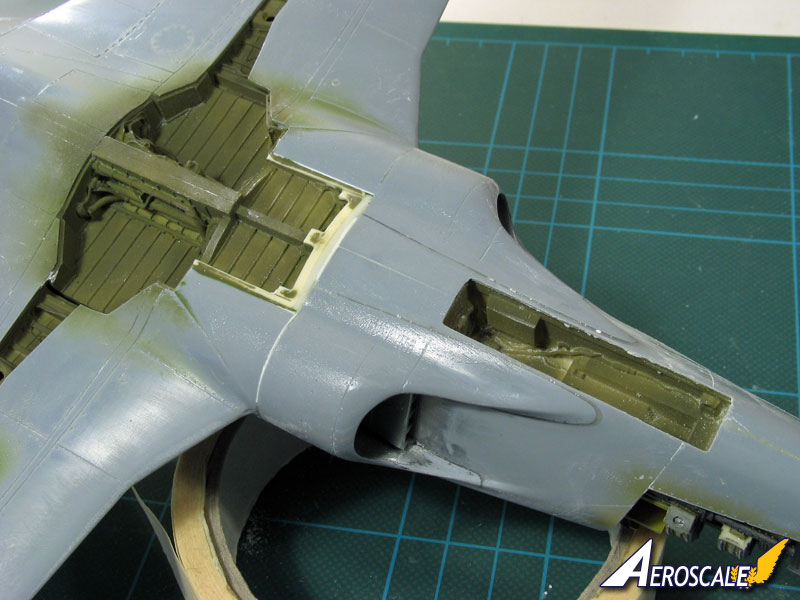
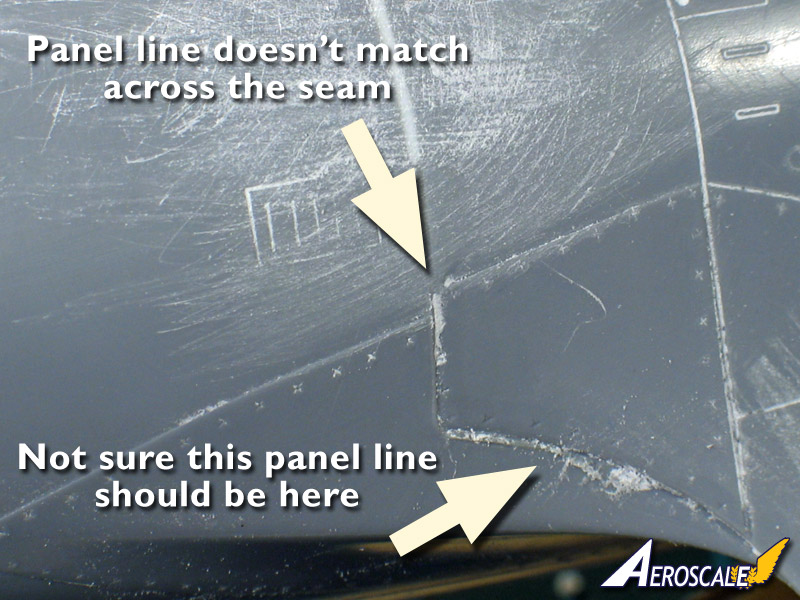
There's a lot more sanding, polishing and re-scribing to do this week. One area that'll need some work is the fillets at the wings' trailing edge. The panel lines don't match up, and I think one of them on each side needs to be be removed altogether. The trouble is, it's an area that doesn't show up well in any of the walkaround pics I've seen so far:
All the best
Rowan

BEWARE OF THE FEW...
As I grow older, I regret to say that a detestable habit of thinking seems to be getting a hold of me. - H. Rider Haggard
litespeed
 News Reporter
England - North West, United Kingdom
Joined: October 15, 2009
KitMaker: 1,976 posts
AeroScale: 1,789 posts
Posted: Monday, September 06, 2010 - 09:13 AM UTC
Looking fantastic so far chaps.
Jean-Luc that T-33 looks stunning. Well done.

Rowan the cockpit of yours looks fantastic, your doing amazingly well considering the workload you have.

All the best.
tim
Merlin
 Senior Editor
#017
United Kingdom
Joined: June 11, 2003
KitMaker: 17,582 posts
AeroScale: 12,795 posts
Posted: Monday, September 06, 2010 - 09:32 AM UTC
Cheers Hermon and Tim
It's great to have people say I'm making reasonable progress when I'm so hopelessly far behind Jean-Luc!


I do actually feel like I'm toddling along quite steadily - it just looks like a snail's pace next to the work of one of the fastest (not to mention, most talented!) modellers on Aeroscale!

All the best
Rowan

BEWARE OF THE FEW...
As I grow older, I regret to say that a detestable habit of thinking seems to be getting a hold of me. - H. Rider Haggard
Moselle, France
Joined: May 15, 2005
KitMaker: 5,653 posts
AeroScale: 4,347 posts
Posted: Monday, September 06, 2010 - 06:27 PM UTC
Hi Rowan,
Quoted Text
It's great to have people say I'm making reasonable progress when I'm so hopelessly far behind Jean-Luc! 

I had vacations in August so I had plenty of time to progress on this build...

It's funny (so to speak) because I had the same problems in the same areas with the misaligned panel lines and seams between the fuselage pieces and the wings.
Thanks for the heads up on the base. I will tone down the color a bit with pastel powder.
Jean-Luc

Better think one hour and build five minutes...
Than think five minutes and build an hour!
Joined: December 23, 2007
KitMaker: 1,596 posts
AeroScale: 1,275 posts
Posted: Monday, September 06, 2010 - 11:43 PM UTC
Well, I'm affraid we can't compere these two build, although the topic is the same.
J-L did a splendid job with his model but it was almost out-of-the-box so he could save some time which Rowan has to spend on fitting the resin. Maybe the final result will be similar, but only in shape. We can only say that everyone who will build this model in future will encounter the similar, if not the same, problems.
So Rowan, don't worry you are delayed, you are simply doing very different job. Keep on rolin'.
Merlin
 Senior Editor
#017
United Kingdom
Joined: June 11, 2003
KitMaker: 17,582 posts
AeroScale: 12,795 posts
Posted: Thursday, September 09, 2010 - 08:32 PM UTC
Hi again
Just a quick update - no pics, I'm afraid. I've done some filling and sanding, and I've attached the tail feathers. The next job will be re-scribing and polishing before an undercoat to check the results. I won't be around much for the next few days - and what time I have must be spent catching up with a little backlog of reviews - so it'll probably be next week before I can make more progress on the F-80.
All the best
Rowan

BEWARE OF THE FEW...
As I grow older, I regret to say that a detestable habit of thinking seems to be getting a hold of me. - H. Rider Haggard
Merlin
 Senior Editor
#017
United Kingdom
Joined: June 11, 2003
KitMaker: 17,582 posts
AeroScale: 12,795 posts
Posted: Monday, September 27, 2010 - 12:41 AM UTC
Hi again
No major progress - this is more to confirm that I'm still pottering along as and when I get a free moment to work on the kit. I'm partway through scribing, and after that will be an undercoat to reveal how much more work needs doing - I rather fear there will be quite a lot, because the n/m finish will highlight every blemish.

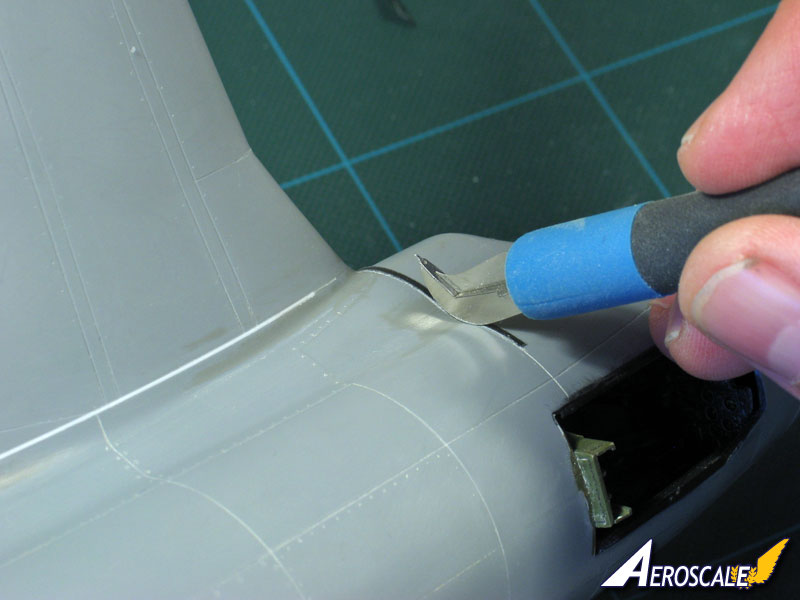
I'll have to add a second dedication to my build - the
Scribe-R. It's proving brilliant for going around the curves, as well as standard scribing.

All the best
Rowan

BEWARE OF THE FEW...
As I grow older, I regret to say that a detestable habit of thinking seems to be getting a hold of me. - H. Rider Haggard
Merlin
 Senior Editor
#017
United Kingdom
Joined: June 11, 2003
KitMaker: 17,582 posts
AeroScale: 12,795 posts
Posted: Tuesday, September 28, 2010 - 09:03 AM UTC
Hi there
A little more progress. I can't pretend I'm a huge fan of re-scribing - it's just something that has to be done sometimes, and there's a certain sense of satisfaction (or is that relief!

) when it turns out OK...
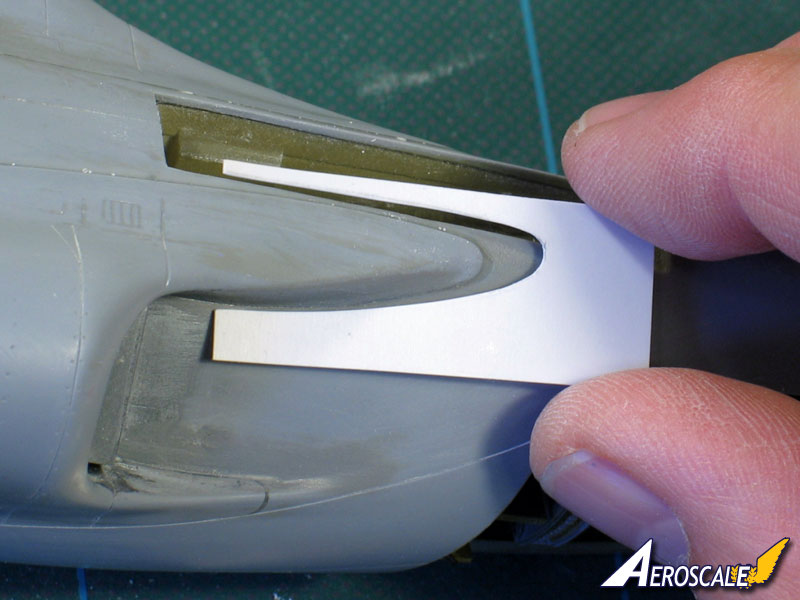
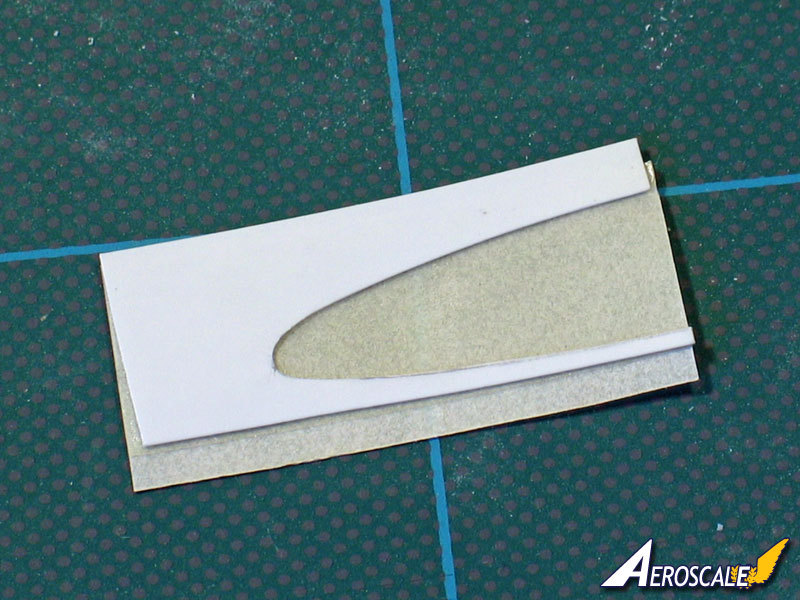
Most of the F-80 scribing is proving straightforward - good old Dymo tape doing the honours. The intake lips are an exception though, and I've resorted to making templates to ensure both sides match.
What I've done is trace the shape on the protective paper from a sheet of decals (moral; never throw anything away

) and transferred it to thin styrene:
The template is then backed with double-sided tape:
and positioned ready to scribe:
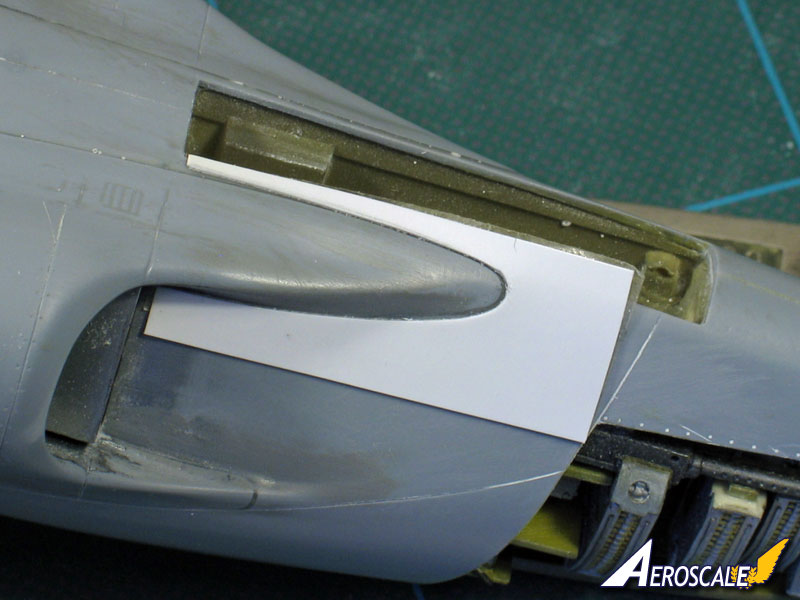
To do the other intake, simply flip the template ready to re-attach with more tape.
All the best
Rowan

BEWARE OF THE FEW...
As I grow older, I regret to say that a detestable habit of thinking seems to be getting a hold of me. - H. Rider Haggard
Moselle, France
Joined: May 15, 2005
KitMaker: 5,653 posts
AeroScale: 4,347 posts
Posted: Wednesday, September 29, 2010 - 12:56 AM UTC
Hi Rowan,
Nice to see that you resumed work on your F-80. The template trick is very interesting indeed...

Jean-Luc

Better think one hour and build five minutes...
Than think five minutes and build an hour!
Florida, United States
Joined: January 14, 2009
KitMaker: 2,798 posts
AeroScale: 2,443 posts
Posted: Wednesday, September 29, 2010 - 12:22 PM UTC
Jean-Luc as always fantastic build.i have a question sir could you please explain the process you used to get the oil staining on the bottom of the fuselage

Thanks in advance,
Justin

"From time to time, the tree of liberty must be watered with the blood of
tyrants and patriots."
- Thomas Jefferson
IPMS#47611
Moselle, France
Joined: May 15, 2005
KitMaker: 5,653 posts
AeroScale: 4,347 posts
Posted: Saturday, October 02, 2010 - 03:11 AM UTC
Hi Justin,
Quoted Text
i have a question sir could you please explain the process you used to get the oil staining on the bottom of the fuselage 
Sorry for the late reply. I use tamiya paint (black or dark brown) heavily diluted with Klir (Future) and apply it with a very fine brush (Tamiya 000). The paint is very translucent so if I want the effect to be more accentuated, I apply several thin layers.
I hope this helped, but please, don't call me "sir". I'm already feeling old enough...


Jean-Luc

Better think one hour and build five minutes...
Than think five minutes and build an hour!
Florida, United States
Joined: January 14, 2009
KitMaker: 2,798 posts
AeroScale: 2,443 posts
Posted: Saturday, October 02, 2010 - 12:14 PM UTC
Thanks Jean-Luc


"From time to time, the tree of liberty must be watered with the blood of
tyrants and patriots."
- Thomas Jefferson
IPMS#47611
Texas, United States
Joined: June 29, 2010
KitMaker: 5,854 posts
AeroScale: 372 posts
Posted: Thursday, October 07, 2010 - 12:10 PM UTC
Very nice work Jean-Luc, I just wish there was more information throughout you blog. This is great stuff


 I hope to finish it this weekend. Unfortunately the school vacations are over here in France and I'm working again since today...


