

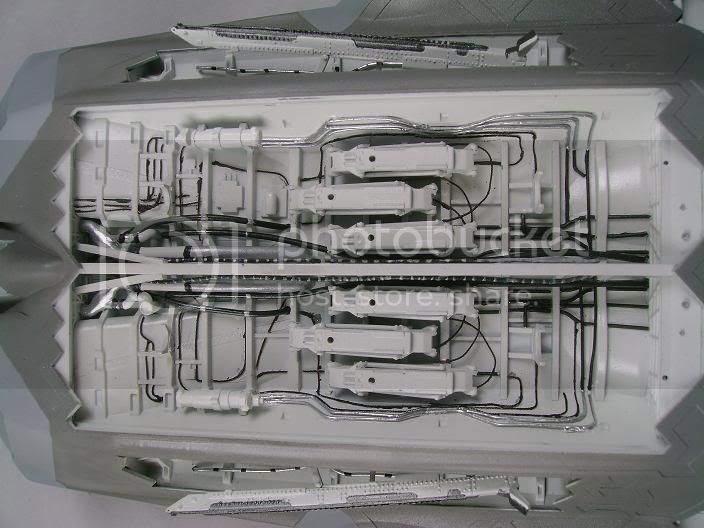
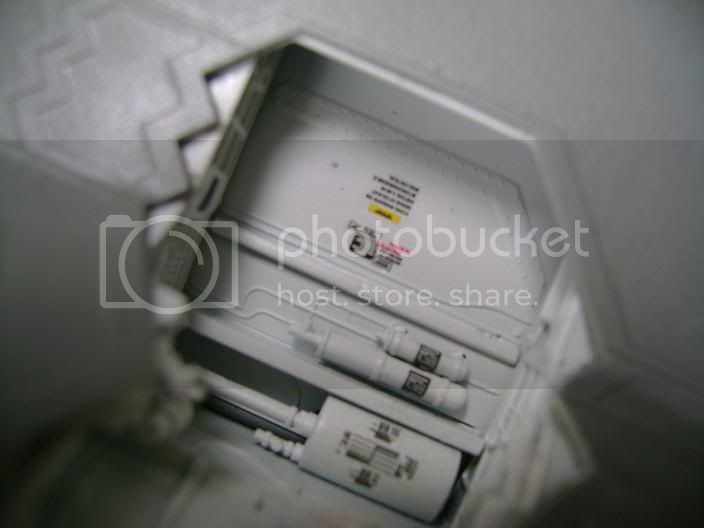
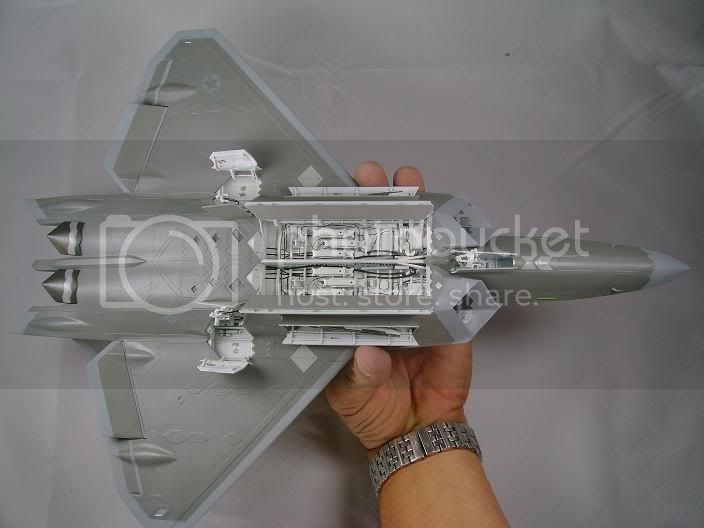
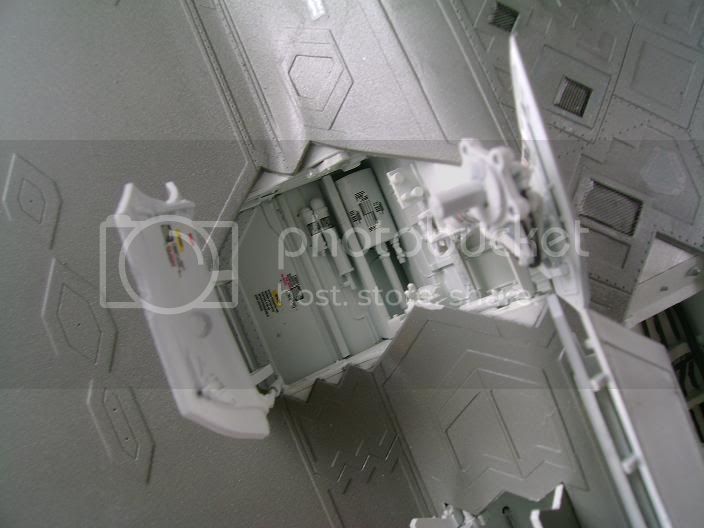
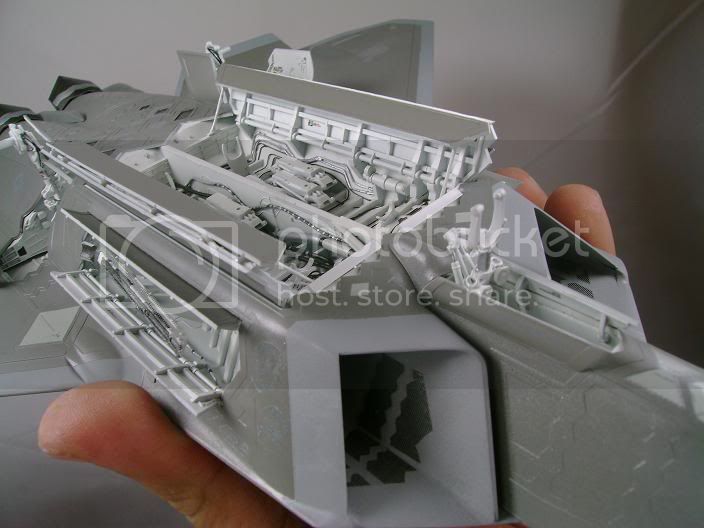
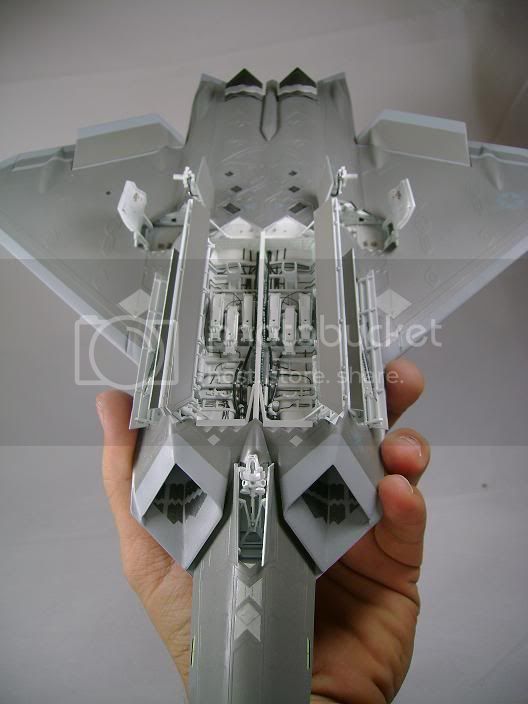
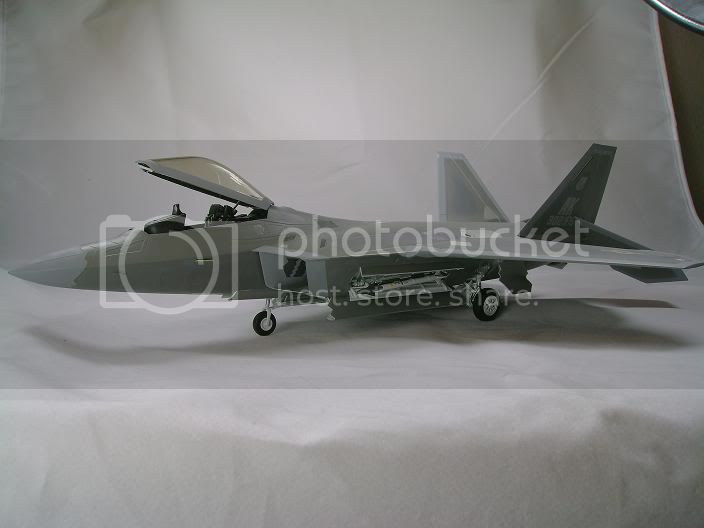
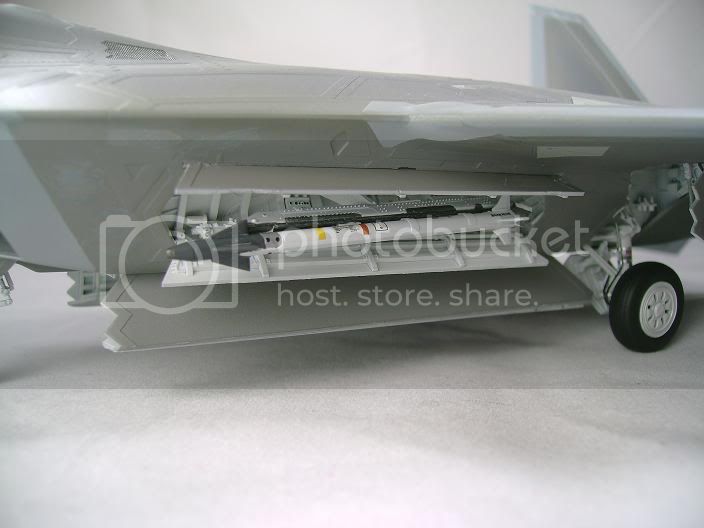
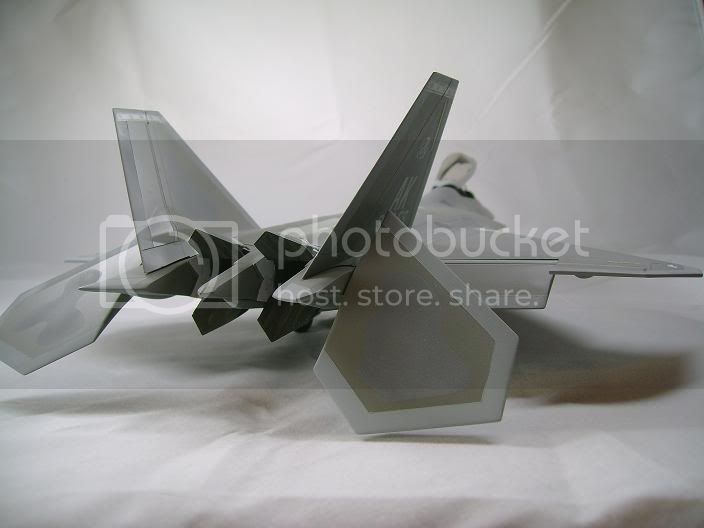
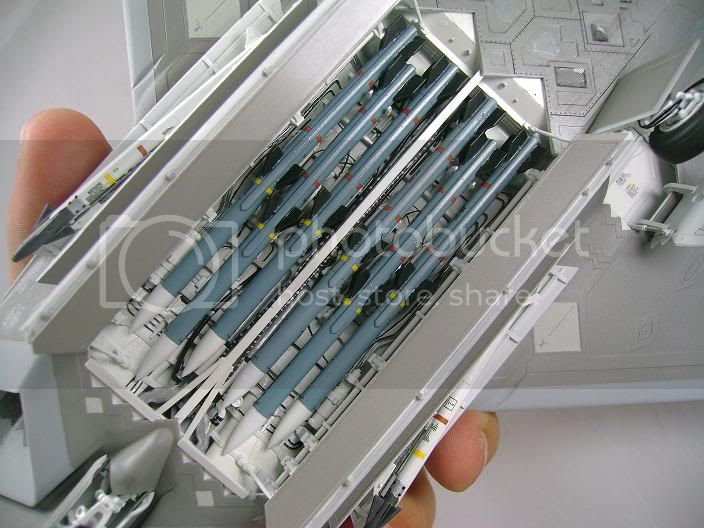
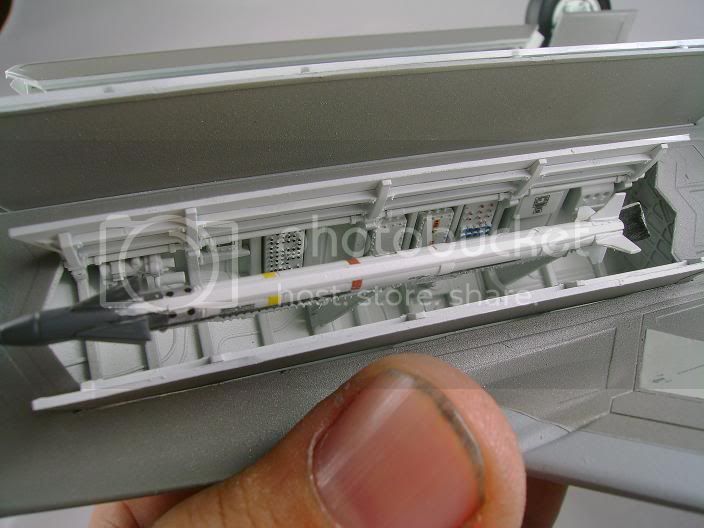
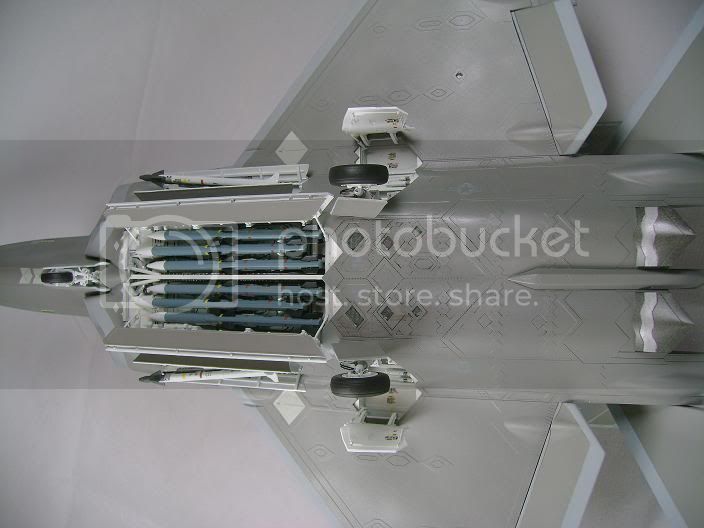
Justin: I see why you wanted the weapons bays open now. The contrast in colors and surface detail between the bay interiors and the airframe's skin is quite excellent.
I got to see one of these up close at the Randolph airshow back in '08 I believe. I should have taken more pictures, however I don't think that it had the weapons bays open.
Hosted by Jim Starkweather
Hasegawa 1/48 F-22 Raptor

vonHengest

Joined: June 29, 2010
KitMaker: 5,854 posts
AeroScale: 372 posts

Posted: Wednesday, September 29, 2010 - 02:38 PM UTC

Keeperofsouls2099
Joined: January 14, 2009
KitMaker: 2,798 posts
AeroScale: 2,443 posts
Posted: Wednesday, September 29, 2010 - 03:20 PM UTC
Thank you,Yes sir it makes it stand out alot more wait till there are missles in there and i still have alot of detail painting and so on 


drabslab

Joined: September 28, 2004
KitMaker: 2,186 posts
AeroScale: 1,587 posts

Posted: Wednesday, September 29, 2010 - 10:15 PM UTC
this is really becoming a masterpiece
and it is at the satge where impatience makes me screw things up
so, stay patient
and it is at the satge where impatience makes me screw things up
so, stay patient

Keeperofsouls2099
Joined: January 14, 2009
KitMaker: 2,798 posts
AeroScale: 2,443 posts
Posted: Thursday, September 30, 2010 - 12:11 AM UTC
Thanks drab 
Keeperofsouls2099
Joined: January 14, 2009
KitMaker: 2,798 posts
AeroScale: 2,443 posts
Posted: Wednesday, October 06, 2010 - 04:52 PM UTC
Got a lot done should be done soon been snapping pictures along the way I will post soon 

Tojo72
Joined: June 06, 2006
KitMaker: 4,691 posts
AeroScale: 238 posts
Posted: Sunday, October 10, 2010 - 08:32 AM UTC
Nice paintjob Justin
Thanks for the great photos Bruce
Thanks for the great photos Bruce
Keeperofsouls2099
Joined: January 14, 2009
KitMaker: 2,798 posts
AeroScale: 2,443 posts
Posted: Sunday, October 10, 2010 - 12:58 PM UTC
Thanks Tojo!
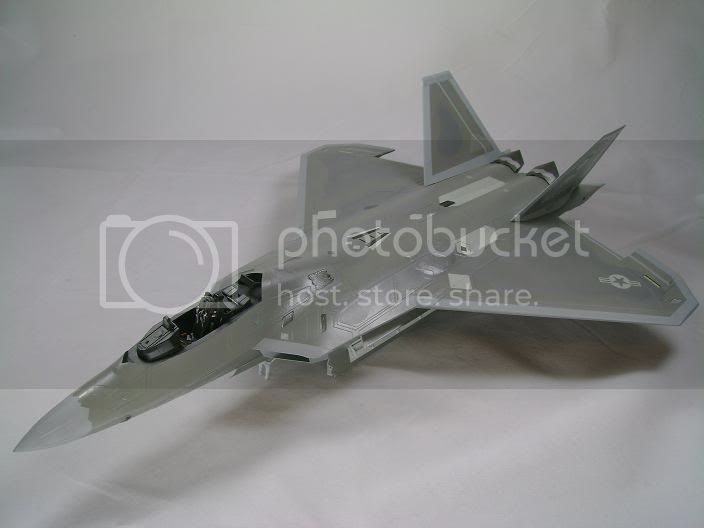
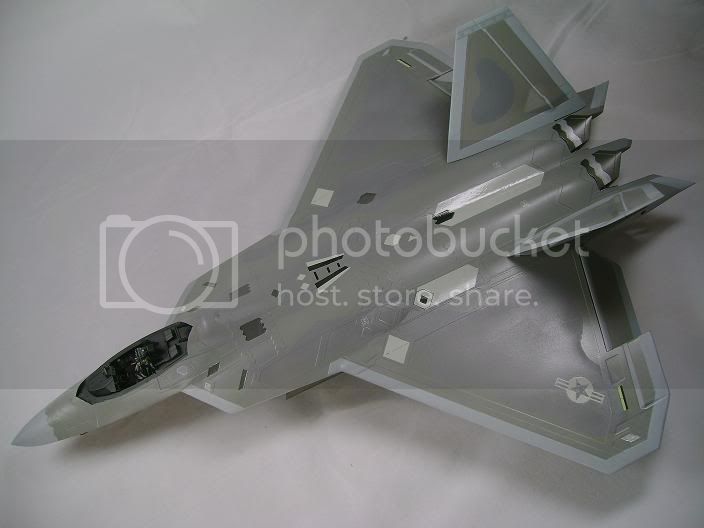
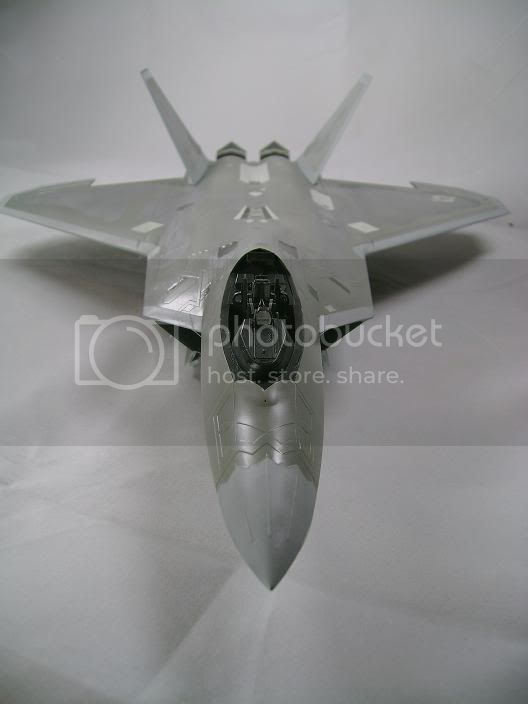
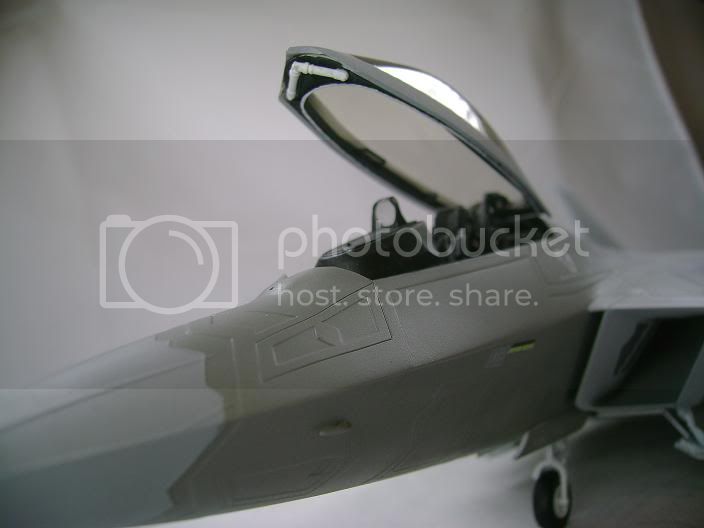
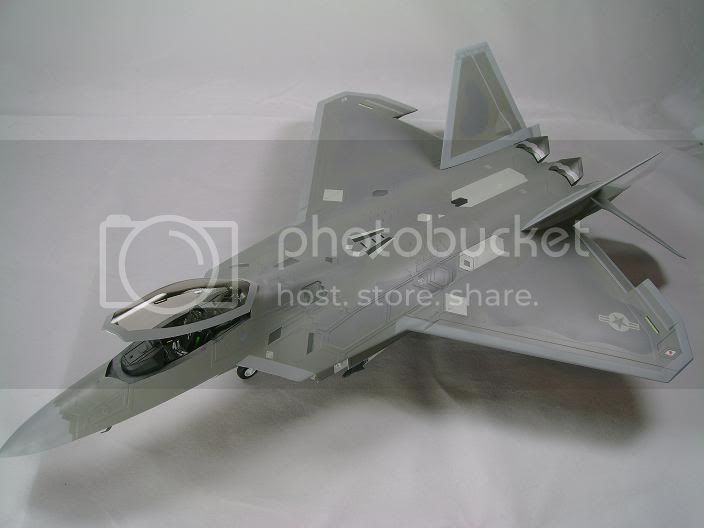
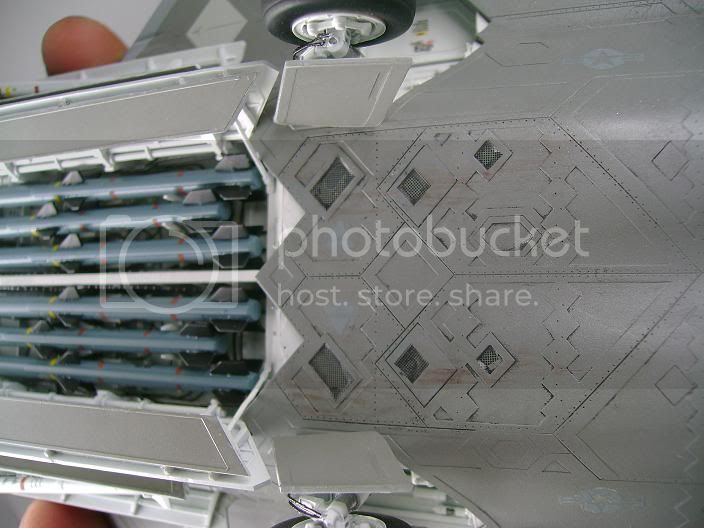
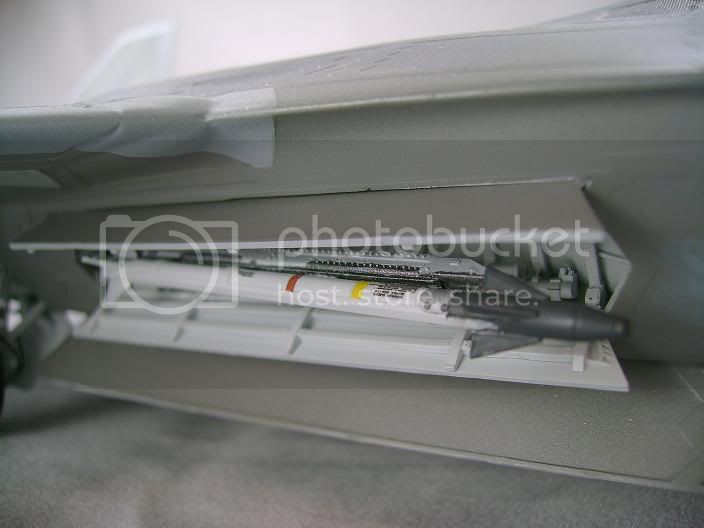
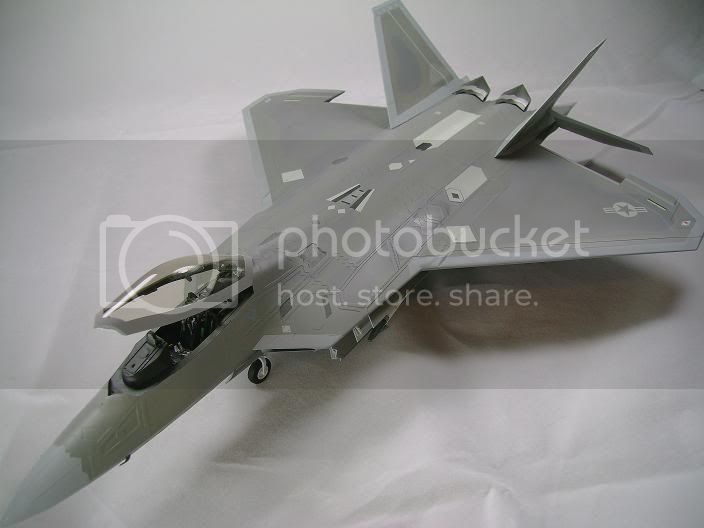
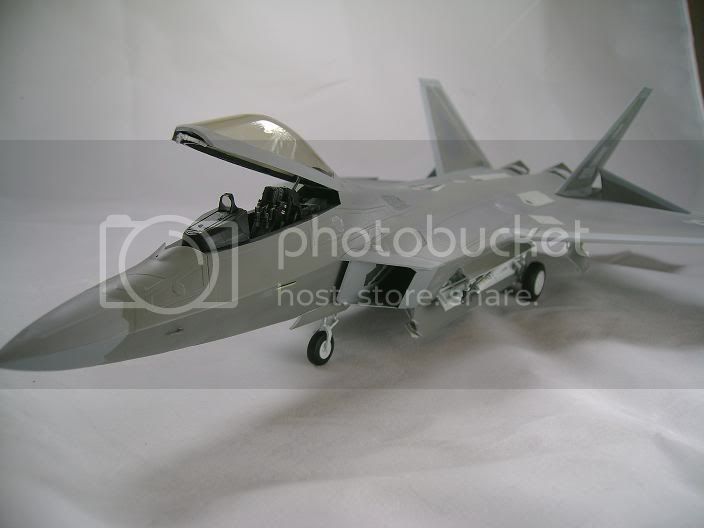
Well here is a photo walk through of whats been going on the last week Its almost finished and it will look good in my case.


Now to get back to work on the missles and wheels hope you like next update will be the finished product 
Well here is a photo walk through of whats been going on the last week Its almost finished and it will look good in my case.
Now to get back to work on the missles and wheels
hope you like next update will be the finished product vonHengest
Joined: June 29, 2010
KitMaker: 5,854 posts
AeroScale: 372 posts
Posted: Sunday, October 10, 2010 - 06:34 PM UTC
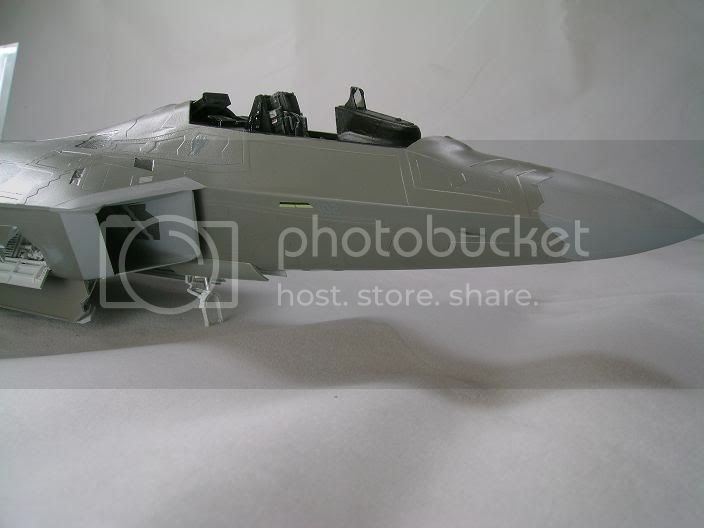
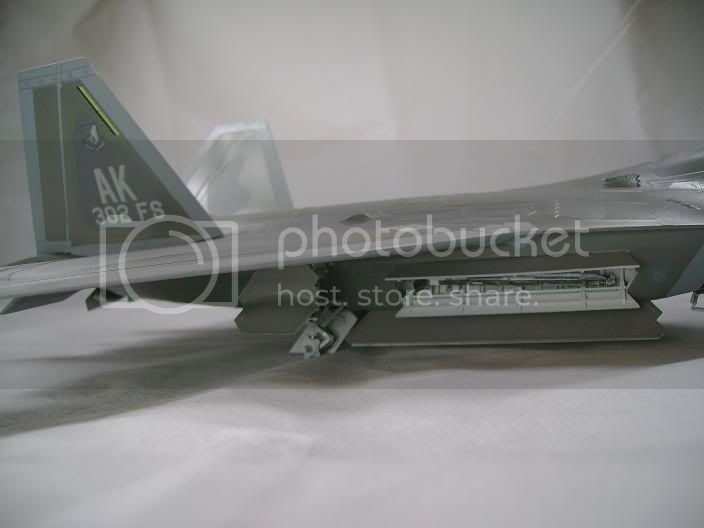
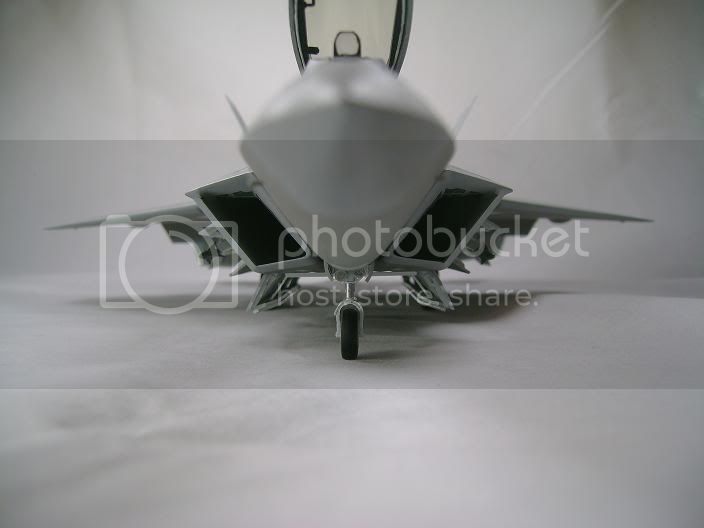
Just one question, are you going to be displaying this one a mirror base? The weapon bays and landing gear look so good it would be a shame to just point them down at a non-reflective surface
Keeperofsouls2099
Joined: January 14, 2009
KitMaker: 2,798 posts
AeroScale: 2,443 posts
Posted: Monday, October 11, 2010 - 11:37 AM UTC
as soon as it is finished yes it will be on a mirror
Jurjen

Joined: September 21, 2003
KitMaker: 3,040 posts
AeroScale: 30 posts

Posted: Monday, October 11, 2010 - 07:16 PM UTC
Wow Justin!
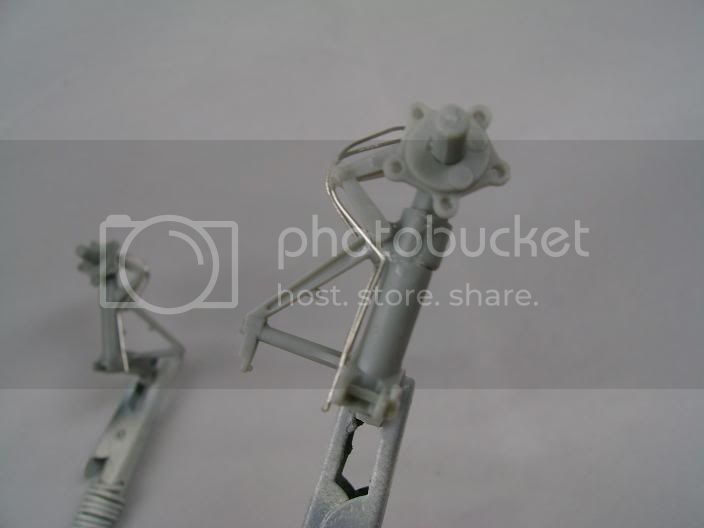
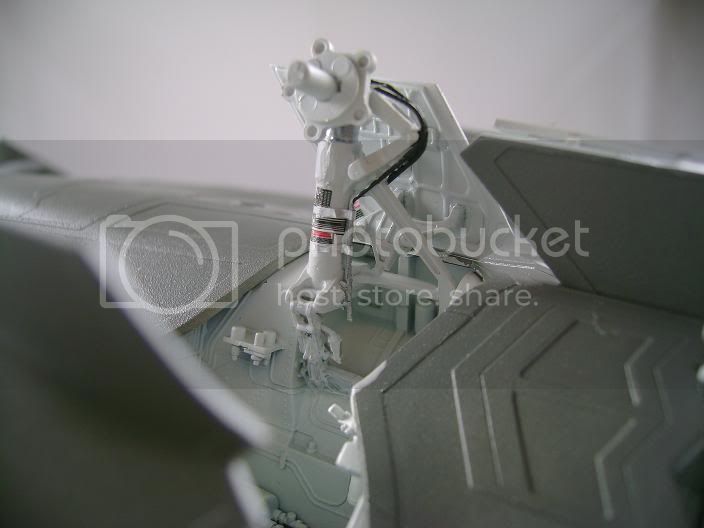
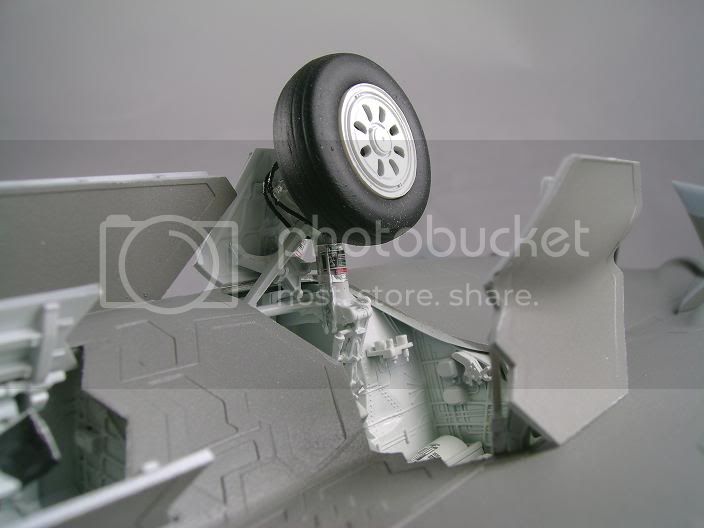
That's a serious machine! What have you used for the landing gear wires? Maybe it is easier to use small solder wire because it is very soft and therefor very easy to lay around curves and other odd shapes. Just a thought!
Very curious to your next update, keep it going!!
That's a serious machine!
What have you used for the landing gear wires? Maybe it is easier to use small solder wire because it is very soft and therefor very easy to lay around curves and other odd shapes. Just a thought! Very curious to your next update, keep it going!!
Keeperofsouls2099
Joined: January 14, 2009
KitMaker: 2,798 posts
AeroScale: 2,443 posts
Posted: Tuesday, October 12, 2010 - 12:42 PM UTC
Thanks solder is to thick.I'll be sticking with stretched sprew from now on
Also IMHO The part I think your referring to is the scissor and on most modern aircraft the hydraulic lines are rubber here because it's a moving part so they are left loose.I also used guitar wire on these because I didn't know how to stretch sprew until recently.which I'm going to go nuts with since I now have about 12 feet of the stuff lol.
Also IMHO The part I think your referring to is the scissor and on most modern aircraft the hydraulic lines are rubber here because it's a moving part so they are left loose.I also used guitar wire on these because I didn't know how to stretch sprew until recently.which I'm going to go nuts with since I now have about 12 feet of the stuff lol.
Keeperofsouls2099
Joined: January 14, 2009
KitMaker: 2,798 posts
AeroScale: 2,443 posts
Posted: Wednesday, October 13, 2010 - 02:56 PM UTC
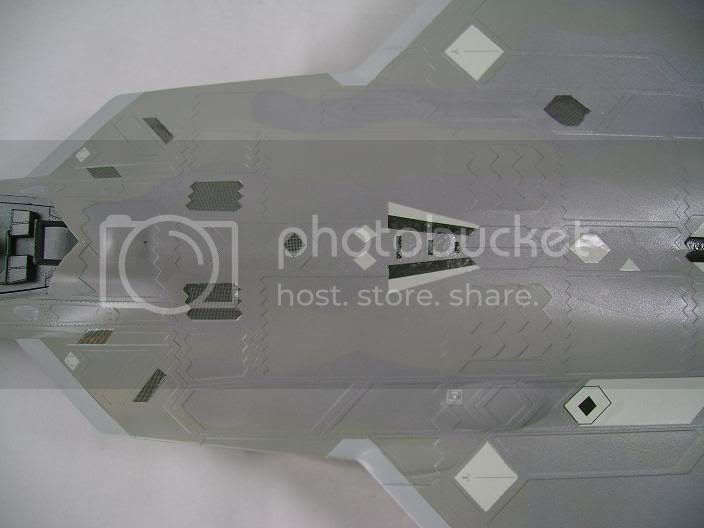
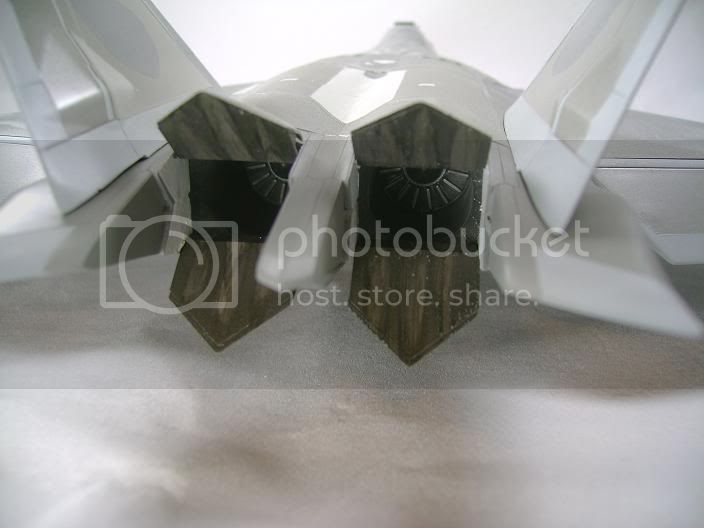
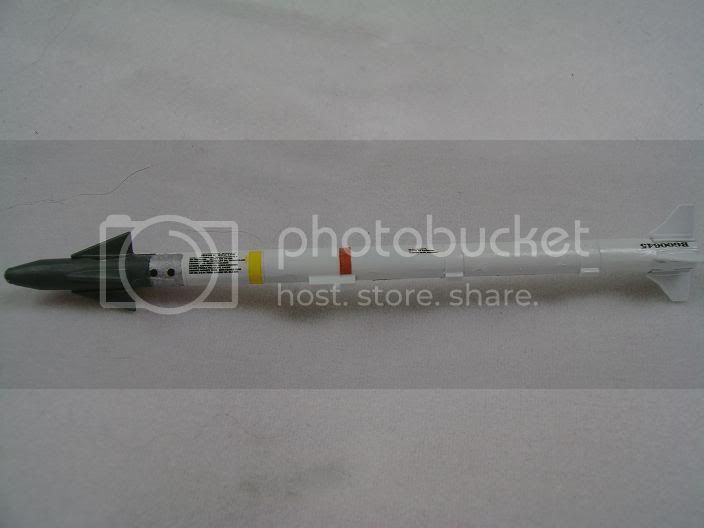
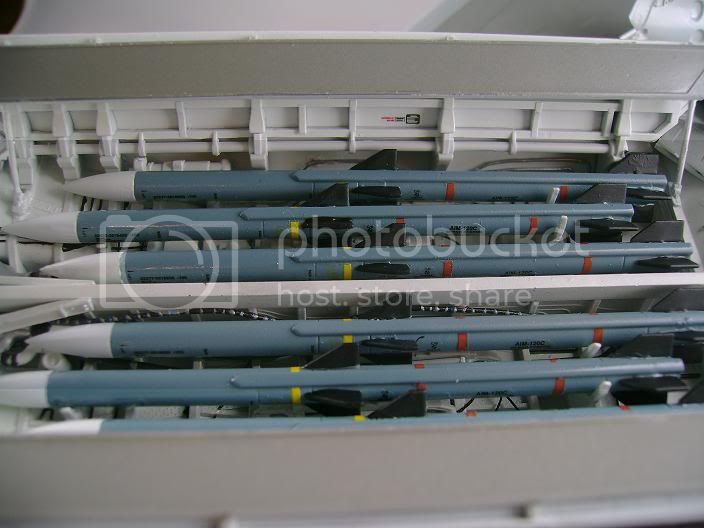
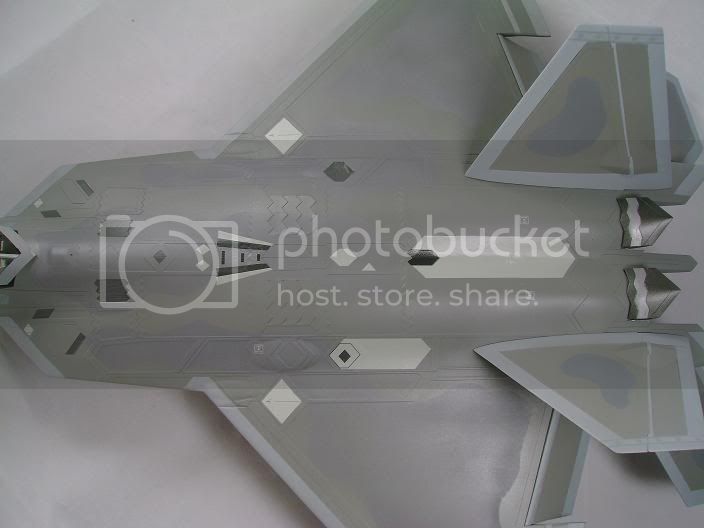
OK the Raptor is 99% done just need to attach the canopy.but that will have to wait while it dries tonight.So I figured I would show you what hours of tedious work,four monkeys,a bottle of Rum(dont tell Auss)  and a dash board Hula girl get me for the day.I finished six AIM-120C's and two AIM-9X sidewinders and buttoned up a few last details like some weathering on the underside..I took pic's before installing the missles because its hard to see all the details after so here you are...
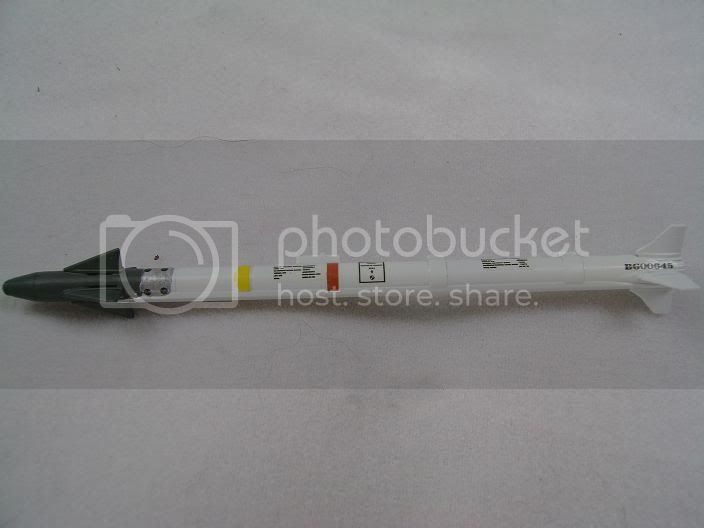
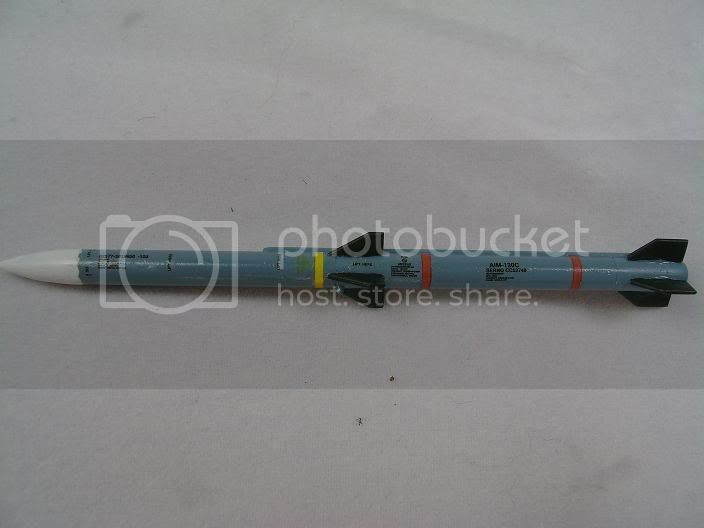
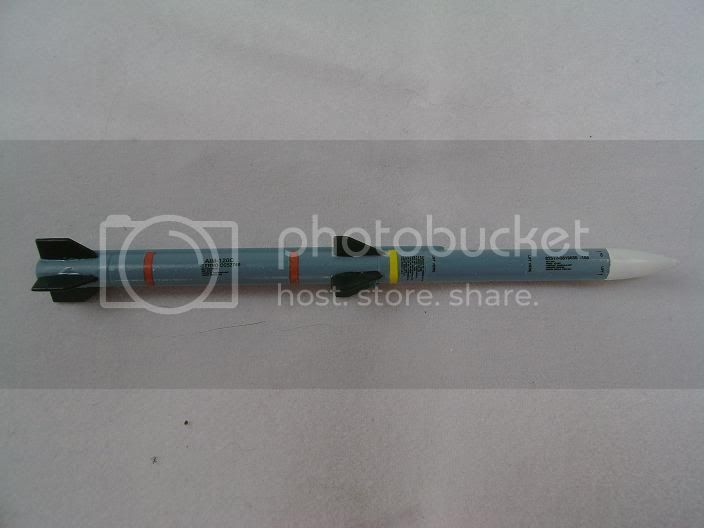
Finished Pic's soon
and a dash board Hula girl get me for the day.I finished six AIM-120C's and two AIM-9X sidewinders and buttoned up a few last details like some weathering on the underside..I took pic's before installing the missles because its hard to see all the details after so here you are...Finished Pic's soon

AussieReg

#007

Joined: June 09, 2009
KitMaker: 8,156 posts
AeroScale: 3,756 posts
Posted: Wednesday, October 13, 2010 - 03:25 PM UTC
Quoted Text
a bottle of Rum(dont tell Auss)
No need to tell me Justin, I can hear the top come off a bottle of Rum from several light years away. I'm just VERY disappointed that I didn't get the invite to partake (or perhaps it's in the mail
 )
)Looking great mate, keep it cooking !!
Cheers, D

Removed by original poster on 10/14/10 - 02:42:24 (GMT).

md72

#439
Joined: November 05, 2005
KitMaker: 4,950 posts
AeroScale: 3,192 posts

Posted: Wednesday, October 13, 2010 - 06:39 PM UTC
Justin, FWIW, I've come across a roll of .010 dia. solder. At .48 full size, it wouldn't be too far off from a real hydraulic line.

Keeperofsouls2099
Joined: January 14, 2009
KitMaker: 2,798 posts
AeroScale: 2,443 posts
Posted: Thursday, October 14, 2010 - 12:32 AM UTC
@auss your always Invited my friend
@mark I've tried to find it locally but nobody carries it so I will use joes method and use stretched sprew from now on.
@afterburner I noticed you removed your post please share I was having a bad week and I vented if you want say it looks like crap be my guest.
@mark I've tried to find it locally but nobody carries it so I will use joes method and use stretched sprew from now on.
@afterburner I noticed you removed your post please share I was having a bad week and I vented if you want say it looks like crap be my guest.
Keeperofsouls2099
Joined: January 14, 2009
KitMaker: 2,798 posts
AeroScale: 2,443 posts
Posted: Friday, October 15, 2010 - 04:31 PM UTC
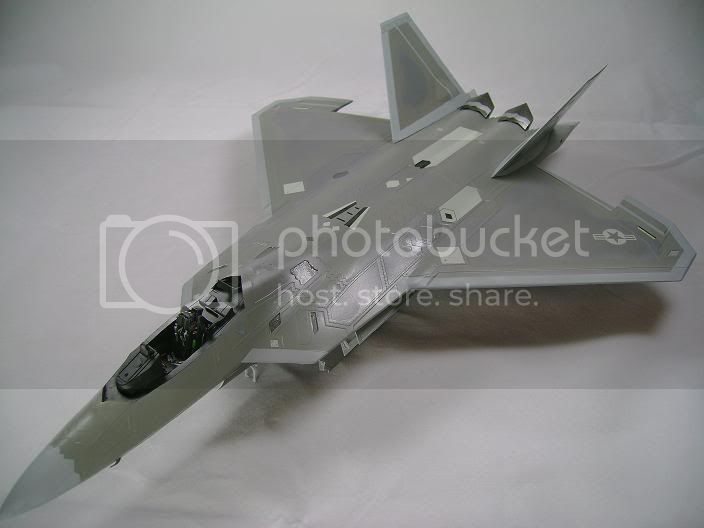
COMPLETION  !!!!!
!!!!!


The kit built really well almost put it self together
Thanks to Hawkeye Hobbies for making such an innovative tint as well.
And also Thanks to Jean-Luc for sharing his technique for oil stains.
!!!!!The kit built really well almost put it self together
Thanks to Hawkeye Hobbies for making such an innovative tint as well.
And also Thanks to Jean-Luc for sharing his technique for oil stains.

mother
Joined: January 29, 2004
KitMaker: 3,836 posts
AeroScale: 1,036 posts
Posted: Friday, October 15, 2010 - 06:12 PM UTC
Yeah now that looks great Justin, well done. Other than the EoD build will or do you have another jet sitting around waiting for glue.
Happy Modeling,
Joe
Happy Modeling,
Joe

Keeperofsouls2099
Joined: January 14, 2009
KitMaker: 2,798 posts
AeroScale: 2,443 posts
Posted: Saturday, October 16, 2010 - 04:41 AM UTC
Thanks joe i dont know yet I keep eye balling the F-5 though
Tojo72
Joined: June 06, 2006
KitMaker: 4,691 posts
AeroScale: 238 posts
Posted: Saturday, October 16, 2010 - 06:03 AM UTC
Justin,excellent build,really beautiful,makes me want to break out my F-22 right now."if I can get up the nerve" But your detailed instructions and guide will definitly make it an easier project to tackle.Thanks again for posting this.
PS-did you ever finish the DML Me-110 ?
PS-did you ever finish the DML Me-110 ?

VonCuda
Joined: November 28, 2005
KitMaker: 2,216 posts
AeroScale: 1,080 posts
Posted: Saturday, October 16, 2010 - 09:29 AM UTC
Sweet! If I had to pick something out to complain about............I'd like to see a pin wash to pick out the exterior details. That's just me though. You guys are seriously rockin' the modern jets around here. I can't wait to get back into the groove.
Hermon
ps: Those weapons bays are the total shiznit. I ain't even gonna try to replicate any of that with my kit. The whole kit needs to be displayed on a mirror so everyone can see the underside detail.
Hermon
ps: Those weapons bays are the total shiznit. I ain't even gonna try to replicate any of that with my kit. The whole kit needs to be displayed on a mirror so everyone can see the underside detail.

Keeperofsouls2099
Joined: January 14, 2009
KitMaker: 2,798 posts
AeroScale: 2,443 posts
Posted: Saturday, October 16, 2010 - 10:47 AM UTC
Thanks Guys.
@Tojo the Dml is just sitting in the corner my son has lost interest but maybe he will pick it up again one day.
@Cuda I was going to give it a wash but out of all the pic's Ilooked out really the only place there is any kind of ware is on the belly under the engines where I put the wash and oil stains.The rest of the bird is smooth sleek and sexy although I dont know what I want to build next now.But I have a list
AussieReg
#007
Joined: June 09, 2009
KitMaker: 8,156 posts
AeroScale: 3,756 posts
Posted: Saturday, October 16, 2010 - 01:29 PM UTC
Beautiful job Justin. I've never been a big fan of modern jets, but seeing the work you and Joe have done of late I may need to take another look in the LHS.
Cheers, D
Cheers, D
Keeperofsouls2099
Joined: January 14, 2009
KitMaker: 2,798 posts
AeroScale: 2,443 posts
Posted: Saturday, October 16, 2010 - 01:41 PM UTC
Thanks D maybe we will see a build log soon
Keeperofsouls2099
Joined: January 14, 2009
KitMaker: 2,798 posts
AeroScale: 2,443 posts
Posted: Sunday, October 17, 2010 - 10:46 AM UTC
100 sorry couldnt help it
sorry couldnt help it |

WEB HOSTING BY


Copyright ©2021 AeroScale and Kitmaker Network, a subsidiary of Silver Star Enterprises
All Rights Reserved. Please read our Conditions of Use and Privacy Policy.
All Rights Reserved. Please read our Conditions of Use and Privacy Policy.