_GOTOBOTTOM
Early Aviation
Discuss World War I and the early years of aviation thru 1934.
Roden 1:32 Sopwith Triplane
wombat58
_VISITCOMMUNITY
New South Wales, Australia
Joined: March 26, 2009
KitMaker: 366 posts
AeroScale: 309 posts
Posted: Friday, November 12, 2010 - 06:34 PM UTC
I don't want to take away from Larsa with his magnificent build but I thought I would add my Triplane build.

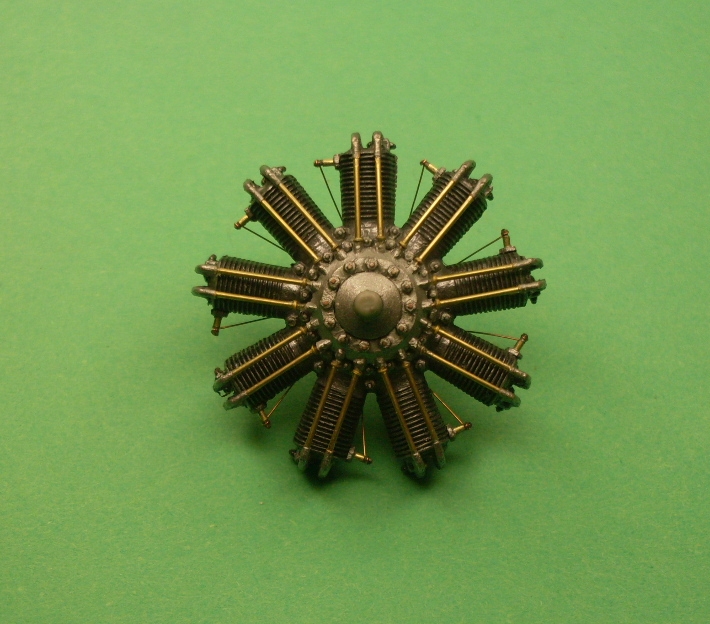
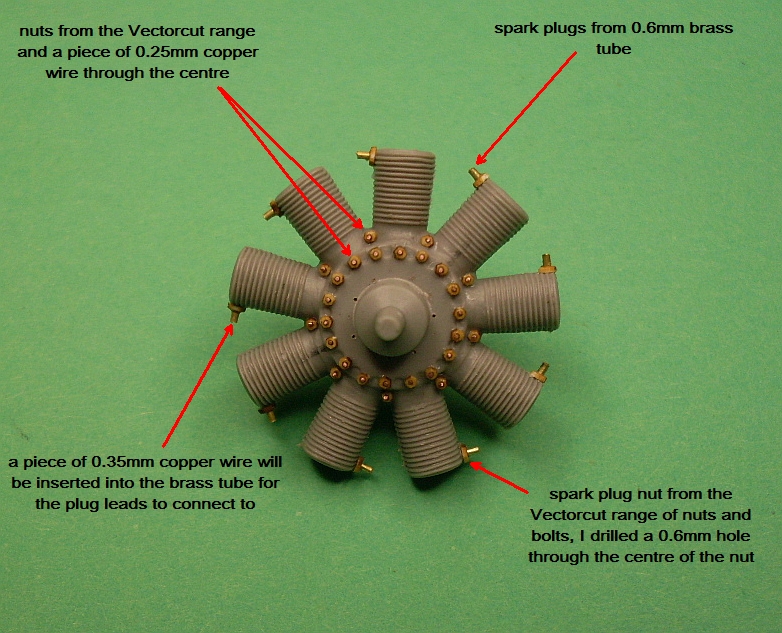
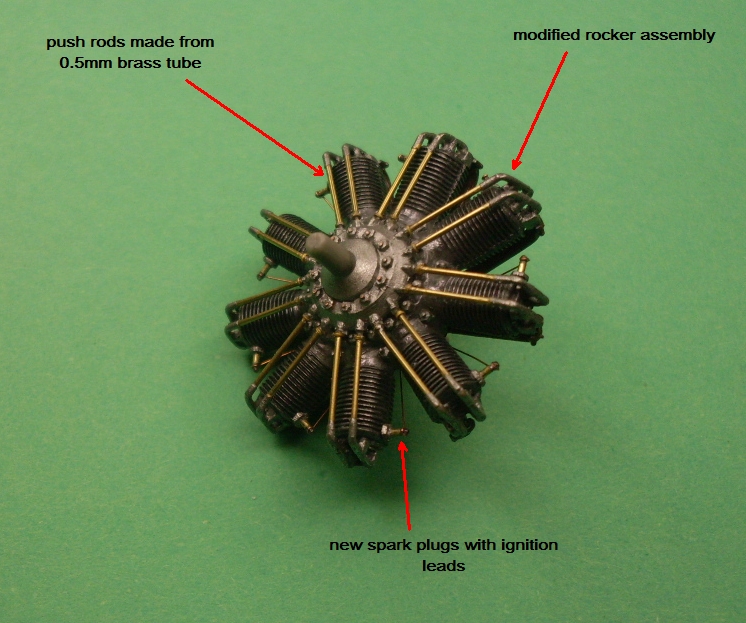
I have started this build with the engine. I have made a few modifications mainly the push rods and rocker assemblies. I removed the blobs of plastic which are supposed to be nuts and replaced them with vectorcut nuts, a brilliant product. I also removed and replaced the spark plugs. I made new connecting pieces to join the push rods with the rockers.

A full build log is on my web site.

http://www.ww1aircraftmodels.com

Des.


wombat58
_VISITCOMMUNITY
New South Wales, Australia
Joined: March 26, 2009
KitMaker: 366 posts
AeroScale: 309 posts
Posted: Friday, November 12, 2010 - 07:43 PM UTC
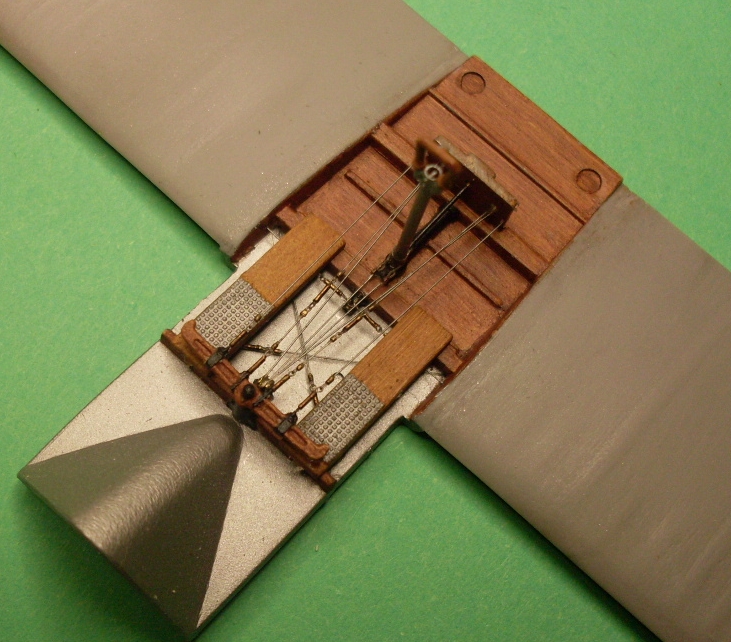
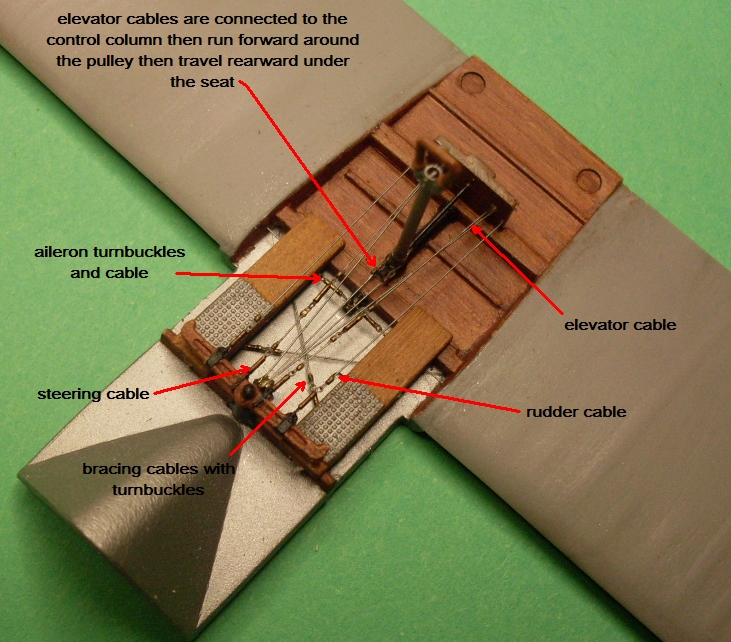
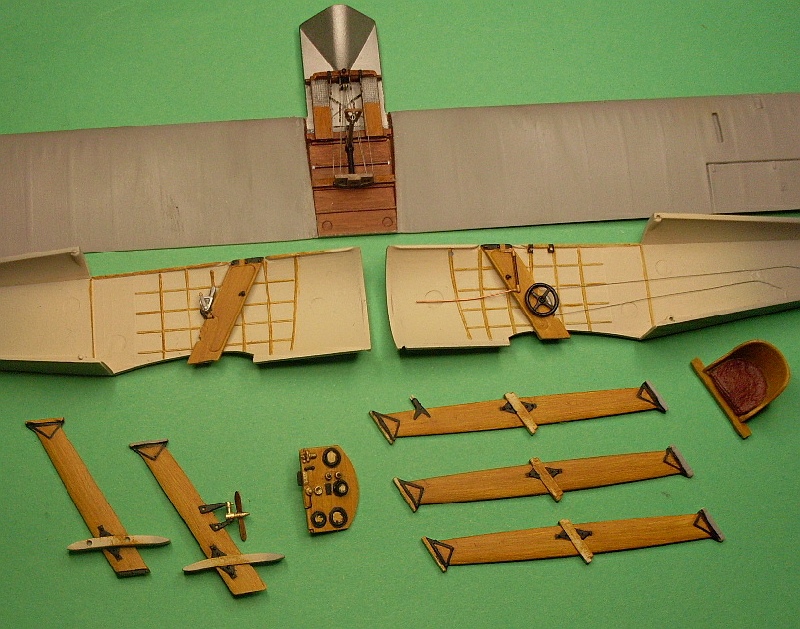
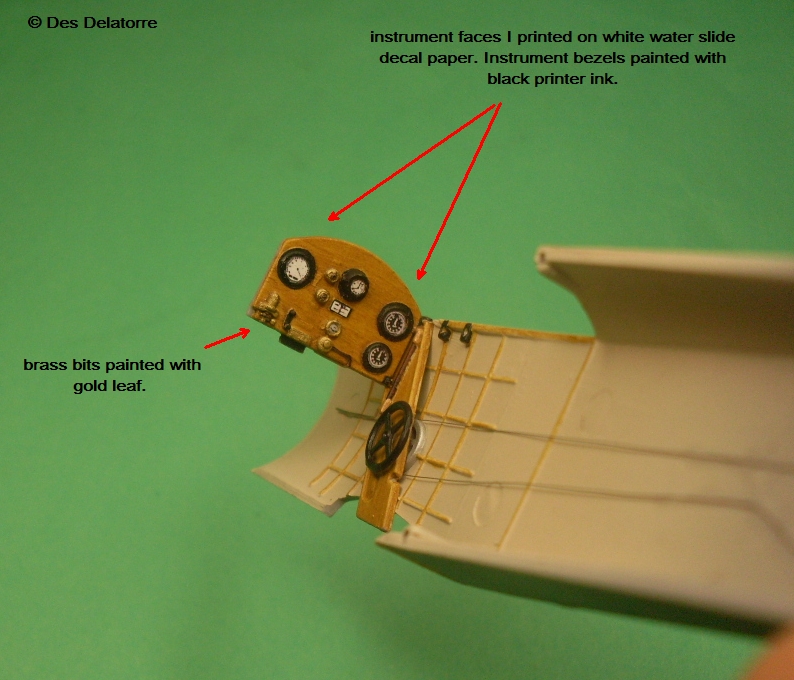
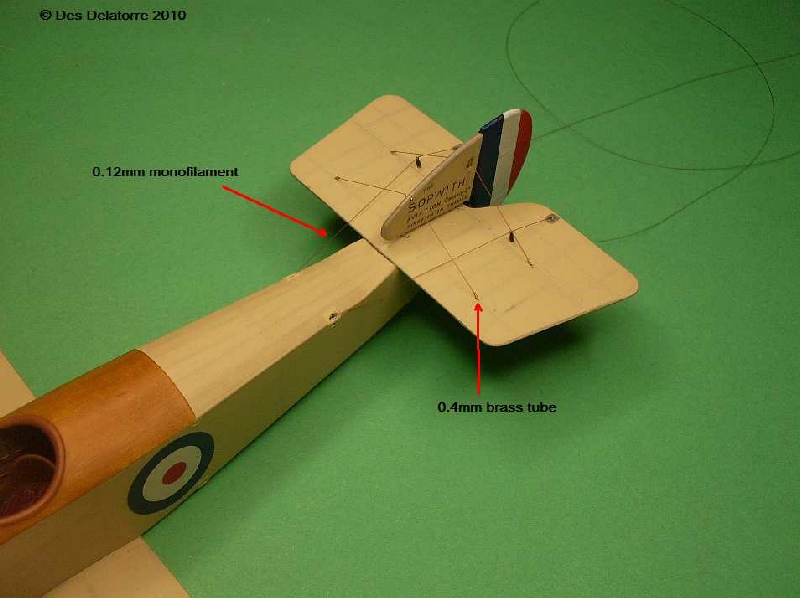
I completed the cockpit control cables, a complex and time consuming process. The turnbuckles are made from 0.4mm brass tube with 0.1mm copper wire eyelets, the small brass cable retaining sleeves are 0.4mm tube 0.5mm long. The cables are 0.12mm invisible thread painted with a 50/50 mix of Humbrol polished aluminium and polished steel. The small elevator pulley is made from brass tube and small brass washers. I fitted a piece of PE to the bottom of the control column so I could connect the elevator cables, they then ran forward, under the pulley then rearward through the seat mounting.

Des.

http://www.ww1aircraftmodels.com


Kornbeef
_VISITCOMMUNITY
England - South East, United Kingdom
Joined: November 06, 2005
KitMaker: 1,667 posts
AeroScale: 1,551 posts
Posted: Friday, November 12, 2010 - 08:15 PM UTC
Beautiful work des, just as I expected when I saw your post. I'm sure Lars won't mind. Even better I know this is in my Xmas stocking so...now I can follow your blog and have an AMS frenzy in the new year.

Thanks for sharing your incredible work.

Keith
Repainted
_VISITCOMMUNITY
Östergötland, Sweden
Joined: April 04, 2006
KitMaker: 1,058 posts
AeroScale: 1,004 posts
Posted: Saturday, November 13, 2010 - 04:24 AM UTC

Quoted Text

Beautiful work des, just as I expected when I saw your post. I'm sure Lars won't mind. Even better I know this is in my Xmas stocking so...now I can follow your blog and have an AMS frenzy in the new year.

Thanks for sharing your incredible work.

Keith


Nol problem my friend, I had my hopes on you. My mission was to build it most OOB and find any misses or flaws for the Swedish distributor. I would like to detail up my kit also, but that was not the deal. So carry on with all beautiful work. I will follow your work as always.
Regards
Larsa
thegirl
_VISITCOMMUNITY
Alberta, Canada
Joined: January 19, 2008
KitMaker: 6,743 posts
AeroScale: 6,151 posts
Posted: Saturday, November 13, 2010 - 01:59 PM UTC
Always a pleasure when you post your work Des ! Your addtionn to the details ; I like how you keep it simple with flare , very nice touch indeed . I'm getting sort of hooked on 32 scale . With the WNW build finished . I have a itching to finsh off the Roden 32 scale Pfalz and get her back on the bench this winter . Looking forward to your next up-date
Kornbeef
_VISITCOMMUNITY
England - South East, United Kingdom
Joined: November 06, 2005
KitMaker: 1,667 posts
AeroScale: 1,551 posts
Posted: Sunday, November 14, 2010 - 10:57 AM UTC

Quoted Text

I'm getting sort of hooked on 32 scale . With the WNW build finished . I have a itching to finsh off the Roden 32 scale Pfalz and get her back on the bench this winter . Looking forward to your next up-date


MWUAAAHAAAAAHAAH gotcha Terri
wombat58
_VISITCOMMUNITY
New South Wales, Australia
Joined: March 26, 2009
KitMaker: 366 posts
AeroScale: 309 posts
Posted: Sunday, November 14, 2010 - 09:16 PM UTC
A small up date.

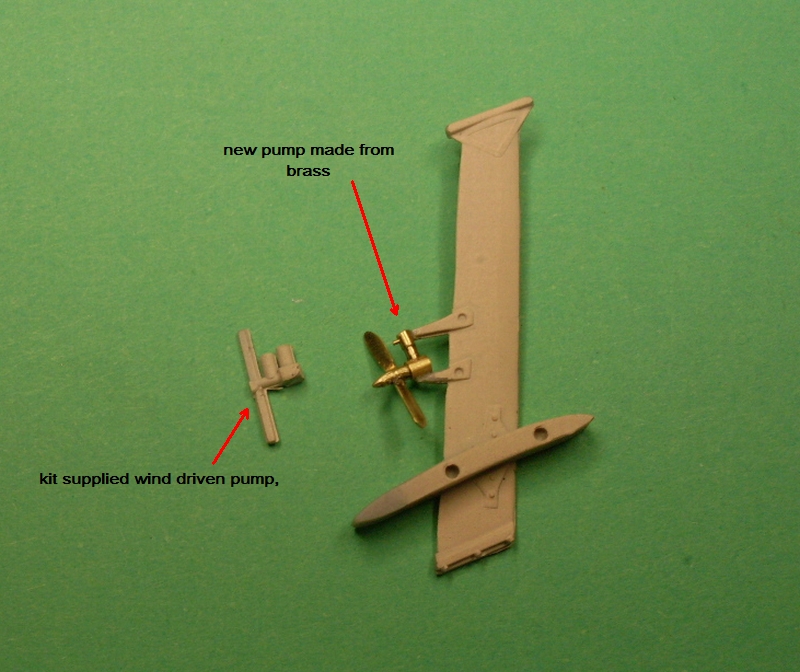
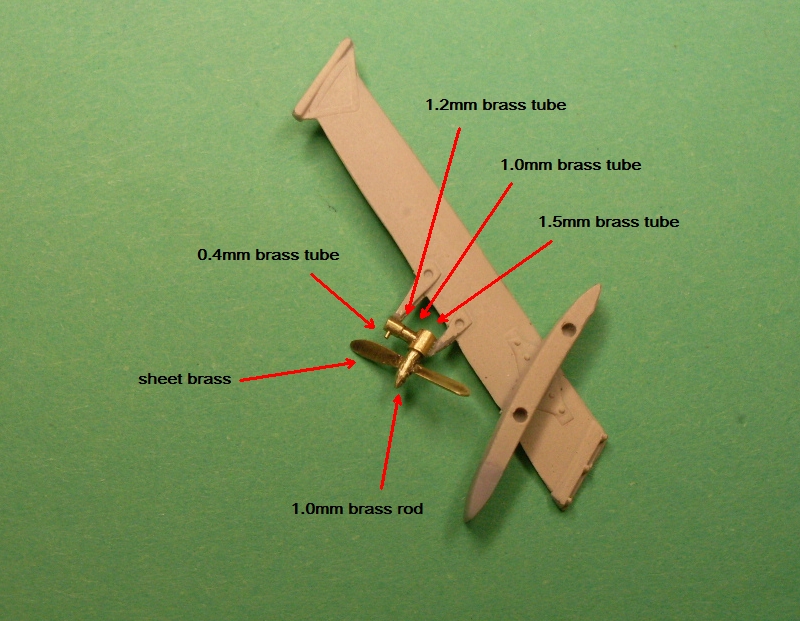
The kit supplied wind driven pump is a very poor representation of the real thing so I made a new one. I removed the old pump and replaced it with one made from brass tube and a propeller made from brass sheet, the prop will be painted a wood colour. The prop shaft is made from 1.0mm brass rod, I cut a slot along its length to take the prop, CA holda it well, once dry I twisted the blades of the prop.

Des.

http://www.ww1aircraftmodels.com


edoardo
_VISITCOMMUNITY
Milano, Italy
Joined: November 30, 2007
KitMaker: 642 posts
AeroScale: 382 posts
Posted: Monday, November 15, 2010 - 01:11 AM UTC
Hi al!
I have a proposal in order to make the table a little more even for the rest of us: ban Des to any brass supply !!

Wonderful as ever Des!

ciao
Edo
Repainted
_VISITCOMMUNITY
Östergötland, Sweden
Joined: April 04, 2006
KitMaker: 1,058 posts
AeroScale: 1,004 posts
Posted: Monday, November 15, 2010 - 01:26 AM UTC
Hi Brassman
The pump looking real fine, whats next thing to fix or do?. Keep the pics comming
Larsa
thegirl
_VISITCOMMUNITY
Alberta, Canada
Joined: January 19, 2008
KitMaker: 6,743 posts
AeroScale: 6,151 posts
Posted: Monday, November 15, 2010 - 02:31 AM UTC
Nicely done Des !
Mgunns
_VISITCOMMUNITY
Arizona, United States
Joined: December 12, 2008
KitMaker: 1,423 posts
AeroScale: 1,319 posts
Posted: Monday, November 15, 2010 - 08:52 AM UTC
Hi Des:

Good to see you back modeling. Great work per usual. I have two of these bad boys and will be following your blog once I tackle the beast. Thanks for posting and to paraphrase Terri, "keeping it simple".
Best

Mark
wombat58
_VISITCOMMUNITY
New South Wales, Australia
Joined: March 26, 2009
KitMaker: 366 posts
AeroScale: 309 posts
Posted: Tuesday, November 23, 2010 - 08:16 AM UTC
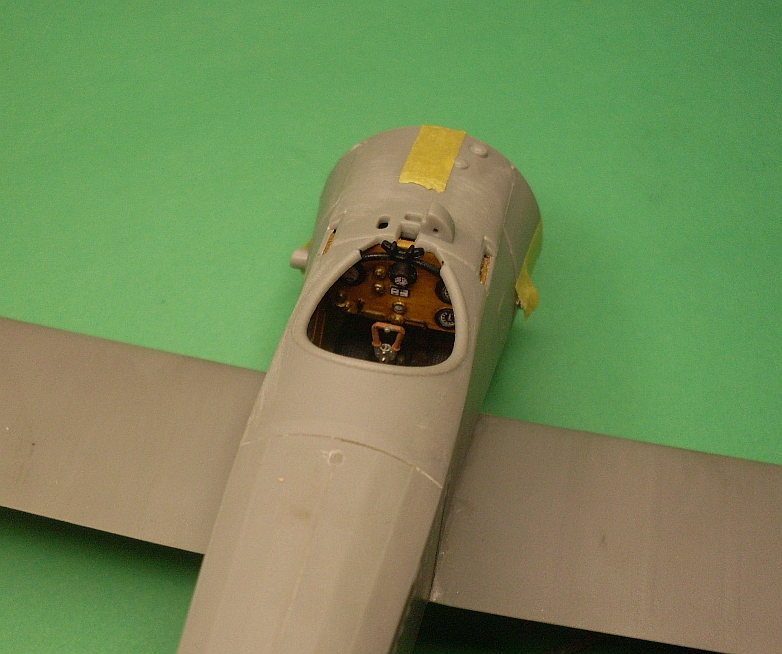
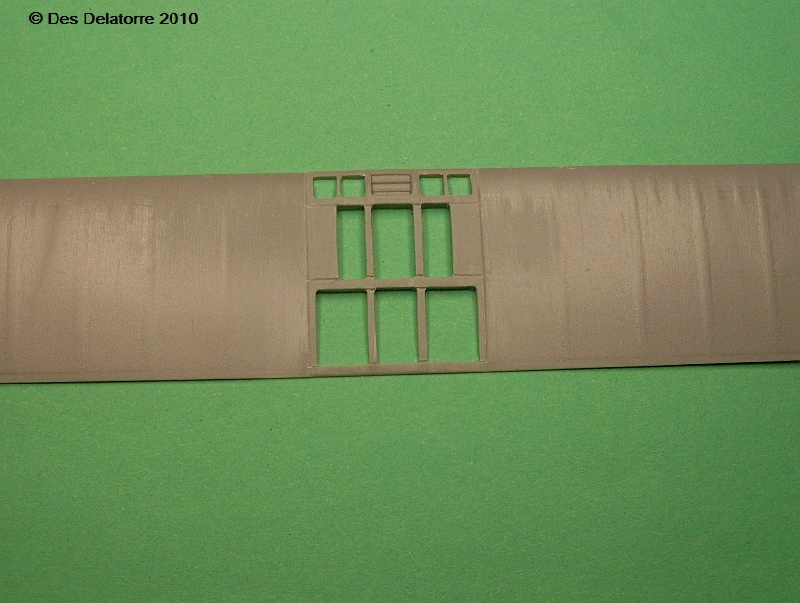
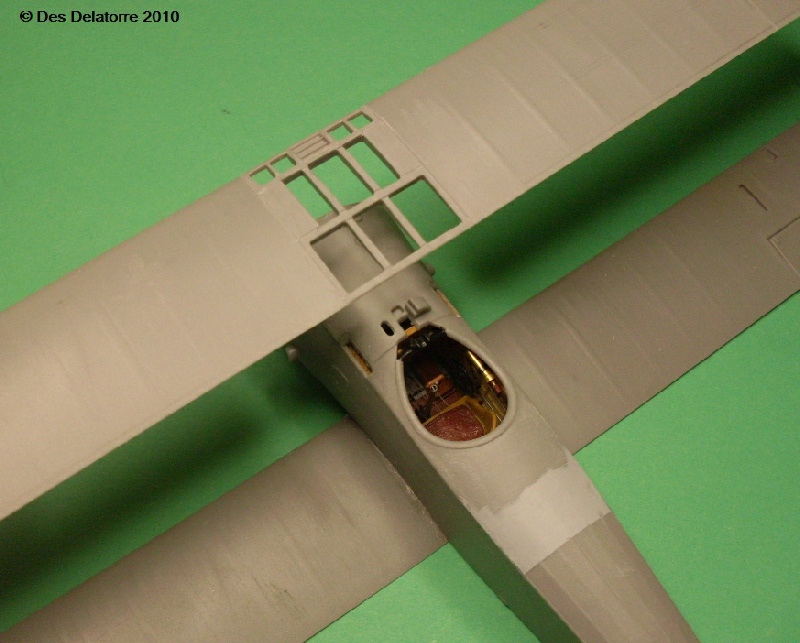
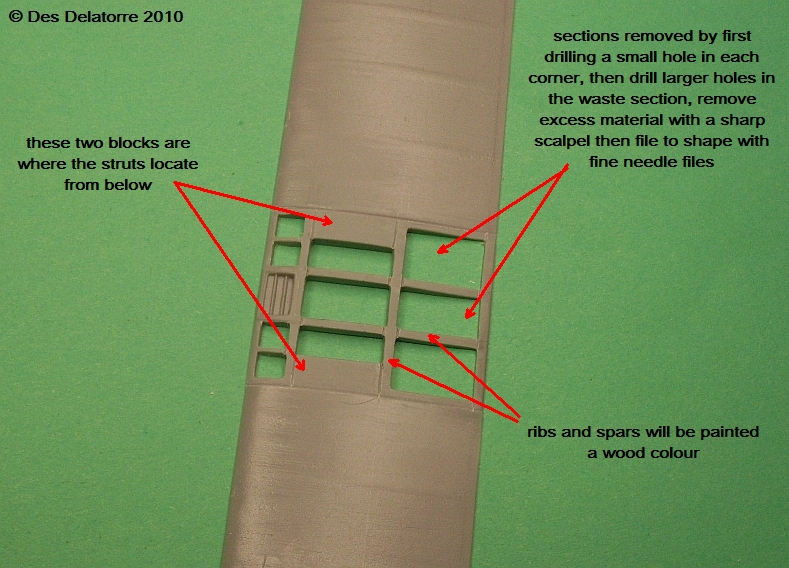
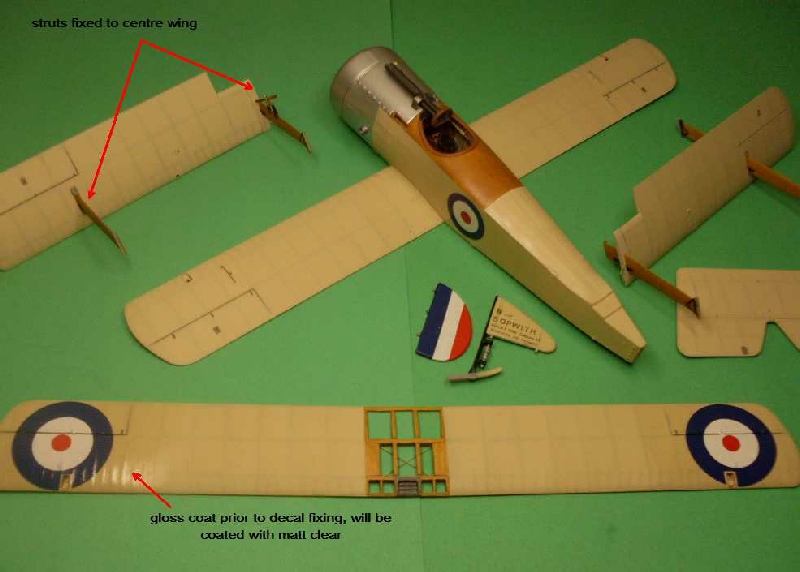
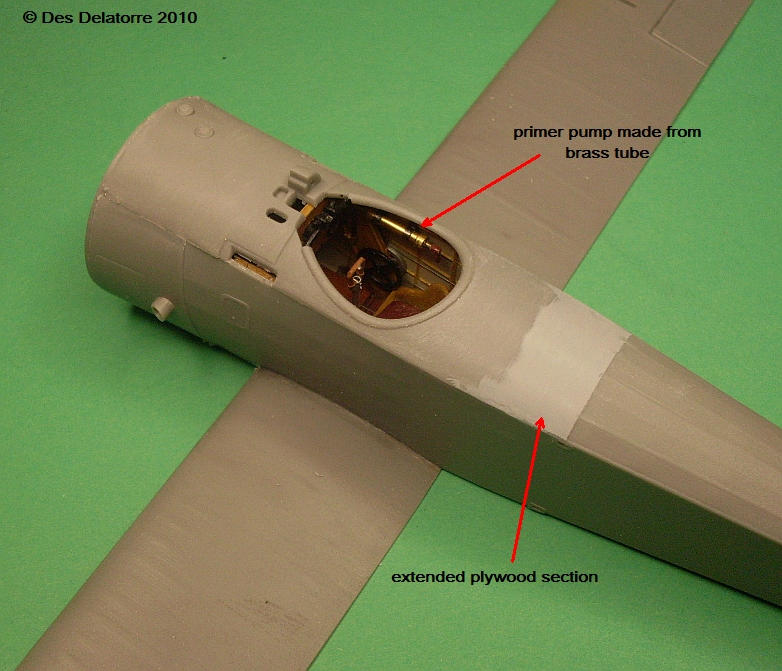
Another update. The fuselage halves have been joined and the bottom wing attached, all parts went together very well. I made a new primer pump and fixed it in position. I'm building this model as the prototype so that involved having a transparent section in the centre of the upper wing, a lot of drilling and filing. I also extended the plywood coaming as per the prototype. All the struts are now completed with wood grain and clear coat. The last photo shows the top wing hand held in position.

Des.

http://www.ww1aircraftmodels.com


wombat58
_VISITCOMMUNITY
New South Wales, Australia
Joined: March 26, 2009
KitMaker: 366 posts
AeroScale: 309 posts
Posted: Tuesday, November 23, 2010 - 08:21 AM UTC


thegirl
_VISITCOMMUNITY
Alberta, Canada
Joined: January 19, 2008
KitMaker: 6,743 posts
AeroScale: 6,151 posts
Posted: Tuesday, November 23, 2010 - 02:07 PM UTC
Most excellent Des ! I really like the different varitions in your wood tones .

Looking forward to your next up-date
Repainted
_VISITCOMMUNITY
Östergötland, Sweden
Joined: April 04, 2006
KitMaker: 1,058 posts
AeroScale: 1,004 posts
Posted: Thursday, November 25, 2010 - 09:37 AM UTC
Just love your búilds my friend.Keep up the good work.

Larsa
NickZour
_VISITCOMMUNITY
Attica, Greece / Ελλάδα
Joined: May 01, 2008
KitMaker: 1,437 posts
AeroScale: 1,241 posts
Posted: Thursday, November 25, 2010 - 10:27 AM UTC
That's an awesome work Mr. Des.

That micro-detailling is one of the BEST I've ever seen, I almost passed out
Good luck with the build Mr. Des


Cheers Nick
JackFlash
_VISITCOMMUNITY
Colorado, United States
Joined: January 25, 2004
KitMaker: 11,669 posts
AeroScale: 11,011 posts
Posted: Thursday, November 25, 2010 - 03:09 PM UTC
Excellent Des! Also I got your mail yesterday. Thanks everso. Let me know if you need anything.
wombat58
_VISITCOMMUNITY
New South Wales, Australia
Joined: March 26, 2009
KitMaker: 366 posts
AeroScale: 309 posts
Posted: Friday, November 26, 2010 - 12:53 PM UTC
Thank you all for your wonderful comments, your kind words are very much appreciated.

Stephen - It was my pleasure, I hope they suit your needs.

Terri - Your SE.5a build was fantastic so your transition into 1:32 scale has already taken a great leap forward, with your expertise you should have no problems with further 1:32 kits.

Larsa - I was keeping a track of your Tripe build before my kit arrived and I picked up a lot of pointers, thank you for sharing.

Edo - Please don't take my brass away, that stuff is my life line. I'm glad I built up a stock pile before demand became so great and stocks started running out, a really handy and versatile material.

Mark - I'm so glad to be back modelling again, takes my mind away from recent events. I always like to add detail but on the other hand I also like to keep it simple.

Nick - My website is aimed mainly at the beginner in bi-planes, so the details I add, even though they may look difficult, are relatively easy to do. The Bristol build you did proves that you have the makings to be a fine WW1 aircraft modeller.

Keith - If you are going to have one of these kits in your xmas stocking I bet I know what you will be doing after the xmas festivities, I will be looking forward to seeing some progress shots of your build.

Des.

http://www.ww1aircraftmodels.com
wombat58
_VISITCOMMUNITY
New South Wales, Australia
Joined: March 26, 2009
KitMaker: 366 posts
AeroScale: 309 posts
Posted: Sunday, December 19, 2010 - 09:52 AM UTC
Hi guys, I'm back on deck again after an horrific month of family tragedy.

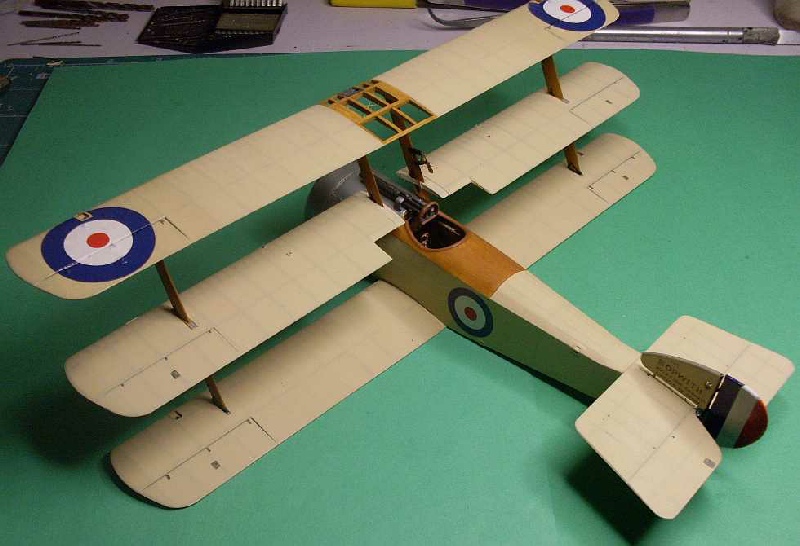
I have included some photos of where progress stands at the moment. The engine fitted extremely well and the cowl slipped on very easy without touching the engine. I have extended the plywood on the fuselage, added paint to the plane after doing all the pre-shading. The decals are on (Pheon Models decals from their Triplane set) and the tail section is now completed. Rigging has commenced with the tail almost finished. The photo of the assembled plane is just a mock up, the wings are doing a balancing act just for photo purposes. The photo of the assembled model shows the true colour.

Des.

http://www.ww1aircraftmodels.com


Kornbeef
_VISITCOMMUNITY
England - South East, United Kingdom
Joined: November 06, 2005
KitMaker: 1,667 posts
AeroScale: 1,551 posts
Posted: Sunday, December 19, 2010 - 12:41 PM UTC
Des,

Sorry to hear of your tragedy, our thoughts are with you, but it's good to see you back and working well again. Yes I can't wait for xmas day to chck my Tripe out, though I've promised myself to finish another couple of projects before starting... *coughs*

Your build and blog on your website wll be a treasure trove of info for me and others.

Thank you for sharing.


Keith
thegirl
_VISITCOMMUNITY
Alberta, Canada
Joined: January 19, 2008
KitMaker: 6,743 posts
AeroScale: 6,151 posts
Posted: Monday, December 20, 2010 - 05:30 AM UTC
Des , Awesome work so far !
OEFFAG_153
_VISITCOMMUNITY
Västra Götaland, Sweden
Joined: February 19, 2010
KitMaker: 1,473 posts
AeroScale: 1,450 posts
Posted: Monday, December 20, 2010 - 07:15 AM UTC
Hi Des,

This tripe is really coming together beautifully, I do like your approach with the cut-out center of the top wing.

Best Regards

Mikael
wombat58
_VISITCOMMUNITY
New South Wales, Australia
Joined: March 26, 2009
KitMaker: 366 posts
AeroScale: 309 posts
Posted: Thursday, December 23, 2010 - 12:43 PM UTC
Thank you for all the nice comments.
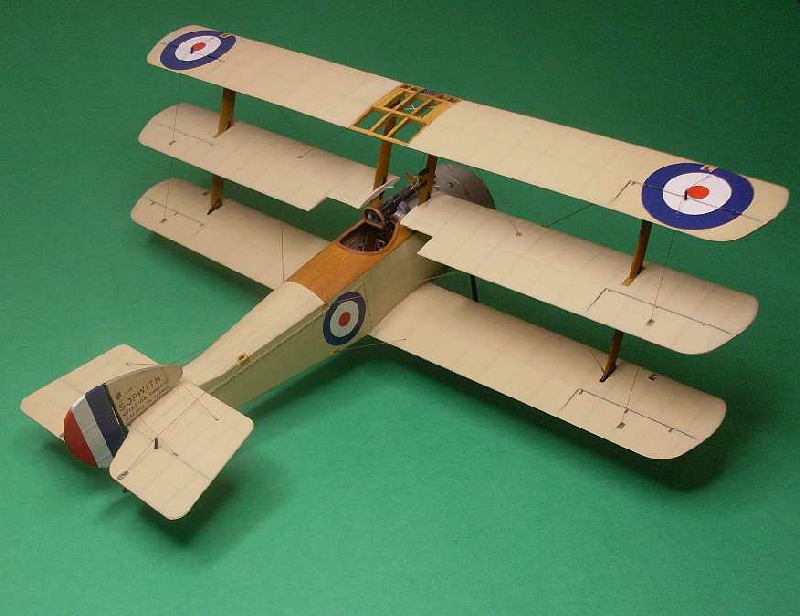
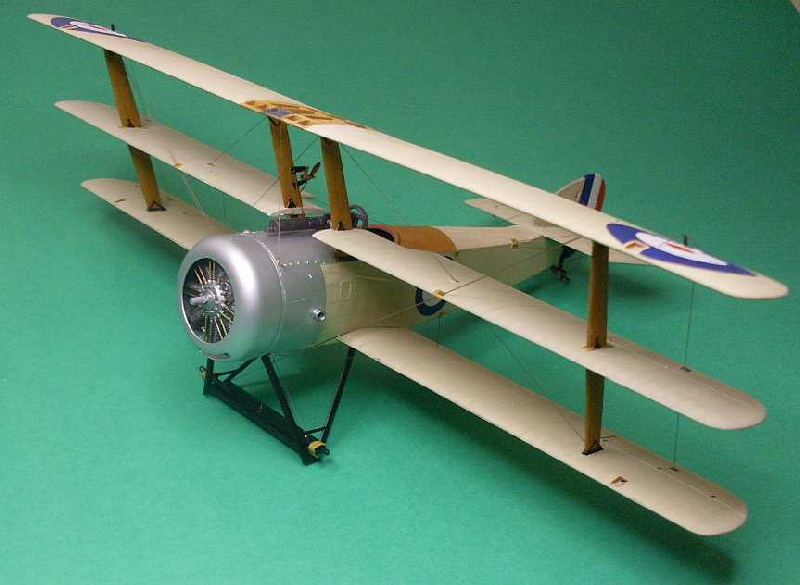
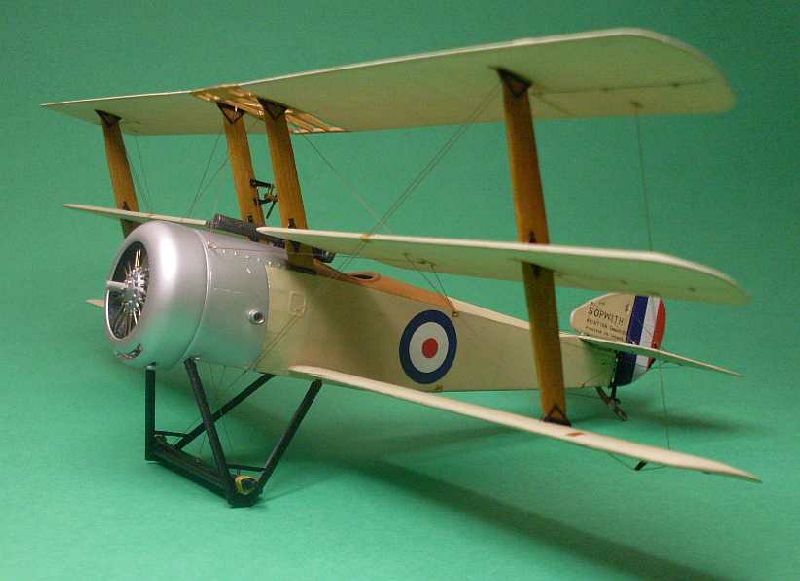
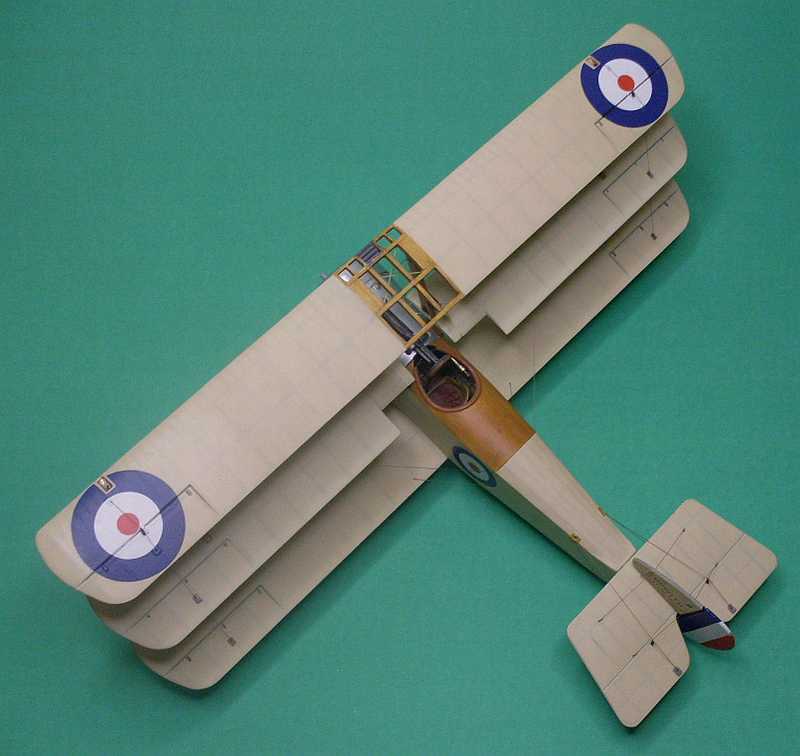
These photos show the progress to date. All the rigging is now completed, the wheels and prop are drying in the heat box. The wings and undercarriage went on beautifully, Roden has done a superb job on these areas which can sometimes be a real problem. Photos of the completed model will be here in a few days, I hope.

Merry Christmas to everyone and I hope the New Year is full of happiness and good health.

Des.


thegirl
_VISITCOMMUNITY
Alberta, Canada
Joined: January 19, 2008
KitMaker: 6,743 posts
AeroScale: 6,151 posts
Posted: Friday, December 24, 2010 - 02:04 AM UTC
Most excellent Des ! Rigging turned out beautifully Looking forward to seeing her with the wheels and prop on
CaptainA
_VISITCOMMUNITY
Indiana, United States
Joined: May 14, 2007
KitMaker: 3,117 posts
AeroScale: 2,270 posts
Posted: Friday, December 24, 2010 - 03:32 AM UTC
I always love what you do with the small scratchbuilt pieces. You are a Brass Master. Those things reall add to the overall affect of the build. You obviously have another masterpiece in this build. Great job and thanks for sharing.
 _GOTOTOP