Keith – Great progress – I'm taking notes for my future build of this baby
Mikael
Early Aviation
Discuss World War I and the early years of aviation thru 1934.
Hosted by Jim Starkweather
Roden 1:32 Sopwith Tripe - Kb's
OEFFAG_153
Västra Götaland, Sweden
Joined: February 19, 2010
KitMaker: 1,473 posts
AeroScale: 1,450 posts
Joined: February 19, 2010
KitMaker: 1,473 posts
AeroScale: 1,450 posts
Posted: Monday, January 03, 2011 - 08:23 PM UTC
Kornbeef
England - South East, United Kingdom
Joined: November 06, 2005
KitMaker: 1,667 posts
AeroScale: 1,551 posts
Joined: November 06, 2005
KitMaker: 1,667 posts
AeroScale: 1,551 posts
Posted: Monday, January 03, 2011 - 08:44 PM UTC
Mikael...thats why I highlighted my own *Faux pas* to save someone else maing the same mistakes.
Never follow a madman down a crazy path my friend
K
Never follow a madman down a crazy path my friend
K
Kornbeef
England - South East, United Kingdom
Joined: November 06, 2005
KitMaker: 1,667 posts
AeroScale: 1,551 posts
Joined: November 06, 2005
KitMaker: 1,667 posts
AeroScale: 1,551 posts
Posted: Monday, January 03, 2011 - 10:45 PM UTC
Reference the post above...HEEEEEEEEEEEEEEEELP!
Scouring what limited Tripe info I can get I'm growing inceasingly confused over the rear turtledeck/coaming.
The length of the coaming seems to vary greatly from shot to shot, some longer than others..
Now my query is there a general rule or something I'm missing?
Did it vary in length during production?
Was it because there was more than one facility producing the tripe?
Or is it a dare I say a kind of random thing?
I think I'm gonna have to hold fire on this art of the build till I know......run to hannants and shell out some cash I can't afford on the Datafile..Ho Hum
Keith the self confusing AMS sufferer
OEFFAG_153
Västra Götaland, Sweden
Joined: February 19, 2010
KitMaker: 1,473 posts
AeroScale: 1,450 posts
Joined: February 19, 2010
KitMaker: 1,473 posts
AeroScale: 1,450 posts
Posted: Tuesday, January 04, 2011 - 12:14 AM UTC
Quoted Text
Mikael...thats why I highlighted my own *Faux pas* to save someone else maing the same mistakes.
Never follow a madman down a crazy path my friend
K
– Unless you're crazy yourself
Mgunns
Arizona, United States
Joined: December 12, 2008
KitMaker: 1,423 posts
AeroScale: 1,319 posts
Joined: December 12, 2008
KitMaker: 1,423 posts
AeroScale: 1,319 posts
Posted: Tuesday, January 04, 2011 - 03:56 AM UTC
Hi Keith:
I am enjoying watching and reading your build blog. I have two of these kits, and will pretty much build them OOB, but; there are things I like to do, and reading your blog and others is always helpful, and fun.
I am looking forward to the next installation.
JackFlash
Colorado, United States
Joined: January 25, 2004
KitMaker: 11,669 posts
AeroScale: 11,011 posts
Joined: January 25, 2004
KitMaker: 11,669 posts
AeroScale: 11,011 posts
Posted: Tuesday, January 04, 2011 - 04:58 AM UTC
Quoted Text
". . .Was it because there was more than one facility producing the tripe?
1. Sopwith
2. Clayton Shuttleworth
3. Oakley
Kornbeef
England - South East, United Kingdom
Joined: November 06, 2005
KitMaker: 1,667 posts
AeroScale: 1,551 posts
Joined: November 06, 2005
KitMaker: 1,667 posts
AeroScale: 1,551 posts
Posted: Wednesday, January 05, 2011 - 04:10 AM UTC
TY again Stephen, bit the bullet and ordered the datafile from Hannants, accidentaly ordering the Roland DVI and Pfalz DIIIa ones too.
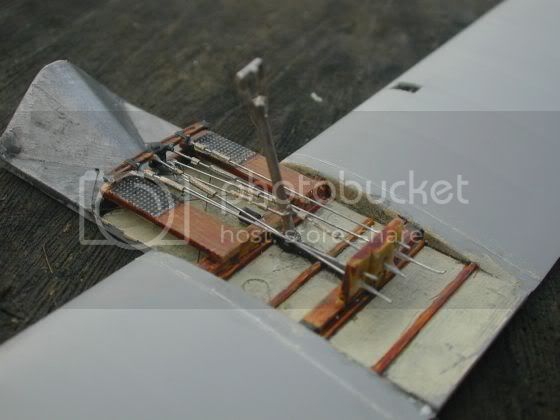
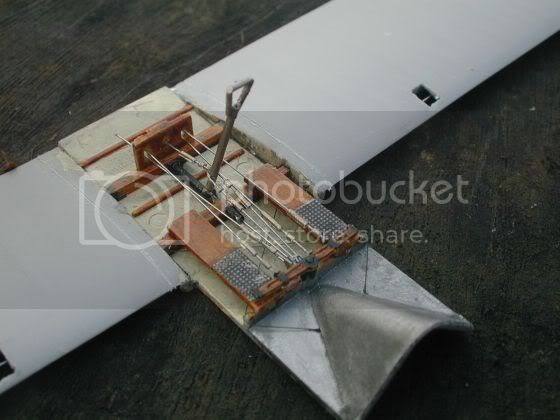
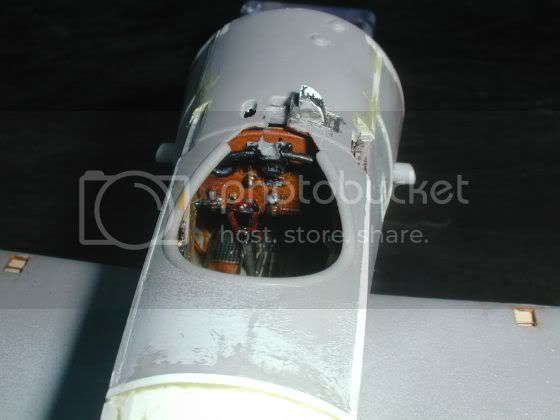
First the interior cockpit floor. cables are the old DML stainless wire, turnbuckles are PC datalead cable sheath...considering how out of sight this part is I think thats more than detailed enough?
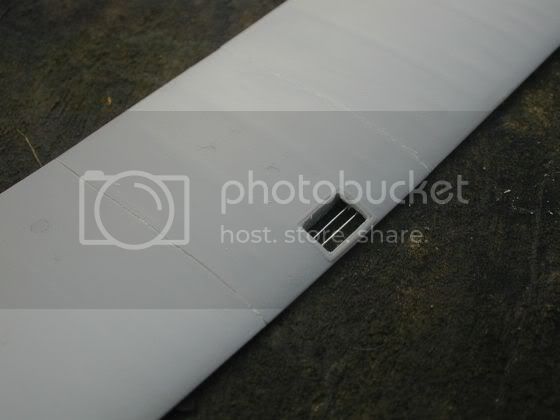
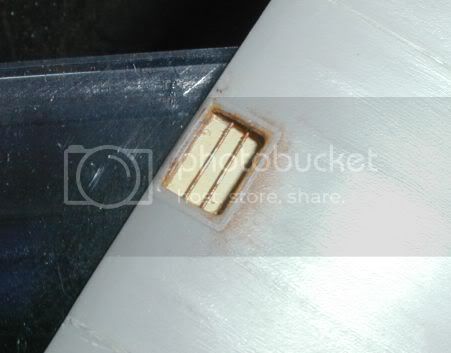
A shot of the upper wing cable inspection window before painting.
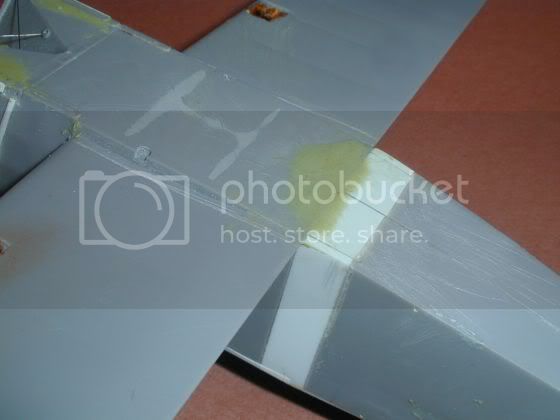
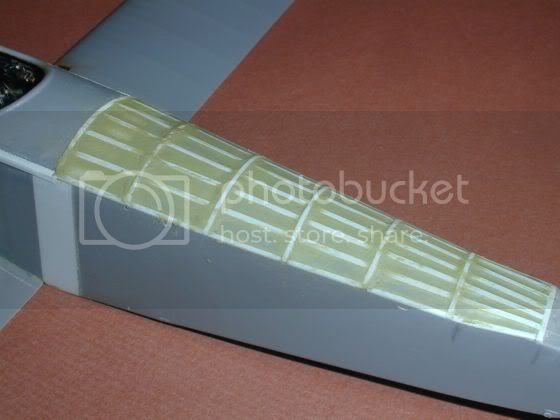
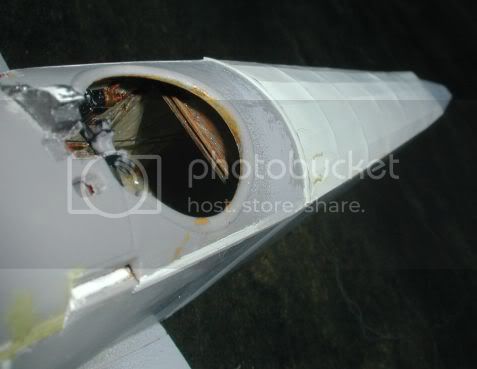
Okay, after a few near misses while working on the lower wing I decided to fix it into place to save breaking the controls or worse. the fit was pretty good, needing little clamping though I never noticed the underside of the nose panel crept up while setting..still I expect its easy to disguise. Mixing the milliput to blend saw me mix far too much and as you can guess I decided to throw caution to the wind and.... Well I said I would wait but couldnt, I began *canvassing* the spine.
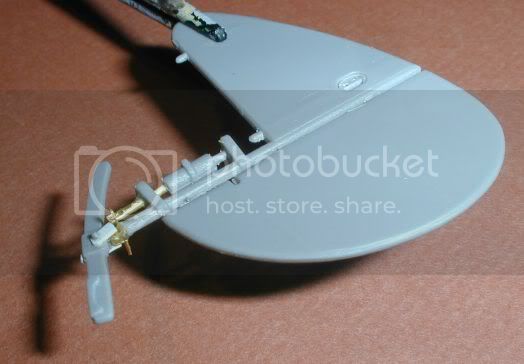
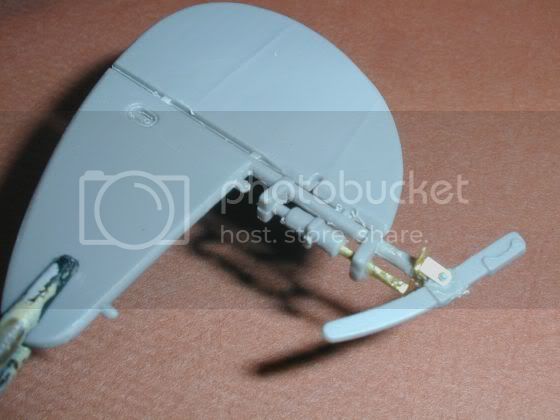
Next on the agenda tail and rudder assy. Using some of the Camel P of P etch I kind of corrected the rudder controls and inserted brass rod into the mix for strength, I also flattened and drilled a short length of .5 brass tube for the lower bracing mount...seems Roden cast it rather short...in comparison to the pics I have.
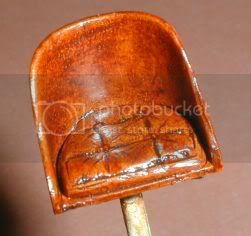
Now the seat...waits for someone to spank me..I know it was supposedly bullet proof steel but I hardly imagine it would be bare metal..taking licence I leatheretted it and made a cumfy bum cushion for Algie to sit on
Thats all folks
JackFlash
Colorado, United States
Joined: January 25, 2004
KitMaker: 11,669 posts
AeroScale: 11,011 posts
Joined: January 25, 2004
KitMaker: 11,669 posts
AeroScale: 11,011 posts
Posted: Wednesday, January 05, 2011 - 08:33 AM UTC
Quoted Text
TY again Stephen, bit the bullet and ordered the datafile from Hannants, accidentaly ordering the Roland D.VI and Pfalz D.IIIa ones too. . .
No worries Keith, You won't be disappointed.
guitarlute101
West Virginia, United States
Joined: December 18, 2006
KitMaker: 1,121 posts
AeroScale: 1,063 posts
Joined: December 18, 2006
KitMaker: 1,121 posts
AeroScale: 1,063 posts
Posted: Wednesday, January 05, 2011 - 09:32 AM UTC
Very nice Keith! The interior cockpit floor looks great!
Mark
Kornbeef
England - South East, United Kingdom
Joined: November 06, 2005
KitMaker: 1,667 posts
AeroScale: 1,551 posts
Joined: November 06, 2005
KitMaker: 1,667 posts
AeroScale: 1,551 posts
Posted: Wednesday, January 05, 2011 - 11:07 AM UTC
Well Stephen despite my grumbls about the kit I'll likely build another, twin gun of course, so the datafile wont go amiss...I wont of course be tearing this one apart to amend something.
TY Mark, I should have snapped a shot or two of the office itself. As it was I forgot to include the seat pic when I posted last so here it is.
Hoping the datafiles with me tomorrow...it was despatched 1st class today
YAY
TY Mark, I should have snapped a shot or two of the office itself. As it was I forgot to include the seat pic when I posted last so here it is.
Hoping the datafiles with me tomorrow...it was despatched 1st class today
YAY
thegirl
Alberta, Canada
Joined: January 19, 2008
KitMaker: 6,743 posts
AeroScale: 6,151 posts
Joined: January 19, 2008
KitMaker: 6,743 posts
AeroScale: 6,151 posts
Posted: Thursday, January 06, 2011 - 06:56 AM UTC
Most excellent progress Keith ! You sure are moving forward on this project
Mgunns
Arizona, United States
Joined: December 12, 2008
KitMaker: 1,423 posts
AeroScale: 1,319 posts
Joined: December 12, 2008
KitMaker: 1,423 posts
AeroScale: 1,319 posts
Posted: Thursday, January 06, 2011 - 08:06 AM UTC
Hi Keith:
Yup, that cockpit floor is outstanding. A lot of effort, hopefully it won't go unnoticed. The seat looks good too! I have a couple of these and am looking forward to tackling one when I get a couple of others on the completed shelf.
Best
Mark
Yup, that cockpit floor is outstanding. A lot of effort, hopefully it won't go unnoticed. The seat looks good too! I have a couple of these and am looking forward to tackling one when I get a couple of others on the completed shelf.
Best
Mark
Kornbeef
England - South East, United Kingdom
Joined: November 06, 2005
KitMaker: 1,667 posts
AeroScale: 1,551 posts
Joined: November 06, 2005
KitMaker: 1,667 posts
AeroScale: 1,551 posts
Posted: Thursday, January 06, 2011 - 08:36 AM UTC
Thanks Terri & mark, Yes despite all my grumbles I'm enjoying the build immensely, so much I'm planning on another later. . .might do the twin gun one on display here in England most likely.
edoardo
Milano, Italy
Joined: November 30, 2007
KitMaker: 642 posts
AeroScale: 382 posts
Joined: November 30, 2007
KitMaker: 642 posts
AeroScale: 382 posts
Posted: Thursday, January 06, 2011 - 06:01 PM UTC
keith, you are doing a great job!
what impresses me most is the canvassing of the spine!
very well done, indeed!
it is just an impression of mine, or lastly the bar has been raised?
it seems to me that the last builds of you guys, are much more detailed, accurate and complete than they were, say, an year ago....
or it is just me that now can see better the effort you put on a build?
anyway much more difficult for me to catch up with you ....
can't wait to see what's under your sleeve next!
ciao
edo
JackFlash
Colorado, United States
Joined: January 25, 2004
KitMaker: 11,669 posts
AeroScale: 11,011 posts
Joined: January 25, 2004
KitMaker: 11,669 posts
AeroScale: 11,011 posts
Posted: Thursday, January 06, 2011 - 06:17 PM UTC
Quoted Text
were the 'bungee fitments' a type of rudementary suspension?
Yes. For the Sopwiths we are told that they were metal springs wrapped in crossmesh fabric and looped around the spreader bar stubs and the axle end 8-10 times at each end. The axle was split at the middle and joined together by a vertical union. The travel of the axle ends was limited by the bungees and the the welded "T" bar in the crotch of the landing gear legs {one per side).
Kornbeef
England - South East, United Kingdom
Joined: November 06, 2005
KitMaker: 1,667 posts
AeroScale: 1,551 posts
Joined: November 06, 2005
KitMaker: 1,667 posts
AeroScale: 1,551 posts
Posted: Thursday, January 06, 2011 - 08:53 PM UTC
Edo.
Thank you for the compliments. Lifting up the bar? I don't think I'll ever have patience or skill to create something as excellent as we see here from some builders.But I enjoy what I do, I enjoy the challenge, sometimes I wish I could just build OOB too. Truthfuly though you are right, I look at my Roden Alb. D.I and I was so proud of when I built it and realise the difference in finish between that and the D.Va sitting by it and the other half finished by my bench.
On this build though having several builds to inspire me and refer to and a set of excellent detail pics from the above link (Jamo's build blog especially) that highlighted things, now I got the Datafile too to add to the confusion.
But my other builds are more works of love..Albatrossen just hits the spot for me!
The spine was time consuming but easier than I thought it would be, hopefully a coat of primer won't make it look dreadful, though I was wondering if it was a little pronounced? I just have to pick the right profile to suit...like everything else matching detail to profile is a nightmare
Mgunns
Arizona, United States
Joined: December 12, 2008
KitMaker: 1,423 posts
AeroScale: 1,319 posts
Joined: December 12, 2008
KitMaker: 1,423 posts
AeroScale: 1,319 posts
Posted: Friday, January 07, 2011 - 01:44 AM UTC
Quoted Text
it is just an impression of mine, or lastly the bar has been raised?
it seems to me that the last builds of you guys, are much more detailed, accurate and complete than they were, say, an year ago....
or it is just me that now can see better the effort you put on a build?
anyway much more difficult for me to catch up with you ....
:-H
I have to agree with Edo, and it isn't just you. Each build is a learning experience: seeing and reading what others on this forum are doing is inspiring, challenging and motivational. Like Keith wrote, his D-I next to a more a current build shows level of advancement. For me the advent of 1/32nd scale and this forum has really motivated me to get back into WWI a/c modeling after a very long hiatis. Thanks to all.
Best wishes n 2011 and lets build!
Mark
thegirl
Alberta, Canada
Joined: January 19, 2008
KitMaker: 6,743 posts
AeroScale: 6,151 posts
Joined: January 19, 2008
KitMaker: 6,743 posts
AeroScale: 6,151 posts
Posted: Friday, January 07, 2011 - 02:23 AM UTC
Quoted Text
keith, you are doing a great job!
what impresses me most is the canvassing of the spine!
very well done, indeed!
it is just an impression of mine, or lastly the bar has been raised?
it seems to me that the last builds of you guys, are much more detailed, accurate and complete than they were, say, an year ago....
or it is just me that now can see better the effort you put on a build?
anyway much more difficult for me to catch up with you ....
can't wait to see what's under your sleeve next!
ciao
edo
Hi Edo and sorry Keith for the high jacking which is about to take place
Edo , that is one of the best part of this hobby , watching everyone grow in their skills , sharing it here with us folks ! With every kit we build we gain experience .Trying new methods and ideas just adds to that skill level .
I remember your first build here and comparing to the work which you do now , you have moved forward in your skills in big way . And I'm sure the rest would agree as well
I have also notice that we will do a better job on a subject if we have high interest in the subject . Like Keith and his Albbies or the Pfalz D.III/a for me .
Now as far as catching up , I think you are already there with the rest of us
edoardo
Milano, Italy
Joined: November 30, 2007
KitMaker: 642 posts
AeroScale: 382 posts
Joined: November 30, 2007
KitMaker: 642 posts
AeroScale: 382 posts
Posted: Friday, January 07, 2011 - 04:21 AM UTC
Well, being this time of the year, I'll guess that Keith will not be upset if we highjack his thread a bit
But now I am left speechless myself, not sure what to say but a BIG thank you folks!
Apart from learning, I enjoy your company very much!
Big hugs!! and have a good new year both off and on the building bench!
Ciao
Edo
But now I am left speechless myself, not sure what to say but a BIG thank you folks!
Apart from learning, I enjoy your company very much!
Big hugs!! and have a good new year both off and on the building bench!
Ciao
Edo
Kornbeef
England - South East, United Kingdom
Joined: November 06, 2005
KitMaker: 1,667 posts
AeroScale: 1,551 posts
Joined: November 06, 2005
KitMaker: 1,667 posts
AeroScale: 1,551 posts
Posted: Friday, January 07, 2011 - 08:58 AM UTC
Yes, no problem Hijacking my threads, I'm as guilty as anyone of that
I'm in total agreement with everything said anyways. Here for one another even if its just to prevent a mistake, any comments welcome, I know its never meant spiteful or nasty and would rather take critiscm during building than get a *Oh* once it done.
Edo...just look at that Trench dio you did and you say you arent up there?...silly.
OEFFAG_153
Västra Götaland, Sweden
Joined: February 19, 2010
KitMaker: 1,473 posts
AeroScale: 1,450 posts
Joined: February 19, 2010
KitMaker: 1,473 posts
AeroScale: 1,450 posts
Posted: Saturday, January 08, 2011 - 07:36 AM UTC
Quoted Text
Yes, no problem Hijacking my threads, I'm as guilty as anyone of that
I'm in total agreement with everything said anyways. Here for one another even if its just to prevent a mistake, any comments welcome, I know its never meant spiteful or nasty and would rather take critiscm during building than get a *Oh* once it done.
Edo...just look at thet Trench dio you did and you say you arent up there?...silly.
First of all Keith – looking very nice indeed, your attention to detail is as good as always – that talskid looks like it could work for real!
Second (and my bit of hijacking) – a big Hear!, Hear!, to what has already been said! – Edo, Keith, Terri and Mark (and the rest of you too) – You guys are all serving as an inspiration, and a great wealth of knowledge and input, that has driven me to better builds, atempting things I'd never thoght I'd try – so a big Thank You for that – just keep it cooming
Best Regards
Mikael
Kornbeef
England - South East, United Kingdom
Joined: November 06, 2005
KitMaker: 1,667 posts
AeroScale: 1,551 posts
Joined: November 06, 2005
KitMaker: 1,667 posts
AeroScale: 1,551 posts
Posted: Sunday, January 09, 2011 - 04:19 AM UTC
Well a little progress/regress to report.
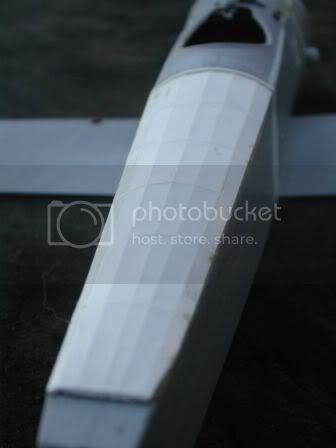
Priming up the spine and attempting to sand a reasonable result made me think of Terri's advice and I redid the spine witha thin skin instead. Adhering it of course was the problem...knowing poly cemet would belt it to easily. So I went for gatorgrip...badmove, I ended up scouring it off and finally setting it with epoxy glue.
Only as I examined the pics while editing to load them did I see the misalignment of stringers..well its epoxied in now..laughs.
Easier to get a good result than my first tried method.
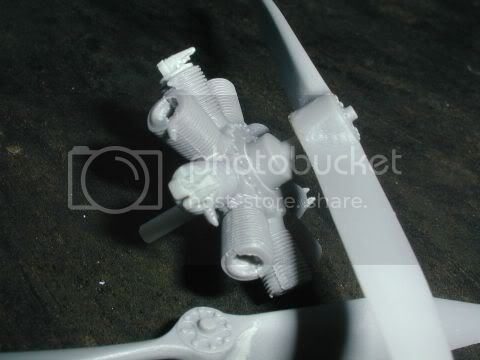
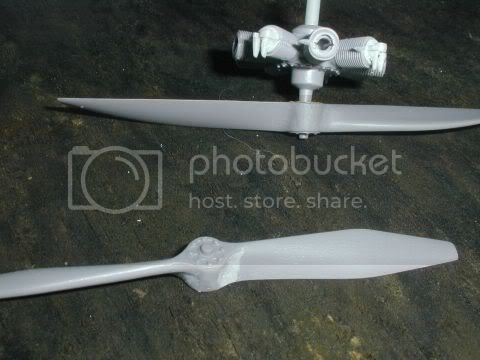
I started the engine, trying to fit the (reworked) heads from the Academy Camel as they are slightly better than Rodens effort. I'm not loooking for anything spectacular heere, if th heads had been easily seen then yes but they really are tucked away. I've cleaned up and filled both props in case... laughs.
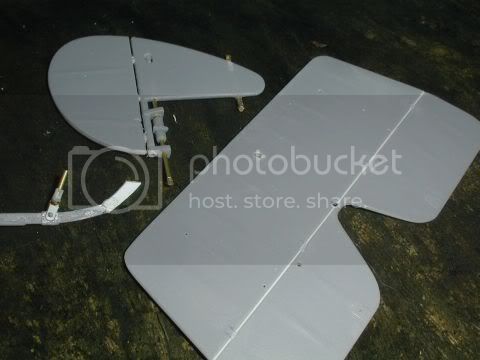
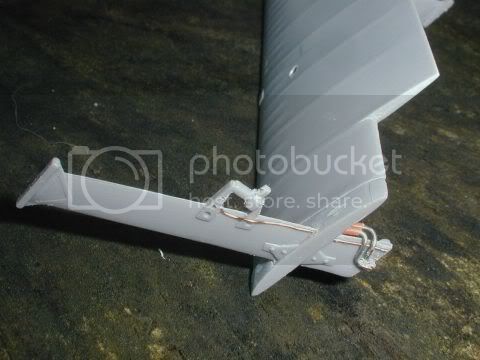
Reworked the tail adding the upper rigging point, Snapping the pin between the tail and the ruder assy while dryfitting had me rethinking this area and how femer the attachments are..so brass rod n tube to the rescue. The skid will be glued to supports out of sight inside the fuselage too...To my eye it looked incredibly easy to snap off. The tail plane itself, is ready for rigging, I mad an attempt to show the hinge points on the upper side and sanded down Rodens thick reinforcements around the rigging points to a more scale depth. Nicking the ends where tail meets elevator as theres no definition or gap on the outer edge too.
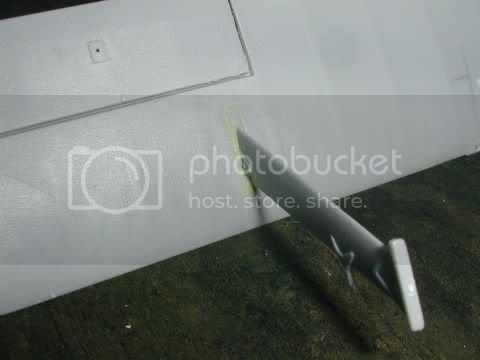
Ignoring sense I built the complete middle wings and struts into one assembly, partly to enable me to fill the gaps around the struts. all rigging points are already drilled and awaiting attachments. Filling done but setting Milliputs taking ages to dry in the cold. The aerlerons have been liberated from the trailing edge to the hinge with a thin saw and from the wingtip to the first hinge in an attempt to enhance their sepereateness but not remove them totally, I think it will work okay.
Airpump prop will be brass pinched from the P of P Camel set as will rigging attachments and control horns etc.
TY Keith
thegirl
Alberta, Canada
Joined: January 19, 2008
KitMaker: 6,743 posts
AeroScale: 6,151 posts
Joined: January 19, 2008
KitMaker: 6,743 posts
AeroScale: 6,151 posts
Posted: Sunday, January 09, 2011 - 02:03 PM UTC
Very nice up-date indeed
Wow , you are like the mad hatter and really moving along with this build Keith
Good for you on the redoing the turtle deck
Very nice results happening here . First attemtp was an interesting way of doing it . Was looking forward to seeing how you where going to get that peek effect from the stringers and forumers . Made one could use rob instead of flat strips of plastic and then use Mr. surface 500 for the fabric over struture look .
Kornbeef
England - South East, United Kingdom
Joined: November 06, 2005
KitMaker: 1,667 posts
AeroScale: 1,551 posts
Joined: November 06, 2005
KitMaker: 1,667 posts
AeroScale: 1,551 posts
Posted: Sunday, January 09, 2011 - 08:21 PM UTC
Quoted Text
Terri,Very nice up-date indeed
Wow , you are like the mad hatter and really moving along with this build Keith
Good for you on the redoing the turtle deck
Very nice results happening here . First attempt was an interesting way of doing it . Was looking forward to seeing how you where going to get that peek effect from the stringers and forumers . Made one could use rod instead of flat strips of plastic and then use Mr. surface 500 for the fabric over struture look .
It actually looked reasonable and was working but would have taken longer than reskinning your way. I think I overdid the width on the stringers and the formers were too pronounced, this was in the back of my mind and you know how it is...eventually you go back ad redo it.
So I thought why not try your way and it worked better than I imagined.
TY for the idea.
JackFlash
Colorado, United States
Joined: January 25, 2004
KitMaker: 11,669 posts
AeroScale: 11,011 posts
Joined: January 25, 2004
KitMaker: 11,669 posts
AeroScale: 11,011 posts
Posted: Monday, January 10, 2011 - 01:40 AM UTC
I think most of us have been there Keith. I can totally identify with having that nagging problem hanging out in the back of your mind. But your "fix" seems to be a good answer.