_GOTOBOTTOM
Early Aviation
Discuss World War I and the early years of aviation thru 1934.
Roden 1:32 Sopwith Tripe - Kb's
thegirl
_VISITCOMMUNITY
Alberta, Canada
Joined: January 19, 2008
KitMaker: 6,743 posts
AeroScale: 6,151 posts
Posted: Monday, January 10, 2011 - 01:27 PM UTC
Kornbeef
_VISITCOMMUNITY
England - South East, United Kingdom
Joined: November 06, 2005
KitMaker: 1,667 posts
AeroScale: 1,551 posts
Posted: Tuesday, February 15, 2011 - 01:31 AM UTC
Hey! I've done some on this.

Got so far as painting, I have to say prewarned as I was I'm very dissappointed with the finish some of which only came to light since she was topcoated.

I have one of those camera's that finds flaws and highlights them darmaticaly

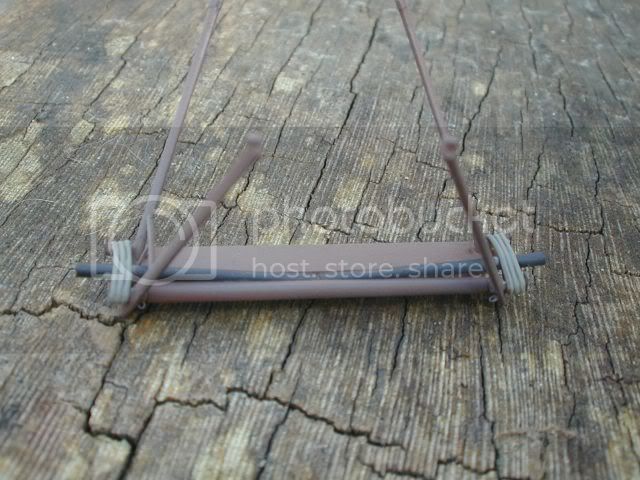
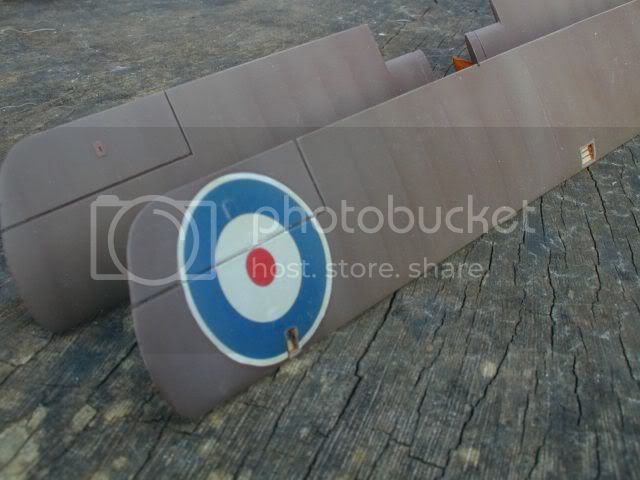
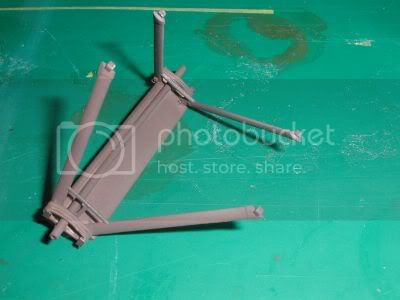
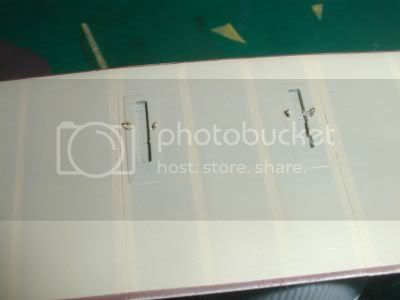
Still this is where I stand, all rigging points are drilled and tags fitted where they seem deemed. CDL was preshaded and topcoated nicely, I didnt realise then how rough the top wings were.

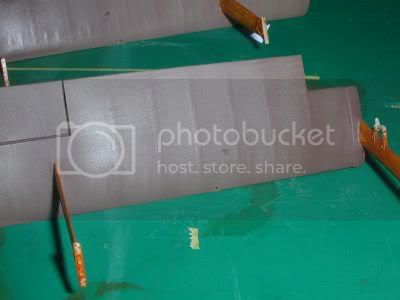
Sprayed the top as PC12 (I dont want to go into the my PC12 is better than you PC12 debate 
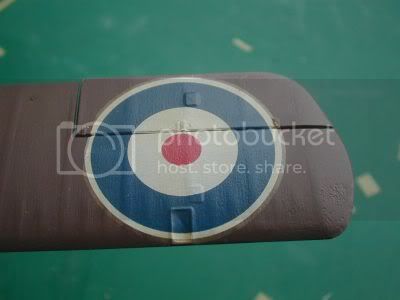
) using Humbrol 160 unfortunately this seems to have a soft never properly drying feel to it, before going further I let it dry, sprayed several coats of Tamiya clear over, all of which seemed to sink in leaving her with a satin sheen....SO silvered decals resulted (another one of those *you should have stoppd* moments).

I lightened the finish with a few coats of desert yellw here and there, oblivious to the fact the decals must have still been drying out as they hadnt silvered by then.

So looks like I'll be building a tatty workhorse,

Still some details to add like the cartridge chute patches around rigging points (cant do till I get her at the rigging stage.)

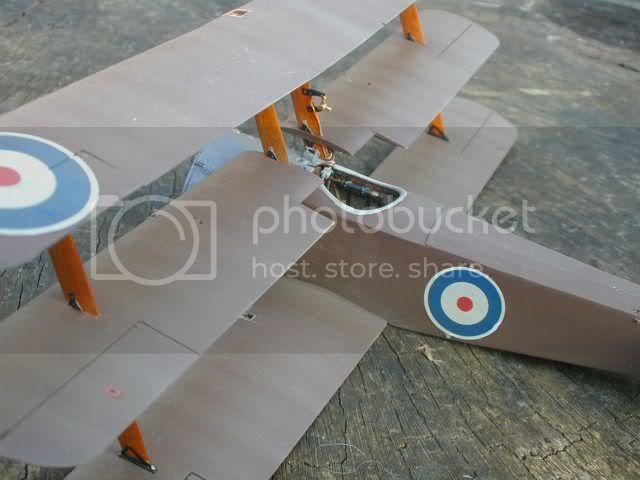
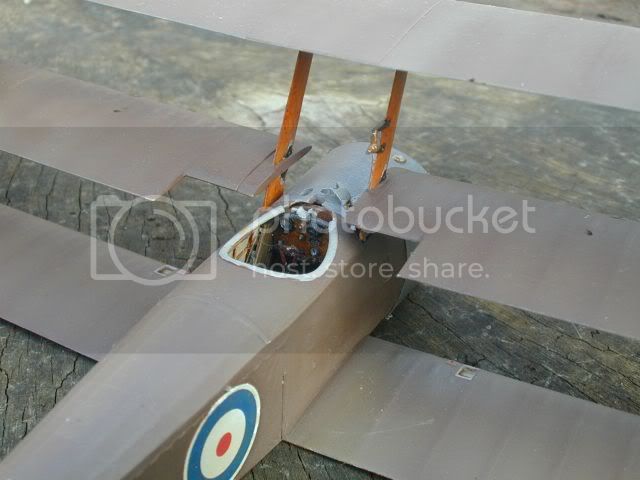
Anyway some pics, I'm sure the finish on the upper wing espeially will be glaringly obvious.
I have to say though I loved building this but if the quality control has slipped so badly at Roden I will hesitate before buying another new release from them.

anyway heres some pics to disect.


At this point I'm wondering whether to invest some of my non-existant money in a set of Pheon decals..whether to sand down and respray the bad areas or just to leave well alone. The camera did highlight things I didnt see and with the naked eye are difficult to pick out.

Keith
Mgunns
_VISITCOMMUNITY
Arizona, United States
Joined: December 12, 2008
KitMaker: 1,423 posts
AeroScale: 1,319 posts
Posted: Tuesday, February 15, 2011 - 03:29 AM UTC
Hi Keith:

I like your preshading on the underside. As to sand it all off? You will be loosing some of the detail, you could try to go around the decals and paint over the silvering. You have come this far, do you really want to go back to square one with paint again? I am of the 'it's good enough' frame of mind, and then try to better on the next one. You may also want to try the scotch pad method and just take the decals off, a little touch up and then you are ready to repaint and decal. I have the Pheon sheet, and it looks nice with a host of options. Good luck and keep us apprised of what you do.

Best
Mark
JackFlash
_VISITCOMMUNITY
Colorado, United States
Joined: January 25, 2004
KitMaker: 11,669 posts
AeroScale: 11,011 posts
Posted: Tuesday, February 15, 2011 - 04:27 AM UTC

Quoted Text

". . .At this point I'm wondering whether to invest some of my non-existant money in a set of Pheon decals..whether to sand down and respray the bad areas or just to leave well alone. The camera did highlight things I didnt see and with the naked eye are difficult to pick out. Keith"


Keith please let me offer some info.

First the silvering. We know that this is nothing more than trapped air. Go back with a sharp brass rod and scratch the slightly surface if the decal's clear edge. Then apply a small thin layer of liquid gloss. This should overlap the edge of the decal edge. Then when dry go back and add the dull coat uniformly over the area.

Next, In his book on the British fighter units (upto mid 1917) Alex Revell discusses the RNAS order to "tone down" the national markings - cockades by painting over the white portions with PC 10 or 12.
Kornbeef
_VISITCOMMUNITY
England - South East, United Kingdom
Joined: November 06, 2005
KitMaker: 1,667 posts
AeroScale: 1,551 posts
Posted: Tuesday, February 15, 2011 - 05:05 AM UTC
Mark, Stephen,

Thanks for the encouragement and thoughtful advice. Taking both ideas I decided to have a little try with the starboard side fueslage cockade. it isnt that well attached, in fact it could have been peeled off easily.
I was of a mind to prick the silvered area with a sharp scalpel and do as you suggested Stephen but thought I'd try trimming the excess off, all seemed to go reasonable, the decals lack of adhesio made it quite simple to carefully lift the excess off. Once I had it trimmed I brushed Kleer (future) around the edge, I'll let that rdy and examine later but it looks okay upto now.

On the surface issue its the tip of the wing, I may fill and sand and just retouch this area, maybe turn it into a field repair.

Funny though how you don't notice things till the camera points them out
thegirl
_VISITCOMMUNITY
Alberta, Canada
Joined: January 19, 2008
KitMaker: 6,743 posts
AeroScale: 6,151 posts
Posted: Wednesday, February 16, 2011 - 01:06 AM UTC
Nice to see you back on this once more . Turtle deck looks great under some paint ! I'm sure you will be able to find a solution to re-pair the upper wing .

Go Keith Go !
CaptainA
_VISITCOMMUNITY
Indiana, United States
Joined: May 14, 2007
KitMaker: 3,117 posts
AeroScale: 2,270 posts
Posted: Thursday, February 17, 2011 - 01:14 PM UTC
Didn't you say you had a second one of these kits? If you do, do the minimum work needed to get it finished, chalk this one up to experience, and enjoy the next one. If you don't have a second one, take a break to work on a WNW kit, and come back to it when you get bored and need a challenge.

I think many of us are aware of the quality issues over there. I won't say I will never get another one. But I will be more selective where my money goes. At $60- $70 a kit, I won't waste my money on something with no PE, bad decals, and poor quality control. I think we have been spoiled of late. I also have enough 32nd scale kits to last about 3-4 years at my current build rate.

Kornbeef
_VISITCOMMUNITY
England - South East, United Kingdom
Joined: November 06, 2005
KitMaker: 1,667 posts
AeroScale: 1,551 posts
Posted: Thursday, February 17, 2011 - 08:15 PM UTC
Hi Carl,

No I havent a second one, I said earlier I had planned possibly building a second as the RAF Museum one. That's unlikely now, like you say I'll seriously think twice about another new release from Roden. It seems their older kits are better, another Albi or more might find a home here or perhaps a Siemens.

The innaccuracies I can live, with but sadly the kit reeks of lack of Quality control, (pinholes, short shot, surface finish in many places) which I am sad to say suprised me. I just hope it's a one off, to my mind Roden should revisit the moulds and check their plastic quality and put right a few of the more blatant mistakes and possibly re-issue.

In comparison the Alb. D.II (Roden/Encore) is a wonderful kit, I'm not bashing Roden just rather disappointed with this release.

I've fixed the issues to a degree I think acceptable, a little work more on the nose panels to do and then its time to put the wings and tail on. For once I've pretty much left the engine till last.

Keith
CaptainA
_VISITCOMMUNITY
Indiana, United States
Joined: May 14, 2007
KitMaker: 3,117 posts
AeroScale: 2,270 posts
Posted: Friday, February 18, 2011 - 09:36 AM UTC
From what you have said, I think you should just do what you need to do to get it finished, in a quick and low aggravation manner. Then carefully display it in its place of honor. Then you can move on to the Roland with a clean conscience.

I hope Roden is reading these blogs. Roden produced a wonderful D.III, which is the kit that really got me back into modeling with passion. As such, Roden will hold a place in my heart with what I will remember as fantastic kits. My Tripe Hound and DH.2 will probably remain unbuilt and get placed in the Do Not Build Pile in my basement. I will carefully read reviews before I buy any of their new kits. If the reviews are good, I will get the kit, even if it is not a subject I want to build, because those subjects are often the most interesting. But this is not why you opened your wonderful build log. And I must say, you really did make this kit look good. Minor things dont attract my eye. Good work and passion for the hobby is what I think about when I critique a build. You certainly have shown both on this build.

I really am anxious to see you finish the Roland.
Mgunns
_VISITCOMMUNITY
Arizona, United States
Joined: December 12, 2008
KitMaker: 1,423 posts
AeroScale: 1,319 posts
Posted: Friday, February 18, 2011 - 02:45 PM UTC
Hi Keith:

I agree with Carl on this one thing Seriously, you have given this kit your heart and soul and time. As he said, finish it up, and give it a place of honor and move on. I have this and will build it. Like Carl, it was Roden's DR1 that got me back into this aspect of the hobby, your masterful preshading on your WNW SE5 challenged me to do same, so I look forward to you finishing this and being inspired by your work. Now isn't that a burden to carry?

Best

Mark
thegirl
_VISITCOMMUNITY
Alberta, Canada
Joined: January 19, 2008
KitMaker: 6,743 posts
AeroScale: 6,151 posts
Posted: Friday, February 18, 2011 - 03:14 PM UTC
I also agree with the guy's Keith . You have put a lot of heart into this build and she looks fabulous . Your attention to the details , you always go the extra mile to get them right . Don't let a few flaws in the kit hold you to the ground .

Lars and Des have show us what can be done with kit and you have taking it to the next level .

I read lots from guy's who say that the kit isun buildible and it sucks , waste of money etc, etc .....

No kit is a 100% , not even WNW . They have flaws and errors as well . I feel when we start to worry about them and pull our hair out it takes the fun away .


guitarlute101
_VISITCOMMUNITY
West Virginia, United States
Joined: December 18, 2006
KitMaker: 1,121 posts
AeroScale: 1,063 posts
Posted: Saturday, February 19, 2011 - 03:46 AM UTC


Hang in there buddy! You've come a long way not to finish it up.

If you are really not happy with the end result you can always use the built model for weathering practice or experimentaion and/or spare parts. I have a few builds that didn't turn out like I had wanted stored in shoeboxes I use for just that purpose.

Mark
Kornbeef
_VISITCOMMUNITY
England - South East, United Kingdom
Joined: November 06, 2005
KitMaker: 1,667 posts
AeroScale: 1,551 posts
Posted: Saturday, February 19, 2011 - 04:13 AM UTC
TY for the encouragement all.

Tis much appreciated and trust me I've no intention of slipping it into the *@
Kornbeef
_VISITCOMMUNITY
England - South East, United Kingdom
Joined: November 06, 2005
KitMaker: 1,667 posts
AeroScale: 1,551 posts
Posted: Sunday, March 27, 2011 - 11:10 AM UTC
been a long time but I have picked this up now and again, so a very few pics to prove it isnt in the bin. Just other more endearing projects have taken preference.


U/c basic painting done, wear and weathering to be done now before fitting and rigging.

Top and middle wings assembled as a unit, decals cut around repaired and generally resealed with Kleer. wood and bracketry all painted and about ripe for fitting...considering some prerigging first though.


the tail is fitted, had something of a frantic time and broke the unit, the snaps never came out at all well, light was beginning to fade. Anyway heres the upperwings dryfitted, as you see the cockade looks a lot better than it did before. Somewhat heartened now only the engine is stopping me progressing...duno why but I really don't want to do it...a nice resin replacement would be just dandy

Keith
Mgunns
_VISITCOMMUNITY
Arizona, United States
Joined: December 12, 2008
KitMaker: 1,423 posts
AeroScale: 1,319 posts
Posted: Monday, March 28, 2011 - 02:56 AM UTC
Hi Keith:

That is a familiar looking stump! I think it is coming along nicely. I know what you mean about not wanting to do it. You have come this far, it is a good looking effort, I am looking forward to seeing you finish it. I was going to get the resin fuselage from PHEON, but they are out, and Sabine wrote it would be about a month or so before replacements come in.

Best

Mark
thegirl
_VISITCOMMUNITY
Alberta, Canada
Joined: January 19, 2008
KitMaker: 6,743 posts
AeroScale: 6,151 posts
Posted: Monday, March 28, 2011 - 03:12 PM UTC
JackFlash
_VISITCOMMUNITY
Colorado, United States
Joined: January 25, 2004
KitMaker: 11,669 posts
AeroScale: 11,011 posts
Posted: Monday, March 28, 2011 - 07:37 PM UTC
Right on Keith. Model On!
RAGIII
_VISITCOMMUNITY
North Carolina, United States
Joined: June 19, 2007
KitMaker: 604 posts
AeroScale: 600 posts
Posted: Thursday, March 31, 2011 - 07:33 AM UTC
Keith,
Looks great! Keep tem coming!
RAGIII
OEFFAG_153
_VISITCOMMUNITY
Västra Götaland, Sweden
Joined: February 19, 2010
KitMaker: 1,473 posts
AeroScale: 1,450 posts
Posted: Thursday, March 31, 2011 - 08:25 AM UTC
Hi Keith

This is shaping up to a very handsome model indeed

Mikael
warreni
_VISITCOMMUNITY
South Australia, Australia
Joined: August 14, 2007
KitMaker: 5,926 posts
AeroScale: 2,201 posts
Posted: Saturday, July 02, 2011 - 09:52 PM UTC
Excellent work Keith. I see my Tripe is not the only one with bad surface finish. I too think the holes in the wings are caused by a mould that has not been cleaned up properly. Oh well, I will continue with mine but it is all OOB for me. Possible short fuselage and all.
I see it has been many months since an update. I hope you haven;t abandoned it at this late stage..
Cheers
Warren
thegirl
_VISITCOMMUNITY
Alberta, Canada
Joined: January 19, 2008
KitMaker: 6,743 posts
AeroScale: 6,151 posts
Posted: Sunday, July 03, 2011 - 09:59 AM UTC

Quoted Text

Excellent work Keith. I see my Tripe is not the only one with bad surface finish. I too think the holes in the wings are caused by a mould that has not been cleaned up properly. Oh well, I will continue with mine but it is all OOB for me. Possible short fuselage and all.
I see it has been many months since an update. I hope you haven;t abandoned it at this late stage..
Cheers
Warren


I agree with Warren , you have come so far with this project that it would be a shame to see you not finish her.
Kornbeef
_VISITCOMMUNITY
England - South East, United Kingdom
Joined: November 06, 2005
KitMaker: 1,667 posts
AeroScale: 1,551 posts
Posted: Sunday, July 03, 2011 - 12:14 PM UTC
Not abandoned no.... I just got a set of HGW seatbelts for her. the etch is good, not ecstatic about the webbing part though, still buried in the depths of the cockpit itll look fine I'm sure.

Just so many unfinished projects to tinker with, thats my problem.

lcarroll
_VISITCOMMUNITY
Alberta, Canada
Joined: July 26, 2010
KitMaker: 1,032 posts
AeroScale: 1,025 posts
Posted: Sunday, July 03, 2011 - 02:22 PM UTC

Quoted Text

Not abandoned no.... I just got a set of HGW seatbelts for her. the etch is good, not ecstatic about the webbing part though, still buried in the depths of the cockpit itll look fine I'm sure.

Just so many unfinished projects to tinker with, thats my problem.


Keith, If I may.....................it's not a problem; more so the mark of a true afictionado and perfection driven enthusiast. Just don't change your standards and particularly your approach to the hobby. Speaking if I may on behalf of many of us you are a "breath of fresh air".............PRESS!

Cheers and regards,
Lance
 _GOTOTOP