_GOTOBOTTOM
Early Aviation
Discuss World War I and the early years of aviation thru 1934.
Roden 1:32 Sopwith Tripe - Kb's
Kornbeef
_VISITCOMMUNITY
England - South East, United Kingdom
Joined: November 06, 2005
KitMaker: 1,667 posts
AeroScale: 1,551 posts
Posted: Friday, December 31, 2010 - 05:22 AM UTC
Well Santa came,

Kornbeef got naughty, set the Albatrossen and Fokkers on hold and dived in.

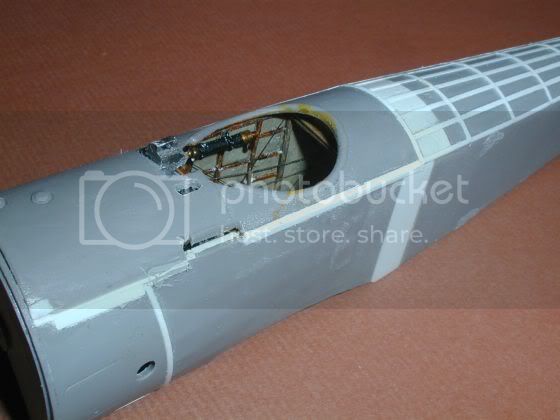
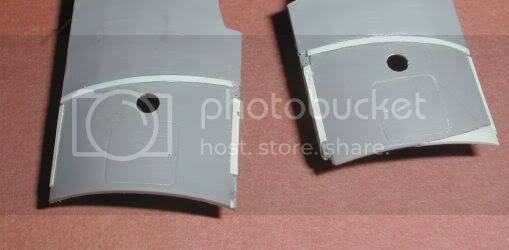
First impressions were good as I perused the sprues, sadly a few things came to light after. Sink marks and the finish on some of the parts leave a lot to be desired and one half of the fuselage wasnt fully moulded.

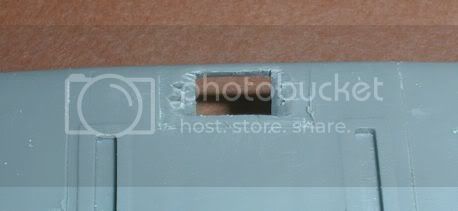
Heres my solution to that along with a little extra detailing (and smoothing of the cheeks panels) I also took out the two little hatches, I cant find a pic of a tripe with these anyway.


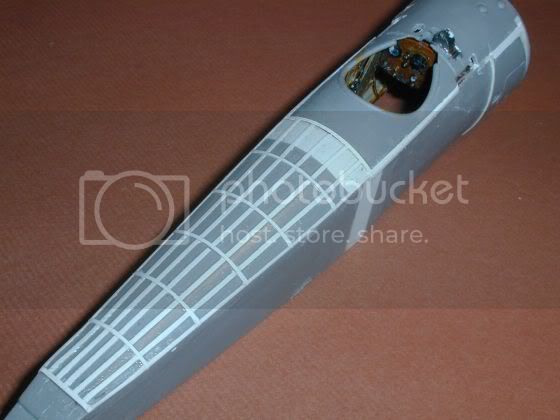
That said the parts are warp free, unlike both my WNW DVa's. Roden have done a reasonable job of subtle rib detailing and much of the kit looks correct. I'm sure many of the shortcomngs found by others are well enough documented. Pheon models produce a set of fuselage halfs which are longer, apparently the kit is based on the dims of the prototype and the production tripes were a tad longer. Anyway I couldnt afford the extra expense and set about the old way of modding...ie: splicing 6mm into the fuselage.

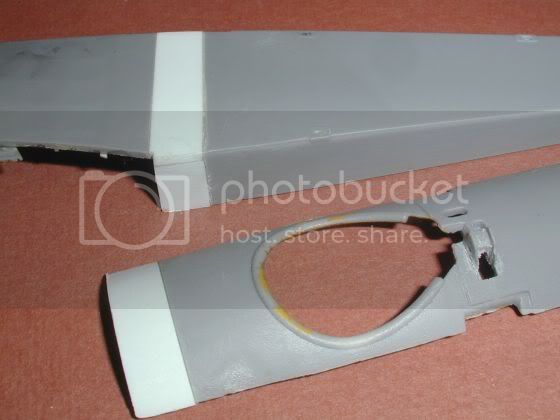
Once the lower wing/cockpit floor is in place I'll make good and reprofile the lower edge to blend it in better.

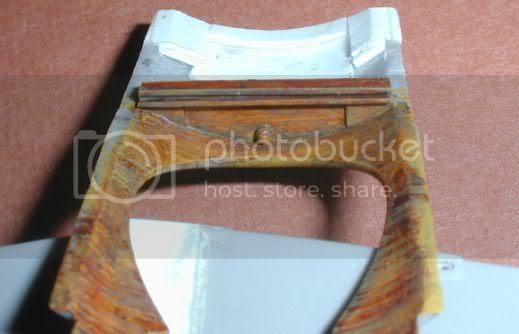
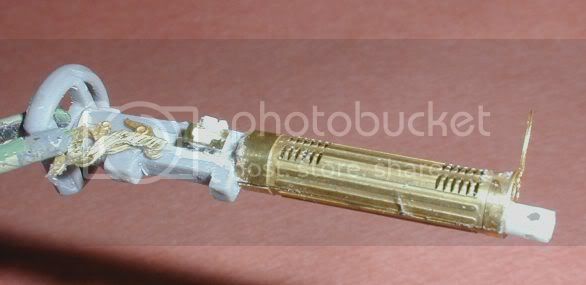
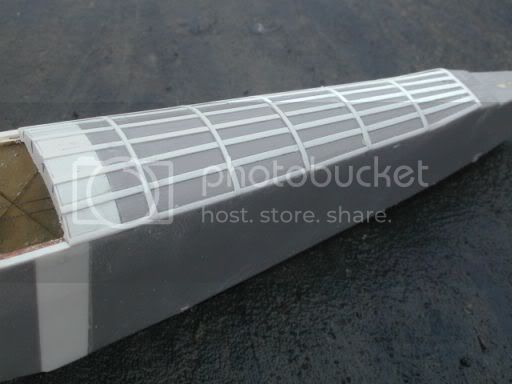
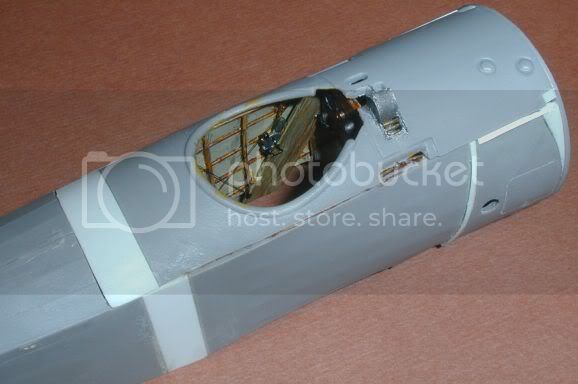
Here is the coaming with its spliced/botched extension, it will be tidied up once the fuselage is joined and I can work it into place of course. I added the cross member and small compartment door behind the pilot. I see it on a few pics of tripes and pups so toook it as a built in feature and not a mod.

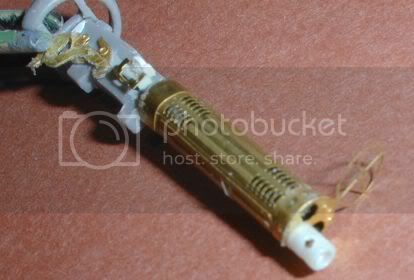
t Heres he cockpit interior still very WIP, I shaved off all the woodwork and rebuilt it out of strip, the fuselage interior seemed a little rough so for a few hours work and thankfully no bloodloss I did it....insane I know, but shaved off and reused the trimwheel too. I added a simple rendition of the bracing cables, I am going to thicken them where the turnbuckles are with PVA or such and added the tail adjusting cables.


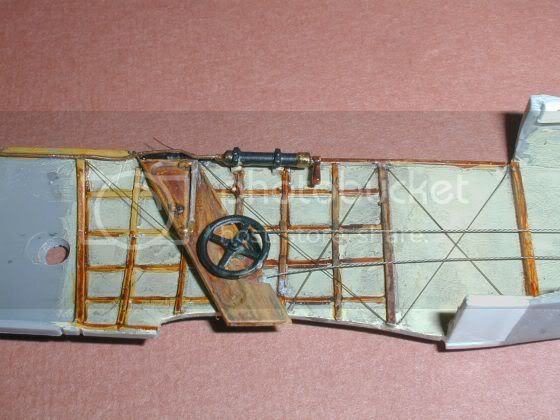
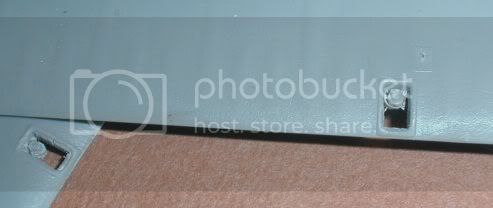
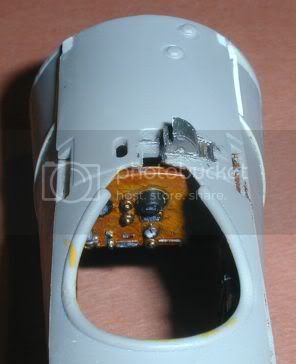
The cockpit floor, this is a *grey area* for me, following Jamo's build and what reference I have, to give my own representation...yes I dunno how I missed those 2 ejector pin marks either


Paint is:-
Citadel Bleached bone for linen
Citadel Bubonic Brown for wood base coat followed with their Fleshwash and drybrushed over with more Bub Brown.
Citadel Chaos Black and Shining gold for fittings.
All dirtied in with Tensochrom Smoke (lifecolor)
It may look rough but seems okay when peering through the top when dryfitted together.

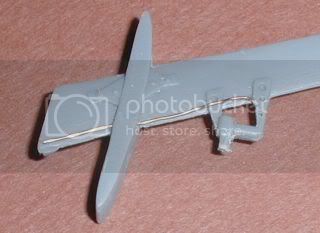
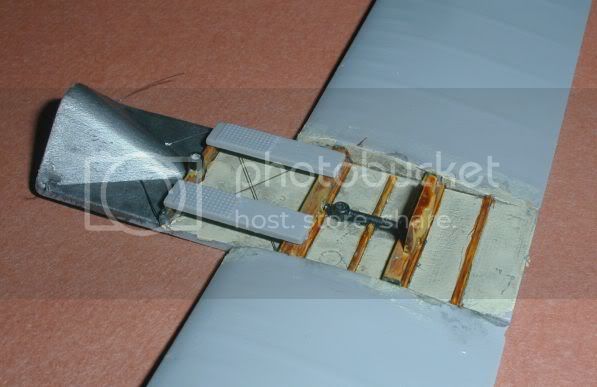
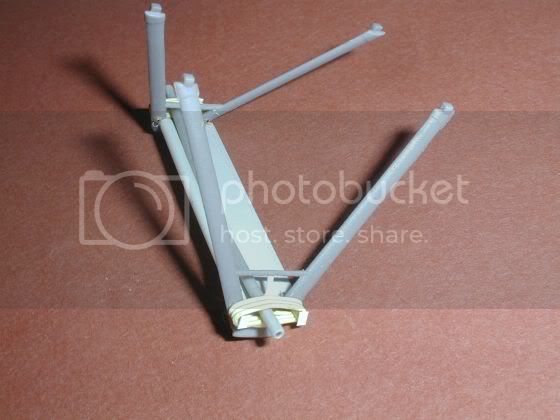
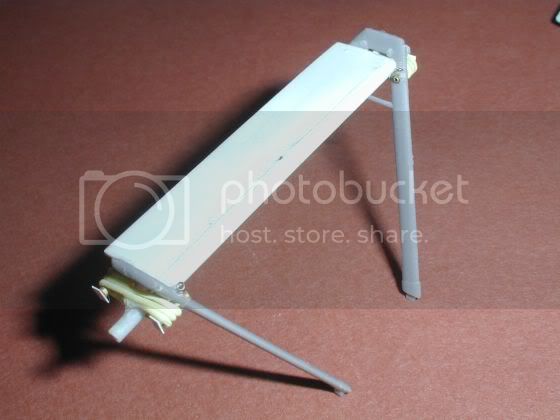
I wasnt happy at all with Roden's axles so salvaging what info I had set about improving the set up. Completely junking the axle I rebuilt it out of stock and rod. The axles themselves are steel wire inside plastic tubes, I added the bungee fitments out of 1mm brass tube (completely missing in the kit & the bungees shown upside down and attached to diddleysquat) and the bungees themselves out of PC datacable, finising off with retaining plates out of strip and fixed all the cable mounting points before final assembly


The wheel discs are awful..sorry I canot say better than that, the finish is so bad they would pass for basketweave. So I stole some from my Roden SE5a (I have a set of Mastercaster wheels which are the right size but the tyres are out of shape...sighs) Some how in the confusion I lost a kit wheel so am hoping it reappears as these thinfgs often do.

Thats all for now folks

Happy New Year to all
thegirl
_VISITCOMMUNITY
Alberta, Canada
Joined: January 19, 2008
KitMaker: 6,743 posts
AeroScale: 6,151 posts
Posted: Friday, December 31, 2010 - 10:31 AM UTC
Very nicely done so far Keith
guitarlute101
_VISITCOMMUNITY
West Virginia, United States
Joined: December 18, 2006
KitMaker: 1,121 posts
AeroScale: 1,063 posts
Posted: Friday, December 31, 2010 - 12:12 PM UTC
Very nice surgery, Keith. It will be nice to see this built up.

Mark
JackFlash
_VISITCOMMUNITY
Colorado, United States
Joined: January 25, 2004
KitMaker: 11,669 posts
AeroScale: 11,011 posts
Posted: Friday, December 31, 2010 - 06:03 PM UTC
Greetings Keith,

How will you deal with the spine and the relevant stations there?


Here are a couple of my Eduard 1:48 builds to illustrate.
Kornbeef
_VISITCOMMUNITY
England - South East, United Kingdom
Joined: November 06, 2005
KitMaker: 1,667 posts
AeroScale: 1,551 posts
Posted: Friday, December 31, 2010 - 09:40 PM UTC
Thanks all,

Stephen, I think I'll tackle the spine as I did the interior woodwork, well sort of.

Lengthwise the detail is reasonable, so once she is glued fast together I might try glueing strips across pressing them down tight then sanding back once dry, after that using milliput to put eh curve into the fabric between.
(Apologies if this is garbled...beer fuddled new year morning brain is functioning on standby power )
CaptainA
_VISITCOMMUNITY
Indiana, United States
Joined: May 14, 2007
KitMaker: 3,117 posts
AeroScale: 2,270 posts
Posted: Saturday, January 01, 2011 - 02:21 AM UTC
You are off to a great start. I have had one of these in my closet for a while now, and haven't even opened it yet as the stories of poor quality control have scared me off. I guess a good modeler like you has little trouble overcoming them.
Mgunns
_VISITCOMMUNITY
Arizona, United States
Joined: December 12, 2008
KitMaker: 1,423 posts
AeroScale: 1,319 posts
Posted: Saturday, January 01, 2011 - 03:29 AM UTC
Looks like you are making good progress on this kit. I too have read some of the "problems" with this kit, but I look forward to building it and will be referencing yours and other blogs here.

Best in the new year

Mark
OEFFAG_153
_VISITCOMMUNITY
Västra Götaland, Sweden
Joined: February 19, 2010
KitMaker: 1,473 posts
AeroScale: 1,450 posts
Posted: Saturday, January 01, 2011 - 07:02 AM UTC
Keith – a very nice start to this project – you seem to be on top of the issues with the kit, and your bungee treatment looks the business!

I have this one in my stash, having read about the length debate I've thoght about how to fix this – your solution seems a good one

Mikael
Kornbeef
_VISITCOMMUNITY
England - South East, United Kingdom
Joined: November 06, 2005
KitMaker: 1,667 posts
AeroScale: 1,551 posts
Posted: Saturday, January 01, 2011 - 07:40 AM UTC
Hiya,

Carl/Mark
Yes there is issues with some aspects, nonetheless Most of the fixes are not that extensive really with a little research. However there is an issue with the plastic on my kit and Jamo's build too.. the underside of the upperwing has quite a few tiny holes in it. finished surfaces in places rough but it doesnt mean it wont build into a nice kit, the fit of parts is pretty good though some location point need a little attention. Overall though it gives the impression the kit was rushed out and the final polish wasnt given to it.

Mikael
It seemed the simplest solution, easier to make than try to mod the kit part.

Well progress is rolling along, I have the fuselage halves together, working on the cockpit floor Dash, and upper coaming before fitting them over the next few days (I have to attempt istrument painting in the morning..really disappointed there was no decals at least. Also because I'm mad I'm opening up the cable inspection windows...seems theres two missing in the lower wings near the inner end as well?

Missing wheel is still missing...hohum.

K

Kornbeef
_VISITCOMMUNITY
England - South East, United Kingdom
Joined: November 06, 2005
KitMaker: 1,667 posts
AeroScale: 1,551 posts
Posted: Sunday, January 02, 2011 - 08:56 AM UTC
*First a question ... Seat belts? Single lap belt or shoulder straps too? and where do they mount? Any info purrrrrleeeze?

Got a little further, fuselage sides are together, the dash panel is in & the bottom side is sanded smooth and contoured to fit the lower wing/floor better *still will need blending once the lower wing/cockpit floor assy is fitted. The upper coaming is shown dry fitted, thers a few areas obviously thar will need some shaping to fit. I have to look at and assess the best way to show the upper deck ribbing once the upper panel is secured.


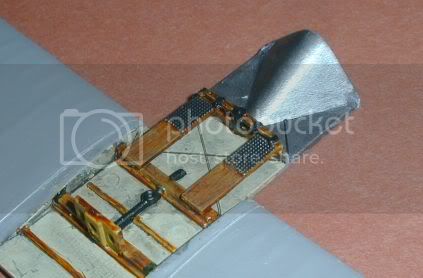
Got a little further here, foot boards & rudder bar is on, predrilled for the cables. gotto make the pulley assy and rig then I can close her up before the weekend..

Kore Kb insanity ensues...cable inspection windows. the plan to show cables and structure and skin the lower surface with the thinnest pcard I have, hoping the translucency shows through a thin coat of CDL. Now I see in a couple of pics there are 2 more insp windows on the lower wings, has anyone any idea of exact location for me?


My pathetic attempt at the bit Jamo excelled making. Pics seem to show a single not double upright on this, I chopped and drilled it and the mounts, added the line from copper wire and will use the prop from the P of P Camel set with a home made spinner *hopefully* The underside of the wing stub had quite substantial sinkage, out of sight but there *AMS*


Now P of P pillage I tried to make the Vickers a little more real..cut that huge block off the top of the breech and kind of made a more realistic attempt at the breech than Roden managed. I was going to leave the plastic jacket, even went as far as drilling it out to take the P of P face plate then noticed the louvres on the top were totally out of line with each other. The other brass cocking mechanism is P of P and Toms mixed up. The padded windsheild, basically thined the supports, I may try adding sheet metal supports between it and the block of the gun. A couple of handles to be made and a little tweak here and there before painting.


Thats all for now...comments n queries and hopefully answers to Po Box 1917
JackFlash
_VISITCOMMUNITY
Colorado, United States
Joined: January 25, 2004
KitMaker: 11,669 posts
AeroScale: 11,011 posts
Posted: Sunday, January 02, 2011 - 05:01 PM UTC

Quoted Text

Well Santa came, . . Sink marks and the finish on some of the parts leave a lot to be desired and one half of the fuselage wasnt fully moulded. . ."


Greetings Keith,
Are you saying that the fuselage was a short shot? Wow that is extrodinary. Sounds like the injection machine was running under low pressure. Have you told Roden about this?


Quoted Text

". . .Here's my solution to that along with a little extra detailing (and smoothing of the cheeks panels) I also took out the two little hatches, I cant find a pic of a tripe with these anyway. . ."


Are you talking about the two access panels found on the front of the fuselage side cowlings? They were on all production airframes. There were three types and they slightly varied in size. But generally they were quad sided and had rounded corners. Some examples listed below.

1. Some had twist snap fittings. These over lapped the carburetor intakes. N5468, N6301

2. There was the forward edge hinged types that had the single catch at the rear edge. N5429, N5459,

3. There was the upper edge hinged types that had the single latch at the lower bottom edge. N500 N504, N5386(Oakley not Sopwith built), N5420, N5430, N5482.

Of the Oakley airframes only N5912 survives at Hendon and originally it had oval access panels like the Sopwith Camel types.
Kornbeef
_VISITCOMMUNITY
England - South East, United Kingdom
Joined: November 06, 2005
KitMaker: 1,667 posts
AeroScale: 1,551 posts
Posted: Sunday, January 02, 2011 - 08:36 PM UTC
Stephen Hi,

No not the two cheek access panels but the two set further back on the fabric section directly below the gun breeches. I should have made it clearer which I meant.

Never the less thanks for the extra info on the access panels, I had wondered, especially about the surviving one you mentioned and its Camel like access panels.... Maybe a future project there.

Keith
guitarlute101
_VISITCOMMUNITY
West Virginia, United States
Joined: December 18, 2006
KitMaker: 1,121 posts
AeroScale: 1,063 posts
Posted: Sunday, January 02, 2011 - 08:43 PM UTC

Keith,

Coming along great. Love that Vickers!

Mark
Kornbeef
_VISITCOMMUNITY
England - South East, United Kingdom
Joined: November 06, 2005
KitMaker: 1,667 posts
AeroScale: 1,551 posts
Posted: Monday, January 03, 2011 - 04:37 AM UTC
Hi all again,

Thanks for the comments Mark, The P of P brass really sets it off well.

Stephen I missed half your questions in my early morning haze. No I never told Roden, It wasnt difficult to rectify and hardly seemed woth the worry about the short shot. Had it been somewhat harder to fix then yes I would have.

So today was spine work day, I realised as I started my plan to extend the coaming was wrong. While searching for images that showed the extra two inspection windows in the lower wing locations I found a CGI render from Rise of Flight that made alarm bells ring. So a little Cyano surgery later and I'd got things right...I hope

This of course meant all rodens spinework was out of place (rigging points too) so I sanded the whole spine down relaid the stringers out of strip and then filed slots in them and added the widthwise ones, images I have show these sit slightly higher than the stringers so when I sanded them down I made them slightly proud but tapered them out to the edges.

Next I shimmed, sanded and glued the coaming on, setting it all aside to dry while I cut the new wing inspection windows. Once it was set I realised I hadnt fitted the rear machinegun support "DOH!" Still I think it isnt difficult to spring into place...hopes... lol

Strips were added to show the overlapping panelwork, and the taping around the coaming panel(this has to be sanced wafer thin once its fully cured.)
I've opened up around the rigging points and panel edges and now its to be left to set overnight and will be sanded and the fabric between the stringers *milliputed* in tomorrow hopefully. This should be an easy task....should be...hmmm


TY for looking..I'm guessing a single lap belt as thats whats in the P of P Camel set

Keith
JackFlash
_VISITCOMMUNITY
Colorado, United States
Joined: January 25, 2004
KitMaker: 11,669 posts
AeroScale: 11,011 posts
Posted: Monday, January 03, 2011 - 08:47 AM UTC
Good work Keith. On the lap belts there were some certainly. But for the Sopwith built versions I think the shoulder harness' were also there. Certainly nothing like the Sutton Farm harness setups seen in the late war aircraft only. WNW Pup has a good take on these.
Kornbeef
_VISITCOMMUNITY
England - South East, United Kingdom
Joined: November 06, 2005
KitMaker: 1,667 posts
AeroScale: 1,551 posts
Posted: Monday, January 03, 2011 - 09:06 AM UTC
Lovely TY Stephen, I'll go peruse their pages now and try not to buy anything....yet
warreni
_VISITCOMMUNITY
South Australia, Australia
Joined: August 14, 2007
KitMaker: 5,926 posts
AeroScale: 2,201 posts
Posted: Monday, January 03, 2011 - 10:07 AM UTC
Good building here. BUt you shouldn't have to fix problems like short shots and bad surface finish.

I had not heard of the quality control problems before and will be inspecting my kit closely tonight. Any problems and I will whinge long and hard until their quality is improved... and my kit problems are fixed of course. For the price we pay for these kits we should have the right to expect good quality control.
CaptainA
_VISITCOMMUNITY
Indiana, United States
Joined: May 14, 2007
KitMaker: 3,117 posts
AeroScale: 2,270 posts
Posted: Monday, January 03, 2011 - 10:43 AM UTC
I opened mine and did a quick check. My kit appears to be crisply molded with no sink marks. But that was a just a quick check. I am a bit releaved, and anxious to build one of these guys.
thegirl
_VISITCOMMUNITY
Alberta, Canada
Joined: January 19, 2008
KitMaker: 6,743 posts
AeroScale: 6,151 posts
Posted: Monday, January 03, 2011 - 11:15 AM UTC
Very nice progress on her so far Keith !

Hope the putty task works out for you , you do like the hard way about things ......

Would it have been easier to re-skin the turtle deck with the detail of the stringers and forumers embosed on the sheet of the new part made of sheet stock . Like what I did on Eduards kit ( forgot to add the forumer detail on my )

JackFlash
_VISITCOMMUNITY
Colorado, United States
Joined: January 25, 2004
KitMaker: 11,669 posts
AeroScale: 11,011 posts
Posted: Monday, January 03, 2011 - 12:17 PM UTC
Keith, If you need images of that ammo access ports I have some. I can't post images from the Datafile. But the title page image on page 1 clearly shows this.
Kornbeef
_VISITCOMMUNITY
England - South East, United Kingdom
Joined: November 06, 2005
KitMaker: 1,667 posts
AeroScale: 1,551 posts
Posted: Monday, January 03, 2011 - 01:29 PM UTC

Quoted Text

Keith, If you need images of that ammo access ports I have some. I can't post images from the Datafile. But the title page image on page 1 clearly shows this.

Yes please Stephen, any image helps
Kornbeef
_VISITCOMMUNITY
England - South East, United Kingdom
Joined: November 06, 2005
KitMaker: 1,667 posts
AeroScale: 1,551 posts
Posted: Monday, January 03, 2011 - 01:36 PM UTC
Terri,

Come on now, when have you ever known me to take an easy option....*never thought of it either..Doh!* At least this one only ended up in a few more parts than it came in

Carl, the only major sinkage was beneath the cockpit floor and the prop (only one of the two) the sinkage under the middle wing stubs wouldnt be noticed unless you suffer E(extreme) AMS.
JackFlash
_VISITCOMMUNITY
Colorado, United States
Joined: January 25, 2004
KitMaker: 11,669 posts
AeroScale: 11,011 posts
Posted: Monday, January 03, 2011 - 02:41 PM UTC

Quoted Text


Quoted Text

Keith, If you need images of that ammo access ports I have some. I can't post images from the Datafile. But the title page image on page 1 clearly shows this.

Yes please Stephen, any image helps


Check your e-mail.
doppelganger
_VISITCOMMUNITY
Idaho, United States
Joined: March 09, 2010
KitMaker: 557 posts
AeroScale: 193 posts
Posted: Monday, January 03, 2011 - 03:05 PM UTC
were the 'bungee fitments' a type of rudementary suspension?
Kornbeef
_VISITCOMMUNITY
England - South East, United Kingdom
Joined: November 06, 2005
KitMaker: 1,667 posts
AeroScale: 1,551 posts
Posted: Monday, January 03, 2011 - 08:18 PM UTC
Stephen, thanks.. nice shot, of course this brings up another point for me to check, I based my cowling panelwork on N5912 from Sergeys excellent http://picasaweb.google.com/sergey.archakov/SopwitchTriplane#
A twin gun set up with the camelesque access panels, clearly different from this shot...laughs...nothing to serious though.

Dave, Yes they were in a way but more a shock absorbing attempt I think for landings.

 _GOTOTOP