KotS GB 2011 Albatros D.III Mtnflyer
Alberta, Canada
Joined: March 08, 2009
KitMaker: 394 posts
AeroScale: 360 posts
Posted: Monday, April 18, 2011 - 01:41 PM UTC
Thanks Terri. The cushion was painted Khaki Drab first, then washed with a leather color and then a black.
Bob, the seat is beginners luck that I'm quite happy with, but thanks for the compliment.
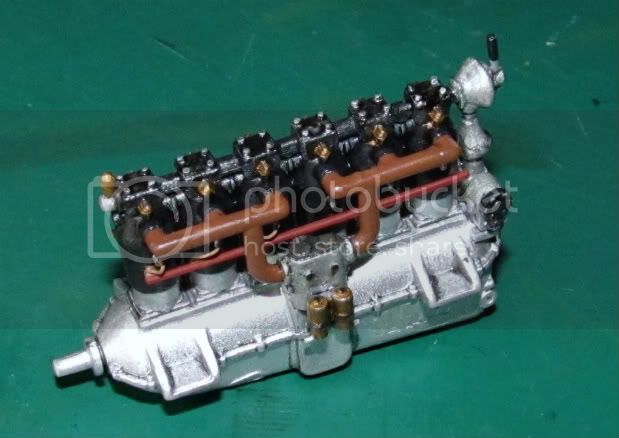
I finished the engine today; at least as far as I'm going to go. No wiring, as I don't believe it would be seen anyway. Obviously, I have to work on my pothole filling technique. The goofy looking air pump on top front was just a 15 min. addition. It surprises me that Roden failed to mold such a noticeable part to their kit. Its not on the D.III 1/32 engine kit either. Oh Well!
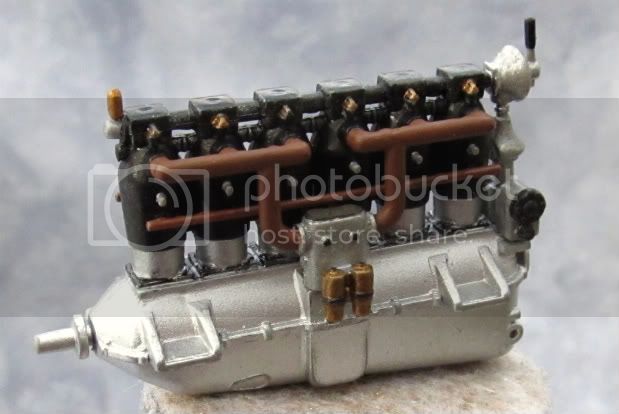
I'll be attending the fuselage interior next. I have to work on my wood making. Guy
Current Projects: 1/144 R5D-3 (MiniCraft)
1/48 Ford Flivver (Williams Bro.)
1/72 UC-64A Norseman (MatchBox)
MAAC No.51187
IPMS CANADA No. 3369
England - South East, United Kingdom
Joined: November 06, 2005
KitMaker: 1,667 posts
AeroScale: 1,551 posts
Posted: Monday, April 18, 2011 - 08:02 PM UTC
Hey that goofy looking airpump is one excellent aiming device.... well it is in Rise of Flight flight sim anyway

Yes Roden missed the air pump, that and a few other things with the (OAW) especially and indeed the DIII itself, still it builds quite out the box. Good if you're not afflicted like me and turn a 125 part kit into a 200 part kit as you go.
Looking very nice, and yes the only wiring you would see unless loking close is the first 3 spark plug leads each side. Easy to add
K
Still can't cure the AMS even with sausage finger implants & olde eyes.
Alberta, Canada
Joined: March 08, 2009
KitMaker: 394 posts
AeroScale: 360 posts
Posted: Tuesday, April 19, 2011 - 02:04 AM UTC
Quoted Text
and yes the only wiring you would see unless loking close is the first 3 spark plug leads each side. Easy to add K
Well then Keith, I suppose I'd better try and add a few wires. I'm trying to raise it up a notch on every project I start. Never played with wiring harnesses before.

Current Projects: 1/144 R5D-3 (MiniCraft)
1/48 Ford Flivver (Williams Bro.)
1/72 UC-64A Norseman (MatchBox)
MAAC No.51187
IPMS CANADA No. 3369
Arizona, United States
Joined: December 12, 2008
KitMaker: 1,423 posts
AeroScale: 1,319 posts
Posted: Tuesday, April 19, 2011 - 07:48 AM UTC

Hi Guy:
The seat really turned out nice, especially for beginners luck. I tried it once, and gave up. Might have to try it again. The engine looks good as well. Yes, the first three plug wires are somewhat visible. Easy enough to do.
Looking forward to more. I built this kit awhile back and really enjoyed it.
Best
Mark
We few, we happy few........
Alberta, Canada
Joined: March 08, 2009
KitMaker: 394 posts
AeroScale: 360 posts
Posted: Thursday, April 21, 2011 - 04:07 AM UTC
Thanks, Mark, for the words.
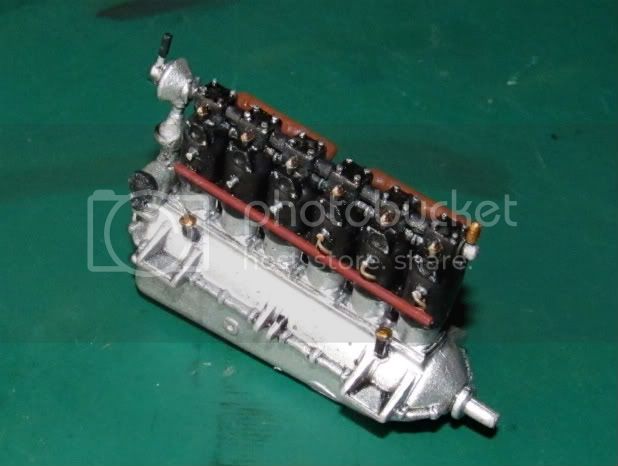
I decided to do a little more with the engine. So I added some wiring to the first 3 cylinders, cause I guess thats what will be seen. I'm also filling the potholes on top, and then a new paint job. Hopefully the paint will be better:
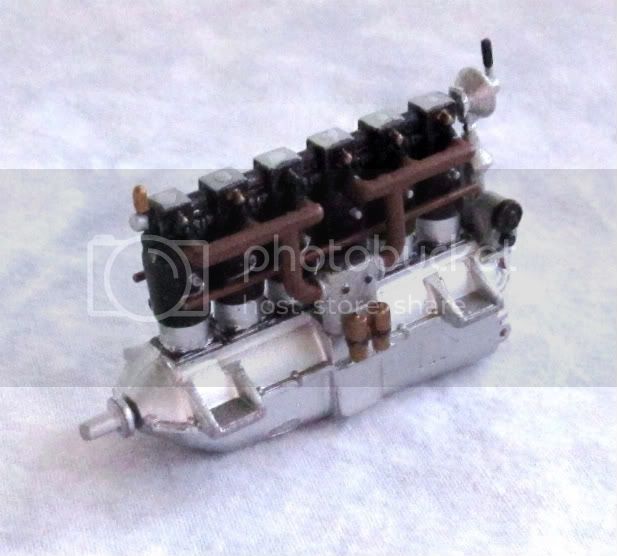
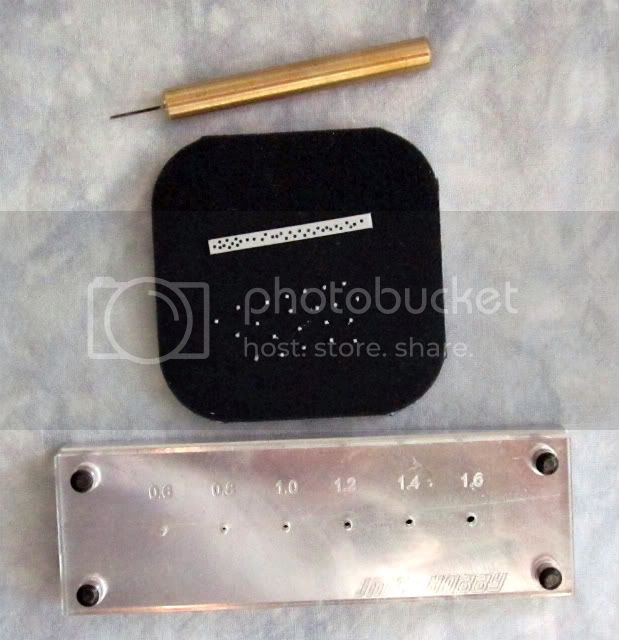
I'm also trying to punch out bolt heads to add to the rocker box tops. The little, tiny specks in the photo are supposed to be my bolt heads. But, I think they are too small for me to work with, and I'm likely looking failure in the face. Going to give it a crack anyway.
I won't be able to continue until later, so I thought I'd bore you with this small nonsense now. Guy
Current Projects: 1/144 R5D-3 (MiniCraft)
1/48 Ford Flivver (Williams Bro.)
1/72 UC-64A Norseman (MatchBox)
MAAC No.51187
IPMS CANADA No. 3369
Alberta, Canada
Joined: March 08, 2009
KitMaker: 394 posts
AeroScale: 360 posts
Posted: Thursday, April 21, 2011 - 10:51 AM UTC
Whoa! It is really tough to take good photos when things are small! Anyway, I've placed the bolt heads on top of the rocker arm covers. I'm really happy with the look, even if it is way out of scale:
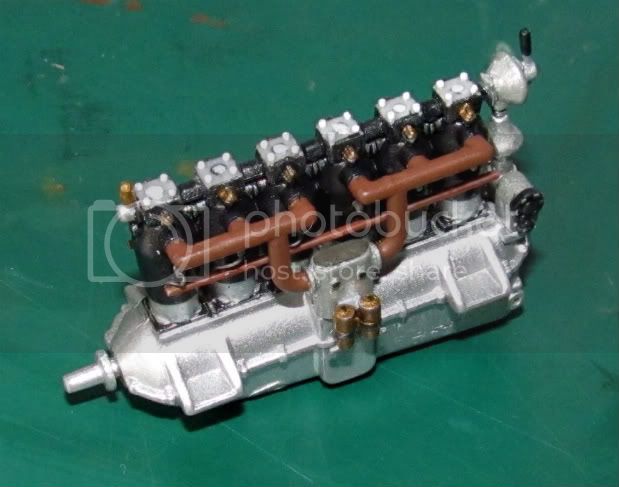
Now for paint.
Current Projects: 1/144 R5D-3 (MiniCraft)
1/48 Ford Flivver (Williams Bro.)
1/72 UC-64A Norseman (MatchBox)
MAAC No.51187
IPMS CANADA No. 3369
New Jersey, United States
Joined: June 02, 2006
KitMaker: 1,212 posts
AeroScale: 468 posts
Posted: Thursday, April 21, 2011 - 01:19 PM UTC
Once the rocker arms are paint and dry brushed they are going to look sweet. Scale scmale... I promise I won't pull out my calipers.

i have the Aber set and annealed the excepts for the fret. It take some of the gloss of the metal to give the paint a little something to grab onto... BUT... very thin and can melt very easily. I almost lost one of the barrels. Maybe go with a good prime coat instead.
Texas, United States
Joined: February 22, 2008
KitMaker: 5,026 posts
AeroScale: 2,811 posts
Posted: Thursday, April 21, 2011 - 03:53 PM UTC
Guy, would you post a photo of the right view of the engine it would help me for my build.
Bob
If it aint broke dont fix it.
Alberta, Canada
Joined: March 08, 2009
KitMaker: 394 posts
AeroScale: 360 posts
Posted: Thursday, April 21, 2011 - 04:10 PM UTC
Hi Bob. You bet, I'll post a photo of the other side on the morrow. I can't right away due to Easter long weekend, and the amount of liquid fuel in the vicinity, which I've consumed a tad.
Wingnut, your right. I've already blackened it and it does look sweet. Tomorrow I'll finish and post. Thanks.
Current Projects: 1/144 R5D-3 (MiniCraft)
1/48 Ford Flivver (Williams Bro.)
1/72 UC-64A Norseman (MatchBox)
MAAC No.51187
IPMS CANADA No. 3369
Texas, United States
Joined: February 22, 2008
KitMaker: 5,026 posts
AeroScale: 2,811 posts
Posted: Thursday, April 21, 2011 - 05:39 PM UTC
Guy, thanks in advance for the post I my self have been recruited to make home made bread sticks for the easter weekend and color eggs. Hopefully not with my airbrush

Bob
If it aint broke dont fix it.
Arizona, United States
Joined: December 12, 2008
KitMaker: 1,423 posts
AeroScale: 1,319 posts
Posted: Friday, April 22, 2011 - 04:05 AM UTC
I think the effort you are putting into this is noteworthy, scale notwithstanding. Really looks nice.
Best
Mark
We few, we happy few........
Alberta, Canada
Joined: July 26, 2010
KitMaker: 1,032 posts
AeroScale: 1,025 posts
Posted: Friday, April 22, 2011 - 05:37 AM UTC
Quoted Text
Hi Bob. You bet, I'll post a photo of the other side on the morrow. I can't right away due to Easter long weekend, and the amount of liquid fuel in the vicinity, which I've consumed a tad.
Wingnut, your right. I've already blackened it and it does look sweet. Tomorrow I'll finish and post. Thanks.
Guy,
As you know I'm building basically the same kit however the Early (Radiator in centre vs. off-set right position) I was reviewing your excellent Post as a "quality control/reality check" for my build.
Question on your earlier section on the engine:
The brass colored 'thing" on the front top that Steven identifies as an air pump, any photos I've got on the early version with the 160 HP engine don't show it thus I have not added it. Is your build, being a later DIII, powered by the 180 HP engine thus it has the pump or have I just got bad photos?
It's an easy fix if I need to add the pump however I'm confused at this point.
Nice work so far; I'll be lurking in the shadows and watching your progress with an eye to learning from it.
Cheers,
Lance
Officially Retired as of 20 August 2013 and looking forward to some un-interrupted bench time. Currently starting Roden's Nieuport 28 and hoping to follow that with another WNW Fokker DVII.
Alberta, Canada
Joined: March 08, 2009
KitMaker: 394 posts
AeroScale: 360 posts
Posted: Friday, April 22, 2011 - 07:01 AM UTC
Hi Lance
I'm the first to admit that I know nothing about the Mecedes D.III engine. Everything I'm doing here, I'm trying for the first time. The colors I've chosen and the nuts-n-bolts I'm adding are mean't to please my eye, and have no realationship with reality. I could'nt tell a 160 HP from a 180 HP if my life depended on it.
I have a photo of the airplane I'm modeling in a Windsock DataFile, and it clearly shows the air pump. My efforts to model it are strictly beginner, so please don't be fooled that I model reality. I'm trying to build a pleaseing airplane, not an exact replica.
Later today, when the women are back from church, I intend to post major, with alot of pictures. These are an offering of what little I have to give, and not a display of professionalism. There are far better modelers on these forums who really are experts.
Lance, I've been following your post, and you are doing a bang-up job. Outstanding effort. If you have any hard questions, I would ask someone who knows, like Mgunns, Terri, Kornbeef, or Stephen. I'm just a wisp in the wind.
Current Projects: 1/144 R5D-3 (MiniCraft)
1/48 Ford Flivver (Williams Bro.)
1/72 UC-64A Norseman (MatchBox)
MAAC No.51187
IPMS CANADA No. 3369
Texas, United States
Joined: February 22, 2008
KitMaker: 5,026 posts
AeroScale: 2,811 posts
Posted: Friday, April 22, 2011 - 07:08 AM UTC
Quoted Text
[
Guy,
As you know I'm building basically the same kit however the Early (Radiator in centre vs. off-set right position) I was reviewing your excellent Post as a "quality control/reality check" for my build.
Question on your earlier section on the engine:
The brass colored 'thing" on the front top that Steven identifies as an air pump, any photos I've got on the early version with the 160 HP engine don't show it thus I have not added it. Is your build, being a later DIII, powered by the 180 HP engine thus it has the pump or have I just got bad photos?
It's an easy fix if I need to add the pump however I'm confused at this point.
Nice work so far; I'll be lurking in the shadows and watching your progress with an eye to learning from it.
Cheers,
Lance
Lance I found these and wondered if they would help your research :
http://thevintageaviator.co.nz/projects/mercedes-engine/daimler-mercedes-d-iii-series-enginehttp://www.indysquadron.com/id21.htmlhttp://www.powerhousemuseum.com/collection/database/?irn=213316https://aeroscale.kitmaker.net/forums/86153&page=1Bob
If it aint broke dont fix it.
England - South East, United Kingdom
Joined: November 06, 2005
KitMaker: 1,667 posts
AeroScale: 1,551 posts
Posted: Friday, April 22, 2011 - 08:17 AM UTC
Bob, if you don't mind I'll jump in ref the air pump.
Yours should have one, earlier ones were thinner units easier to miss in pics but on occasion they were placed further back on the rocker assembly, so if your reference doesnt show it on the nose of the engine rocker assy, try looking towards the back of the engine. It does appear to be set after the last rocker assembly.
From what pics & reference I have I would say late (OAW) DIIIs have the 180 engine, the standard DIII;s the 160 with the thinner air pump (This part is supplied by WNW BTW on their engine sprue (I know your kits are Rodens though but a trip to WNWs website might glean a few pics of the parts) Rodens engine is a little of a mishmash of types, fine unless you want to accurise things of course.
OAW were producing the finest DIII (IMHO) still with the later engine when the Albatros parent company were moving on to the DV and went on to make DVa's later..
I'm sure stephen or someone equally well knowledged will shoot me down in flames though
Keith.
Still can't cure the AMS even with sausage finger implants & olde eyes.
Texas, United States
Joined: February 22, 2008
KitMaker: 5,026 posts
AeroScale: 2,811 posts
Posted: Friday, April 22, 2011 - 09:59 AM UTC
Keith, I bow to those with more knowlege than I

WW l was more of an after thought since I was mostly interested in WW ll. I have learned much since visting the threads here.
Bob
If it aint broke dont fix it.
Alberta, Canada
Joined: March 08, 2009
KitMaker: 394 posts
AeroScale: 360 posts
Posted: Friday, April 22, 2011 - 11:23 AM UTC
Keith, thankyou for your valuable input. Odd that I'm learning so much off my own thread, but I do so enjoy it.
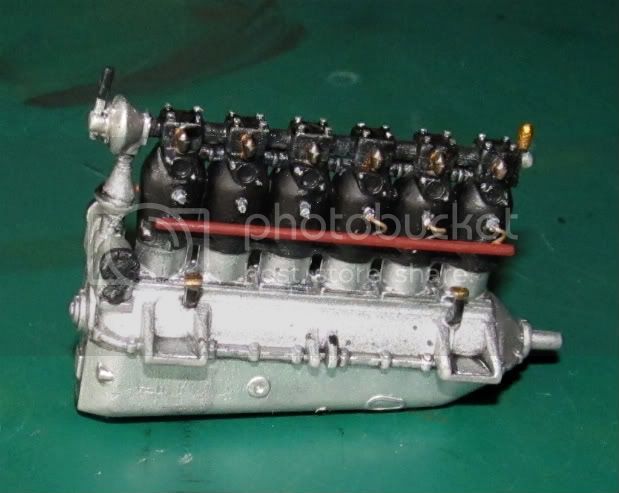
The engine is finally finished. Perhaps not realistic to the letter, but good enough for a hillbilly:
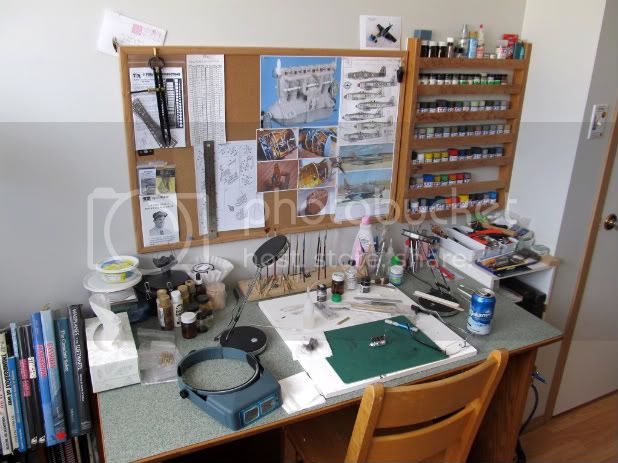
I also wanted to show you where this all happened. In my grown-up son's room. He moved out, taking the furniture with him. So I moved my desk in there. Now he wants back in. I'm thinking about it.
Guy
Current Projects: 1/144 R5D-3 (MiniCraft)
1/48 Ford Flivver (Williams Bro.)
1/72 UC-64A Norseman (MatchBox)
MAAC No.51187
IPMS CANADA No. 3369
Texas, United States
Joined: February 22, 2008
KitMaker: 5,026 posts
AeroScale: 2,811 posts
Posted: Friday, April 22, 2011 - 12:16 PM UTC
Guy, your engine photos are what I am using for my Fokker DVll build. Regarding your son, give only half of the room back at market rent.
Bob
If it aint broke dont fix it.
Alberta, Canada
Joined: July 26, 2010
KitMaker: 1,032 posts
AeroScale: 1,025 posts
Posted: Friday, April 22, 2011 - 12:45 PM UTC
Quoted Text
Hi Lance
I'm the first to admit that I know nothing about the Mecedes D.III engine. Everything I'm doing here, I'm trying for the first time. The colors I've chosen and the nuts-n-bolts I'm adding are mean't to please my eye, and have no realationship with reality. I could'nt tell a 160 HP from a 180 HP if my life depended on it.
I have a photo of the airplane I'm modeling in a Windsock DataFile, and it clearly shows the air pump. My efforts to model it are strictly beginner, so please don't be fooled that I model reality. I'm trying to build a pleaseing airplane, not an exact replica.
Later today, when the women are back from church, I intend to post major, with alot of pictures. These are an offering of what little I have to give, and not a display of professionalism. There are far better modelers on these forums who really are experts.
Lance, I've been following your post, and you are doing a bang-up job. Outstanding effort. If you have any hard questions, I would ask someone who knows, like Mgunns, Terri, Kornbeef, or Stephen. I'm just a wisp in the wind.
Guy,
Thanks for the nice words. From following your build methinks you sell yourself very short. If you are a wisp in the wind talent-wise then some phantom built that engine. My compliments right back to you. By the way, on the Son thing, keep your Son's room as is; once out the door my rule was "back on my terms only". I spent years modeling on and off on the kitchen table, in the laundry room, in a nasty basement and, like you I suspect, now it's my turn. I'll post a photo or two of my "cave" at the end of my build as well. As for consulting with Mark, Terri, Steven, and Keith I sure do both on and off the Post to various degrees. In a word, tremendous. That's why I enjoy this site so much, good people who trip over one another to help!
Keith, Bob et al,
As before thanks for the great info, I'll be on it shortly. I'll go back and study those Ref. Photos to start and will hit your links.
Cheers,
Lance
Officially Retired as of 20 August 2013 and looking forward to some un-interrupted bench time. Currently starting Roden's Nieuport 28 and hoping to follow that with another WNW Fokker DVII.
Alberta, Canada
Joined: March 08, 2009
KitMaker: 394 posts
AeroScale: 360 posts
Posted: Friday, April 22, 2011 - 12:46 PM UTC
Bob, I hope your D.VII turns out shining. Its all actually fairly easy when you think about it. Here I am showing you all the things not to do. It removes that much from the equation. Here's an example;
My pathetic attempt at wood-working. This after Terri and others have made so much effort bringing forth tutorials on how it should be done:
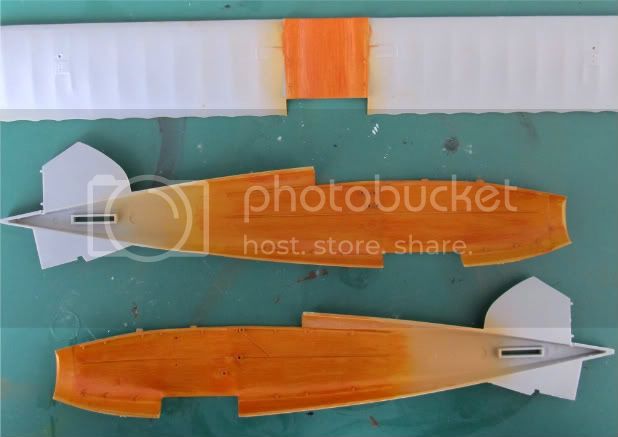
It's way to orange, and way to hard to see the grain. I'm very unhappy with it. Good thing its going to be on the inside.
I'm going to spend more time researching technique before I screw-up the exterior.
This mess was done with Tamiya XF-59 as a base, and cheap WallyWorld oils to mutilate the grain. I really am ashamed, and promise I won't do it again.
Guy
Current Projects: 1/144 R5D-3 (MiniCraft)
1/48 Ford Flivver (Williams Bro.)
1/72 UC-64A Norseman (MatchBox)
MAAC No.51187
IPMS CANADA No. 3369
Alberta, Canada
Joined: July 26, 2010
KitMaker: 1,032 posts
AeroScale: 1,025 posts
Posted: Saturday, April 23, 2011 - 03:17 AM UTC
Guy,
If you are unhappy with the grain can you remove just the oils and start again on the base coat? I read an article years ago about stripping paint off of old models being restored. Even totally dried and cured paints years old can apparently be stripped nicely with no damage to the plastic using plain old oven cleaner such as "Easy Off" and I believe the author stated the gel water rinsable version worked best. I havn't tried it myself however the article was, as I recall, in Scale Aircraft Modeler so it's probably a reputable source.
Failing that refill the Kokanee Can on your desk photo and reflect on the fact that we've all been there and done that; no doubt all worse then where you're presently at. Speaking for myself I could have you all rolling on the floor with some of my gaffs....trick is to keep on modelling or, as they say, "don't worry, be happy"
Going public with your errors is in the spirit of our little community, share the good (and the bad!) so we all can continue to learn and improve.
Cheers!! (as he tips the cold can to his quivering lips)
Lance
Officially Retired as of 20 August 2013 and looking forward to some un-interrupted bench time. Currently starting Roden's Nieuport 28 and hoping to follow that with another WNW Fokker DVII.
North Carolina, United States
Joined: June 19, 2007
KitMaker: 604 posts
AeroScale: 600 posts
Posted: Monday, April 25, 2011 - 10:45 AM UTC
First let me say that I think you are being a bit harsh on yourself! Perhaps a bit dark but the grain is clearly visible to me. I am on of those who prefer a more subtle implied grain anyway

That being said, Stripping oils is a pretty easy process. Try a little Testors airbrush thinner on a rag. If that fails brake fluid will take away all offending paint. I have used both methods many times on the same model when I was not satisfied with my wood grain or Fokker Streaking

Remeber to have fun,
RAGIII
New Jersey, United States
Joined: June 02, 2006
KitMaker: 1,212 posts
AeroScale: 468 posts
Posted: Wednesday, April 27, 2011 - 01:58 AM UTC
I agree with Rick, take it easy on yourself. Looks like wood to me too. All looking very Nice.
Alberta, Canada
Joined: March 08, 2009
KitMaker: 394 posts
AeroScale: 360 posts
Posted: Sunday, May 01, 2011 - 05:59 AM UTC
Actually guys, I don't think I'm being hard on myself. All around, I'm very happy; I've made major advancements in my personal modeling ability with this build. I probably would not have been compelled to do so, if not for the acute modeling hints set out on this forum. Thankyou all.
I'm working on the guns:
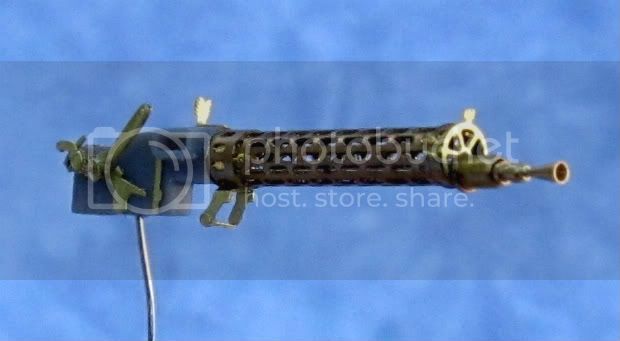
I'm using the Aber Spandau kit. Trying to take my time and do a good job, although the shear small size of the parts and the fragility has beat me up pretty good. I started out knowing so little about PE, and then learned the hard way as I went along.
I'm certain that some of the broken pieces and missing parts have launched their way beyond the ozone layer, as they are nowhere to be found. PE has a mind of its own; it magnetizes, flicks away, disappears, and generally frustrates me.
Some more photos:

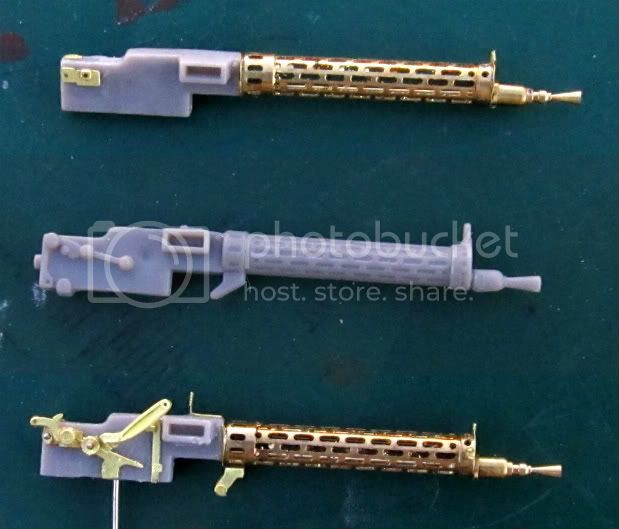
As you can see in the comparison photo, I'm still working on the 2nd gun. Its a worse job than the first one. I made mistakes. Some of the PE were just to small for my present capability, and were unused.
Guy
Current Projects: 1/144 R5D-3 (MiniCraft)
1/48 Ford Flivver (Williams Bro.)
1/72 UC-64A Norseman (MatchBox)
MAAC No.51187
IPMS CANADA No. 3369
England - South East, United Kingdom
Joined: November 06, 2005
KitMaker: 1,667 posts
AeroScale: 1,551 posts
Posted: Sunday, May 01, 2011 - 07:07 AM UTC
Guy, Yes I totally agree, PE is evil but wonderful stuff. Nice work though, good to see the Aber set used in all its glory and shows why its that bit more expensive than the Master product. You get all the breech detailing stuff.
If you don't mind a bit of advice, use your best Maxim on the right side, the cocking mechanisms are more visible on that side of the build.
One thing though, even WNW got wrong, Albatros Maxim's dont use the long cocking handle, they employ a slightly different mechanism. It's a minor thing though all in all.
I can't wait to see your progress on the rest of the build either. Keep us posted

Keith
Still can't cure the AMS even with sausage finger implants & olde eyes.


