

Early Aviation
Discuss World War I and the early years of aviation thru 1934.
Discuss World War I and the early years of aviation thru 1934.
Hosted by Jim Starkweather
KotS GB 2011 Hansa B. W.29 OEFFAG_153

JackFlash

Joined: January 25, 2004
KitMaker: 11,669 posts
AeroScale: 11,011 posts
Posted: Thursday, March 24, 2011 - 10:02 PM UTC
Now that is prime. Mikael you are on your way to a great finish.

OEFFAG_153

Joined: February 19, 2010
KitMaker: 1,473 posts
AeroScale: 1,450 posts

Posted: Sunday, March 27, 2011 - 09:17 PM UTC
 Hi All sorry for the late replies I've been away on holiday (in Rome, Italy
  )
)Thank You so very much for your kind comments and votes of confidence they really mean a lot I've had a bit of a hard time to get into a flow into this build but I'm hoping this will change now, with more buildingtime ahead

Terri the trolley was done by first spraying light grey, with some darker splashes here and there (exposed wood does turn grey pretty fast) This was then painted with washes of burnt umber and black, with some indian red to get rust at the details...)
Mark Thank You the fuel tank was supposed to be painted dark grey, but I opted for an unpainted one, I always like to show different surfaces and textures in the cockpit to ad interest (though it may not always be absolutely correct)

Thank You all again, and best regards
Mikael

thegirl

Joined: January 19, 2008
KitMaker: 6,743 posts
AeroScale: 6,151 posts
Posted: Monday, March 28, 2011 - 01:16 AM UTC
Thanks Mikael !
Hope that you had an excellent holiday !
Hope that you had an excellent holiday !
OEFFAG_153
Joined: February 19, 2010
KitMaker: 1,473 posts
AeroScale: 1,450 posts
Posted: Wednesday, March 30, 2011 - 02:44 AM UTC
Quoted Text
Thanks Mikael !
Hope that you had an excellent holiday !
The holiday was most excellent Thank You Terri
Rome is a very nice and interesting place and the food is fantastic 
Mikael
OEFFAG_153
Joined: February 19, 2010
KitMaker: 1,473 posts
AeroScale: 1,450 posts
Posted: Wednesday, March 30, 2011 - 02:53 AM UTC
Ooops Apparently I got a bit carried away last night while doing some building, I decided to also have a look over at WNW Inspired by some of the other builds here at the GB I thoght I'd oogle a bit at some possible future buys...
Not sure what really happened, but this morning I had a confirmed shipmment mail in my inbox for the Roland, The Ninak and The Gotha
Oh well all I have to figure out now is how to get them into the house without too much fuss, and where the heck to put them once built (and when to have the time to build them)
Mikael
dmopath
Joined: July 02, 2010
KitMaker: 175 posts
AeroScale: 174 posts
Posted: Wednesday, March 30, 2011 - 06:55 AM UTC
Hi Mikael
At my house, item one on your list is always the most difficult to overcome. I start by promising never to buy another kit ever again (which always generates a large laugh ) then by completing unfinished household chores for the next few months.
At my house, item one on your list is always the most difficult to overcome. I start by promising never to buy another kit ever again (which always generates a large laugh
) then by completing unfinished household chores for the next few months.JackFlash
Joined: January 25, 2004
KitMaker: 11,669 posts
AeroScale: 11,011 posts
Posted: Wednesday, March 30, 2011 - 07:50 AM UTC
Quoted Text
Ooops Apparently I got a bit carried away last night while doing some building, I decided to also have a look over at WNW Inspired by some of the other builds here at the GB I thoght I'd oogle a bit at some possible future buys...
Not sure what really happened, but this morning I had a confirmed shipmment mail in my inbox for the Roland, The Ninak and The Gotha
Oh well all I have to figure out now is how to get them into the house without too much fuss, and where the heck to put them once built (and when to have the time to build them)
Mikael
To coin a phrase that notes the invetability of occurances manifesting into the fabric of our lives. "Kits happen".

OEFFAG_153
Joined: February 19, 2010
KitMaker: 1,473 posts
AeroScale: 1,450 posts
Posted: Wednesday, March 30, 2011 - 09:15 AM UTC
Quoted Text
To coin a phrase that notes the invetability of occurances manifesting into the fabric of our lives. "Kits happen".

edoardo

Joined: November 30, 2007
KitMaker: 642 posts
AeroScale: 382 posts
Posted: Wednesday, March 30, 2011 - 05:54 PM UTC
"kits heppen!"... how true!

Mgunns
Joined: December 12, 2008
KitMaker: 1,423 posts
AeroScale: 1,319 posts

Posted: Thursday, March 31, 2011 - 01:16 AM UTC
Quoted Text
Ooops Apparently I got a bit carried away last night / Not sure what really happened, but this morning I had a confirmed shipmment mail in my inbox for the Roland, The Ninak and The Gotha
To coin a phrase that notes the invetability of occurances manifesting into the fabric of our lives. "Kits happen".
It's amazing how that happens. Did WNW know you wanted those and without no action on your part place the order? If so... that's customer service!
And Stephen couldn't have wrote it better: "Kits Happen". I remind my bride of that when they magically appear on the shelf.
Good Luck with all that
Mark

vulkanizer

Joined: December 26, 2009
KitMaker: 144 posts
AeroScale: 109 posts

Posted: Thursday, March 31, 2011 - 10:30 AM UTC
Quoted Text
Quoted Text Not sure what really happened, but this morning I had a confirmed shipmment mail in my inbox for the Roland, The Ninak and The Gotha
"Kits happen".
legendary, I have to write this down
OEFFAG_153
Joined: February 19, 2010
KitMaker: 1,473 posts
AeroScale: 1,450 posts
Posted: Friday, April 08, 2011 - 06:57 AM UTC
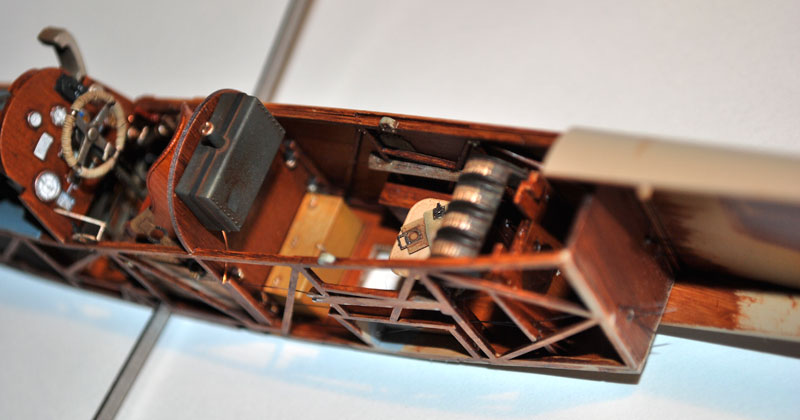
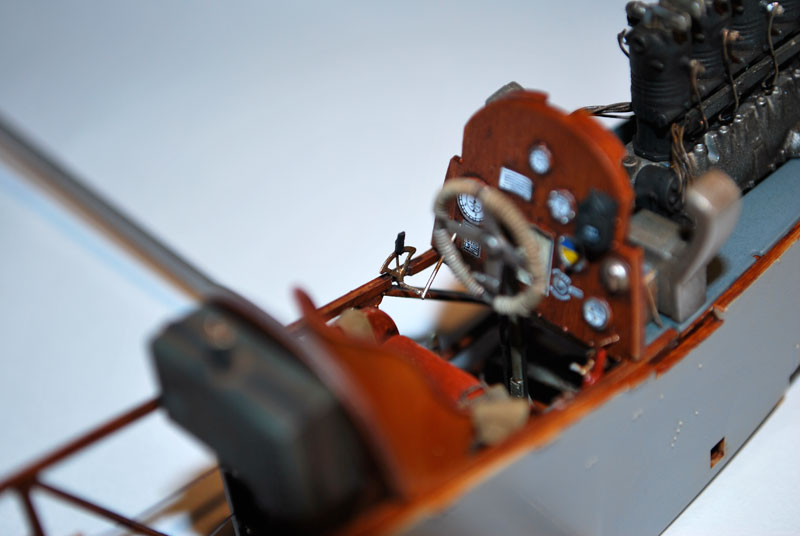
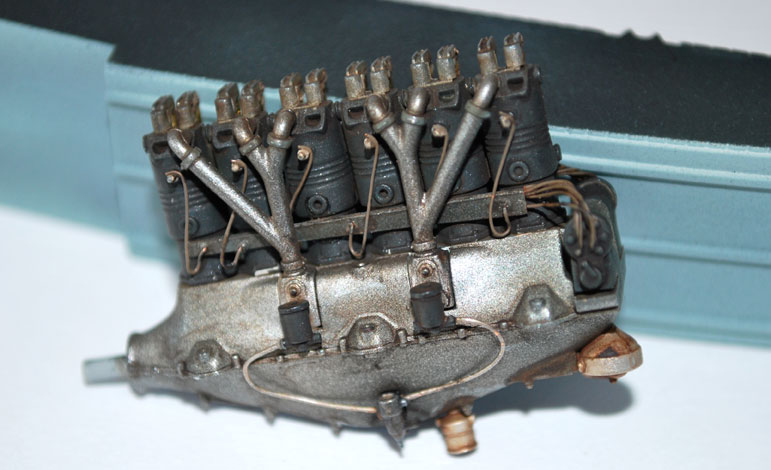
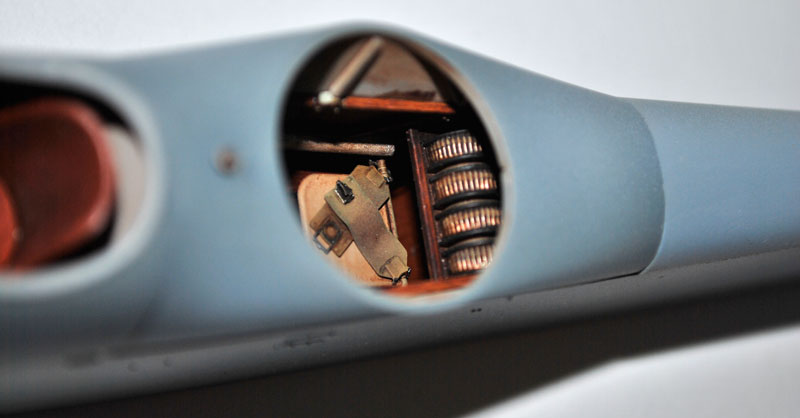
Hi All,Time for another update. This time progress has been a bit faster though I'm still struggling a bit to get into the build properly. Everything has fitted well togetherand WNW does make things pretty easy. A very enjoyable experience so far. I've added a few bits and pieces to make things look a bit more busy mostly fulelines not much of it will be noticable once I'm done though.
Interior is just about finished, and the engine is almost done too wou'nt be long before the fuselage is together...
To make things a bit simpler I tried threading the control lines prior to putting the side on, tensioning them after the side was glued. Worked quite OK.
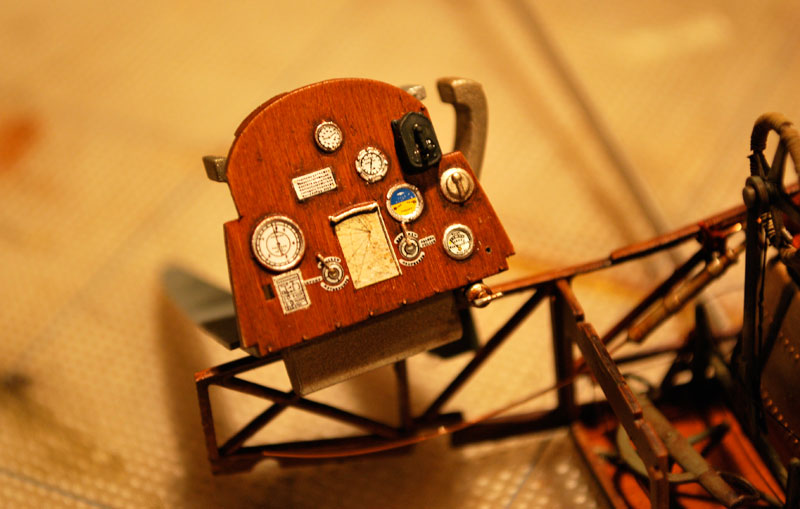
WNW really make it easy for you to do the instruments. After letting the oil dry, I simply painted the rims of the beezels, and applied the decals using a bit of Micro set to make them stick better finished the whole thing in less than an hour.
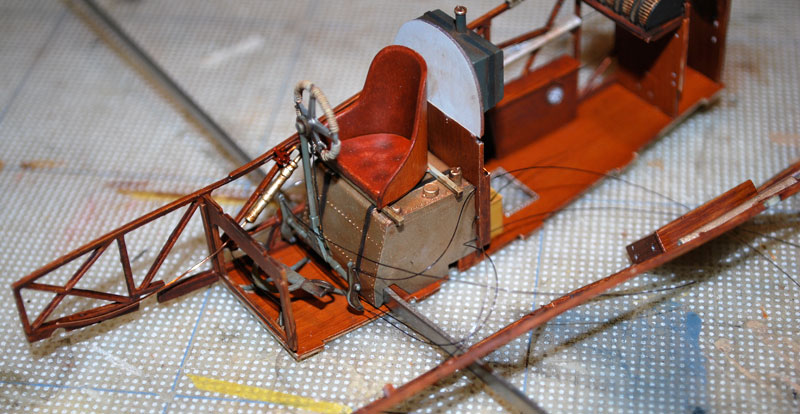
Interior asembly in place in one of the fuselage halfs. It fitted quite well, and I made things easier by sanding the edges a bit on the internal structure.
Barely visible the added fuel lines are behind the switch.
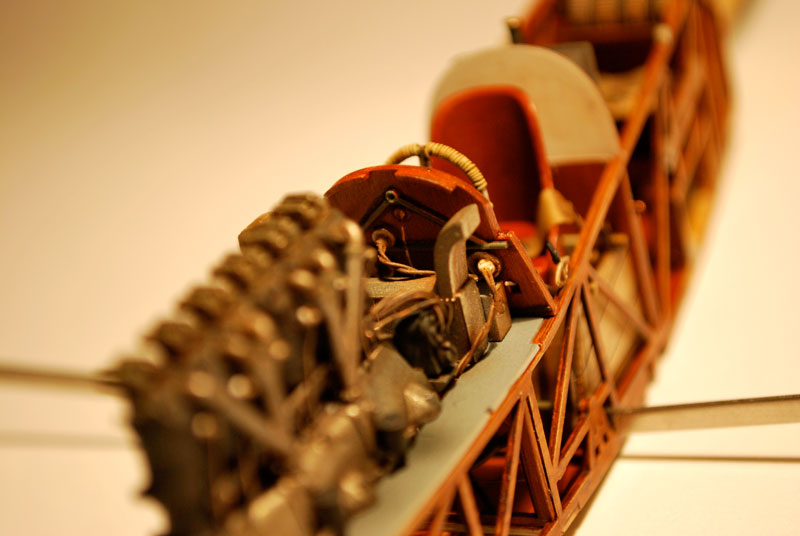
I exchanged the throttle for a brass A/M one out of the sparebox partly because I wanted to, and partly because I lost the kit one to the carpet monster
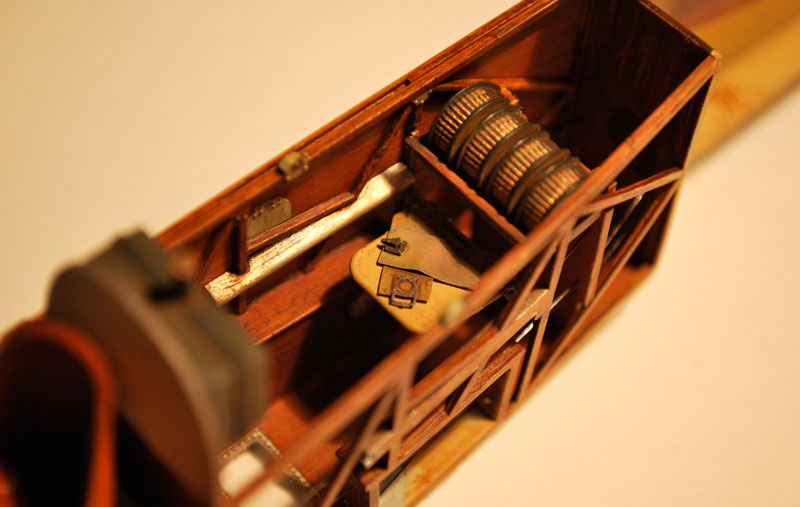
Observers office with the foldable seat and harness. The PE in this kit is a lot better than the previous ones. Thinner, and more manageble.
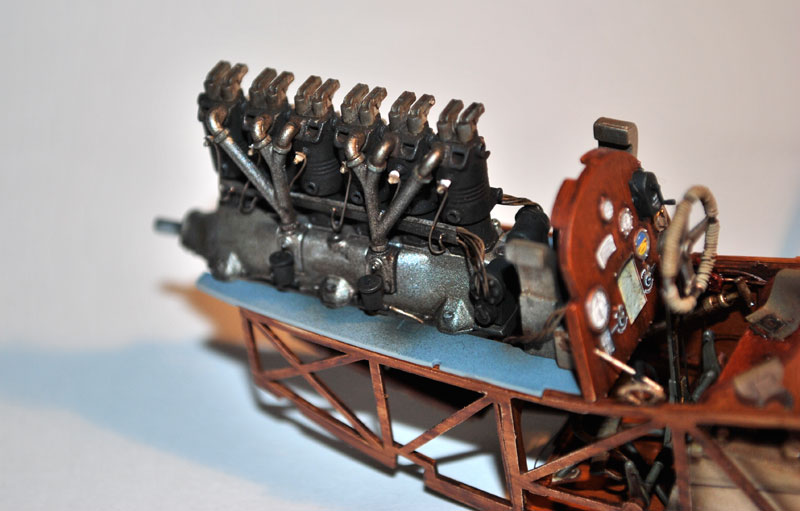
Engines only dryfitted here still some more details and painting to be done before it'll be glued into place. I've added spark leads, and the channel where they run (wonder why WNW has'nt included this, as it is such a noticable item on the engine?)
I really can't get over how small the engine looks for such a large plane. Compared with the LVGs engine, it looks a bit like the tiny kid brother.
There you go picking up momentum, next time it'll be a closed up fuselage getting painted I think.
Thank You for looking, any and all comments or suggestions are as usual most welcome
Best Regards
Mikael

RAGIII
Joined: June 19, 2007
KitMaker: 604 posts
AeroScale: 600 posts
Posted: Friday, April 08, 2011 - 02:41 PM UTC
That Instrument panel is incredible! The rest is just better than the Instrument Panel! Keep Posting, I really like this build!
RAGIII
RAGIII
OEFFAG_153
Joined: February 19, 2010
KitMaker: 1,473 posts
AeroScale: 1,450 posts
Posted: Saturday, April 09, 2011 - 11:45 PM UTC
Quoted Text
That Instrument panel is incredible! The rest is just better than the Instrument Panel! Keep Posting, I really like this build!
RAGIII
Thank You so very much RAGII for your kind comments they mean a lot to me
Mikael
dmopath
Joined: July 02, 2010
KitMaker: 175 posts
AeroScale: 174 posts
Posted: Sunday, April 10, 2011 - 07:10 AM UTC
Your work is stunning!
I am encouraged by your use of Microset with no problems. I will now use it judiciously as my build slowly continues.
I am encouraged by your use of Microset with no problems. I will now use it judiciously as my build slowly continues.
OEFFAG_153
Joined: February 19, 2010
KitMaker: 1,473 posts
AeroScale: 1,450 posts
Posted: Sunday, April 10, 2011 - 08:04 PM UTC
HI Dennis,
Thank You so very much
Regarding the Micro Set, I've only used it in small amounts, so be careful to start with. I've also done a bit of Micro Sol, and this also works in very small doses. A bit too much, and the decal is fried... Good luck
Mikael
Thank You so very much
Regarding the Micro Set, I've only used it in small amounts, so be careful to start with. I've also done a bit of Micro Sol, and this also works in very small doses. A bit too much, and the decal is fried... Good luck
Mikael
vulkanizer
Joined: December 26, 2009
KitMaker: 144 posts
AeroScale: 109 posts
Posted: Monday, April 11, 2011 - 01:41 AM UTC
Perfect. I took a cup of coffee, a cigarette and watching those work . Pure pleasure
Mgunns
Joined: December 12, 2008
KitMaker: 1,423 posts
AeroScale: 1,319 posts
Posted: Monday, April 11, 2011 - 02:12 AM UTC
Hi MIkael:Your HB29 is coming along nicely. I echo the sentiments on the engine, it looks real good. Looking forward to more.
Best
Mark
thegirl
Joined: January 19, 2008
KitMaker: 6,743 posts
AeroScale: 6,151 posts
Posted: Monday, April 11, 2011 - 11:41 AM UTC
Very , very nice !
OEFFAG_153
Joined: February 19, 2010
KitMaker: 1,473 posts
AeroScale: 1,450 posts
Posted: Monday, April 11, 2011 - 11:06 PM UTC
Dani very glad you're enjoying my build Thank You so much for you kind compliment
Mark Many thanks for your kind comments
Terri Thank You so very much
Best Regards
Mikael
Mark Many thanks for your kind comments
Terri Thank You so very much
Best Regards
Mikael
OEFFAG_153
Joined: February 19, 2010
KitMaker: 1,473 posts
AeroScale: 1,450 posts
Posted: Friday, April 22, 2011 - 08:29 AM UTC
Hi Everybody, and a happy easter to all of you 
We're having lovely spring weather here in Sweden, so what else to do but to go inside and do a bit of updating
I've had substantial progress lately, and am fast approaching the decaling stage of this build. Shortly after my last post the fuselage was closed up pretty uneventful, with only a bit of filling and cleaning up to do. The engine has been all but finished off, and the paintjob on the outside is done. This went pretty smooth, as there is not all that much masking or that many colours for that matter.
There are a few things that I've thoght a bit about though. Looking at the Datafile, and comparing it with the WNW paint instructions, there are quite a few things that differs. For instance the pontoons are depicted in the datafile as the same grey as the fuselage and with Naval hex on top where as WNW have them all black, with underside blue on the bottom (Now looking at the images in the WNW instructions they do look very dark, and no sign of any hex....) Another thing is the underside of the stabaliser, the datfile has it in CDL, like the undersides of the wings. WNW in light blue.
Then there is the question of the colour of the Naval Hex; was it the blue pattern or was it the brown?
Well after studying the images I have at hand, and thinking about things I choose to follow the WNW instructions rather than the Datafile (well on the hex I guess there is very little choice anyway).
So here is how it all looks now:
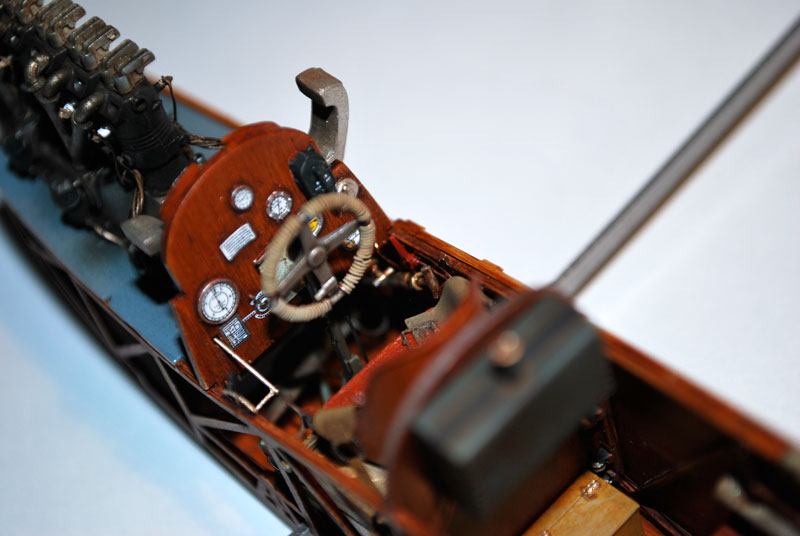
Starting off with the engine I've still to add the throttlelinkage to this side. This is also the side I plan to keep open and exposed
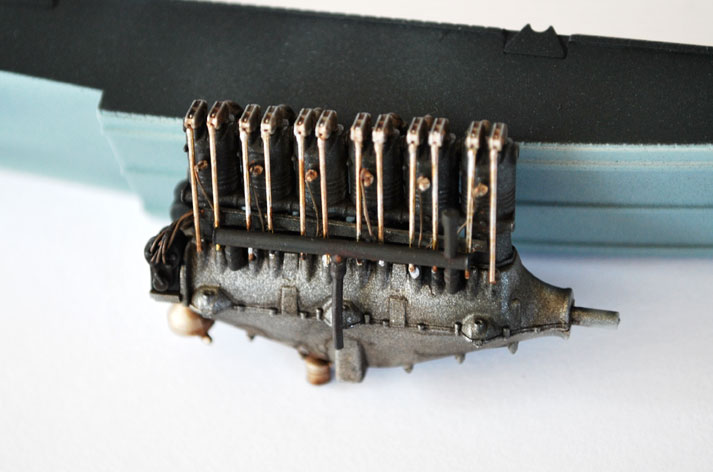
I had to cheat with the roccker arms here the ignition cable chanel turned out to be a bit on the thick side.... It will not be noticable once the engine pane is in place so I choos eto ignore this problem.

I mixed my own grey shade for the fuselage as I could not find any Tamiya X83 anywhere around here. It probably turned out a bit dark, but it seems to match the datafile pretty well
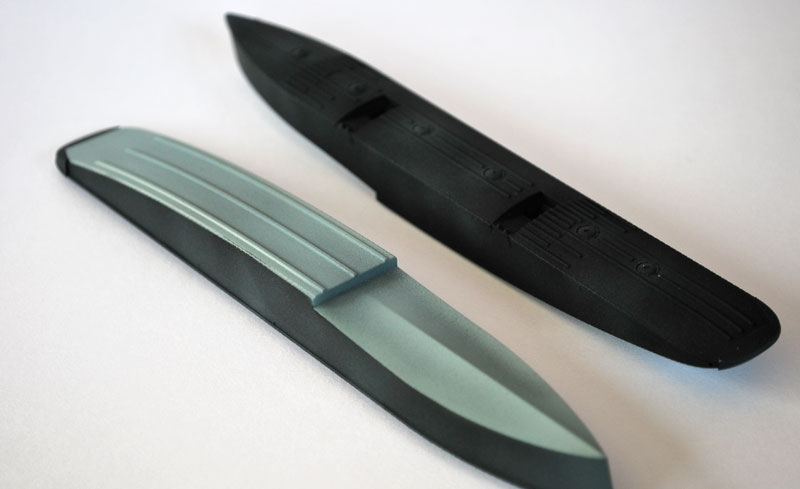
"black" pontoons. Actually I never use full on black anywhere on my models, I feel it doesn't look right in scale. the Tamiya "Nato black" which has a grey tint to it is my prefered choice here.
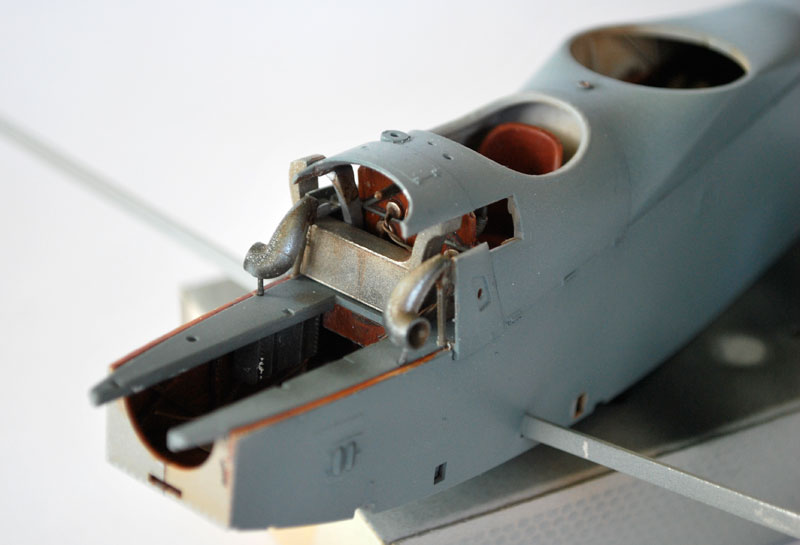
One area where I had a bit of trouble (only a bit) was when I fitted the panles with the spent shell shutes (the things that look like a boat funnel on its side). They were a bit hard to get in place standing a bit too proud of the uselage. I had to trim them down a bit on the backside to get them to sit right.
Also this area is one that is a bit hazy in the instructions. bit no. A 27 an internal brace that goes over and in front of the ammobox (missing in this image), is not called out in the instructions and just appear very faintly in the last step on page 7. It is also not very clear how the side engine panels (F4 & F5) rest together with the short top panel (F13) on the inside or the outside? After a bit of test fitting and scrutinising the bits I concluded on the inside. To get this sequense right at this stage is important when you glue the panles with the spent shell shute otherwise you might end up with panels that don't sit well together in the end.

Althogh the fuselage was a very good fit I ended up with a seam, that I had to revisit a couple of times to get right. Also there was a slight sink mark up front. No great hastle though.

I did some preshading of the wings with ribtapes covered. Not much to show for it in this image, but its clearer INRL. Top of the wings now ready for the Naval Hex.
Well folks thats about it for now time for some eggs and I think the first BBQ of the summer Hopefully also some more building before this long weekend is over.
Thank You for looking all and any comments are as usual very welcome.
Mikael
We're having lovely spring weather here in Sweden, so what else to do but to go inside and do a bit of updating
I've had substantial progress lately, and am fast approaching the decaling stage of this build. Shortly after my last post the fuselage was closed up pretty uneventful, with only a bit of filling and cleaning up to do. The engine has been all but finished off, and the paintjob on the outside is done. This went pretty smooth, as there is not all that much masking or that many colours for that matter.
There are a few things that I've thoght a bit about though. Looking at the Datafile, and comparing it with the WNW paint instructions, there are quite a few things that differs. For instance the pontoons are depicted in the datafile as the same grey as the fuselage and with Naval hex on top where as WNW have them all black, with underside blue on the bottom (Now looking at the images in the WNW instructions they do look very dark, and no sign of any hex....) Another thing is the underside of the stabaliser, the datfile has it in CDL, like the undersides of the wings. WNW in light blue.
Then there is the question of the colour of the Naval Hex; was it the blue pattern or was it the brown?
Well after studying the images I have at hand, and thinking about things I choose to follow the WNW instructions rather than the Datafile (well on the hex I guess there is very little choice anyway).
So here is how it all looks now:
Starting off with the engine I've still to add the throttlelinkage to this side. This is also the side I plan to keep open and exposed
I had to cheat with the roccker arms here the ignition cable chanel turned out to be a bit on the thick side.... It will not be noticable once the engine pane is in place so I choos eto ignore this problem.
I mixed my own grey shade for the fuselage as I could not find any Tamiya X83 anywhere around here. It probably turned out a bit dark, but it seems to match the datafile pretty well
"black" pontoons. Actually I never use full on black anywhere on my models, I feel it doesn't look right in scale. the Tamiya "Nato black" which has a grey tint to it is my prefered choice here.
One area where I had a bit of trouble (only a bit) was when I fitted the panles with the spent shell shutes (the things that look like a boat funnel on its side). They were a bit hard to get in place standing a bit too proud of the uselage. I had to trim them down a bit on the backside to get them to sit right.
Also this area is one that is a bit hazy in the instructions. bit no. A 27 an internal brace that goes over and in front of the ammobox (missing in this image), is not called out in the instructions and just appear very faintly in the last step on page 7. It is also not very clear how the side engine panels (F4 & F5) rest together with the short top panel (F13) on the inside or the outside? After a bit of test fitting and scrutinising the bits I concluded on the inside. To get this sequense right at this stage is important when you glue the panles with the spent shell shute otherwise you might end up with panels that don't sit well together in the end.
Althogh the fuselage was a very good fit I ended up with a seam, that I had to revisit a couple of times to get right. Also there was a slight sink mark up front. No great hastle though.
I did some preshading of the wings with ribtapes covered. Not much to show for it in this image, but its clearer INRL. Top of the wings now ready for the Naval Hex.
Well folks thats about it for now time for some eggs and I think the first BBQ of the summer
Hopefully also some more building before this long weekend is over.Thank You for looking all and any comments are as usual very welcome.
Mikael

Kornbeef

Joined: November 06, 2005
KitMaker: 1,667 posts
AeroScale: 1,551 posts

Posted: Friday, April 22, 2011 - 11:40 AM UTC
great update, thanks for sharing the issues with us too.
Really lovely work Mikael. Happy easter to you and yours.
Keith
Really lovely work Mikael. Happy easter to you and yours.
Keith

Bigrip74
Joined: February 22, 2008
KitMaker: 5,026 posts
AeroScale: 2,811 posts

Posted: Friday, April 22, 2011 - 12:13 PM UTC
Mikael, thanks for the photos.
Bob
Bob

lcarroll
Joined: July 26, 2010
KitMaker: 1,032 posts
AeroScale: 1,025 posts
Posted: Saturday, April 23, 2011 - 03:26 AM UTC
Mikael,
Really nice!
Our weather here about the same as yours...nice Spring sunshine after a long hard winter. As for the BBQ, you bet! Have a Happy Easter with your family and keep the updates coming. This is a beautiful build.
Cheers,
Lance
Really nice!
Our weather here about the same as yours...nice Spring sunshine after a long hard winter. As for the BBQ, you bet! Have a Happy Easter with your family and keep the updates coming. This is a beautiful build.
Cheers,
Lance
JackFlash
Joined: January 25, 2004
KitMaker: 11,669 posts
AeroScale: 11,011 posts
Posted: Saturday, April 23, 2011 - 03:15 PM UTC
Quoted Text
". . .The Engine is only dryfitted here still some more details and painting to be done before it'll be glued into place. I've added spark leads, and the channel where they run (wonder why hasn't WNW included this, as it is such a noticable item on the engine?)
I really can't get over how small the engine looks for such a large plane. Compared with the LVG engine, it looks a bit like the tiny kid brother. . .
Best Regards
Mikael
The 150hp motor fitted to the HB W.29 was similar but not the same to the motor in the Roland D.VIb. The pending release of the late production Schwerin Fok. D.VII has the BMW in it. We just need some one to do a 1:48 and 1:32 Bz IIIa 185hp
 |

WEB HOSTING BY


Copyright ©2021 AeroScale and Kitmaker Network, a subsidiary of Silver Star Enterprises
All Rights Reserved. Please read our Conditions of Use and Privacy Policy.
All Rights Reserved. Please read our Conditions of Use and Privacy Policy.