

Early Aviation
Discuss World War I and the early years of aviation thru 1934.
Discuss World War I and the early years of aviation thru 1934.
Hosted by Jim Starkweather
KotS GB 2011 Albatros D.II Kornbeef

JackFlash

Joined: January 25, 2004
KitMaker: 11,669 posts
AeroScale: 11,011 posts
Posted: Sunday, March 27, 2011 - 02:45 PM UTC
Very nice details!

Kornbeef

Joined: November 06, 2005
KitMaker: 1,667 posts
AeroScale: 1,551 posts

Posted: Tuesday, April 05, 2011 - 04:34 AM UTC
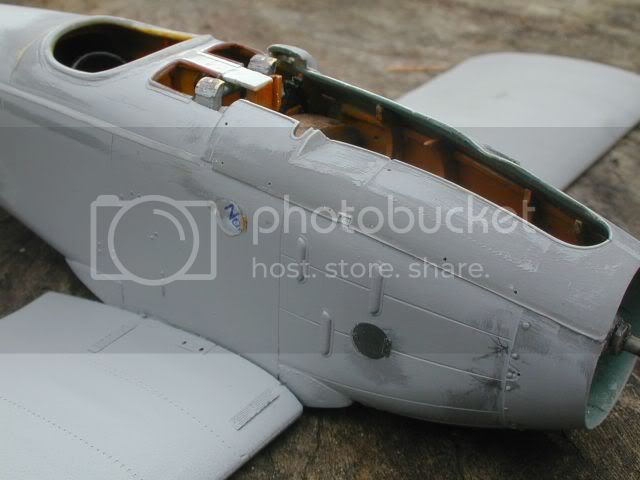
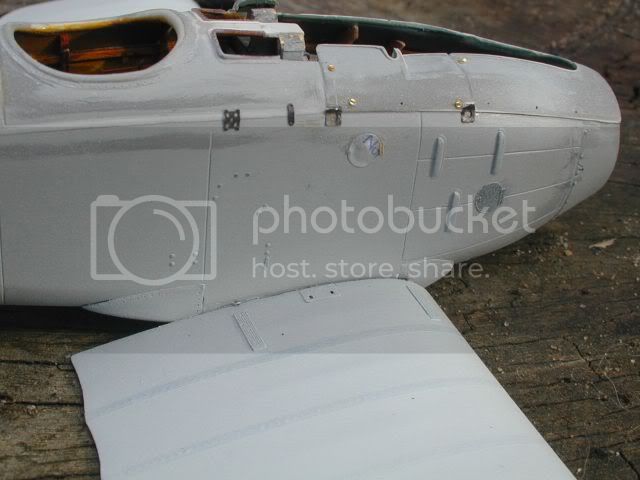
Well heres a little update again. I've ploughed ahead and am at the buttoned up and adding external detail stage.
Thank you Stephen for the comment, the forum seems a little quiet, must be the weather turning better at last.
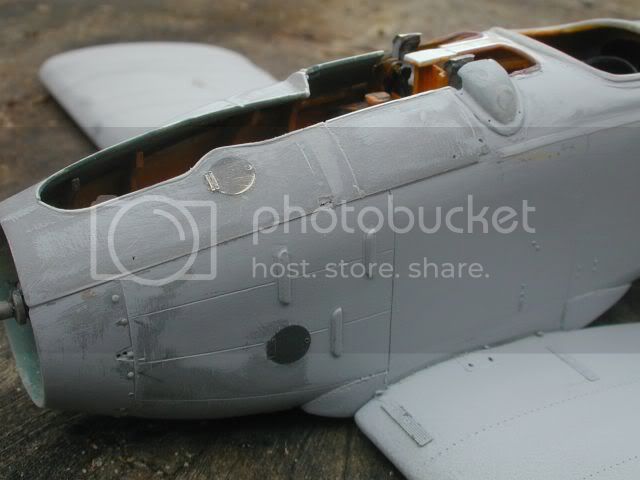
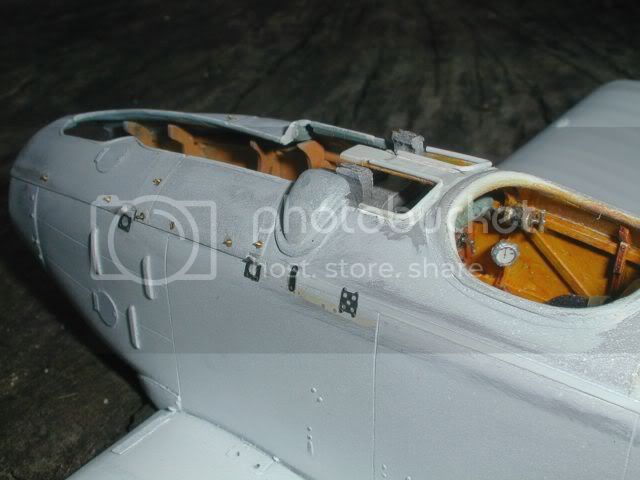
Much sanding and fitting later I've reached this point. Just as always dryfitting everything fitted snug, when it came to fixing I had a bit of a daymare getting the coaming and cowls to sit right. I think I had the cockpit tub assembly a little high when it set, which on turn pushed the centre of the cowl/coaming up a smidge.
The cover over the belt feed is a WNW one from the DVa kit thinned and shaped (Roden's seemed to petite to me.) I was sitting in my office (Loo) reading when it came to my attention I had the cowling join in the wrong place...it was in the Albatros position not the OAW. an easy fix though. Etch is the Encore etch mostly, with the odd P of P part here and there. I've redone the bulges and fasteners on the nose cowl adding a few MIA ones too. I kow the P of P set for the albatros has lovely etched fasteners, I might try but they seem a tad big and quite fiddly. So who knows?
Tuther side, much the same work here as the left. I do have to open up the area's where the cabane strut mounts go yet though. I modded the cowl in front of the water pipe, on a pic of D916/16 with no engine in I noticed it was quite pronounced.
Eagle eyes may notice the dished panel added to the side, this seems peculiar to OAW DIIs I spotted it in the pics of D916/16 and subsequently on all pics I found that were deffo OAW craft. There is a pic of a mechanic working there in one ofmy refs and I'm assuming its for either access to fuel, oil or cooling.
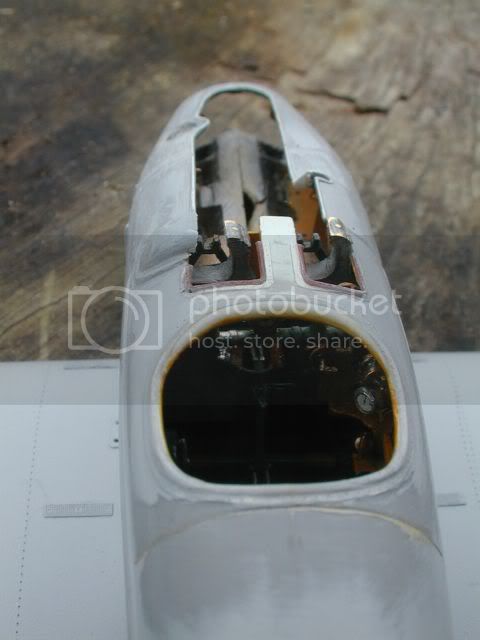
Bot bot here I was struggling to find a decent ref to the underside of the nose...Thankfully Koloman's replica build over on the Drome supplied me with a shot of this area showing not only access doors but the small drain grommets too..YAY! Looking now I may have th straps between the U/C mounts too straight though and I really messed up those extra panel lines a bit..LOL
Still I'm lost for where the catridge exit point is on this plane...hopefully by i get that far Koloman will have cut them.
Anyway, comments always welcome
Keith
Thank you Stephen for the comment, the forum seems a little quiet, must be the weather turning better at last.
Much sanding and fitting later I've reached this point. Just as always dryfitting everything fitted snug, when it came to fixing I had a bit of a daymare getting the coaming and cowls to sit right. I think I had the cockpit tub assembly a little high when it set, which on turn pushed the centre of the cowl/coaming up a smidge.
The cover over the belt feed is a WNW one from the DVa kit thinned and shaped (Roden's seemed to petite to me.) I was sitting in my office (Loo) reading when it came to my attention I had the cowling join in the wrong place...it was in the Albatros position not the OAW. an easy fix though. Etch is the Encore etch mostly, with the odd P of P part here and there. I've redone the bulges and fasteners on the nose cowl adding a few MIA ones too. I kow the P of P set for the albatros has lovely etched fasteners, I might try but they seem a tad big and quite fiddly. So who knows?
Tuther side, much the same work here as the left. I do have to open up the area's where the cabane strut mounts go yet though. I modded the cowl in front of the water pipe, on a pic of D916/16 with no engine in I noticed it was quite pronounced.
Eagle eyes may notice the dished panel added to the side, this seems peculiar to OAW DIIs I spotted it in the pics of D916/16 and subsequently on all pics I found that were deffo OAW craft. There is a pic of a mechanic working there in one ofmy refs and I'm assuming its for either access to fuel, oil or cooling.
Bot bot here I was struggling to find a decent ref to the underside of the nose...Thankfully Koloman's replica build over on the Drome supplied me with a shot of this area showing not only access doors but the small drain grommets too..YAY! Looking now I may have th straps between the U/C mounts too straight though and I really messed up those extra panel lines a bit..LOL
Still I'm lost for where the catridge exit point is on this plane...hopefully by i get that far Koloman will have cut them.
Anyway, comments always welcome
Keith
dmopath
Joined: July 02, 2010
KitMaker: 175 posts
AeroScale: 174 posts
Posted: Tuesday, April 05, 2011 - 05:09 AM UTC
Most excellent progress. The level of detail is outstanding.
As I said before, this build will be kept for future reference.
As I said before, this build will be kept for future reference.

vulkanizer

Joined: December 26, 2009
KitMaker: 144 posts
AeroScale: 109 posts

Posted: Tuesday, April 05, 2011 - 07:15 AM UTC
very impressive 

Mgunns
Joined: December 12, 2008
KitMaker: 1,423 posts
AeroScale: 1,319 posts

Posted: Tuesday, April 05, 2011 - 07:52 AM UTC
 Hi Keith:
This is coming along nicely. The "padding" around the openings really makes it stand out. These early Albatros really are neat and I am looking forward to seeing this one come about. You are right, little activity these days.
Best
Mark

lcarroll

Joined: July 26, 2010
KitMaker: 1,032 posts
AeroScale: 1,025 posts

Posted: Tuesday, April 05, 2011 - 09:01 AM UTC
Keith,
VERY NICE! Your detail is commendable and this one will be a real beauty. Many thanks for sharing; I found the solution to a quandry I was having with the control wire routing on the rudder pedal assembly on my early DIII in your cockpit module photos (after hours of fruitless scouring of a million references I might add) Per Dennis' remark, I'll keep this article close for future reference.
Look forward to more.
Cheers,

OEFFAG_153

Joined: February 19, 2010
KitMaker: 1,473 posts
AeroScale: 1,450 posts
Posted: Tuesday, April 05, 2011 - 09:04 AM UTC
Hi Keith
Still here and watching (but not much time for blogging nor building at the moment )
)
Wow your updates never disapoint this is turning out to be another gem your detailing is superb Keep it coming
Best Regards
Mikael
Still here and watching (but not much time for blogging nor building at the moment
) Wow your updates never disapoint this is turning out to be another gem your detailing is superb Keep it coming
Best Regards
Mikael
Kornbeef
Joined: November 06, 2005
KitMaker: 1,667 posts
AeroScale: 1,551 posts
Posted: Tuesday, April 05, 2011 - 11:52 AM UTC
Quoted Text
Lance, thanks, one thing though, if you follow this layout for the DIII it's incorrect. The DIII was set up like the DVa Not like the DI & DII even though Roden and Windsock show it that way. Though the rudder routing is similar, the column etc is wrong. I found out from Doug Bauman who pointed me to Kolomans replica builds on the Aerodrome for reference. Keith,
VERY NICE! Your detail is commendable and this one will be a real beauty. Many thanks for sharing; I found the solution to a quandry I was having with the control wire routing on the rudder pedal assembly on my early DIII in your cockpit module photos (after hours of fruitless scouring of a million references I might add) Per Dennis' remark, I'll keep this article close for future reference.
Look forward to more.
Cheers,
Heres the link to page 2 of my OAW build showing the cockpit mods...which is still unfinished...it might get done now 1/32nd loz is becoming available. here.
And a link to how she stands ATM...still here too.
lcarroll
Joined: July 26, 2010
KitMaker: 1,032 posts
AeroScale: 1,025 posts
Posted: Wednesday, April 06, 2011 - 05:57 AM UTC
Keith,
Many Thanks for the info and hints!
I went to the Koloman articles on The Aerodrome; absolutely incredible. I am a registered member but havn't spent as much time there as I should. One could dig around there for days or weeks on end, an endless source of info.
I also reviewed your original thread on the DIII and between the two sources can see where your timely reply has saved my day. Must be something wrong as, like you, I can't live with the knowlege that something is not right on the build. (per your trademark but slightly modified, "can't build OOB, can''t build OOB.... ad infinitum!) I've now got a relatively simple re-work on the rudder assembly and a few scratch components to cobble together to correct and significantly add to the kit layout.
I am just slow starting this build again for the KoTS Group Build and hope to get the thread officially underway in 2-3 weeks. Have taken photos along the way and will get the thred underway from present state which is still working on the cockpit module, ammo and fuel cans and a nearly complete engine. Just a matter of finishing off the "working for a living" thing and easing into some serious modeling.
Thanks so very much again for the help...........what an excellent site this is, so much to learn, so little time!
Cheers,
Lance

thegirl
Joined: January 19, 2008
KitMaker: 6,743 posts
AeroScale: 6,151 posts
Posted: Wednesday, April 06, 2011 - 01:31 PM UTC
As always Keith , you never disappoint !
Kornbeef
Joined: November 06, 2005
KitMaker: 1,667 posts
AeroScale: 1,551 posts
Posted: Thursday, April 07, 2011 - 05:34 AM UTC
Terri you are too kind by half. thank you.
Lance, that's what we are here for. If I can see anyway of helping another modeller to do their best I will. I'm not one to sit and watch someone else do something in error when I know I could offer advice. I do try to work out if the other is just after a good finish or suffers AMS like I though...
Lance, that's what we are here for. If I can see anyway of helping another modeller to do their best I will. I'm not one to sit and watch someone else do something in error when I know I could offer advice. I do try to work out if the other is just after a good finish or suffers AMS like I though...
lcarroll
Joined: July 26, 2010
KitMaker: 1,032 posts
AeroScale: 1,025 posts
Posted: Friday, April 08, 2011 - 04:06 AM UTC
Quoted Text
Terri you are too kind by half. thank you.
Lance, that's what we are here for. If I can see anyway of helping another modeller to do their best I will. I'm not one to sit and watch someone else do something in error when I know I could offer advice. I do try to work out if the other is just after a good finish or suffers AMS like I though...
Keith,
Not to worry, I can assure you it's nothing more then rampant AMS. I do more working backwards then forwards as new info surfaces and some minor detail done in error makes me "wake up screaming in the night"! Presently the little time I have available for the hobby is being devoted to a retrofit/rebuild of the control mechanisms per our earlier discussions and what I've discovered on the links you provided. I've probably used more CA De-bonder then the average sane modeler would in a lifetime in the past few weeks. The big thing is how much fun I'm having, which is what this great hobby is all about.
Cheers, and keep the updates coming.
Lance
mtnflyer
Joined: March 08, 2009
KitMaker: 394 posts
AeroScale: 360 posts
Posted: Friday, April 08, 2011 - 11:26 AM UTC
Keith, your one of the fellas I really like to watch and learn from on this site. I take a-lot from you, and you probably don't even know it. Well done on your progress.

justjim
Joined: October 30, 2005
KitMaker: 8 posts
AeroScale: 4 posts
Posted: Sunday, April 10, 2011 - 07:12 PM UTC
I watch with great anticipation of the final build, You, Sir, Are inspirational, I have just entertained the thought of building these beautiful early aircraft in just the last Month or so after seeing the work of the Masters out there and you are one of an elite group!!!!!thegirl
Joined: January 19, 2008
KitMaker: 6,743 posts
AeroScale: 6,151 posts
Posted: Monday, April 11, 2011 - 11:48 AM UTC
Quoted Text
Terri you are too kind by half. thank you.
Lance, that's what we are here for. If I can see anyway of helping another modeller to do their best I will. I'm not one to sit and watch someone else do something in error when I know I could offer advice. I do try to work out if the other is just after a good finish or suffers AMS like I though...
You are more then welcome my friend ! Always a pleasure to watch your builds progress , even a bigger bonus when you finish them
I'm kinda exceited to see how the wooded fuselage turns out on this build
Kornbeef
Joined: November 06, 2005
KitMaker: 1,667 posts
AeroScale: 1,551 posts
Posted: Monday, April 11, 2011 - 01:05 PM UTC
Quoted Text
You are more then welcome my friend ! Always a pleasure to watch your builds progress , even a bigger bonus when you finish them
I'm kinda exceited to see how the wooded fuselage turns out on this build
Yes Terri I have finished the odd one or two

Oh and as for the fuselage, sorry to dissappoint but I'm building her as an OAW tricolour camo all over, similar to the famous pics of D.910/16.
Lance, Guy and Jim. I only wish i was half as good as you make me sound.
And minor text update, pics to follow tomorrow maybe life and weather permitting. I tried a method of reproducing ribtapes... hopefully its worked reasonably. Wings are almost ready for paint. Fuselage has some PE to add and cabane mountings to work out. I'm going to use the resin Cylinder block I think, theres less work involved.
Tks all for the kind comments...sleepitime for me now
Kornbeef
Joined: November 06, 2005
KitMaker: 1,667 posts
AeroScale: 1,551 posts
Posted: Wednesday, April 13, 2011 - 06:58 AM UTC
Minor update, with a few pics.
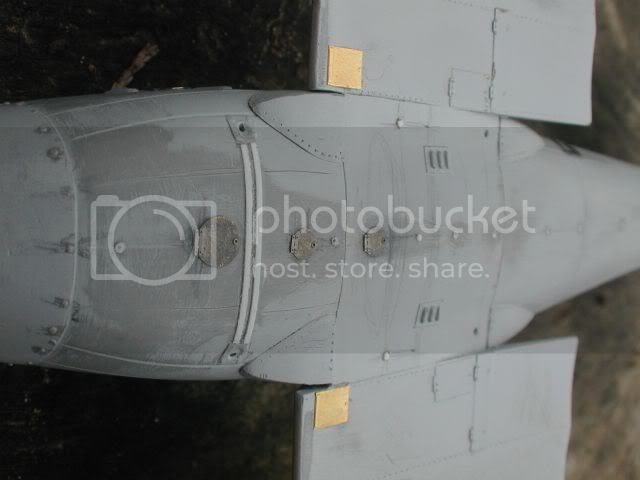
I'm in the midst of fitting all the tiny PE fasteners around the cowls. I realised when I saw the pics how bad my eyesight/light in my den is... I also realised now I have to trim the machinegun apertures back a little to sit the guns correctly.
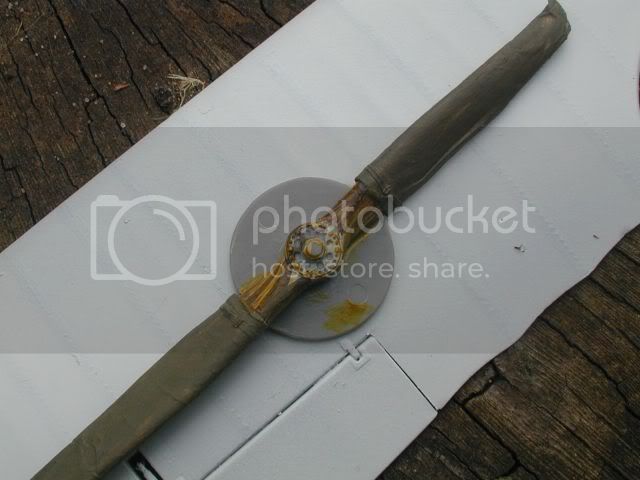
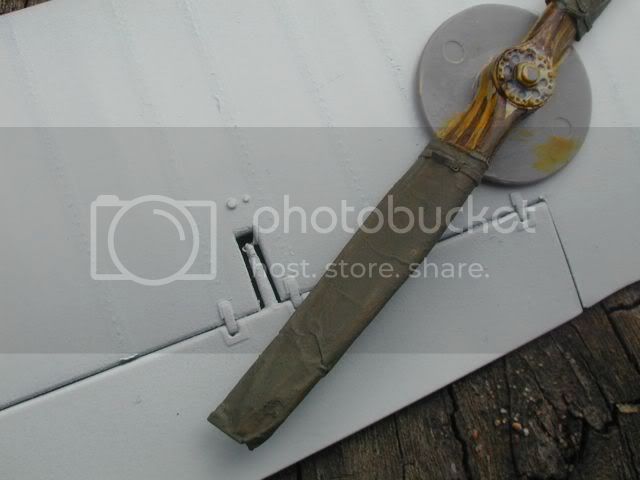
I thought for a change I'd try something different with the prop so bagged the blades with tissue and PVA, PE buckles and stips of wine bottle top metal for straps. If you look closely at the wing underneath you will see my attempt to show rib stitching and tapes. It kind of worked I think, and I'm reasonably happy with the outcome though it fluctuates a bit between ribs.
Other bit I've been working on are the guns, not going overboard on them the upper wing is quite low so P of P jackets and a but of breech detail is all I need.
Tks for lookin and extra thanks to all you who spur me on and offer such a wealth of advise
Keith
I'm in the midst of fitting all the tiny PE fasteners around the cowls. I realised when I saw the pics how bad my eyesight/light in my den is...
I also realised now I have to trim the machinegun apertures back a little to sit the guns correctly. I thought for a change I'd try something different with the prop so bagged the blades with tissue and PVA, PE buckles and stips of wine bottle top metal for straps. If you look closely at the wing underneath you will see my attempt to show rib stitching and tapes. It kind of worked I think, and I'm reasonably happy with the outcome though it fluctuates a bit between ribs.
Other bit I've been working on are the guns, not going overboard on them the upper wing is quite low so P of P jackets and a but of breech detail is all I need.
Tks for lookin and extra thanks to all you who spur me on and offer such a wealth of advise
Keith

Bigrip74
Joined: February 22, 2008
KitMaker: 5,026 posts
AeroScale: 2,811 posts

Posted: Wednesday, April 13, 2011 - 07:38 AM UTC
Keith, my eyes are also not what they were. I can just make out the stitching on the ribs. Nice idea on the prop, what did you use for the holding strap?
Bob
Bob
Kornbeef
Joined: November 06, 2005
KitMaker: 1,667 posts
AeroScale: 1,551 posts
Posted: Wednesday, April 13, 2011 - 08:12 AM UTC
Quoted Text
Easy, its foil from a wine bottle and a PE buckle from an ancient Verlinden set.Keith, my eyes are also not what they were. I can just make out the stitching on the ribs. Nice idea on the prop, what did you use for the holding strap?
Bob
Kornbeef
Joined: November 06, 2005
KitMaker: 1,667 posts
AeroScale: 1,551 posts
Posted: Wednesday, April 27, 2011 - 05:43 AM UTC
just so I don't get unstickied... I have been tinkering with this... Hoping to get a sigificant bit done tomorrow...mainly PE
L
L

wing_nut
Joined: June 02, 2006
KitMaker: 1,212 posts
AeroScale: 468 posts
Posted: Wednesday, April 27, 2011 - 07:20 AM UTC
Keith that is some really beautiful work. The covers for the prop is a great touch and really well done.
Kornbeef
Joined: November 06, 2005
KitMaker: 1,667 posts
AeroScale: 1,551 posts
Posted: Thursday, April 28, 2011 - 08:06 AM UTC
Hey Marc, thanks, I just wanted something a little different for a change.
Anyway, I did as promised, spent a few short hours tinkering with the DII
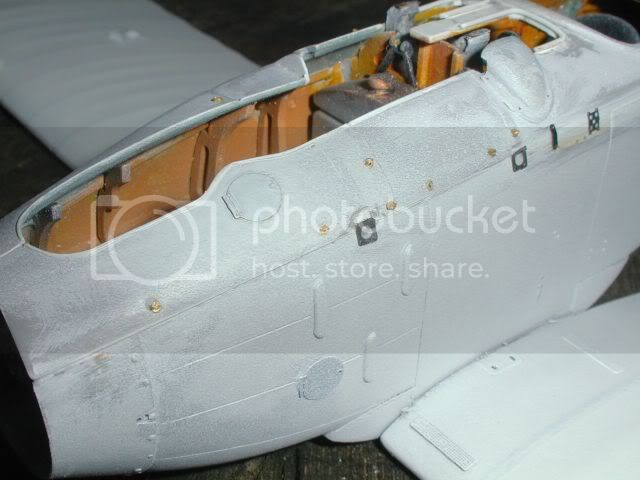
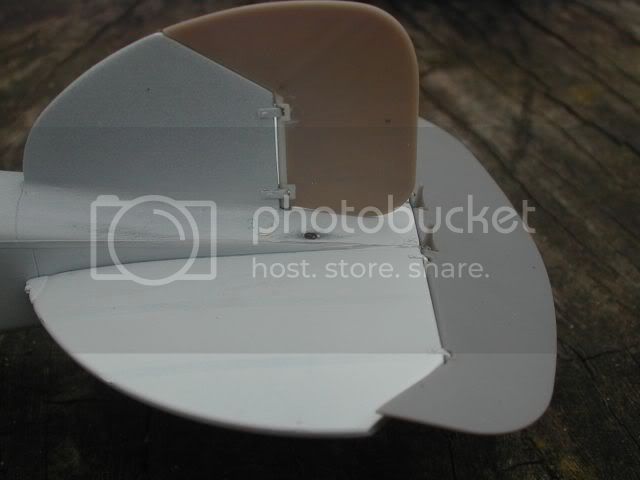
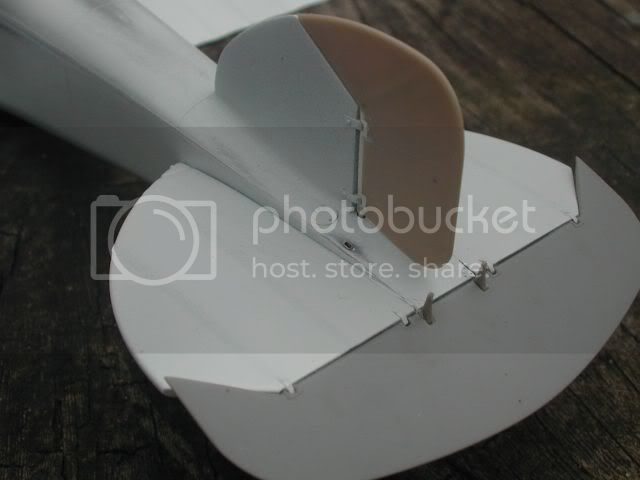
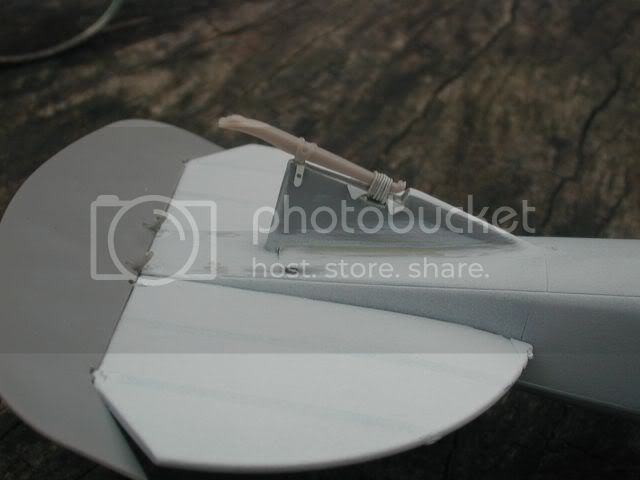
In my madness trying to open up the machinegun apertures I broke off the rear gun support bar and had to repair it... Anyway thats done, must the fasteners are on, added the rings around the cable points in the rear fuselage, modded another DIII tail skid...dunno what happened to the first.. Fixed the elevator and rudder and did some general clean up. By next week I'm hoping to have her ready for paint (the bulk of her anyway) I've a few details to scratch and add such as cowling spring clips.
Yes the white specs everywhere are sanded plastic and filler.
Well thats all for today. Comments and critique welcome as always
I might get a good day in tommorow avoiding the royal wedding...
Keith
Anyway, I did as promised, spent a few short hours tinkering with the DII
In my madness trying to open up the machinegun apertures I broke off the rear gun support bar and had to repair it... Anyway thats done, must the fasteners are on, added the rings around the cable points in the rear fuselage, modded another DIII tail skid...dunno what happened to the first.. Fixed the elevator and rudder and did some general clean up. By next week I'm hoping to have her ready for paint (the bulk of her anyway) I've a few details to scratch and add such as cowling spring clips.
Yes the white specs everywhere are sanded plastic and filler.
Well thats all for today. Comments and critique welcome as always
I might get a good day in tommorow avoiding the royal wedding...
Keith
OEFFAG_153
Joined: February 19, 2010
KitMaker: 1,473 posts
AeroScale: 1,450 posts
Posted: Thursday, April 28, 2011 - 08:50 AM UTC
Very, very nice Keith, this is one outstanding build to be very proud of!
Continiuing on this beauty sounds preferable to watching royal weddings on the telly
Mikael
Continiuing on this beauty sounds preferable to watching royal weddings on the telly
Mikael

67foxtrot
Joined: February 13, 2008
KitMaker: 36 posts
AeroScale: 35 posts
Posted: Thursday, April 28, 2011 - 10:28 AM UTC
Keith,
I have been watching this wonderful build in the background along with your other Albatros builds past and I really admire all of the scratch work you have done as well as added details.
I have been learning a whole lot from you and look forward to your next steps on the build.
Dave
I have been watching this wonderful build in the background along with your other Albatros builds past and I really admire all of the scratch work you have done as well as added details.
I have been learning a whole lot from you and look forward to your next steps on the build.
Dave
JackFlash
Joined: January 25, 2004
KitMaker: 11,669 posts
AeroScale: 11,011 posts
Posted: Thursday, April 28, 2011 - 01:04 PM UTC
Excellent build . I like the large amount of detail you have added.
 |

WEB HOSTING BY


Copyright ©2021 AeroScale and Kitmaker Network, a subsidiary of Silver Star Enterprises
All Rights Reserved. Please read our Conditions of Use and Privacy Policy.
All Rights Reserved. Please read our Conditions of Use and Privacy Policy.