

Okay I'm committed or should be at least.
For the group build I'm taking on one of my *Hanger queens* the Roden/Encore Albatros DII. Here is the old buildblog for reference and when I post new pics you'll see she isnt far along from there.
here.
Progress may not be swift, I've a few irons in the fire at the moment.
Cheers Keith
Early Aviation
Discuss World War I and the early years of aviation thru 1934.
Discuss World War I and the early years of aviation thru 1934.
Hosted by Jim Starkweather
KotS GB 2011 Albatros D.II Kornbeef

Kornbeef

Joined: November 06, 2005
KitMaker: 1,667 posts
AeroScale: 1,551 posts

Posted: Wednesday, February 09, 2011 - 08:32 PM UTC
mtnflyer

Joined: March 08, 2009
KitMaker: 394 posts
AeroScale: 360 posts
Posted: Thursday, February 10, 2011 - 04:42 AM UTC
Hi Kieth
I've studied your old build log, and I'm quite impressed. I'm anxious to see how your going to "wood-up" that interior and paint it when its already built. This is definitly going to be a learning experience for me, as I'm just a beginner, and don't know.
I'm going the other way right now, trying to 'wood-up' everything and then put it together. So you may not know it, but you'll be teaching me something.

CaptainA

Joined: May 14, 2007
KitMaker: 3,117 posts
AeroScale: 2,270 posts
Posted: Thursday, February 10, 2011 - 04:44 AM UTC
It is good to see you pulling this one out of the box for a restart. Welcome to the GB.

Kornbeef
Joined: November 06, 2005
KitMaker: 1,667 posts
AeroScale: 1,551 posts
Posted: Thursday, February 10, 2011 - 07:22 AM UTC
Guy,
Thank you, yes theres many ways to approach this, I've tried all I think. Just watch this space when it all goes awry
Carl, what can I say... never too many Albatri? Had to go Roden/encore with so many WNW builds going on.
Keith
Thank you, yes theres many ways to approach this, I've tried all I think. Just watch this space when it all goes awry
Carl, what can I say... never too many Albatri? Had to go Roden/encore with so many WNW builds going on.
Keith

OEFFAG_153

Joined: February 19, 2010
KitMaker: 1,473 posts
AeroScale: 1,450 posts

Posted: Friday, February 11, 2011 - 01:53 AM UTC
Hi Keith I do remember this one 
Looking forward to watching it come together I'm pretty keen on this kit myself, if I can find one at a decent price This is the one Mk of Albatros D types I am missing from my lineup
All the best
Mikael
Looking forward to watching it come together I'm pretty keen on this kit myself, if I can find one at a decent price This is the one Mk of Albatros D types I am missing from my lineup
All the best
Mikael

thegirl
Joined: January 19, 2008
KitMaker: 6,743 posts
AeroScale: 6,151 posts
Posted: Friday, February 11, 2011 - 03:38 AM UTC
I remember this one as well and was wondering what happen to the project , now I know ...Keith was saving it for a GB such as this one !
Nice to see you pick this back up again , also looking forward to seeing AMS comes up with new ways of driving you nuts!
Nice to see you pick this back up again , also looking forward to seeing AMS comes up with new ways of driving you nuts!
dmopath
Joined: July 02, 2010
KitMaker: 175 posts
AeroScale: 174 posts
Posted: Friday, February 11, 2011 - 11:31 AM UTC
Hi Keith,
Since this is the only Encore kit I haven't touched (yet), I'm anxious to see how your build continues.
Since this is the only Encore kit I haven't touched (yet), I'm anxious to see how your build continues.

Mgunns
Joined: December 12, 2008
KitMaker: 1,423 posts
AeroScale: 1,319 posts

Posted: Saturday, February 12, 2011 - 03:43 AM UTC
 Hi Keith:
I did this one as well, OOB for me no AMS, and I enjoyed it a lot. Very few problem areas, none that I recall actually, and just turned into a neat model. I used the kit decals and did it in Boelcke's markings per the kit instructions; it will be neat to see how you do this and how this turns out. Nice to see you brining this back.
Best
Mark
Kornbeef
Joined: November 06, 2005
KitMaker: 1,667 posts
AeroScale: 1,551 posts
Posted: Thursday, March 10, 2011 - 05:05 AM UTC
Hi all,
I know I should be doing the finishing touches to the Rolie but I need to do some *get your teeth into* building to relax. I like to do finishes when chilled and lifes been anything but chilled this week.
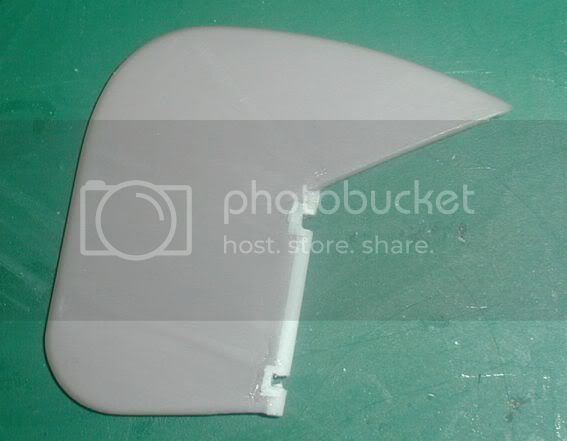
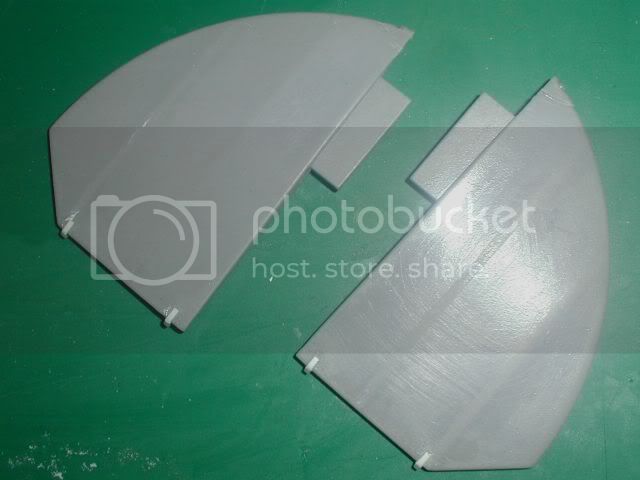
Anyways on with some progress on the D.II. I noticed the Windsock plans in both the D.I/D.II Datafile and the Albatros special there was a few differences between them and the kit, the main being the lower tail fin/tailskid.
The fuselage in this kit is generic, used for the D.I, the D.II and the D.III so there are bound to be differences but the angle of and length of the fin is quite wrong and subsequently the skid itself too. After some time cross referring measuring and checking pics I modded it as shown, It was a little puzzling until I realised to get everything to look correct I had to mod the rudder too...I got carried away and reshaped some that had to be redone such was my over enthusiasm.

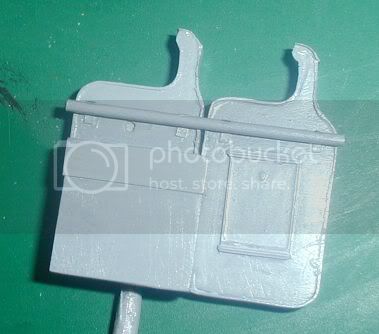
Okay on with the mods...first used belt container, much different to the DIII/DV type supplied with the kit. P of P DI etched used to detail the amocans.
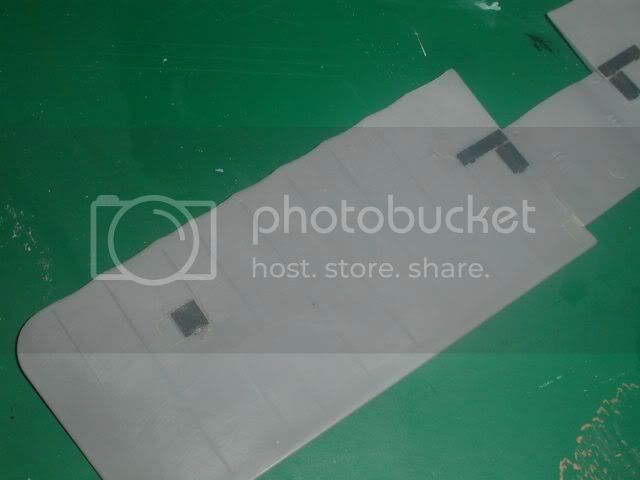
The wings and tail have been modded for the DII cabanes, the bolts have been added to the upper wing above the cabane mounting points, upper rad redone again. (not sure if its the right or wrong type as both 2 and 3 panel types are used on the DII. I'm modding her to (OAW) spec or trying to at least.


Now I noticed....why do I do that? It only makes more work.
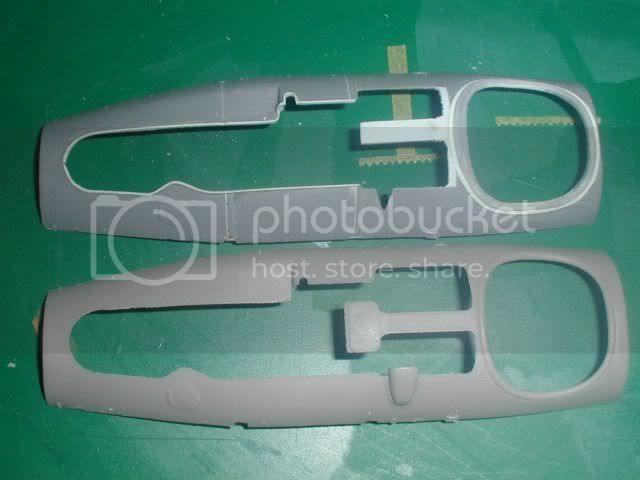
There are two distinct cockpit opening shapes, I pored through my reference and came rightly or wrongly to a decision. OAW DII's seem to have a higher sided flat bottomed opening...of course to me thats just irresistable so set about modding the coaming and cowls to suit...its amazing what little differences you pick up (the other kit part is from a dead DIII that I cannibalised for the fuselage for my DI when I accidentally warped it drying oils). checking pics it seems 3 of 4 panel lines needed redoing, a new one added on the nose, the wooden extension between the guns needed moving and the lip around the top edge needed adding. The beltchute cover is quite the wrong shape...luckily the WNW one will fit just nicely.

NOW Question time... three colour camo...which is best suited as there seems some controversy, I am leaning towards a scheme like No 8 D916/16 but have no definate ref to the upper surfaces of a machine finished in this camo, was it like either the front or rear illustration in the Windsock datafile.
As always any comments thoughts advice critiscisms taken
Ta Keith
I know I should be doing the finishing touches to the Rolie but I need to do some *get your teeth into* building to relax. I like to do finishes when chilled and lifes been anything but chilled this week.
Anyways on with some progress on the D.II. I noticed the Windsock plans in both the D.I/D.II Datafile and the Albatros special there was a few differences between them and the kit, the main being the lower tail fin/tailskid.
The fuselage in this kit is generic, used for the D.I, the D.II and the D.III so there are bound to be differences but the angle of and length of the fin is quite wrong and subsequently the skid itself too. After some time cross referring measuring and checking pics I modded it as shown, It was a little puzzling until I realised to get everything to look correct I had to mod the rudder too...I got carried away and reshaped some that had to be redone such was my over enthusiasm.
Okay on with the mods...first used belt container, much different to the DIII/DV type supplied with the kit. P of P DI etched used to detail the amocans.
The wings and tail have been modded for the DII cabanes, the bolts have been added to the upper wing above the cabane mounting points, upper rad redone again. (not sure if its the right or wrong type as both 2 and 3 panel types are used on the DII. I'm modding her to (OAW) spec or trying to at least.
Now I noticed....why do I do that? It only makes more work.
There are two distinct cockpit opening shapes, I pored through my reference and came rightly or wrongly to a decision. OAW DII's seem to have a higher sided flat bottomed opening...of course to me thats just irresistable so set about modding the coaming and cowls to suit...its amazing what little differences you pick up (the other kit part is from a dead DIII that I cannibalised for the fuselage for my DI when I accidentally warped it drying oils). checking pics it seems 3 of 4 panel lines needed redoing, a new one added on the nose, the wooden extension between the guns needed moving and the lip around the top edge needed adding. The beltchute cover is quite the wrong shape...luckily the WNW one will fit just nicely.
NOW Question time... three colour camo...which is best suited as there seems some controversy, I am leaning towards a scheme like No 8 D916/16 but have no definate ref to the upper surfaces of a machine finished in this camo, was it like either the front or rear illustration in the Windsock datafile.
As always any comments thoughts advice critiscisms taken
Ta Keith
CaptainA
Joined: May 14, 2007
KitMaker: 3,117 posts
AeroScale: 2,270 posts
Posted: Thursday, March 10, 2011 - 12:30 PM UTC
Your building skill always impresses me. You take simple things that many of us would just overlook, and make modifications that are just amazing. As always, very fine work.
Kornbeef
Joined: November 06, 2005
KitMaker: 1,667 posts
AeroScale: 1,551 posts
Posted: Saturday, March 12, 2011 - 10:34 PM UTC
Hi all minor update time.
Thanks for the comment Carl, I dunno whether its a curse or blessing not being able to just ignore stuff
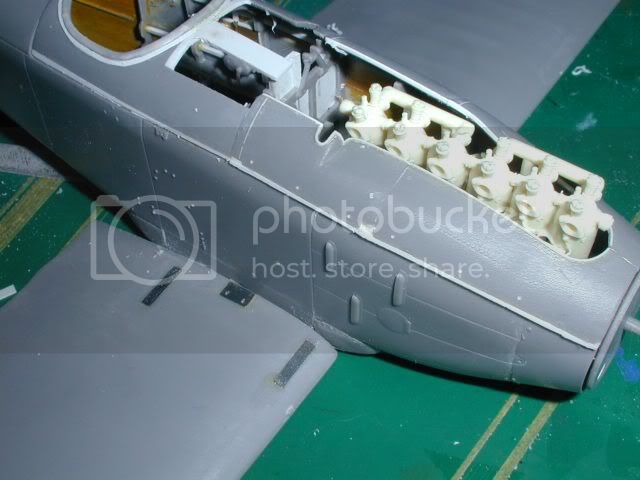
Anyway. I spent a while sanding the spinner profile down wanting to capture the gap between it and the cowlings better. I added a couple of dents to give it character, and intend to add the reinforcing strips around the prop openings. With sore fingers I then started on the prop. The Roden offering is a bit chunky, suddenly a light popped on in the darkness inside my vacant skull and I took a spare Axial that WNW kindly supply with their engine sprue. It fits just right and bonus I have the decals to use with it as a Wolff is what I used on the Roland (Mucho thanko WNW)

I've been working all over this kit at the same time, took a few photos but due to a greasy smear most came out all glammy soft focus. So bear with me.
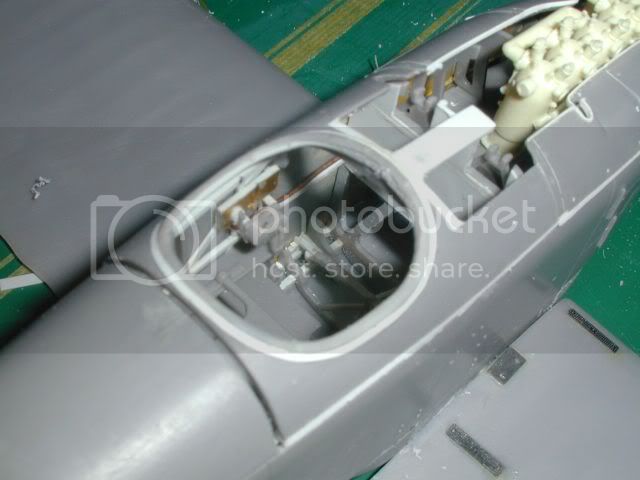
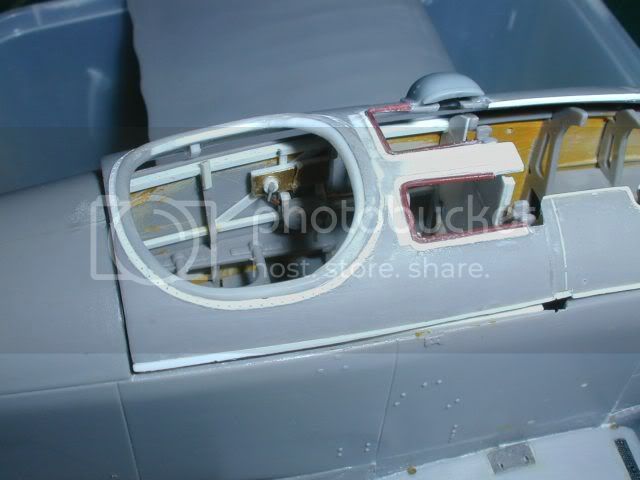
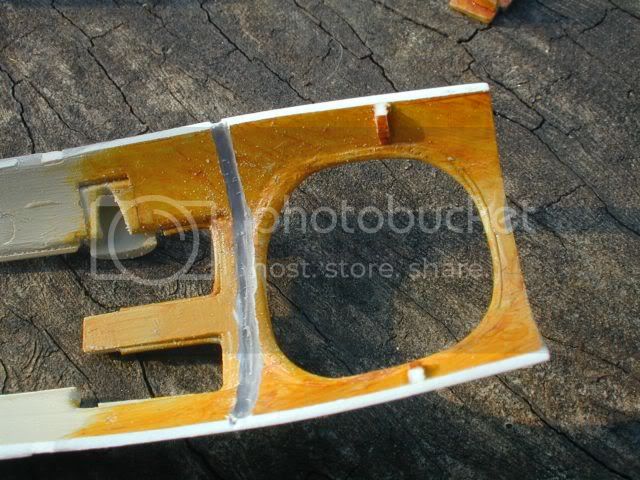
I continued on the cowl/coaming assembly adding a strip of plasticard along its lower edge a:/ to lift the rear so the top of the coaming lined up with the spine and b:/ so the gap around the spinner is more even, I'm waiting it to set before smoothing it in. Also I began to thin the cockpit coaming interior somewhat, I think the former next to the seat needs to extend upwards a little. Unfortunately I havent any pics of this but I do have shots showing a little work in the cockpit.
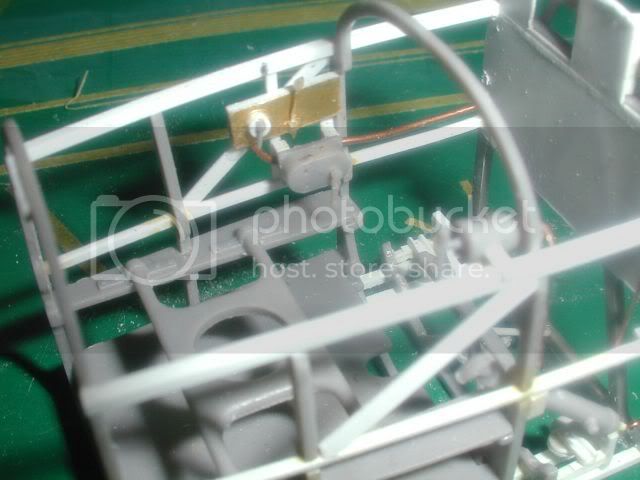
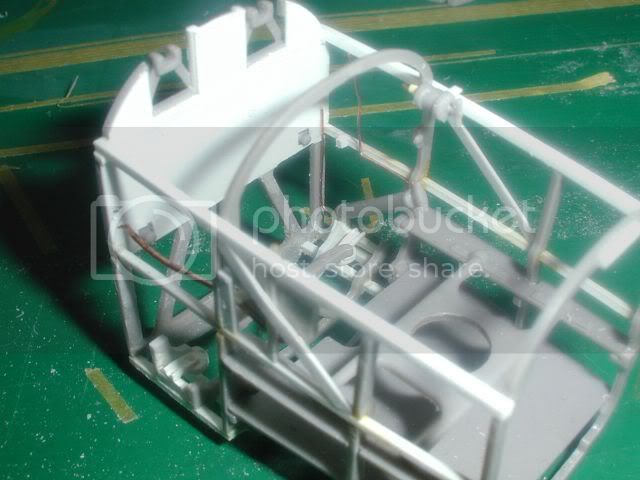
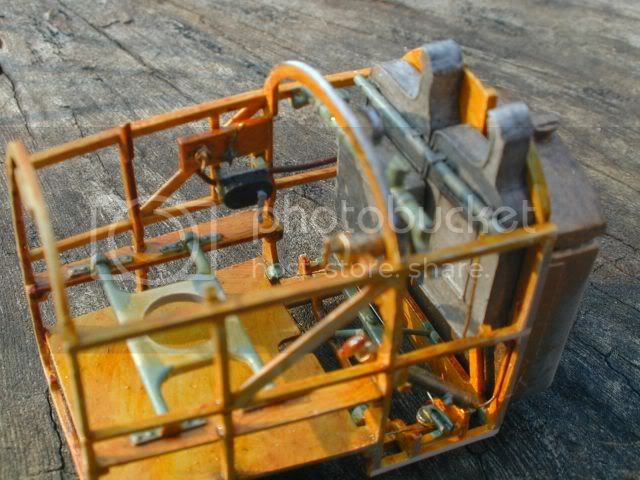
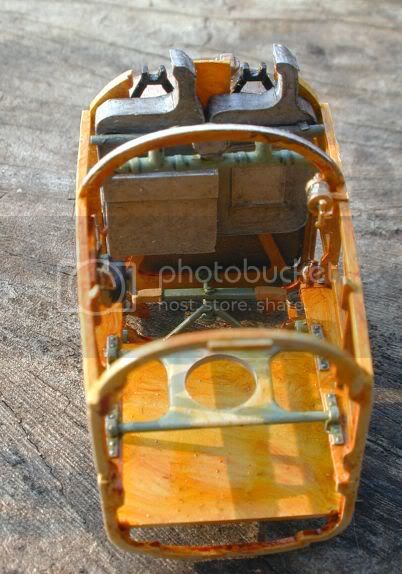
Here I started adding details but redid the pulley so the cable looks right from above when fitted. 3 discs, the centre one having the edge trimmed to suit. I've added the mag wiring harness, the greaser and primer pump and pipework, the fuel control panel will be added after the woodwork is painted, which may be soon...possibly. I have to get the various other parts ready to wood up at the same time.
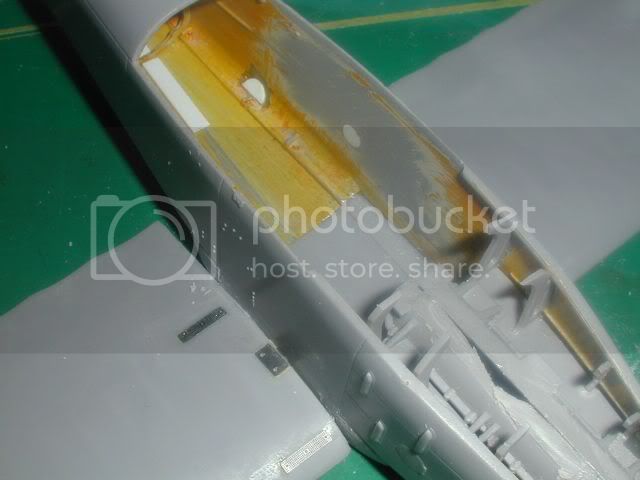
I had wooded the fuselage interioir but looking at it after and realising the floor wasnt done I rubbed her down and am going to redo. But the lower wing is on and the gaps filled. Yes I can fit the interior into it as an assembly
Perhaps later today I can redo the pics that glammed up on me this morn.
I added a lip around the lower rear of the fuel tank, adding spotweld/brazing with a rivet wheel.
Anyway, disjointed I know but..hey thats me
Ta Keith.
Thanks for the comment Carl, I dunno whether its a curse or blessing not being able to just ignore stuff
Anyway. I spent a while sanding the spinner profile down wanting to capture the gap between it and the cowlings better. I added a couple of dents to give it character, and intend to add the reinforcing strips around the prop openings. With sore fingers I then started on the prop. The Roden offering is a bit chunky, suddenly a light popped on in the darkness inside my vacant skull and I took a spare Axial that WNW kindly supply with their engine sprue. It fits just right and bonus I have the decals to use with it as a Wolff is what I used on the Roland (Mucho thanko WNW)
I've been working all over this kit at the same time, took a few photos but due to a greasy smear most came out all glammy soft focus. So bear with me.
I continued on the cowl/coaming assembly adding a strip of plasticard along its lower edge a:/ to lift the rear so the top of the coaming lined up with the spine and b:/ so the gap around the spinner is more even, I'm waiting it to set before smoothing it in. Also I began to thin the cockpit coaming interior somewhat, I think the former next to the seat needs to extend upwards a little. Unfortunately I havent any pics of this but I do have shots showing a little work in the cockpit.
Here I started adding details but redid the pulley so the cable looks right from above when fitted. 3 discs, the centre one having the edge trimmed to suit. I've added the mag wiring harness, the greaser and primer pump and pipework, the fuel control panel will be added after the woodwork is painted, which may be soon...possibly. I have to get the various other parts ready to wood up at the same time.
I had wooded the fuselage interioir but looking at it after and realising the floor wasnt done I rubbed her down and am going to redo. But the lower wing is on and the gaps filled. Yes I can fit the interior into it as an assembly
Perhaps later today I can redo the pics that glammed up on me this morn.
I added a lip around the lower rear of the fuel tank, adding spotweld/brazing with a rivet wheel.
Anyway, disjointed I know but..hey thats me
Ta Keith.

JackFlash
Joined: January 25, 2004
KitMaker: 11,669 posts
AeroScale: 11,011 posts
Posted: Sunday, March 13, 2011 - 07:36 AM UTC
Keith Please Model On!
Kornbeef
Joined: November 06, 2005
KitMaker: 1,667 posts
AeroScale: 1,551 posts
Posted: Sunday, March 13, 2011 - 08:12 AM UTC
Hi all
Stephen yes that is my intention.
I redid the extra pics as I said I might, a little harsh because the flash but at least the lens is clean.
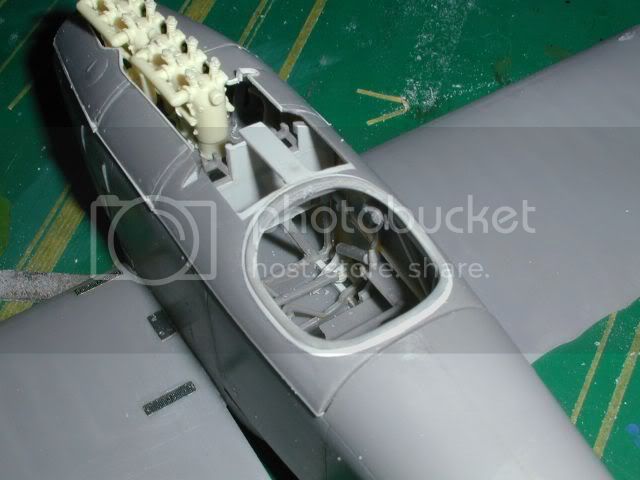
Mainly just dryfitted shots of the cockpit module and coaming in place and one shot of the underside joints which is still quite rough. I've shimmed up the bottom edge of the coaming/cowls to lift the whole part and align it better with the spine and it also creates a truer circle around the spinner. The engine, I decided to go with a 50/50 Roden/resin set up, in my usual way, after all only the top half is really visible and I will fit it after the cowling assembly is fixed and finished... This makes life simpler to my mind at least. Anyway I didnt get as much done as hoped. Today was bonding day as I stripped my sons Warhammer figures of paint for him
TTFN
Keith
Stephen yes that is my intention.
I redid the extra pics as I said I might, a little harsh because the flash but at least the lens is clean.
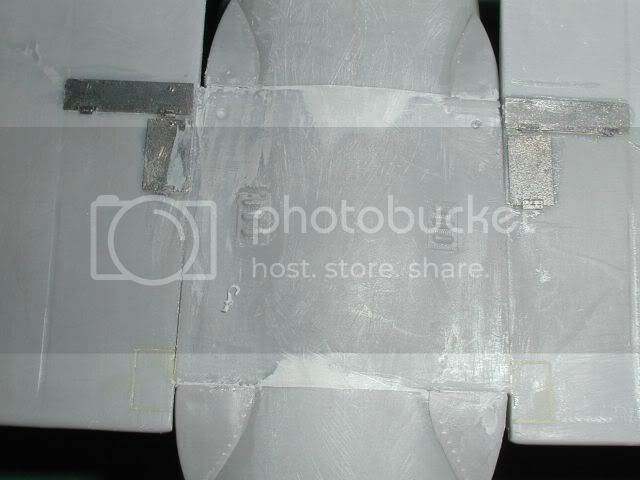
Mainly just dryfitted shots of the cockpit module and coaming in place and one shot of the underside joints which is still quite rough. I've shimmed up the bottom edge of the coaming/cowls to lift the whole part and align it better with the spine and it also creates a truer circle around the spinner. The engine, I decided to go with a 50/50 Roden/resin set up, in my usual way, after all only the top half is really visible and I will fit it after the cowling assembly is fixed and finished... This makes life simpler to my mind at least. Anyway I didnt get as much done as hoped. Today was bonding day as I stripped my sons Warhammer figures of paint for him
TTFN
Keith
Mgunns
Joined: December 12, 2008
KitMaker: 1,423 posts
AeroScale: 1,319 posts
Posted: Monday, March 14, 2011 - 06:42 AM UTC
Hi Keth:This is coming along nicely. I like your interior work, the magneto switch attachment point is really noteworthy as is all the rest. I constantly marvel at how you can take somethingthat is pretty decent SOOTB and really work it into a masterpiece. I am ejoying your work.
Best
Mark
OEFFAG_153
Joined: February 19, 2010
KitMaker: 1,473 posts
AeroScale: 1,450 posts
Posted: Monday, March 14, 2011 - 07:28 AM UTC
Hi Keith very nice progress on the DII Your extra attention to details is as usual beautifully executed and will certinly pay off in the finished item
Not sure if you've solved the question of cammo as yet but here's a link I got some time ago via Stephen on DI/DII cammo by Dan San Abbot. A very inteersting read... DII cammo article
Best Regards
Mikael
Not sure if you've solved the question of cammo as yet but here's a link I got some time ago via Stephen on DI/DII cammo by Dan San Abbot. A very inteersting read... DII cammo article
Best Regards
Mikael
Kornbeef
Joined: November 06, 2005
KitMaker: 1,667 posts
AeroScale: 1,551 posts
Posted: Monday, March 14, 2011 - 08:35 AM UTC
Mikael.
Many many many thanks for that, not only did it solve my probs with the camo it also points out a few little differences like wheel/tyre sizes. The only trouble now isthat it raises two more things.
1 I want to build another DII already...seeing those camo variations
2 The DII is beginning to overtake the DIII as my favourite Albi
Again Many thanks for sharing that gem of info...
Keith.
OEFFAG_153
Joined: February 19, 2010
KitMaker: 1,473 posts
AeroScale: 1,450 posts
Posted: Tuesday, March 15, 2011 - 06:12 AM UTC
Glad I could help Keith
As you say, difficult only making one DII lets see... one in LVG cammo scheme one with a wooden fuselage one in Ottoman markings Hmmmm
As you say, difficult only making one DII lets see... one in LVG cammo scheme one with a wooden fuselage one in Ottoman markings Hmmmm
Kornbeef
Joined: November 06, 2005
KitMaker: 1,667 posts
AeroScale: 1,551 posts
Posted: Tuesday, March 15, 2011 - 07:46 PM UTC
Yes Mikael isnt that so?
Well a little update, I have the interior almost ready to basecoat ready for the wood graining. I spent a lot of the reast of the time working on the coaming and adding detail to the tail, adding the underside of the rad and cabane mounting points to the upperwing. that and preparing the many rigging points.
 .
.
I've added the beading around the breech openings, modded the padding yet again, odd how things look right till you begin to assemble components isnt it?
 .
.
Here you might just make out the tabs for the rigging etch from the P of P Camel set
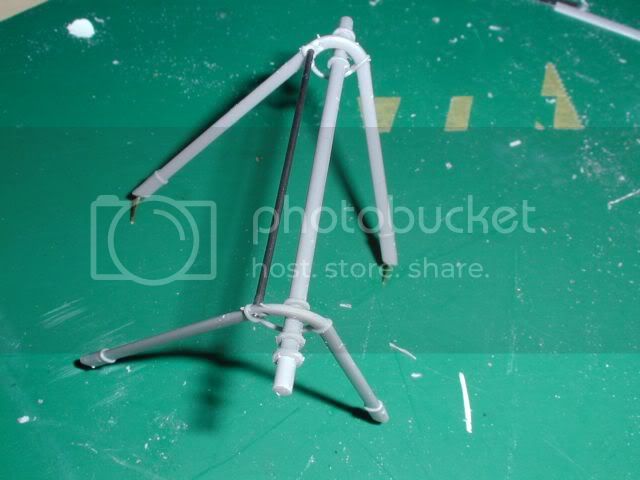
U/c started, pinned at the mounting points to the fuselage, a steel length added instead of the plastic for strength and set aside to dry before extra detail and bungeeing.

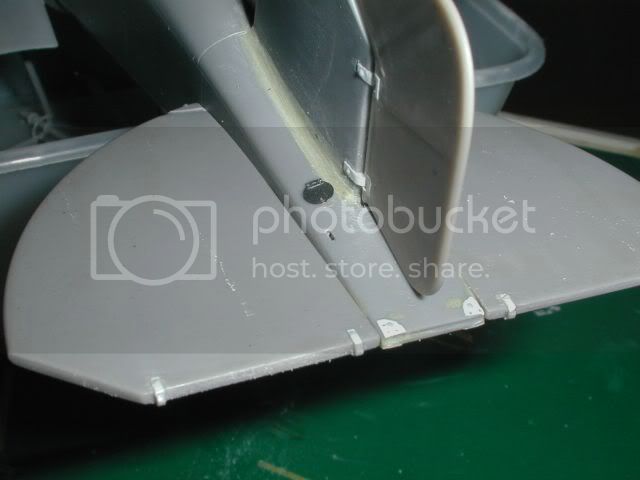

A few shots of the tail area, I added the rudder mounts, and bolt heads, brackets on the tail and began cutting back the milliput fairing underneath the skid support a little. I still have the skid brackets to do and a few bits to add. I was thinking of using some spare wingrib decals to just add a little depth and detail to theflying sufraces before painting the topcoats.
Well thats all for now.
comments always welcome.
Keith
Well a little update, I have the interior almost ready to basecoat ready for the wood graining. I spent a lot of the reast of the time working on the coaming and adding detail to the tail, adding the underside of the rad and cabane mounting points to the upperwing. that and preparing the many rigging points.
.I've added the beading around the breech openings, modded the padding yet again, odd how things look right till you begin to assemble components isnt it?
. Here you might just make out the tabs for the rigging etch from the P of P Camel set
U/c started, pinned at the mounting points to the fuselage, a steel length added instead of the plastic for strength and set aside to dry before extra detail and bungeeing.
A few shots of the tail area, I added the rudder mounts, and bolt heads, brackets on the tail and began cutting back the milliput fairing underneath the skid support a little. I still have the skid brackets to do and a few bits to add. I was thinking of using some spare wingrib decals to just add a little depth and detail to theflying sufraces before painting the topcoats.
Well thats all for now.
comments always welcome.
Keith
thegirl
Joined: January 19, 2008
KitMaker: 6,743 posts
AeroScale: 6,151 posts
Posted: Wednesday, March 16, 2011 - 12:03 AM UTC
Very nice job done on adding the extra details to make this project really pop !
Looking forward to the next up-date
Looking forward to the next up-date
dmopath
Joined: July 02, 2010
KitMaker: 175 posts
AeroScale: 174 posts
Posted: Wednesday, March 16, 2011 - 12:30 AM UTC
Most impressive. I just purchased this kit, and your build will be an excellent reference.
Kornbeef
Joined: November 06, 2005
KitMaker: 1,667 posts
AeroScale: 1,551 posts
Posted: Wednesday, March 16, 2011 - 12:06 PM UTC
thanks for the encouragement. had to do the W word today so got nothing done. Hoping to basecoat the interior and other woodie bits tomorrow at least.
TA K
had to do the W word today so got nothing done. Hoping to basecoat the interior and other woodie bits tomorrow at least.TA K

Repainted
Joined: April 04, 2006
KitMaker: 1,058 posts
AeroScale: 1,004 posts
Posted: Wednesday, March 16, 2011 - 11:43 PM UTC
Impressive work you have here my friend.As always I´m tempted to restart my old hobby again.Lazy me
//Larsa
//Larsa
Kornbeef
Joined: November 06, 2005
KitMaker: 1,667 posts
AeroScale: 1,551 posts
Posted: Saturday, March 19, 2011 - 04:14 AM UTC
No pics but a little update, today I was woodgraining the interior, fiddly but I think once it dries amd I get other details painted it will look okay. On the other hand I'm looking for ways of representing rib tapes, even tried sellotape but its too prominent.. I was thinking of ribtape decal just to give some representation under the paint.
Ta K
Ta K
thegirl
Joined: January 19, 2008
KitMaker: 6,743 posts
AeroScale: 6,151 posts
Posted: Saturday, March 19, 2011 - 07:14 AM UTC
What , no pic's of your wood grain ? I don't know if I will make through the day now and all ! hehehe
For the rib tapes how about use bare metal foil ? Thinner then using clear tape and will have a more in scale apperence .
You can also layer it it as well starting with a thin strip and the one which goes over top is just a bit wider .
For the rib tapes how about use bare metal foil ? Thinner then using clear tape and will have a more in scale apperence .
You can also layer it it as well starting with a thin strip and the one which goes over top is just a bit wider .
Kornbeef
Joined: November 06, 2005
KitMaker: 1,667 posts
AeroScale: 1,551 posts
Posted: Sunday, March 27, 2011 - 10:53 AM UTC
Hah Terri funny girl..
been a few days, times been tight but made some progress and got a few snaps to whet Terri's appetite.
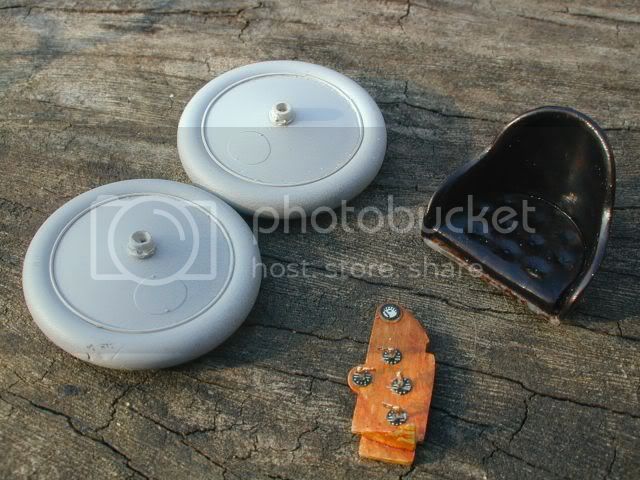
the detailed wheels actually pinched of my DIII(OAW) kit Apparently OAW used different wheel/tyre config to Albatros. The seat needs the front of the wooden base painting otherwise is ready for belts. The fuel control panel, almost ready to pop into the cockpit module, just needs a coat of Kleer, a little wearing in and the pipework adding to the rear side.

A few shots of the cockpit module and the mods to the inner side of the coaming

Finally a parting shot of it all dryfitted together, sorry but the light was fading...not enough to trigger the flash though.
Onward and upward
Keith
been a few days, times been tight but made some progress and got a few snaps to whet Terri's appetite.
the detailed wheels actually pinched of my DIII(OAW) kit Apparently OAW used different wheel/tyre config to Albatros. The seat needs the front of the wooden base painting otherwise is ready for belts. The fuel control panel, almost ready to pop into the cockpit module, just needs a coat of Kleer, a little wearing in and the pipework adding to the rear side.
A few shots of the cockpit module and the mods to the inner side of the coaming
Finally a parting shot of it all dryfitted together, sorry but the light was fading...not enough to trigger the flash though.
Onward and upward
Keith
 |

WEB HOSTING BY


Copyright ©2021 AeroScale and Kitmaker Network, a subsidiary of Silver Star Enterprises
All Rights Reserved. Please read our Conditions of Use and Privacy Policy.
All Rights Reserved. Please read our Conditions of Use and Privacy Policy.