KotS GB 2011 Junkers J.I JackFlash
Colorado, United States
Joined: January 25, 2004
KitMaker: 11,669 posts
AeroScale: 11,011 posts
Posted: Monday, March 28, 2011 - 03:44 AM UTC
". . .The most important thing is to know why you build and then get the most that you can out of building." via D.D.
Alberta, Canada
Joined: January 19, 2008
KitMaker: 6,743 posts
AeroScale: 6,151 posts
Posted: Monday, March 28, 2011 - 02:55 PM UTC
Looking sweet Stephen ! are you going to reproduce the glass in the scope on the 14/17 ?
Colorado, United States
Joined: January 25, 2004
KitMaker: 11,669 posts
AeroScale: 11,011 posts
Posted: Monday, March 28, 2011 - 03:36 PM UTC
Greetings Terri,
Yes, I intend on further detailing and even a bit of gunmetal dry brushing.
". . .The most important thing is to know why you build and then get the most that you can out of building." via D.D.
England - South East, United Kingdom
Joined: November 06, 2005
KitMaker: 1,667 posts
AeroScale: 1,551 posts
Posted: Monday, March 28, 2011 - 08:15 PM UTC
They look just great Stephen obviously still WIP but those barrels just give them that extra zap.
On the Roland I tried washing the blued areas witth Blue ink from Citadel, I got a reasonable result, one I'm going to experiment further with.
Looking forwards to seeing you do the mod on this one.
Keith
Still can't cure the AMS even with sausage finger implants & olde eyes.
Colorado, United States
Joined: January 25, 2004
KitMaker: 11,669 posts
AeroScale: 11,011 posts
Posted: Tuesday, March 29, 2011 - 03:17 PM UTC
The lets move on! My next move is to build a mock up of the cockpit interior and save the kit part til I am sure of cuts I need to make. Always keep scrap sheet plastic! It comes in handy for these things.

". . .The most important thing is to know why you build and then get the most that you can out of building." via D.D.
Västra Götaland, Sweden
Joined: February 19, 2010
KitMaker: 1,473 posts
AeroScale: 1,450 posts
Posted: Wednesday, March 30, 2011 - 02:42 AM UTC
Beautiful work on the MGs Stephen and a very interesting build thread!
Mikael
_________________________________________________________
Just finished the Wingnut Wings Taube. On to the Junkers D.1
Kentucky, United States
Joined: July 02, 2010
KitMaker: 175 posts
AeroScale: 174 posts
Posted: Wednesday, March 30, 2011 - 07:03 AM UTC
A magnificent beginning, sir...
I noticed that my lower wing does cause some minuscule splitting of the seams when dry-fitted, along with major excavation of the fuselage mount to get the center portion of the wing to seat properly. No problems with the upper wing. I guess it depends on the mold.
I will continue to follow your build closely.
"I took German in school...but I can't understand the way these foreigners speak it." The Dawn Patrol (1938)
Dennis O'C
North Carolina, United States
Joined: June 19, 2007
KitMaker: 604 posts
AeroScale: 600 posts
Posted: Thursday, March 31, 2011 - 02:55 AM UTC
Stephen,
Glad to see you had no wing fit issues this time! The MGs look fantastic!
RAGIII
Colorado, United States
Joined: January 25, 2004
KitMaker: 11,669 posts
AeroScale: 11,011 posts
Posted: Monday, April 04, 2011 - 04:48 PM UTC
". . .The most important thing is to know why you build and then get the most that you can out of building." via D.D.
Colorado, United States
Joined: January 25, 2004
KitMaker: 11,669 posts
AeroScale: 11,011 posts
Posted: Monday, April 04, 2011 - 04:54 PM UTC
As you can see some attempt has been made to repaint the basic colours on the outside.
But significant colour notations for the interior need to be observed.
.jpg)
They also seem to have repaired the instrument panel in the pilot's cockpit. Now when you see the images from the WNW instruction booklet you see the original state of deterioration and the extent of how differently the paint was applied to certain areas.
Note the white areas near the rear cockpit flooring and on the twin parabellum supprt frames are white (well worn but white).
". . .The most important thing is to know why you build and then get the most that you can out of building." via D.D.
Colorado, United States
Joined: January 25, 2004
KitMaker: 11,669 posts
AeroScale: 11,011 posts
Posted: Monday, April 04, 2011 - 05:21 PM UTC
The two images shown here are at the bottom of the instruction page 18 tend to show Junkers J.I 816/17 before restoration began.
.jpg)
.jpg)
". . .The most important thing is to know why you build and then get the most that you can out of building." via D.D.
Colorado, United States
Joined: January 25, 2004
KitMaker: 11,669 posts
AeroScale: 11,011 posts
Posted: Thursday, April 07, 2011 - 02:06 AM UTC
Ok here is some progress.
It is not yet glued in place here so I can push it in further.

Here I am checking the angle of the gun with the hole.


". . .The most important thing is to know why you build and then get the most that you can out of building." via D.D.
Colorado, United States
Joined: January 25, 2004
KitMaker: 11,669 posts
AeroScale: 11,011 posts
Posted: Thursday, April 07, 2011 - 02:19 AM UTC
Here the clearance holes for the bullet path are plotted upper surface lower wing.

Here the clearance holes for the bullet path are plotted under surface lower wing.

These next images show the basic colours of the interior of J.I 816/17 and the modified instrument panel. The PE Bosch starter magneto is from a left over Part of Paland brass set . The kit item was removed. The current restoration on the original shows this starter mag has been moved to the new location.

There will be some white portions added to the rear cockpit per the original airframe. More to come.

". . .The most important thing is to know why you build and then get the most that you can out of building." via D.D.
Colorado, United States
Joined: January 25, 2004
KitMaker: 11,669 posts
AeroScale: 11,011 posts
Posted: Monday, April 18, 2011 - 08:12 PM UTC
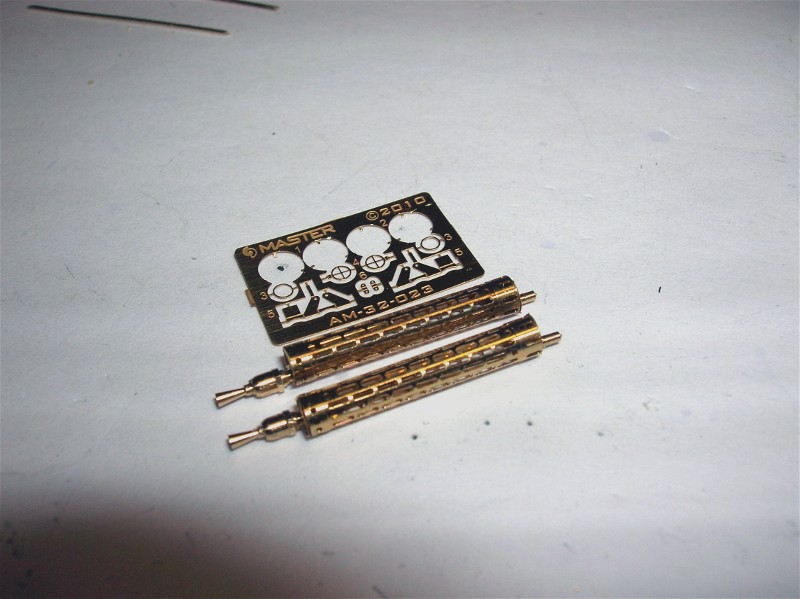
I have had to rethink my appraisal of the Parabellums being used in this Junkers J.I. Several things have changed my thinking.
1. WNW Richard Alexander's e-mails
2. German munitions expert Dave Watts e-mails.
3. This image.
4. A possible image I am seeking from Harry Woodman's archive.
One or both of these may have been the late Spandau Maxims that were the 13mm bore. So instead of the Air Master Parabellums I intend on using the Air Master Spandaus. Also over all they fit better than the Parabellums. Next to work out the triggering mechanism.
". . .The most important thing is to know why you build and then get the most that you can out of building." via D.D.
Colorado, United States
Joined: January 25, 2004
KitMaker: 11,669 posts
AeroScale: 11,011 posts
Posted: Thursday, May 19, 2011 - 03:11 AM UTC
Quoted Text
I have had to rethink my appraisal of the Parabellums being used in this Junkers J.I. Several things have changed my thinking.
1. WNW Richard Alexander's e-mails
2. German munitions expert Dave Watts e-mails.
3. This image.
4. A possible image I am seeking from Harry Woodman's archive.
One or both of these may have been the late Spandau Maxims that were the 13mm bore. So instead of the Air Master Parabellums I intend on using the Air Master Spandaus. Also over all they fit better than the Parabellums. Next to work out the triggering mechanism.
Recent research has proved to me at least that the 13mm Maxims were not used on this machine. So I'll be using the Air Master Spandaus.
". . .The most important thing is to know why you build and then get the most that you can out of building." via D.D.
Colorado, United States
Joined: January 25, 2004
KitMaker: 11,669 posts
AeroScale: 11,011 posts
Posted: Thursday, May 19, 2011 - 03:36 AM UTC

Looking forward at the various angles that need to be negotiated for the Spandau Maxim gun support framing.

Working on the bits and bobs. Anything metal gets a coat of Testors Aluminum (buffable) and a coat of clear Dullcote. Next the Basic colour. The engine access cowls are being simulated to have heat distortion in the basic colour.
". . .The most important thing is to know why you build and then get the most that you can out of building." via D.D.
Västra Götaland, Sweden
Joined: February 19, 2010
KitMaker: 1,473 posts
AeroScale: 1,450 posts
Posted: Thursday, May 19, 2011 - 07:49 PM UTC
HI Stephen great to see you're making progress with this build and looking great too! Hope to see more as it develops.
Best Regards
Mikael
_________________________________________________________
Just finished the Wingnut Wings Taube. On to the Junkers D.1
Colorado, United States
Joined: January 25, 2004
KitMaker: 11,669 posts
AeroScale: 11,011 posts
Posted: Wednesday, June 08, 2011 - 03:54 AM UTC
Working on a few kit interior pieces.


Fuselage only held together not fixed yet.

". . .The most important thing is to know why you build and then get the most that you can out of building." via D.D.
Alberta, Canada
Joined: January 19, 2008
KitMaker: 6,743 posts
AeroScale: 6,151 posts
Posted: Saturday, June 18, 2011 - 03:14 AM UTC
Still don't like the idea of sitting on top on the gas tank, but excellent progress Stephen !
Colorado, United States
Joined: January 25, 2004
KitMaker: 11,669 posts
AeroScale: 11,011 posts
Posted: Tuesday, July 19, 2011 - 09:35 PM UTC
Greetings all,
The build does progress. Images to post in the next couple of days. I am almost ready to close up the fuselage now. The cradle has come together well enough but I had to modifiy my early assumption that downward firing Parbellums were used when in fact it was Spandau Maxims. So I have switched from Master Parbellums to their Maxims.
". . .The most important thing is to know why you build and then get the most that you can out of building." via D.D.
New Jersey, United States
Joined: June 02, 2006
KitMaker: 1,212 posts
AeroScale: 468 posts
Posted: Wednesday, July 20, 2011 - 03:17 AM UTC
Missed this thread until now. Looks good.
Texas, United States
Joined: February 01, 2007
KitMaker: 365 posts
AeroScale: 356 posts
Posted: Thursday, July 21, 2011 - 01:56 AM UTC
Stephen,
The ol'girl sure is coming along nicely my friend. Very impressive Master -Model PE.
Highest Regards,
Gregory Jouette

Colorado, United States
Joined: January 25, 2004
KitMaker: 11,669 posts
AeroScale: 11,011 posts
Posted: Sunday, August 28, 2011 - 09:53 PM UTC
Good news! The rear cockpit cradle for the downward firing Spandaus is almost finished. I'll have some images in the next couple of days. I am trying to finish up some of these cockpit details. Then on to the engine.
". . .The most important thing is to know why you build and then get the most that you can out of building." via D.D.
New Jersey, United States
Joined: June 02, 2006
KitMaker: 1,212 posts
AeroScale: 468 posts
Posted: Monday, August 29, 2011 - 02:04 PM UTC
A couple of days? Unacceptable

OK... sorry... we'll wait

Colorado, United States
Joined: January 25, 2004
KitMaker: 11,669 posts
AeroScale: 11,011 posts
Posted: Tuesday, August 30, 2011 - 05:50 AM UTC
". . .The most important thing is to know why you build and then get the most that you can out of building." via D.D.


.jpg)
.jpg)
.jpg)
.jpg)


