Quoted Text
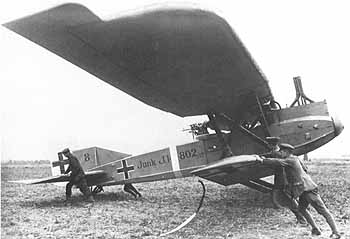
Images here are from the WNW site and were taken by Giorgio Dorat. They show the rear cockpit of the Junkers J.I in Milan. . .The divider wall between the front and rear cockpit has been removed to accomidate the twin parabellum installation. . . "
.jpg)
.jpg)
Some interesting and important facts can be gleaned from the images above. These must be identified BEFORE you begin altering the plastic kit. For instance, note the opening for the right hand gun in the lower fuselage. The fuel tank that doubles as the pilot's chair has a wedge cut back at its lower rear facing edge. This is then repaired with a curved piece welded in place. This is for the right hand gun jacket clearance. The gun mounts are staggered because the ammo drums were stacked.
The spindle that holds the ammo drums in place has two different thickness'. This is so they could use drums with two different sized holes. Why would they do that? The ammo drums had to be different sized so not to get them mixed up if the gunner had to rearm in flight. Again why? Because there were two different types of ammo used.
1. Normal, exploding & tracer rounds for sighting in or hitting soft targets - human.
2. Armour piercing tracer rounds. The crew had to carry special documents so if brought down they might not be criminally charged for carrying them.
So it seems this aircraft was designed to hit both soft (human) & hard targets (Tanks and convoy vehicles).
The Central Powers developed their own variants of the tracer and the "LS" was in use by late 1916. LS stood for Leuchtspur - luminous tracing ammunition. An armour piercing tracer was introduced in early 1917, known as the PL - Panzer Leuchtspur. British tests showed this round to be almost as effective as a standard armour piercing round. As has been noted in tech manuals, as the tracing element (usually phosphorous) burned out, bullet weight changed and trajectory was affected. However, since most ground war combats were conducted nearly at pistol range, trajectory shift woulda been minimal.
Here we see the first element of the problematic issues that arose from this weapon. The German Parabellum guns would have to be more substantial and have longer & larger rounds to be effective. Standard Parabellums would not be able to carry ordinance that would be highly effective. The standard German round was 7.92mm. Even the British developed a Vickers mg balloon gun that used 11mm rounds.
In addition some German aircraft carried a normal round intended to explode with a puff of smoke after some 350-400 meters. The purpose was to give the pilot an idea of range rather than that the explosion was intended to do any damage since rifle caliber rounds were to small to carry a meaningful explosive charge.
German pilots had to get permission for every time they went up with incendiary ammo ( LS or PL)- therefore the pilot had a passport/booklet saying that he was allowed to use this ammo for a (balloon or vehicle) attack. His commander had to sign it verifying the use for every such mission.
Note I have come to the conclusion that Spandau Maxims were used instead of Parabellums. Thanks to Richard Alexander and Dave Watts.


 (I can explain the lapse... it was the