KotS GB 2011 Albatros D.Va wing_nut
Alberta, Canada
Joined: March 08, 2009
KitMaker: 394 posts
AeroScale: 360 posts
Posted: Tuesday, May 24, 2011 - 01:17 AM UTC
Your right, Marc. In the pic, it does look like the grain diminished somewhat after applying a wet covering. But, I can guess that it does look more pronounced in real life.
I believe that cameras often generalize whats there in color differiation, and then our brain tries to correct difficiencies to what we know as normal. Like our seeing incadescent light as yellowish white when its actually red in reality.
I usually try to use natural, diffused light (not direct sunlight). Most of my photos are taken indoors using natural light through a window. I have a white, silk umbrella to diffuse harsh light, and I often use white card as light reflectors to fill shadow. It seems to work for me, but then again, I'm certainly no photographer.
I remain very impressed with your outstanding modeling prowess; you are putting together a fine D.Va.

Current Projects: 1/144 R5D-3 (MiniCraft)
1/48 Ford Flivver (Williams Bro.)
1/72 UC-64A Norseman (MatchBox)
MAAC No.51187
IPMS CANADA No. 3369
Alberta, Canada
Joined: July 26, 2010
KitMaker: 1,032 posts
AeroScale: 1,025 posts
Posted: Tuesday, May 24, 2011 - 01:35 AM UTC
Quoted Text
Now that is a very interesting tecnique very nicely done Marc this thread is really developing into a great tutorial on various hints and tips!
Mikael
Marc,
Neat! (and very nice results.) I'd like to try this technique. Mig Pigments, are they a stick, pencil, or powder or what format? I assume Mig is the brand name, will try to Google it however any info you can add would be great.
Cheers,
Lance
Officially Retired as of 20 August 2013 and looking forward to some un-interrupted bench time. Currently starting Roden's Nieuport 28 and hoping to follow that with another WNW Fokker DVII.
Arizona, United States
Joined: December 12, 2008
KitMaker: 1,423 posts
AeroScale: 1,319 posts
Posted: Tuesday, May 24, 2011 - 04:35 AM UTC
Hi Marc:
Very neat idea indeed. I ordered some of that mig powder, will try it on a future project. Yours really is impressive.
Best
Mark
We few, we happy few........
New Jersey, United States
Joined: June 02, 2006
KitMaker: 1,212 posts
AeroScale: 468 posts
Posted: Tuesday, May 24, 2011 - 01:10 PM UTC
Thanks again guys.
Mark, yup that's the stuff The one I used is New Wood.
Lance if you not searched them yet, they are powders.
Guy, I may try to play wit the contrast setting in the camera. Or maybe direct sunlight. It may just need that harsh unidirectional light. But that's for a different forum

For anyone trying this I should let you know, I was going for a pretty muted grain so the pigments where brushed off form what the pics show right after the paper template is removed. Play around with it though. I think there is a lot of fun stuff that can be done this way.
New Jersey, United States
Joined: June 02, 2006
KitMaker: 1,212 posts
AeroScale: 468 posts
Posted: Wednesday, May 25, 2011 - 11:30 AM UTC
I am running out of sub-assemblies and other tasks to do. I am about to be forced to start putting this thing together and

rig the thing.
So some procedural questions for the experienced rag wing guys. Wings are are almost all done as far as marking. Do I put the flat coat on and some weathering before it goes on with the struts? Same goes for the fuselage.... get it as done as possible then start the assembly?
I also see pics of other models and there is a birds nest of wires on a wing or the side of a fuselage. Get one end of a planned rigging wire into the wing before hand? Or is it possible to work between the wings and do that after?
I don't mind telling you, I am just a wee bit nervous at the up coming steps. Still loads of places to F this thing up.

England - South East, United Kingdom
Joined: November 06, 2005
KitMaker: 1,667 posts
AeroScale: 1,551 posts
Posted: Wednesday, May 25, 2011 - 07:41 PM UTC
Lovely work Marc.
Yes its easiest to get as complete as possible before fitting the upper wing and rigging.
Yes its also easier to pre rig one end of as many as possible of the interplane rigging.
Don't worry...

Still can't cure the AMS even with sausage finger implants & olde eyes.
New Jersey, United States
Joined: June 02, 2006
KitMaker: 1,212 posts
AeroScale: 468 posts
Posted: Thursday, May 26, 2011 - 12:35 AM UTC
Bayern, Germany
Joined: December 11, 2010
KitMaker: 64 posts
AeroScale: 57 posts
Posted: Thursday, May 26, 2011 - 02:02 AM UTC
Excellent approach! I spent a lot of time in research on this as well.
This post made me to run a test instantly. I had good experiences with a additional thin layer of brown oil colour, applyed with a chisel brush. It brings some additional depth because auf the traces the brush hairs leave.
The cross effects are nice.
Maybe you have the mood to try it as well. Guess you will like it.
If you dislike, you can whipe it off and everything is just as before.
Thanks for inspiration!
Great!
New Jersey, United States
Joined: June 02, 2006
KitMaker: 1,212 posts
AeroScale: 468 posts
Posted: Friday, May 27, 2011 - 01:15 AM UTC
Thanks Alex. I will be giving that added effect a try. At our club meeting we usually have a little work shop on techniques and will be putting one together on this.
New Jersey, United States
Joined: June 02, 2006
KitMaker: 1,212 posts
AeroScale: 468 posts
Posted: Friday, May 27, 2011 - 02:10 AM UTC
I think we all have those little milestones that get us excited. One of mine is getting the decal finished. I think its the 1st peel off formation while I make motor noises
The weather process has started too. The first thing to do was add some depth to the wings. A pot-it on one side of the rib and some thinned Tamiya smoke on the other. Have spent most of my recent time ,the last couple of years, in the armor forums, this has come to be known as color modulation. Giving the impression of 3D when there isn't any. Is this term used in aircraft as well? I plan to give the wings a few coats of a buff filter to tone down the lozenge color. Should have done that first.

The smoke will come off easily with some alcohol.
Västra Götaland, Sweden
Joined: February 19, 2010
KitMaker: 1,473 posts
AeroScale: 1,450 posts
Posted: Friday, May 27, 2011 - 02:52 AM UTC
Very nice and a beautiful profile to do.
The smoke over the Loz does ad depth I've used the same technique myself in the past though I'm not familiar with the technical terms you mention... Guess its an armour thing.
Mikael
_________________________________________________________
Just finished the Wingnut Wings Taube. On to the Junkers D.1
Colorado, United States
Joined: January 25, 2004
KitMaker: 11,669 posts
AeroScale: 11,011 posts
Posted: Friday, May 27, 2011 - 08:23 AM UTC
Quoted Text
'. . .The weather process has started too. The first thing to do was add some depth to the wings. A pot-it on one side of the rib and some thinned Tamiya smoke on the other. Have spent most of my recent time ,the last couple of years, in the armor forums, this has come to be known as color modulation. Giving the impression of 3D when there isn't any. Is this term used in aircraft as well?. . ."
We call it "Texturing".
". . .The most important thing is to know why you build and then get the most that you can out of building." via D.D.
New Jersey, United States
Joined: June 02, 2006
KitMaker: 1,212 posts
AeroScale: 468 posts
Posted: Sunday, May 29, 2011 - 08:10 AM UTC
Texturing... simple... to the point!
If you'll excuse me I need to go apply some selective spectrum dissection laminate. (coat of paint
)
New Jersey, United States
Joined: June 02, 2006
KitMaker: 1,212 posts
AeroScale: 468 posts
Posted: Monday, May 30, 2011 - 03:54 AM UTC
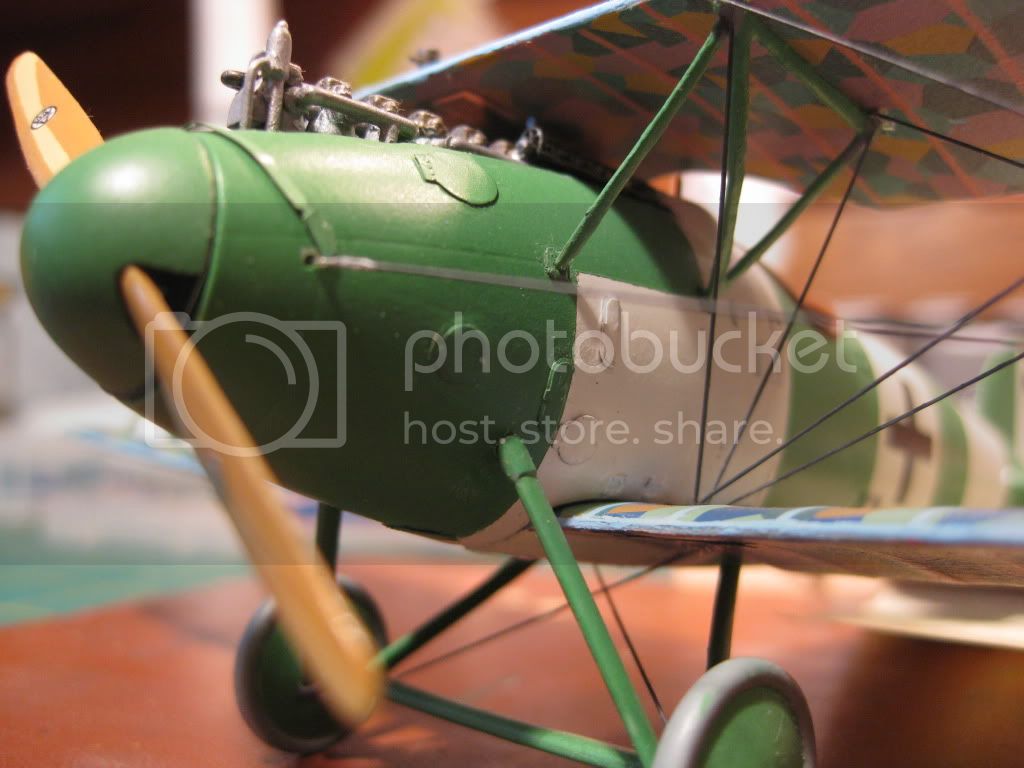
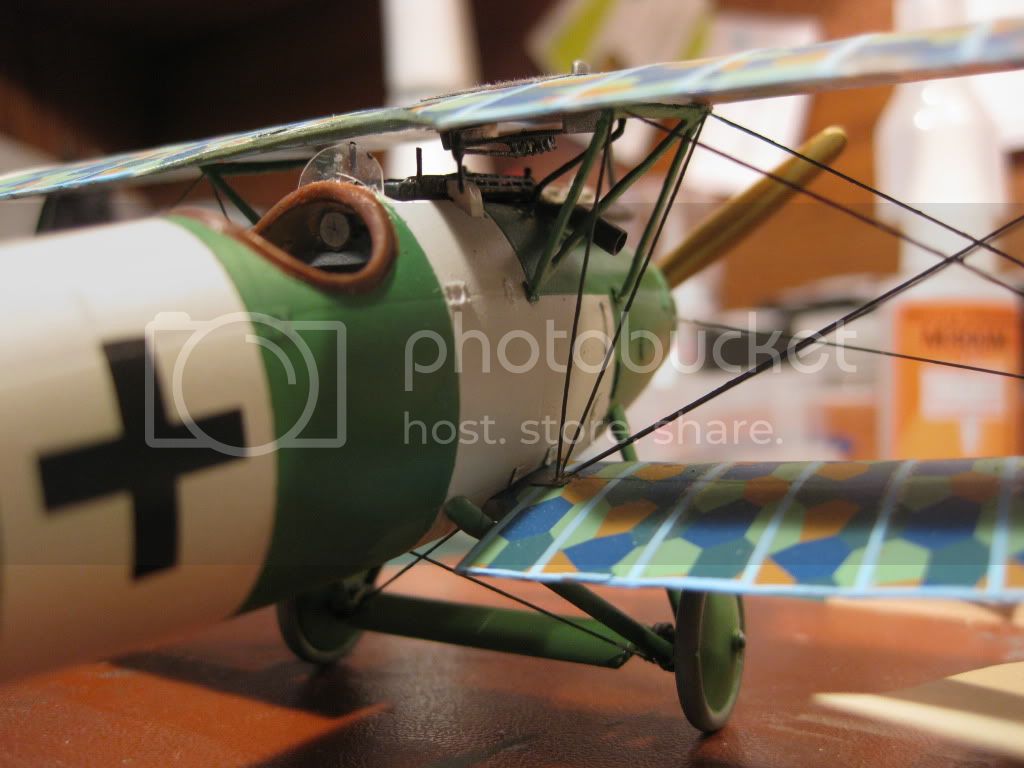
I think the fuselage is officially done. It's been flat coated and then a light buff to bring a slight sheen.
Had I remembered to do it before putting on the bottom wings, the largest of the rivet wheels would likely have worked well for the nail heads. I made pencil marks spaced 1/16" on tape and cut a thin strip, applied to the model and made the dimples with a sharp probe. Went surprising fast. Some dark gray oils rubbed in with a Q-Tip and wiped clean. I did screw one thing up with the nails though. Anyone?
And next Albatros I build... and there will be more... oh yes, there will be more
I iwll fill the panel lines and have a smooth fuselage and mask off th wood panels.
Prop is ready for a bunch of clear coats.

England - South East, United Kingdom
Joined: November 06, 2005
KitMaker: 1,667 posts
AeroScale: 1,551 posts
Posted: Monday, May 30, 2011 - 06:47 AM UTC
Diamond not X..... did the same myself once
Still can't cure the AMS even with sausage finger implants & olde eyes.
New Jersey, United States
Joined: June 02, 2006
KitMaker: 1,212 posts
AeroScale: 468 posts
Posted: Monday, May 30, 2011 - 12:59 PM UTC
Yeah NUTS
And boy was I ticked off when I realized. But... it's a model. Just as long as I don't do that next time
Alberta, Canada
Joined: July 26, 2010
KitMaker: 1,032 posts
AeroScale: 1,025 posts
Posted: Monday, May 30, 2011 - 02:44 PM UTC
Marc,
So, to go back to the "Largest of the rivet wheels for the nails".......I just ordered the 1/72 wheel from UMM - Unique Master Models. It's the black handled unit they sell as opposed to the Rosie the Riviter Set. Can you confirm which one you are saying is the correct spacing? I suspect since you specify the "larger one" it is not the 1/72 tool. No rush, our "Posties" are apparently about to indulge in their Bi-Annual Strike thus any mail orders will be significantly delayed.
Cheers,
Lance
Officially Retired as of 20 August 2013 and looking forward to some un-interrupted bench time. Currently starting Roden's Nieuport 28 and hoping to follow that with another WNW Fokker DVII.
New Jersey, United States
Joined: June 02, 2006
KitMaker: 1,212 posts
AeroScale: 468 posts
Posted: Tuesday, May 31, 2011 - 05:43 AM UTC
Hi Lance
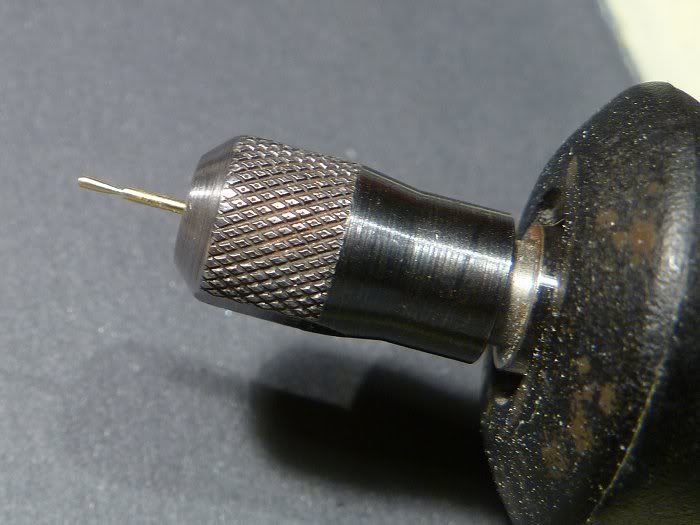
The 1/72 scale tool you ordered is the one i used on the wing seam stitching. The "largest" wheels referred to is the "D" wheel for the Trumpeter tool. The spacing is 1 MM or .04". Looks like UMM only has 1 tool with a 1 MM pattern but it's a Rosie so it is pricier. Yes it is easier to use than the Trumpeter but for less than $10 with 4 wheels sizes looks like a deal.
In the pic the top row is made with the "R"iveter an the bottom row with the "T"ape. BTW, I made that little test real quick so the tape nail head are not perfect. If you go slow they are neater.
Alberta, Canada
Joined: July 26, 2010
KitMaker: 1,032 posts
AeroScale: 1,025 posts
Posted: Tuesday, May 31, 2011 - 11:05 AM UTC
Mark,
Thanks for taking the time to answer my question and providing a "picture worth a thousand words". I now know exactly what I need and you're right, the lozenge seams will require the smaller wheel/tool. I'll have to order a 1mm spaced "Rosie"with my next mail order.
As an aside I used your wine bottle foil technique on the coaming of my DIII and added the tacks or rivets this morning. I'm sure I far surpassed your "pulting" record as I managed to launch at least 2 for every one succesfully installed. I hope to publish another update real soon and you can check out the results. I've got a way to go to match the realism you achieved however the technique was not as onerous as I thought it would be and I intend to continue to use your method. In order to not infringe on your patent I used foil from a bottle of Single Malt Scotch.....................wish I had known sooner as I've gone through a few of those in the past years and tossed out a lot of good modeling material! Thanks for sharing your method.
Cheers,
Lance

Officially Retired as of 20 August 2013 and looking forward to some un-interrupted bench time. Currently starting Roden's Nieuport 28 and hoping to follow that with another WNW Fokker DVII.
New Jersey, United States
Joined: June 02, 2006
KitMaker: 1,212 posts
AeroScale: 468 posts
Posted: Tuesday, May 31, 2011 - 11:37 AM UTC
Looking forward to seeing that coaming. And don't worry about throwing away the good modeling material. Just don't try to build up your stock of foil too quickly

New Jersey, United States
Joined: June 02, 2006
KitMaker: 1,212 posts
AeroScale: 468 posts
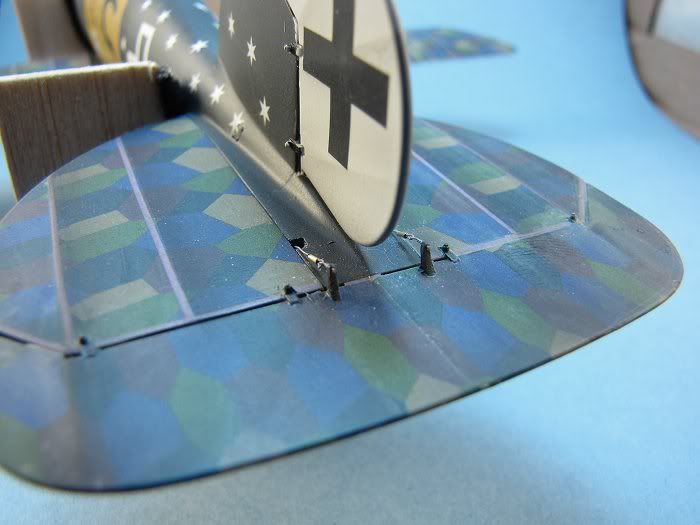
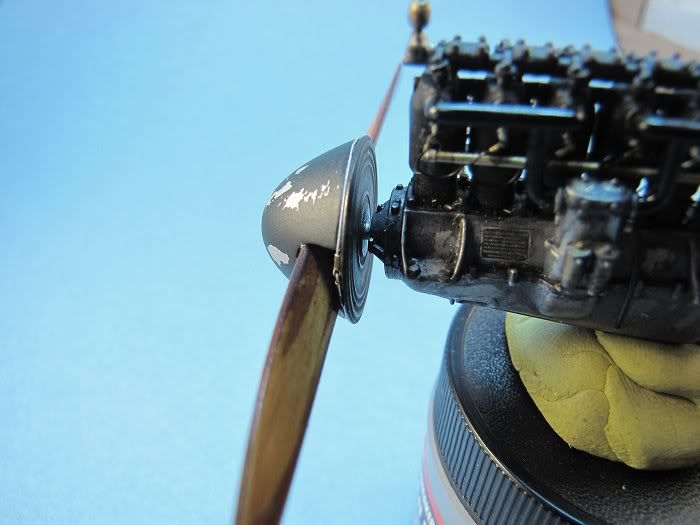
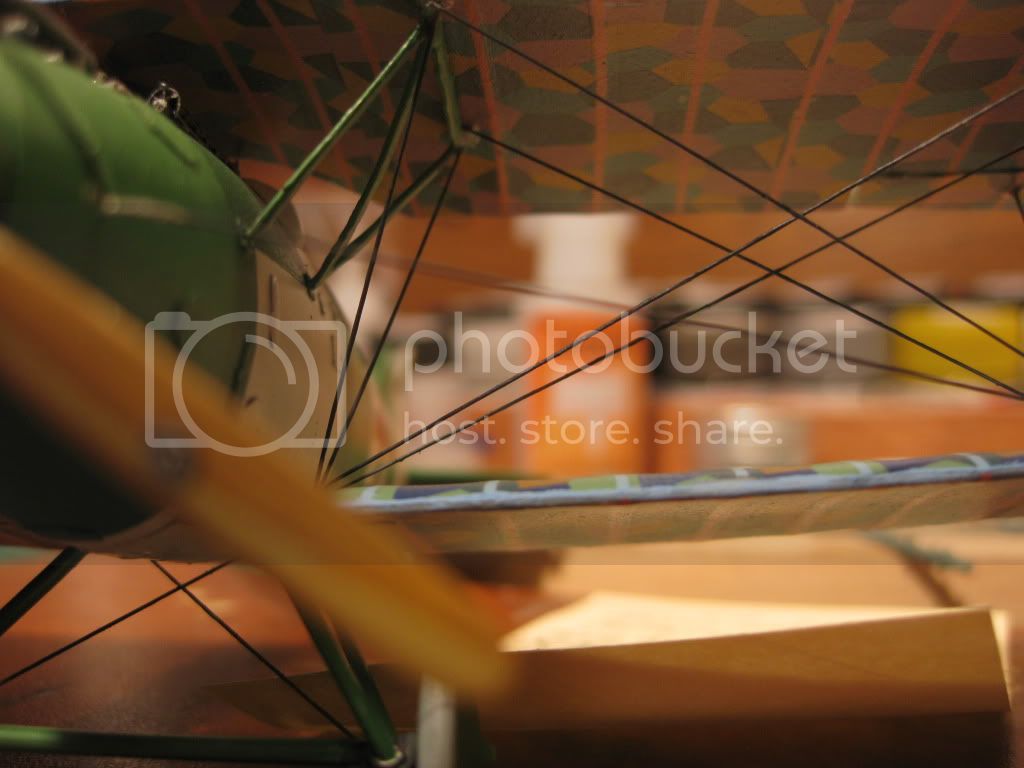
Posted: Thursday, June 02, 2011 - 12:49 AM UTC
My 1st WWI rigging

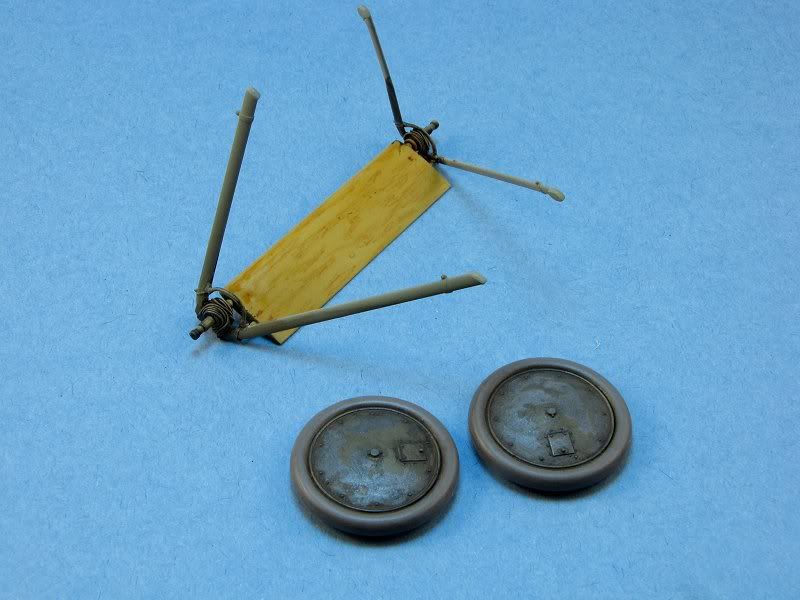
But I already have to make a decision. My choice of material may be nice in theory, it is difficult to work with. I am using .007" Ultra Wire. I think I had it in my head that using real wire would be cool. The plan was to get one end of the cable all fixed up with eyelets and turnbuckles and get that glued in place. Then the other end would go through an eyelet already in place, looped back through and another piece of brass tube and pulled taught. the problem is even through it fist through the tube doubled it does not slide very easily which is going to be very problematic when I am trying to fix the 2nd end once the upper wing is fixed in place. So the decision is... do i take off the few that I have done and change to invisible thread or take my lumps and muddle through and see what happens.
Anyway... just a few cables done... on the front of the fuselage, the elevators and the spinner. I am real happy with the way the spinner turned out. The beck outside edge of the spinner was beveled so when glue to the back plate there was a groove. But as described above what a PITA it was to get the cables linked.
Alberta, Canada
Joined: July 26, 2010
KitMaker: 1,032 posts
AeroScale: 1,025 posts
Posted: Thursday, June 02, 2011 - 04:01 AM UTC
Mark,
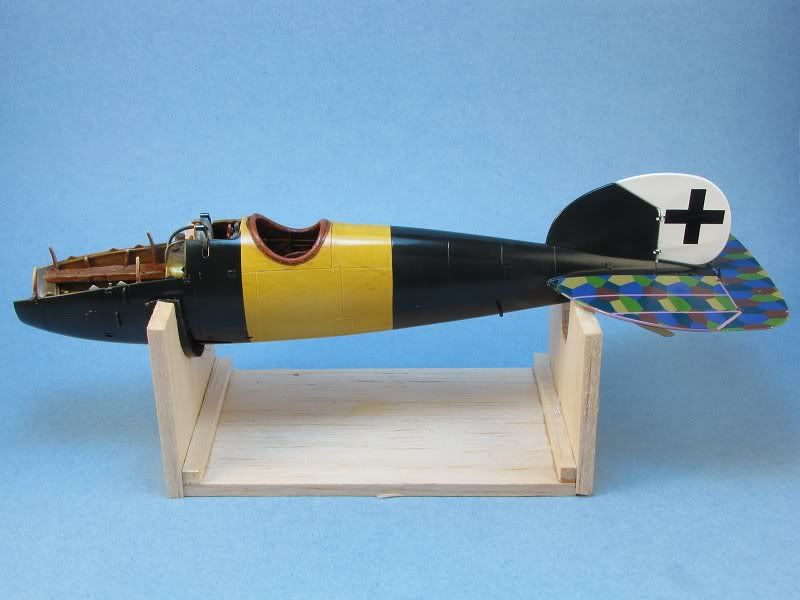
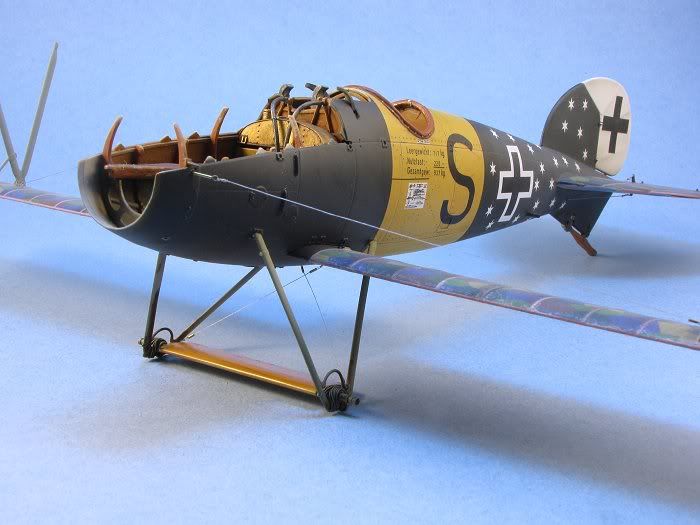
Been there.........done that! In the past I've used wire as well, albeit on the smaller (1/48) scale. I purchased a stock of various sized Guitar Wires and still have them hanging on a "stretcher board" in my workshop. I beleive the smallest is .18mm. My experience was like yours, couldn't bend it around at the terminal ends without leaving a curve at the end and / or not getting it taut enough. I still used it much like the old Dragon Kit wires, cut to a very accurate length and CA'ed in place at each end. The effect is OK on 1/48th as the "runs" are reasonably short and it doesn't sag ; in 1/32 I believe the wires will sag due to the increased length. My plan now that I've migrated to the larger scale is to use this technique sparingly, on short "runs" only and take up the monofilament and brass tube approach on the bulk of the rigging.
You can see the effect on the Albatros in 1/48 scale below, I think it's mostly .23 and .30mm wire on this one. Might give you some idea of how long a "run"you could get however the turnbuckle/eyelet addition may preclude this technique altogether.
Bottom line, I'm going to visit the nearest Sporting Goods Outlet (Wallymart) and stock up on more mono fishing line.
I can't imagine working with the stiff wire using the turnbuckle / eyelet technique although you are using an even finer guage wire. I also purchased a set of RB Productions Brit PE Wires however can't get my head around how to ensure they go on tight and stay that way. I have yet to try them (and will) however "confidence is not high!!" I'll be sure to share that experience once I get to the Pup or SE5 in my stash. (or, god forbid, the WNW Tripe I am eagerly awaiting.)
Hope all this not so informed babbling is of some use to you.I'd go the mono route myself if only for sanities sake!
Cheers,
Lance
Officially Retired as of 20 August 2013 and looking forward to some un-interrupted bench time. Currently starting Roden's Nieuport 28 and hoping to follow that with another WNW Fokker DVII.
Arizona, United States
Joined: December 12, 2008
KitMaker: 1,423 posts
AeroScale: 1,319 posts
Posted: Thursday, June 02, 2011 - 07:31 AM UTC

Hi Marc:
It's looking good, but it's not to late to change your rigging material and approach. I really like the way the scheme is taking shape. Looking forward to more.
Best
Mark
We few, we happy few........
New Jersey, United States
Joined: June 02, 2006
KitMaker: 1,212 posts
AeroScale: 468 posts
Posted: Monday, June 06, 2011 - 12:58 AM UTC
Between here and another forum I got lots of great advise about the rigging materials. One of the guys at the the other from swears by Uni monofilament thread used in fly tying. A tiny bit of stretch and take paint better than regular fishing line. My local store did not have th mono thread but had the multi-fiber which came in different colors. A picked a spool of the gray. The thickness is 70 denier (a textile measurement) that equals .007", the same as the wire.
WOW this stuff is great. Knot tying is a snap and when fed back through the turnbuckle you can almost just pull the one end to tightened the line. Just a drop of CA on the end of the cut thread to keep a little point to go through small holes. I did the fuselage cable over and was done in minutes instead of the half hour struggle with the wire.
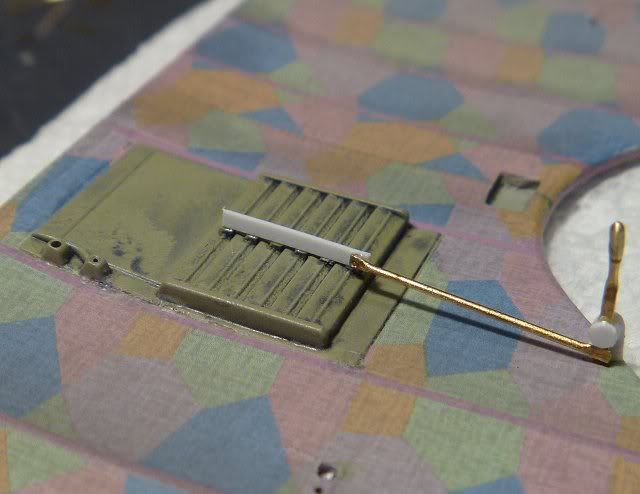
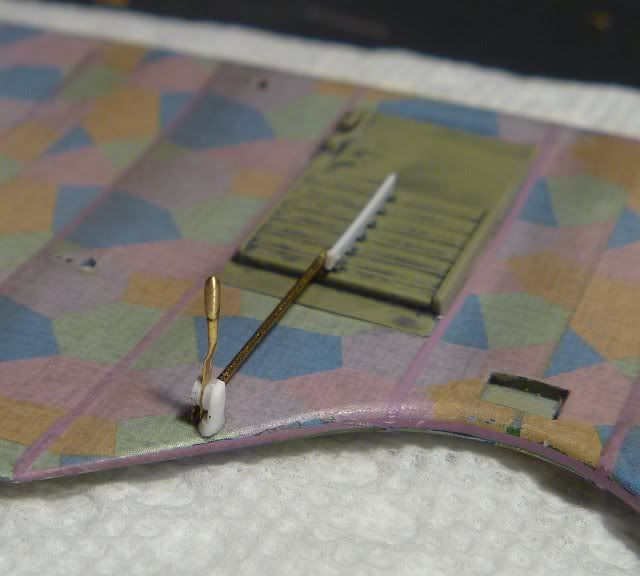
I scratched the handle and linkage for the radiator, The handle was turned with a Dremel the shape filed. With that last detail for upper wing it is ready to be mounted.
Alberta, Canada
Joined: March 08, 2009
KitMaker: 394 posts
AeroScale: 360 posts
Posted: Monday, June 06, 2011 - 01:59 AM UTC
Great stuff, Marc! I mean; WOW!
Its wonderful using your post as a learning emporium, you have such great ideas. And as far as the Uni-thread rigging goes, thats what I'll be using. I am a fly tyer, so I already have miles of the stuff.
Current Projects: 1/144 R5D-3 (MiniCraft)
1/48 Ford Flivver (Williams Bro.)
1/72 UC-64A Norseman (MatchBox)
MAAC No.51187
IPMS CANADA No. 3369