KotS GB 2011 SPAD VII warreni
South Australia, Australia
Joined: August 14, 2007
KitMaker: 5,926 posts
AeroScale: 2,201 posts
Posted: Wednesday, June 15, 2011 - 04:42 PM UTC
Greetings All!
While I wait for parts to arrive or the D.VI and the Pup's bits to harden up I thought I may as well start a new project.
It is Roden's 1/32 SPAD VII. Fit is a bit less accurate than WNW but not bad really. I am going to be a bit lazy and just build enough of the engine to mount the prop.
Now which other one to do next....

You may be right, I may be crazy.
South Australia, Australia
Joined: August 14, 2007
KitMaker: 5,926 posts
AeroScale: 2,201 posts
Posted: Thursday, June 16, 2011 - 06:31 PM UTC
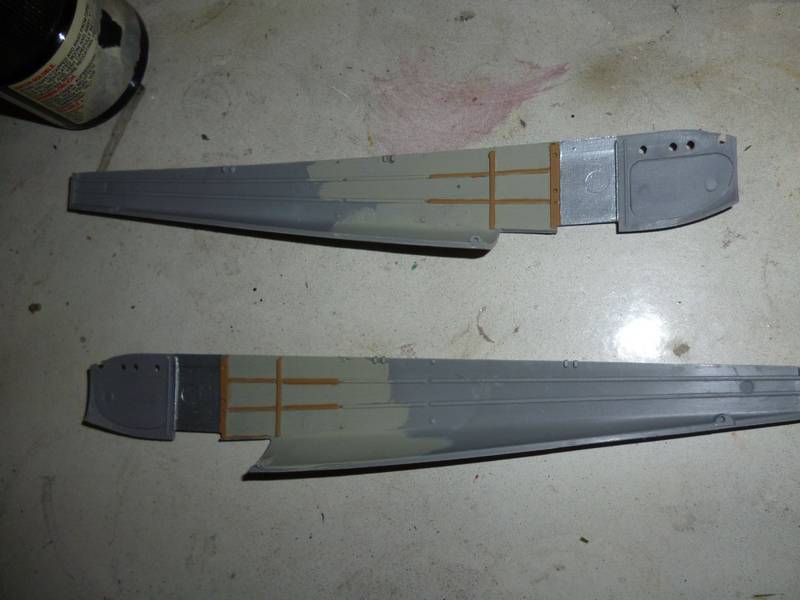
Some more progress...
I have the interior ready to put in the fuselage. I have also drilled holes for the rigging wires.
Stay tuned!

You may be right, I may be crazy.
Ohio, United States
Joined: May 02, 2010
KitMaker: 596 posts
AeroScale: 197 posts
Posted: Thursday, June 16, 2011 - 07:28 PM UTC
Your build is looking pretty nice, Warren! Just curious, but how do you find Roden's kits? I'm having a devil of a time with mine so far (I'm working on their 1/48 Fokker D.VII) and, this being my first WWI bird, I can't tell if this is because of my [in]abilities or Roden's. I know it could just be a fluke with these particular molds, but do you have the experience to say whether or not a Roden kit is more likely to be good quality than not? I have their 1/48 Nieuport N28C1 on the bench next, but with the trouble I've been through so far, I want to know if I should look for a different kit. Thanks for your input and I'll keep watching your builds!
South Australia, Australia
Joined: August 14, 2007
KitMaker: 5,926 posts
AeroScale: 2,201 posts
Posted: Thursday, June 16, 2011 - 07:40 PM UTC
Hi Robby.
Glad to give you some feedback! This is all for 1/32 scale stuff. IMHO the best WW1 kits available are from WNW. I have built a number of WW1 kits now and the only hassles I have had with WNW kits hve been with their engine cowlings not fitting on a couple of the planes I have built, namely Bristol Fighter and the Junkers/
General plastic quality, fit, decals and instructions are above Roden's kits. Roden kits take much more effort than the WNW kits and I can't seem to get as good results, but that could be just me.
I am not sure of the 1/48 side of things as I hardly ever build 1/48 scale kits.. just two so far including a Tamiya F-16 which was nice. But I have heard that Eduard make marvellous 1/48 WW1 kits.
One thing that used to phase me was the rigging, but I have got a technique down-pat now and I actually enjoy the rigging! Although I am sure the WNW Gotha will test me there!

Good luck with the D.VII. You should join this Group Build.
Cheers
Warren
You may be right, I may be crazy.
Ohio, United States
Joined: May 02, 2010
KitMaker: 596 posts
AeroScale: 197 posts
Posted: Thursday, June 16, 2011 - 08:02 PM UTC
Thanks for the advice! I'll probably just keep the kit I have, as I got it on sale for about $15 and I don't see much room to step up in that price range. I completely forgot about WNW (I'd read quite a bit of these Early Aviation forums before I got my kits) when I bought my Rodens, but the only reason I got 48 instead of 32 was because of space. I'm a college student, so any space to display my models is on my tiny bookshelves...all the books that used to be on them have since been evacuated to make room for more of my models!! When I have a place of my own and can devote literally ROOMS of my house to modeling, I'm sure I'll evolve to the larger, more detailed kits. But for now, my standard size is 1/48 aircraft, 1/72 whirlybirds, and 1/35 armor.
But enough about that...what's this super-effective rigging technique you have?? The whole reason I bought WWI kits was because I REALLY love stretching sprue over an open Zippo! Are you building a Gotha soon? I have always been in awe of that monster!
South Australia, Australia
Joined: August 14, 2007
KitMaker: 5,926 posts
AeroScale: 2,201 posts
Posted: Thursday, June 16, 2011 - 09:14 PM UTC
I am in my late 40's with a five bedroom house and a huge shed so space is not too much of a problem..
Super-effective rigging technique is using eyelets made from fine wire, 0.5mm diameter brass tubing for turnbuckles and for holding the wires in place. I then use invisible mending thread, painted with a Tamiya Paint marker that is at least 15 years old, and pass it through the 1mm long brass tube before passing it through the eyelet I glued in position previously. Then you pass the thread back through the tube and carefully tighten the thread sliding the tube down to the eyelet. Apply a tiny drop of glue to the top of the tube to hold the thread in place and repeat lots of time. I always do the top wing before I attach it to the model. Makes it much easier.
That is a quick and dirty explaination. There are threads on this sight about rigging but if you want a step by step I will try and help.
Cheers
You may be right, I may be crazy.
Alberta, Canada
Joined: January 19, 2008
KitMaker: 6,743 posts
AeroScale: 6,151 posts
Posted: Friday, June 17, 2011 - 01:25 AM UTC
Another one !
I'm going to send you all of my kits to build for me , at the rate you are going here it should only take you a few years !
Nice start Warren !
South Australia, Australia
Joined: August 14, 2007
KitMaker: 5,926 posts
AeroScale: 2,201 posts
Posted: Friday, June 17, 2011 - 09:17 AM UTC

Thanks for that Terri. Feel free to send as many as you want. I am on a WW1 kick at the moment and am enjoying it immensely. It seemed that as soon as I got the rigging down it made everything much easier.
I got the fuselage together yesterday afternoon but a test fit of the top decking showed a little 'fitting' would be needed...
You may be right, I may be crazy.
Alberta, Canada
Joined: January 19, 2008
KitMaker: 6,743 posts
AeroScale: 6,151 posts
Posted: Friday, June 17, 2011 - 09:25 AM UTC
Quoted Text
Thanks for that Terri. Feel free to send as many as you want. I am on a WW1 kick at the moment and am enjoying it immensely. It seemed that as soon as I got the rigging down it made everything much easier.
I got the fuselage together yesterday afternoon but a test fit of the top decking showed a little 'fitting' would be needed...
Once you get the rigging a few tries it really is very easy to do .
South Australia, Australia
Joined: August 14, 2007
KitMaker: 5,926 posts
AeroScale: 2,201 posts
Posted: Friday, June 17, 2011 - 09:47 AM UTC
Yes, but this one is going to take a little creative thinking with the centre bay struts and the 6 wires crossing at the middle point..
You may be right, I may be crazy.
South Australia, Australia
Joined: August 14, 2007
KitMaker: 5,926 posts
AeroScale: 2,201 posts
Posted: Monday, June 20, 2011 - 10:57 AM UTC
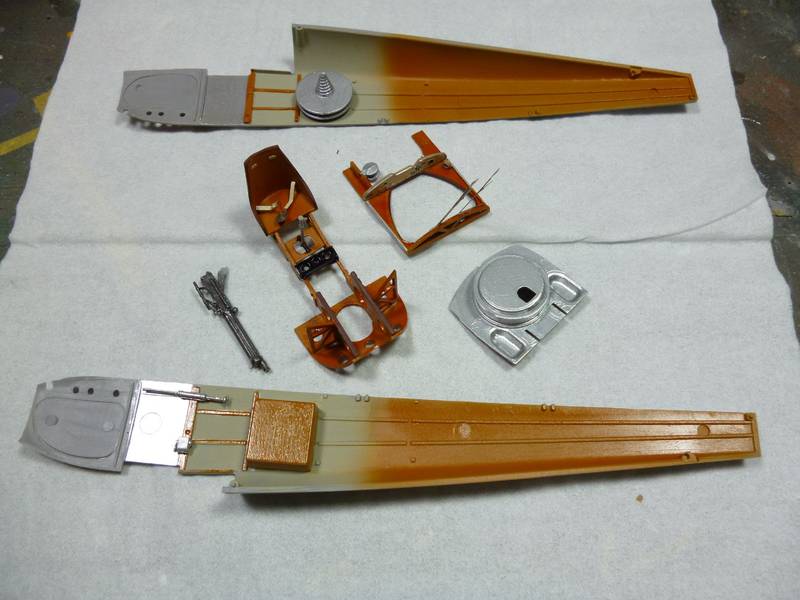
A quick update..
There you go.
Just kidding.. one word describes progress so far.. filling... as in gaps.. as in sanding and trimming parts so they go even close to fitting.. Some modelling experience needed indeed!..
You may be right, I may be crazy.
South Australia, Australia
Joined: August 14, 2007
KitMaker: 5,926 posts
AeroScale: 2,201 posts
Posted: Monday, June 20, 2011 - 10:55 PM UTC
Hi Everyone
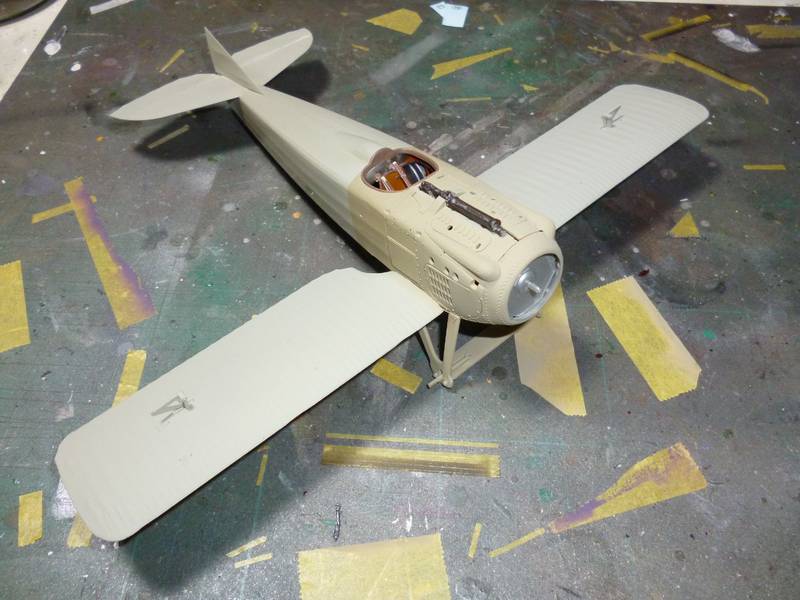
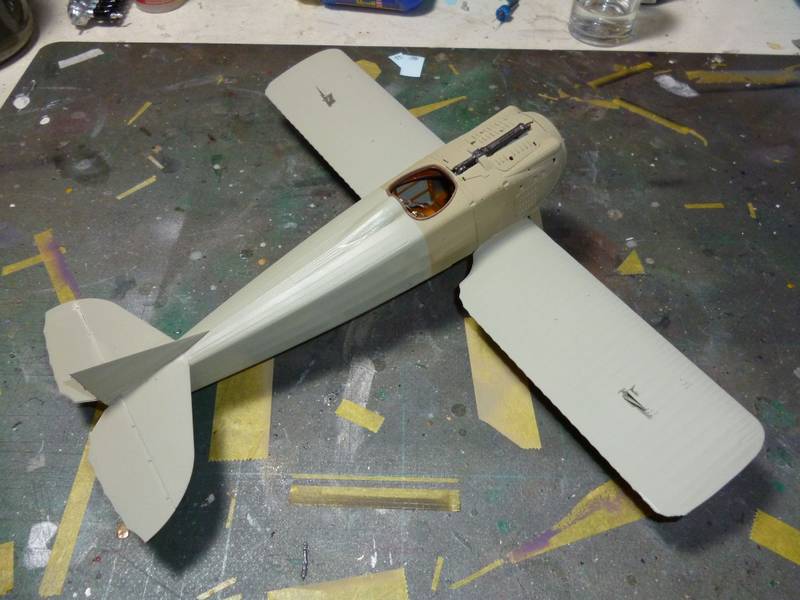
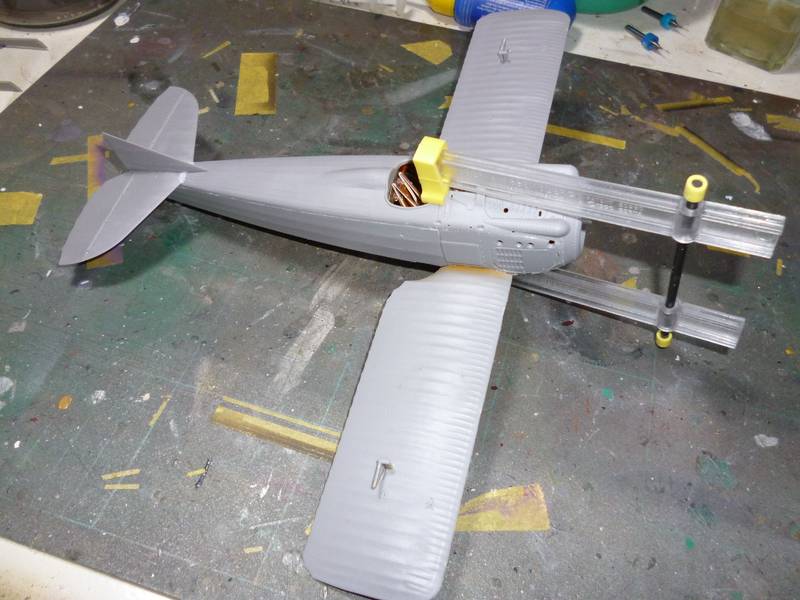
I think I may have snagged the colours using plain old Tamiya paints, Xf-55 for the lighter colour and XF-57 for the darker one. They may not be perfect matches, but they are close enough to my eyes.
So the undercarriage is on.
Coats of paint on.
Future on for decal application.
When I have the decals on I will install the eyelets where necessary for the rigging then install the cabane struts then main struts. I have worked out a sneeky way to do the wires that join the at the centre of the inner struts. WIll be interesting to see if it works.
More photos tomorrow maybe...
You may be right, I may be crazy.
Indiana, United States
Joined: May 14, 2007
KitMaker: 3,117 posts
AeroScale: 2,270 posts
Posted: Tuesday, June 21, 2011 - 12:12 AM UTC
A quick build with this kit makes it all that much more amazing. Have fun with the rigging.
"Treat 'em Rough", Current Builds--Wingnut Rumpler
I am frequently seen with blood shot eyes from staying up past my nap time to get the right colour scheme on my latest WWI model?
New Jersey, United States
Joined: June 02, 2006
KitMaker: 1,212 posts
AeroScale: 468 posts
Posted: Tuesday, June 21, 2011 - 07:34 AM UTC
...and repeat lots of time
Oh brother you got that right.
Looking good Warren. I have no idea how long my flaring interest in WWI birds will last but I hope it's long enough to get in one of the Spads.
South Australia, Australia
Joined: August 14, 2007
KitMaker: 5,926 posts
AeroScale: 2,201 posts
Posted: Tuesday, June 21, 2011 - 09:14 AM UTC
Hi Everyone.
I applied the rudder decals the other day and even though I applied Micro-set etc they never seemed to stick. I picked the rudder up after 8 hours or so expecting it to be dry and the decals still slid around easily. I got a bit upset and removed them woughly and frew them in the bin.. I then had to wash my hands as they had disintigrated into about 1 million pieces on removal. Seemed to stick to my fingers OK though..

I can paint the rudder marking no problem but I am going to try a few of the larger decals to see what happens. If they don't work I have ordered a set of the Pheon decals for the SPAD and I have it on good advice that they are marvellous. If I don't use them on this one I want to build a SPAD in US 5 colour camo colours anyway so the decals will be used then.
More news later.
You may be right, I may be crazy.
South Australia, Australia
Joined: August 14, 2007
KitMaker: 5,926 posts
AeroScale: 2,201 posts
Posted: Tuesday, June 21, 2011 - 03:05 PM UTC
Hmmm.. Looks like the SPAD will be moved into the hanger for a while after I tried to apply the decals and this happened...
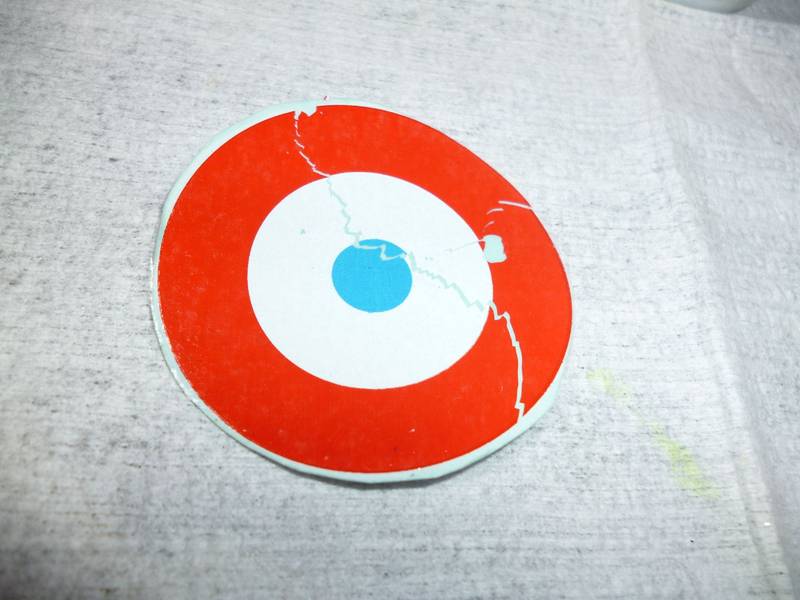
I will wait for the Pheon Decals to arrive before I do anything else.
That means just one thing.. start another one!!
You may be right, I may be crazy.
Alberta, Canada
Joined: July 26, 2010
KitMaker: 1,032 posts
AeroScale: 1,025 posts
Posted: Tuesday, June 21, 2011 - 03:25 PM UTC
Hey Warren,
How come you got only three portions; some of mine last week were so many pieces I had to replace them? Honestly, I believe the only solution for this brand on the decal side is a complete after market substitution Hearing of cracking, fragmenting, and just plain old self destructing decals from these folks is now a daily occurence. I still believe their subjects are neat and, in most cases, the kits pretty good.
This one looks good and I'll be following you on the build; the "filling and fixing" seems vaguely familiar to me.................
I'm with you...........go the Pheon route. I don't have the set you mentioned but the ones I do have look really nice and, by all reports, work very well!
Cheers,
Lance
Officially Retired as of 20 August 2013 and looking forward to some un-interrupted bench time. Currently starting Roden's Nieuport 28 and hoping to follow that with another WNW Fokker DVII.
South Australia, Australia
Joined: August 14, 2007
KitMaker: 5,926 posts
AeroScale: 2,201 posts
Posted: Tuesday, June 21, 2011 - 05:43 PM UTC
Now if one had half a brain one would have scanned in the decals BEFORE attempting to use them. Then when they self-destructed one could print some more decals out on the decal paper one has stashed away and tried agin.. but one is not that smart...

You may be right, I may be crazy.
Alberta, Canada
Joined: January 19, 2008
KitMaker: 6,743 posts
AeroScale: 6,151 posts
Posted: Wednesday, June 22, 2011 - 01:25 AM UTC
Have you tried clear coating them with decal film ?
Either I will use Testors in the spray can or micro scales decal film and brush it on . Had some succes with this .......
Colorado, United States
Joined: January 25, 2004
KitMaker: 11,669 posts
AeroScale: 11,011 posts
Posted: Wednesday, June 22, 2011 - 04:00 AM UTC
Greetings Warren,
Roden has no problem with sending replacement decal sheets it seems. But you have to ask. Clear coating is a good method for dealing with these decals. The problem lays here with the decals not having a thick enough clear coat from the decal manufacturer Roden purchases from.
". . .The most important thing is to know why you build and then get the most that you can out of building." via D.D.
South Australia, Australia
Joined: August 14, 2007
KitMaker: 5,926 posts
AeroScale: 2,201 posts
Posted: Wednesday, June 22, 2011 - 07:52 AM UTC
Ah.. I have never used that technique.. Looks like it may be time for a trip to the LHS.
I also find that the decals don't like snuggling down around detail. I have tried heat (warm water), Micro-Sol (or Set, the one in the red writing bottle) and plain old pressure with a tissue..
I want to do Guynemer's aircraft so I think I will perservere with the Roden decals, after I clear coat them, and try and resurrect that roundel somehow.. or maybe just paint the roundel? We shall see.
You may be right, I may be crazy.
New Jersey, United States
Joined: June 02, 2006
KitMaker: 1,212 posts
AeroScale: 468 posts
Posted: Friday, June 24, 2011 - 01:21 AM UTC
Ah yes, the mosaic decals. I personally think that the manufacture made a limited supply of these to scatter about just to "F" with us
I thank we've all worn that t-shirt at least once. I too use the decal spray if I suspect a problem but I decant, de-gas and spray though an airbrush for a thin coat. I tend to be very heavy handed with a spray can.
South Australia, Australia
Joined: August 14, 2007
KitMaker: 5,926 posts
AeroScale: 2,201 posts
Posted: Tuesday, July 05, 2011 - 09:57 PM UTC
Woohoo!! My Pheon decals arrived from France today so I can hopefully finish the SPAD this weekend!
You may be right, I may be crazy.
Västra Götaland, Sweden
Joined: February 19, 2010
KitMaker: 1,473 posts
AeroScale: 1,450 posts
Posted: Wednesday, July 06, 2011 - 01:45 AM UTC
Greetings warren
Wow you must be the "most kits on the go ever" here at the early avaition forum. Nice to see you tackle this one too. I'm considering it for one of my next builds soon.
Did you have any troubles fitting the engine panels over the engine? I hear this has been a difficulty for many in the past...
Best Regards
Mikael
_________________________________________________________
Just finished the Wingnut Wings Taube. On to the Junkers D.1
South Australia, Australia
Joined: August 14, 2007
KitMaker: 5,926 posts
AeroScale: 2,201 posts
Posted: Wednesday, July 06, 2011 - 09:20 AM UTC
@Mikael, not much trouble as I left most of the engine out.. Basically I have just enough to hold the propeller..
Panels are on forever so why bother with engine detail you will never see?
Cheers mate!
You may be right, I may be crazy.


