

Early Aviation
Discuss World War I and the early years of aviation thru 1934.
Discuss World War I and the early years of aviation thru 1934.
Hosted by Jim Starkweather
Kots GB 2012 Ru. C.IV Early - Kornbeef
DrIAce

Joined: August 14, 2011
KitMaker: 59 posts
AeroScale: 56 posts
Posted: Thursday, March 08, 2012 - 05:26 AM UTC
Dittos to the above-Nice Work !

Kornbeef

Joined: November 06, 2005
KitMaker: 1,667 posts
AeroScale: 1,551 posts

Posted: Tuesday, March 13, 2012 - 11:01 PM UTC
Thanks all for the positive feed back I really appreciate it along with any tips etc or even critisism, best way to learn 
Bench time and web times been a little scant of late but she is progressing slowly.
So for your eyes.


If you don't have much time why not wear and weather... and weather... and weather.


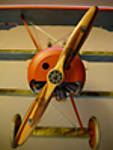
I tried something different with the prop and spinner. In order to lose the seam between the spinner front and the small section that slots behind the prop blade, I cut the blades close to the boss and pinned them so they could be fitted after, also made sure to pin them differently so I couldnt get them mixed up.
Yes the bright green stripe and spinner are thin, washy brush painted, I was trying to get a scale hand painted look, Do you think it works?


And so to begin the rigging. Now I've tried to replicate the bound over interwoven effect you see on the non-turnbuckled end of the cables, not yet painted so its hard to see if it works, I'm of mixed opinion but thought I'd try it out somewhere quite simple for a starter.
Hundreds of rigging eyes and things to prep now...well seems hundreds to me.
TTFN Guys n girls
Bench time and web times been a little scant of late but she is progressing slowly.
So for your eyes.
If you don't have much time why not wear and weather... and weather... and weather.
I tried something different with the prop and spinner. In order to lose the seam between the spinner front and the small section that slots behind the prop blade, I cut the blades close to the boss and pinned them so they could be fitted after, also made sure to pin them differently so I couldnt get them mixed up.
Yes the bright green stripe and spinner are thin, washy brush painted, I was trying to get a scale hand painted look, Do you think it works?
And so to begin the rigging. Now I've tried to replicate the bound over interwoven effect you see on the non-turnbuckled end of the cables, not yet painted so its hard to see if it works, I'm of mixed opinion but thought I'd try it out somewhere quite simple for a starter.
Hundreds of rigging eyes and things to prep now...well seems hundreds to me.
TTFN Guys n girls
mtnflyer

Joined: March 08, 2009
KitMaker: 394 posts
AeroScale: 360 posts
Posted: Wednesday, March 14, 2012 - 01:07 AM UTC
Wow Keith. With some people modelling is an art and not just modelling at all. You don't seem afraid of experimenting new technique, and taking the chance. Very inspirational. Your doing an amazing job!!

OEFFAG_153

Joined: February 19, 2010
KitMaker: 1,473 posts
AeroScale: 1,450 posts

Posted: Wednesday, March 14, 2012 - 01:26 AM UTC
Keith,
I really like it! Your weathering, and "brush painting" looks very convincing to me. I especially like the way the oil has run underneath the fuselage.
Best Regards
Mikael
I really like it! Your weathering, and "brush painting" looks very convincing to me. I especially like the way the oil has run underneath the fuselage.
Best Regards
Mikael
Kornbeef
Joined: November 06, 2005
KitMaker: 1,667 posts
AeroScale: 1,551 posts
Posted: Wednesday, March 14, 2012 - 02:22 AM UTC
Guy, yes thanks, well thats the beauty of this forum, we all try things and share and insire each other. And theres ALWAYS something for even far better modellers than me can learn from others.
Mikael. TY I picked up the fact that the oil leak overspill runs at an angle from the pic onpage 11 of the kit handbook, and its blow up on WNWs site. I'd never before thought about airflow from the prop affecting the directions. Another thing learned
Mikael. TY I picked up the fact that the oil leak overspill runs at an angle from the pic onpage 11 of the kit handbook, and its blow up on WNWs site. I'd never before thought about airflow from the prop affecting the directions. Another thing learned

lcarroll
Joined: July 26, 2010
KitMaker: 1,032 posts
AeroScale: 1,025 posts
Posted: Wednesday, March 14, 2012 - 03:42 AM UTC
Keith,
Beautiful weathering effects. The angled oil stains are a great "catch" and look perfect. Speaking of "learning from others" a question if I may. Your rigging on the gear supports is excellent, really caught my eye. You have a double turn buckle arrangement at the terminal end at the top ie. eyelet at each end of the buckle. How do you connect to the top end at the fuselage, looks like you build an eyelet on the end of the buckle and then insert it into the fuselage/gear strut but then how do you tension it? (or am I missing some magic method, maybe I need stronger morning coffee??!?)
Cheers,
Lance
Kornbeef
Joined: November 06, 2005
KitMaker: 1,667 posts
AeroScale: 1,551 posts
Posted: Wednesday, March 14, 2012 - 06:40 AM UTC
Lance, Hi,
Simply put,
I make one eyelet from wire, then thread it onto another length of wire and make another so it makes a flexible joint, (this is the end I affix to the mounting point) this then I fasten one end into the brass tube. Another eyelet at the other end completes the turnbuckle assembly which can be mounted then.
The other end I used to mount an eyelet and thread a tiny length of brass over invisi thread then back through the eyelet and brass, tensioning and affixing it with Cyano gel.
This time however I take one eyelet before trimming it to size and thread the thread through it, holding it tight in pinchers I smear the thread close to the eyelet with Cyano Gel and twizzle the two lengths of thread together under tension. I hold it till it sets then adjust and trim off the excess, once its done (after making a few) I brush thin cyano over the jointed end to make sure and catch the stub of thread too, I do this BEFORE mounting the eyelet to the model.
So basically I have one turnbuckle assy, and one cable complete with eyelet to be mounted seperately, I join and tension as usual witha short collar of brass tube at the turnbuckle end. I intend possible mounting most as complete untensioned assemblies to most points on the model, hoping this might save some of the major fiddlybits, just glue, glue and tension in theory...and I mean in theory!!!
I've just painted the rigged undercarriage as shown above, I'm going to paint the non tunbuckled end in a dark grey or brown to simulate the doped strips they wrapped the cable joint in and think it gives a nice representation.
I tried this before but never had much success, more because of method than design.
Blah Blah
lcarroll
Joined: July 26, 2010
KitMaker: 1,032 posts
AeroScale: 1,025 posts
Posted: Wednesday, March 14, 2012 - 07:49 AM UTC
Thank you kind Sir!
Too late for the SE I'm building as it's "pre-rigged" (one end of each wire mounted to cut the fat finger challenge by 50%) however I'll be trying your method in future; I like the results a lot.
I appreciate the learning experience this Forum provides.
Cheers,
Lance

Too late for the SE I'm building as it's "pre-rigged" (one end of each wire mounted to cut the fat finger challenge by 50%) however I'll be trying your method in future; I like the results a lot.
I appreciate the learning experience this Forum provides.
Cheers,
Lance

Jessie_C

Joined: September 03, 2009
KitMaker: 6,965 posts
AeroScale: 6,247 posts

Posted: Wednesday, March 14, 2012 - 02:22 PM UTC
Don't believe him Lance. He's got the miniturising machine from Fantastic Voyage stashed in his basement and he's been teasing us with a real Rumpler all along.

JackFlash
Joined: January 25, 2004
KitMaker: 11,669 posts
AeroScale: 11,011 posts
Posted: Wednesday, March 14, 2012 - 03:48 PM UTC
Quoted Text
Don't believe him Lance. He's got the miniturising machine from Fantastic Voyage stashed in his basement and he's been teasing us with a real Rumpler all along.
Wow! that dusted off some synaptic pathways. . .
OEFFAG_153
Joined: February 19, 2010
KitMaker: 1,473 posts
AeroScale: 1,450 posts
Posted: Wednesday, March 14, 2012 - 07:52 PM UTC
Quoted Text
Mikael. TY I picked up the fact that the oil leak overspill runs at an angle from the pic onpage 11 of the kit handbook, and its blow up on WNWs site. I'd never before thought about airflow from the prop affecting the directions. Another thing learned
Well now that is another thing learned I never considered the prop wash effect on the oil runs... I tried a new thing, several models ago, where I used an empty airbrush blowing the oil spills to get a "windflow" effect... I was'nt too happy with the result but perhaps with this new knowledge I can somehow get this to work...
Thanks Keith!
Mikael

eseperic

Joined: November 06, 2009
KitMaker: 624 posts
AeroScale: 609 posts

Posted: Thursday, March 15, 2012 - 01:03 AM UTC
Keith,
Very nice work on the rigging! Although I am swamped with dirty dippers, I just couldn't resist commenting! Thanks for the tips as well
All the best,
Entoni
Very nice work on the rigging! Although I am swamped with dirty dippers, I just couldn't resist commenting! Thanks for the tips as well
All the best,
Entoni
lcarroll
Joined: July 26, 2010
KitMaker: 1,032 posts
AeroScale: 1,025 posts
Posted: Friday, March 16, 2012 - 02:44 AM UTC
Quoted Text
Don't believe him Lance. He's got the miniturising machine from Fantastic Voyage stashed in his basement and he's been teasing us with a real Rumpler all along.
Don't be silly; we all know it's done by a crew of tiny miniture spiders or mites. The trick is Keith knows what to feed the little beggars!
Cheers,
Lance

Mgunns
Joined: December 12, 2008
KitMaker: 1,423 posts
AeroScale: 1,319 posts

Posted: Friday, March 16, 2012 - 04:37 AM UTC
Hello Keith:
Your effort on the rigging really looks great and requires a lot of patience and skill, well fed and trained spiders not withstanding. I don't know if I have the eyes or the inclination to do all that, but your's is truly outstanding.
Best
Mark
Your effort on the rigging really looks great and requires a lot of patience and skill, well fed and trained spiders not withstanding. I don't know if I have the eyes or the inclination to do all that, but your's is truly outstanding.
Best
Mark
Kornbeef
Joined: November 06, 2005
KitMaker: 1,667 posts
AeroScale: 1,551 posts
Posted: Monday, March 19, 2012 - 11:32 AM UTC
The top wing is on. Setting as I type, all the details around the engine are done, So only rigging and weathering and such to do. hoping to get a few hours in on her tomorrow so if the suns out might get some pics too.
Only mishap was breaking off *and losing* the fuel guage between the pilot and observer. sighs... still scratching one isnt all that hard I guess.
And TYVM for all the kind comments so far. The rigging will be a test, see if my cunning plan will work
K
Only mishap was breaking off *and losing* the fuel guage between the pilot and observer. sighs... still scratching one isnt all that hard I guess.
And TYVM for all the kind comments so far. The rigging will be a test, see if my cunning plan will work
K
lcarroll
Joined: July 26, 2010
KitMaker: 1,032 posts
AeroScale: 1,025 posts
Posted: Monday, March 19, 2012 - 02:40 PM UTC
The rigging will be a test, see if my cunning plan will work
K[/quote]
Good luck Keith; I too had a cunning plan approx. a week ago and I'm still rigging. In fairness I havn't had the amount of time for it I'd like, but it has been a long haul.
Hope your "thread-fest" goes faster then mine!
Cheers,
Lance
K[/quote]
Good luck Keith; I too had a cunning plan approx. a week ago and I'm still rigging. In fairness I havn't had the amount of time for it I'd like, but it has been a long haul.
Hope your "thread-fest" goes faster then mine!
Cheers,
Lance
Kornbeef
Joined: November 06, 2005
KitMaker: 1,667 posts
AeroScale: 1,551 posts
Posted: Monday, March 19, 2012 - 11:28 PM UTC
Well my free day kind of evaporated as they do... ho hum. Anyway got a few shots of her as she stands. noticed a few bits I missed too.
One thing to note for anyone building her DONT fit the exhaust stay/support till later if you are fitting the upper wing without the radiator. I've a bit of surgery to do...DOH!


Final shot shows my *experimental* rigging to pretty good effect. I like the result, just needs tidying here and there as I go along.
Ta K
One thing to note for anyone building her DONT fit the exhaust stay/support till later if you are fitting the upper wing without the radiator. I've a bit of surgery to do...DOH!
Final shot shows my *experimental* rigging to pretty good effect. I like the result, just needs tidying here and there as I go along.
Ta K
OEFFAG_153
Joined: February 19, 2010
KitMaker: 1,473 posts
AeroScale: 1,450 posts
Posted: Tuesday, March 20, 2012 - 12:23 AM UTC
Very Nice indeed Keith I like your rigging lines they look very convincing!
Mikael
Mikael
Mgunns
Joined: December 12, 2008
KitMaker: 1,423 posts
AeroScale: 1,319 posts
Posted: Tuesday, March 20, 2012 - 01:44 AM UTC
 Hello Keith:
Your work has always impressed me, and this is no exception. The rigging is amazing. The degree of realism in this is truly outstanding.
Best
Mark
Kornbeef
Joined: November 06, 2005
KitMaker: 1,667 posts
AeroScale: 1,551 posts
Posted: Saturday, March 31, 2012 - 07:12 AM UTC
Thanks guys,
Been a busy few days and havent been able to do much but today I got her rigged, took all day a little at a time.
So tomorrow I'll pain the rigging, that leaves only the parrabellum and mount to finish, A new fuel guage to scratch and final weathering and a little more wearing in.
Hope to post pics tomorrow all things being well.
TTFN
OOPs forgot the rad.. gotta fins a way to squeeeeeeze it in
Kornbeef
Joined: November 06, 2005
KitMaker: 1,667 posts
AeroScale: 1,551 posts
Posted: Sunday, April 01, 2012 - 01:34 AM UTC
The end is so close now I just don't want to rush and spoil something. Also It's been such an enjoyable build I'm reluctant to call it done (Ayone else ever feel like that?)
Anyway some shots before final finishing commences over the next few days. Then what next? So many half finished projects and new ones in the stash...


Just final wear and weathering, the ammo belt is freshly painted. Thanks for looking. Keith
Anyway some shots before final finishing commences over the next few days. Then what next? So many half finished projects and new ones in the stash...
Just final wear and weathering, the ammo belt is freshly painted. Thanks for looking. Keith
mtnflyer
Joined: March 08, 2009
KitMaker: 394 posts
AeroScale: 360 posts
Posted: Sunday, April 01, 2012 - 03:05 AM UTC
A contest winner for sure, Keith. An amazing, realistic modelling effort. Very well done! Kudos to you.
JackFlash
Joined: January 25, 2004
KitMaker: 11,669 posts
AeroScale: 11,011 posts
Posted: Sunday, April 01, 2012 - 06:08 AM UTC
Most impressive. My sincre thanks to Keith and Mark for allowing me to include their build images with the Aeroscale kit review of the WNW #32023.
Follow the link
Follow the link
Mgunns
Joined: December 12, 2008
KitMaker: 1,423 posts
AeroScale: 1,319 posts
Posted: Monday, April 02, 2012 - 03:56 AM UTC
[quote]The end is so close now I just don't want to rush and spoil something. Also It's been such an enjoyable build I'm reluctant to call it done (Ayone else ever feel like that?)
Hi Keith: I know exactly how you feel. I really enjoyed the WNW Pfalz and The WNW Pup, it was like, "Now What"?
I think this has really turned out nice. The turnbuckles really add an element of realism to it. The overiszed rubbish bin in the background is the only indicator that it isn't real. The natural lighting and outdoor setting heightens the effect of realism. Outstanding work again Keith.
Best
Mark

guitarlute101
Joined: December 18, 2006
KitMaker: 1,121 posts
AeroScale: 1,063 posts
Posted: Monday, April 02, 2012 - 04:15 AM UTC
Great work Keith!!
Mark
 |

WEB HOSTING BY


Copyright ©2021 AeroScale and Kitmaker Network, a subsidiary of Silver Star Enterprises
All Rights Reserved. Please read our Conditions of Use and Privacy Policy.
All Rights Reserved. Please read our Conditions of Use and Privacy Policy.