

I know I've started this but I'm hoping no one minds. I will I hope do another build before the GB ends.
Previous progress here.
A day free today, the weathers nice so I might get some progress pics up later.
Keith
Early Aviation
Discuss World War I and the early years of aviation thru 1934.
Discuss World War I and the early years of aviation thru 1934.
Hosted by Jim Starkweather
Kots GB 2012 Ru. C.IV Early - Kornbeef

Kornbeef

Joined: November 06, 2005
KitMaker: 1,667 posts
AeroScale: 1,551 posts

Posted: Tuesday, January 31, 2012 - 08:24 PM UTC

amegan

#243

Joined: March 21, 2008
KitMaker: 996 posts
AeroScale: 915 posts

Posted: Wednesday, February 01, 2012 - 09:46 AM UTC
Seen your thread, very nice work, I'll keep watching
Kornbeef
Joined: November 06, 2005
KitMaker: 1,667 posts
AeroScale: 1,551 posts
Posted: Wednesday, February 01, 2012 - 08:05 PM UTC
I got a fair amount of bench time yesterday.
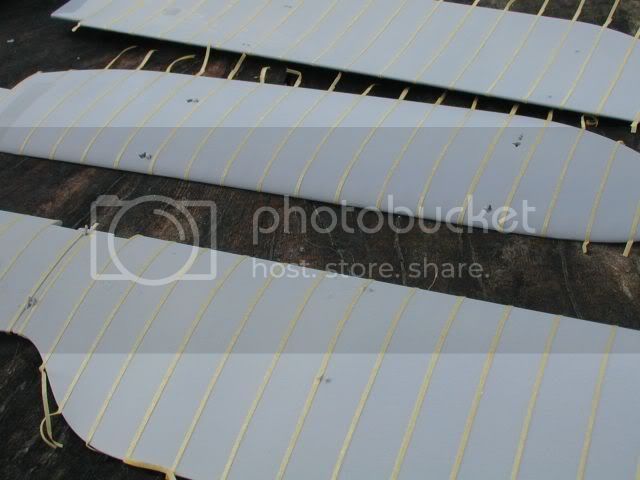
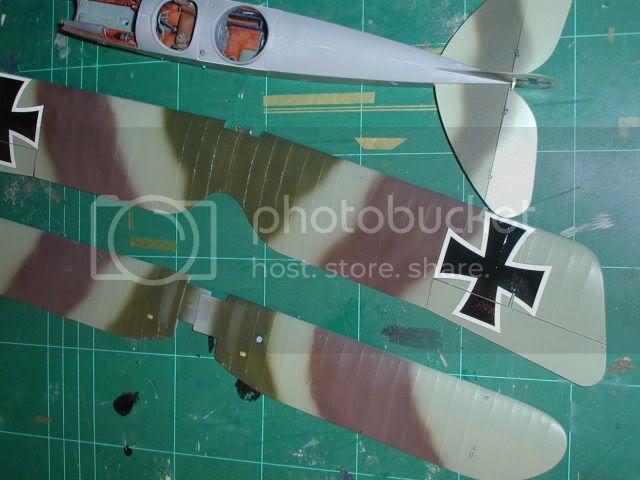
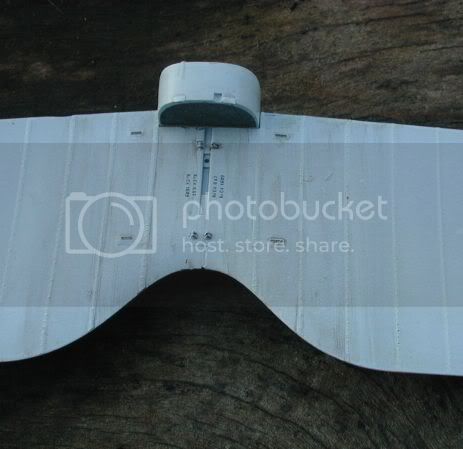
I got further than the following pics indicate, as far as shooting the first coat on the wings underside.
Heres a shot of them masked for preshading. I think overall I should have used a deeper grey but I#m not remasking now!
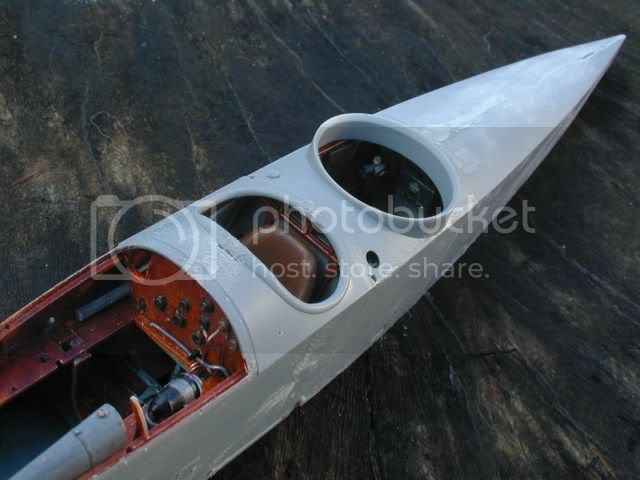
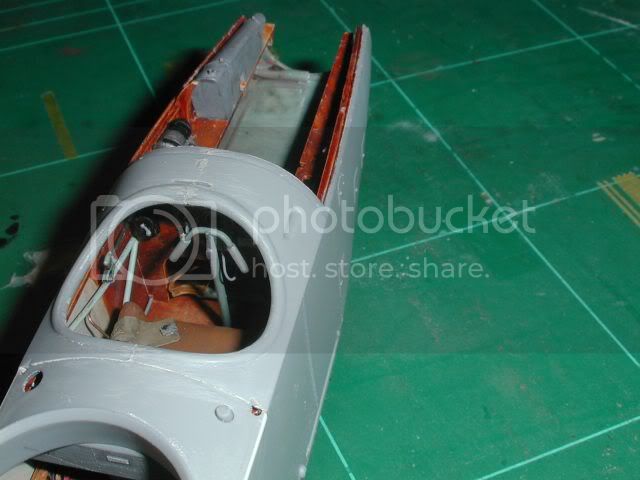
The fuselage is now buttoned up, I added some details, not OTT AMS though
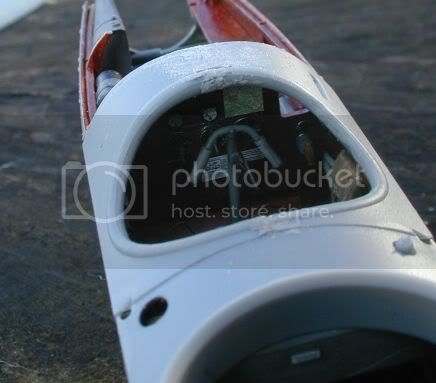
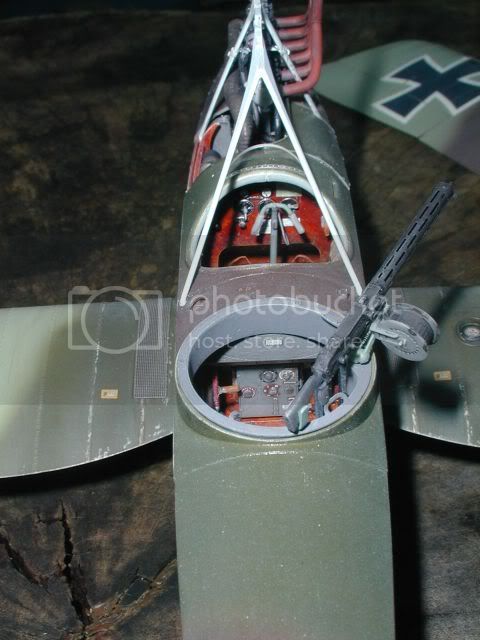
Cockpit:-
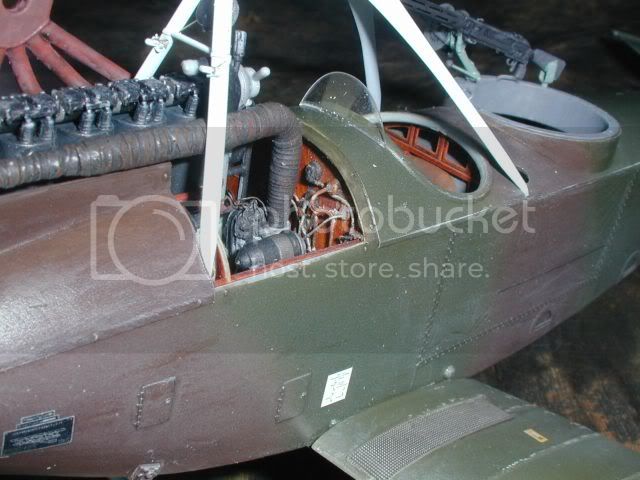
I removed what I presumed a choke lever on the lower dash and replaced it with a pin head which was about the right dims. *fortunate?* I added the gun cable from the yoke, it appears to run through the dash in what ref pics I have. I added a bitser bag for the pilots bnicknacks and cut the spark advance lever away from the upper longeron and reprofiled it. That and a few fuel pipes connecting the tanks pretty much completes the mods
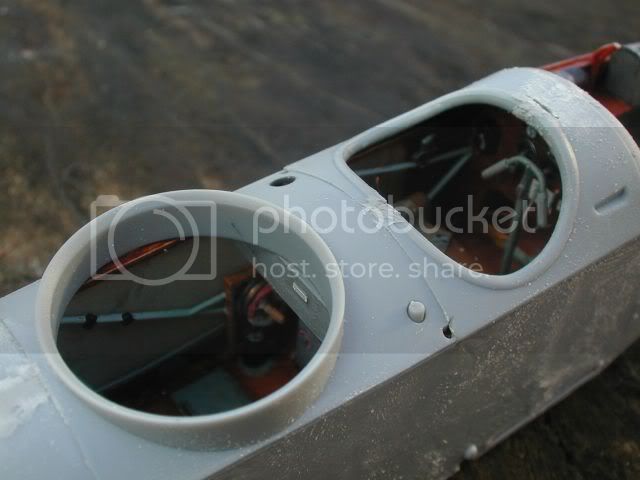
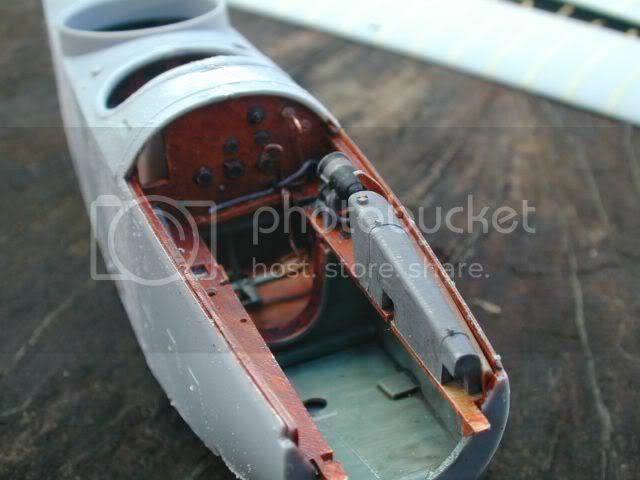
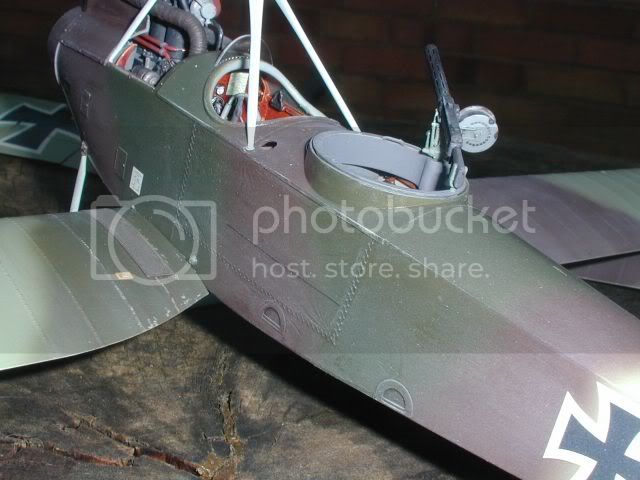
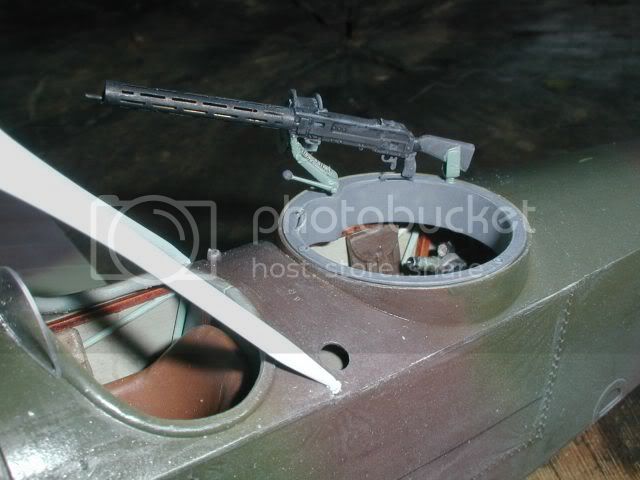
Gunners station:-
I've added a map case, a better handle to the aerial cable, some ammunition storage (as WNW never indicated any) Opened up the eyepeice of the bombsight and went for the poano stool option for the seat.
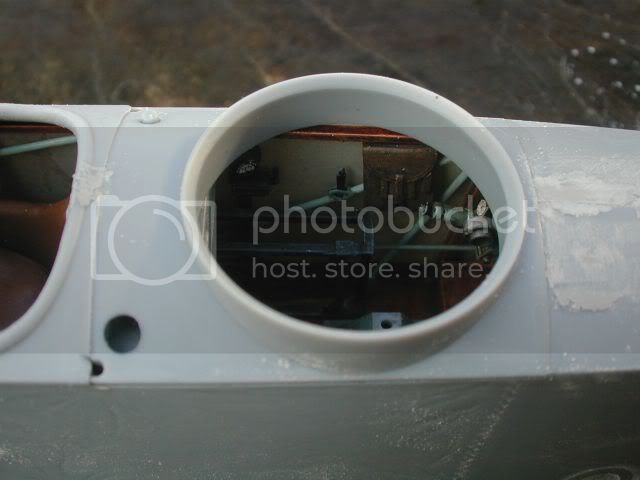
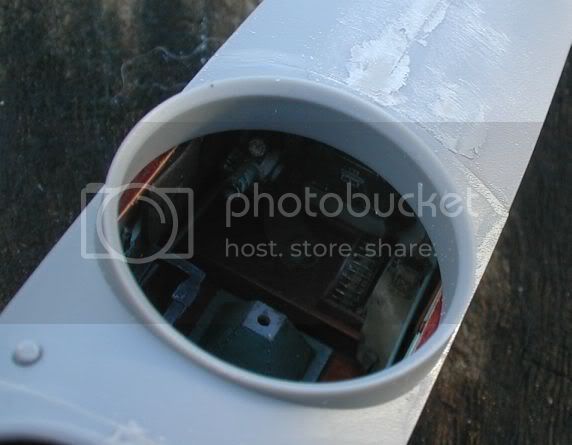
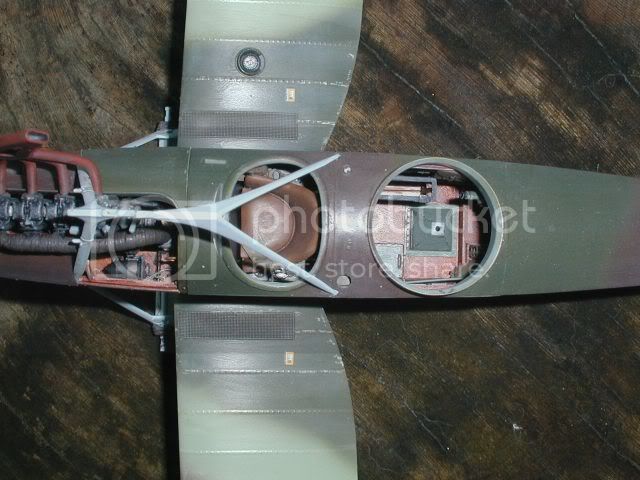
Engine bay:-
I'm midway through detailing some pipework and cablong to busy up the back of the dash panel prior to installing the engie. Waiting for new drill bits to finish plumbing up before fitting the motor. Not following WNWs method of construction I already forsee issues fitting the maxim but as it will be buried I dont see it as a great issue
Lots more done just not particularly exciting pics...
Ta for looking, comments always welcome and thank you Andrew
Keith
I got further than the following pics indicate, as far as shooting the first coat on the wings underside.
Heres a shot of them masked for preshading. I think overall I should have used a deeper grey but I#m not remasking now!
The fuselage is now buttoned up, I added some details, not OTT AMS though
Cockpit:-
I removed what I presumed a choke lever on the lower dash and replaced it with a pin head which was about the right dims. *fortunate?* I added the gun cable from the yoke, it appears to run through the dash in what ref pics I have. I added a bitser bag for the pilots bnicknacks and cut the spark advance lever away from the upper longeron and reprofiled it. That and a few fuel pipes connecting the tanks pretty much completes the mods
Gunners station:-
I've added a map case, a better handle to the aerial cable, some ammunition storage (as WNW never indicated any) Opened up the eyepeice of the bombsight and went for the poano stool option for the seat.
Engine bay:-
I'm midway through detailing some pipework and cablong to busy up the back of the dash panel prior to installing the engie. Waiting for new drill bits to finish plumbing up before fitting the motor. Not following WNWs method of construction I already forsee issues fitting the maxim but as it will be buried I dont see it as a great issue
Lots more done just not particularly exciting pics...
Ta for looking, comments always welcome and thank you Andrew
Keith

OEFFAG_153

Joined: February 19, 2010
KitMaker: 1,473 posts
AeroScale: 1,450 posts

Posted: Thursday, February 02, 2012 - 01:17 AM UTC
Keith This is looking very promising indeed, Have you decided which profile to do yet?
I'm seriously thinking about getting the late version Rumpler (there is something about Lozenged wings )
)
Mikael
I'm seriously thinking about getting the late version Rumpler (there is something about Lozenged wings
)Mikael
mtnflyer

Joined: March 08, 2009
KitMaker: 394 posts
AeroScale: 360 posts
Posted: Thursday, February 02, 2012 - 02:37 AM UTC
Keith. From a getting educated standpoint, I really admire your work. The cockpit details your adding seem simple enough, yet allow for maximum impact.
I've not noticed before, someone dressing the outside of the firewall. I'm wondering if all that fine work will be seen or totally obscured by engine and cowling.
Your doing a wonderful job and I'm enjoying the show. Thanks
I've not noticed before, someone dressing the outside of the firewall. I'm wondering if all that fine work will be seen or totally obscured by engine and cowling.
Your doing a wonderful job and I'm enjoying the show. Thanks

Mgunns

Joined: December 12, 2008
KitMaker: 1,423 posts
AeroScale: 1,319 posts

Posted: Thursday, February 02, 2012 - 02:39 AM UTC
HellO Keith:
You seem to be making good progress on this. The extra attention to detail, i.e., AMS additions are nicely done. I have this kit as well, and will be referring to your build whenever I tackle it. Looking forward to more.
Best
Mark
You seem to be making good progress on this. The extra attention to detail, i.e., AMS additions are nicely done. I have this kit as well, and will be referring to your build whenever I tackle it. Looking forward to more.
Best
Mark
Kornbeef
Joined: November 06, 2005
KitMaker: 1,667 posts
AeroScale: 1,551 posts
Posted: Thursday, February 02, 2012 - 09:03 AM UTC
Hi fellas,
Mikael, I'm not building any of the set profiles, just building an anonomous early Rumpler, one of the great unrecorded masses.. I want a splash of colour on her somewhere.
I'm sure some must have been quite strikingly marked.
Guy, up to this moment I'm planning on having the left rear cowl off showing the back of the dash the generator and carb basically so am concentrating detailing those areas a little, time might decide otherwise however and she could end up cowled up.
Info always comes to light after you imagine a layout as I'm sure you've found. I feel a late Rumpler calling, maybe that one might get the full AMS treatment after cutting my teeth on this.
Mark. Please do, I'll post a more comprehensive good bad and ugly on the kit as it progresses. The only part I have found I am unsure about is the undercarriage, it looks out to me and I took chance to mod mine. I may be wrong but my eye says otherwise
So as to progress, wings tail and rudder are topcoated sealed and decalled all in a day. painted in a mix of lifecolour and Citadel paints Gretchen green & Skull white make a lovely apple greygreen BTW
K

lcarroll
Joined: July 26, 2010
KitMaker: 1,032 posts
AeroScale: 1,025 posts
Posted: Thursday, February 02, 2012 - 11:43 AM UTC
Keith,
The old oak stump is showing off some pretty nice things again. I'll be watching this one as you have really gone after interior enhancements, the firewall and engine compartment look really "spiffy"!
Watch that AMS, however I percieve it's too late.........
Cheers,
Lance
The old oak stump is showing off some pretty nice things again. I'll be watching this one as you have really gone after interior enhancements, the firewall and engine compartment look really "spiffy"!
Watch that AMS, however I percieve it's too late.........
Cheers,
Lance

JackFlash
Joined: January 25, 2004
KitMaker: 11,669 posts
AeroScale: 11,011 posts
Posted: Friday, February 03, 2012 - 03:40 PM UTC
Good build Keith! Just to suggest, as to splash of colour how about a replacement wing panel and or aileron (s) or elevators? A mix of 1917 5 colour lozenge with the two toned upper camouflage. If memory serves Ray Rimell did a profile of a Rumpler C.IV in sprayed colours of various reddish and milk chocolate browns.
Kornbeef
Joined: November 06, 2005
KitMaker: 1,667 posts
AeroScale: 1,551 posts
Posted: Friday, February 03, 2012 - 07:29 PM UTC
Well onwards and upwards, as they say (hopefully)
Progress to date. It's early here the chaos of a new baby in the family hasnt restarted yet, I'm stealing a few quiet hours while the world slumbers to post.
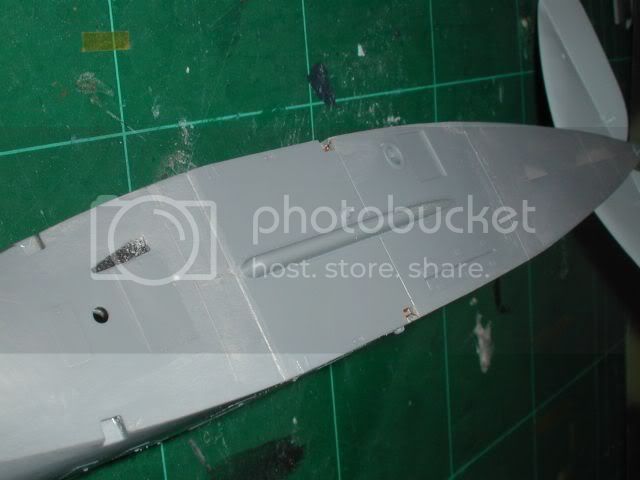
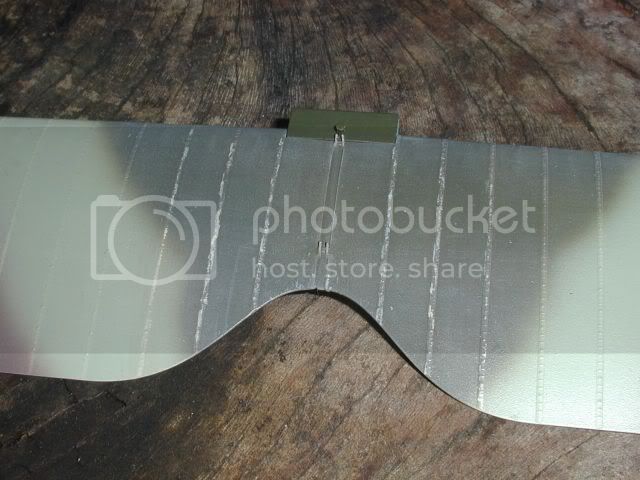
Whe flying surfaces are ready for weathereing in (yes the paint is intentionally patchy (tries to sound convincing )
I've trie to mimic the peeling dope around the centre ribs to some success, base coating in enamel then overspraying in acrylics meant I could pick away the still damp top coat with a blade easily enough... what I didnt think was going back and mimicking it elsewhere once the paint had dried would lift both coats...DOH! as Homer puts it.
((what else I didnt realise was I couldnt see that difference till camerus digitalus pointed it out glaringly clearly
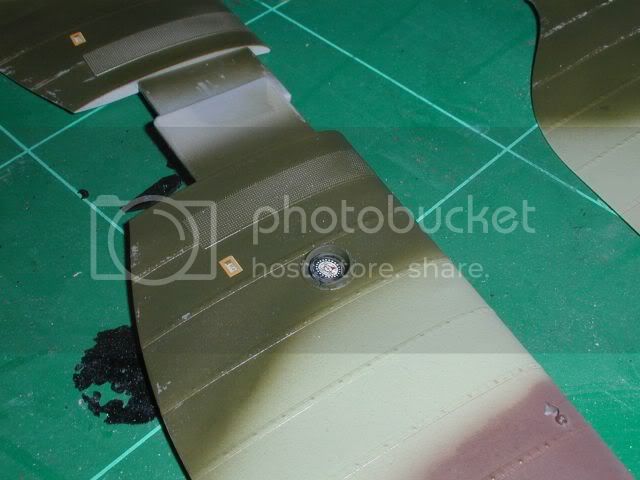
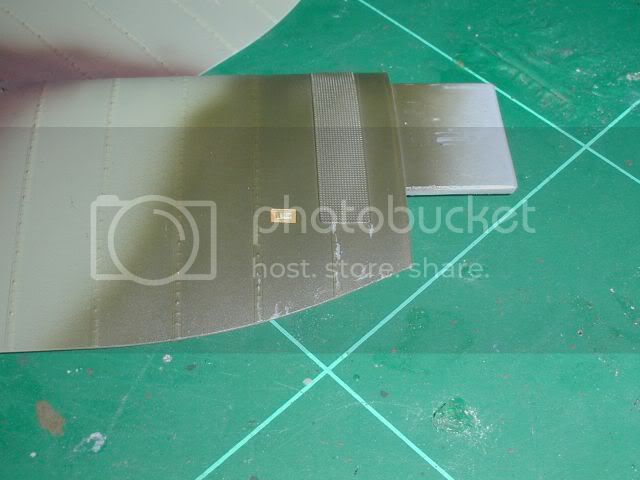
Arent those WNW stamp inspection window decals just great?
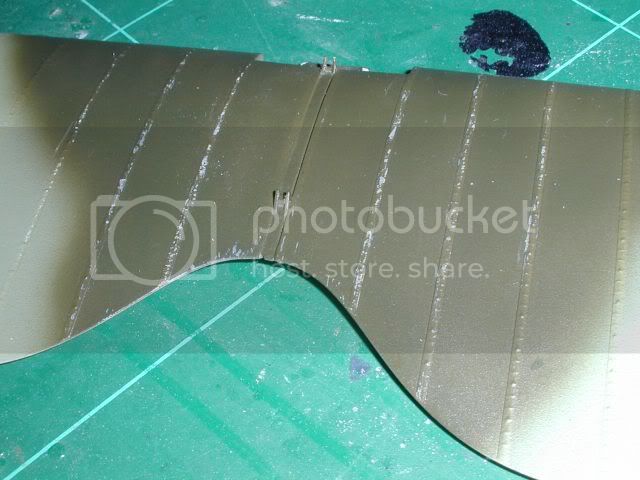
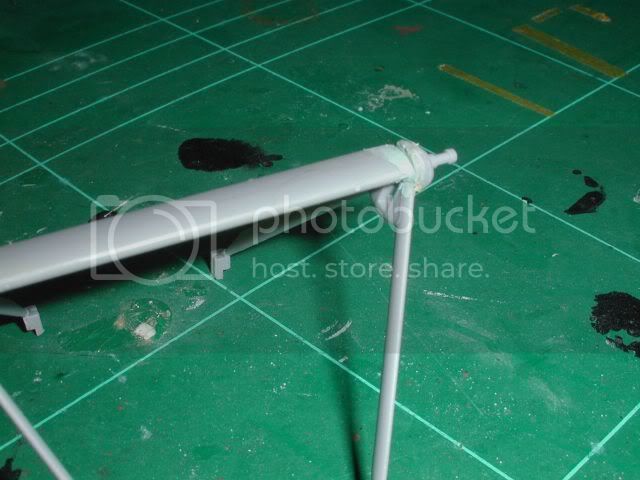
One pointer: while assembling the upper wing, take care ensuring the fit of the centre section, I didnt and had something of a chore sanding the joints without losing the ribbing tape detail. I'm not happy with the result but its quite out of sight anyway.
I got a bit further with the plumbing wiring & today all things willing I'm working on the engine plumbing etc.

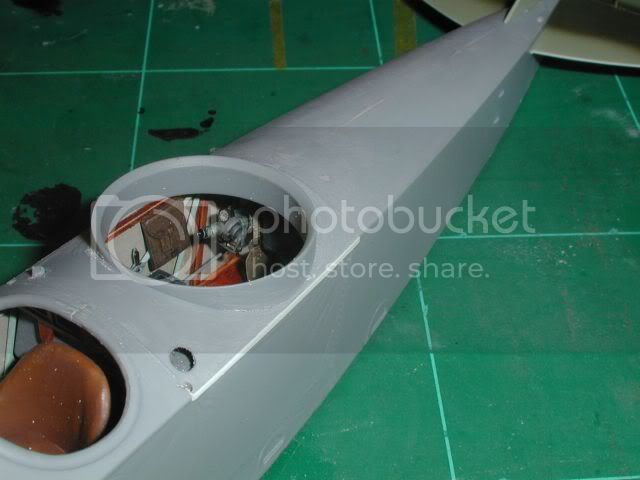
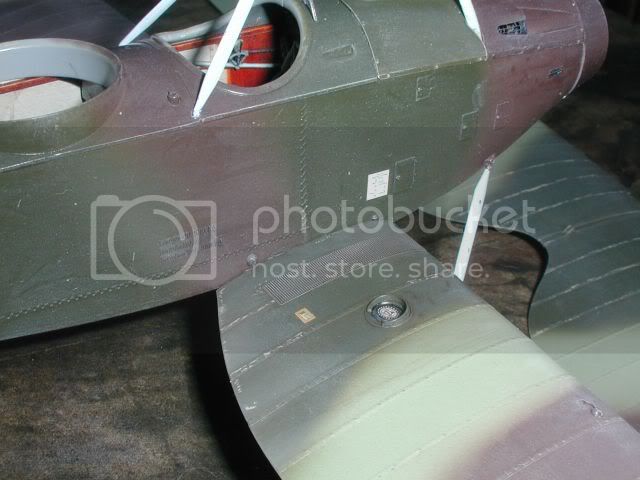
The fuselage, well easy to see one tiny mod. also easy to see it isnt square. lol
you might be able to make out the creases I tried to *subtly* apply to the cockpit sides. I wont know how well this has worked till paint lands. You may also note the patches of filler along the seam. I know Rowan pointed out in his review of the late model that he had a bit of warpage, Well let me assure you this was all my own doing, the sides fitted snug as supplied by WNW but mt idea of dovetailing reinforcing strips each side pulled it out of line.
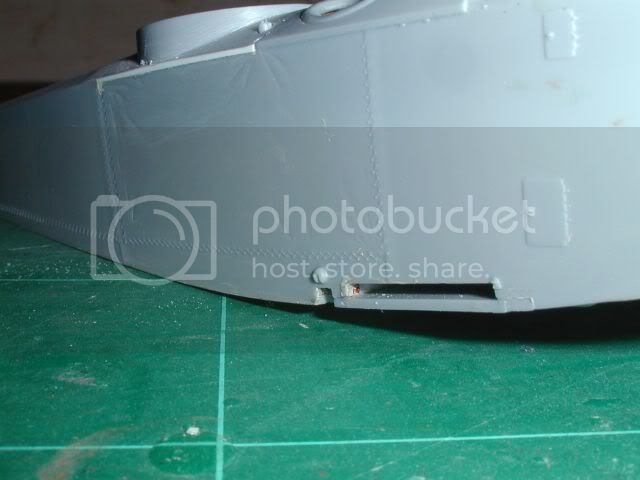
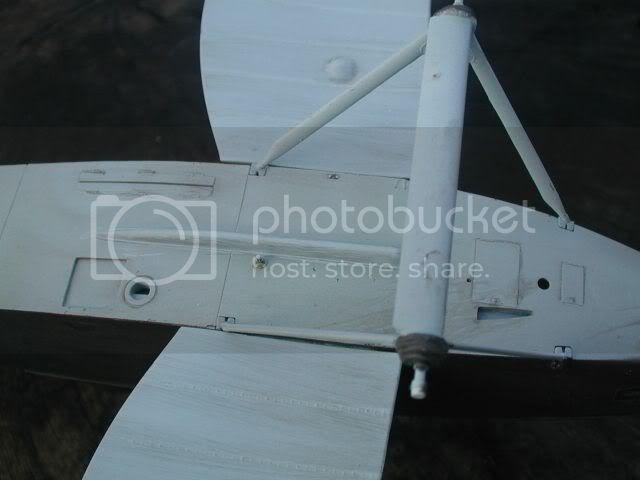
Now the undercarriage, this is my take on how it is, I'm not saying WNW got it a little wrong, Just as I percieve it and I'm no egspurt. I cut and re-assembled with the axle and fairing a little deeper in the slot then filled between the fairing anf legs as it appears in pics and the drawings from *Flight* to be welded together with only the axle itself moving. Right or wrongly thats how I see it. *gulp*

TTFN old beans,
Keith
Progress to date. It's early here the chaos of a new baby in the family hasnt restarted yet, I'm stealing a few quiet hours while the world slumbers to post.
Whe flying surfaces are ready for weathereing in (yes the paint is intentionally patchy (tries to sound convincing
)I've trie to mimic the peeling dope around the centre ribs to some success, base coating in enamel then overspraying in acrylics meant I could pick away the still damp top coat with a blade easily enough... what I didnt think was going back and mimicking it elsewhere once the paint had dried would lift both coats...DOH! as Homer puts it.
((what else I didnt realise was I couldnt see that difference till camerus digitalus pointed it out glaringly clearly
Arent those WNW stamp inspection window decals just great?
One pointer: while assembling the upper wing, take care ensuring the fit of the centre section, I didnt and had something of a chore sanding the joints without losing the ribbing tape detail. I'm not happy with the result but its quite out of sight anyway.
I got a bit further with the plumbing wiring & today all things willing I'm working on the engine plumbing etc.
The fuselage, well easy to see one tiny mod. also easy to see it isnt square. lol
you might be able to make out the creases I tried to *subtly* apply to the cockpit sides. I wont know how well this has worked till paint lands. You may also note the patches of filler along the seam. I know Rowan pointed out in his review of the late model that he had a bit of warpage, Well let me assure you this was all my own doing, the sides fitted snug as supplied by WNW but mt idea of dovetailing reinforcing strips each side pulled it out of line.
Now the undercarriage, this is my take on how it is, I'm not saying WNW got it a little wrong, Just as I percieve it and I'm no egspurt. I cut and re-assembled with the axle and fairing a little deeper in the slot then filled between the fairing anf legs as it appears in pics and the drawings from *Flight* to be welded together with only the axle itself moving. Right or wrongly thats how I see it. *gulp*
TTFN old beans,
Keith

gajouette
Joined: February 01, 2007
KitMaker: 365 posts
AeroScale: 356 posts

Posted: Saturday, February 04, 2012 - 04:38 AM UTC
Kieth,
She shaping up to be one beautiful C.IV my friend. Great additional plumbing you've added to the engine compartment.
Looking forward to the next update.By the way thanks for the tip on the upper wing,I'll have to remember that when I get around to building mine.
Highest Regards,
Gregory Jouette
She shaping up to be one beautiful C.IV my friend. Great additional plumbing you've added to the engine compartment.
Looking forward to the next update.By the way thanks for the tip on the upper wing,I'll have to remember that when I get around to building mine.
Highest Regards,
Gregory Jouette
Mgunns
Joined: December 12, 2008
KitMaker: 1,423 posts
AeroScale: 1,319 posts
Posted: Monday, February 06, 2012 - 01:43 AM UTC
Hello Keith:The plumbing in the engine compartment is really neat and will draw attention to that area. Thanks too for the tips on the wing, I have one and will be careful at that juncture. Looking forward to more.
Best
Mark
Kornbeef
Joined: November 06, 2005
KitMaker: 1,667 posts
AeroScale: 1,551 posts
Posted: Sunday, February 19, 2012 - 05:19 AM UTC
First apologies.
Its been a while since I posted much of anything first (grand)baby arrived with complications so I've been otherwise engaged... still got some bench time in though.
So heres the progress, the lower wings are dryfitted only I'm on making turnbuckles a bit at a time and hopping on the kit as and when I get chance, had a few minor drama's nothing too daunting though, cowls etc fitted like a dream.
Still lots of weathering wear details to add but apart from the struts the sprues are looking pretty bare
Thats all for now folks.
Ta for any comments. Keith
JackFlash
Joined: January 25, 2004
KitMaker: 11,669 posts
AeroScale: 11,011 posts
Posted: Sunday, February 19, 2012 - 07:13 AM UTC
Looking good! 
lcarroll
Joined: July 26, 2010
KitMaker: 1,032 posts
AeroScale: 1,025 posts
Posted: Sunday, February 19, 2012 - 07:49 AM UTC
Keith,
Wonderful to behold, your engine compartment and firewall detailing is particularly impressive. I always look forward to updates from the great oak stump; this one was worth the wait. Very nice indeed!
Cheers,
Lance
Wonderful to behold, your engine compartment and firewall detailing is particularly impressive. I always look forward to updates from the great oak stump; this one was worth the wait. Very nice indeed!
Cheers,
Lance
Mgunns
Joined: December 12, 2008
KitMaker: 1,423 posts
AeroScale: 1,319 posts
Posted: Sunday, February 19, 2012 - 10:39 AM UTC
Hello Keith:
THis is really turning out nicely. First one I have seen a build blog on, and it is really looking neat.
Best
Mark
THis is really turning out nicely. First one I have seen a build blog on, and it is really looking neat.
Best
Mark

RAGIII
Joined: June 19, 2007
KitMaker: 604 posts
AeroScale: 600 posts
Posted: Monday, February 20, 2012 - 07:50 AM UTC
Keith,
Beautiful work as always from your bench.
RAGIII
Beautiful work as always from your bench.
RAGIII

eseperic

Joined: November 06, 2009
KitMaker: 624 posts
AeroScale: 609 posts

Posted: Monday, February 20, 2012 - 10:19 AM UTC
Keith,
I am thoroughly impressed with your build! This is great opportunity for me to learn more. wonderful subject and still better display of skills! I will watch with interest!
All the best,
Entoni
I am thoroughly impressed with your build! This is great opportunity for me to learn more. wonderful subject and still better display of skills! I will watch with interest!
All the best,
Entoni
OEFFAG_153
Joined: February 19, 2010
KitMaker: 1,473 posts
AeroScale: 1,450 posts
Posted: Monday, February 20, 2012 - 07:56 PM UTC
Keith this is looking really great I especially like the busy parts behind the engine. Very convincing!
Mikael
Mikael
Kornbeef
Joined: November 06, 2005
KitMaker: 1,667 posts
AeroScale: 1,551 posts
Posted: Monday, February 20, 2012 - 09:55 PM UTC
Hey Thanks guys, your comments are really appreciated. I wish I could pull off the kind of things in 1:48th many of you do.
I'm really enjoying this build so much, a few minor issues but nothing unsurmountable... most my own making of course. So much I'm planning a Late model too with some more detail. So much of treasures this kit has are kind of hidden.
Adding the little details and a few extras at the moment, hoping to be in the ready to fit the upper wing zone by next week but don't want to blunder ahead. Rigging... going to try to prerig as much as possible Ive one or two ideas to try, 50ish turnbuckles to make over the next few days too... not a time for fat finger syndrome... also I better make a sacrifice to the carpet and laminate floor demons to sate their voracious hunger first.

thegirl
Joined: January 19, 2008
KitMaker: 6,743 posts
AeroScale: 6,151 posts
Posted: Saturday, February 25, 2012 - 11:22 AM UTC
I'm shocked that you are keeping your AMS under control on this build ......see I told you those pills would work !!!
Well done so far my friend ....
Terri
Well done so far my friend ....
Terri

mike_espo
Joined: September 26, 2011
KitMaker: 125 posts
AeroScale: 115 posts
Posted: Monday, February 27, 2012 - 06:01 AM UTC
Wow. The engine and cockpit detail is incredible. Wood grain is perfect. Really nice. Can't wait to see the rest.
What scale? That can't be 1/48.....
What scale? That can't be 1/48.....
Kornbeef
Joined: November 06, 2005
KitMaker: 1,667 posts
AeroScale: 1,551 posts
Posted: Tuesday, February 28, 2012 - 08:15 PM UTC
Hiya Terri, yes the pills are working, though once the DVII is released I don't think theres anything on the market strong enough to keep the AMS in check
Mike, Oh no its 1/32nd I was just saying how I admired those that can put such detail into smaller scales. Thanks for the kind comments none the less
Progress has been slow, I've had family around, always a good thing. Hoping to get some serious bench time in soon though so watch this space.
Keith
Mike, Oh no its 1/32nd I was just saying how I admired those that can put such detail into smaller scales. Thanks for the kind comments none the less
Progress has been slow, I've had family around, always a good thing. Hoping to get some serious bench time in soon though so watch this space.
Keith
JackFlash
Joined: January 25, 2004
KitMaker: 11,669 posts
AeroScale: 11,011 posts
Posted: Friday, March 02, 2012 - 06:12 AM UTC
I'll be using your thread(s) for a guide!

gajouette
Joined: February 01, 2007
KitMaker: 365 posts
AeroScale: 356 posts
Posted: Tuesday, March 06, 2012 - 08:29 AM UTC
Keith,
Excellent progress my friend.Love that camouflage scheme,perfect choice for an early Rumpler.
Highest Regards,
Gregory Jouette
Excellent progress my friend.Love that camouflage scheme,perfect choice for an early Rumpler.
Highest Regards,
Gregory Jouette
 |

WEB HOSTING BY


Copyright ©2021 AeroScale and Kitmaker Network, a subsidiary of Silver Star Enterprises
All Rights Reserved. Please read our Conditions of Use and Privacy Policy.
All Rights Reserved. Please read our Conditions of Use and Privacy Policy.