

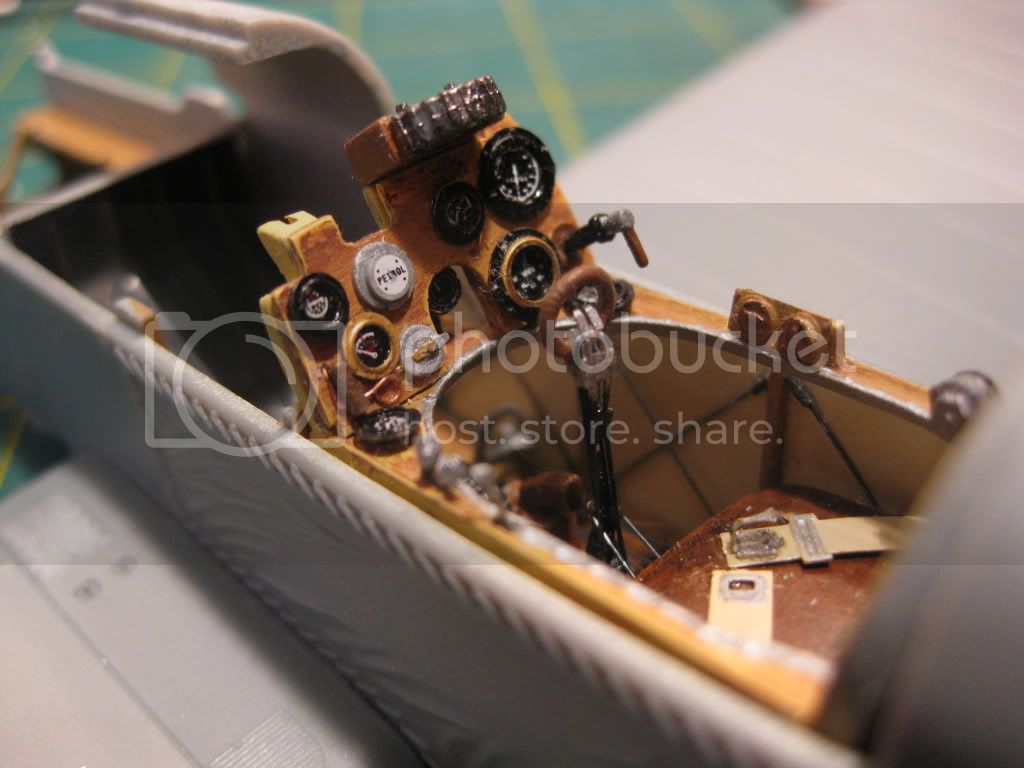
Great progress and yup, that instrument panel really looks the business!
Best Regards
Mikael
Early Aviation
Discuss World War I and the early years of aviation thru 1934.
Discuss World War I and the early years of aviation thru 1934.
Hosted by Jim Starkweather
KotS GB 2012 SE5a - lcarroll

OEFFAG_153

Joined: February 19, 2010
KitMaker: 1,473 posts
AeroScale: 1,450 posts

Posted: Monday, February 06, 2012 - 08:27 PM UTC

lcarroll

Joined: July 26, 2010
KitMaker: 1,032 posts
AeroScale: 1,025 posts
Posted: Tuesday, February 07, 2012 - 02:43 AM UTC
Quoted Text
I'll take one Lance!
Nice work so far Sir!
One tip I have for you, the rigging on the SE.5a can be very confusing at times. Make sure you have all your planning done before starting. I am sure you will, but the SE.5a was the only WNW model that I got the rigging wrong on... so far..
Warren,
Send me a PM with your mailing info; I'll be happy to send one off to you.
Cheers,
Lance

lcarroll
Joined: July 26, 2010
KitMaker: 1,032 posts
AeroScale: 1,025 posts
Posted: Tuesday, February 07, 2012 - 04:19 AM UTC
Mikael, Warren and Stephen,
Again, thanks for the encouraging comments. It is said that we are our own greatest critics; that in combination with what Kornbeef termed the dreaded "camerus digitalis" (or words to that effect) can be somewhat demoralising at times. The panel pleases me greatly with the "naked eye" however try as I might the photo results look anything but "clean", my latest quest!
Warren; I'll do my homework dilligently on the rigging prior to going further. The "Special" has the Official Rigging Diagram and is full of good detail shots, the WNW Instructions appear excellent as well. Last, if Brian Knight's cover painting on the Special is accurate it will help a lot.
I read on a previous build threads that this was the most complicated build to date for the author; I'm still looking over my shoulder for the "catch" as so far it's going well other then my clumsiness. Hope I'm not missing something................
Cheers,
Lance
OEFFAG_153
Joined: February 19, 2010
KitMaker: 1,473 posts
AeroScale: 1,450 posts
Posted: Tuesday, February 07, 2012 - 08:23 PM UTC
Lance I always have the same reaction when I photograph my "final"results. Rigging lines not quite tensioned, silvered decals, dust and various other small mistakes all show up magnified x 100. Fortunately in real life they don't show too much, so I try to ignore most of it as you say we are our own greatest critics.
Mikael
Mikael
lcarroll
Joined: July 26, 2010
KitMaker: 1,032 posts
AeroScale: 1,025 posts
Posted: Wednesday, February 08, 2012 - 04:40 AM UTC
Some more progress but it's a slow process; lots of details surfacing that need time to resolve.
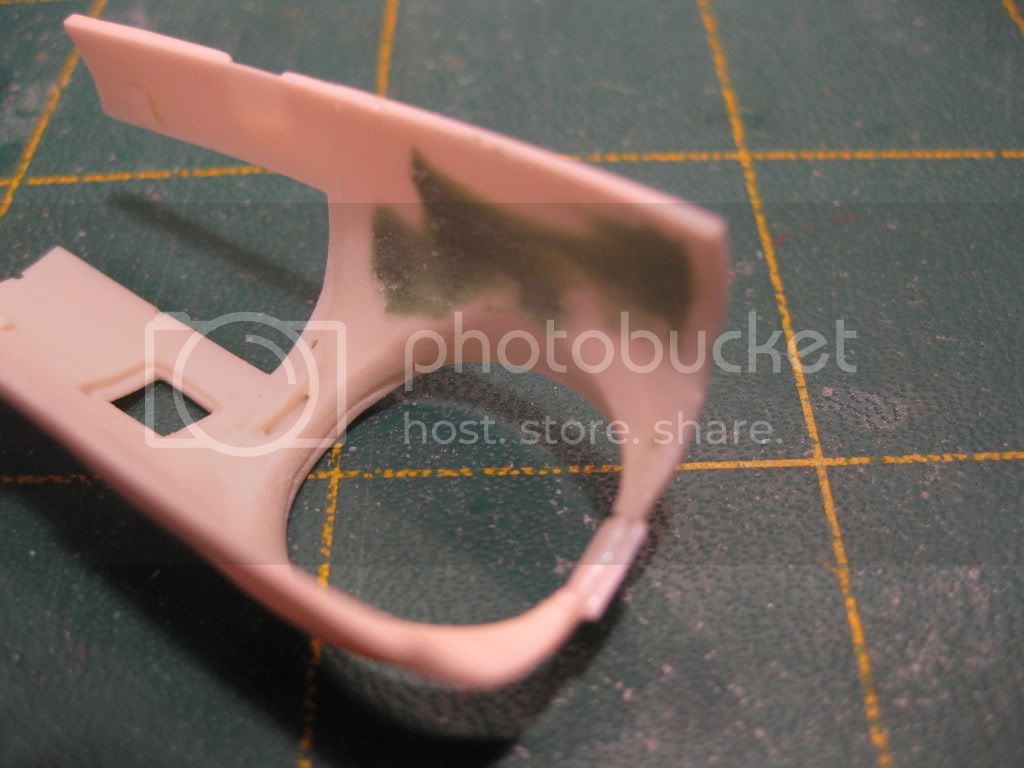
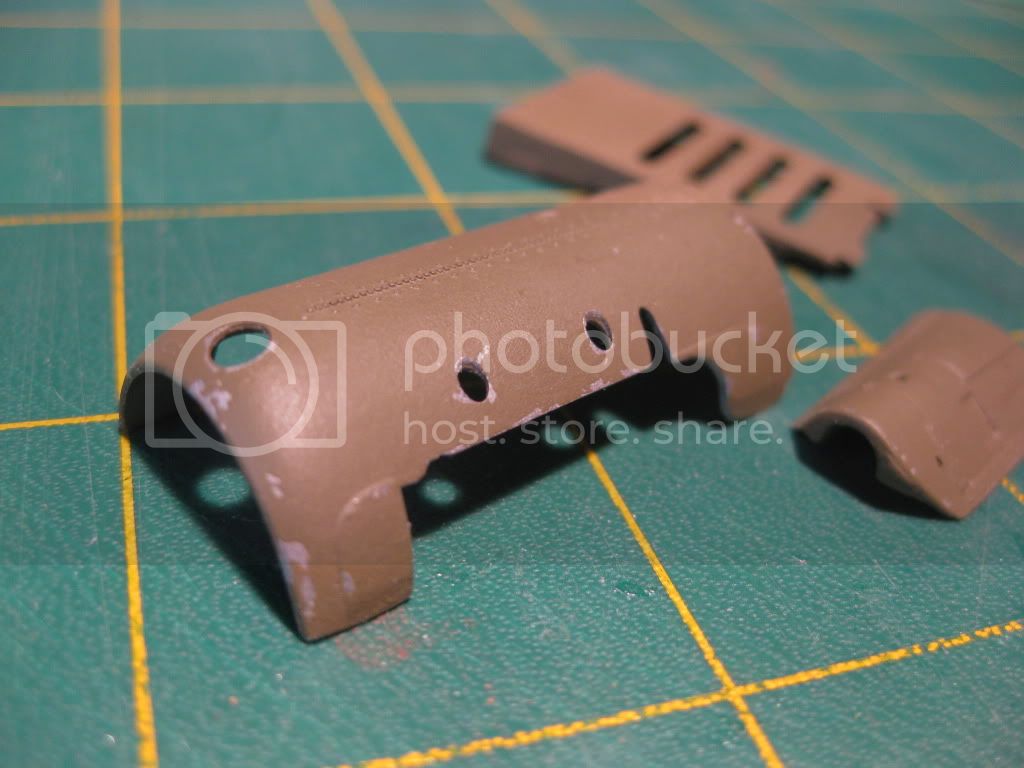
The resin coaming was a little rough in finish, the inside needed some filling of the mould imperfections and the next big task will be adding the formers as seen on the original. A comparison before starting....

Once the coaming was trimmed for a rough fit on the fuselage I used Squadron Green Putty as the filler.
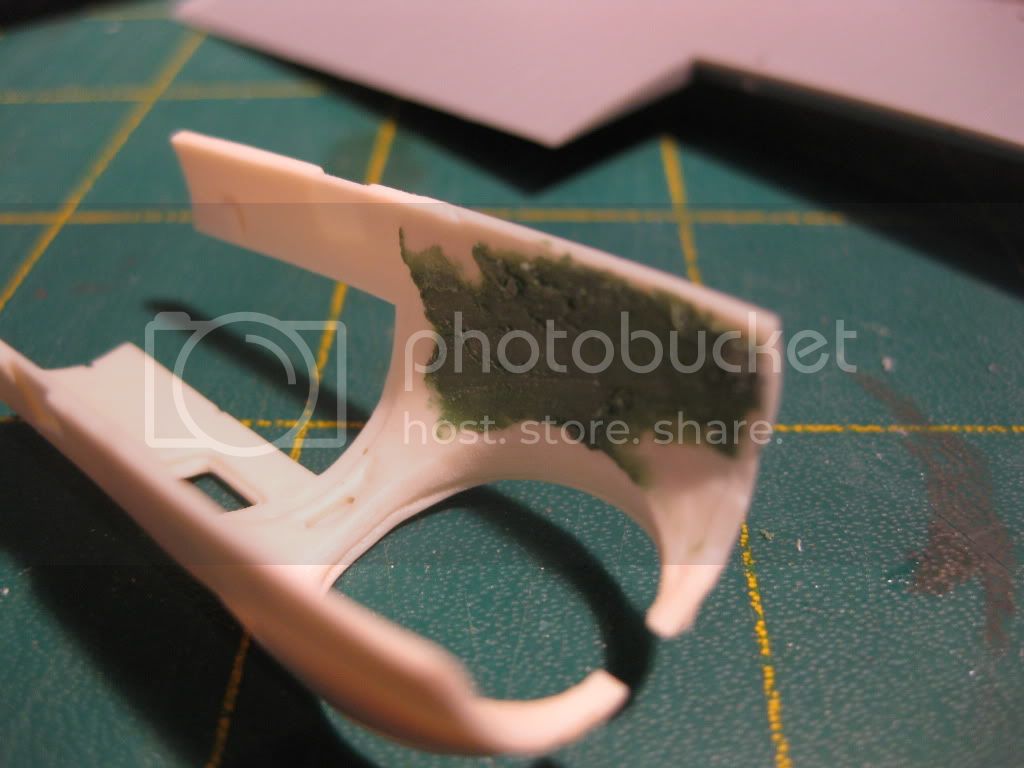
Once sanded down and some of the excess resin "blobs were removed it was ready for the wood base coat to be followed by some wood graining. But wait as they say in the T.V. marketing commercials, "that's not all!" The coaming had a very thin amount of moulding at the rear end; this shattered during clean up and a styrene filler strip was CA'ed in place to be formed and blended in prior to finishing.

Prior to that bit of surgury the fit was further refined and I must say in support of the product it is an excellent fit.

At this point the fit of the instrument panel and shelf was checked as well as the basic engine block; all is looking good.

And that's where I am this fine Weds. morning. I have a few chores to complete and then hope to finish the coaming interior formers, re-form the back of the opening, and get some paint on it, and if all goes well install it on the fuselage. At this point it appears filling will be minimum. After that step I'll get going on the "Hisso". The plan is to finish only the top portions that will be visible around the exhaust manifolds. A bit of a shame really as the WNW engine component is supurbly detailed. I toyed with the idea of tossing the Roden engine in but shied away from the possibility of fit problems with the cowling later.
As an aside I hope to build the Roden Kit as a follow up later, if so I might utilise a lot of the WNW engine sub components on it and have the engine cowlings off with the engine exposed.
Thanks for looking and more to follow in a day or two. So far it's going too smoothly, there has to be a "catch" of some sort he said with his typical pessimism!
Cheers,
Lance:|
The resin coaming was a little rough in finish, the inside needed some filling of the mould imperfections and the next big task will be adding the formers as seen on the original. A comparison before starting....
Once the coaming was trimmed for a rough fit on the fuselage I used Squadron Green Putty as the filler.
Once sanded down and some of the excess resin "blobs were removed it was ready for the wood base coat to be followed by some wood graining. But wait as they say in the T.V. marketing commercials, "that's not all!" The coaming had a very thin amount of moulding at the rear end; this shattered during clean up and a styrene filler strip was CA'ed in place to be formed and blended in prior to finishing.
Prior to that bit of surgury the fit was further refined and I must say in support of the product it is an excellent fit.
At this point the fit of the instrument panel and shelf was checked as well as the basic engine block; all is looking good.
And that's where I am this fine Weds. morning. I have a few chores to complete and then hope to finish the coaming interior formers, re-form the back of the opening, and get some paint on it, and if all goes well install it on the fuselage. At this point it appears filling will be minimum. After that step I'll get going on the "Hisso". The plan is to finish only the top portions that will be visible around the exhaust manifolds. A bit of a shame really as the WNW engine component is supurbly detailed. I toyed with the idea of tossing the Roden engine in but shied away from the possibility of fit problems with the cowling later.
As an aside I hope to build the Roden Kit as a follow up later, if so I might utilise a lot of the WNW engine sub components on it and have the engine cowlings off with the engine exposed.
Thanks for looking and more to follow in a day or two. So far it's going too smoothly, there has to be a "catch" of some sort he said with his typical pessimism!
Cheers,
Lance:|
mtnflyer
Joined: March 08, 2009
KitMaker: 394 posts
AeroScale: 360 posts
Posted: Thursday, February 09, 2012 - 09:04 AM UTC
Lance,I'm really liking the cockpit.
Believe me, I know what your talking about in that prep work is alot of time consuming effort. Sometimes a fella just never seems to feel like anything is getting done. Its all worth it though, and just part of the game.
Your doing a very special job. Congradulations.
Believe me, I know what your talking about in that prep work is alot of time consuming effort. Sometimes a fella just never seems to feel like anything is getting done. Its all worth it though, and just part of the game.
Your doing a very special job. Congradulations.
lcarroll
Joined: July 26, 2010
KitMaker: 1,032 posts
AeroScale: 1,025 posts
Posted: Thursday, February 09, 2012 - 11:09 AM UTC
Thanks for the encouraging words Guy.
Yes, this stage does go slow, not much to show for the past day or so but a lot of little stuff completed. I'll be closing up the cockpit as soon as I finish some of the "bits", got hung up on the prop/spinner assembly yesterday as it was not quite as simple as I thought.
Cheers,
Lance
Yes, this stage does go slow, not much to show for the past day or so but a lot of little stuff completed. I'll be closing up the cockpit as soon as I finish some of the "bits", got hung up on the prop/spinner assembly yesterday as it was not quite as simple as I thought.
Cheers,
Lance

Mgunns

Joined: December 12, 2008
KitMaker: 1,423 posts
AeroScale: 1,319 posts

Posted: Friday, February 10, 2012 - 03:56 AM UTC
 Hello Lance:
I fully appreciate your sentiment, I am in the slow stage of lozenge placement, so nothing really exciting to report just a few sentences. Once that is accomplished the pace picks up a bit. Same with this kit, once you get past the interior phase, the pace picks up. Having built this, and will be building one again, just like yours now, I would highly recommend ensuring the rigging is on the upper wing prior to installing the upper wing. It is somewhat of a pain to rig and by doing the upper wing first, you will save youself some anguish. By using EZ line, the modeler can pre rig the interplane and cabane struts prior to the top wing emplacement. That is my plan for the next one.
Good luck and hang in there, the world is watching and waiting.

Best
Mark
lcarroll
Joined: July 26, 2010
KitMaker: 1,032 posts
AeroScale: 1,025 posts
Posted: Friday, February 10, 2012 - 06:59 AM UTC
Mark,
After reading your suggestion and studying the rigging diagrams I beleive it's the way I'll go. I don't have EZ Line however if the struts are all permanently in place with the top wing as the template I'm thinking it will work fine. Have to be carefull though for sure.
As for the slow progress......... very slow indeed. Presently I'm "re-inventing the wheel" with the resin after market coaming. I used the PE interior frames which were intended for the standard coaming and thought I was done. Now I'm adding more frame formers as I wasn't happy with the into the cockpit view, it lacked detail. Also layering putty onto the leather coaming liner proper to build up some relief.
Should be able to produce a few photos in a day or two.
Thanks for the advice; may indeed save me some grief!
Cheers,
Lance
lcarroll
Joined: July 26, 2010
KitMaker: 1,032 posts
AeroScale: 1,025 posts
Posted: Saturday, February 11, 2012 - 12:30 PM UTC
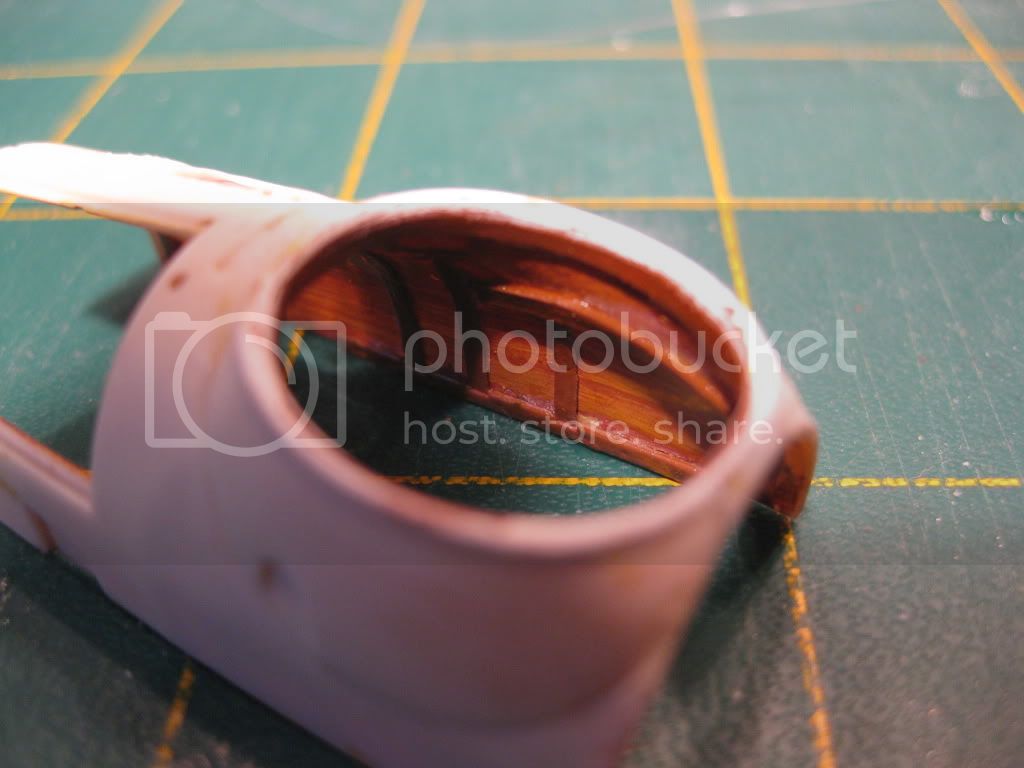
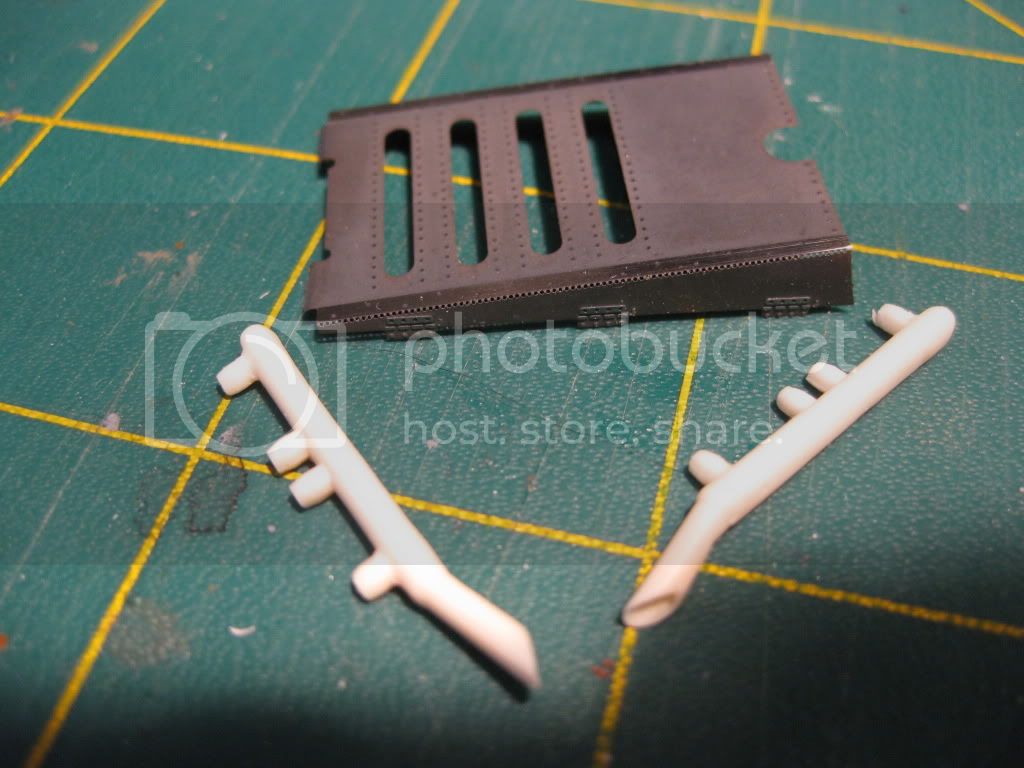
Another update; some reasonable progress but a long way to go.
The LVG spinner which McCudden had salvaged from an LVG he downed was more work then I had anticipated, this being my first experience with resin. I used my Dremel with a round tip rasp to hollow it out, then dressed out the prop blade openings with a round file and some final sanding.
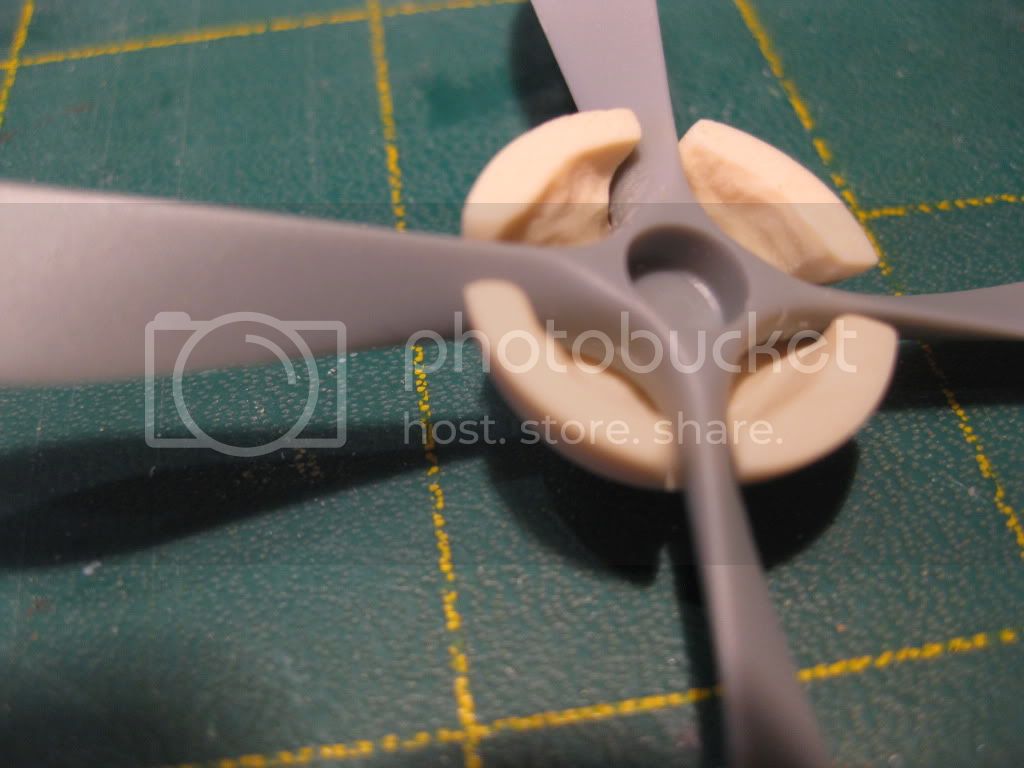
Once the rough work is complete the fit is excellent.
Next in the plan was to install the resin cowling/coaming on the fuselage. At this point I elected to add some formers to the interior of the part as the PE
ones added earlier were designed for the original unbulged coaming and did not look at all complete nor realistic.
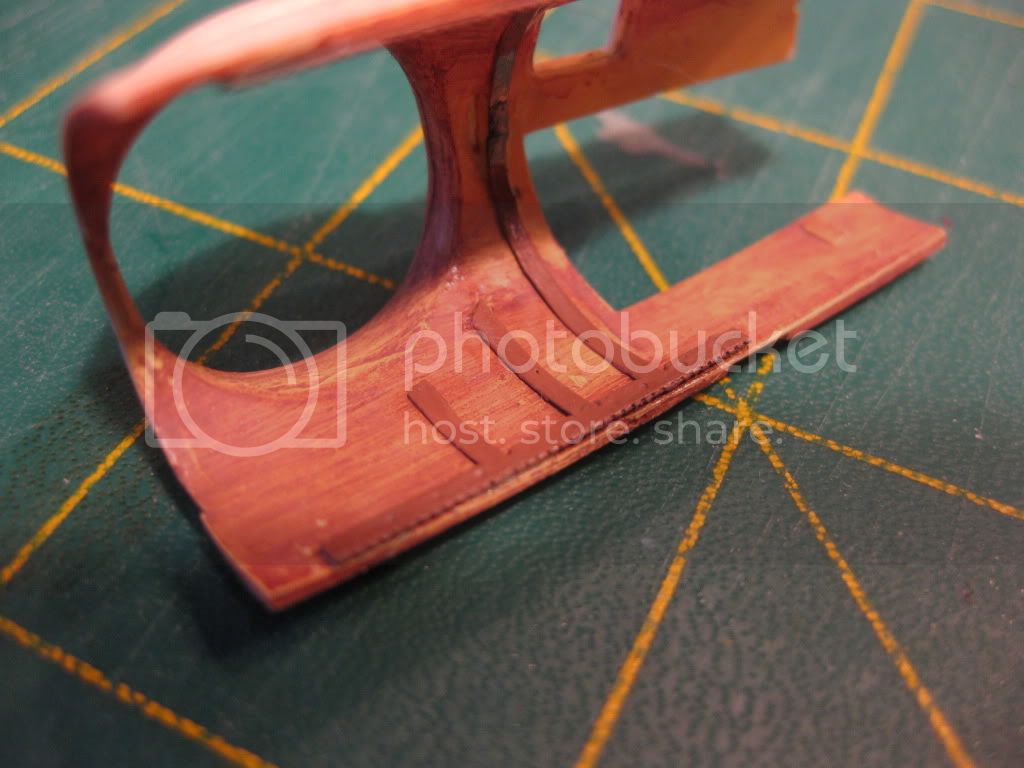
I added two formers or strips where I thought logic would place them (I could not locate any ref. photos or diagrams) One was installed as a "ring " around the top of the coaming/opening, the other longitudinally below that. I reasoned it couldn't be much different then a cedar strip canoe frame I helped refurbish years ago..... The inside was then given a thin coat of Tamiya Transparent Orange.
At this point I used Tamiya Putty to fair the ring strip around the opening into the outer rim; once dry it was sanded. re-coated, and then sanded again. This will be painted leather as the soft coaming liner later in the build.
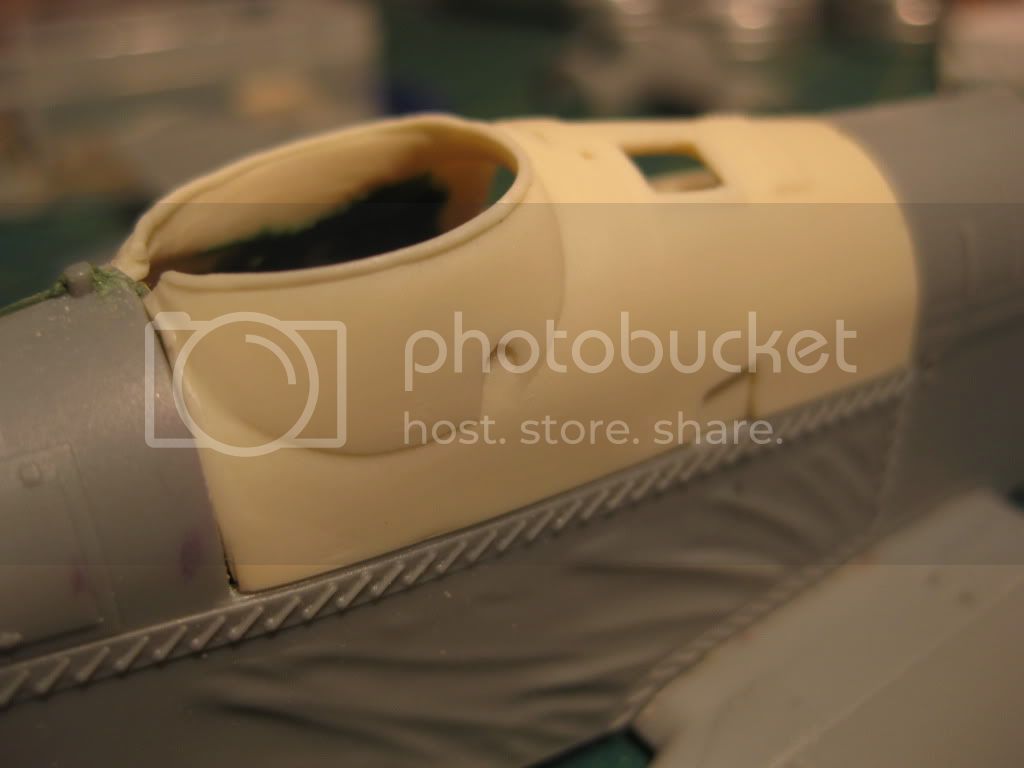
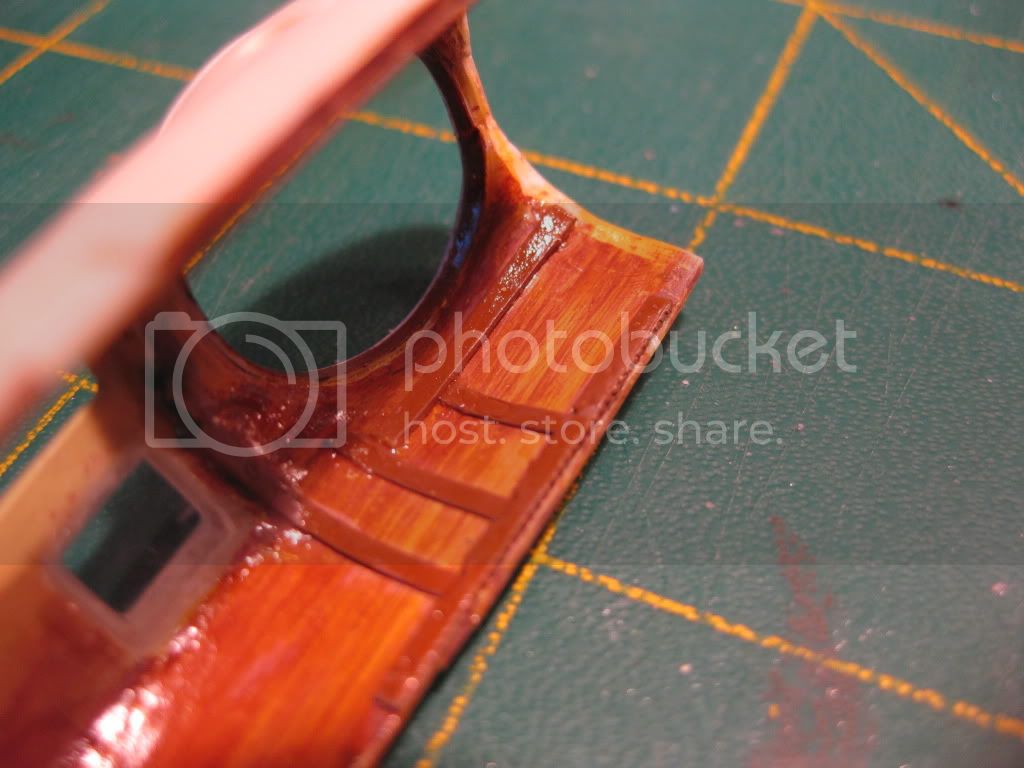
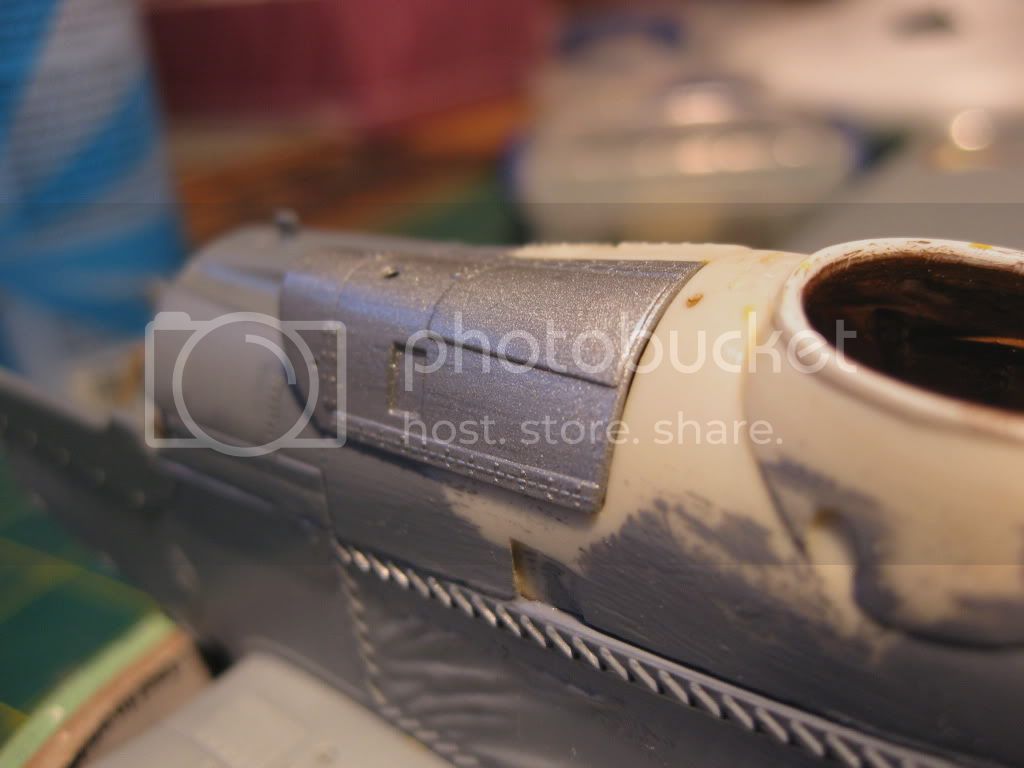
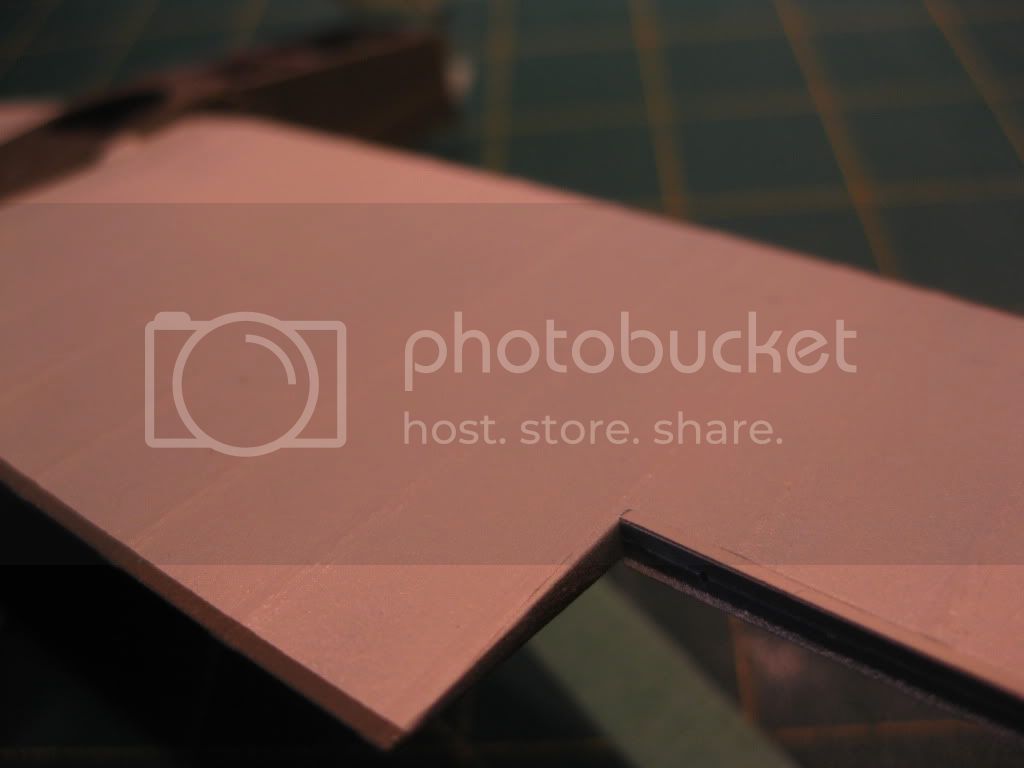
Next the greatest progress to date, the resin coaming was mated to the fuselage using CA. The fit went very well, some minor filling and sanding (still a bit more to go) and I am very pleased with the fit. Some Model Master Grey Primer has been applied to verify the joint filling on the fuselage as well as the coaming/fuselage joins. The after market coaming is a good product and, with minor trimming and sanding the window on the starboard upper side, panel covering the Vickers Gun, and forward engine upper cowling all fit very nicely.
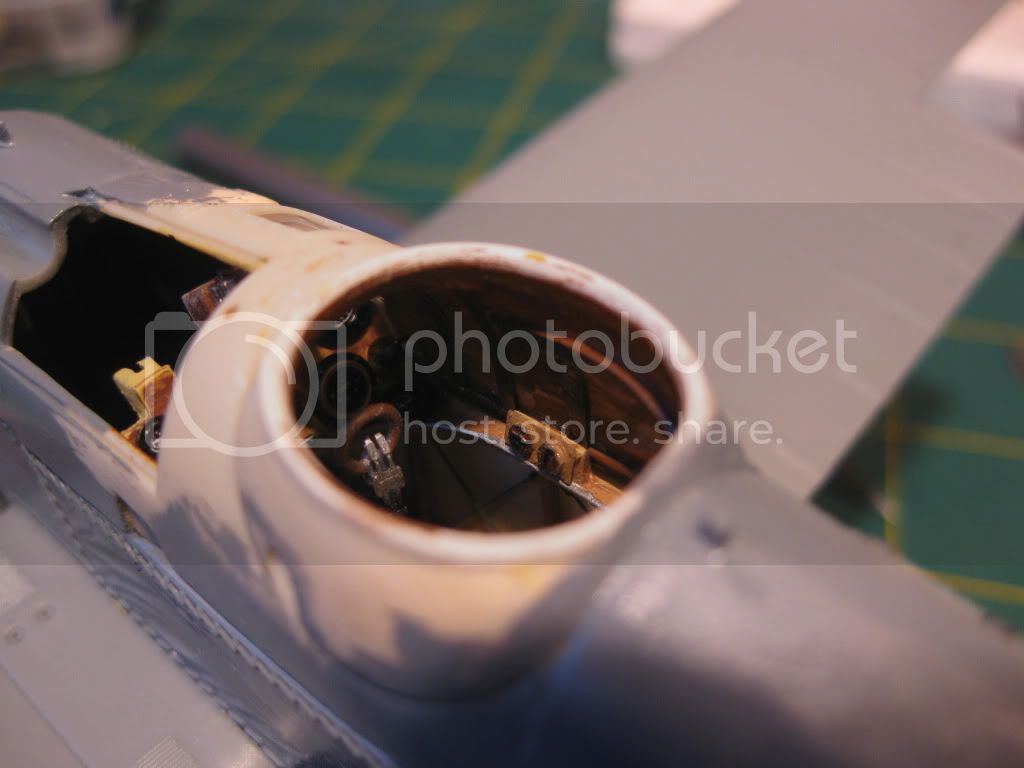
And another with the Vickers panel "posed".
On the miscellaneous side the Radiator got some pre-work, the lower center portion had a section of vanes (cut from the Eduard PE Sheet) added to match the Ref. photos of 4891 and some preliminary painting. (yes, the bent vane right side lower will be straightened....great little camera!)

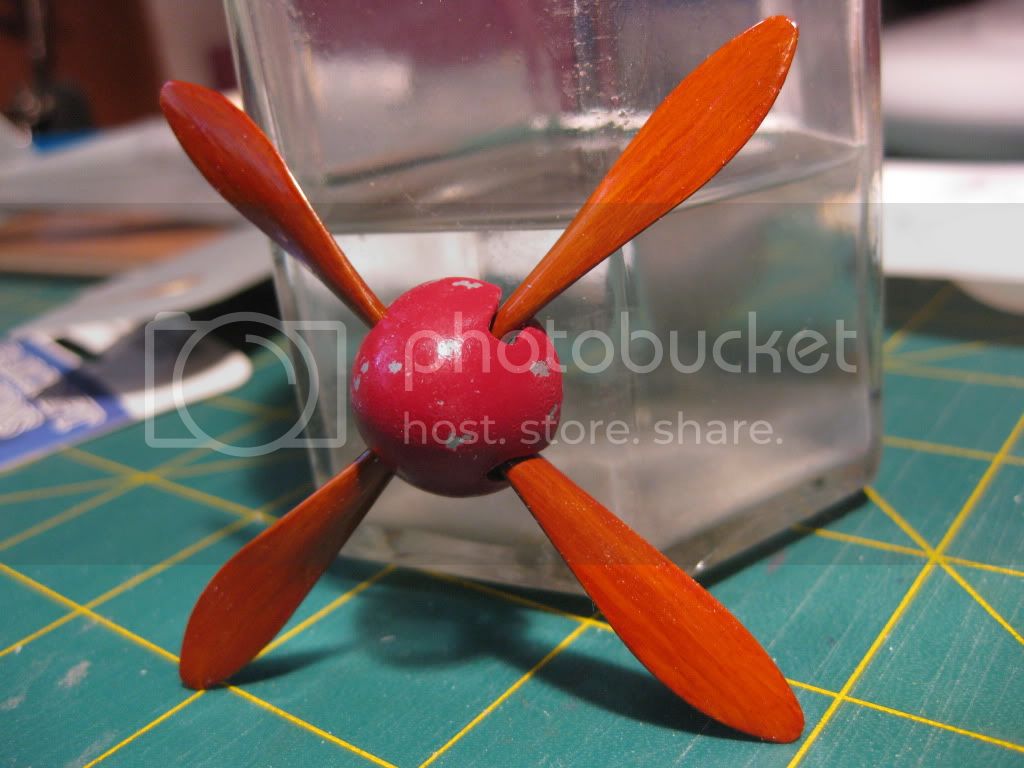
Also the prop has been painted, grained, and had a coat of Transparent Orange, photos later.
And that's all for now folks. Still progressing OK, no major disasters, and still really impressed with this kit.(the after market set and bits from the Encore Kit are really good as well.)
Thanks for looking........
Cheers,
Lance
The LVG spinner which McCudden had salvaged from an LVG he downed was more work then I had anticipated, this being my first experience with resin. I used my Dremel with a round tip rasp to hollow it out, then dressed out the prop blade openings with a round file and some final sanding.
Once the rough work is complete the fit is excellent.
Next in the plan was to install the resin cowling/coaming on the fuselage. At this point I elected to add some formers to the interior of the part as the PE
ones added earlier were designed for the original unbulged coaming and did not look at all complete nor realistic.
I added two formers or strips where I thought logic would place them (I could not locate any ref. photos or diagrams) One was installed as a "ring " around the top of the coaming/opening, the other longitudinally below that. I reasoned it couldn't be much different then a cedar strip canoe frame I helped refurbish years ago..... The inside was then given a thin coat of Tamiya Transparent Orange.
At this point I used Tamiya Putty to fair the ring strip around the opening into the outer rim; once dry it was sanded. re-coated, and then sanded again. This will be painted leather as the soft coaming liner later in the build.
Next the greatest progress to date, the resin coaming was mated to the fuselage using CA. The fit went very well, some minor filling and sanding (still a bit more to go) and I am very pleased with the fit. Some Model Master Grey Primer has been applied to verify the joint filling on the fuselage as well as the coaming/fuselage joins. The after market coaming is a good product and, with minor trimming and sanding the window on the starboard upper side, panel covering the Vickers Gun, and forward engine upper cowling all fit very nicely.
And another with the Vickers panel "posed".
On the miscellaneous side the Radiator got some pre-work, the lower center portion had a section of vanes (cut from the Eduard PE Sheet) added to match the Ref. photos of 4891 and some preliminary painting. (yes, the bent vane right side lower will be straightened....great little camera!)
Also the prop has been painted, grained, and had a coat of Transparent Orange, photos later.
And that's all for now folks. Still progressing OK, no major disasters, and still really impressed with this kit.(the after market set and bits from the Encore Kit are really good as well.)
Thanks for looking........
Cheers,
Lance
mtnflyer
Joined: March 08, 2009
KitMaker: 394 posts
AeroScale: 360 posts
Posted: Saturday, February 11, 2012 - 04:01 PM UTC
Lance, I have this kit, just no AM. You've chosen an exciting subject, though. Something different.
Was/is that Vickers panel AM too, or just your own good idea?
Great model, with an excellent builder at the helm. I'm following, every day!
Was/is that Vickers panel AM too, or just your own good idea?
Great model, with an excellent builder at the helm. I'm following, every day!
lcarroll
Joined: July 26, 2010
KitMaker: 1,032 posts
AeroScale: 1,025 posts
Posted: Sunday, February 12, 2012 - 02:42 AM UTC
Thanks Guy,
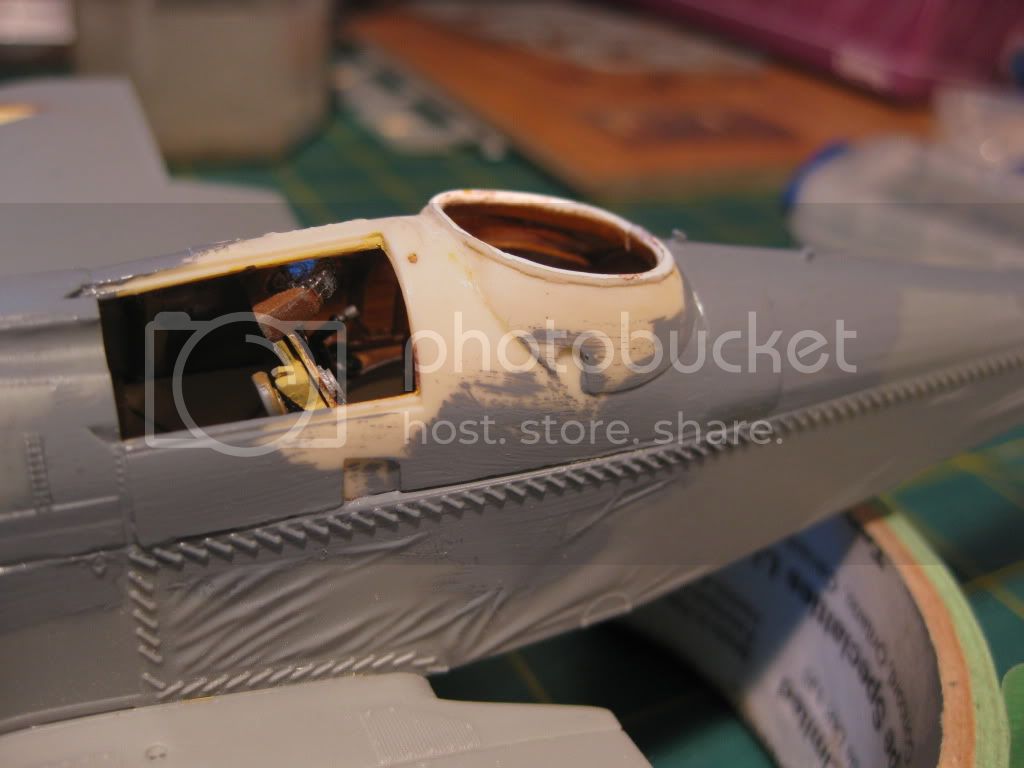
The panel over the Vickers gun and Bay is part of the WNW Kit. Squadron/True Details did their homework on the coaming as this panel and the "window" that provides some light to the instrument panel fit their AM piece quite well. The only criticism I have of this AM Set to date is lack of direction or details being included for the inside of the major component. The fit as you can see is pretty good as well.
I'd rate this product highly and recommend it to folks considering this version.
Cheers,
Lance
Mgunns
Joined: December 12, 2008
KitMaker: 1,423 posts
AeroScale: 1,319 posts
Posted: Tuesday, February 14, 2012 - 01:32 AM UTC
Hello Lance:Nice work on the inside of the cockpit coming. It is coming along nicely, looking forward to more as you progress on this.
Best
Mark
lcarroll
Joined: July 26, 2010
KitMaker: 1,032 posts
AeroScale: 1,025 posts
Posted: Tuesday, February 14, 2012 - 04:07 AM UTC
Quoted Text
Nice work on the inside of the cockpit coming. It is coming along nicely, looking forward to more as you progress on this.
Best
Mark
Mark,
I've spent some time thinking about the next few steps and particularly your suggestions on the rigging/assembly sequence. The more I projected the rigging "equation" the more EZ Line seemed logical so I ordered some last night. Marc's (Wingnut's) comments on the product were also encouraging. This may cause a delay while I await the Postal Services inevitable inputs.
Quick question for you (or anyone with EZ Line experience):
Along with Bob's Buckles and slightly larger ones of my own manufacture I use mono fishing line, 4 and 6 lb. test which are .20 and .23 mm respectively, the EZ Line is .15mm so should easily fit the buckles. I've never been able to use the "thru the tube, loop thru the eyelet, and back thru the brass tubing" method as the mono is too thick for the second go-thru. Do you use the technique or just knot and CA the line at the eyelet/buckle?
In the interim I've pre-drilled all the eyelet locations and am close to the painting stage, then I can clean up the holes and start laying in the eyelets. Should keep me busy for a while.
I'd be interested in your feedback and it may also interest others.......
Cheers,
Lance
Mgunns
Joined: December 12, 2008
KitMaker: 1,423 posts
AeroScale: 1,319 posts
Posted: Tuesday, February 14, 2012 - 06:54 AM UTC
Hi Lance:
I have tried only once to get the EZ line through the tube, and it is a little too big and fiddly. You will find it behaves like no other line you have used. It does go through the eyelet alright, provided there is no obstruction. I wrap it around itself two times, apply CA, trim and it is good. It has the twisted look to it which I think is a nice compromise. I use two sets of tweezers when I wrap it around itself. One to go under and the other to grab it and go over or vice versa. Keeps my fingers out of the space. The SE can be a bit frustrating but take your time, take a break and it will be fine. I just ca'd the stuff in the landing gear strut, as there wasn't enough room for four of the eyelets that I had made.
Once you get the hang of it, it goes pretty smoothly.
Good Luck
Mark

amegan

#243

Joined: March 21, 2008
KitMaker: 996 posts
AeroScale: 915 posts

Posted: Tuesday, February 14, 2012 - 08:06 AM UTC
If I could build a cockpit like that I'd be happy indeed. Mark's system of rigging sounds good, might give that a try. Bear ing mind that British WW1 machines often used streamline wire which doesn't use turnbuckles, it is made to length.
lcarroll
Joined: July 26, 2010
KitMaker: 1,032 posts
AeroScale: 1,025 posts
Posted: Tuesday, February 14, 2012 - 04:00 PM UTC
Mark,
Thanks once again for the advice. I'm going to have to "play around" with the EZ Line before commiting, sounds like it's very different.
Andrew,
Thanks for the vote of confidence on the cockpit, they get better the more you try them and some of the stuff available on the market recently makes better results easier to achieve.
No significant progress to report at this time; working on smaller bits and pieces, getting ready to mask the lower wings and flight control surfaces for pre-shading (so I can get a coat of PC10 on the top of this little devil), and also pulled away by the display cabinets I've got in progress in the workshop.
I'll get some photos on here when things look a little more "progressed"!
Cheers,
Lance
OEFFAG_153
Joined: February 19, 2010
KitMaker: 1,473 posts
AeroScale: 1,450 posts
Posted: Wednesday, February 15, 2012 - 09:27 PM UTC
Hi Lance,
Great progress with the build this is looking sharp!
I used EZ line for my two latest projects and like Mark I found it to be very different from fishing line. I don't think its at all possible to use a tube and doing a loop like you describe with EZ. The line is "heavy" and limp as cooked spagetti.
Also a thing to remember, is that it does not ad any strength to the wing and strut assembly, like the mono line does.
I definately think it has its uses: In my opinion its gerat to use beween cabanes and struts, and also as control lines where it can be a bit hard to get them stretched enough with nylon.
I also found it very good with super glue, bonding instantly, and I did'nt have to use any accelerator at all.
I will continue to use it but for some integral rigidity I'll still do the main lines using 0.15 fishing line.
Mikael
lcarroll
Joined: July 26, 2010
KitMaker: 1,032 posts
AeroScale: 1,025 posts
Posted: Thursday, February 16, 2012 - 04:19 AM UTC
Mikael,
Thanks for providing your insight on this product; all makes good sense to me. My order was shipped yesterday according to my Email from WNW so hopefully it will arrive in reasonable time.
I suspected that the EZ Line would not work with the tubes; wondering if a little stiffening of the ends might allow the tubes to be "threaded on"? (a little white glue or paint for example?) Once it arrives I'll play around and experiment with it a bit before using it on a build. The more I examine the SE5a rigging the greater the advantage of pre-rigging appears to be the solution but, even with the precut flat wires and no turn buckles on most Brit subjects, the tubes still represent the couplings very well - I was really pleased with the Pup results in this regard but it's rigging is much simpler and I did it all after assembly.
I suspect like most techniques compromise and combinations will become the solution; for now I can see the Cabanes and strut support wires in EZ for sure. Then, as you point out, there's the strength factor.............."and then, and then, and then..!!"
But in the end, this sort of thing is why we don't collect Diecast Pre-assembled models, this is the fun of it after all.
In the interim I've got plenty to do on this one before rigging; the taping for pre-shading is almost done but going slowly and I've got a lot more filling and smoothing out to do on the fuselage, not to mention some recent bright ideas for more mods/add-ons to keep me moving at a very snailish pace.
Cheers,
Lance 
Thanks for providing your insight on this product; all makes good sense to me. My order was shipped yesterday according to my Email from WNW so hopefully it will arrive in reasonable time.
I suspected that the EZ Line would not work with the tubes; wondering if a little stiffening of the ends might allow the tubes to be "threaded on"? (a little white glue or paint for example?) Once it arrives I'll play around and experiment with it a bit before using it on a build. The more I examine the SE5a rigging the greater the advantage of pre-rigging appears to be the solution but, even with the precut flat wires and no turn buckles on most Brit subjects, the tubes still represent the couplings very well - I was really pleased with the Pup results in this regard but it's rigging is much simpler and I did it all after assembly.
I suspect like most techniques compromise and combinations will become the solution; for now I can see the Cabanes and strut support wires in EZ for sure. Then, as you point out, there's the strength factor.............."and then, and then, and then..!!"
But in the end, this sort of thing is why we don't collect Diecast Pre-assembled models, this is the fun of it after all.
In the interim I've got plenty to do on this one before rigging; the taping for pre-shading is almost done but going slowly and I've got a lot more filling and smoothing out to do on the fuselage, not to mention some recent bright ideas for more mods/add-ons to keep me moving at a very snailish pace.
Cheers,
Lance
lcarroll
Joined: July 26, 2010
KitMaker: 1,032 posts
AeroScale: 1,025 posts
Posted: Friday, February 17, 2012 - 12:55 PM UTC
Starting to see a faint glimmer of light at the end of this tunnel; making some measurable progress.
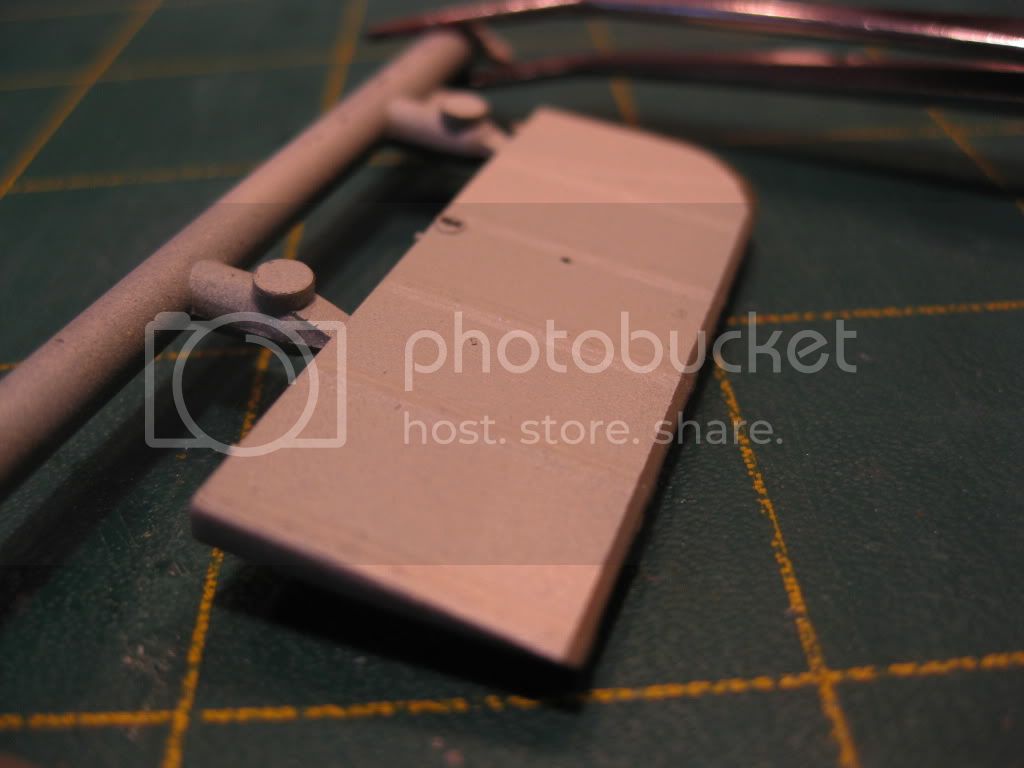
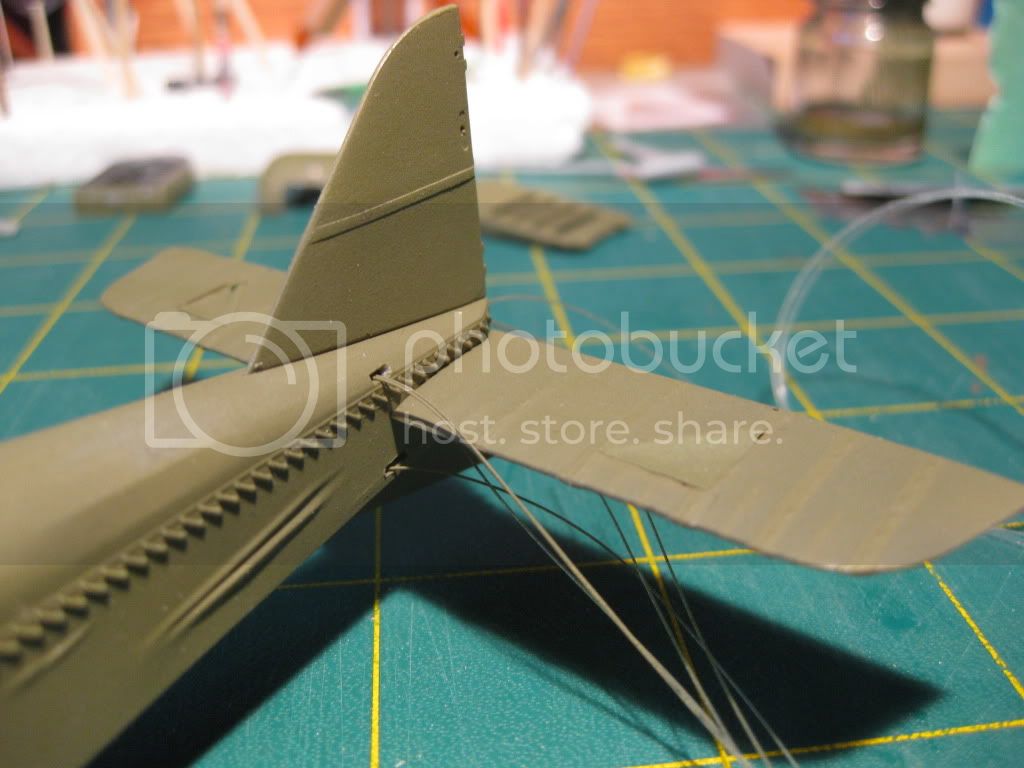
First, the rudder and vertical stab got some formers added. This shortcoming has been mentioned many times in previous builds and I used sheet styrene strips sanded down to give them the proper profiles. The "heavy" decals on the Pheon Sheet tempted me however in the end I elected to go with some "scratching".
The rudder before and after some paint to check the effect and the Stab.


I also got the urge to dress up the top center portion of the upper wing; the lines moulded to the center section begged improvement so I photographed it for future ref. and removed the moldings. I assume they are fuel vent or drain tubes and will add scratch built ones later in the build.
Before and after:

Next step was taping and pre-shading which seemed to take forever. I elected to do both tops and bottoms however the effect may be lost on the top surfaces........
Taping complete
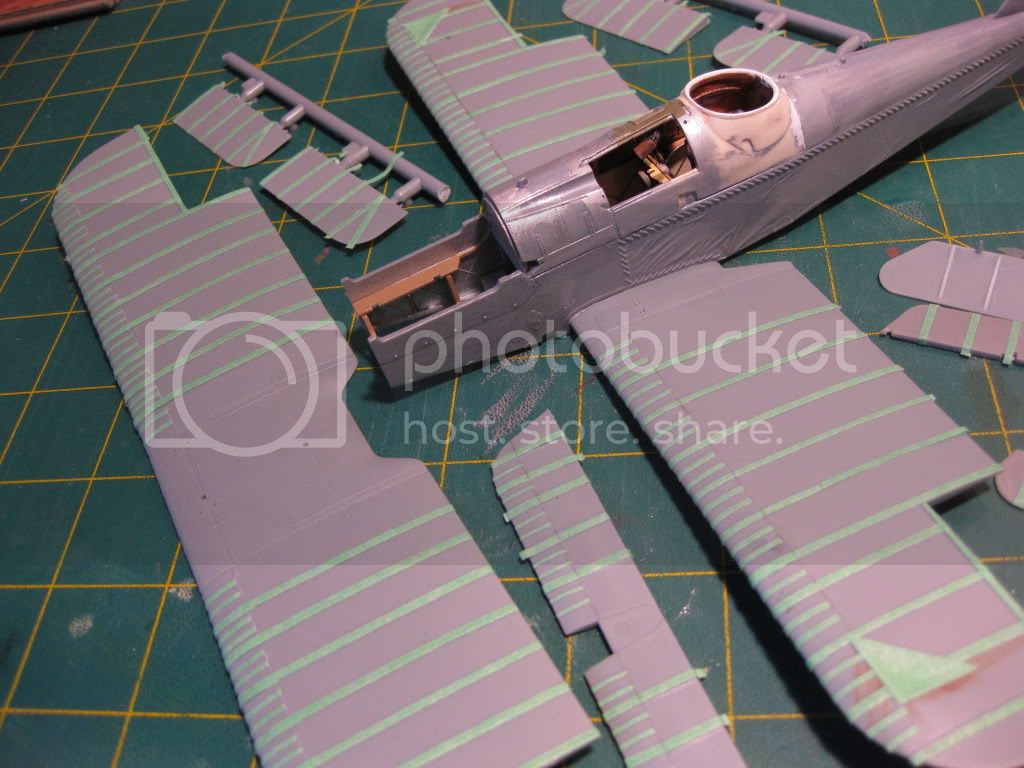
and pre-shading completed.

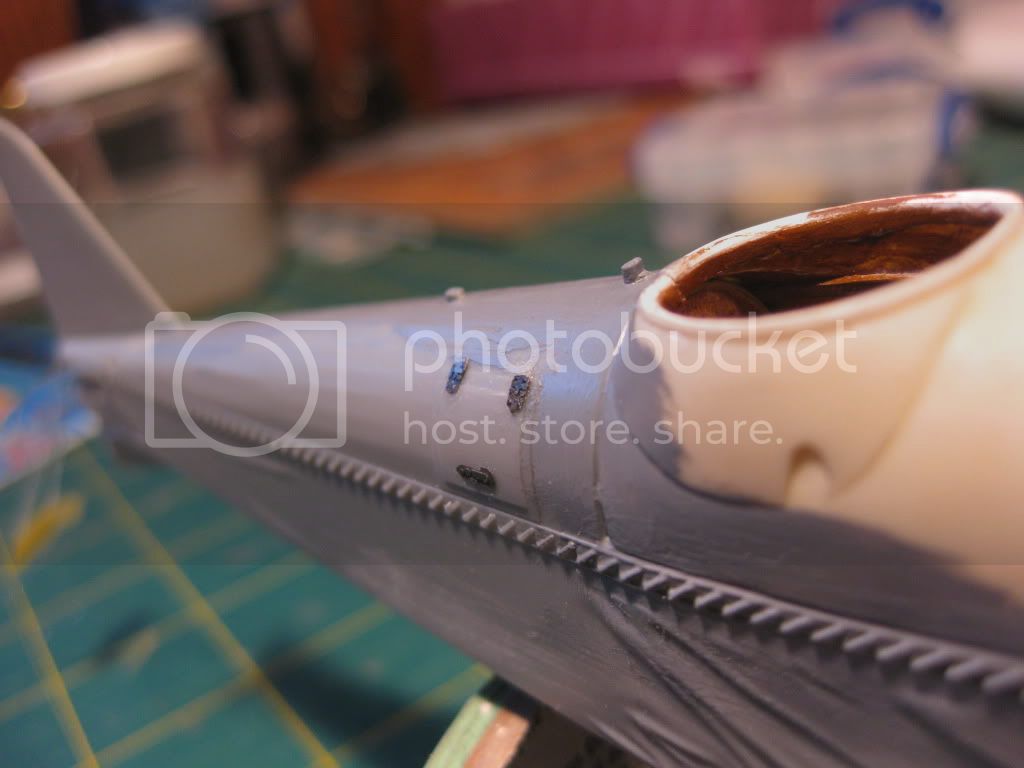
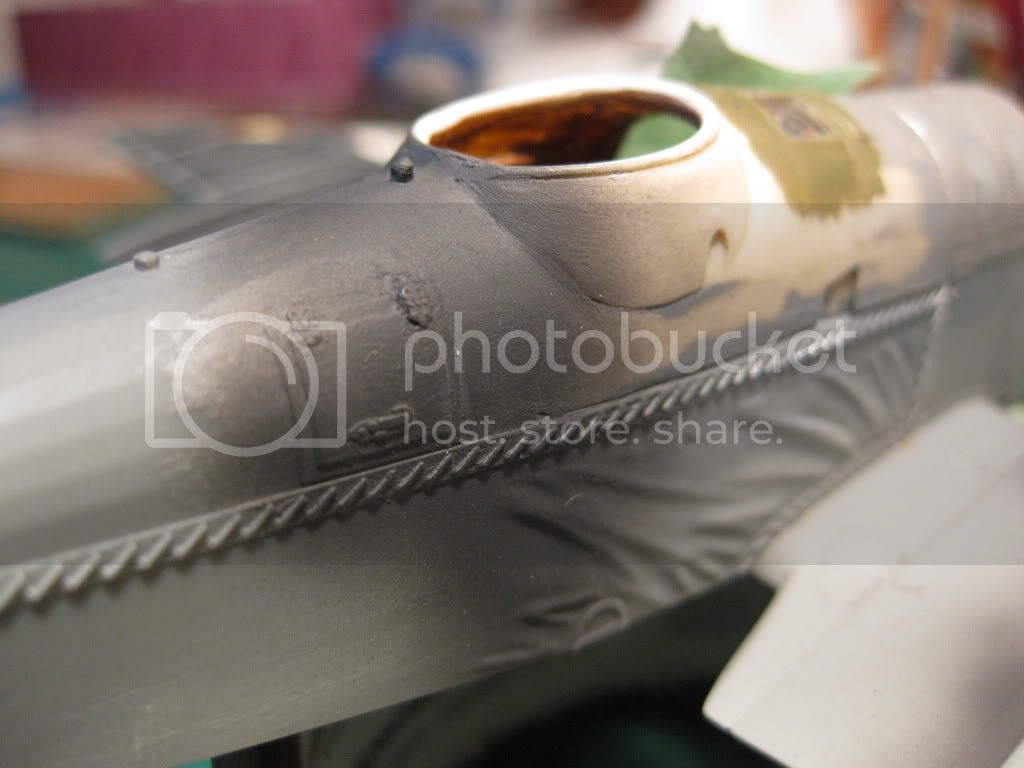
I took advantage of a loaded airbrush and sprayed a bit of the pre-shading on the joints of the resin coaming to verify the finish; pleasantly surprised with the joints but a little more shaping and clean up required around the leather ring coaming.

Last, a few pics of some of the smaller bits being prepped for later (gives a nice break from cutting and applying seemingly millions of tape bits)
The AM resin exhausts (4891 had the non typical short stacks fitted) and the PE nose under panel.
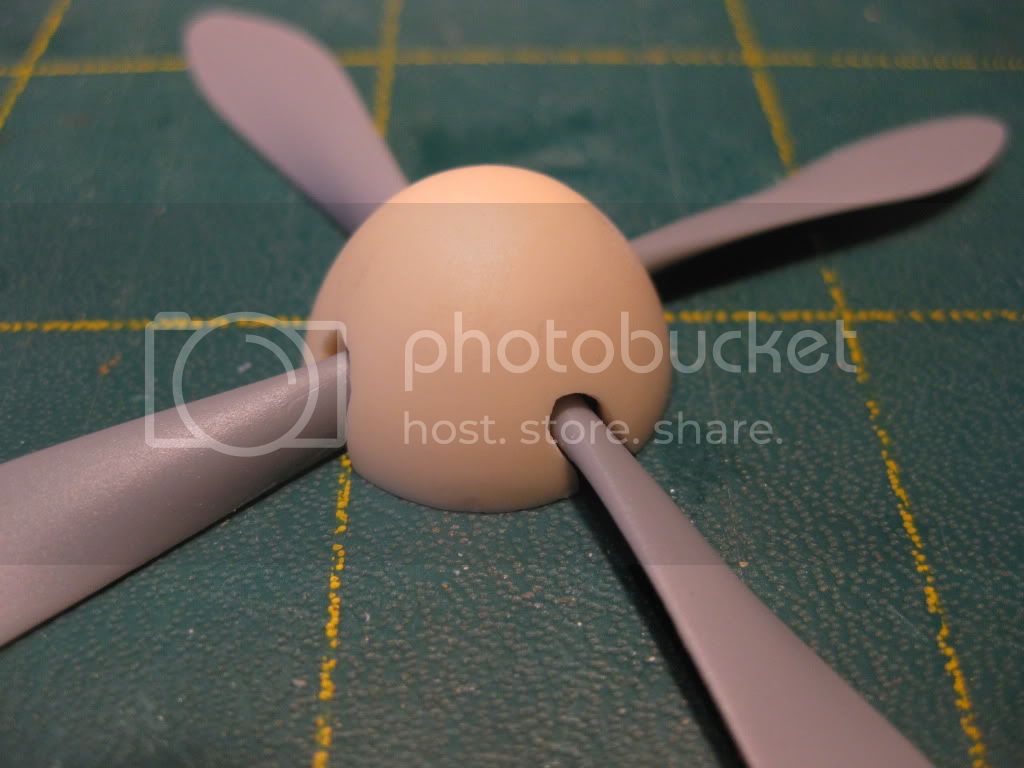
And the prop and spinner ready to go.
And that's it for now. My next step will be to get the CDL on the bottom of the flying surfaces and, after a little more clean up, the PC10 upper paint. I'm leaving the rigging eyelets until that's complete to minimise the blocking of the eyelets with paint but will take my chances with the clear coat for decals and final semi gloss finish.
Thanks for looking, all comments and hints most welcome! Think I'll take a short beer break tonite and start fresh tomorrow.
Cheers,
Lance
First, the rudder and vertical stab got some formers added. This shortcoming has been mentioned many times in previous builds and I used sheet styrene strips sanded down to give them the proper profiles. The "heavy" decals on the Pheon Sheet tempted me however in the end I elected to go with some "scratching".
The rudder before and after some paint to check the effect and the Stab.
I also got the urge to dress up the top center portion of the upper wing; the lines moulded to the center section begged improvement so I photographed it for future ref. and removed the moldings. I assume they are fuel vent or drain tubes and will add scratch built ones later in the build.
Before and after:
Next step was taping and pre-shading which seemed to take forever. I elected to do both tops and bottoms however the effect may be lost on the top surfaces........
Taping complete
and pre-shading completed.
I took advantage of a loaded airbrush and sprayed a bit of the pre-shading on the joints of the resin coaming to verify the finish; pleasantly surprised with the joints but a little more shaping and clean up required around the leather ring coaming.
Last, a few pics of some of the smaller bits being prepped for later (gives a nice break from cutting and applying seemingly millions of tape bits)
The AM resin exhausts (4891 had the non typical short stacks fitted) and the PE nose under panel.
And the prop and spinner ready to go.
And that's it for now. My next step will be to get the CDL on the bottom of the flying surfaces and, after a little more clean up, the PC10 upper paint. I'm leaving the rigging eyelets until that's complete to minimise the blocking of the eyelets with paint but will take my chances with the clear coat for decals and final semi gloss finish.
Thanks for looking, all comments and hints most welcome! Think I'll take a short beer break tonite and start fresh tomorrow.
Cheers,
Lance
lcarroll
Joined: July 26, 2010
KitMaker: 1,032 posts
AeroScale: 1,025 posts
Posted: Tuesday, February 21, 2012 - 03:48 AM UTC
A bit more progress on the Build; slow but sure at this stage I'm afraid.
Bottom flying surfaces got their coat of CDL, the preshading worked well although it is very subtle (which I like). A few very mundane photos (after the PC 10 was added to the upper portions) to illustrate:
After 24 hours of drying time the PC10 top surfaces and various bits and pieces were completed after a long masking process to accomodate the PC10 "wrap-under".
First the upper surfaces were further cleaned up, some more shaping and cleanup done on the coaming and panel joins, and then the base coat was applied.

I intend to keep the weathering/wear index fairly low on this one, some "chipping" has been applied to various panels, mostly leading edges or joints and most in the forward nose area.
The pre-shading on the top surfaces didn't really stand out as predicted but I suspect the final overcoats should heighten the effect.

All of this has now dried for 24 hours; I may give it a shot of Future or clear gloss enamel later today in prep for the decaling.
And that is briefly "it" to this point. I am really enjoying this project, the Kit is absolutely phenomenal and a joy to work with, the A/M bits have proved very good as well. More to follow soon....
Cheers,
Lance
Bottom flying surfaces got their coat of CDL, the preshading worked well although it is very subtle (which I like). A few very mundane photos (after the PC 10 was added to the upper portions) to illustrate:
After 24 hours of drying time the PC10 top surfaces and various bits and pieces were completed after a long masking process to accomodate the PC10 "wrap-under".
First the upper surfaces were further cleaned up, some more shaping and cleanup done on the coaming and panel joins, and then the base coat was applied.
I intend to keep the weathering/wear index fairly low on this one, some "chipping" has been applied to various panels, mostly leading edges or joints and most in the forward nose area.
The pre-shading on the top surfaces didn't really stand out as predicted but I suspect the final overcoats should heighten the effect.
All of this has now dried for 24 hours; I may give it a shot of Future or clear gloss enamel later today in prep for the decaling.
And that is briefly "it" to this point. I am really enjoying this project, the Kit is absolutely phenomenal and a joy to work with, the A/M bits have proved very good as well. More to follow soon....
Cheers,
Lance
Mgunns
Joined: December 12, 2008
KitMaker: 1,423 posts
AeroScale: 1,319 posts
Posted: Thursday, February 23, 2012 - 03:22 AM UTC
Hello Lance:This is coming along nicely. Your attention to detail around the coming has paid off. Looking forward to more as you progress through this build.
Until that time
Mark
OEFFAG_153
Joined: February 19, 2010
KitMaker: 1,473 posts
AeroScale: 1,450 posts
Posted: Thursday, February 23, 2012 - 03:42 AM UTC
Very nice progress Lance whats your recipe for PC10?
Looking at the coaming makes me wonder if it was hard to get in and out of the cockpit? Also wondering why this modification was done, and what the benefit was?
Mikael
Looking at the coaming makes me wonder if it was hard to get in and out of the cockpit? Also wondering why this modification was done, and what the benefit was?
Mikael
lcarroll
Joined: July 26, 2010
KitMaker: 1,032 posts
AeroScale: 1,025 posts
Posted: Thursday, February 23, 2012 - 08:24 AM UTC
Quoted Text
Very nice progress Lance whats your recipe for PC10?
Looking at the coaming makes me wonder if it was hard to get in and out of the cockpit? Also wondering why this modification was done, and what the benefit was?
Mikael
Mikael,
First, the modification. According to the references I have the purpose was to provide more protection from the slipstream and extreme cold at higher altitudes. Since McCudden really went after the "high Flyers' doing Recce work it's logical he'd have this modification. I have not seen reference to any other 56 Sqn. aircraft having it however logically it would make sense that this and his previous aircraft, 4863, would not be the only ones. If anyone has further details I'd love to hear about them.
I also read a comment in one of the books that the modified coaming increased the shoulder room for the pilots in a normally very confined original design.
The PC10 formula I like is a 50/50 mix of Model Master enamels, Olive Drab FS34087 and Faded Olive Drab Product # 20510. The photos I posted are decieving; the best true color representation is the upper nose cowling. The pic. of the empennage is much more green in tone then the actual, the one of the forward fuselage (last photo) much "browner" then the actual. Stephen recommended M.M. "Field Drab" to me some time ago and it's quite close to my mix, but a little dark by comparison. I'm sure wear, weathering, and the mood of the mixer/painter in the field would make any and all of these close. I tried a mix using Tamiya XF51 Khaki Drab and XF10 Flat Brown which came out far too brown for my liking. I believe it's probably really good for the PC12 Reddish Brown finish and plan to use it on a Sopwith Tripe at some point. I can't recall where I got that hint.
Thanks for the encouraging comments; I'm up to my ears in the Pledge/Future gloss coat getting ready for the decals (lots of down time as it dries) and also working on the assemblies still to be added. Then there's the dreaded eyelets still to go.....
Cheers,
Lance
OEFFAG_153
Joined: February 19, 2010
KitMaker: 1,473 posts
AeroScale: 1,450 posts
Posted: Thursday, February 23, 2012 - 09:01 PM UTC
HI Lance,
Thanks for the input on the coaming makes sense to try to protect yourself from the elements while on high level missions. I also think it gives the SE5 a meaner more businesslike look.
Thank You also on the PC10 tips On Fe 2b, the upperwing should be PC10, while the rest of the craft is either dark grey or black. The reference to this upper wing colour is "chocolate" so I'm thinking I'm going to go with a pretty brown version of PC10, a bit like what you describe for the Tripe!
Mikael
Mikael
 |

WEB HOSTING BY


Copyright ©2021 AeroScale and Kitmaker Network, a subsidiary of Silver Star Enterprises
All Rights Reserved. Please read our Conditions of Use and Privacy Policy.
All Rights Reserved. Please read our Conditions of Use and Privacy Policy.