Kots GB 2012 Southampton MK I-tinbanger
Ontario, Canada
Joined: February 04, 2008
KitMaker: 2,507 posts
AeroScale: 1,814 posts
Posted: Sunday, June 10, 2012 - 12:27 PM UTC
" The Die Hards"
43rd MIDDLESEX REGIMENT
MACHINE GUN CORPS
XXX CORP
The most effective way to do it, is to do it.
- Amelia Earhart
Alberta, Canada
Joined: July 26, 2010
KitMaker: 1,032 posts
AeroScale: 1,025 posts
Posted: Sunday, June 10, 2012 - 01:54 PM UTC
Richard,
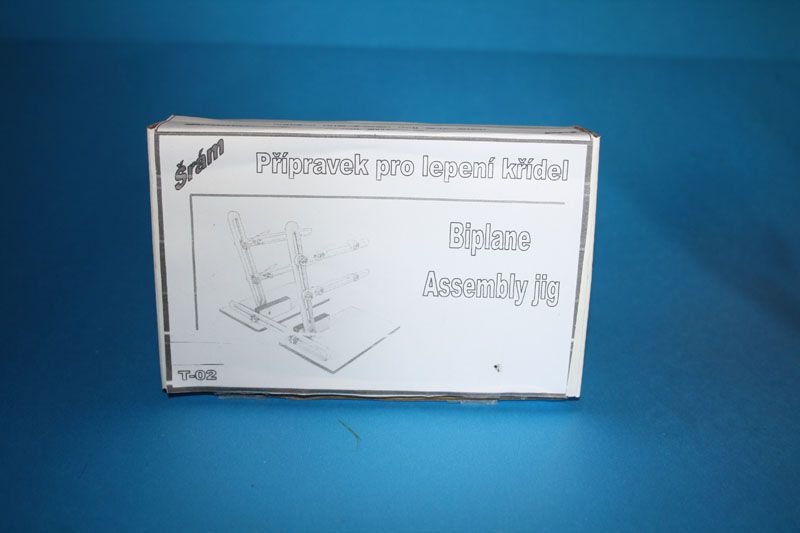
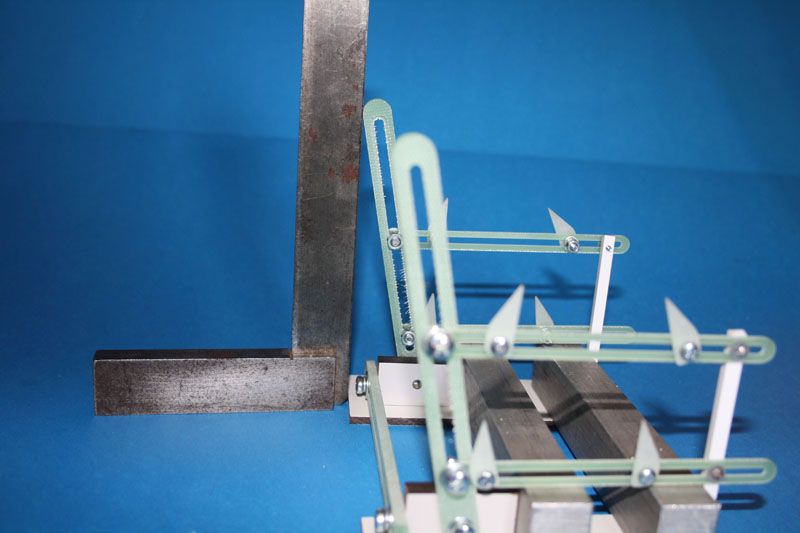
Neat Assembly Jig, I bought the Aeroclub version and although it's a "bear" to set up it is worth it's weight in gold.
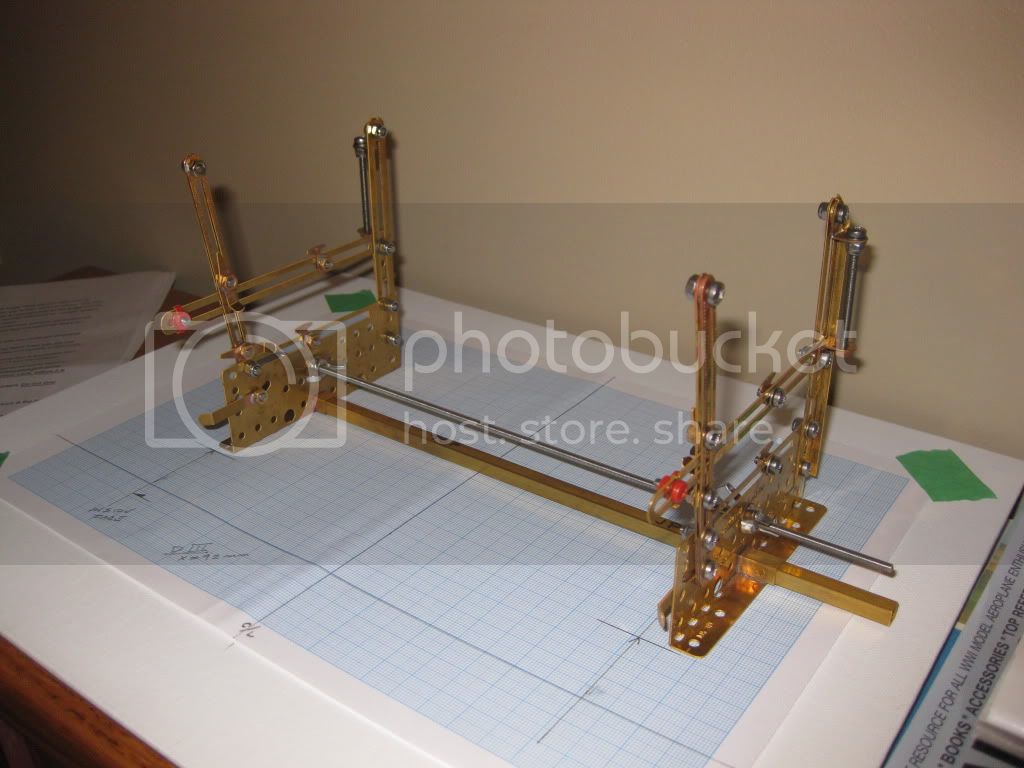
I used it for the first time on a Roden Albatros DIII, worked wonderfully.
I'll be interested in your views on this tool, not many of the members seemed particularly keen on mine, or maybe I just got the wrong impression; I think they are a great resource. I also note you've enhanced yours with some extra support etc. which will make it even better. Great move on your part, you'll use it more then once or twice for sure!!
Cheers,
Lance
Officially Retired as of 20 August 2013 and looking forward to some un-interrupted bench time. Currently starting Roden's Nieuport 28 and hoping to follow that with another WNW Fokker DVII.
Västra Götaland, Sweden
Joined: February 19, 2010
KitMaker: 1,473 posts
AeroScale: 1,450 posts
Posted: Sunday, June 10, 2012 - 09:41 PM UTC
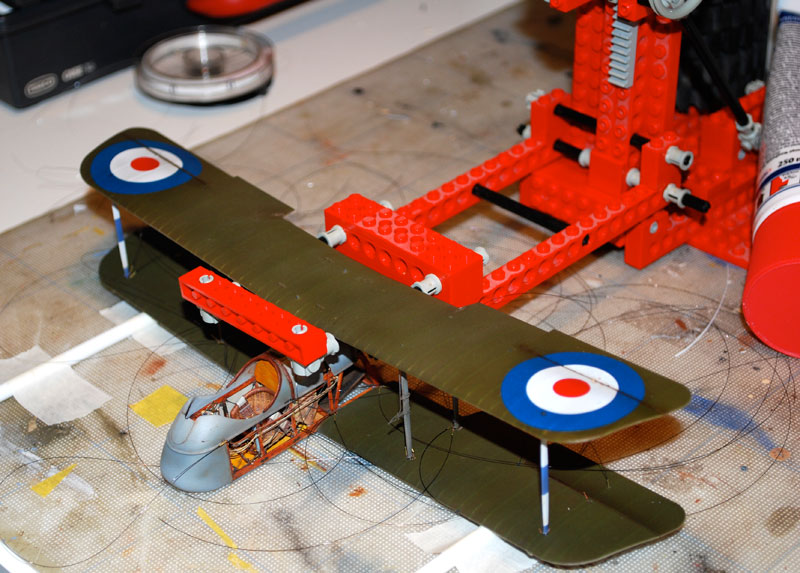
Richard very nice progress on the tinbanger looking forward to more as it develops.
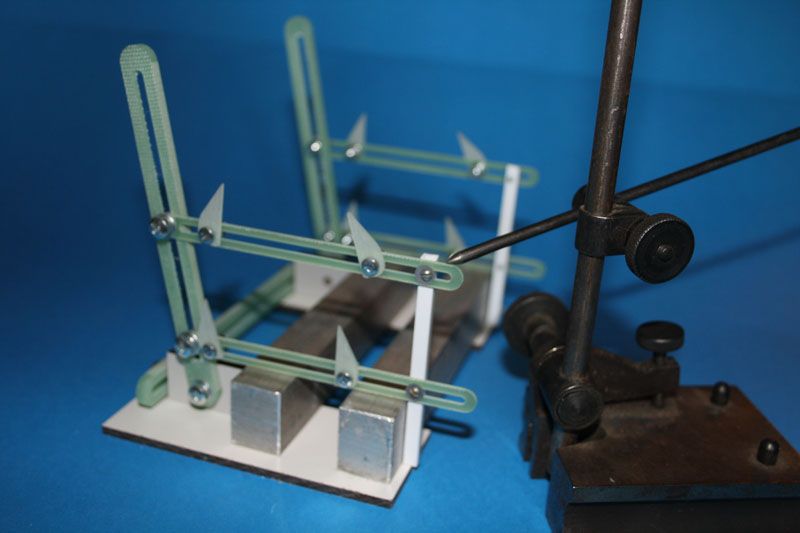
Nice selection of jigs Lance, the m.m. grid paper is a good idea that I'll steal from you hope you don't mind.
Here's a pic of my own home made jig in progress
Best Regards
Mikael
_________________________________________________________
Just finished the Wingnut Wings Taube. On to the Junkers D.1
Ontario, Canada
Joined: February 04, 2008
KitMaker: 2,507 posts
AeroScale: 1,814 posts
Posted: Sunday, June 10, 2012 - 10:49 PM UTC
Hi
Thank you Mikael and Lance!
Mikael good use of Lego!
Lance I will use this jig for many kits to come.
My next step is to mount the jig on a table that I can rotate and tip (Like tables used by wood carvers( Lee Valley in Ottawa may have something)).
The jig is good for 1/72 & 1/48 scale,I will see if I can find a Aeroclub jig for larger scales.
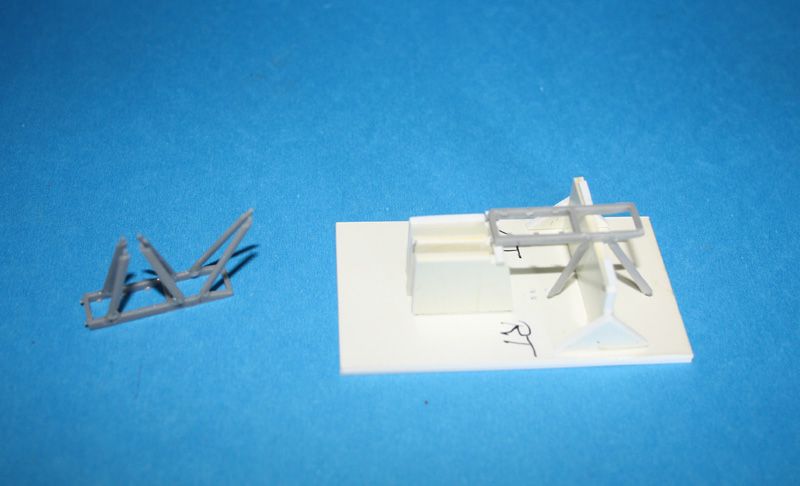
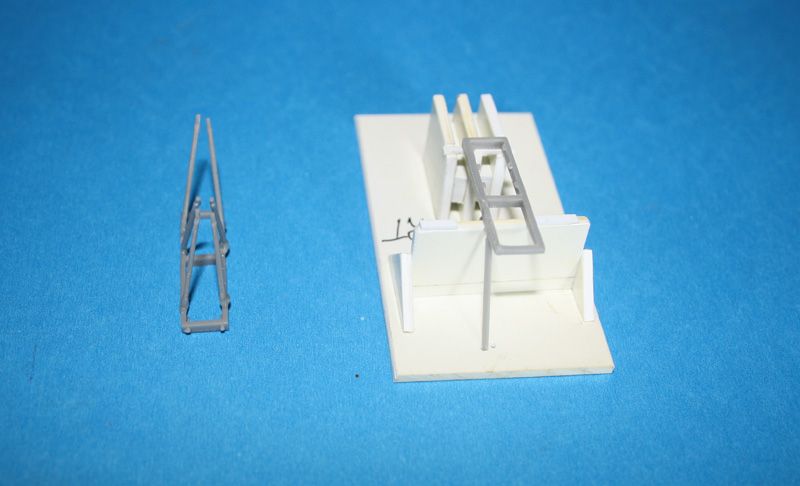
I have 20 struts to install on the Southampton! not sure that I could do this free hand.

" The Die Hards"
43rd MIDDLESEX REGIMENT
MACHINE GUN CORPS
XXX CORP
The most effective way to do it, is to do it.
- Amelia Earhart
Alberta, Canada
Joined: July 26, 2010
KitMaker: 1,032 posts
AeroScale: 1,025 posts
Posted: Monday, June 11, 2012 - 12:24 AM UTC
Richard,
I corresponded on-line with the Chap at Aeroclub (regretably I don't recall his name and have since changed computers-lost the file) concerning using it for 1:32, he charges a small extra fee to assemble the jig prior to shipping and added longer components to accomodate the larger scales. It works very well so if you need a larger capability I recommend it.It's 44.5 Pounds, Website:
www.aeroclub-models.com / or Email at
[email protected] I also use it "unclamped" just to check alignment and also to provide support during some of the rigging process. On the other hand, if you have some Lego laying around Mikael's version has the right price and if you've checked his builds it works better then all!
Cheers,
Lance
Officially Retired as of 20 August 2013 and looking forward to some un-interrupted bench time. Currently starting Roden's Nieuport 28 and hoping to follow that with another WNW Fokker DVII.
Ontario, Canada
Joined: February 04, 2008
KitMaker: 2,507 posts
AeroScale: 1,814 posts
Posted: Monday, June 11, 2012 - 11:17 AM UTC
Hi Lance.
Checked out web site and bad news:-
AEROCLUB MODELS WEBSITE
8th March 2010
The website will be unavailable until further notice owing to the loss of Mr. Peter Wright (52) of Aeroclub Models who died suddenly this morning while on holiday in France.
We will try and fill any outstanding orders that have been placed in a timely manner but ask that customers be patient during what will no doubt be a difficult few weeks.
As many customers will know, Peter was an integral part of Aeroclub Models and a valued friend and colleague for over 28 years.
He will be sadly missed.
John Adams.
Aeroclub Models.
" The Die Hards"
43rd MIDDLESEX REGIMENT
MACHINE GUN CORPS
XXX CORP
The most effective way to do it, is to do it.
- Amelia Earhart
Alberta, Canada
Joined: July 26, 2010
KitMaker: 1,032 posts
AeroScale: 1,025 posts
Posted: Monday, June 11, 2012 - 01:47 PM UTC
Richard,
That was from March 2010 and I believe John (Adams) is still scrambling to keep the business going. I had to "try again" by sending him an EMail at the second link. Once we were hooked up all went well. I don't think he's out of business; there's an ad on the inside back cover of the latest 'WINDSOCK wORLDWIDE" in the same place it appears every issue.
Cheers,
Lance
Officially Retired as of 20 August 2013 and looking forward to some un-interrupted bench time. Currently starting Roden's Nieuport 28 and hoping to follow that with another WNW Fokker DVII.
British Columbia, Canada
Joined: September 03, 2009
KitMaker: 6,965 posts
AeroScale: 6,247 posts
Posted: Monday, June 11, 2012 - 03:04 PM UTC
John is still going, but he does all of his sales by e-mail these days. The website is for all intents and purposes defunct.
When once you have tasted flight you will walk the Earth with your eyes turned skyward.
For there you have been, and there you will always long to return.
-Leonardo Da Vinci
Ontario, Canada
Joined: February 04, 2008
KitMaker: 2,507 posts
AeroScale: 1,814 posts
Posted: Monday, June 11, 2012 - 07:21 PM UTC
Thank you Jessica & Lance.
I will try e-mail for info.
" The Die Hards"
43rd MIDDLESEX REGIMENT
MACHINE GUN CORPS
XXX CORP
The most effective way to do it, is to do it.
- Amelia Earhart
Ontario, Canada
Joined: February 04, 2008
KitMaker: 2,507 posts
AeroScale: 1,814 posts
Posted: Saturday, June 23, 2012 - 02:31 AM UTC
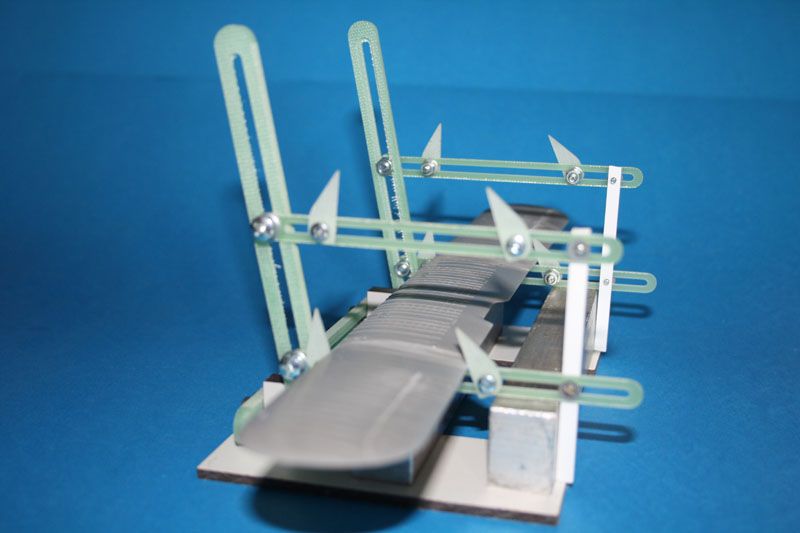
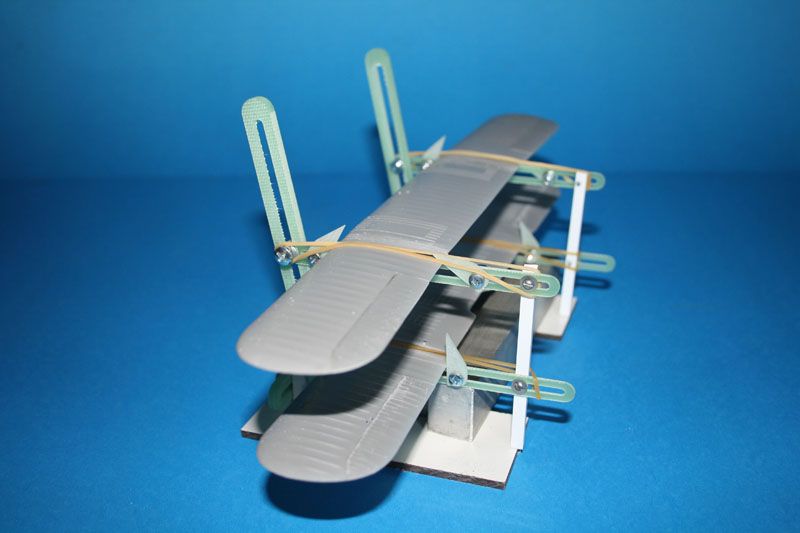
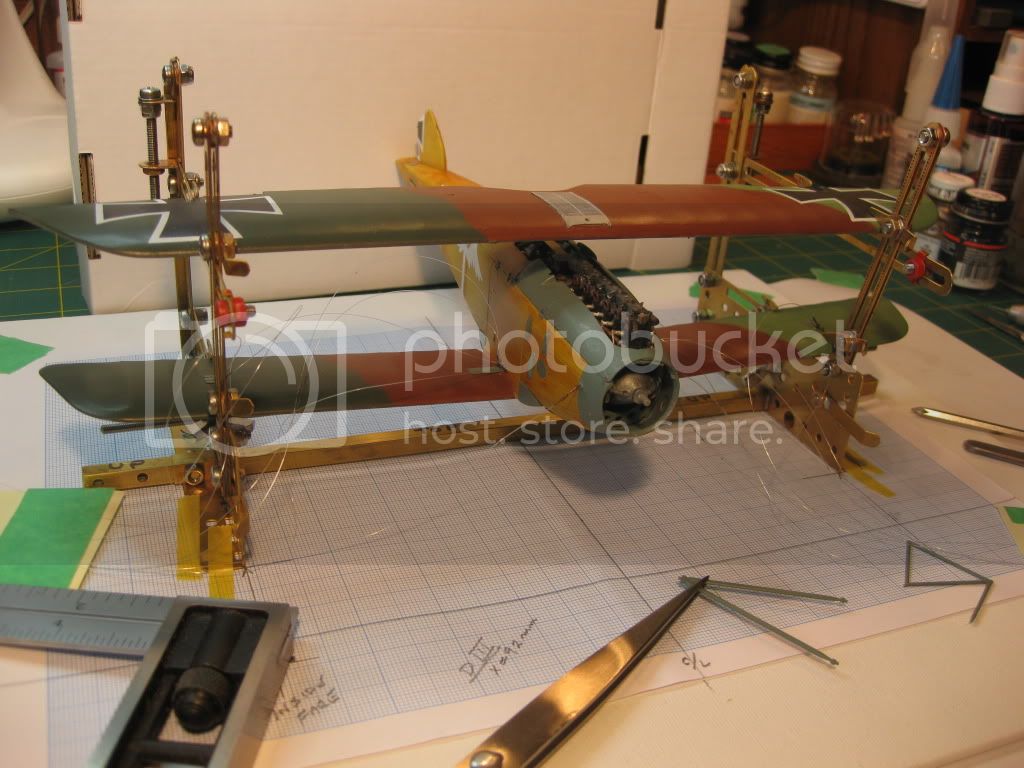
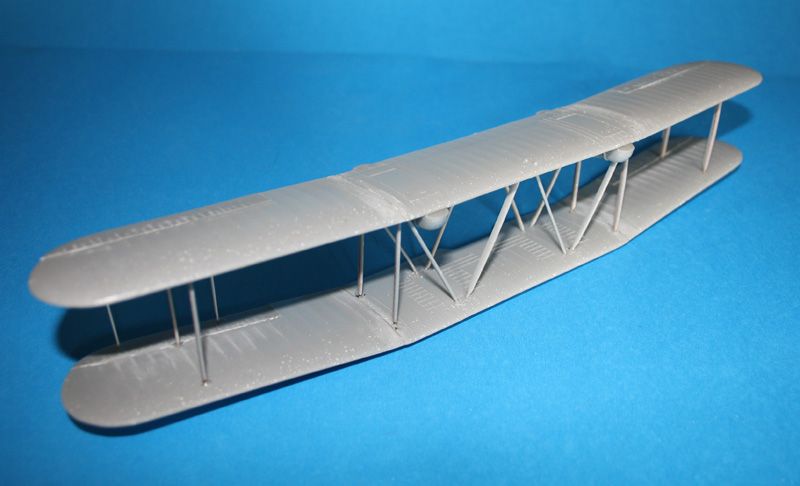
Hi all
All struts are in place, next the aileron mechanism.
" The Die Hards"
43rd MIDDLESEX REGIMENT
MACHINE GUN CORPS
XXX CORP
The most effective way to do it, is to do it.
- Amelia Earhart
British Columbia, Canada
Joined: September 03, 2009
KitMaker: 6,965 posts
AeroScale: 6,247 posts
Posted: Saturday, June 23, 2012 - 03:19 AM UTC
It's nice that you could build the wing assembly separate from the fuselage. You can get in from all angles to do the rigging : )
When once you have tasted flight you will walk the Earth with your eyes turned skyward.
For there you have been, and there you will always long to return.
-Leonardo Da Vinci
Ontario, Canada
Joined: February 04, 2008
KitMaker: 2,507 posts
AeroScale: 1,814 posts
Posted: Saturday, June 23, 2012 - 04:26 AM UTC
Hi Jessica
Yes it is a better way to build!
As this is my first build of this type I have spent a lot of time planing the assembly steps,(not sure i am correct).
The motors frames are being built on a a jig I have made(photo's later).it's like building a ship in a bottle!I will install motors and fuel tank etc after painting.
I will prime and topcoat inner wings then rig and prime /paint out wings.
The hard part will be the rigging/struts of the wings to the hull ,but my wing jig with the hull blocked should do it.
" The Die Hards"
43rd MIDDLESEX REGIMENT
MACHINE GUN CORPS
XXX CORP
The most effective way to do it, is to do it.
- Amelia Earhart
Ontario, Canada
Joined: February 04, 2008
KitMaker: 2,507 posts
AeroScale: 1,814 posts
Posted: Sunday, June 24, 2012 - 05:01 AM UTC
" The Die Hards"
43rd MIDDLESEX REGIMENT
MACHINE GUN CORPS
XXX CORP
The most effective way to do it, is to do it.
- Amelia Earhart
Colorado, United States
Joined: January 25, 2004
KitMaker: 11,669 posts
AeroScale: 11,011 posts
Posted: Friday, June 29, 2012 - 12:32 PM UTC
It is a very common sense approach to build jigs especially for engine supports on seaplane kits. Even the slightest variation can throw an assembly off.

". . .The most important thing is to know why you build and then get the most that you can out of building." via D.D.
Ontario, Canada
Joined: February 04, 2008
KitMaker: 2,507 posts
AeroScale: 1,814 posts
Posted: Saturday, June 30, 2012 - 10:39 PM UTC
Hi
Jack this is a nice 1/72 kit,lots of planing though!
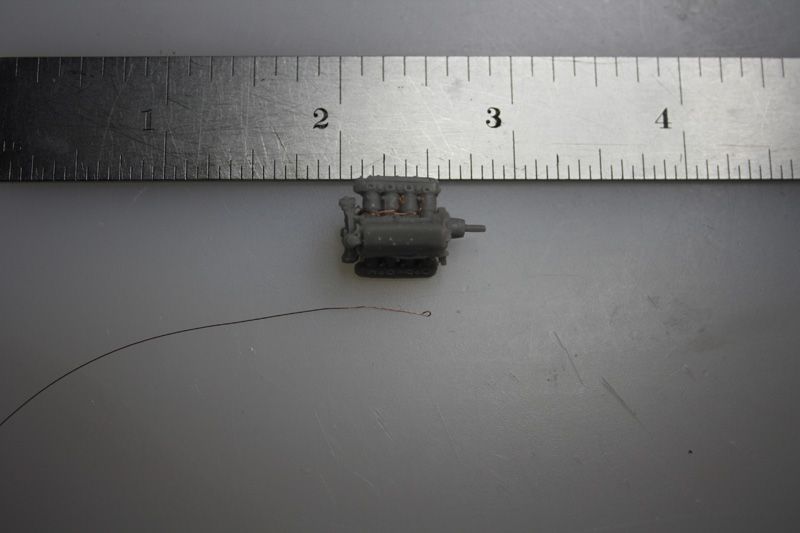
I have started to wire the plugs with .005" copper wire.
I have photos of the Napier as a guide.
Hope i get the firing order right! lol.(22 cylinders to go)
" The Die Hards"
43rd MIDDLESEX REGIMENT
MACHINE GUN CORPS
XXX CORP
The most effective way to do it, is to do it.
- Amelia Earhart
Ontario, Canada
Joined: February 04, 2008
KitMaker: 2,507 posts
AeroScale: 1,814 posts
Posted: Sunday, July 08, 2012 - 06:42 AM UTC
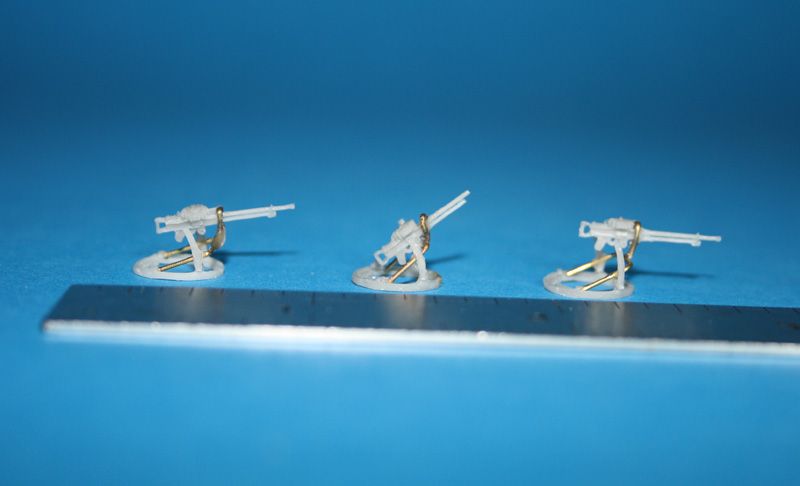
Hi
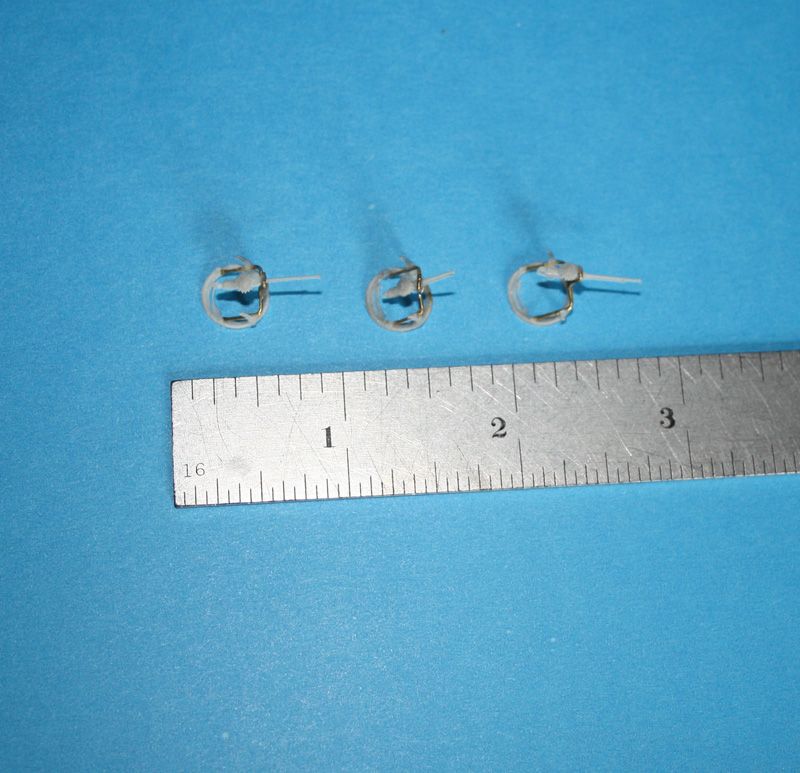
I have worked on the hull this week and given it a coat of primer.
Here are a couple of photos of the Lewis guns and scraff rings
ready to prime.
" The Die Hards"
43rd MIDDLESEX REGIMENT
MACHINE GUN CORPS
XXX CORP
The most effective way to do it, is to do it.
- Amelia Earhart
Västra Götaland, Sweden
Joined: February 19, 2010
KitMaker: 1,473 posts
AeroScale: 1,450 posts
Posted: Thursday, July 12, 2012 - 08:44 AM UTC
Very neat detailing looking good!
Mikael
_________________________________________________________
Just finished the Wingnut Wings Taube. On to the Junkers D.1
Ontario, Canada
Joined: February 04, 2008
KitMaker: 2,507 posts
AeroScale: 1,814 posts
Posted: Friday, July 13, 2012 - 04:20 AM UTC
Thank you Mikael
Next time i may try a larger scale?
" The Die Hards"
43rd MIDDLESEX REGIMENT
MACHINE GUN CORPS
XXX CORP
The most effective way to do it, is to do it.
- Amelia Earhart
Ontario, Canada
Joined: February 04, 2008
KitMaker: 2,507 posts
AeroScale: 1,814 posts
Posted: Saturday, July 14, 2012 - 03:55 AM UTC
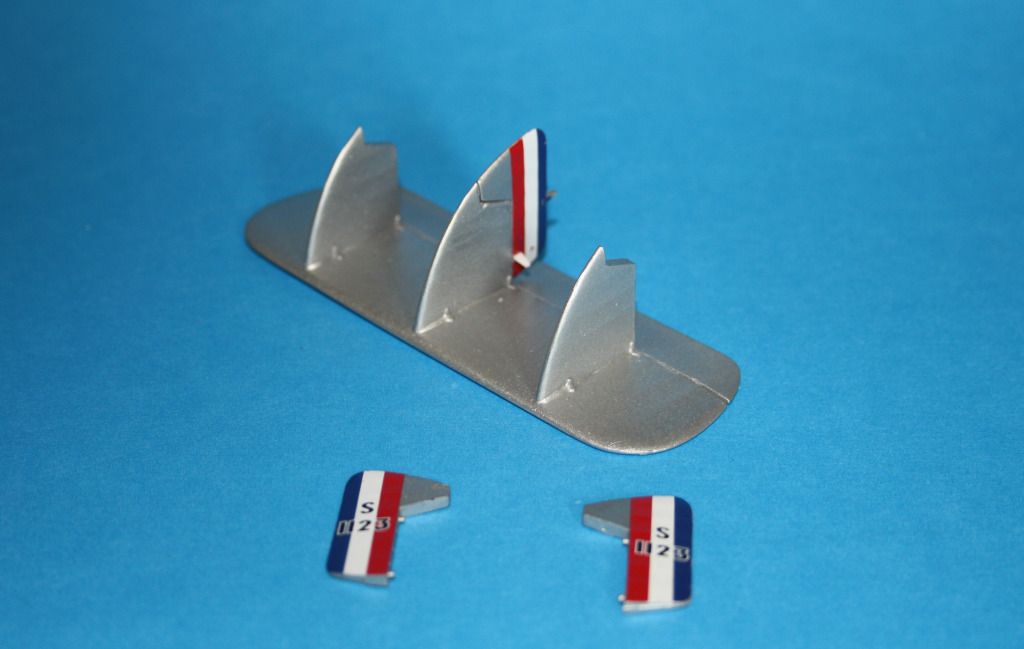
Hi All
Tail getting close to final assembly.
" The Die Hards"
43rd MIDDLESEX REGIMENT
MACHINE GUN CORPS
XXX CORP
The most effective way to do it, is to do it.
- Amelia Earhart
Ontario, Canada
Joined: February 04, 2008
KitMaker: 2,507 posts
AeroScale: 1,814 posts
Posted: Saturday, July 21, 2012 - 01:36 AM UTC
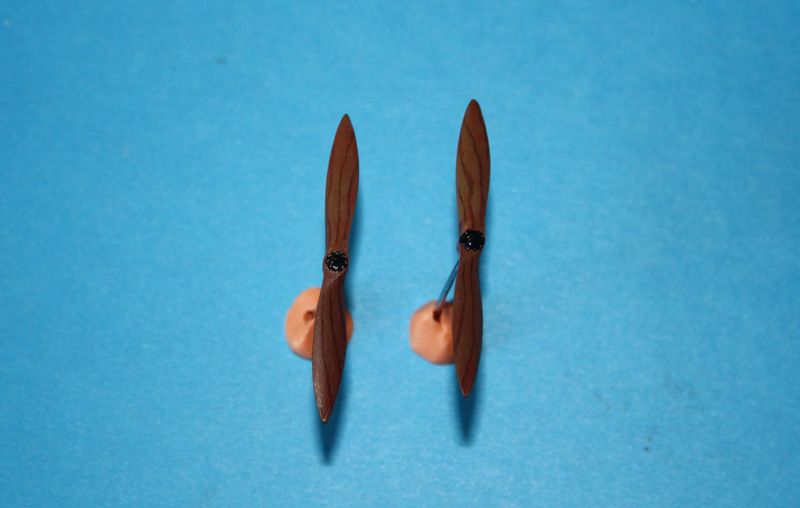
Hi
Working on many different areas of the AC this week.
Here are photos of the props ready to install.
" The Die Hards"
43rd MIDDLESEX REGIMENT
MACHINE GUN CORPS
XXX CORP
The most effective way to do it, is to do it.
- Amelia Earhart
Colorado, United States
Joined: January 25, 2004
KitMaker: 11,669 posts
AeroScale: 11,011 posts
Posted: Saturday, August 11, 2012 - 03:45 PM UTC
You are doing a good job on this finely molded bit of resin. So! You like seaplanes eh? I think I have just the ticket for you.

". . .The most important thing is to know why you build and then get the most that you can out of building." via D.D.
Ontario, Canada
Joined: February 04, 2008
KitMaker: 2,507 posts
AeroScale: 1,814 posts
Posted: Sunday, August 12, 2012 - 08:20 AM UTC
Have you ever been to sea Billy?

" The Die Hards"
43rd MIDDLESEX REGIMENT
MACHINE GUN CORPS
XXX CORP
The most effective way to do it, is to do it.
- Amelia Earhart
Ontario, Canada
Joined: February 04, 2008
KitMaker: 2,507 posts
AeroScale: 1,814 posts
Posted: Saturday, August 18, 2012 - 02:56 AM UTC
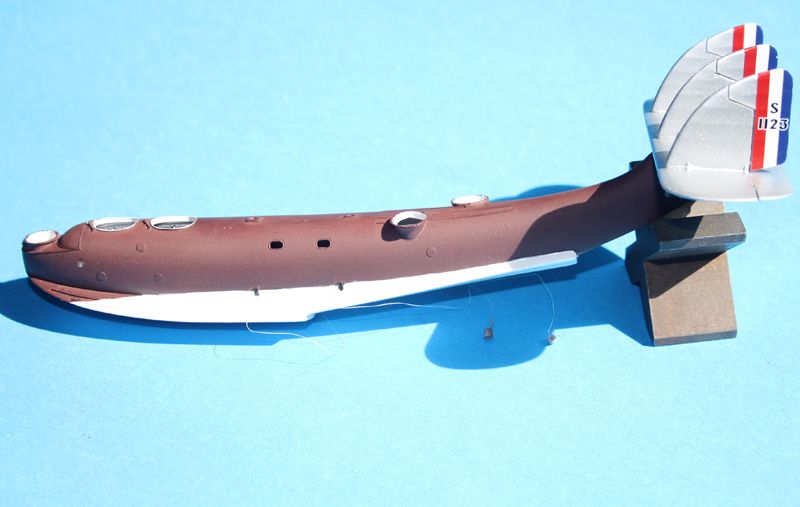
Still working on Southampton + three other models!
Tail on and working on rigging.
" The Die Hards"
43rd MIDDLESEX REGIMENT
MACHINE GUN CORPS
XXX CORP
The most effective way to do it, is to do it.
- Amelia Earhart
Colorado, United States
Joined: January 25, 2004
KitMaker: 11,669 posts
AeroScale: 11,011 posts
Posted: Saturday, August 18, 2012 - 11:46 AM UTC
Quoted Text
Have you ever been to sea Billy?
No but I have been blown ashore many times Can't seem to get passed the reef! Aaarrrggghh
". . .The most important thing is to know why you build and then get the most that you can out of building." via D.D.
Ontario, Canada
Joined: February 04, 2008
KitMaker: 2,507 posts
AeroScale: 1,814 posts
Posted: Sunday, August 19, 2012 - 06:26 AM UTC
" The Die Hards"
43rd MIDDLESEX REGIMENT
MACHINE GUN CORPS
XXX CORP
The most effective way to do it, is to do it.
- Amelia Earhart