Neil, great-looking Hawk display. I like your idea of getting input from the family about markings!!! I have started doing that because half the time I can't make up my mind so I will let my wife and son wade through my fifty seven F/A-18 sheets and help me find a scheme. Once again, great job.
Best wishes, Ian
Air Campaigns
Want to start or join a group build? This is where to start.
Want to start or join a group build? This is where to start.
Hosted by Frederick Boucher, Michael Satin
OFFICIAL: British Aerospace Campaign Thread

SaxonTheShiba

Joined: February 01, 2009
KitMaker: 1,233 posts
AeroScale: 663 posts

Posted: Wednesday, October 03, 2012 - 10:48 AM UTC
Blueheeler

Joined: March 18, 2008
KitMaker: 347 posts
AeroScale: 223 posts

Posted: Wednesday, October 03, 2012 - 11:26 AM UTC
Great job with it Neil, and yeah, even harder job keeping all the kids happy!
Heres my entry, Hasegawas' Lightening F.6 in 1/72. Kit was pretty basic but went together well enough.


Cheers,
Nick.

Heres my entry, Hasegawas' Lightening F.6 in 1/72. Kit was pretty basic but went together well enough.


Cheers,
Nick.


fireresq1

Joined: May 04, 2012
KitMaker: 60 posts
AeroScale: 43 posts

Posted: Sunday, October 07, 2012 - 11:33 PM UTC
Neil nice work on your kit looks great. Ill have to try your way of chosing the decals., as sometimes i find my self stearing blankly over a sheet for ages. 


fireresq1

Joined: May 04, 2012
KitMaker: 60 posts
AeroScale: 43 posts

Posted: Sunday, October 07, 2012 - 11:41 PM UTC
something different, looks good Nick
Posted: Monday, October 08, 2012 - 09:59 AM UTC
Neil,
Nice Hawk and great idea with the two sets of markings!
Nick,
Looks good, I never knew that the tanks were on the top of the wings.
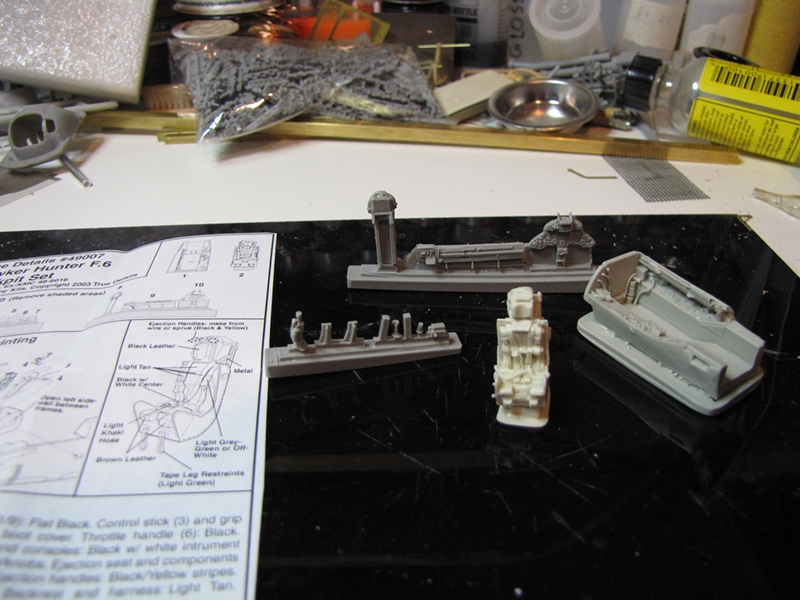
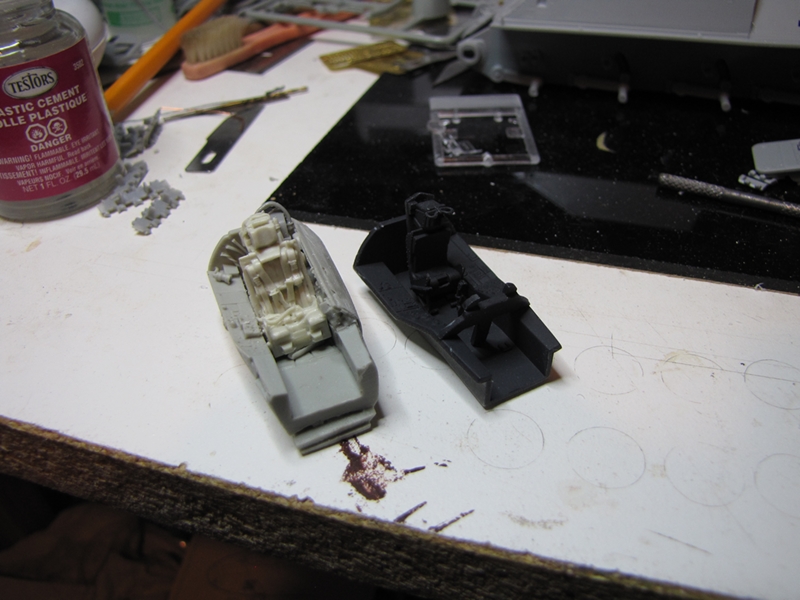
My True Details cockpit came in a while ago and I just started cleaning it up, here it is with a comparison shot thrown in.
Cheers Rob.
Nice Hawk and great idea with the two sets of markings!

Nick,
Looks good, I never knew that the tanks were on the top of the wings.
My True Details cockpit came in a while ago and I just started cleaning it up, here it is with a comparison shot thrown in.

Cheers Rob.


Blueheeler

Joined: March 18, 2008
KitMaker: 347 posts
AeroScale: 223 posts

Posted: Monday, October 08, 2012 - 06:45 PM UTC
Thanks guys. Rob, neither did I until went looking through the net for some pics. Heres one parked up somewhere;

Cheers,
Nick.

Cheers,
Nick.

Posted: Tuesday, October 09, 2012 - 04:36 AM UTC
For most of their career the overwing tanks weren't carried. 74 Squadron wore them when they went out to Singapore, after that they weren't really seen again until the last few years of the Lightnings service in the late 80s.

Hawkeye65

Joined: February 11, 2012
KitMaker: 56 posts
AeroScale: 50 posts

Posted: Wednesday, October 17, 2012 - 02:45 AM UTC
Harrier GR3: I'm calling this one finished.


SaxonTheShiba

Joined: February 01, 2009
KitMaker: 1,233 posts
AeroScale: 663 posts

Posted: Wednesday, October 17, 2012 - 06:32 AM UTC
Congrats on the GR.3 build, Harry. Very nice. I am glad we have the Harrier well represented for this outting.
Best wishes, Ian

Best wishes, Ian


Siderius

Joined: September 20, 2005
KitMaker: 1,747 posts
AeroScale: 1,673 posts

Posted: Wednesday, October 17, 2012 - 07:32 AM UTC
Nick your EE Lightning looks great! What a good looking machine too. Harry I like the looks of your Harrier too. Both of you should be proud. Good additions to your collections. Russell

fireresq1

Joined: May 04, 2012
KitMaker: 60 posts
AeroScale: 43 posts

Posted: Monday, October 22, 2012 - 07:39 PM UTC
There she is.. great work on the GR3 Harry another fine kit from Western Australia 

Posted: Monday, October 29, 2012 - 08:15 AM UTC
Here is my entry for this campaign. The Buccaneer from Matchbox. One of their later kits with a bit more detail, but still has very wide and deep panel lines.
Also the lack of underwing stores is annoying especially since the instructions show Buccaneers making a low altitude pass on an airfield with iron bombs under the wings.
More to follow soon as this should be a quick build.

Also the lack of underwing stores is annoying especially since the instructions show Buccaneers making a low altitude pass on an airfield with iron bombs under the wings.
More to follow soon as this should be a quick build.

Posted: Thursday, November 01, 2012 - 08:34 AM UTC
A little more progress on my Buccaneer. The Matchbox kit is up to usual Matchbox standard and goes together without any problems.


Posted: Saturday, November 03, 2012 - 02:33 PM UTC
A little more progress on my Buccaneer. Cockpit is done with very relaxed pilots  The camouflage will be hand brushed since the original camouflage is hard edged. A little old school, but hope it will come out nice.


 The camouflage will be hand brushed since the original camouflage is hard edged. A little old school, but hope it will come out nice.


V2Phantom

Joined: December 26, 2008
KitMaker: 288 posts
AeroScale: 195 posts

Posted: Sunday, November 04, 2012 - 03:43 AM UTC
Here's a little update on my Hawk build. I now have a gloss black overcoat on the model.


I am not really happy with the way it looks in spots as I picked up some dirt/dust/particles in the gloss paint in several spots, especially under the fuselage. I also noticed part of a fingerprint on the undersurface of a wing. Gloss black paint does have a way to highlight problems!
My plan now is to carefully sand the problem areas and shoot another coat of gloss black. Then it is on to the decals.
Have fun modeling!
Mike

Posted: Sunday, November 04, 2012 - 12:56 PM UTC
Looks nice, Mike. The overall gloss black will look cool with some markings on it.
A little more progress on my Buccaneer. The markings are on. Only thing missing is a little light weathering. All the pictures I have seen show very clean aircraft.
More to follow soon

A little more progress on my Buccaneer. The markings are on. Only thing missing is a little light weathering. All the pictures I have seen show very clean aircraft.
More to follow soon


SaxonTheShiba

Joined: February 01, 2009
KitMaker: 1,233 posts
AeroScale: 663 posts

Posted: Sunday, November 04, 2012 - 01:07 PM UTC
Mike-----Hawk looks great. Gloss black paint is a tough color to deal with on a model.
Jesper-----Great looking Buccaneer.!
Best wishes, Ian
Jesper-----Great looking Buccaneer.!
Best wishes, Ian
Posted: Sunday, November 04, 2012 - 08:15 PM UTC
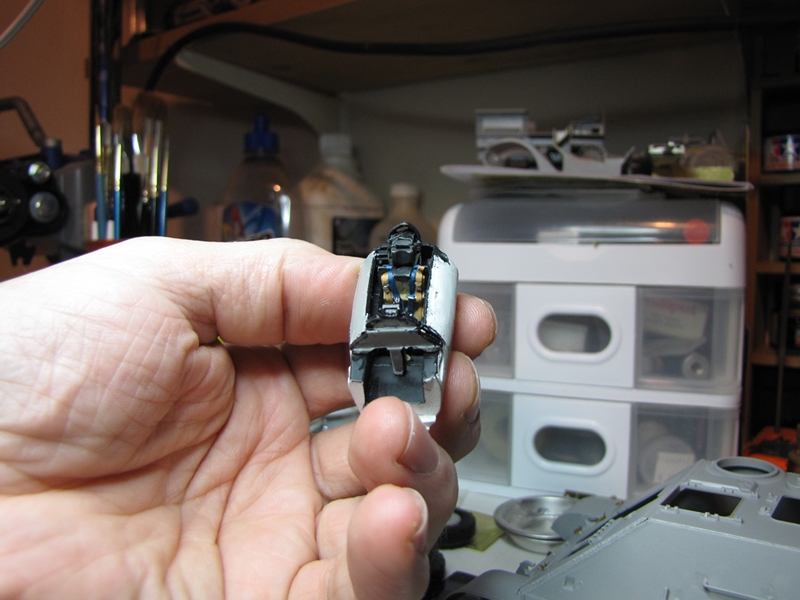
Got some painting done on the cockpit,
I painted everything flat white primer to start, then flat black. After I used a knife to scratch out the details in the panel and consoles a little colour where needed and got a start on painting the seat.
Cheers Rob.
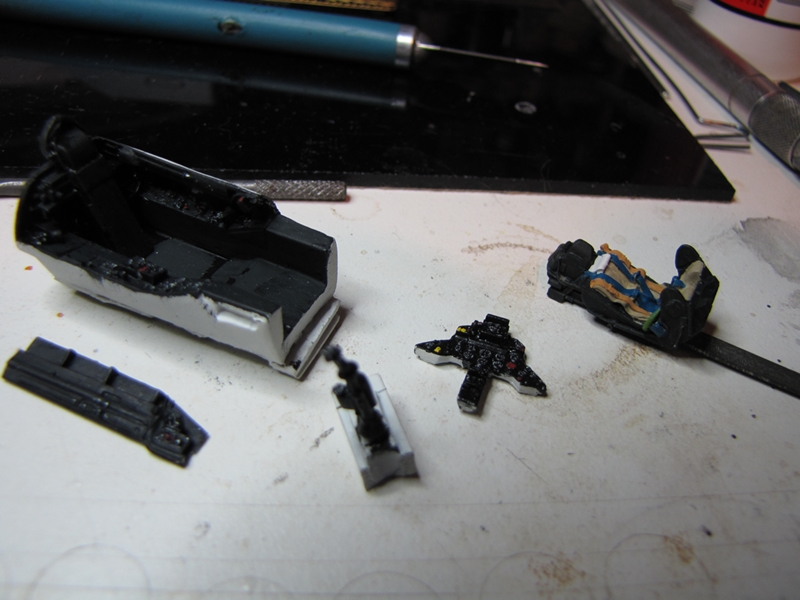
I painted everything flat white primer to start, then flat black. After I used a knife to scratch out the details in the panel and consoles a little colour where needed and got a start on painting the seat.

Cheers Rob.

Posted: Monday, November 05, 2012 - 01:58 PM UTC
Thanks for the comment, Ian. My Buccaneer is now done. An excellent little kit taking its age into account. However, I would have loved some underwing stores as an option.


Posted: Wednesday, November 07, 2012 - 12:34 AM UTC
Jesper,
Very Nice!
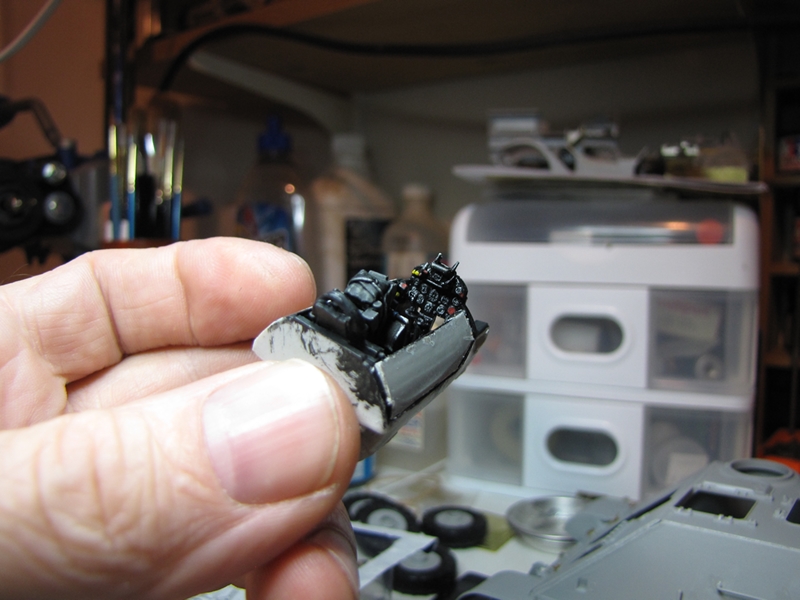
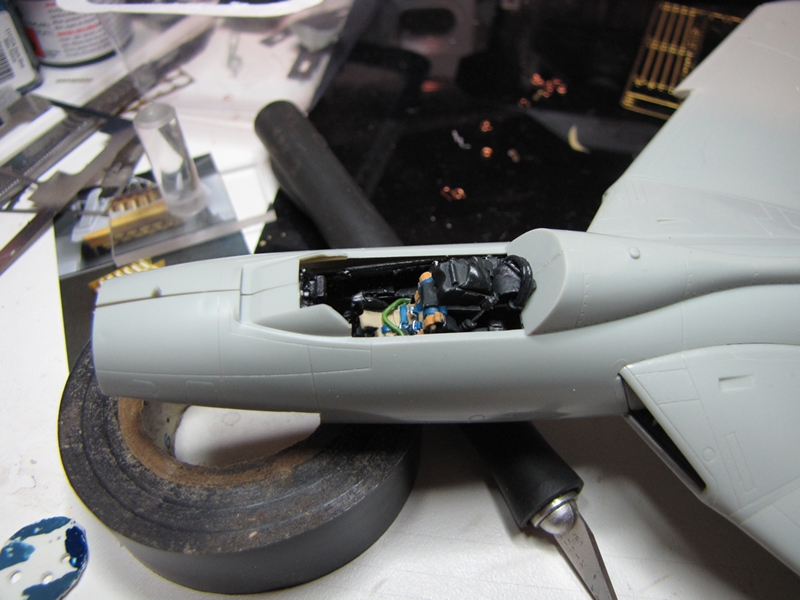
Got the cockpit finished and ready to install in the fuse.
Cheers Rob.
Very Nice!
Got the cockpit finished and ready to install in the fuse.

Cheers Rob.


Posted: Thursday, November 08, 2012 - 09:06 PM UTC
Progress update, Trumpeter 1/32 BAE Lightning F.6 


Siderius

Joined: September 20, 2005
KitMaker: 1,747 posts
AeroScale: 1,673 posts

Posted: Friday, November 09, 2012 - 07:14 AM UTC
Jesper, your Buccaneer looks fantastic! Great looking build, especially with an older kit, good work there. Russell 

V2Phantom

Joined: December 26, 2008
KitMaker: 288 posts
AeroScale: 195 posts

Posted: Saturday, November 10, 2012 - 04:00 AM UTC
Jesper
This looks great! It is really hard to beleive that this started out as a Matchbox kit. I have not had much interest in the Buccaneer but I must admit the aircraft is starting to grow on me. I just may need to add one of these to the ole collection.......
Have fun modeling!
Mike

This looks great! It is really hard to beleive that this started out as a Matchbox kit. I have not had much interest in the Buccaneer but I must admit the aircraft is starting to grow on me. I just may need to add one of these to the ole collection.......
Have fun modeling!
Mike
Quoted Text
Thanks for the comment, Ian. My Buccaneer is now done. An excellent little kit taking its age into account. However, I would have loved some underwing stores as an option.

Posted: Saturday, November 10, 2012 - 03:35 PM UTC
Slowly getting closer to paint. 
Had a couple of mishaps, had the cockpit installed and went to add the lower nose piece then found that I needed to cut some of the pour block off for the nose wheel bay. in the process of doing that the instrument panel came out(I thought no problem I'll glue it back later) so got the chunk cut out and glued the cockpit back in then glued the lower nose piece in(it came out perfect would need little if any cleanup) then went to put the instrument panel back
  It would not fit. So I cut out the instrument shroud hopping that would allow me to coax the panel in, but no
  so had to remove the lower nose and cockpit and start over.
  Why is it we do this?
  Got that all back together and finished some more parts.
Cheers Rob.
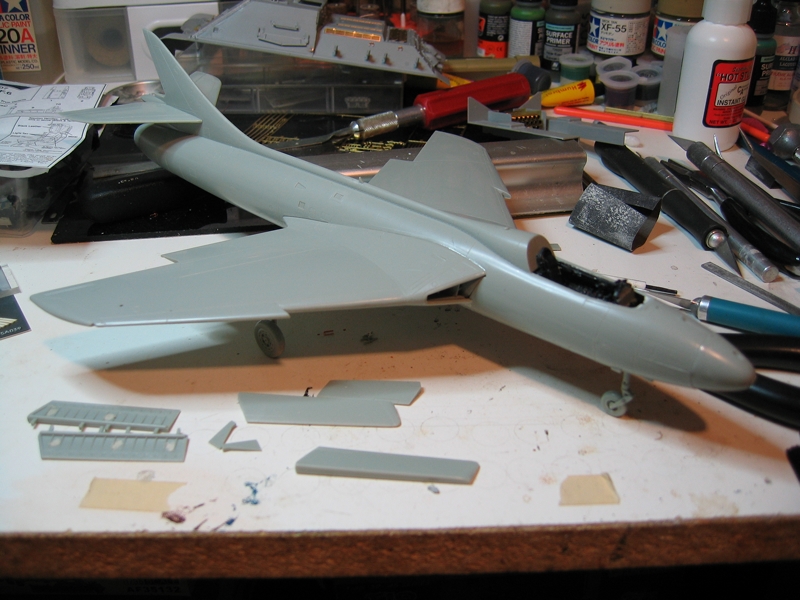

Had a couple of mishaps, had the cockpit installed and went to add the lower nose piece then found that I needed to cut some of the pour block off for the nose wheel bay.
 in the process of doing that the instrument panel came out(I thought no problem I'll glue it back later) so got the chunk cut out and glued the cockpit back in then glued the lower nose piece in(it came out perfect would need little if any cleanup) then went to put the instrument panel back
  It would not fit. So I cut out the instrument shroud hopping that would allow me to coax the panel in, but no
  so had to remove the lower nose and cockpit and start over.
  Why is it we do this?
  Got that all back together and finished some more parts.
Cheers Rob.


SaxonTheShiba

Joined: February 01, 2009
KitMaker: 1,233 posts
AeroScale: 663 posts

Posted: Saturday, November 10, 2012 - 04:42 PM UTC
Rob, sorry you had all those issues with the model but a fine looking Hunter so far.
Regards, Ian
Regards, Ian
 |


