

Hey what red is everyone using for this?
I'm leaning toward XF7. Just concerned about the flatness.
Testors enamel red is in the running but enamel makes me nervous.
Air Campaigns
Want to start or join a group build? This is where to start.
Want to start or join a group build? This is where to start.
Hosted by Frederick Boucher, Michael Satin
OFFICIAL: Porco Rosso Campaign
raypalmer

Joined: March 29, 2010
KitMaker: 1,151 posts
AeroScale: 985 posts

Posted: Sunday, January 20, 2013 - 03:22 PM UTC

tinbanger
Joined: February 04, 2008
KitMaker: 2,507 posts
AeroScale: 1,814 posts

Posted: Sunday, January 20, 2013 - 11:24 PM UTC
Hi
I used red oxide primer with a top coat of Testors Clear Pearl spray.

I used red oxide primer with a top coat of Testors Clear Pearl spray.


jeremiaha41

Joined: February 27, 2011
KitMaker: 47 posts
AeroScale: 2 posts
Posted: Monday, January 21, 2013 - 07:24 AM UTC
I'm building the Testors Supermarine S6B Racer out of the box. Brent
Bink123
Joined: June 23, 2008
KitMaker: 414 posts
AeroScale: 364 posts
Posted: Monday, January 21, 2013 - 09:47 AM UTC
Very nice, Tinbanger.
tinbanger
Joined: February 04, 2008
KitMaker: 2,507 posts
AeroScale: 1,814 posts
Posted: Monday, January 21, 2013 - 10:28 AM UTC
Quoted Text
Very nice, Tinbanger.
Thank you Bink123
Made a change from the usual builds!
raypalmer
Joined: March 29, 2010
KitMaker: 1,151 posts
AeroScale: 985 posts
Posted: Monday, January 21, 2013 - 04:27 PM UTC
Well I was all geared up tonight to really go nuts on the interior. Buuuuuut you can't see anything but the cockpit once assembled. So I'm going to focus on the cockpit and forge ahead.

Removed by original poster on 01/24/13 - 18:58:53 (GMT).
Bink123
Joined: June 23, 2008
KitMaker: 414 posts
AeroScale: 364 posts
Posted: Thursday, January 24, 2013 - 07:29 AM UTC
This aircraft will be a member of the Flying Pirate Alliance. As all of the other craft in the film are marked alphabetically, this one will be X or Z.
Here are several photos showing progress -
Proposed scheme showing proposed motor and cowl, observer's mg mounting, mg's, proposed propellers and crew

Chosen engine and propeller, also continued clean-up of fuselage and wings.

Decided to paint undeside azure blue and top-side to be a faded blue. the photo doesn'tshow the fading well. Chose markings and cut out pattern from white decal stock.

I will post more photos soon. I am working on the floats.
Arrrrr.
raypalmer
Joined: March 29, 2010
KitMaker: 1,151 posts
AeroScale: 985 posts
Posted: Friday, January 25, 2013 - 04:19 PM UTC
I quite like that gunners cupola you've scratch built there Richard. It puts me in mind of that scene in Last Crusade when Sean Connery shoots up the stabilizer.
Progress on my Savoia thus far is I'm ~70% through the interior build and paint. I drilled out the IP and applied the instrument decal from behind. Looks ok. I'm still on the fence about adding ignition wires to the engine. Worried about whether I'll be able to manage a respectable wood finish on the prop... White for the Italian tail flash and under wing markings is on and masked. I think this may be my first ever completed campaign!
Progress on my Savoia thus far is I'm ~70% through the interior build and paint. I drilled out the IP and applied the instrument decal from behind. Looks ok. I'm still on the fence about adding ignition wires to the engine. Worried about whether I'll be able to manage a respectable wood finish on the prop... White for the Italian tail flash and under wing markings is on and masked. I think this may be my first ever completed campaign!
raypalmer
Joined: March 29, 2010
KitMaker: 1,151 posts
AeroScale: 985 posts
Posted: Saturday, January 26, 2013 - 05:11 PM UTC


And so I forge ahead. Displeased with my interior. The wood didn't turn out and then it all just went to shambles.

North4003

Joined: August 01, 2012
KitMaker: 960 posts
AeroScale: 391 posts
Posted: Monday, January 28, 2013 - 05:35 PM UTC

Here is my float-plane for the PR air campaign. A classic Testors, Hawk, ? S6B in all it's 1950's model glory including sink marks and flash. I've been wanting to get this built for some time and the PR campaign is a good reason to get this one done. Not a lot of parts but it will be fun I predict.
North4003
Joined: August 01, 2012
KitMaker: 960 posts
AeroScale: 391 posts
Posted: Monday, January 28, 2013 - 05:53 PM UTC

Sunday has always been a good day to get some modeling done. I got the main components assembled. I have been pre-planning the painting and finishing process. I would like to add the rigging. I'm thinking about fishing line or brass wire. Advice would be appreciated. On to filling and sanding next. BTW, I've broken the code on posting photos'.

JPTRR

#051

Joined: December 21, 2002
KitMaker: 7,772 posts
AeroScale: 3,175 posts
Posted: Tuesday, January 29, 2013 - 02:41 AM UTC
I never looked at this campaign before. Some great models here. That Stearman mod is wonderful and I am in awe of the detail in the Fine Molds flying boat. Where's that Savoia?

Bink123
Joined: June 23, 2008
KitMaker: 414 posts
AeroScale: 364 posts
Posted: Tuesday, January 29, 2013 - 06:13 AM UTC
Wow, the S6B, I can't wait to see it. is that kit still available?
North4003
Joined: August 01, 2012
KitMaker: 960 posts
AeroScale: 391 posts
Posted: Tuesday, January 29, 2013 - 02:37 PM UTC
The S6B shows up every once and a while on ebay. My hobby shop had a display of Testors' racers and other former Hawk kits. I've always admired the Thompson Trophy racers of the 20's and 30's as well as the Regina Aeronautica.
Bink123
Joined: June 23, 2008
KitMaker: 414 posts
AeroScale: 364 posts
Posted: Tuesday, January 29, 2013 - 05:14 PM UTC
Thanks, I'll have to keep my eyes peeled. BTW - a long, long time ago I built that kit, I think I was about 10 at the time (that would be about 50 years ago).
raypalmer
Joined: March 29, 2010
KitMaker: 1,151 posts
AeroScale: 985 posts
Posted: Wednesday, January 30, 2013 - 07:11 AM UTC


Some more of the S.21. Assembly is essentially complete, the exhausts, prop and spinner will be bolted on right before the final clearcoat. Only major paintwork left is brown and red. From there is touchups and minor weathering.
I'm not going to preshade I don't think.... Perhaps ink in the lines. The Savoia appears to have a mighty think lacquer coat in on it, but it is only a cartoon...
raypalmer
Joined: March 29, 2010
KitMaker: 1,151 posts
AeroScale: 985 posts
Posted: Wednesday, January 30, 2013 - 02:00 PM UTC
I'm just going to bump this thread along with some content. I got to get to this beauty more than I anticipated today.


Woooooo it's pretty now. This is my first ever use of Vallejo. The belly is in "Wood" and the rest is "Italian Red" because that had to be the paint I bought for this bird.
I am impressed with this stuff. I may be a convert.
Woooooo it's pretty now. This is my first ever use of Vallejo. The belly is in "Wood" and the rest is "Italian Red" because that had to be the paint I bought for this bird.
I am impressed with this stuff. I may be a convert.
raypalmer
Joined: March 29, 2010
KitMaker: 1,151 posts
AeroScale: 985 posts
Posted: Wednesday, January 30, 2013 - 03:09 PM UTC
Things are going so well that one could almost squeal with delight.


Emeritus

Joined: March 30, 2004
KitMaker: 2,845 posts
AeroScale: 1,564 posts

Posted: Saturday, February 02, 2013 - 07:12 AM UTC
Looking good!
Seems you got everything covered well - the construction of the S.21 made me decide to paint mine in subassemblies: engine nacelle, wing, floats, and upper and lower fuselage. Fortunately the Finemolds kit fits together so well there should be zero trouble with that approach.
Btw, did you paint the white and green areas or use the kit-supplied decals?

JClapp

#259
Joined: October 23, 2011
KitMaker: 2,265 posts
AeroScale: 1,715 posts

Posted: Saturday, February 02, 2013 - 08:46 AM UTC

Emeritus
Joined: March 30, 2004
KitMaker: 2,845 posts
AeroScale: 1,564 posts
Posted: Sunday, February 03, 2013 - 03:21 AM UTC
A little bit more progress. For some reason the otherwise well detailed kit doesn't make any mention of the two bracing wires running from the wing to each wing float. So, gotta have 'em! 
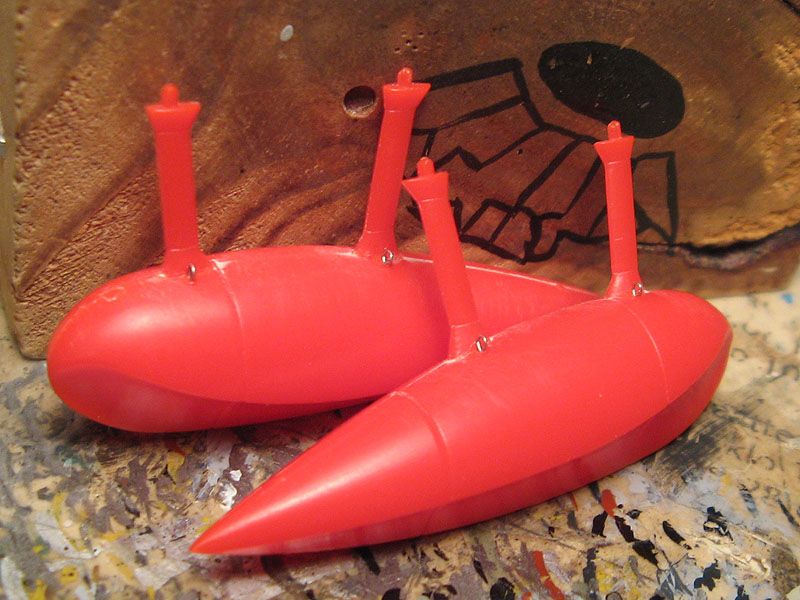
For mounting said wires, I made kind of semi-turnbuckles by twisting thin wire with a drill bit.
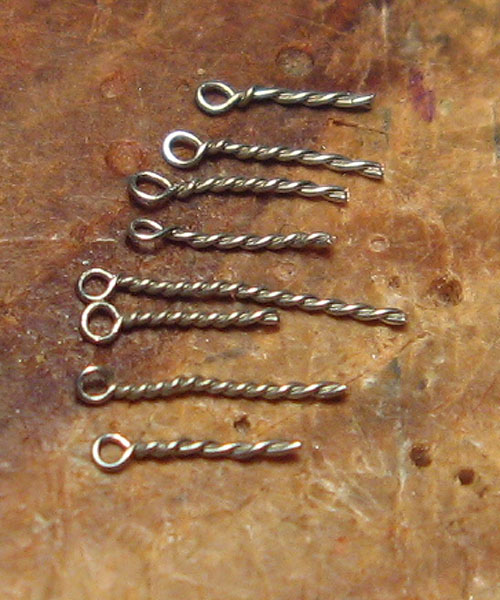
These there then cut to length and glued to holes drilled to the wing and the floats.
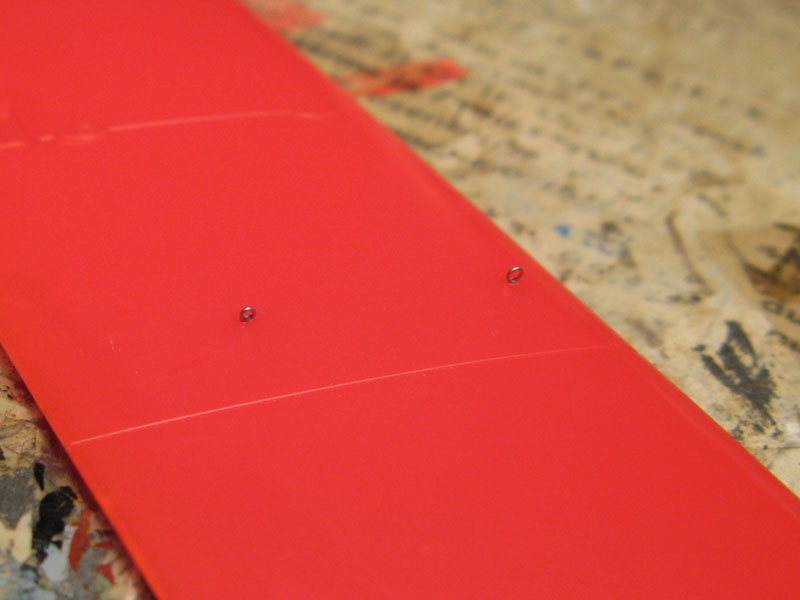
Since the wires weren't depicted in the kit's painting instructions, nor could I find any proper (scale) drawings online, I used screenshots from the film for estimating a distance from the float attachment points to drill the holes in the wings, 2 cm seemed good to me.

For mounting said wires, I made kind of semi-turnbuckles by twisting thin wire with a drill bit.
These there then cut to length and glued to holes drilled to the wing and the floats.
Since the wires weren't depicted in the kit's painting instructions, nor could I find any proper (scale) drawings online, I used screenshots from the film for estimating a distance from the float attachment points to drill the holes in the wings, 2 cm seemed good to me.
raypalmer
Joined: March 29, 2010
KitMaker: 1,151 posts
AeroScale: 985 posts
Posted: Sunday, February 03, 2013 - 07:23 AM UTC
Quoted Text
A little bit more progress. For some reason the otherwise well detailed kit doesn't make any mention of the two bracing wires running from the wing to each wing float. So, gotta have 'em!
For mounting said wires, I made kind of semi-turnbuckles by twisting thin wire with a drill bit.
These there then cut to length and glued to holes drilled to the wing and the floats.
Since the wires weren't depicted in the kit's painting instructions, nor could I find any proper (scale) drawings online, I used screenshots from the film for estimating a distance from the float attachment points to drill the holes in the wings, 2 cm seemed good to me.
*furiously studying photos*
Eetu I've already nicked your aileron control rod adjustment, so be warned. I'm going to be mimicking you here too
What are you going to do for the wires themselves?Emeritus
Joined: March 30, 2004
KitMaker: 2,845 posts
AeroScale: 1,564 posts
Posted: Sunday, February 03, 2013 - 12:03 PM UTC
Quoted Text
Eetu I've already nicked your aileron control rod adjustment, so be warned. I'm going to be mimicking you here too
No prob, go ahead!
The wires themselves? Well, I'm thinking of attaching the wires to the floats, gluing the floats to the wing, the attaching the wires to the wing. If that is what you had in mind?
raypalmer
Joined: March 29, 2010
KitMaker: 1,151 posts
AeroScale: 985 posts
Posted: Sunday, February 03, 2013 - 01:47 PM UTC
Eetu I missed your post. In answer to your question I did paint on the tricolors, I never trust a decal larger than a coin.
I just filled in the panel lines with dark red oil and turpenoid, weathering is basically done, didn't want to make it look too beat up. Very near the finish line now!
I just filled in the panel lines with dark red oil and turpenoid, weathering is basically done, didn't want to make it look too beat up. Very near the finish line now!
 |

WEB HOSTING BY


Copyright ©2021 AeroScale and Kitmaker Network, a subsidiary of Silver Star Enterprises
All Rights Reserved. Please read our Conditions of Use and Privacy Policy.
All Rights Reserved. Please read our Conditions of Use and Privacy Policy.