Air Campaigns
Want to start or join a group build? This is where to start.
OFFICIAL: Porco Rosso Campaign
Bink123
_VISITCOMMUNITY
Quebec, Canada
Joined: June 23, 2008
KitMaker: 414 posts
AeroScale: 364 posts
Posted: Friday, February 22, 2013 - 02:50 AM UTC
Hello everyone.

Here are photos of my progress on my Flying Pirate Alliance fast scout/reconnaissance craft

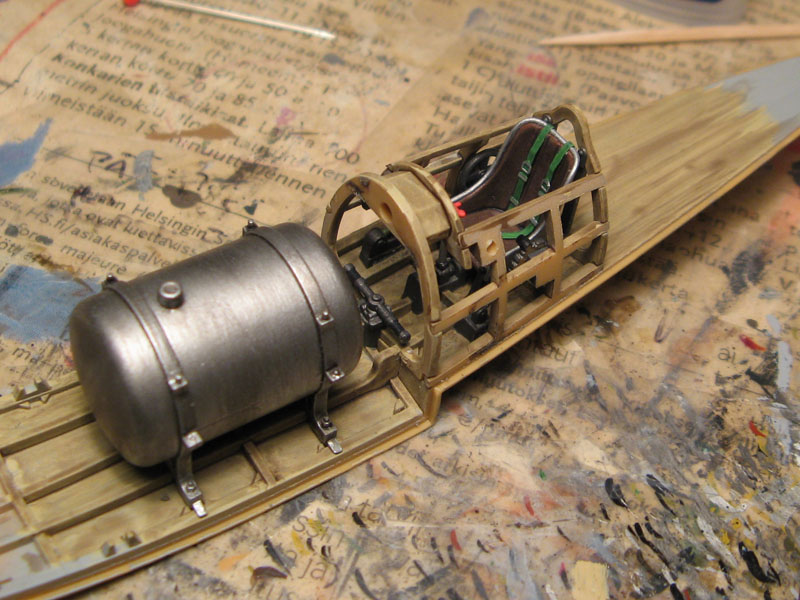
First off, float construction using sheet styrene and milliput.


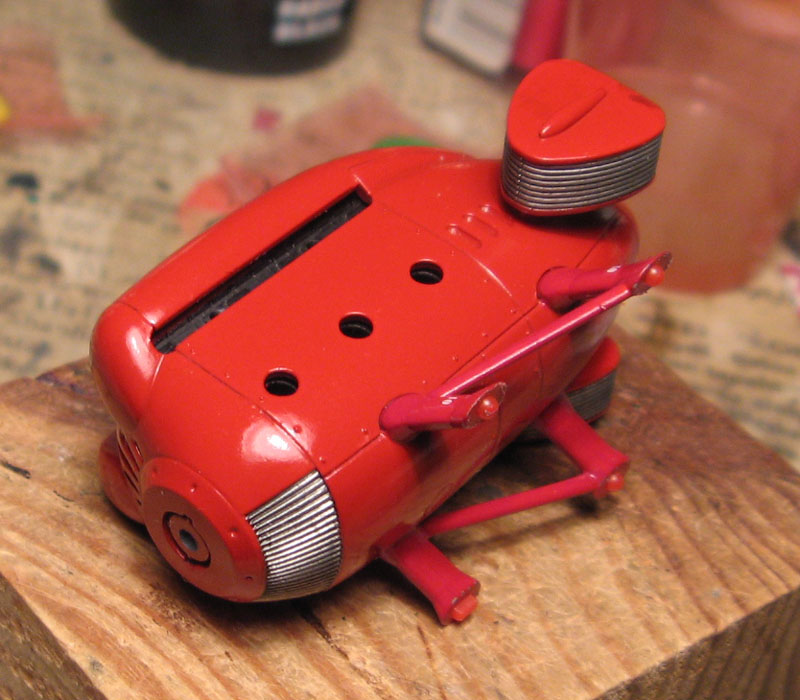
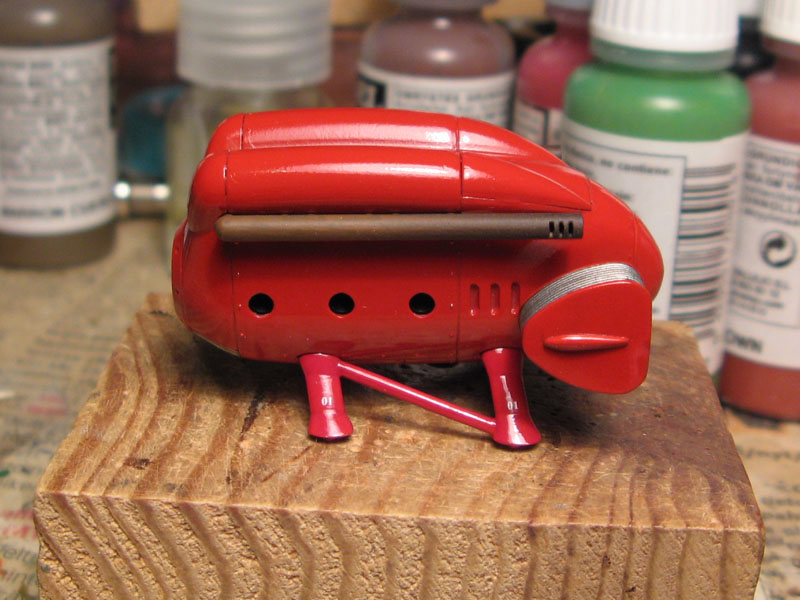
Next, installation of main float, decal stripe on fuselage and engine/prop


Next, preparation for mounting wingtip floats


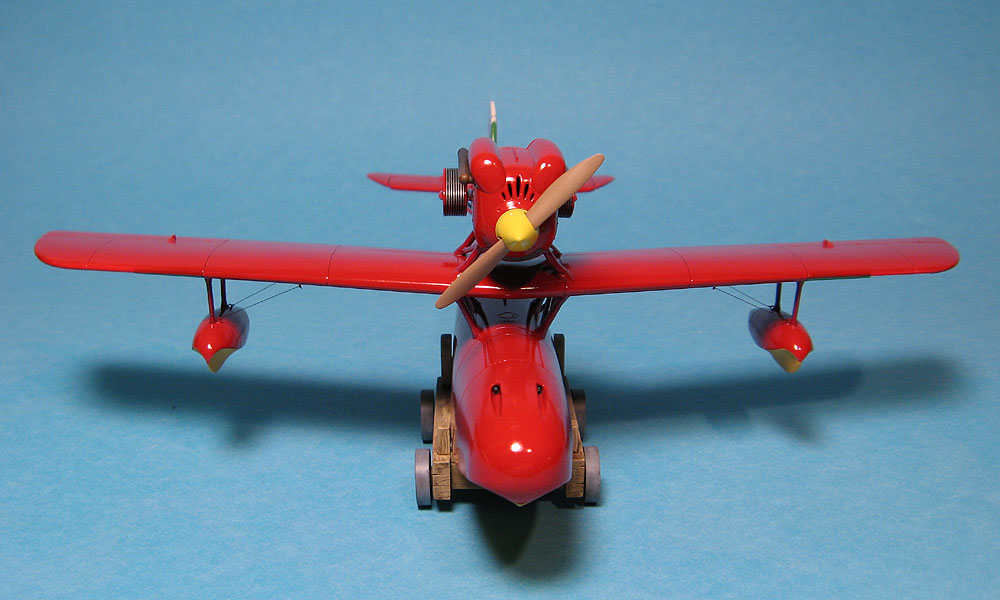
Floats temporarily stuck on to check for overall scheme, nice view of sharkmouth


Rigging completed, all floats installed, working on aircrew, and machine guns


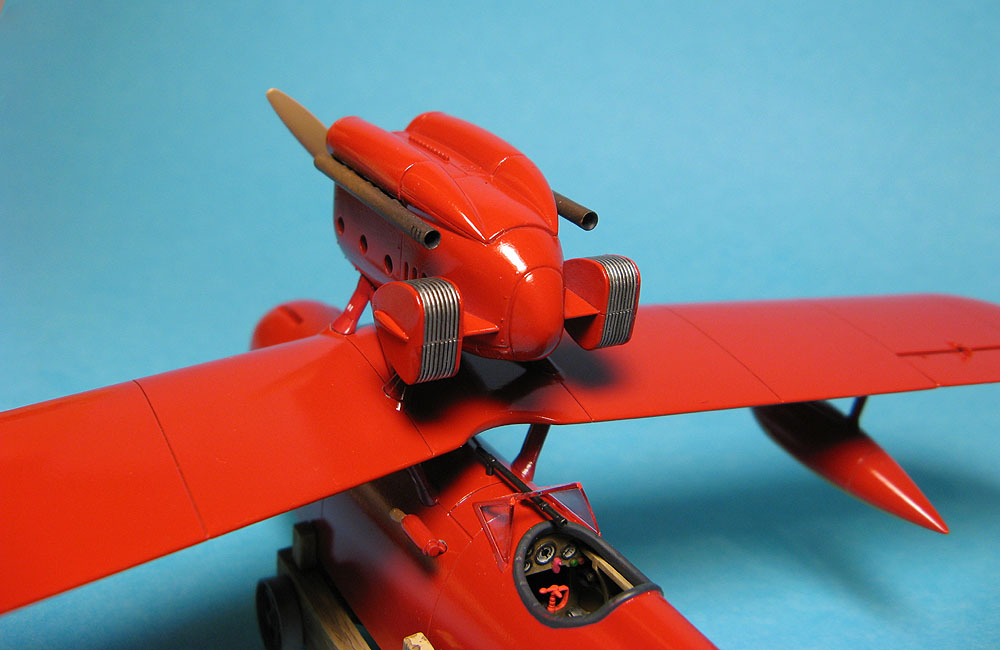
Aircrew installed, machine guns, and working on final details


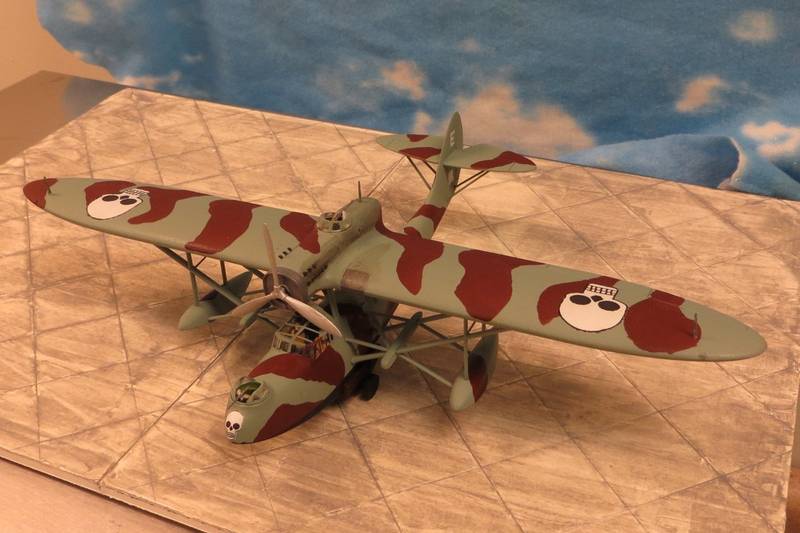
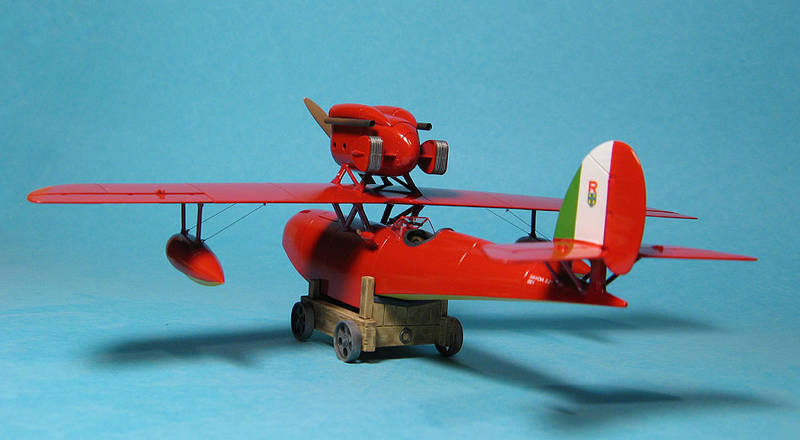
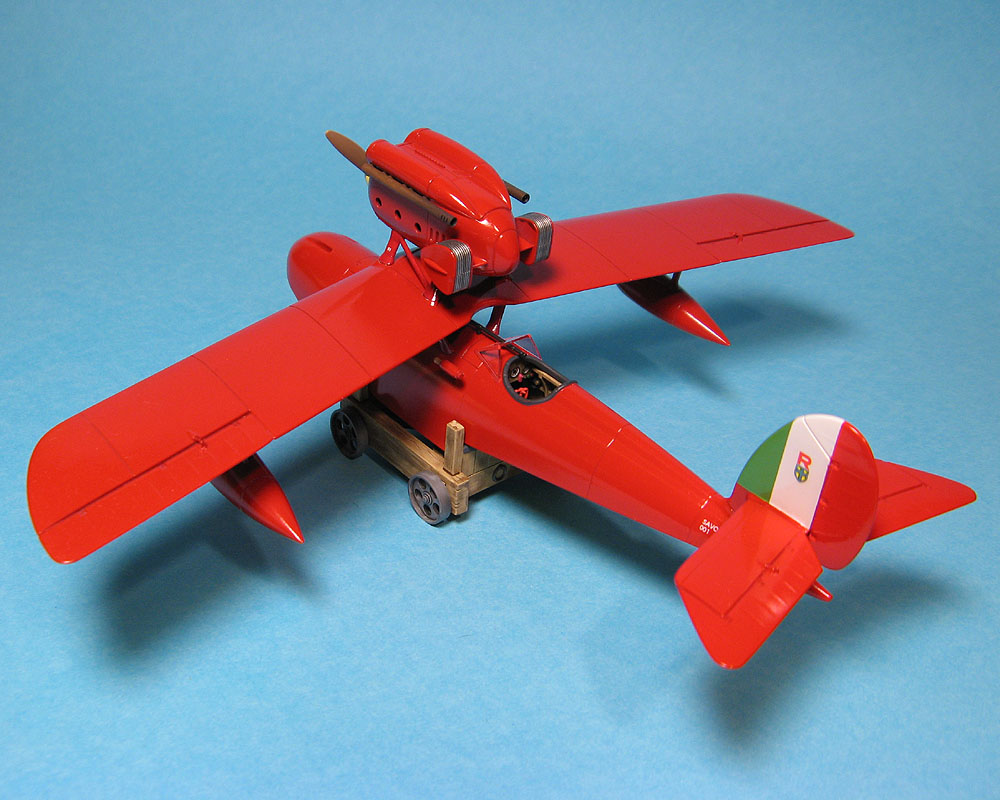
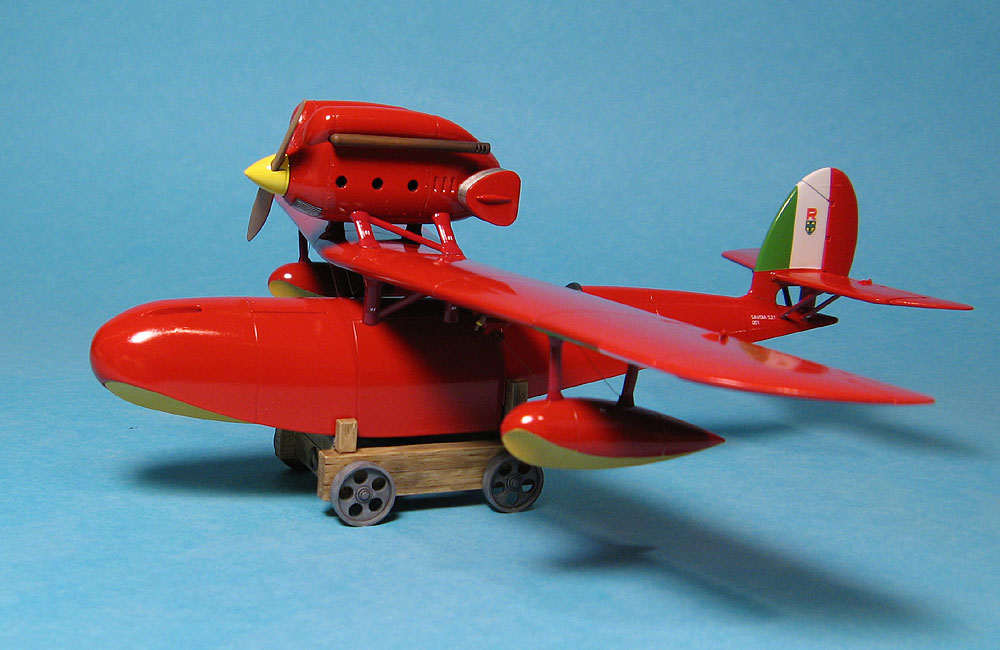
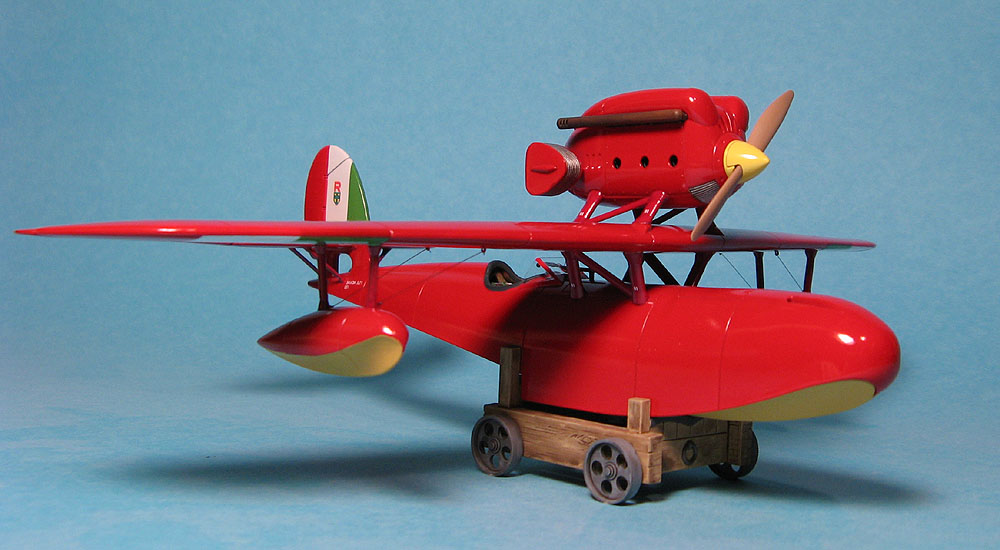
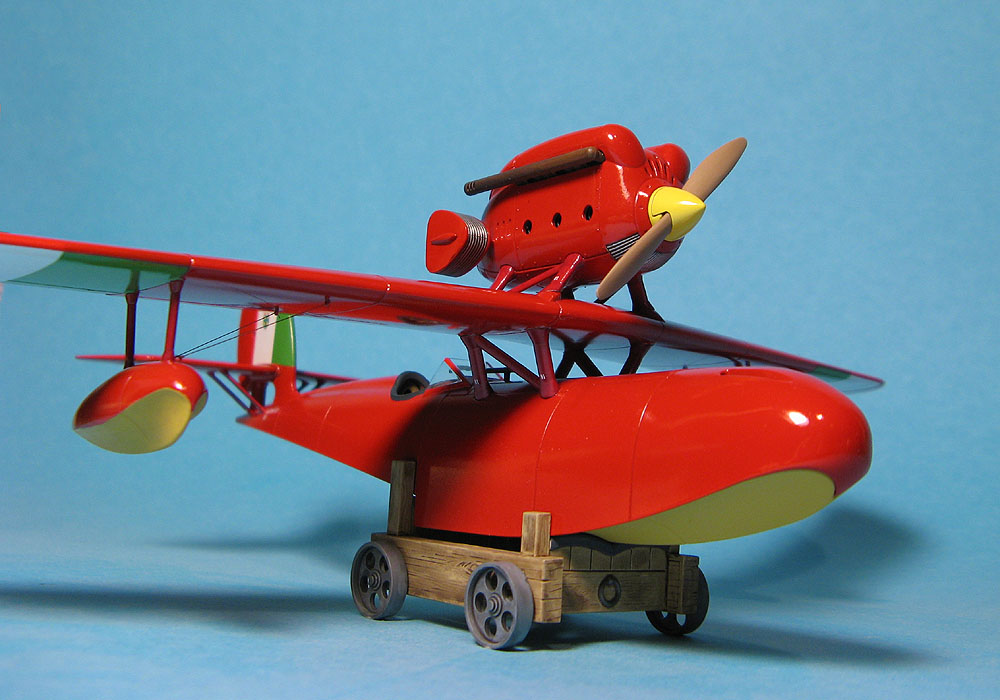
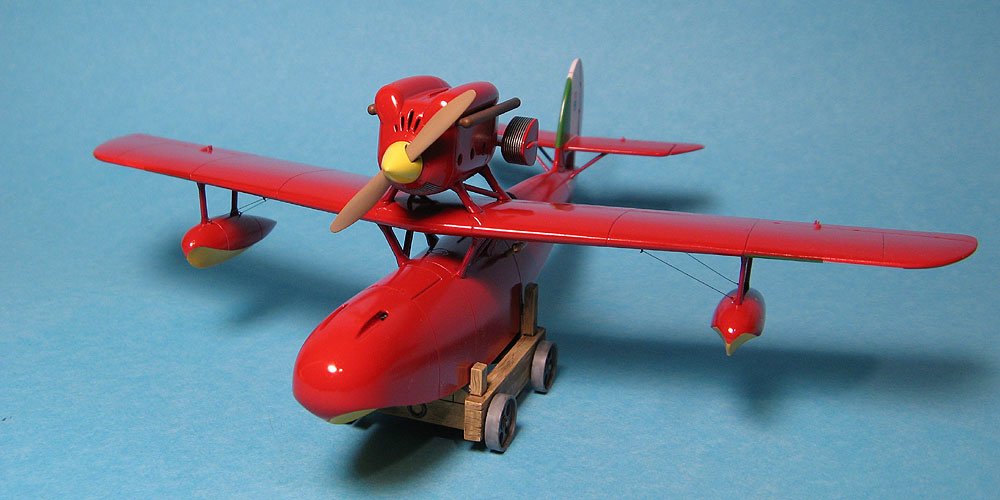
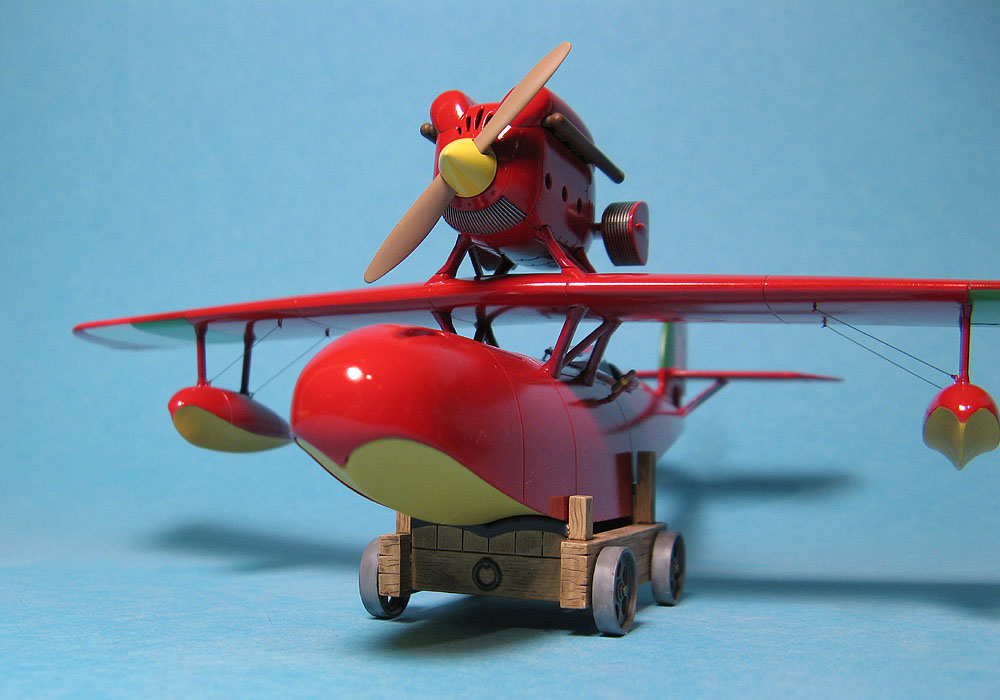
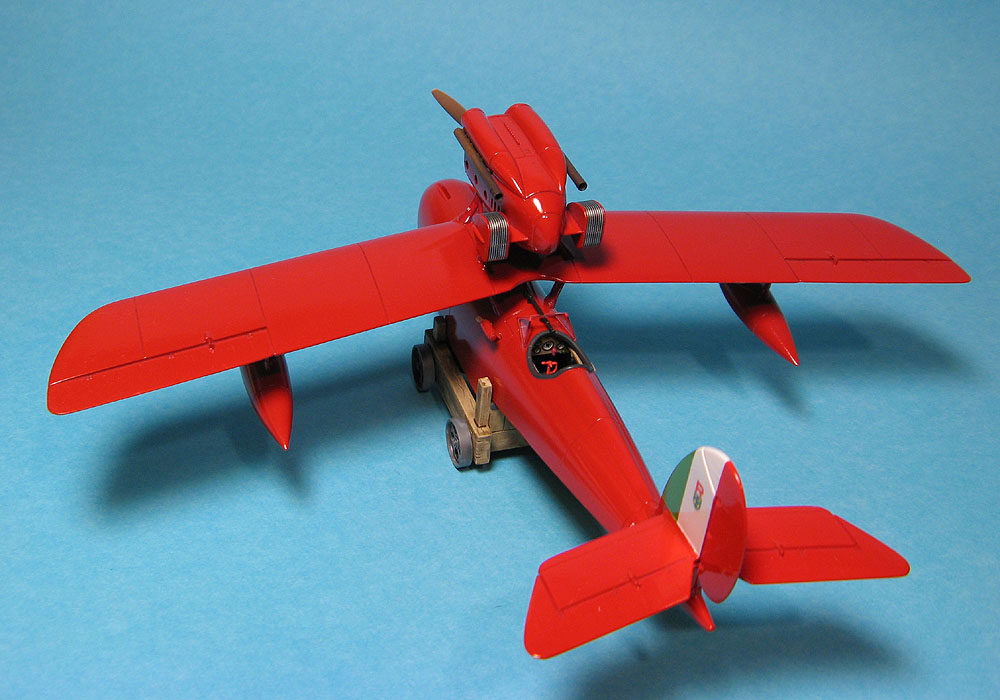
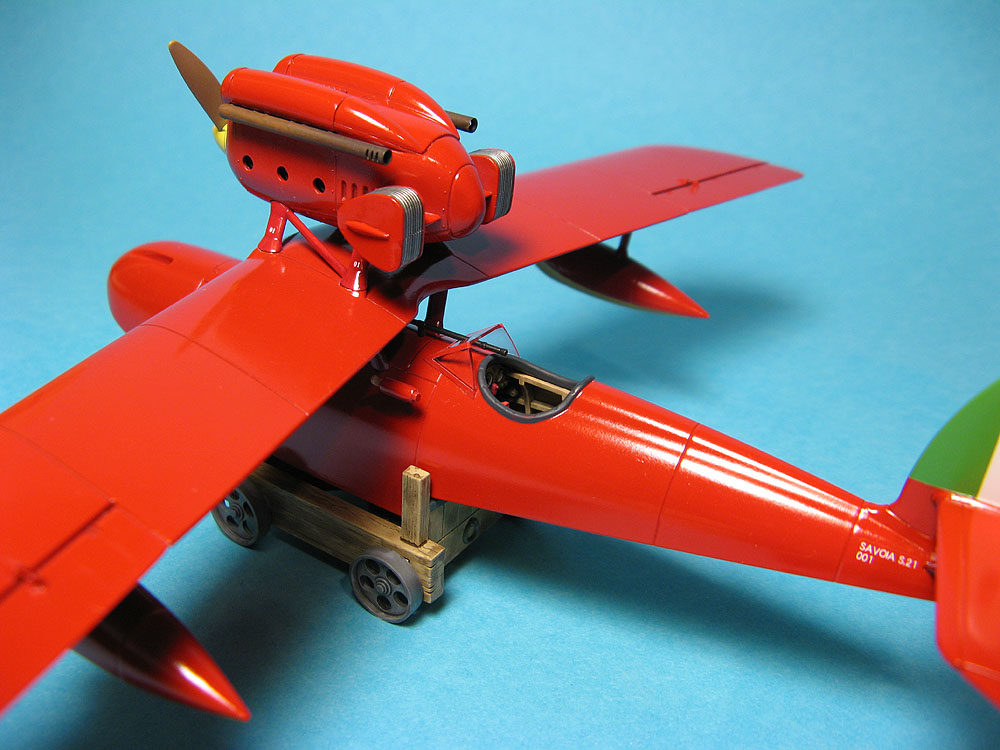
Final pics of completed model


Final notes -

The fuselage and wings are from an old Lindberg 1/48 Stearman Trainer

The propeller is from a Modelcraft 1/48 Noordoyn Norseman, the propeller spinner is from an Airfix 1/48 Hawker Hurricane mk.I

Floats are scratchbuilt

Piarate decals are handmade from white decal material from a Hobbycraft 1/32 Fokker triplane

Twin Lewis guns for rear gunner are from a Roden 1/48 Bristol F2B

Engine is from a SMER 1/48 Bristol Bulldog

Sharkmouth decals are from an Eduard 1/48 Roland C.II

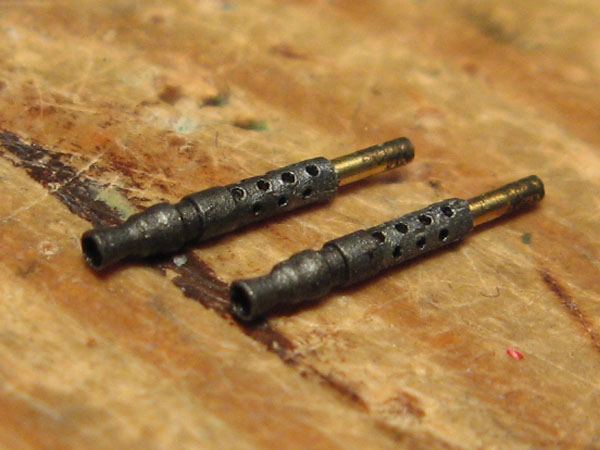
Underwing machine guns are from a Hasegawa 1/48 Spitfire Mk. IX, housing origin.. I forget.

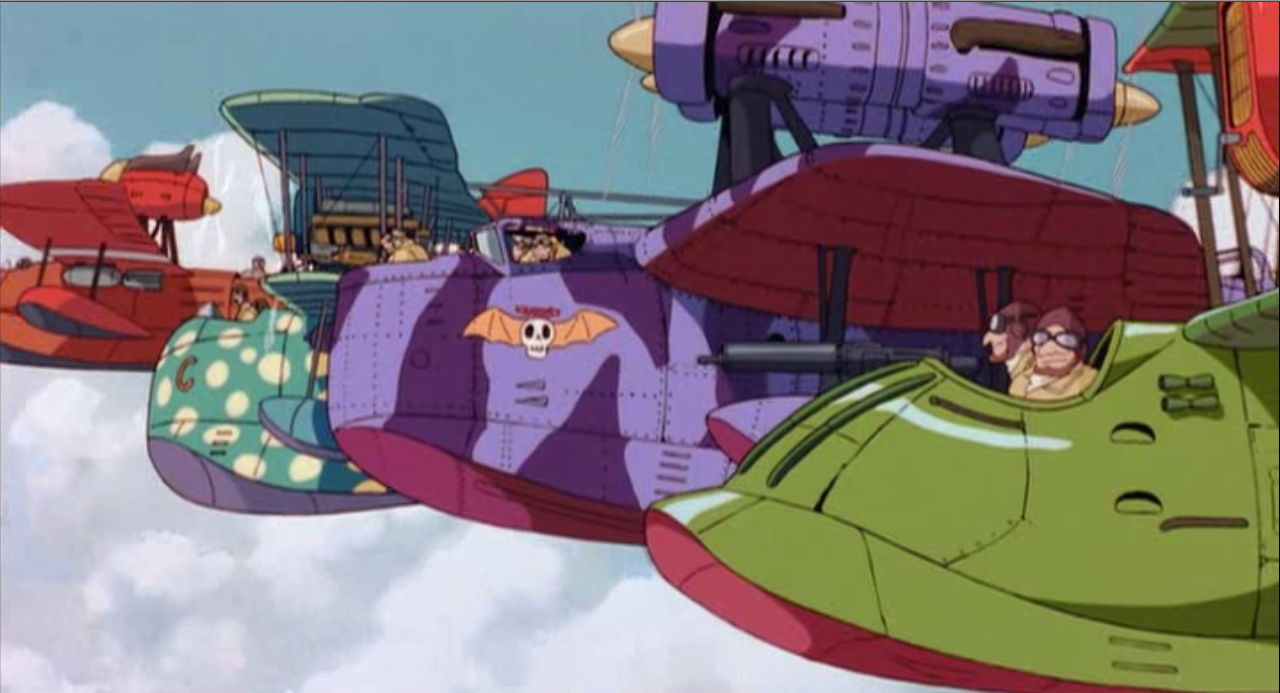
Hope you like it. Though not in the Porco Rosso movie, the model was inspired by it.

JClapp
#259
_VISITCOMMUNITY
Massachusetts, United States
Joined: October 23, 2011
KitMaker: 2,265 posts
AeroScale: 1,715 posts
Posted: Friday, February 22, 2013 - 04:58 AM UTC
That is wonderful! I love the shark mouth on the pontoon!

A very interesting assemblage of salvaged parts, that's an interesting approach to building a model, and where but a fantasy fiction campaign could you do that?
I'm glad to see more than one pirate craft in here, they are my favorite part of the film.
raypalmer
_VISITCOMMUNITY
Ontario, Canada
Joined: March 29, 2010
KitMaker: 1,151 posts
AeroScale: 985 posts
Posted: Friday, February 22, 2013 - 05:19 AM UTC
Richard! That's amazing. That must have been fun to build!
Bink123
_VISITCOMMUNITY
Quebec, Canada
Joined: June 23, 2008
KitMaker: 414 posts
AeroScale: 364 posts
Posted: Friday, February 22, 2013 - 06:03 AM UTC
Thank you, I am pleased with how it turned out. It was a fun build.


By the way - I am having trouble posting to the group Build gallery. How do i do this??
raypalmer
_VISITCOMMUNITY
Ontario, Canada
Joined: March 29, 2010
KitMaker: 1,151 posts
AeroScale: 985 posts
Posted: Friday, February 22, 2013 - 11:37 AM UTC

Quoted Text

Thank you, I am pleased with how it turned out. It was a fun build.


By the way - I am having trouble posting to the group Build gallery. How do i do this??

I couldn't get it to work until I shrunk the file sizes down.
Bink123
_VISITCOMMUNITY
Quebec, Canada
Joined: June 23, 2008
KitMaker: 414 posts
AeroScale: 364 posts
Posted: Friday, February 22, 2013 - 03:02 PM UTC
OK, I'll give it a try. Thanks

10 minutes later.......... OK it worked. I've posted 4 photos in the GB Gallery.

Rick
Emeritus
_VISITCOMMUNITY
Uusimaa, Finland
Joined: March 30, 2004
KitMaker: 2,845 posts
AeroScale: 1,564 posts
Posted: Sunday, February 24, 2013 - 05:54 AM UTC
Funny, this must be the first airplane kit I've ever built where I end up finishing the cockpit last!

The main components are about ready now, nothing that special this time about them, it's mostly smaller parts and comments on the instructions' paint callouts.

MG 17 Machine gun barrels (from Master) painted and ready for installation:

uriously, the kit comes with full machine guns and ammo boxes that will be unseen in the when finished unless you pose the service hatch open, yet the fuselage has only the gun trough, which I presume to be due to molding limitations. Anyway, since I'm building mine buttoned up, I drilled open the holes for the MG barrels and omitted the guns and ammo boxes; it'll be just the MG muzzles peeking from the troughs. Not exactly movie-accurate, but close enough for me.

Fuel pump handle:

For some reason, the instructions missed the shaft being olive green instead of dark metal.

The instructions call this propeller (I presume it powers the instrumentation?) to be painted silver - another mistake. It should be painted similarly to the main prop.


Moving on, the instructions don't mention anything about the support struts being a different shade of red than the rest, and the call for the forward radiator to be painted 'old gold,' instead of silver, like the rear ones. All visible right on the box art.

But then again, I did use all the decals indicated in the painting instructions - the film doesn't show any stencils on the support struts, nor the aircraft type ID text in front of the rudder.
Anyway, I still can't help wondering how those colour errors got into the instructions, while even the box top features stills from the film.
raypalmer
_VISITCOMMUNITY
Ontario, Canada
Joined: March 29, 2010
KitMaker: 1,151 posts
AeroScale: 985 posts
Posted: Sunday, February 24, 2013 - 06:33 AM UTC
Eetu you're a master. Makes me want to buy another and try again!
Emeritus
_VISITCOMMUNITY
Uusimaa, Finland
Joined: March 30, 2004
KitMaker: 2,845 posts
AeroScale: 1,564 posts
Posted: Sunday, February 24, 2013 - 07:13 AM UTC
Thanks! Even though the red paint job did turn out rather nice, it could be better, there's spots where it's far from those showroom finishes you see on car models.

Your late type build turned out really good too. If you haven't built the early type kit yet, there's a perfect excuse for another. Or if you haven't built the R3C-0, I can highly recommend it. Just like the Savoia, it goes together like a dream and looks as gorgeous.
JClapp
#259
_VISITCOMMUNITY
Massachusetts, United States
Joined: October 23, 2011
KitMaker: 2,265 posts
AeroScale: 1,715 posts
Posted: Monday, February 25, 2013 - 04:18 PM UTC
Ive finished with the Gabbiano


Ive been wanting to built an Air Pirate fleet for years. So, very glad this campaign ran. if there is ever a Porco Rosso 2...
Emeritus
_VISITCOMMUNITY
Uusimaa, Finland
Joined: March 30, 2004
KitMaker: 2,845 posts
AeroScale: 1,564 posts
Posted: Tuesday, February 26, 2013 - 12:41 PM UTC
Turned out really nice!

Btw, does campaign ending date of 28th mean that we still got that day to work on our entries?
I'm on a slightly mad rush here trying to finish my S.21 in time. I now have pretty much everything painted and ready for final assembly, just hoping there's enough drying time to get it finished.
raypalmer
_VISITCOMMUNITY
Ontario, Canada
Joined: March 29, 2010
KitMaker: 1,151 posts
AeroScale: 985 posts
Posted: Tuesday, February 26, 2013 - 01:18 PM UTC
February 28th at 23:59:59. Snap a pic as soon as it's all in one piece!
raypalmer
_VISITCOMMUNITY
Ontario, Canada
Joined: March 29, 2010
KitMaker: 1,151 posts
AeroScale: 985 posts
Posted: Tuesday, February 26, 2013 - 03:24 PM UTC
Well there may not be many finished models in it when all is said and done (Eetu I know you can do it!). But I must say that this is one butt-kicking campaign gallery.

Great stuff guys, really fun campaign. We need to get more members to see this movie so when we do Porco Rosso II there'll be an airforce of pastel pirates! I showed it to my old dad the other day and he loved it.


I'm quite partial to the lavender one myself.
North4003
_VISITCOMMUNITY
England - West Midlands, United Kingdom
Joined: August 01, 2012
KitMaker: 960 posts
AeroScale: 391 posts
Posted: Tuesday, February 26, 2013 - 05:09 PM UTC
Hello, I'm finishing sanding and detailing my S6B. I hope to have it painted by the 28th.
Bink123
_VISITCOMMUNITY
Quebec, Canada
Joined: June 23, 2008
KitMaker: 414 posts
AeroScale: 364 posts
Posted: Wednesday, February 27, 2013 - 02:39 AM UTC
I'm looking forward to see it.

Ray, it's all about quality over quantity anyway.
Emeritus
_VISITCOMMUNITY
Uusimaa, Finland
Joined: March 30, 2004
KitMaker: 2,845 posts
AeroScale: 1,564 posts
Posted: Wednesday, February 27, 2013 - 09:22 AM UTC
Getting there...


Bink123
_VISITCOMMUNITY
Quebec, Canada
Joined: June 23, 2008
KitMaker: 414 posts
AeroScale: 364 posts
Posted: Wednesday, February 27, 2013 - 09:22 AM UTC
By the way fellow Porco Rosso fans, February 28th is my birthday. I will be 61.


Emeritus
_VISITCOMMUNITY
Uusimaa, Finland
Joined: March 30, 2004
KitMaker: 2,845 posts
AeroScale: 1,564 posts
Posted: Thursday, February 28, 2013 - 07:42 AM UTC
Happy birthday!

I got my entry finished! Hmmm, the campaign gallery shows the date 3-1-2013, yet the "campaigns" page here at Aeroscale still has the campaign as running... Guess the gallery uses a different time zone setting? Since Aeroscale is co.uk, I presume it's Greenwich time by default?

Anyway, here's my S.21.


If you wonder about those black smudges on the inside of the right side engine cooler, I noticed them in the middle of taking the pictures and got rid of them.

I'll post a bunch of more pictures when I get them edited and uploaded on Photobucket.

raypalmer
_VISITCOMMUNITY
Ontario, Canada
Joined: March 29, 2010
KitMaker: 1,151 posts
AeroScale: 985 posts
Posted: Thursday, February 28, 2013 - 08:03 AM UTC
Eetu that's a beauty. You've got to enter that in model of the month! Your interior is legendary.
JClapp
#259
_VISITCOMMUNITY
Massachusetts, United States
Joined: October 23, 2011
KitMaker: 2,265 posts
AeroScale: 1,715 posts
Posted: Thursday, February 28, 2013 - 08:47 AM UTC
yes, outstanding!
It's still the 28th over much of the world, so I think its no problem even if the gallery is logged in some other way.
Emeritus
_VISITCOMMUNITY
Uusimaa, Finland
Joined: March 30, 2004
KitMaker: 2,845 posts
AeroScale: 1,564 posts
Posted: Thursday, February 28, 2013 - 09:17 AM UTC
Thanks! I think I'll enter MOM, it was last summer when I last finished something and/or entered MOM.

Well, here's that additional bunch of pics I promised. Quite a lot actually, sorry for straining your internet connection...


Thanks for running the campaign, I had a great time!
Bink123
_VISITCOMMUNITY
Quebec, Canada
Joined: June 23, 2008
KitMaker: 414 posts
AeroScale: 364 posts
Posted: Thursday, February 28, 2013 - 09:33 AM UTC
beautiful job, lovely finish. Congratulations on building a spectacular model.
raypalmer
_VISITCOMMUNITY
Ontario, Canada
Joined: March 29, 2010
KitMaker: 1,151 posts
AeroScale: 985 posts
Posted: Thursday, February 28, 2013 - 12:49 PM UTC
Ribbons are awarded!

Brent, if you finish in the next few days I will happily award one to you as well.


Everyone else. Well done gentlemen
North4003
_VISITCOMMUNITY
England - West Midlands, United Kingdom
Joined: August 01, 2012
KitMaker: 960 posts
AeroScale: 391 posts
Posted: Thursday, February 28, 2013 - 01:51 PM UTC
I will finish this campaign.
North4003
_VISITCOMMUNITY
England - West Midlands, United Kingdom
Joined: August 01, 2012
KitMaker: 960 posts
AeroScale: 391 posts
Posted: Tuesday, March 05, 2013 - 10:36 AM UTC
The Testors S6B is taking longer to complete than I anticipated. Just when I think its' ready to string and paint it needs a bit more sanding and finishing. I'm determined to complete this campaign even though the deadline has passed. I have done some scratch building of smaller details such as a seat back and engine straps. I need to add a new keel along the fusalage. I drilled 16 holes for the rigging and will have to replace some of the details lost in sanding.