OFFICIAL: Ground Force - Diorama
England - South West, United Kingdom
Joined: September 01, 2012
KitMaker: 123 posts
AeroScale: 47 posts
Posted: Sunday, January 13, 2013 - 10:46 PM UTC
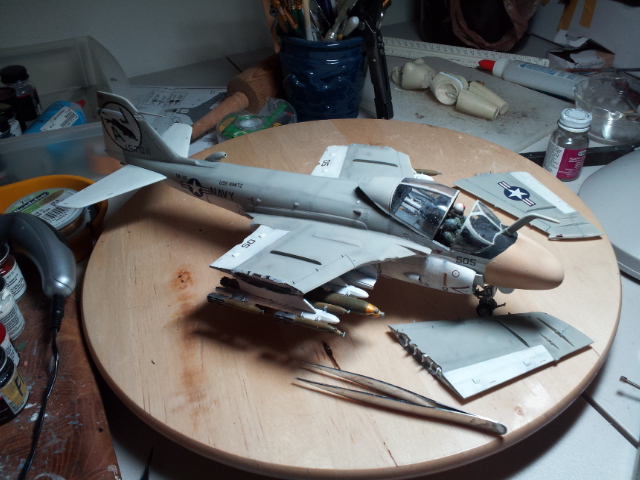
Hey guys another quick update on the A-10. The cockpit as been successfully installed now.
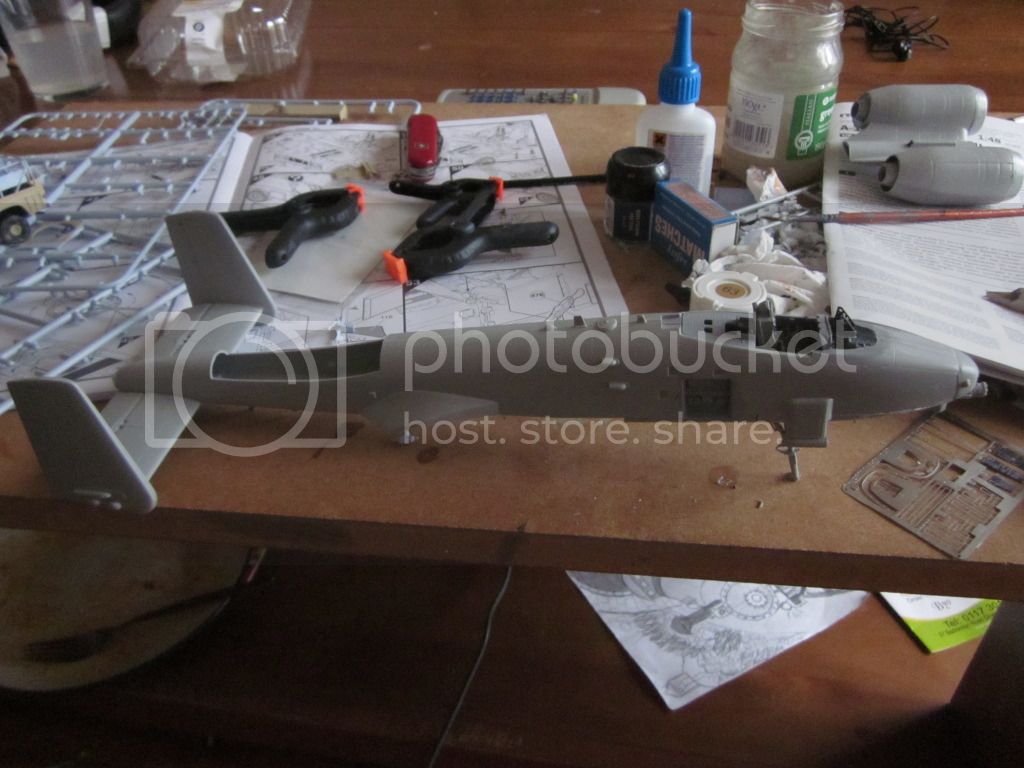

Also managed to get the wings together. Its a nice kit this one. Although I have managed to forget the 30g nose weight; which will make life interesting, especially seeing as one of the engine units is going to be resin!

Massachusetts, United States
Joined: November 07, 2012
KitMaker: 16 posts
AeroScale: 12 posts
Posted: Monday, January 14, 2013 - 12:38 AM UTC
That is one beautiful A-6! The detail work adds so much life to this bird. I've always had a fascination with war planes featuring side-by-side crew configurations...it's like they're both facing the sh*t equally.

Florida, United States
Joined: September 22, 2012
KitMaker: 97 posts
AeroScale: 30 posts
Posted: Monday, January 14, 2013 - 05:35 AM UTC
Hibbert: Thanks. Lotta love put into her. I agree about the side by side. Gives it a different feel. If you're really into the A-6 I suggest either the book or the movie based on the book "Flight of the Intruder." Goes into detail about the technical aspects of flying one of these babies.
Southwood: Don't worry about the weight in the nose since your going to put it in a dio. I have the same issue with my A-6 but I will glue it to the base which will alleviate the tail-drag
Massachusetts, United States
Joined: November 07, 2012
KitMaker: 16 posts
AeroScale: 12 posts
Posted: Tuesday, January 15, 2013 - 03:24 PM UTC
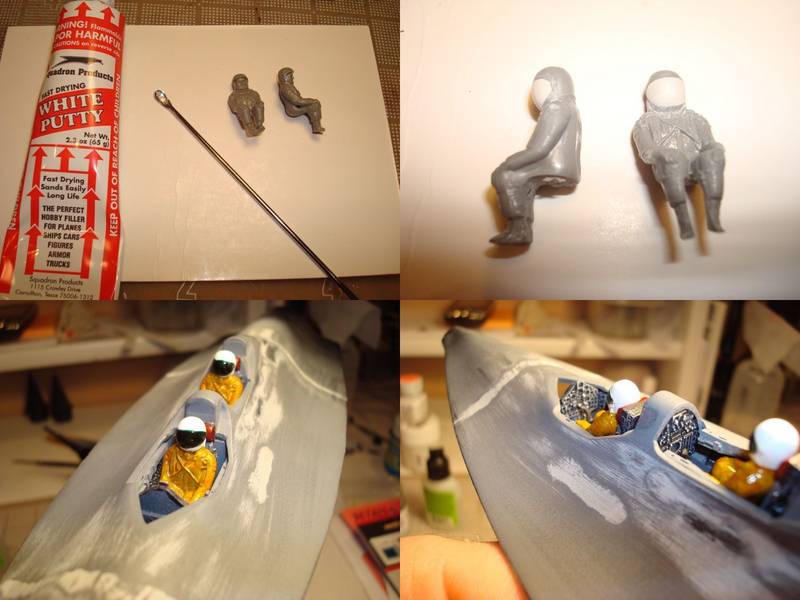
I'm continuing the prep work on the Habu and started on the cockpit while the various putty work dries.
In order to balance the finished plane in the dio, I'm attempting to dry-fit assemble the whole thing, adding weight where necessary before final assembly.
The front cockpit is by True Details and the rear is the kit part, cut in half, and reversed to fit the contour of the opening. The seats are kit parts, and the figures are from the Revell Mercury/ Gemini kit. Some filing was necessary to seat the figures normally.
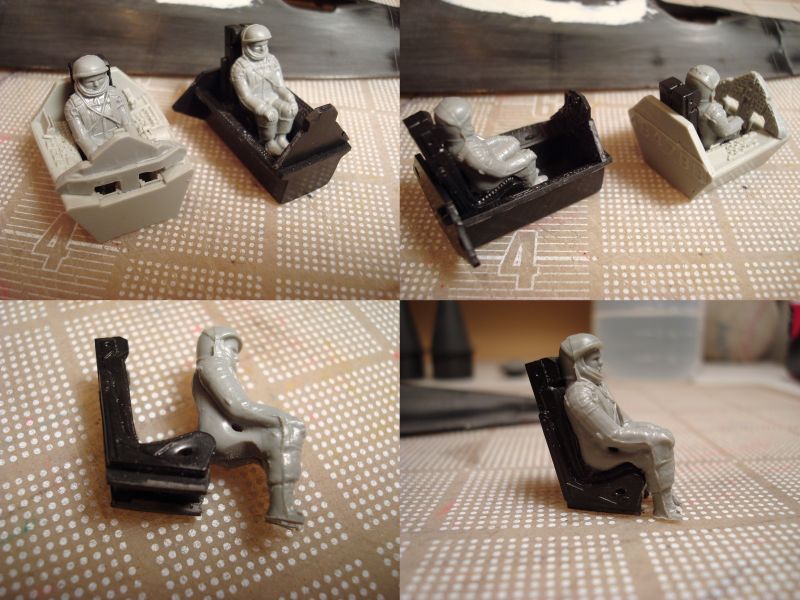
In order to have the pilot's (SR-71B = two pilots) heads sit in the canopy window's correctly, the ejection seat risers were sanded down incrementally until it looked right. For that matter, the front pilot will sit about 1mm higher when permanently fixed.
Gonna sand off the bailor bar on top of the helmet and fill the face area in with putty to form the shields. Please post any constructive criticisms and thanks for looking!


#041
Kobenhavn, Denmark
Joined: July 20, 2006
KitMaker: 10,069 posts
AeroScale: 3,788 posts
Posted: Tuesday, January 22, 2013 - 07:59 AM UTC
Quoted Text
Hey Jesper, your Rufe looks really good and the dio idea sounds really good, why not build another Rufe and just expand the dio a bit ?
Cheers, D
I will probably build the Hasegawa N1K2 Rex floatplane. The time period will not fit precisely, but it could be an old Rufe surviving to fight along side the Rex later in the war.
Hibbert, nice progress. That will be one stunning diorama.
Campaign'oholic - 252+ campaigns completed
Massachusetts, United States
Joined: November 07, 2012
KitMaker: 16 posts
AeroScale: 12 posts
Posted: Wednesday, January 30, 2013 - 10:23 PM UTC
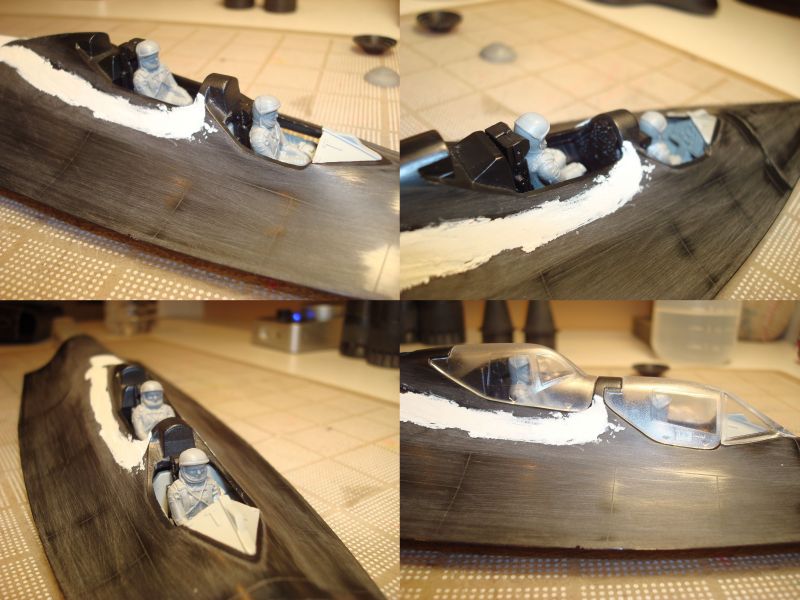
Hi everyone, here's some progress pics to share. My typical scale is 1:24 so this has been slow going, but fun for sure...mostly.
The helmet shields are done and the pilots are in paint. Still have some details to add to the pilots helmets and suits. Not going into detail inside the cockpit due to closed canopies, except right at the canopy glass. The rest was simply dry-brushed.
I started working on fixing the too-narrow chines problem with this kit. My plan is to remove the highlighted raised sections of the entire forward fuselage, and add the styrene sheet in its place. Then when the halves are joined, I will re-shape and join them in.
Being that the styrene is soft, I tried to carve a portion and test it (small red circle) which ended in a trip to urgent care at 4am, and 8 stitches. It will be rotary tool from here on out...

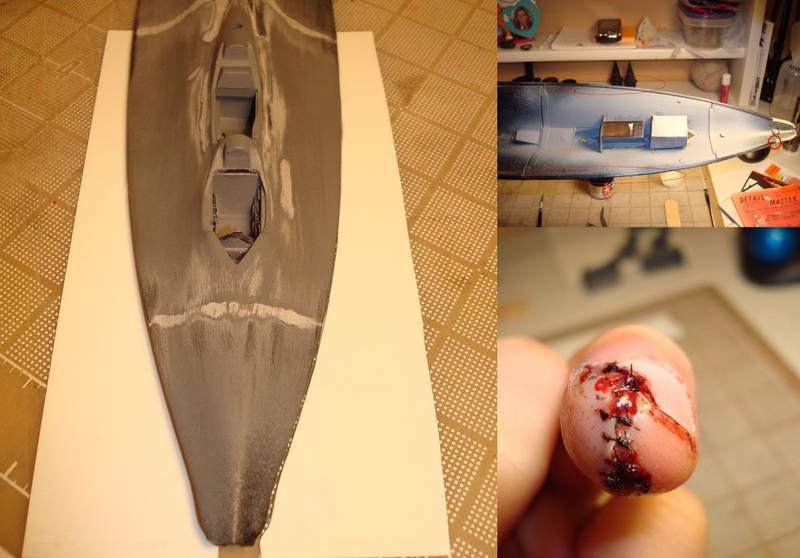
I apologize if the finger grossed you out. Please reply with any constructive criticisms.
England - South East, United Kingdom
Joined: February 05, 2008
KitMaker: 1,381 posts
AeroScale: 1,110 posts
Posted: Thursday, January 31, 2013 - 06:08 AM UTC
lookin good.... apart from the finger ! no need to rush anything, still 11 months to go !

all the best paul
England - South East, United Kingdom
Joined: February 05, 2008
KitMaker: 1,381 posts
AeroScale: 1,110 posts
Posted: Wednesday, February 06, 2013 - 04:58 AM UTC
i managed to get the decals for my aircraft so i'll be working on that first then the car and figures.
paul
England - East Midlands, United Kingdom
Joined: February 07, 2004
KitMaker: 911 posts
AeroScale: 415 posts
Posted: Friday, February 08, 2013 - 09:32 PM UTC
Dr Hibbert - OWWWWWWWWWWWWWWWCHHHHHHHHHHHHH!!!!!!!!!!!

"Nelson be damned.......Lets get the hell out of here!"
California, United States
Joined: August 01, 2010
KitMaker: 143 posts
AeroScale: 55 posts
Posted: Saturday, February 09, 2013 - 05:44 AM UTC
Florida, United States
Joined: September 22, 2012
KitMaker: 97 posts
AeroScale: 30 posts
Posted: Saturday, February 09, 2013 - 02:46 PM UTC
I like how most of the guys are just standing around doing nothing

Cool dio idea. Never seen one of this subject matter. Have you considered the scene being an active live-fire? The guys could be standing around with their hands over their ears, maybe show tracer fire from the gun? (Just an idea) Or are you going to recreate the photo?
California, United States
Joined: August 01, 2010
KitMaker: 143 posts
AeroScale: 55 posts
Posted: Saturday, February 09, 2013 - 06:05 PM UTC
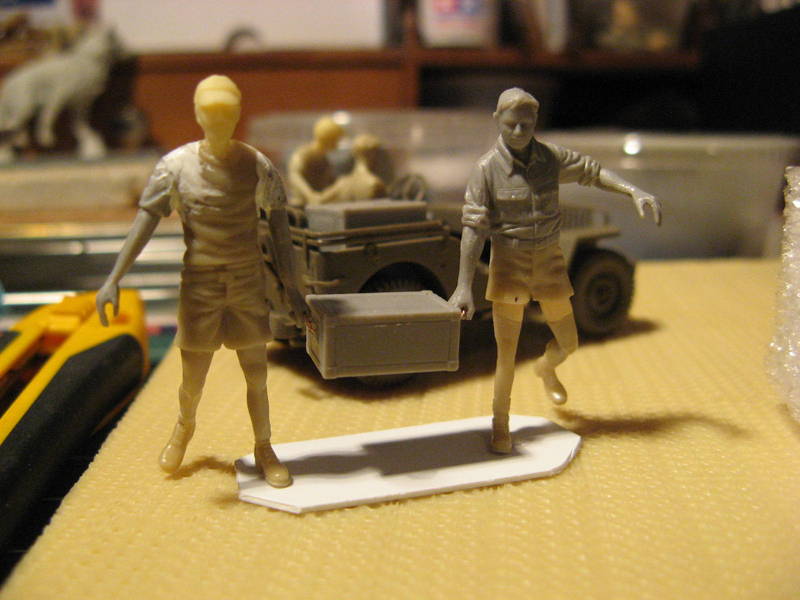
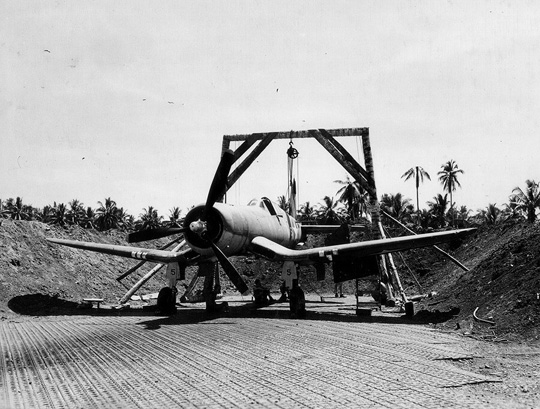
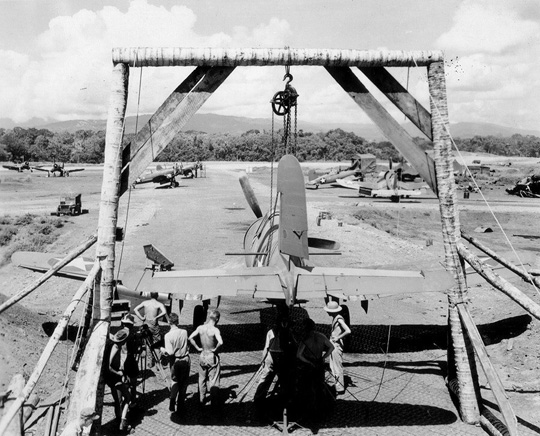
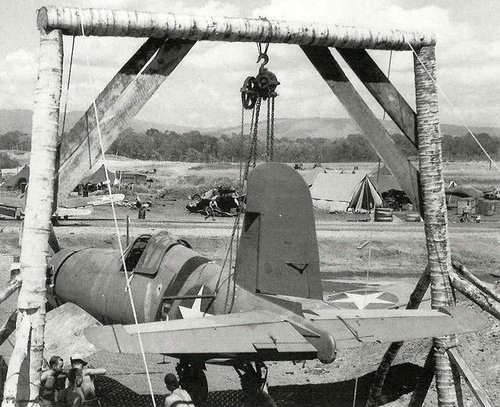
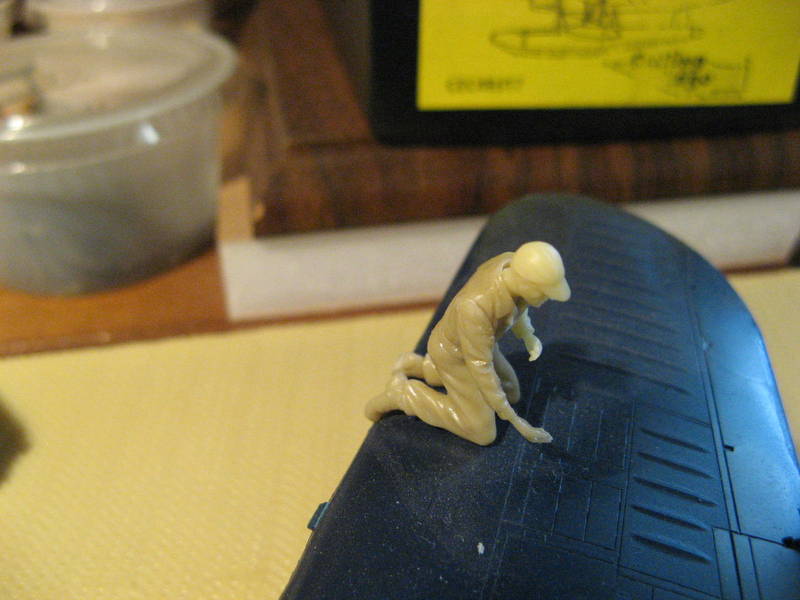
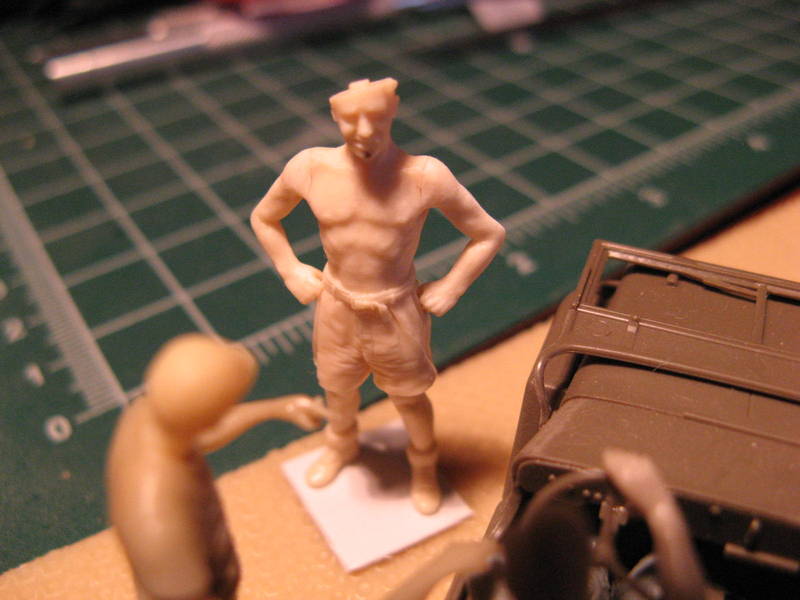
Yes Mark, I will be reproducing the picture with a little bit of artistic license, the rear view pic I've had in an old air war book since the 80's, it wasn't until internet and google that I found different views of the same plane. If you look closer at the rear view pic, one guy is looking through a spotting scope and the guy next to him is giving his two cents worth. Live fire would have been cool (I actually considered that) but wasn't sure how I could've pulled it off. I will post some pics soon of the figures I have so far, I still have to build the F4U and the jeep, the ones in the pic is for mock up and positioning... I think the ground crew is standing around cause they are waiting for the ammo/beer delivery guy. Most of the figures I'm using are heavily modified, not too many shirtless guys in 1/48, and I have to scratch build the spotting scope
AussieReg
 Associate Editor
#007
Victoria, Australia
Joined: June 09, 2009
KitMaker: 8,156 posts
AeroScale: 3,756 posts
Posted: Saturday, February 09, 2013 - 07:20 PM UTC
I think that the guys are standing around wondering how much strife they will be in when the CO finds out that they just shot a heap of holes in the other Corsairs down the field !

ON the bench
Revell 1/24 '53 Corvette (building as '54)
Revell 1/24 BMW 507 Coupe and Cabrio
Italeri 1/48 Me262 B-1a/U1 Nightfighter
Monogram 1/24 '57 Chevy Nomad
Dragon 1/350 USS Frank Knox DD-742
California, United States
Joined: August 01, 2010
KitMaker: 143 posts
AeroScale: 55 posts
Posted: Saturday, February 09, 2013 - 07:51 PM UTC
I thought the same thing, but the caption in my book says that it's a newly delivered corsair and maybe there's a procedure for aligning the guns first before live fire??? Cause it doesn't look like there's a target downrange...I'd like to do a little research to find out what is really going on

California, United States
Joined: August 01, 2010
KitMaker: 143 posts
AeroScale: 55 posts
Posted: Sunday, February 10, 2013 - 09:50 AM UTC
Massachusetts, United States
Joined: November 07, 2012
KitMaker: 16 posts
AeroScale: 12 posts
Posted: Sunday, February 10, 2013 - 09:55 AM UTC
This is gonna be a great Dio! I love the theme and the character poses look very detailed; natural...
California, United States
Joined: August 01, 2010
KitMaker: 143 posts
AeroScale: 55 posts
Posted: Sunday, February 10, 2013 - 10:50 AM UTC
Thanks doc, the caption on the original photo says that it was in Guadalcanal. I was wondering if someone can help me out with any tips on duplicating sunburned skin. What color should I add to the basic skin tone
Well it's back to the project, updates soon. Happy modeling everybody
Florida, United States
Joined: September 22, 2012
KitMaker: 97 posts
AeroScale: 30 posts
Posted: Sunday, February 10, 2013 - 05:09 PM UTC
I like the bird poop as an Easter egg
Little things like that are my favorite part of a dio.
Good job on the shirtless men. Good realism. I've only done a little on working with realistic skin (barbie bust in my gallery) but I know the secret is layers. Put down your base coat, then put down the shade of red you want. Make it look patchy and not at all uniform so use different shades of red in different parts. Sunburns also are splotchy so sallow white splotches could/should be present. then dry brush or kinda feather it (if using an air brush) with your base coat to blend it in. You can put a thin layer of your base to give a subtle look. The more layers you ad the more depth you can present, however this is 1/35 so you can't give too much depth before it looks funny. Also don't forget the influence of clothes; white skin burns brighter than dark skin.
Would be funny to have a guy with a farmers burn or a farmers tan with the rest burnt
If you want more and probably better info I'd suggest an artist book on painting.
Hope this helps in some way
California, United States
Joined: August 01, 2010
KitMaker: 143 posts
AeroScale: 55 posts
Posted: Sunday, February 10, 2013 - 06:40 PM UTC

Mark, great idea on that farmers tan, forgot about that syndrome
Yes I will be researching techniques on that. I have the lifecolor flesh set, it has 6 colors in it that should work out pretty well. Just have to be careful not to overdo it in 1/48 scale. I got the humorous idea from the Sheperd Paine book on building dioramas. He has great suggestions on all kinds of dio subjects.
now that I have most of the figures ironed out I will be working on the Corsair next
But here are the ammo bearers, these guys should round out the scene, it's close to being in danger of overcrowding
until next time happy modeling everybody
England - South East, United Kingdom
Joined: February 05, 2008
KitMaker: 1,381 posts
AeroScale: 1,110 posts
Posted: Monday, February 11, 2013 - 04:07 AM UTC
welcome roland,
that dio will look great.
all the best
paul
European Union
Joined: September 28, 2004
KitMaker: 2,186 posts
AeroScale: 1,587 posts
Posted: Wednesday, February 13, 2013 - 08:04 AM UTC
I have really started now with this campaign

I am building a Demon. No pictures yet as i have once made a review of this AZ model for Aeroscale and I can't yet show anything more than what is there.
Actually I don't really need the plane but an aeroscale campaign without a plane looks quite silly isn't it?
The "real job" has also started with asking around for the cost of a few things. Just wait and see.
The mission: Beat the stash.
Almost conquered: MIG-29, Blackhawk, Skyray, Skyraider, fouga
Main battle:Demon, Skyhawk, F-14, CH-53
Stash reserve:Blackhawk, CH-46, 47 en 53; SU-7, Eurofighter, mohawk, hellcat, F-16D, 6x Fouga Magister, Voodoo
British Columbia, Canada
Joined: September 03, 2009
KitMaker: 6,965 posts
AeroScale: 6,247 posts
Posted: Wednesday, February 13, 2013 - 09:13 AM UTC
Quoted Text
Actually I don't really need the plane but an aeroscale campaign without a plane looks quite silly isn't it?
Well, the plane doesn't necessarily need to be
complete.
When once you have tasted flight you will walk the Earth with your eyes turned skyward.
For there you have been, and there you will always long to return.
-Leonardo Da Vinci
England - South East, United Kingdom
Joined: February 05, 2008
KitMaker: 1,381 posts
AeroScale: 1,110 posts
Posted: Saturday, February 23, 2013 - 10:22 PM UTC
hi all,
a little bit of work done here...apart from decals and details the aircraft is nearly complete, next onto the car. the white metal car will be a basis for the german staff car, the white metal moulding is pretty rough so it'll take some work to knock it into shape.....now where did i put my dremel....

all the best paul
California, United States
Joined: August 01, 2010
KitMaker: 143 posts
AeroScale: 55 posts
Posted: Sunday, February 24, 2013 - 08:41 AM UTC
#259
Massachusetts, United States
Joined: October 23, 2011
KitMaker: 2,265 posts
AeroScale: 1,715 posts
Posted: Monday, March 04, 2013 - 08:34 AM UTC
I've gotten a start on my project for this campaign, which is US Army Caribou in the maintenance bay on Kwajalein.
you can see the aircraft shop building in this picture, you can even see a Caribou nose in -

I have gotten the basic structure done
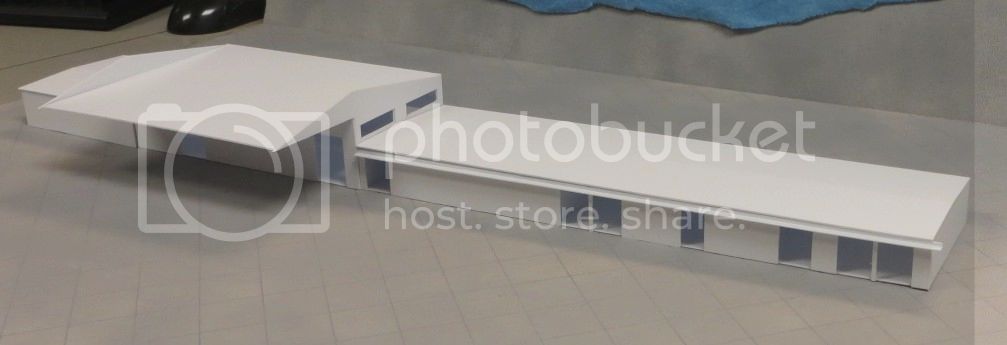
I havent looked at the Caribou kit recently. Im not sure where it is actually, but there is a lot of work do do on the building.


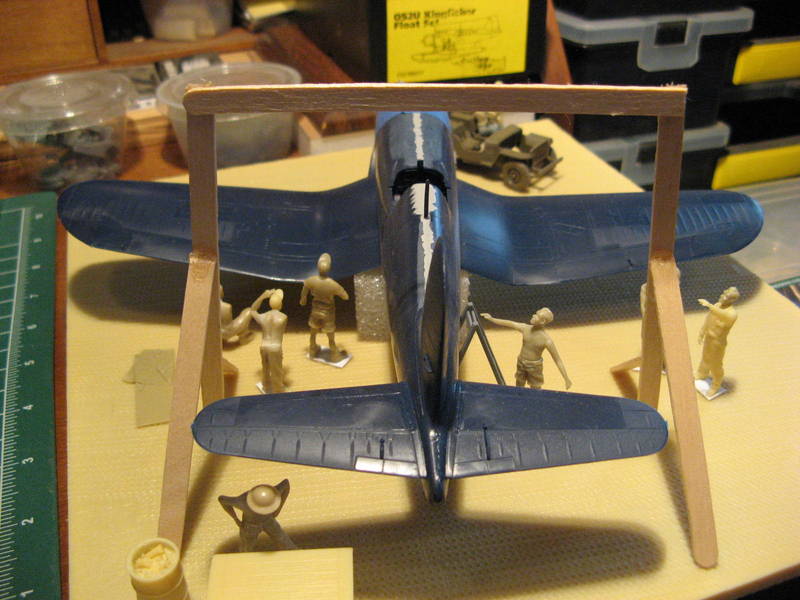
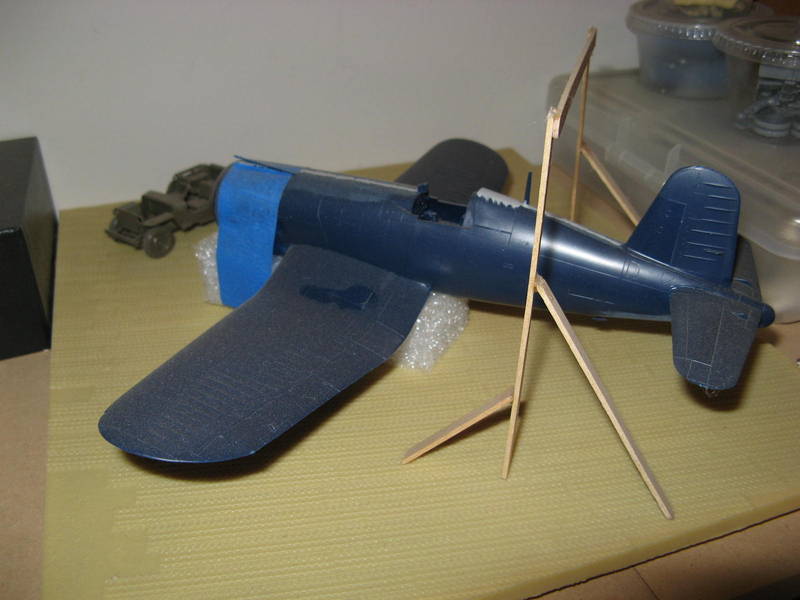 Just a mock up, I will be using a Tamiya Corsair 1D not this Hasegawa F4U4...


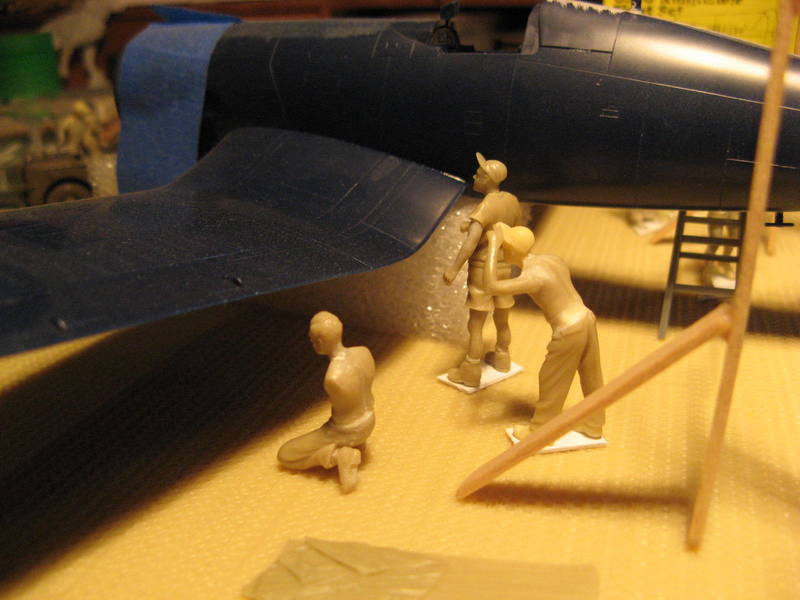
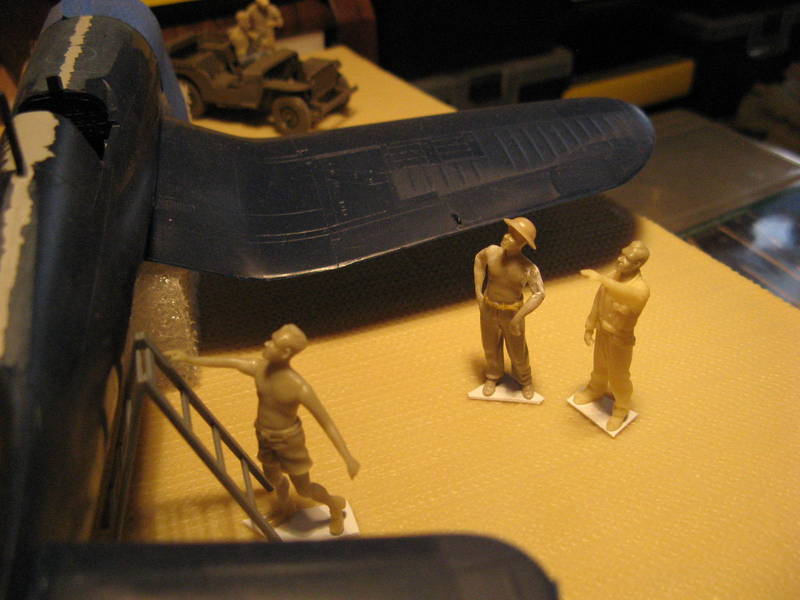

 I will add a humorous touch to this scene, the two guys looking up at the rear fuselage will be discussing the bird crap that was left after a goonie bird or a pelican defecated on the fuselage while perched atop the lift, the guy climbing the ladder will be holding a pail and a rag to wash it off. I will be scratch building this bird also taking off


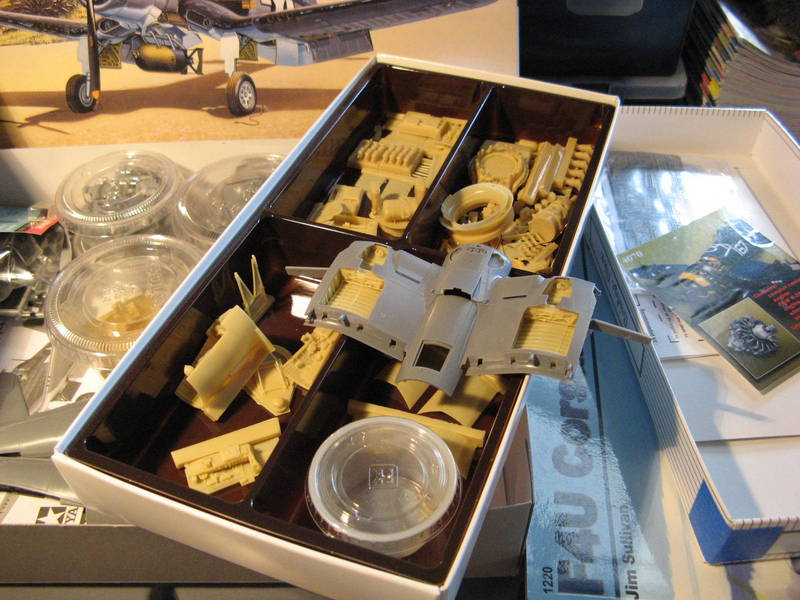
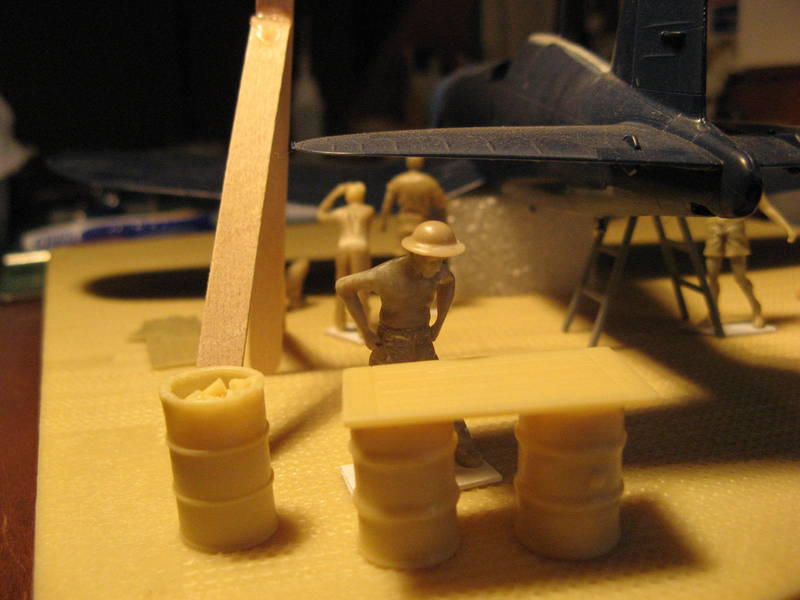
 Now a boatload of resin, just need to decide how much of it to use