

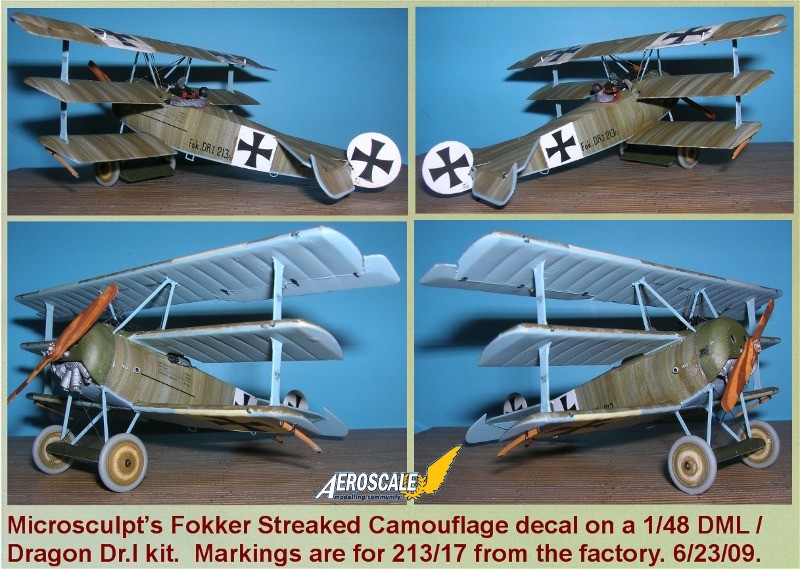
My first WW I aircraft build: Roden's 1/32 Dr.1.
Not starting the build yet, still plenty of time to go.
Cheers,
Julian
Early Aviation
Discuss World War I and the early years of aviation thru 1934.
Discuss World War I and the early years of aviation thru 1934.
Hosted by Jim Starkweather
KotS III GB Fokker Dr.I

Gremlin56
Joined: October 30, 2005
KitMaker: 3,897 posts
AeroScale: 564 posts
KitMaker: 3,897 posts
AeroScale: 564 posts
Posted: Sunday, February 03, 2013 - 07:56 AM UTC
Gremlin56
Joined: October 30, 2005
KitMaker: 3,897 posts
AeroScale: 564 posts
KitMaker: 3,897 posts
AeroScale: 564 posts
Posted: Monday, February 04, 2013 - 07:39 AM UTC
As I stated before this is my first WWI build so I am still puzzeling out what cabane struts are and how many turnbuckles I need etc. 
The reason I bought the Dr.I was because someone recommended it as a painless way to get into rigged aircraft. Well, that still remains to be seen. I will be ordering the Eduard PE set to add to the detailing and at the moment I am looking for reference material and after market add-ons. As soon as I have all the bit and pieces I will post some photos of the kick-off.
Cheers,
Julian

Jessie_C


Joined: September 03, 2009
KitMaker: 6,965 posts
AeroScale: 6,247 posts

Posted: Monday, February 04, 2013 - 08:49 AM UTC
Cabane struts are the ones that go between the fuselage and the upper wing, usually just in front of the cockpit. The ones holding the wings apart are usually called the interplane struts, or just wing struts
The Dr.I rigging was pretty minimal, just a pair or wires which cross between the forward pair of cabane struts, another pair between the forward landing gear struts and then the control wires. You'll only need 6 turnbuclkes, because the lower portions of the cabane strut rigging vanish into the upper fuselage to attach to the longerons inside.
The Dr.I rigging was pretty minimal, just a pair or wires which cross between the forward pair of cabane struts, another pair between the forward landing gear struts and then the control wires. You'll only need 6 turnbuclkes, because the lower portions of the cabane strut rigging vanish into the upper fuselage to attach to the longerons inside.
Gremlin56
Joined: October 30, 2005
KitMaker: 3,897 posts
AeroScale: 564 posts
KitMaker: 3,897 posts
AeroScale: 564 posts
Posted: Monday, February 04, 2013 - 09:04 AM UTC
Hi Jessie, thanks for the pointers. The rigging is pretty well non-existent and six turn-buckles won't break the bank 
Cheers,
Julian
Cheers,
Julian

Kornbeef

Joined: November 06, 2005
KitMaker: 1,667 posts
AeroScale: 1,551 posts

Posted: Monday, February 04, 2013 - 07:28 PM UTC
I'm not sure what level you intend to take this in terms of OOB to AMS insanity 
But a couple of points with this kit to prewarn you.
One is that the engine doesnt fit under the cowl without modding either or both. Thin the cowl or take a slivver off each cylinder. Of course if you dont require it to turn its easy to just chop the cylinder heads of the hidden cylinders.
Two is the tail centre section needs filling to match the erst of the tail (the part over the fuselage).
Three try to source after market decals Rodens Decals are notoriosly fragile and difficult to work with. Hannants did have a few nice options last time I checked.
As for reference. You might find the Windosck Fokker Dr.I Jagdstaffeln more than you need.
Keith
Gremlin56
Joined: October 30, 2005
KitMaker: 3,897 posts
AeroScale: 564 posts
KitMaker: 3,897 posts
AeroScale: 564 posts
Posted: Tuesday, February 05, 2013 - 03:55 AM UTC
Hi Keith, on this build testing the water here. I have been amazed at some of the magnificent WNW models built here but haven't taken that plunge yet. The Roden Dr.I looked interesting, tending to head towards Kemp's mount. After market is rather simple for this kit I would think. I see that Vector makes a replacement 1/32 engine, would that solve the problem in this case? As for reference I have a couple of books on the Dr.I so that should be okay. Just a case of not wanting to fudge up my first triplane Thanks for the advice,
cheers,
Julian
Thanks for the advice, cheers,
Julian

OEFFAG_153

Joined: February 19, 2010
KitMaker: 1,473 posts
AeroScale: 1,450 posts

Posted: Tuesday, February 05, 2013 - 08:47 PM UTC
Hi Julian,
Like Keith and Jessica already pointed out, the DR1 is a pretty nice kit to start your WWI modeling with. Both of them are a great source as to what needs to be fixed on any WWI kit.
Look forward to your build.
Mikael
Like Keith and Jessica already pointed out, the DR1 is a pretty nice kit to start your WWI modeling with. Both of them are a great source as to what needs to be fixed on any WWI kit.
Look forward to your build.
Mikael

lcarroll
Joined: July 26, 2010
KitMaker: 1,032 posts
AeroScale: 1,025 posts
Posted: Wednesday, February 06, 2013 - 02:24 AM UTC
Julian,
I built this Kit about 2 years back and I really like it. In addition to Keith's comments watch the fit of the "middle" wing to the fuselage, especially if you are adding detail and a frame to the cockpit. I also found the landing gear too flimsy and substituted brass for the struts. As for decals, I tried to use a few of the kit decals on another project; they simply disintegrated. Rowan at Pheon Decals has an excellent sheet, 32002 Fokker Dr.I of JGII that offers many really attractive schemes you may want to consider.
Good luck with your Build and I look forward to following your progress.
Cheers,
Lance
Gremlin56
Joined: October 30, 2005
KitMaker: 3,897 posts
AeroScale: 564 posts
KitMaker: 3,897 posts
AeroScale: 564 posts
Posted: Wednesday, February 06, 2013 - 07:50 AM UTC
Quoted Text
Hi Julian,
Like Keith and Jessica already pointed out, the DR1 is a pretty nice kit to start your WWI modeling with. Both of them are a great source as to what needs to be fixed on any WWI kit.
Look forward to your build.
Mikael
Hi Mikael,
Thank you for the very kind welcome message. Jessica was already a great help on the Sukhoi campaign and Keith has given me some good advice. I have gotten hold of the Eduard PE set for the Dr.1 and also some beautiful etched barrels and cooling jackets for the MG's. I will try the decals for the version I don't want to build. If they shatter I will try a spray of decalfix, and if that doesn't work I will bin them
Cheers,
Julian
Gremlin56
Joined: October 30, 2005
KitMaker: 3,897 posts
AeroScale: 564 posts
KitMaker: 3,897 posts
AeroScale: 564 posts
Posted: Wednesday, February 06, 2013 - 07:54 AM UTC
Quoted Text
Julian,
I built this Kit about 2 years back and I really like it. In addition to Keith's comments watch the fit of the "middle" wing to the fuselage, especially if you are adding detail and a frame to the cockpit. I also found the landing gear too flimsy and substituted brass for the struts. As for decals, I tried to use a few of the kit decals on another project; they simply disintegrated. Rowan at Pheon Decals has an excellent sheet, 32002 Fokker Dr.I's of JGII that offers many really attractive schemes you may want to consider.
Good luck with your Build and I look forward to following your progress.
Cheers,
Lance
Hi Lance,
Thank you for the advice on Roden's tri-plane. Seems that this kit has a few "quirks"that need to be mastered to be able to finish it. The advice concerning the undercart struts is interesting. Might replace them with brass tube.
Do you have a link to Pheon decals or can I find them by googling?
Thanks and cheers,
Julian
Kornbeef
Joined: November 06, 2005
KitMaker: 1,667 posts
AeroScale: 1,551 posts
Posted: Wednesday, February 06, 2013 - 08:20 AM UTC
Julian, just a heads up. regarding the flimsy undercarriage, Hammants stock metal replacements for these along with the cabane struts and axles. I spooted them today and ordered a set for my Encore F.I thats floating near the top of the stash.
Keith
Keith
lcarroll
Joined: July 26, 2010
KitMaker: 1,032 posts
AeroScale: 1,025 posts
Posted: Wednesday, February 06, 2013 - 08:22 AM UTC
Julian,
You can Email Rowan Broadbent at: [email protected]
and ask him to send you his on-line catalogue info. Outstanding service, selection, and quality.
Cheers,
Lance
You can Email Rowan Broadbent at: [email protected]
and ask him to send you his on-line catalogue info. Outstanding service, selection, and quality.
Cheers,
Lance
Gremlin56
Joined: October 30, 2005
KitMaker: 3,897 posts
AeroScale: 564 posts
KitMaker: 3,897 posts
AeroScale: 564 posts
Posted: Wednesday, February 06, 2013 - 08:26 AM UTC
Thank you very much Lance. I have sent a mail,
cheers,
Julian
cheers,
Julian
lcarroll
Joined: July 26, 2010
KitMaker: 1,032 posts
AeroScale: 1,025 posts
Posted: Wednesday, February 06, 2013 - 02:37 PM UTC
Quoted Text
Julian, just a heads up. regarding the flimsy undercarriage, Hammants stock metal replacements for these along with the cabane struts and axles. I spooted them today and ordered a set for my Encore F.I thats floating near the top of the stash.
Keith
Keith,
Who markets these replacement parts? Although happy with my scratch built "Strutz" ones it was a very "fiddly" process.
Cheers,
Lance

Kornbeef
Joined: November 06, 2005
KitMaker: 1,667 posts
AeroScale: 1,551 posts
Posted: Wednesday, February 06, 2013 - 07:28 PM UTC
Lance
The maker is Scale aircraft conversions
http://www.hannants.co.uk/product/SAC32036 is the link to them at Hannants so you can take a peek.
The maker is Scale aircraft conversions
http://www.hannants.co.uk/product/SAC32036 is the link to them at Hannants so you can take a peek.
Gremlin56
Joined: October 30, 2005
KitMaker: 3,897 posts
AeroScale: 564 posts
KitMaker: 3,897 posts
AeroScale: 564 posts
Posted: Saturday, February 09, 2013 - 03:27 AM UTC
February 9th update:
Getting the bits and pieces together now. I don't thing I am posting anything that has not been seen here before
Eduard photo-etch, Master barrels and cooling jackets, RB productions turn-buckles and I am waiting for some North Star eyelets. I really like Kempf's Dr.1 so I will give the decals a spray with liquid decal film before trying them. If they are unusable I will order on-line.


All for now,
cheers,
Julian
Getting the bits and pieces together now. I don't thing I am posting anything that has not been seen here before
Eduard photo-etch, Master barrels and cooling jackets, RB productions turn-buckles and I am waiting for some North Star eyelets. I really like Kempf's Dr.1 so I will give the decals a spray with liquid decal film before trying them. If they are unusable I will order on-line.
All for now,
cheers,
Julian
Gremlin56
Joined: October 30, 2005
KitMaker: 3,897 posts
AeroScale: 564 posts
KitMaker: 3,897 posts
AeroScale: 564 posts
Posted: Friday, February 15, 2013 - 05:17 AM UTC
Update February 15th:
Started work on my Dr.1. Sprayed the engine with Alclad burnt metal and painted details with Vallejo liquid metals. Added ignition lines on the cylinders that will be visible. Weathered with a wash of Vallejo black wash.Trying to reproduce the two part cowling. Not sure if I will leave it like this or file it down and add rivets with my trusty punch and die. The undercart wing has been filed down and the two jack-pads have been added.


First attempt at the seat frame, Not even sure why I am bothering with this because it won't be very visible:

All for the moment, dividing my time between the Flea, (Anthony Fokker's Dr.1) and the Whale, ( Blohm and Voss shipyard's Bismarck).
Cheers,
Julian
Started work on my Dr.1. Sprayed the engine with Alclad burnt metal and painted details with Vallejo liquid metals. Added ignition lines on the cylinders that will be visible. Weathered with a wash of Vallejo black wash.Trying to reproduce the two part cowling. Not sure if I will leave it like this or file it down and add rivets with my trusty punch and die. The undercart wing has been filed down and the two jack-pads have been added.
First attempt at the seat frame, Not even sure why I am bothering with this because it won't be very visible:
All for the moment, dividing my time between the Flea, (Anthony Fokker's Dr.1) and the Whale, ( Blohm and Voss shipyard's Bismarck).
Cheers,
Julian

DanielMoscatelli

Joined: August 22, 2011
KitMaker: 998 posts
AeroScale: 20 posts
Posted: Friday, February 15, 2013 - 07:39 AM UTC
Now I understand the silence of radio of this last week ...  .... jejejej
 Enjoy with this Dr1!!!
My friend you do not have peace!!!
I will be guarding jajajajja
My Regards for All
Gremlin56
Joined: October 30, 2005
KitMaker: 3,897 posts
AeroScale: 564 posts
KitMaker: 3,897 posts
AeroScale: 564 posts
Posted: Friday, February 15, 2013 - 07:48 AM UTC
Gremlin56
Joined: October 30, 2005
KitMaker: 3,897 posts
AeroScale: 564 posts
KitMaker: 3,897 posts
AeroScale: 564 posts
Posted: Friday, March 01, 2013 - 07:17 PM UTC
March 2nd update:
Most of my attention has been focused on my Bismarck build but I have made some progress on Kemp's Dr.1 and I am beginning to understand the challenge of building these small aircraft models. I have made my first attempt at hand painting a laminated wood propeller:


The boss plate still has to be washed to make the details pop but the lamination effect I am quite happy with for a first go.
I have also had my first brush in, ( excuse the pun), with Anthony's hand slapped olive paint job. I sprayed the wing with a suitable bleached linen colour and then using a fan brush drew a layer of Abteilung olive drab oil over the wing. After this I cleaned the brush and made several more passes removing a lot of the oil. The process will be repeated in places with a darker green today. Any comments on this process are welcome, I am quite happy with how this is turning out. At first the process really freaked me out but I think I might just pull the effect off


Cheers,
Julian
Most of my attention has been focused on my Bismarck build but I have made some progress on Kemp's Dr.1 and I am beginning to understand the challenge of building these small aircraft models. I have made my first attempt at hand painting a laminated wood propeller:
The boss plate still has to be washed to make the details pop but the lamination effect I am quite happy with for a first go.
I have also had my first brush in, ( excuse the pun), with Anthony's hand slapped olive paint job. I sprayed the wing with a suitable bleached linen colour and then using a fan brush drew a layer of Abteilung olive drab oil over the wing. After this I cleaned the brush and made several more passes removing a lot of the oil. The process will be repeated in places with a darker green today. Any comments on this process are welcome, I am quite happy with how this is turning out. At first the process really freaked me out but I think I might just pull the effect off
Cheers,
Julian
DanielMoscatelli
Joined: August 22, 2011
KitMaker: 998 posts
AeroScale: 20 posts
Posted: Saturday, March 02, 2013 - 03:05 AM UTC
Great work Julian. But even I dont understand the final result that you try with the wings. Im attentive.!!! Regards Daniel
Gremlin56
Joined: October 30, 2005
KitMaker: 3,897 posts
AeroScale: 564 posts
KitMaker: 3,897 posts
AeroScale: 564 posts
Posted: Saturday, March 02, 2013 - 03:43 AM UTC
Hi Daniel,
This is Anthony Fokker's idea of how a factory fresh finish should look
It's green paint slopped over linen.
This is the aircraft I want to copy:


Long way to go yet though
Cheers,
Julian
This is Anthony Fokker's idea of how a factory fresh finish should look
It's green paint slopped over linen.
This is the aircraft I want to copy:
Long way to go yet though
Cheers,
Julian

JackFlash

Joined: January 25, 2004
KitMaker: 11,669 posts
AeroScale: 11,011 posts
Posted: Saturday, March 02, 2013 - 08:28 AM UTC
Gremlin56
Joined: October 30, 2005
KitMaker: 3,897 posts
AeroScale: 564 posts
KitMaker: 3,897 posts
AeroScale: 564 posts
Posted: Saturday, March 02, 2013 - 08:42 AM UTC
Thank you very much Stephen,
a very interesting article,
cheers,
Julian
a very interesting article,
cheers,
Julian
Gremlin56
Joined: October 30, 2005
KitMaker: 3,897 posts
AeroScale: 564 posts
KitMaker: 3,897 posts
AeroScale: 564 posts
Posted: Monday, March 04, 2013 - 06:51 PM UTC
I have run into some "strong head-winds" on the build combining oil and acrylic paints. Had to strip off the paint and am back to step one. A positive side effect to this sort of occurrence is that I realize where I plooked things and now can start my offensive with more confidence.
Cheers,
Julian
Cheers,
Julian
 |

WEB HOSTING BY


Copyright ©2021 AeroScale and Kitmaker Network, a subsidiary of Silver Star Enterprises
All Rights Reserved. Please read our Conditions of Use and Privacy Policy.
All Rights Reserved. Please read our Conditions of Use and Privacy Policy.