Hosted by Rowan Baylis
1:32 Revell P-51B "BIG MAC Junior"
FlorinM

Joined: August 01, 2011
KitMaker: 385 posts
AeroScale: 173 posts

Posted: Tuesday, June 04, 2013 - 11:04 PM UTC
I normally build Luftwaffe aircraft, but I like the Razorback Mustang from an aesthetic point of view. I saw the Revell 1:32 kit at a friend and found that, in spite of its age -being first released in 1969- its flaws can be corrected much easier than those of the Trumpeter kit. So, the first chance I got, I purchased one, together with some after-market sets: from Aires the cockpit, the gun bay (it is crap, won't use it) and the landing gear bay, Scale Aircraft Conversions' metal gear, and from Quickboost the exhaust, underwing pylons and propeller blades, the Eduard set for the Revell kit , and from HGW the seatbelts. It will depict Capt John Brown Jr's bird, using Lifelike Decals set 32-015. Feedback is VITAL, as I know next to nothing about this aircraft. PLEASE help me, if you spot errors and inaccuracies, point them out!
FlorinM

Joined: August 01, 2011
KitMaker: 385 posts
AeroScale: 173 posts

Posted: Tuesday, June 04, 2013 - 11:41 PM UTC
I started by correcting the width issue of the top cowling of the Revell kit, it is two millimeters too narrow. An easy fix: cut it down the middle, glue a strip of styrene...
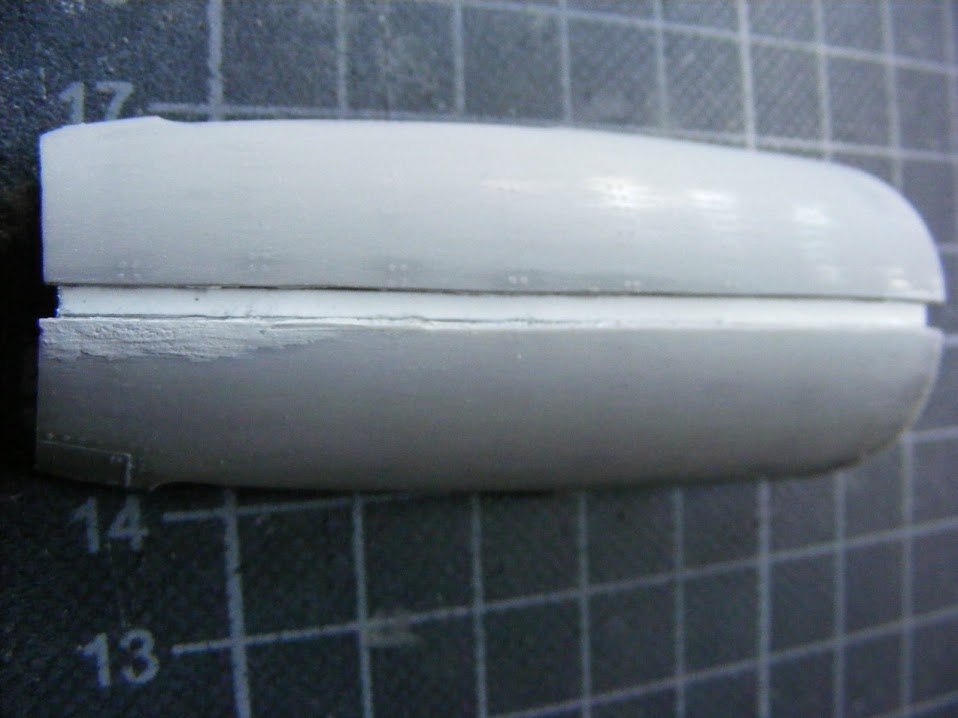
... and then milliput it over
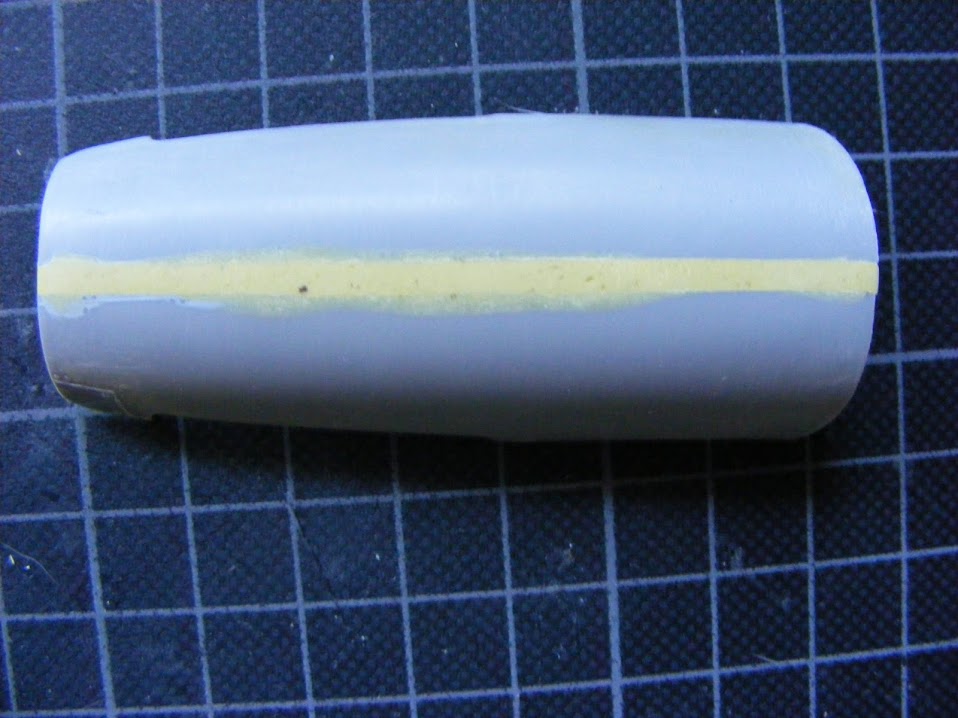
Late edit: After consulting scale drawings, the author of this build blog has found that two millimeters should only be added to the front of the cowling, while at the rear only half a millimeter.

... and then milliput it over

Late edit: After consulting scale drawings, the author of this build blog has found that two millimeters should only be added to the front of the cowling, while at the rear only half a millimeter.
bdanie6

Joined: November 09, 2008
KitMaker: 615 posts
AeroScale: 459 posts

Posted: Wednesday, June 05, 2013 - 02:01 AM UTC
Florin, I have to say that I have not seen a good review of this kit, so I am going to be following your build with much interest. 
So far , just the cowling correction, looks like a good, easy fix
Good luck
Later

So far , just the cowling correction, looks like a good, easy fix

Good luck

Later

FlorinM

Joined: August 01, 2011
KitMaker: 385 posts
AeroScale: 173 posts

Posted: Wednesday, June 05, 2013 - 02:14 AM UTC
The kit does require some work, but, apart from the spinner that is undersized, has few other major issues. If you are interested I will post a side by side comparison of the two plastic P-51B'S available in 1:32, the Revell and the Trumpeter.
FlorinM

Joined: August 01, 2011
KitMaker: 385 posts
AeroScale: 173 posts

Posted: Wednesday, June 05, 2013 - 06:20 AM UTC
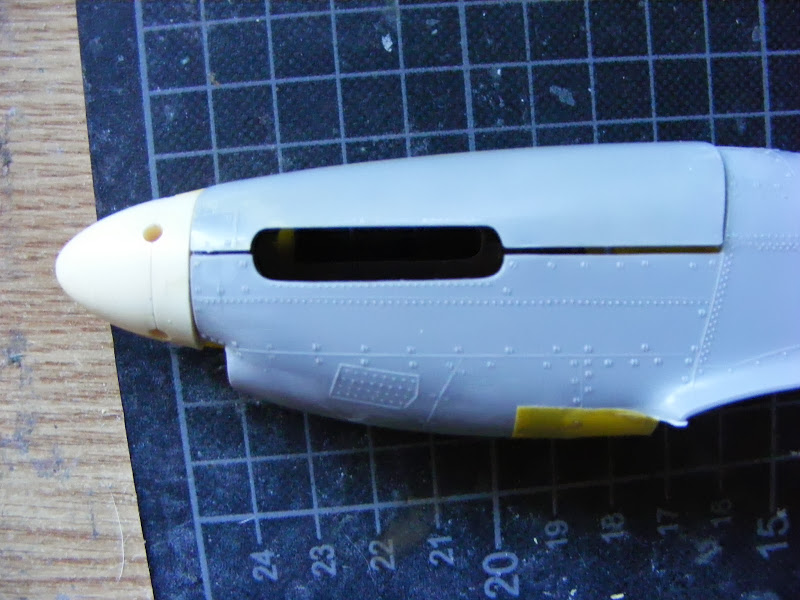
A dry fit test of the improved nose. I'm using a home made resin copy of the Hasegawa D spinner.

FlorinM

Joined: August 01, 2011
KitMaker: 385 posts
AeroScale: 173 posts

Posted: Wednesday, June 05, 2013 - 11:08 PM UTC
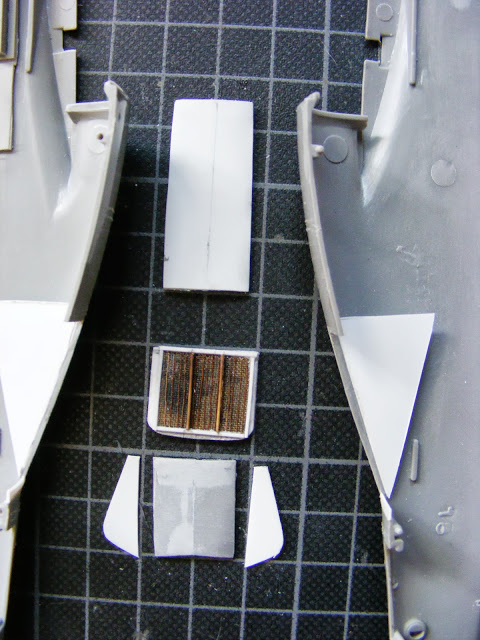
The components of the radiator well are fabricated. All that is missing is an actuating rod.

Joel_W

Joined: December 04, 2010
KitMaker: 11,666 posts
AeroScale: 7,410 posts

Posted: Thursday, June 06, 2013 - 03:37 AM UTC
Florin, I to will be following your build with much interest, especially since the kit is of 1969 vintage.
Joel
Joel
FlorinM

Joined: August 01, 2011
KitMaker: 385 posts
AeroScale: 173 posts

Posted: Thursday, June 06, 2013 - 05:32 AM UTC
Enjoy! The old Revell kit is the best starting point between the two choices. The Revell shapes are pretty much spot on and one only has to tweak the details, a much easier job than completely rebuilding the fuselage and wings for the Trumpeter kit.
bdanie6

Joined: November 09, 2008
KitMaker: 615 posts
AeroScale: 459 posts

Posted: Thursday, June 06, 2013 - 09:30 PM UTC
Florin, the radiator looks good. Yes it is easier to modify what you have rather than fabricate the entire part yourself. That being said, the new spinner looks great.
Since I didn't know there were issues with the Trumpeter P-51B kit, a side-by-side build would be much appreciated
Later
Since I didn't know there were issues with the Trumpeter P-51B kit, a side-by-side build would be much appreciated

Later

FlorinM

Joined: August 01, 2011
KitMaker: 385 posts
AeroScale: 173 posts

Posted: Thursday, June 06, 2013 - 11:14 PM UTC
It is not a side by side build, a friend has the Trumpy kit and has allowed me to take some pictures. I will point out the more blatant issues. The Hadegawa P-51 D, known to be accurate both in outline and shape will serve as a benchmark.
Three fuselages from top to bottom: Revell, Hasegawa and Trumpeter. The Trumpeter nose is way too pointy

The Revell kit (bottom half), always criticized for its nose too sharp, has minor issues on the nose compared with its newer and pointier counterpart:
Trumpeter (bottom half) blew it with the top of the fuselage, too:

Trumpeter on top. The 90 degree angle bottom is wrong, it was supposed to be rounded!
Same on top, the bottom being the Hasegawa D fuselage. You can see fuselage contour discrepancies as in the picture above. The Revell kit follows the contour of the Hasegawa.

Both kits have wrong panel lines that need to be rescribed, but it is a much easier task on the Revell kit given its raised details that only need to be sanded down.
Three fuselages from top to bottom: Revell, Hasegawa and Trumpeter. The Trumpeter nose is way too pointy

The Revell kit (bottom half), always criticized for its nose too sharp, has minor issues on the nose compared with its newer and pointier counterpart:

Trumpeter (bottom half) blew it with the top of the fuselage, too:

Trumpeter on top. The 90 degree angle bottom is wrong, it was supposed to be rounded!

Same on top, the bottom being the Hasegawa D fuselage. You can see fuselage contour discrepancies as in the picture above. The Revell kit follows the contour of the Hasegawa.

Both kits have wrong panel lines that need to be rescribed, but it is a much easier task on the Revell kit given its raised details that only need to be sanded down.
FlorinM

Joined: August 01, 2011
KitMaker: 385 posts
AeroScale: 173 posts

Posted: Thursday, June 06, 2013 - 11:22 PM UTC
The Mustang had an laminar flow wing. The old kit has the correct wing profile, the bucket manufacturer does not...
Revell, good:

Trumpeter, bad:

Here is the wing profile for the Hasegawa kit, in spite of a redesigned wing root, it still has the laminar flow profile:

The wingspan of the Trumpeter kit is shorter by 5 millimeters, wheel wells are generally accurate on both kits, the Revell one being too shallow and integral to the bottom wing. Landing flaps on the Revell kit are 2 millimeters too narrow, while their Trumpeter counterparts need to be longer by almost 5 millimeters. Panel lines more accurate with regard to size and position on the Revell kit.
In conclusion if I had the Trumpeter kit I would have to rebuild the fuselage in a proportion of 90% and build a new wing at more than seven times the cost of the Revell kit. Simply unacceptable!
Revell, good:

Trumpeter, bad:

Here is the wing profile for the Hasegawa kit, in spite of a redesigned wing root, it still has the laminar flow profile:

The wingspan of the Trumpeter kit is shorter by 5 millimeters, wheel wells are generally accurate on both kits, the Revell one being too shallow and integral to the bottom wing. Landing flaps on the Revell kit are 2 millimeters too narrow, while their Trumpeter counterparts need to be longer by almost 5 millimeters. Panel lines more accurate with regard to size and position on the Revell kit.
In conclusion if I had the Trumpeter kit I would have to rebuild the fuselage in a proportion of 90% and build a new wing at more than seven times the cost of the Revell kit. Simply unacceptable!
Joel_W

Joined: December 04, 2010
KitMaker: 11,666 posts
AeroScale: 7,410 posts

Posted: Friday, June 07, 2013 - 02:03 AM UTC
Florin, your comparison of the Trumpy and Revell fuselage shapes to the now standard Hasegawa P51, really makes it very obvious to see the issues you were alluding to.
Joel
Joel
bdanie6

Joined: November 09, 2008
KitMaker: 615 posts
AeroScale: 459 posts

Posted: Friday, June 07, 2013 - 08:49 AM UTC
Florin, thank you for the time and effort you put into that review. 

I still find it absolutely amazing that 2 companies can look at one object and come out with 2 so dissimilar kits.

Still looking forward to your build
Later


I still find it absolutely amazing that 2 companies can look at one object and come out with 2 so dissimilar kits.


Still looking forward to your build
Later

FlorinM

Joined: August 01, 2011
KitMaker: 385 posts
AeroScale: 173 posts

Posted: Tuesday, June 11, 2013 - 12:08 AM UTC
Although designed for the Trumpeter kit, the Aires cockpit walls fit like a glove to the Revell oldie, a little cleanup, a little glue... and it's perfect!


Joel_W

Joined: December 04, 2010
KitMaker: 11,666 posts
AeroScale: 7,410 posts

Posted: Tuesday, June 11, 2013 - 01:27 AM UTC
Florin, I'm still amazed that Trumpeter, with all the available computer technology, could make that many major shape and profile issues. The old Revell issue shows that when the time and effort is put in, the results speak for themselves.
Before your side by side comparison, I would have just assumed that the Trumpy kit was the better of the two simply because it's so much newer.
Joel
Before your side by side comparison, I would have just assumed that the Trumpy kit was the better of the two simply because it's so much newer.
Joel
FlorinM

Joined: August 01, 2011
KitMaker: 385 posts
AeroScale: 173 posts

Posted: Tuesday, June 11, 2013 - 02:30 AM UTC
What is really sad is the fact that the Mustang is not just some obscure aircraft, documentation is plentiful and there are some real life aircraft to measure, too... For now the best P-51 B/C available in 1:32nd is the Rutman resin kit. Sadly there is only one option available in plastic, and it's vintage 1969, with its reissues from time to time. A little work is required, true, but it will look great in the end!
With regard to Trumpeter, sadly their P-51 B is a missed opportunity.
Hope that a major kit manufacturer will sooner or later release a decent Razorback Mustang in 1:32!
With regard to Trumpeter, sadly their P-51 B is a missed opportunity.
Hope that a major kit manufacturer will sooner or later release a decent Razorback Mustang in 1:32!
FlorinM

Joined: August 01, 2011
KitMaker: 385 posts
AeroScale: 173 posts

Posted: Thursday, June 13, 2013 - 03:07 AM UTC
I replicated the wooden floor of the cockpit. Can anybody please tell me if the floor was painted black just like that of the D version or was it lacquered?


bdanie6

Joined: November 09, 2008
KitMaker: 615 posts
AeroScale: 459 posts

Posted: Thursday, June 13, 2013 - 07:28 AM UTC
Actually Florin, the floor in the B/C Mustangs was the top of the wing. When the fuselage and the wing were mated together, the wing became the cockpit floor, fuel gauges were added for left and right wing tank levels and the whole thing was painted zinc chromate and then zinc chromate green.
In this picture from the flight manual for a P-51B-1NA, on the upper right hand picture you can just see the floor and the rivets holding the wing together.

What you can't see is that he floor is curved to follow the laminar flow shape of the wing itself.
Hope this helps you
Later
In this picture from the flight manual for a P-51B-1NA, on the upper right hand picture you can just see the floor and the rivets holding the wing together.

What you can't see is that he floor is curved to follow the laminar flow shape of the wing itself.
Hope this helps you

Later

FlorinM

Joined: August 01, 2011
KitMaker: 385 posts
AeroScale: 173 posts

Posted: Thursday, June 13, 2013 - 07:57 AM UTC
The top of the wing floor was specific to the Allison powered Mustangs. On page 60 of P-51 Mustang in detail and scale, part 1, by Bert Kinzey, ISBN 1-888974-02-8 it says: "On Merlin powered Mustangs, to include the P-51B and P-51C, a wood floor was added inside the cockpit" and pictures show said wood floor with the holes for the fuel gauges.
Moreover the Tamiya 1:48 P-51B, while an excellent kit, has received serious Flak for the metal, curved floor rendered instead of the boarded one.
Moreover the Tamiya 1:48 P-51B, while an excellent kit, has received serious Flak for the metal, curved floor rendered instead of the boarded one.

Jessie_C


Joined: September 03, 2009
KitMaker: 6,965 posts
AeroScale: 6,247 posts

Posted: Thursday, June 13, 2013 - 08:41 AM UTC
What about giving the floor a nice black wash, sanding off the wear areas, then applying more layers of wash in the corners and going over everything with a dust-coloured drybrushing? That should give you a nice lived-in look while avoiding the question of what colour it should have been.
FlorinM

Joined: August 01, 2011
KitMaker: 385 posts
AeroScale: 173 posts

Posted: Thursday, June 13, 2013 - 08:52 AM UTC
That I'll do, thank you!
FlorinM

Joined: August 01, 2011
KitMaker: 385 posts
AeroScale: 173 posts

Posted: Friday, June 21, 2013 - 05:45 PM UTC
The Aires seat is a good base for improvement, lightening holes were drilled and a handle was added on the right side:


FlorinM

Joined: August 01, 2011
KitMaker: 385 posts
AeroScale: 173 posts

Posted: Saturday, June 22, 2013 - 01:00 AM UTC
The seat, part two: I've enlarged the central hole. Next to the seat is the kapok filled cushion/dinghy


Joel_W

Joined: December 04, 2010
KitMaker: 11,666 posts
AeroScale: 7,410 posts

Posted: Saturday, June 22, 2013 - 04:06 AM UTC
Florin, the seat details are looking good.
Joel
Joel
FlorinM

Joined: August 01, 2011
KitMaker: 385 posts
AeroScale: 173 posts

Posted: Saturday, June 22, 2013 - 08:36 PM UTC
I know it's not perfect, but one does what one can...
How much will be visible in the end is unknown, but the seat is done (minus seatbelts and paint job).

How much will be visible in the end is unknown, but the seat is done (minus seatbelts and paint job).

 |


