I've been looking forward to GWH 1/48 scale F-15C MSIP 11 Eagle since it was announced. This is their 2nd Eagle release: the F-15 B/D being their 1st, and has all the needed corrections from the 2nd run. While I'm by no means a rivet counter, with today's computer aided CAD programs, I do expect the finished model to be a close representation.
Rowan has already done a fantastic, and super detailed in box review, so there is really no point in me adding my 2 cents. All I can say is that I've never seen so many sprue trees and parts for a 1/48 scale jet before. Needless to say, I'm more then impressed with the kit.
The only issue I have with the kit is the decal sheet, as it's rather uninspiring offering, Don't misinterpret poor decals, as the 2 sheets including comprehensive stencils looks fantastic, but rather a somewhat more colorful option of markings, so I just might go with an after market set.
One of the few AM parts I've opted for on both my F-4B and A-63 builds was resin ejection seats. The Aces 11 seat in the kit really looks quite nice.
I decided to remove the molded on shoulder harness and securing straps and use a combination of PE extras and Masking Tape to replace them. The kit doesn't come with seatbelts, so adding the double set of seatbelts was that much quicker.
I grab handles are just painted yellow for now, but once the seat is sealed, weathered with a wash, I'll use a fine tip black marker to add the black stripes.
Joel
Modern (1975-today)
Discuss the modern aircraft age from 1975 thru today.
Hosted by Jim Starkweather
GWH 1/48 scale F-15C Eagle
Joel_W
Associate Editor
New York, United States
Joined: December 04, 2010
KitMaker: 11,666 posts
AeroScale: 7,410 posts
Joined: December 04, 2010
KitMaker: 11,666 posts
AeroScale: 7,410 posts
Posted: Sunday, December 07, 2014 - 11:00 PM UTC
chris1
Auckland, New Zealand
Joined: October 25, 2005
KitMaker: 949 posts
AeroScale: 493 posts
Joined: October 25, 2005
KitMaker: 949 posts
AeroScale: 493 posts
Posted: Thursday, December 11, 2014 - 09:30 AM UTC
Hi Joel
Following along.
Chris
Following along.
Chris
Joel_W
Associate Editor
New York, United States
Joined: December 04, 2010
KitMaker: 11,666 posts
AeroScale: 7,410 posts
Joined: December 04, 2010
KitMaker: 11,666 posts
AeroScale: 7,410 posts
Posted: Thursday, December 11, 2014 - 10:10 PM UTC
Chris,
Welcome to my latest modeling journey.
Joel
Welcome to my latest modeling journey.
Joel
Posted: Thursday, December 11, 2014 - 11:43 PM UTC
Interesting decal sheet. The 104th is stationed about 5 miles from where I am working right now.
I see those guys hot roding around all the time.
Posted: Thursday, December 11, 2014 - 11:45 PM UTC
I think this may be another build to watch the progress of Joel.
Joel_W
Associate Editor
New York, United States
Joined: December 04, 2010
KitMaker: 11,666 posts
AeroScale: 7,410 posts
Joined: December 04, 2010
KitMaker: 11,666 posts
AeroScale: 7,410 posts
Posted: Friday, December 12, 2014 - 01:48 AM UTC
Quoted Text
Interesting decal sheet. The 104th is stationed about 5 miles from where I am working right now.
I see those guys hot roding around all the time.
Jonathan,
Here on LI, there really isn't any military over fly flights as the defense industry is all but gone, and exists basically in name only. The ANG out east only flies helicopters these days, so seeing a fighter or any current military aircraft is few and far between.
Still haven't ordered the decal sheet, but I'm months and months from decaling.
Joel
Joel_W
Associate Editor
New York, United States
Joined: December 04, 2010
KitMaker: 11,666 posts
AeroScale: 7,410 posts
Joined: December 04, 2010
KitMaker: 11,666 posts
AeroScale: 7,410 posts
Posted: Friday, December 12, 2014 - 01:52 AM UTC
Quoted Text
I think this may be another build to watch the progress of Joel.
Darren,
Glad you're joining the party.
This afternoon I finished up the Aces 11 seat with the black stripes on the grab handles, detail painted the top of the harness assembly so it looks like separate belts, and weathered the seat and back cushion and belts. I've just started the cockpit and IP. Will be posting the next update in a few days.
Joel
Joel_W
Associate Editor
New York, United States
Joined: December 04, 2010
KitMaker: 11,666 posts
AeroScale: 7,410 posts
Joined: December 04, 2010
KitMaker: 11,666 posts
AeroScale: 7,410 posts
Posted: Friday, December 12, 2014 - 06:21 AM UTC
Thought I'd would do a quick update since I've finished the kit seat. I modified the top of the shoulder harnesses so that where they attach to the seat they look like 4 individual belts. I used a black ultra fine tip marker to add the black lines to the hand grips. Finally, a few washes of Raw Umber enamel paint heavily thinned, and liberally applied to seat cushions and belts. The Aces 11 seat is just loosely fitted into the cockpit. It actually fits between the two support rails, but the fit is very tight, and I didn't want to take a chance on breaking one of them.
As you can see I started the cockpit sub assembly, which is about the most detailed kit cockpit I've ever seen. The side walls have almost as much detail as a resin cockpit. And for my display purposes it's more then adequate. Here's the start of the side walls.
The main section of the cockpit and the electronics bay are well detailed. And everything fits perfectly. Just amazing.
The instrument panel is beautifully modeled with excellent detail. But I was concerned that the instrument faces were just a little too shallow after the instrument decals were added and lenses made from Pledge, so I decided to drill all of them out, then make a back plate from .040 sheet.
Finally I test fitted the two sides, and the IP to get a sense of how it would look, and how good the fit is. Well, it looks outstanding, and the fit is 100% perfect.
Thanks to all for stopping by.
Joel
Joel_W
Associate Editor
New York, United States
Joined: December 04, 2010
KitMaker: 11,666 posts
AeroScale: 7,410 posts
Joined: December 04, 2010
KitMaker: 11,666 posts
AeroScale: 7,410 posts
Posted: Sunday, December 14, 2014 - 11:07 PM UTC
Well, yesterday I finally finished the cockpit. I added the tops of the electrical boxes, as well as the handles, then I masked and airbrushed them Nato Black. When the paint had dried, I dry brushed everything that had an edge or raised detail with a medium gray acrylic paint, and let it dry for a hour or so. Next up was a wash of Burnt Umber enamel paint, that helped to bring out the details in the electrical compartment behind the cockpit.
I finished up the IP and made all the lenses out of Pledge. My biggest issue is that most of them looks completely black in the pictures. It's really a lot harder to photograph then I thought.
the seat is just test fitted in, and the flight stick was left out for now.
I constructed the front wheel well which went together perfectly, then air brushed on Tamiya Gray Primer, followed by Nato Black, then Tamiya Gloss White. When dry it also received a wash of Burnt Umber to bring out the excellent molded on detail.
I was real curious to see how the cockpit shell would fit into the front sub assembly of the fuselage. The fit was perfect. As a matter of fact, I was amazed that the two halves when joined fit so well, that they stayed together without any tape. Lets hope that the rest of the major sub assemblies have this good of a fit.
Thanks for stopping by and having a look.
Joel
Posted: Monday, December 15, 2014 - 12:09 PM UTC
Hi Joel
It's looking really good. Lovely neat job drilling out the instrument bezels.
All the best
Rowan
It's looking really good. Lovely neat job drilling out the instrument bezels.
All the best
Rowan
Joel_W
Associate Editor
New York, United States
Joined: December 04, 2010
KitMaker: 11,666 posts
AeroScale: 7,410 posts
Joined: December 04, 2010
KitMaker: 11,666 posts
AeroScale: 7,410 posts
Posted: Monday, December 15, 2014 - 05:58 PM UTC
Quoted Text
Hi Joel
It's looking really good. Lovely neat job drilling out the instrument bezels.
All the best
Rowan
Rowan,
Thanks for stopping by, and liking what you've seen so far.
I've decided that I rather close up the two instrument compartments, and most likely the front radar as well, as I prefer a more ready for flight look. I was really surprised that both panels are an excellent fit, with just a little bit of filler needed on the lower seam of each.
Joel
chris1
Auckland, New Zealand
Joined: October 25, 2005
KitMaker: 949 posts
AeroScale: 493 posts
Joined: October 25, 2005
KitMaker: 949 posts
AeroScale: 493 posts
Posted: Tuesday, December 16, 2014 - 01:57 AM UTC
Hi Joel
Looks good,which markings are you going with the Hi vis or low vis?
Cheers
Chris
Looks good,which markings are you going with the Hi vis or low vis?
Cheers
Chris
Joel_W
Associate Editor
New York, United States
Joined: December 04, 2010
KitMaker: 11,666 posts
AeroScale: 7,410 posts
Joined: December 04, 2010
KitMaker: 11,666 posts
AeroScale: 7,410 posts
Posted: Tuesday, December 16, 2014 - 07:45 PM UTC
Quoted Text
Hi Joel
Looks good,which markings are you going with the Hi vis or low vis?
Cheers
Chris
Chris,
Still haven't totally decided on getting the Caracal decals, but the odds get better everyday. I'd definitely go with the Hi-Vis option, as that is the whole point of getting the AM sheet. If I wanted Low-Vis markings, the kit decals would do just fine.
The 2nd reason for wanting the Caracal decals, is that it would be the 3rd AM decal company I've tried on the last 3 builds: Fightertown, & Kit World being the two others. And both were truly outstanding. Back in the 70's, 99% of the AM decals were Microscale, and I tended to buy a sheet for every new 1/72 scale build. Strange that I haven't even looked at their offerings yet.
Joel
Removed by original poster on 12/19/14 - 20:26:43 (GMT).
Joel_W
Associate Editor
New York, United States
Joined: December 04, 2010
KitMaker: 11,666 posts
AeroScale: 7,410 posts
Joined: December 04, 2010
KitMaker: 11,666 posts
AeroScale: 7,410 posts
Posted: Friday, December 19, 2014 - 02:20 AM UTC
With the cockpit now complete minus the Hud Shroud, Hud, Aces 11 ejection seat, and the control stick, I turned my attention to the lower fuselage assembly. For some strange reason GWH calls this sub assemby the upper fuselage assembly. Go figure.
There are just 3 main parts to the assembly, the lower fuselage, and both lower halves of the wings.
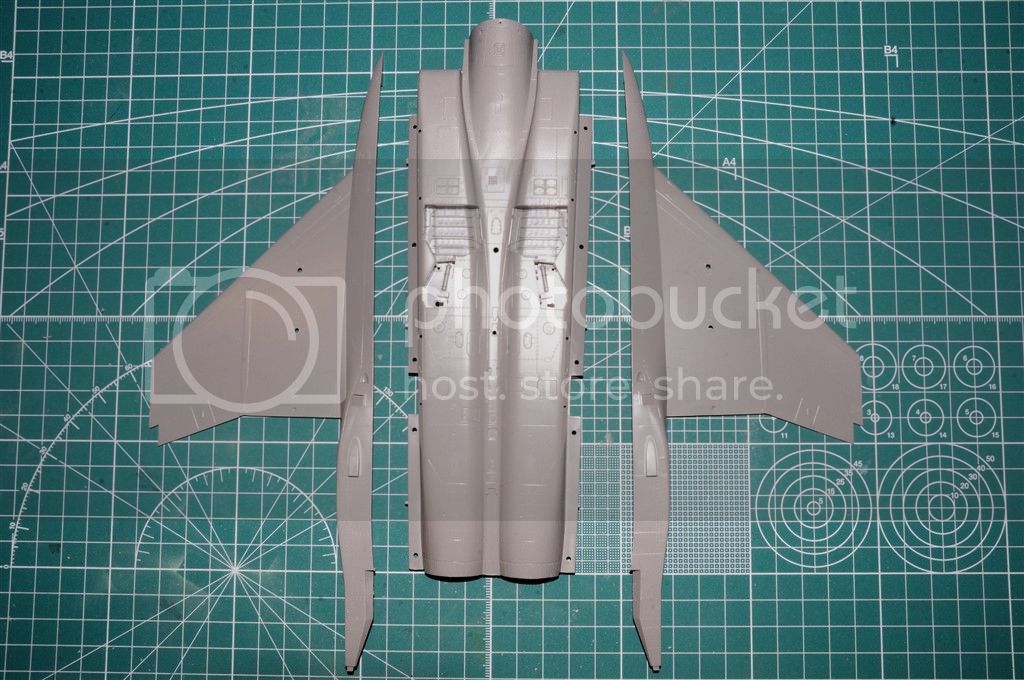
Each wing assembly attaches to the fuselage by 3 locating pins. The fit is absolutely perfect. It's that good.
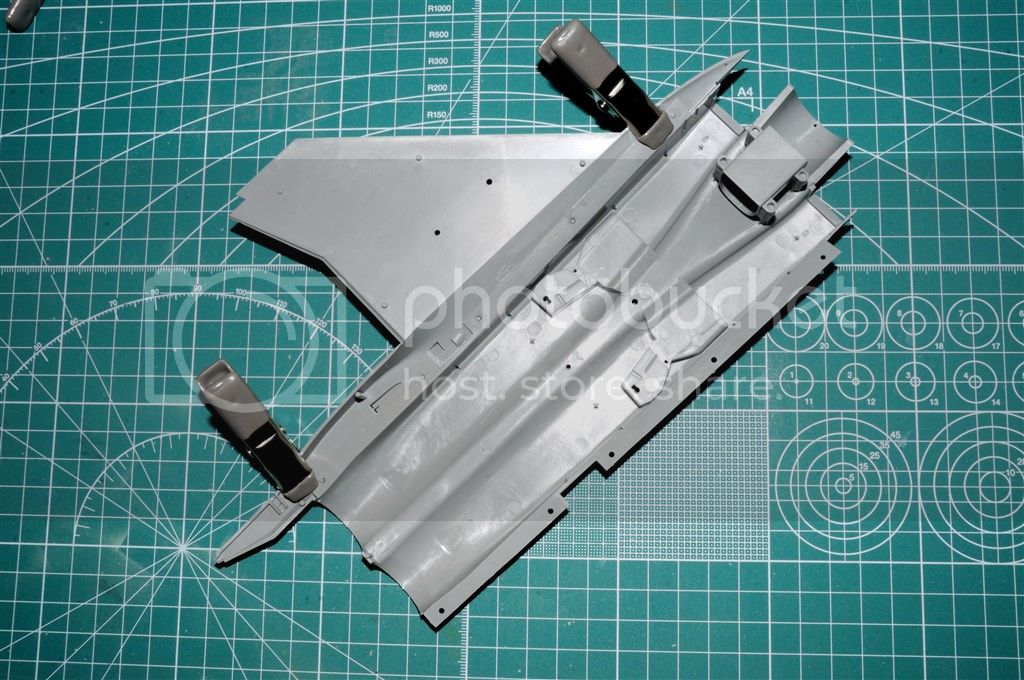
The joint line is in fact a real seam, but on one side the forward part had a recessed line a little wider then I wanted, which results in a small gap. Since I didn't want to use any glue on the outside surfaces, I worked some Extra thin from the inside of the joint to seal the gap. To decrease the recessed panel line I'll apply a bead of Vallejo White Acrylic putty during the final stages before priming. Apply, set up for 30 seconds, then wipe the excess off with a damp Qtip.
The front cockpit sub assemly is firmly secured to the main fuselage not only by a large matting surface, but there is a box type receptical to hold it in the exact position.
I test fitted the two sections, which is a perfect flush fit, and it's rock solid. The result does leave a deep joint line that needs to be addressed, that I'll also use Vallejo White Acrylic putty on, so it's really another non-issue.
Now comes those dreaded intake trumpets. All injected molded ones are two piece units resulting with two seams. The fit is once again perfect, and even with careful gluing from the outside, you end up with seams. In the past I've just left it as is, since one has to really look directly
into the trumpets to see them. I decided before the build to use a technique that Janne, a modeling friend from Sweden has used with great results; White Gloss Latex paint.
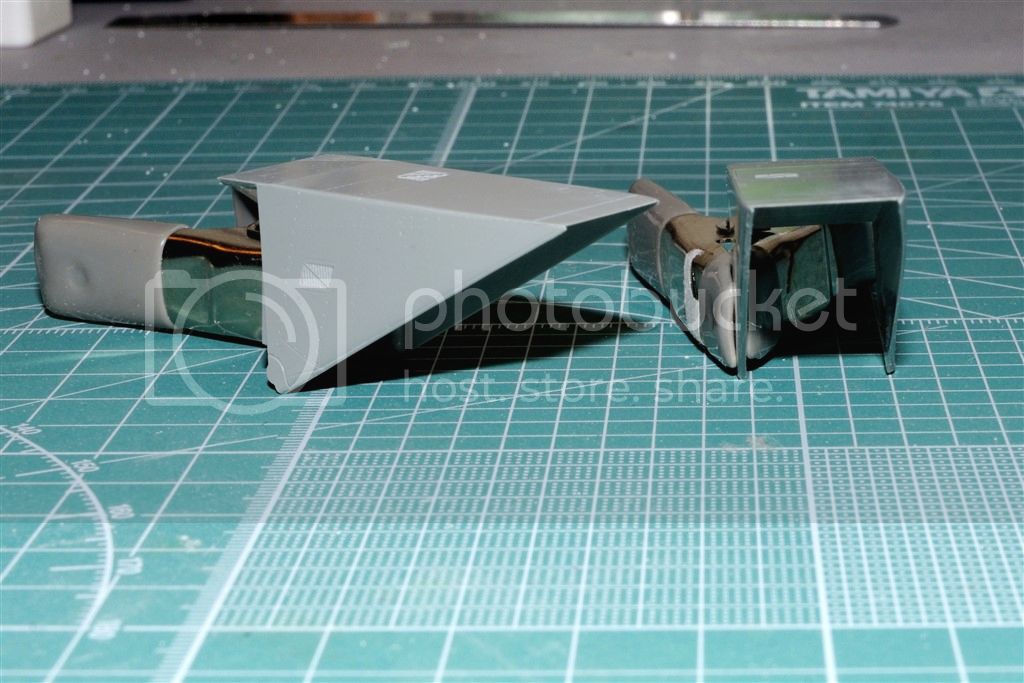
I carefully taped the engine end of the trumpets closed with Blue painters tape:
Using Satin White Latex paint, as I have gallons of the stuff for home painting projects, I carefully filled each trumpet to the top, then let the paint cure for 5 min. Pouring the paint out takes a lot longer then filling them up. I slowly rotated the trumpets so that the paint continued to evenly coat the 4 inside walls. One coat really looked good to me, even though Janne suggested 2 or 3 coats. So I let them dry for a few hours, then removed the tape. I was really suprised at how much paint flowed out and over my fingers!. Cleanup is just was with just warm water.
I test fitted one mocked up engine, and I needed to remove the latex paint from the joint. Took about 2 min each with my Dremel and a sanding drum. Then I test fitted both intake trumpets on the lower fuselage. They really looked good.
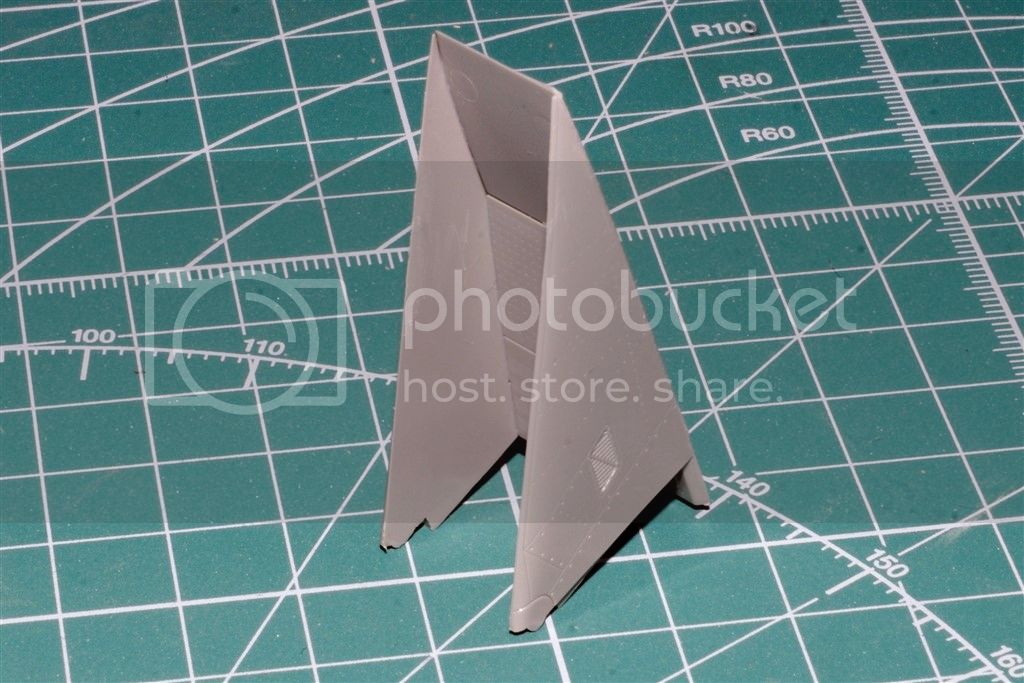
The next step was the construction of the air intake ramps. The kit gives you the option of two different positions: Horizontal for on the ground, or a down position for supersonic flight. I opted for the Horizontal position.
Each air intake is comprised of 4 main pieces, that fit like a glove.
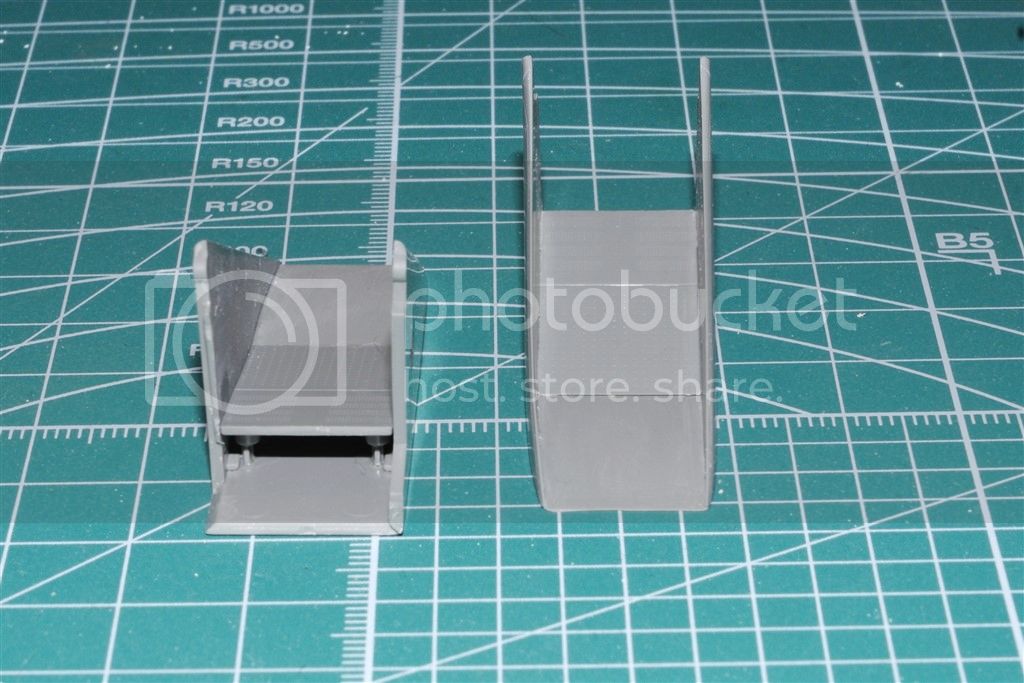
With careful gluing, there is absolutely no gaps. The resulting joint lines are at 90%, the intake fronts edges are literally razor sharp. Some very careful sanding with #320, #600, 4,000, & 6,000 produces a finished air intake that looks like it was a one piece molding.
Finally, I test fitted one air in take to see the full effect:
Again, thanks to Janne for supplying me with the correct color FS number, and how far into the trumpets to paint the gray paint. The air intakes will be painted fS36375 Light Gray as well as the scale 1st few feet of the trumpets.
Well, that's how far I've gotten on my build. Thanks to all for stopping by and reading through this rather long post.
Joel
There are just 3 main parts to the assembly, the lower fuselage, and both lower halves of the wings.
Each wing assembly attaches to the fuselage by 3 locating pins. The fit is absolutely perfect. It's that good.
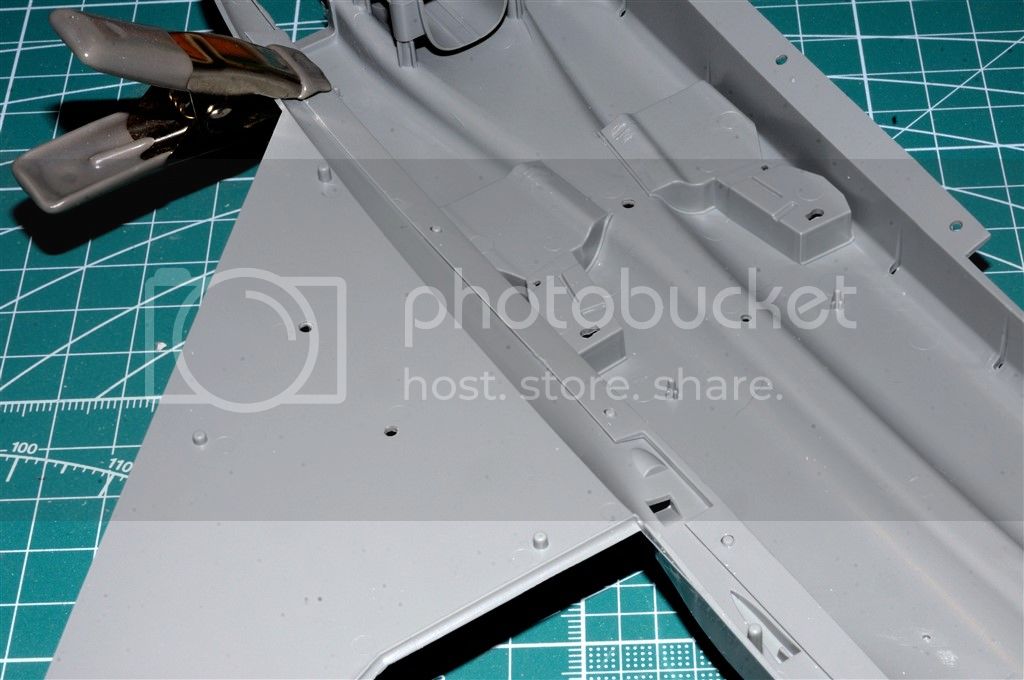
The joint line is in fact a real seam, but on one side the forward part had a recessed line a little wider then I wanted, which results in a small gap. Since I didn't want to use any glue on the outside surfaces, I worked some Extra thin from the inside of the joint to seal the gap. To decrease the recessed panel line I'll apply a bead of Vallejo White Acrylic putty during the final stages before priming. Apply, set up for 30 seconds, then wipe the excess off with a damp Qtip.
The front cockpit sub assemly is firmly secured to the main fuselage not only by a large matting surface, but there is a box type receptical to hold it in the exact position.
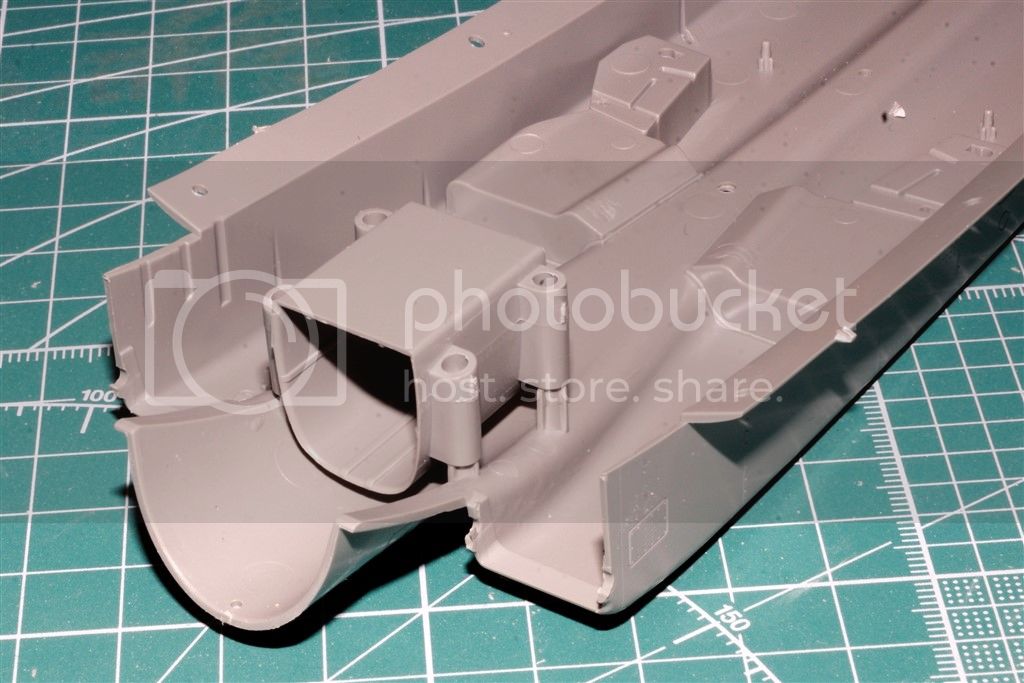
I test fitted the two sections, which is a perfect flush fit, and it's rock solid. The result does leave a deep joint line that needs to be addressed, that I'll also use Vallejo White Acrylic putty on, so it's really another non-issue.
Now comes those dreaded intake trumpets. All injected molded ones are two piece units resulting with two seams. The fit is once again perfect, and even with careful gluing from the outside, you end up with seams. In the past I've just left it as is, since one has to really look directly
into the trumpets to see them. I decided before the build to use a technique that Janne, a modeling friend from Sweden has used with great results; White Gloss Latex paint.
I carefully taped the engine end of the trumpets closed with Blue painters tape:
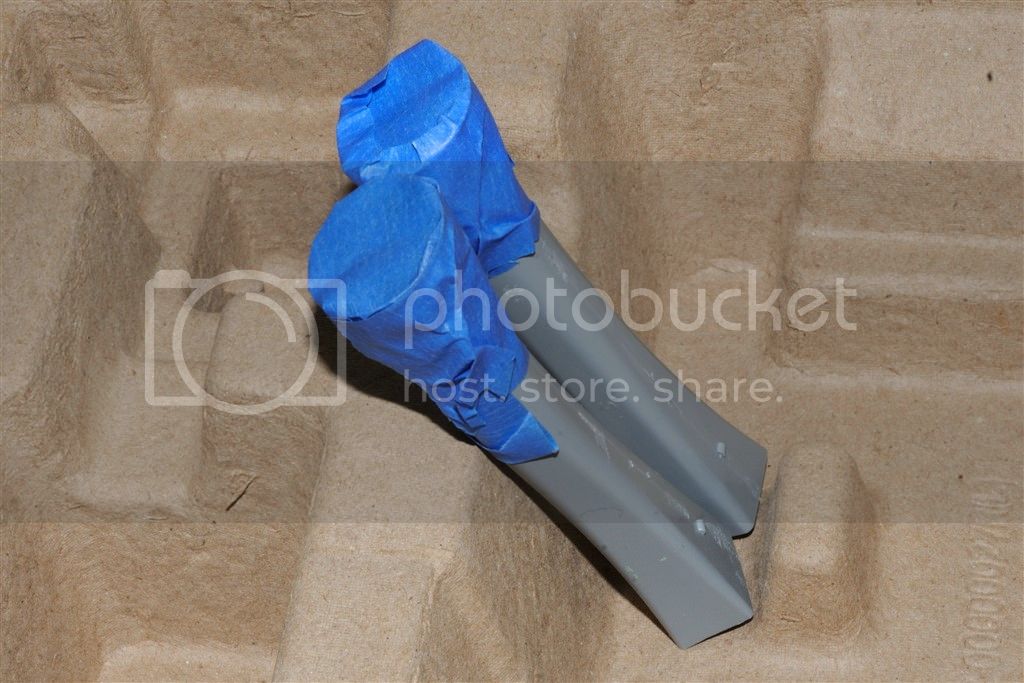
Using Satin White Latex paint, as I have gallons of the stuff for home painting projects, I carefully filled each trumpet to the top, then let the paint cure for 5 min. Pouring the paint out takes a lot longer then filling them up. I slowly rotated the trumpets so that the paint continued to evenly coat the 4 inside walls. One coat really looked good to me, even though Janne suggested 2 or 3 coats. So I let them dry for a few hours, then removed the tape. I was really suprised at how much paint flowed out and over my fingers!. Cleanup is just was with just warm water.
I test fitted one mocked up engine, and I needed to remove the latex paint from the joint. Took about 2 min each with my Dremel and a sanding drum. Then I test fitted both intake trumpets on the lower fuselage. They really looked good.
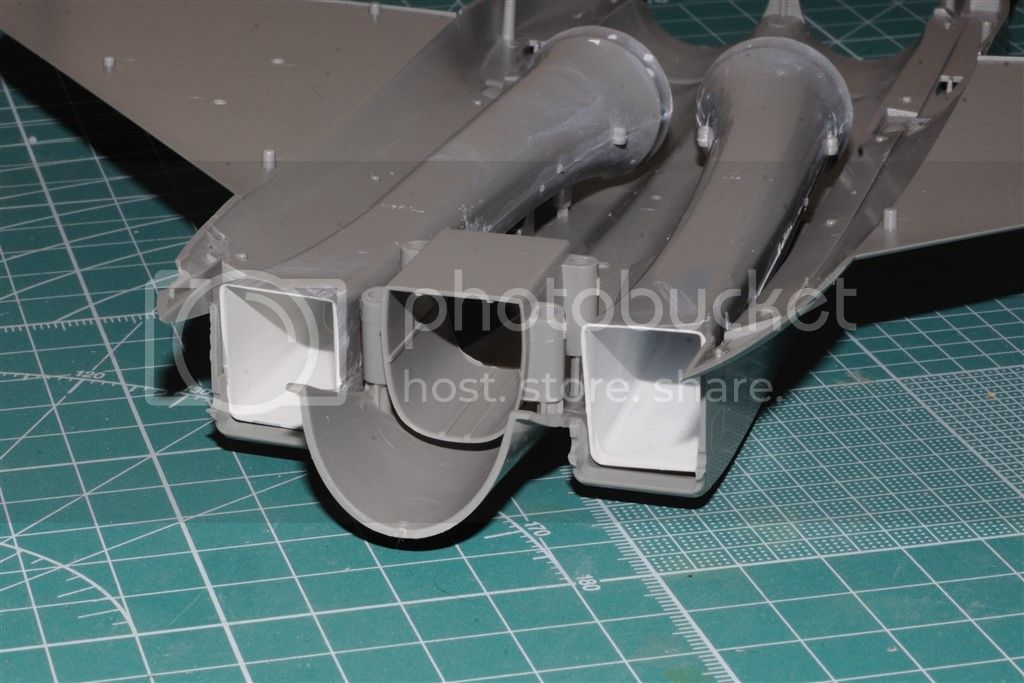
The next step was the construction of the air intake ramps. The kit gives you the option of two different positions: Horizontal for on the ground, or a down position for supersonic flight. I opted for the Horizontal position.
Each air intake is comprised of 4 main pieces, that fit like a glove.
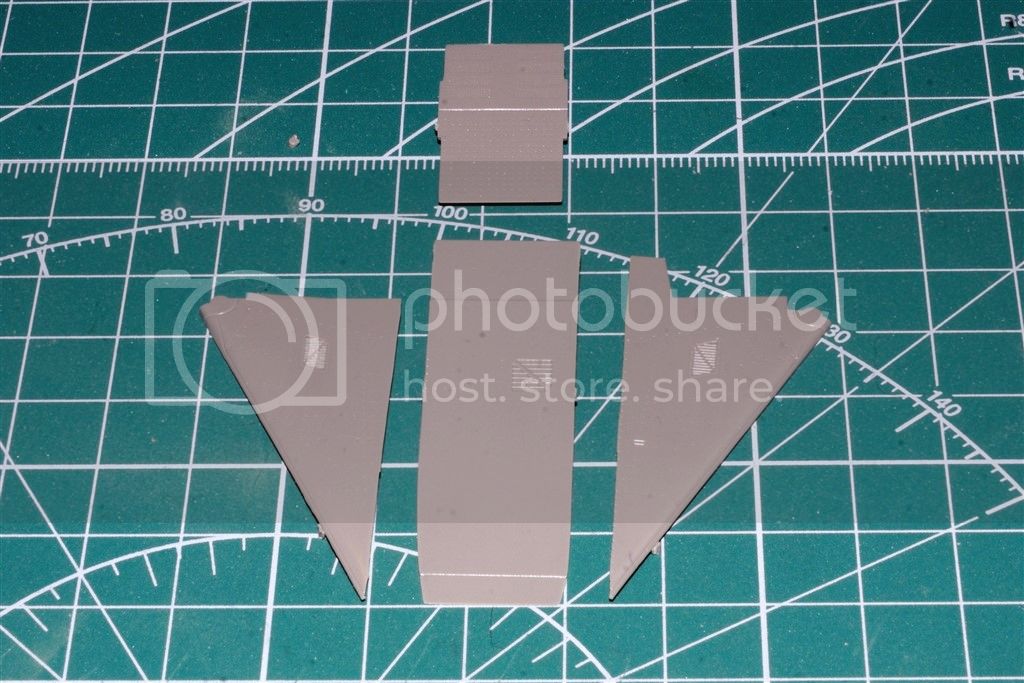
With careful gluing, there is absolutely no gaps. The resulting joint lines are at 90%, the intake fronts edges are literally razor sharp. Some very careful sanding with #320, #600, 4,000, & 6,000 produces a finished air intake that looks like it was a one piece molding.
Finally, I test fitted one air in take to see the full effect:
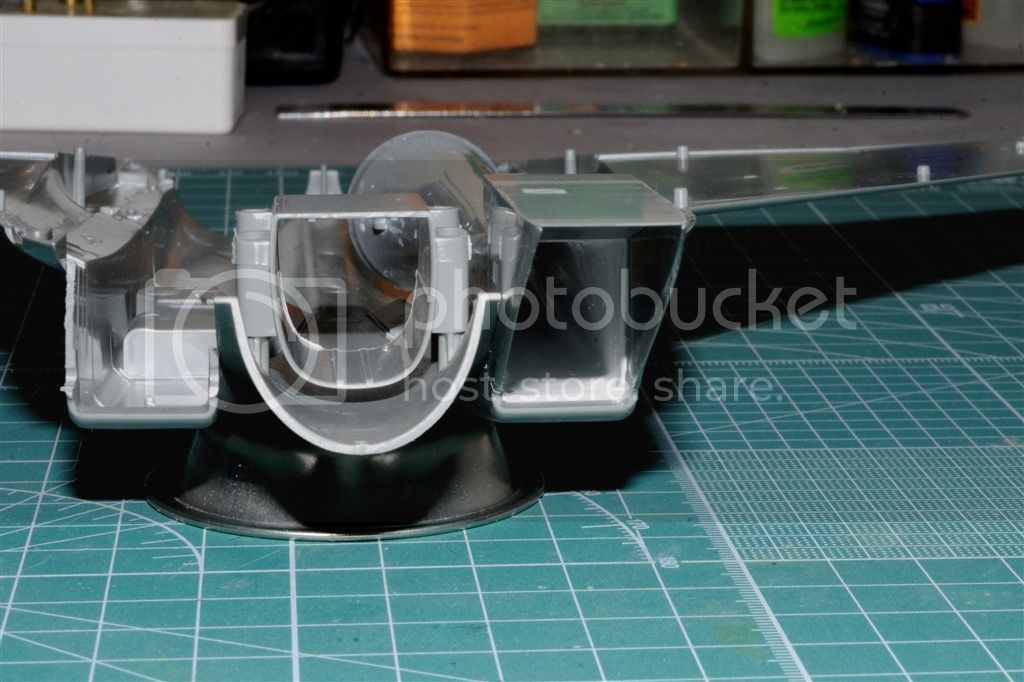
Again, thanks to Janne for supplying me with the correct color FS number, and how far into the trumpets to paint the gray paint. The air intakes will be painted fS36375 Light Gray as well as the scale 1st few feet of the trumpets.
Well, that's how far I've gotten on my build. Thanks to all for stopping by and reading through this rather long post.
Joel
Mcleod
Alberta, Canada
Joined: April 07, 2010
KitMaker: 1,028 posts
AeroScale: 939 posts
Joined: April 07, 2010
KitMaker: 1,028 posts
AeroScale: 939 posts
Posted: Friday, December 19, 2014 - 02:59 AM UTC
Long posts with great photos are good, Joel. A very neat tutorial on that inner seam technique; I see trying that out in my future.
Joel_W
Associate Editor
New York, United States
Joined: December 04, 2010
KitMaker: 11,666 posts
AeroScale: 7,410 posts
Joined: December 04, 2010
KitMaker: 11,666 posts
AeroScale: 7,410 posts
Posted: Friday, December 19, 2014 - 03:53 AM UTC
Quoted Text
Long posts with great photos are good, Joel. A very neat tutorial on that inner seam technique; I see trying that out in my future.
Ben,
Thank you. I was kind of concerned that I rambled on for so long.
Joel
Posted: Friday, December 19, 2014 - 04:25 AM UTC
Now we're getting somewhere.
The engine intake plena and exhaust tunnel geometry are really interesting and make one think about how this beast works.
Joel_W
Associate Editor
New York, United States
Joined: December 04, 2010
KitMaker: 11,666 posts
AeroScale: 7,410 posts
Joined: December 04, 2010
KitMaker: 11,666 posts
AeroScale: 7,410 posts
Posted: Friday, December 19, 2014 - 04:47 AM UTC
Quoted Text
Now we're getting somewhere.
The engine intake plena and exhaust tunnel geometry are really interesting and make one think about how this beast works.
Jonathan,
Without a doubt this is the best engineered kit I've ever seen. Truly outstanding in concept and execution. Rowan was dead right in his box review.
Joel
Joel_W
Associate Editor
New York, United States
Joined: December 04, 2010
KitMaker: 11,666 posts
AeroScale: 7,410 posts
Joined: December 04, 2010
KitMaker: 11,666 posts
AeroScale: 7,410 posts
Posted: Thursday, December 25, 2014 - 05:18 AM UTC
Progress has been at my usual snails pace, but some progress has been made none the less.
After gluing up the fuselage cockpit sides, and closing up the two electrical panels, some sanding and light putty work was needed to blend, and even out the surface. The nose cone fit was fairly good, but a small step was quite evident on the top. I sanded, then blended in some Green stuff.
After gluing in the air intake trumpets, the single piece top fuselage/wing was glued to the bottom half, resulting in a absolutely perfect main fuselage/wing section, without any issues concerning proper wing orientation.
Even with the near perfect fit of the upper and lower fuselage halves, I did have some minor seam and gap issues. For the most part either Green Stuff or Vallejo White Acrylic putty took care of them as you can see in the above pictures. Do to my carelessness in dry fitting the intakes to the main fuselage, I ended up with a little misalignment that was best dealt with by a small piece of .040 sheet and some green stuff, as you can see at the front of the wing right behind the intakes.
Next up was gluing the cockpit section to the main fuselage section. The fit is simply outstanding. Here's a picture of the final test fit
I just used some Tamiya Extra thin and a few pieces of tape till the glue dries.
Whatever small issues that have to dealt with, will be done with Vallejo White putty so that the seams still remains.
Up next my attention will be focused on the landing gear assemblies.
Thanks for stopping by, and checking out my progress.
Joel
Joel_W
Associate Editor
New York, United States
Joined: December 04, 2010
KitMaker: 11,666 posts
AeroScale: 7,410 posts
Joined: December 04, 2010
KitMaker: 11,666 posts
AeroScale: 7,410 posts
Posted: Wednesday, December 31, 2014 - 02:01 AM UTC
Well, I've made a little more progress at my usual snails pace, so I thought I'd bring you up speed.
All that was left after joining the wing sub assembly to the main fuselage sub assembly was the main air brake on the top behind the cockpit. Since I had already decided that I wanted a clean overall shape, and thus had closed both electrical panels by the nose, and the nose cone itself, closing the brake was a no brainer. The fit was absolutely perfect. Just a little Tamiya Extra thin, and it was done. Next up was the twin tails.
GWH has the rudders as separate pieces, but its a butt joint that just doesn't look right. So I drilled out two mounting holes in each rudder, and a corresponding set of holes in each tail. Just to be on the safe side, I drilled the holes one size larger then the steel wire, using a nice drop of CA to secure the pins to the bottom of the holes.
Then I just pushed the pins into position and aligned the rudders.
Now the Eagle was starting to finally look like an Eagle.
Next up was the twin engines. While I wasn't planning on having either one displayed out of the F-15C, they need to be built so that the intake blades are up against the back of the air intakes. each engine is a small mini kit, and builds up without any issues. I have no idea if any of the detailing is right or wrong, but for my purposes it doesn't really matter.
Once assembled, I primed the intakes fans and the exhaust cans with Tamiya Gray Primer.
Then I airbrushed on Alcad 11 Steel, followed by a light coat of Model Master Buffing Exhaust.
A quick test fit of the engines looked pretty good.
finally, I started on the front landing gear strut.
I drilled out the lightning holes, then added two electrical wires with tape mounting brackets for the twin landing lights.
And now you're up to date.
Joel
VonCuda
North Carolina, United States
Joined: November 28, 2005
KitMaker: 2,216 posts
AeroScale: 1,080 posts
Joined: November 28, 2005
KitMaker: 2,216 posts
AeroScale: 1,080 posts
Posted: Wednesday, December 31, 2014 - 05:29 AM UTC
Beautiful build you've got going on Joel. After being out of modeling for so long I enjoy following these in-depth build blogs and relearning much of what I'd forgotten. Drilling out the instrument faces, wiring the landing gear lights, etc. are little things that really make a kit come together.
Keep progressing! I'm watching with interest!
WoodshedWings
Ontario, Canada
Joined: October 11, 2012
KitMaker: 141 posts
AeroScale: 139 posts
Joined: October 11, 2012
KitMaker: 141 posts
AeroScale: 139 posts
Posted: Wednesday, December 31, 2014 - 05:58 AM UTC
Nice progress Joel. I do like the look of those GWH jets. I have their FW189 reserved for another day.
Joel_W
Associate Editor
New York, United States
Joined: December 04, 2010
KitMaker: 11,666 posts
AeroScale: 7,410 posts
Joined: December 04, 2010
KitMaker: 11,666 posts
AeroScale: 7,410 posts
Posted: Wednesday, December 31, 2014 - 07:54 PM UTC
Quoted Text
Beautiful build you've got going on Joel. After being out of modeling for so long I enjoy following these in-depth build blogs and relearning much of what I'd forgotten. Drilling out the instrument faces, wiring the landing gear lights, etc. are little things that really make a kit come together.
Keep progressing! I'm watching with interest!
Hermon,
Welcome to the party. Thank you for appreciating my most modest efforts to date. Comments, ask questions, and of course offer suggestions any time you feel like doing so.
It wasn't that many years ago that I returned to the hobby after a 30+ year hiatus. Everything that could change, did change, and the learning curve for this old timer was long, and at times steep. What I found was that the basics are still the basics, just tweaked a bit. Best advice I can give you is what I was given on my return; concentrate on building the best OOB builds lyou can. Once I reached that level, then I just kicked it up a notch or two each build. None of my builds are contest quality, but each one is a definite improvement of the previous ones. Having fun and enjoying each build is what's important to me.
The last time I left the hobby it was simply because is stopped being fun, and became a quest to win at every contest and convention I went to. Now I build strictly for myself, and to share with others on line here at Aeroscale and one other forum ARC.
Joel
Joel_W
Associate Editor
New York, United States
Joined: December 04, 2010
KitMaker: 11,666 posts
AeroScale: 7,410 posts
Joined: December 04, 2010
KitMaker: 11,666 posts
AeroScale: 7,410 posts
Posted: Wednesday, December 31, 2014 - 07:57 PM UTC
Quoted Text
Nice progress Joel. I do like the look of those GWH jets. I have their FW189 reserved for another day.
Mike,
Thanks. So far this is my favorite build in years. The kit is great in every respect. The only issue I have is that if I screw it up, it's my fault. At least when I have a bad day fishing, I can blame the fish.
Haven't seen any new builds since you finished the F104. Anything in the works now?
Joel