Joel, the F-15 looks really nice. Keep up the good work.
Regards,
Ian
Modern (1975-today)
Discuss the modern aircraft age from 1975 thru today.
Discuss the modern aircraft age from 1975 thru today.
Hosted by Jim Starkweather
GWH 1/48 scale F-15C Eagle

SaxonTheShiba

Joined: February 01, 2009
KitMaker: 1,233 posts
AeroScale: 663 posts

Posted: Tuesday, January 27, 2015 - 06:39 AM UTC

WoodshedWings

Joined: October 11, 2012
KitMaker: 141 posts
AeroScale: 139 posts

Posted: Tuesday, January 27, 2015 - 06:46 PM UTC
Hi Joel,
the Eagle is looking 'the business'. Good work so far. I bet there are more than a couple of stencils to apply! Good luck!
Mike.
the Eagle is looking 'the business'. Good work so far. I bet there are more than a couple of stencils to apply! Good luck!
Mike.
Joel_W

Joined: December 04, 2010
KitMaker: 11,666 posts
AeroScale: 7,410 posts

Posted: Tuesday, January 27, 2015 - 07:38 PM UTC
Quoted Text
Joel, the F-15 looks really nice. Keep up the good work.
Regards,
Ian
Ian,
Thanks for stopping by and liking what I've accomplished so far. Still have a long way to go before I can put it in the done column.
Joel
Joel_W

Joined: December 04, 2010
KitMaker: 11,666 posts
AeroScale: 7,410 posts

Posted: Tuesday, January 27, 2015 - 07:41 PM UTC
Quoted Text
Hi Joel,
the Eagle is looking 'the business'. Good work so far. I bet there are more than a couple of stencils to apply! Good luck!
Mike.
Thanks Mike for those more then kind words. As for the stencils, there are some, but no where the amount that I had to apply with the Academy F-4B or what you had on your F-104G,especially in 1/32 scale.
Joel
chris1

Joined: October 25, 2005
KitMaker: 949 posts
AeroScale: 493 posts

Posted: Wednesday, January 28, 2015 - 12:23 AM UTC
Hi Joel,
She is really starting to look great.
Waiting for the next update hope it won't be long.
Cheers
Chris
She is really starting to look great.
Waiting for the next update hope it won't be long.
Cheers
Chris
Joel_W

Joined: December 04, 2010
KitMaker: 11,666 posts
AeroScale: 7,410 posts

Posted: Wednesday, January 28, 2015 - 01:46 AM UTC
Quoted Text
Hi Joel,
She is really starting to look great.
Waiting for the next update hope it won't be long.
Cheers
Chris
Chris,
I keep on plugging away making progress slow but steady. I have a very small update in a day or so on how I repaired screwing up the drop tank wield lines while sanding the seams.
Gloss coated the fuselage and will be starting the weathering process slowly but surely.
Joel
Posted: Wednesday, January 28, 2015 - 01:52 AM UTC
Hi Joel
That is looking very, very, nice indeed!
All the best
Rowan
That is looking very, very, nice indeed!

All the best
Rowan


SaxonTheShiba

Joined: February 01, 2009
KitMaker: 1,233 posts
AeroScale: 663 posts

Posted: Wednesday, January 28, 2015 - 03:23 AM UTC
You all are correct about the stencils. I remember when I cracked open my first Haseagawa 1/48th scale F-15 back in the 80's and I am pretty sure the decal sheet was about as big as the box. The little honeycomb NO STEP stencils were the best........all fifty of them. Anyway, continuing to look forward to your finished Eagle, Joel.
Regards,
Ian
Regards,
Ian
Joel_W

Joined: December 04, 2010
KitMaker: 11,666 posts
AeroScale: 7,410 posts

Posted: Wednesday, January 28, 2015 - 03:56 AM UTC
Quoted Text
Hi Joel
That is looking very, very, nice indeed!
All the best
Rowan
Rowan,
Thanks so much for stopping by. Glad you like my efforts to date. Now get back to your Bronco

Joel
Joel_W

Joined: December 04, 2010
KitMaker: 11,666 posts
AeroScale: 7,410 posts

Posted: Wednesday, January 28, 2015 - 04:01 AM UTC
Ian,
Gotta love those Honey Comb no steps for sure. Rest assured I'll get to the finish line eventually.
I've haven't said this in a few updates now, but the GWH kit is still the best overall model I've ever built.
Just started working on the stations and loads out. OMG, talk about detail. Looks more like what you would expect in a high end 1/32 scale kit from Tamiya. You get two AIM-9X Sidewinders, two AIM-120C AMRAAMs, and two AIM-120A AMRAAMs plus full stenciling. My favorite.
Joel

SaxonTheShiba

Joined: February 01, 2009
KitMaker: 1,233 posts
AeroScale: 663 posts

Posted: Wednesday, January 28, 2015 - 05:41 AM UTC
Yeah, I have heard good things about the GWH kit. That's good they include ordnance because that is lacking in a lot of jet kits in this day and age. I need to buy one of these because I have some neat decal sheets for -15's.
Best wishes,
Ian
Best wishes,
Ian
Joel_W

Joined: December 04, 2010
KitMaker: 11,666 posts
AeroScale: 7,410 posts

Posted: Wednesday, January 28, 2015 - 06:20 AM UTC
Ian,
At the price of these new kits which start at $60 and go up from there, I would expect more then just decent loads out. And GHW loads just blew me away.
Joel
At the price of these new kits which start at $60 and go up from there, I would expect more then just decent loads out. And GHW loads just blew me away.
Joel
Joel_W

Joined: December 04, 2010
KitMaker: 11,666 posts
AeroScale: 7,410 posts

Posted: Thursday, January 29, 2015 - 01:40 AM UTC
Work has started in earnest on the stations, loads out, and the drop tanks. GWH has done a excellent job of molding raised wielded seam lines on the drop tanks.

Unfortunately, after I glued the tank halves together, some sanding was necessary to remove the Extra Thin glue/plastic seam lines. Now I'm not exactly the most careful modeler when it comes to sanding, so I ended up removing four sections of the wield lines, 2 from the front wield and 2 from the rear wield on all 3 drop tanks.

So now came the question on how to repair my screw up. At 1st I thought that some stretched sprue would do nicely, but after several attempts, I just didn't like the overall look, so I removed all the pieces of stretched sprue, resanded, and polished. Next came the old standby of tape and putty, so I tried Green Stuff. I just couldn't get it to lay down a nice consistent bead, so I thought about thinning it with Lacquer Thinner or Extra Thin. Neither option really appealed to me as I didn't want a smooth finish, and that's what I usually get with thinned out Green Stuff. My last option was Vallejo's white acrylic putty. I use it all the time to fill small scratches and seams, and this repair falls into that category if you stretch the concept enough. So I cut small strips of blue painters tape and carefully laid them along each side of the wield seam where the repair was needed.

Then I applied a rough bead of Vallejo white putty

Then removed the tape before it had set up

the repaired seams looked pretty good to me

So I went ahead and repaired the other two drop tanks. I gave it a day to dry, then primed the tanks with Mr.Primer Surfacer 1,000, gave that over night to dry and cure, then airbrushed on Model Master FS 36375 Light Ghost Gray. The final results looks pretty decent to me.


Joel
Unfortunately, after I glued the tank halves together, some sanding was necessary to remove the Extra Thin glue/plastic seam lines. Now I'm not exactly the most careful modeler when it comes to sanding, so I ended up removing four sections of the wield lines, 2 from the front wield and 2 from the rear wield on all 3 drop tanks.
So now came the question on how to repair my screw up. At 1st I thought that some stretched sprue would do nicely, but after several attempts, I just didn't like the overall look, so I removed all the pieces of stretched sprue, resanded, and polished. Next came the old standby of tape and putty, so I tried Green Stuff. I just couldn't get it to lay down a nice consistent bead, so I thought about thinning it with Lacquer Thinner or Extra Thin. Neither option really appealed to me as I didn't want a smooth finish, and that's what I usually get with thinned out Green Stuff. My last option was Vallejo's white acrylic putty. I use it all the time to fill small scratches and seams, and this repair falls into that category if you stretch the concept enough. So I cut small strips of blue painters tape and carefully laid them along each side of the wield seam where the repair was needed.
Then I applied a rough bead of Vallejo white putty
Then removed the tape before it had set up
the repaired seams looked pretty good to me
So I went ahead and repaired the other two drop tanks. I gave it a day to dry, then primed the tanks with Mr.Primer Surfacer 1,000, gave that over night to dry and cure, then airbrushed on Model Master FS 36375 Light Ghost Gray. The final results looks pretty decent to me.
Joel

SaxonTheShiba

Joined: February 01, 2009
KitMaker: 1,233 posts
AeroScale: 663 posts

Posted: Thursday, January 29, 2015 - 05:54 AM UTC
Joel, the drop tank looks good. You can't go wrong with Mr. Surfacer either. That stuff is the coolest thing since microwaveable pizza. You doing tanks on the shoulder pylons or the centerline tank......or all three?
Regards,
Ian
Regards,
Ian
Joel_W

Joined: December 04, 2010
KitMaker: 11,666 posts
AeroScale: 7,410 posts

Posted: Thursday, January 29, 2015 - 06:13 AM UTC
Quoted Text
Joel, the drop tank looks good. You can't go wrong with Mr. Surfacer either. That stuff is the coolest thing since microwaveable pizza. You doing tanks on the shoulder pylons or the centerline tank......or all three?
Regards,
Ian
Ian,
I'm doing all three 300 gal drop tanks on the three stations. Then two AIM-9X Sidewinders and two AIM-120C AMRAAM on the wing stations, and two AIM-120A AMRAAMs in the front two stations on the fuselage. In other words, my Eagle is loaded for bear.
Joel

SaxonTheShiba

Joined: February 01, 2009
KitMaker: 1,233 posts
AeroScale: 663 posts

Posted: Thursday, January 29, 2015 - 06:25 AM UTC
That will look really good!
Ian
Ian
Posted: Thursday, January 29, 2015 - 04:24 PM UTC
Hi Joel
Lovely job repairing the weld seams! I'll be sure to remember that tip.
All the best
Rowan
Lovely job repairing the weld seams! I'll be sure to remember that tip.

All the best
Rowan

Joel_W

Joined: December 04, 2010
KitMaker: 11,666 posts
AeroScale: 7,410 posts

Posted: Thursday, January 29, 2015 - 06:07 PM UTC
Quoted Text
Hi Joel
Lovely job repairing the weld seams! I'll be sure to remember that tip.
All the best
Rowan
Rowan,
Thanks.
The strange thing is that the repair looks much more like a painted wield seam then the original molding. If I wasn't so lazy, I should have sanded off all the molded on seams and redone them. Nah, just too much work for too little gain.
Joel
Joel_W

Joined: December 04, 2010
KitMaker: 11,666 posts
AeroScale: 7,410 posts

Posted: Monday, February 02, 2015 - 02:42 AM UTC
It's hard to believe, but I've got another update to post. I've been working on slowly weathering the F-15C. My goal is for an operational looking aircraft that has been well maintained, but ready on the flightline.
After I finished applying all the decals on the fuselage and wings. I sealed them with a few coats of Testors Glosscoat, and let them dry for a day.
Weathering started with Flory's Dark wash,with a few drops of his Light wash in a small metal mixing dish. I then cut the wash 50/50 with plain old tape water, rather then working with the wash full strength. The wash now easily runs along recessed panel lines, and into every nook and cranny.
Rather then apply the wash to the entire fuselage, I used a #03 paint brush, and carefully applied it only along either side of those recesses. As per my usual method I prefer to do one area at a time, rather then the whole top or bottom. So I started with one wing. For rivets I painted a line over each full run.
Using damp Qtips (with my method you go through a ton of them), I rubbed off the excess in a back and forth motion, so that the residue would have the appearance of being blown backwards by the air flow. For the darker color on the wing tops, I rubbed harder then usual, with the end result being a more faded worn look.
My goal is to have the panel lines and rivets blend more into the overall weathered finish, rather then using a darker color that would further draw the viewers eye to them.
After I finished with the flory Washes, I went over a few panels to slightly weather them as well.
Still left to do is the exhaust MNF, which I'm planning on doing with Model Master enamel Burnt Sienna thinned to the consistency of India Ink, and applied as a pin wash.
Joel
Joel_W

Joined: December 04, 2010
KitMaker: 11,666 posts
AeroScale: 7,410 posts

Posted: Monday, February 02, 2015 - 03:23 AM UTC
I noticed in the pictures that I missed rubbing off one area right behind the cockpit. It's been rubbed out, and the Eagle has been Dullcoated.
Joel
Joel

SaxonTheShiba

Joined: February 01, 2009
KitMaker: 1,233 posts
AeroScale: 663 posts

Posted: Monday, February 02, 2015 - 06:16 AM UTC
That really looks good Joel. The tell-tale F-15 bare metal area on the underside really looks good too. I bet you went through 500 Q-Tips removing the excess wash. The panel lines blend well with the finish, though, so it was definitely worth the trouble.
Best wishes,
Ian
Best wishes,
Ian
Joel_W

Joined: December 04, 2010
KitMaker: 11,666 posts
AeroScale: 7,410 posts

Posted: Monday, February 02, 2015 - 06:30 AM UTC
Quoted Text
That really looks good Joel. The tell-tale F-15 bare metal area on the underside really looks good too. I bet you went through 500 Q-Tips removing the excess wash. The panel lines blend well with the finish, though, so it was definitely worth the trouble.
Best wishes,
Ian
Ian,
Thanks so much for those more then kind words. I stopped counting at 24 Qtips. I was really concerned about over doing the wash. So if anything I went even more conservative then usual by adding more light wash and diluting it with so much water. The secret is in the rubbing.
Joel

SaxonTheShiba

Joined: February 01, 2009
KitMaker: 1,233 posts
AeroScale: 663 posts

Posted: Monday, February 02, 2015 - 06:44 AM UTC
The aft formation strip light on the fuselage below the wing...is that molded on the fuselage or is it a piece of photo etch? It looks very realistic.
Regards,
Ian
Regards,
Ian
Joel_W

Joined: December 04, 2010
KitMaker: 11,666 posts
AeroScale: 7,410 posts

Posted: Monday, February 02, 2015 - 06:39 PM UTC
Quoted Text
The aft formation strip light on the fuselage below the wing...is that molded on the fuselage or is it a piece of photo etch? It looks very realistic.
Regards,
Ian
Ian,
Both aft formation strip lights are PE with decals for the lenses. One side has two lights and the other has 3 lights. The front ones are just decals. The wing tip formation lights come as decals. And as usual, it's nearly impossible to get them to do a 180 and snuggle down to the wing tip, so I just paint them instead.
Joel
Joel_W

Joined: December 04, 2010
KitMaker: 11,666 posts
AeroScale: 7,410 posts

Posted: Monday, February 09, 2015 - 08:08 PM UTC
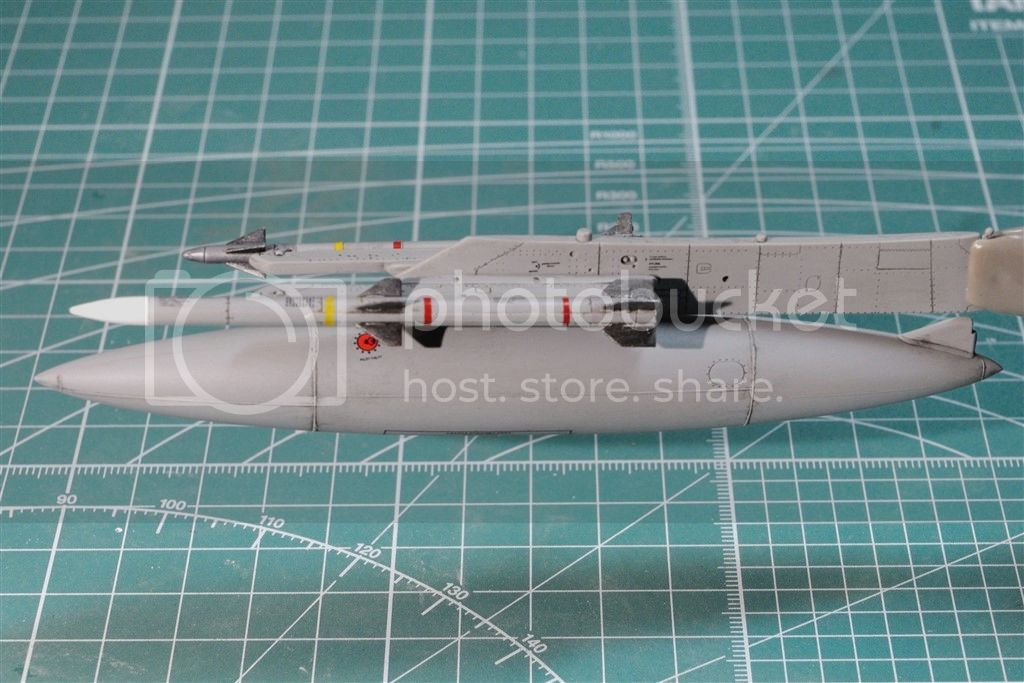
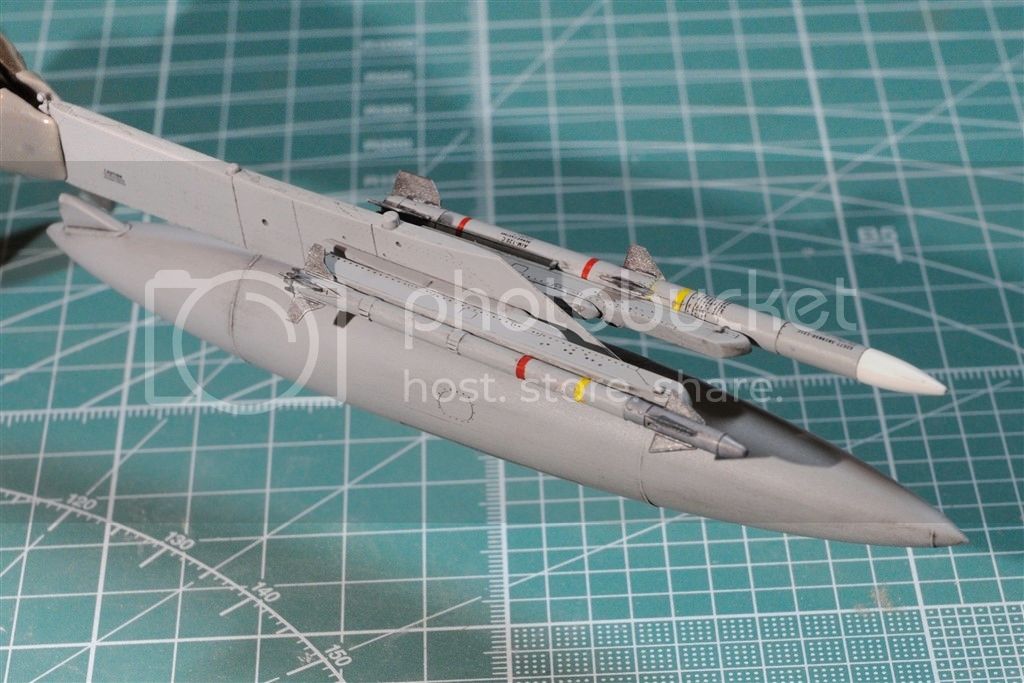
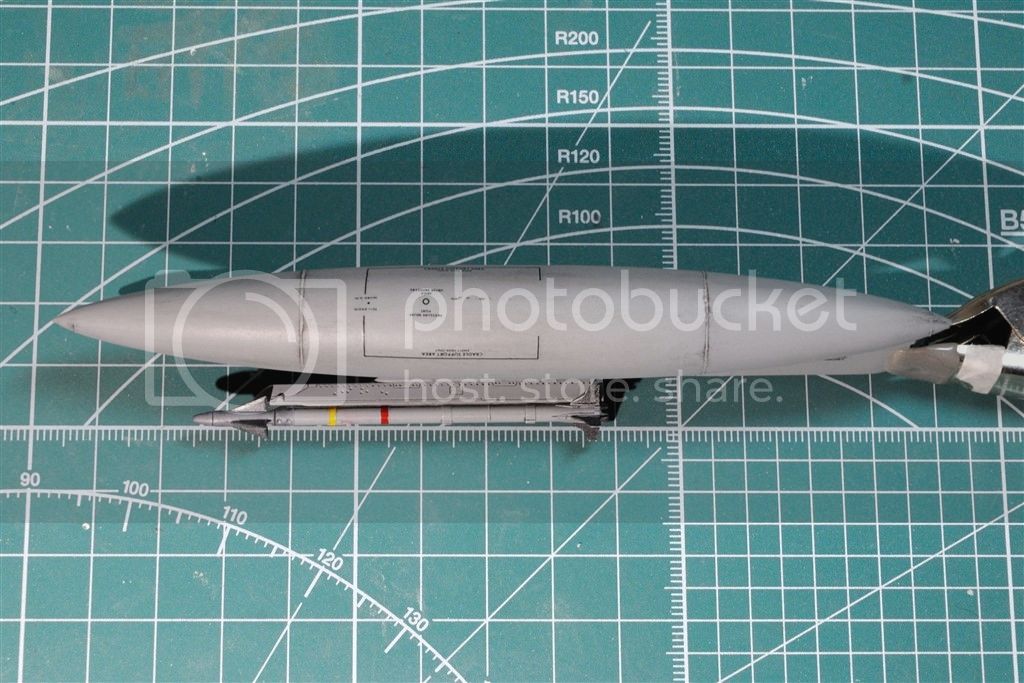
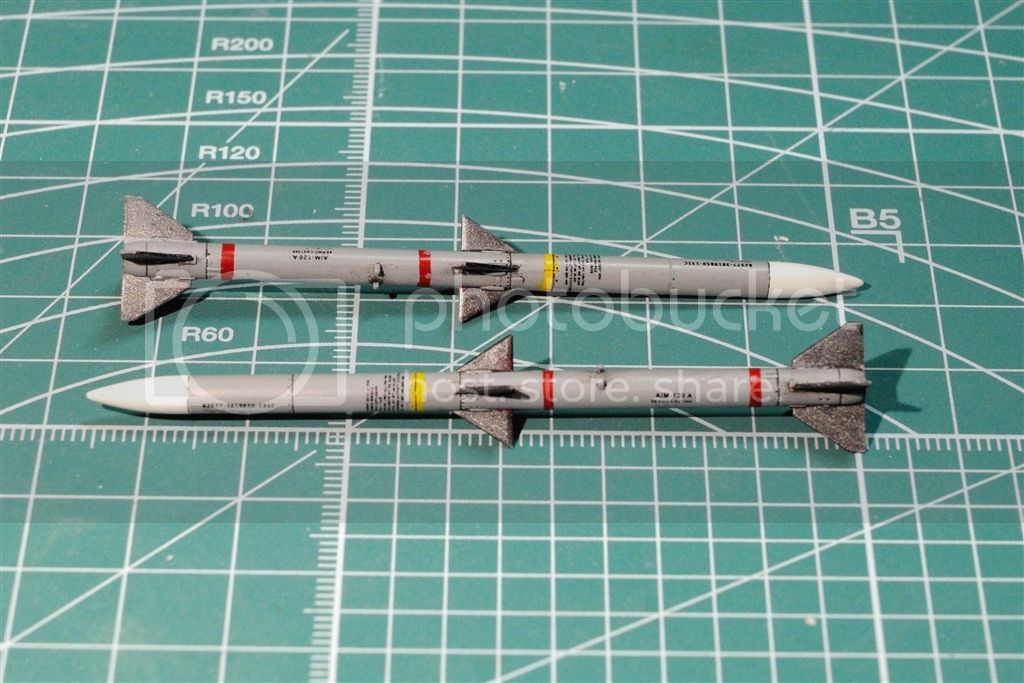
It's been a little while since I last updated my progress on the F-15C build. Work has concentrated on completing both wing stations and the centerline station for just the 300 gallon drop tank. All 3 stations have been painted with Model Master FS36375 Light Ghost Gray. The AIM-9X Sidewinders, as well as the AIM-120A AMRAAMs & AIM-120C AMRAAMs have also been painted. The Yellow and Red stripes were masked and air brushed on as the kit decals just didn't want to lay down. Honestly, it was faster to mask, paint, and cleanup, then deal with each of those stripes.
All the various components received a coating of Glosscoat as a base for the kit decal stencils. With a little effort and using Paul Budziks 3 step decaling procedure of Micro Set under and over, then Micro Sol, followed by Solvaset, worked perfectly. This has been the 1st model ever that I've used Solvaset, and I'm more then impressed.
Once the decals had dried overnight, a 2nd coat of Glosscoat was applied. I let that dry for several hours, then I applied a Sludge was of Flories Dark wash. To make it flow into the shallow panel recesses, I thinned it 2 parts wash to 1 part warm tap water. 15 min later I very carefully removed the excess with damp Qtips, then sealed with Dullcoat.
Finally after a few hours of drying time, I glued up the stations with Gorilla glue. Just amazing stuff.
I'm really quite happy how the homemade wield seams turned out after the wash. Honestly, they look better then the smooth kit wield seams.
Here's a few pictures of the stations and loads.
Joel
 |


