Hi Joel,
thx for the advise... but how do I check for the air leak?
gr TC
World War II
Discuss WWII and the era directly before and after the war from 1935-1949.
Hosted by Rowan Baylis
Revell Dornier Do 217-5 1/48 Build
Twentecable
Overijssel, Netherlands
Joined: September 13, 2003
KitMaker: 339 posts
AeroScale: 244 posts
Joined: September 13, 2003
KitMaker: 339 posts
AeroScale: 244 posts
Posted: Saturday, January 23, 2016 - 03:18 PM UTC
Joel_W
Associate Editor
New York, United States
Joined: December 04, 2010
KitMaker: 11,666 posts
AeroScale: 7,410 posts
Joined: December 04, 2010
KitMaker: 11,666 posts
AeroScale: 7,410 posts
Posted: Saturday, January 23, 2016 - 10:57 PM UTC
Quoted Text
Hi Joel,
thx for the advise... but how do I check for the air leak?
gr TC
Not sure which AB you have, but assuming it's a internal AB, they're all about the same in design. To clean it you had to have taken off the two caps over the cone and needle. Hand tighten both, then air brush water through it and see if it still bubbles. If yes, then you need to remove both and apply a sealant. I use Bees Wax that I rub off a tube of Burts Bees lip Balm. Just a little will do the trick.
Joel
Twentecable
Overijssel, Netherlands
Joined: September 13, 2003
KitMaker: 339 posts
AeroScale: 244 posts
Joined: September 13, 2003
KitMaker: 339 posts
AeroScale: 244 posts
Posted: Tuesday, February 23, 2016 - 11:13 PM UTC
Ok Guys, a maojr update from me. The basic camo sheme is on... it took me longer then expected but I learned a thing or 2 in the process.
So first on was the dark green colour. I completely oversprayed my pre shading due to unthinnend paint.
So I added some aftershading
And another coat of green
After that I added some higlights, I dont got a pic of that in this fase...
Next up was masking for the second camo colour... that was alot of work. Also I got the layout wrong, I mirrorewed it. Gave me some trouble later on.
I thought my colour used now was to grey
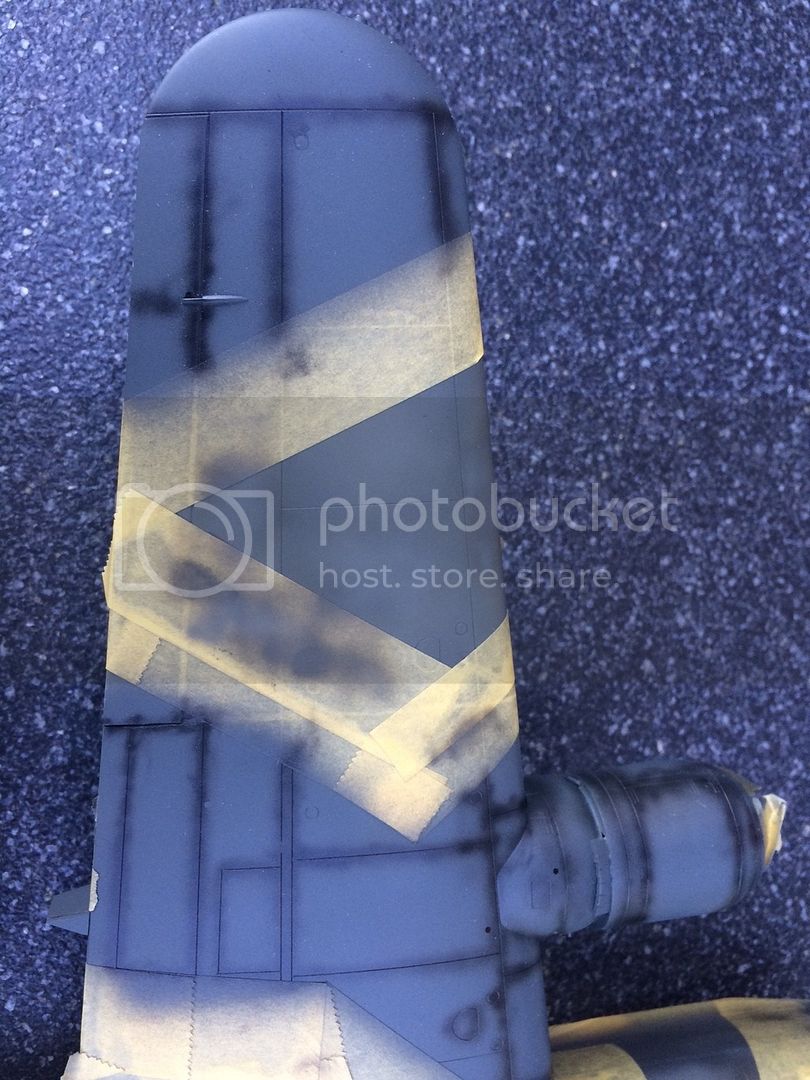
I post shaded it
and added a light green colour. This time more thinnend down and had better control so I didnt overspray the shadow completely. I higlighted the centers
The excitement... my bird almost ready for removal of the masks...
And here she is without masks...
I now have oversprayed her with gloss varnish and am in the proces of putting on the decals. Already here something went wrong... a yellow line is not straight but wobbly... I will post pics of that later and ask advice how to handle this.
gr TC
greif8
Bayern, Germany
Joined: January 17, 2006
KitMaker: 673 posts
AeroScale: 492 posts
Joined: January 17, 2006
KitMaker: 673 posts
AeroScale: 492 posts
Posted: Friday, February 26, 2016 - 03:07 PM UTC
The final result looks quite nice Lars. I would not worry about "mirroring" the camo, most Luftwaffe camo schemes had and "A" and a "B" paint scheme; they were mirrors of each other. Airbrushing preshading can be tricky to avoid covering the effect. I like to spray 4-5 very light coats; this allows me to gage when to stop, the downside being achieving a smooth surface, which can be tough to do - at least for me.
Joel_W
Associate Editor
New York, United States
Joined: December 04, 2010
KitMaker: 11,666 posts
AeroScale: 7,410 posts
Joined: December 04, 2010
KitMaker: 11,666 posts
AeroScale: 7,410 posts
Posted: Sunday, February 28, 2016 - 10:11 PM UTC
Lars,
The effect of the pre and post shading really shows up extremely well. Needless to say, I'm rather impressed by what you've achieved.
Joel
The effect of the pre and post shading really shows up extremely well. Needless to say, I'm rather impressed by what you've achieved.
Joel
Twentecable
Overijssel, Netherlands
Joined: September 13, 2003
KitMaker: 339 posts
AeroScale: 244 posts
Joined: September 13, 2003
KitMaker: 339 posts
AeroScale: 244 posts
Posted: Tuesday, March 01, 2016 - 11:15 PM UTC
Hi Ernest and Roth, thank you so much for the kind words. I feel flattered. There is going so much wrong with this plane even with my (rusted and some time ago) model experience. But it is fun and I think that historic purist and judges want clap their hands but my bird will stand proud on my shelf.
Atm I am applying the decals wich is a small disaster.. they are very thin.. move around constantly and fix where I dont want them to fix. But well 1 or 2 sessions and that is over. And I can start some weathering...
gr TC
Atm I am applying the decals wich is a small disaster.. they are very thin.. move around constantly and fix where I dont want them to fix. But well 1 or 2 sessions and that is over. And I can start some weathering...
gr TC
greif8
Bayern, Germany
Joined: January 17, 2006
KitMaker: 673 posts
AeroScale: 492 posts
Joined: January 17, 2006
KitMaker: 673 posts
AeroScale: 492 posts
Posted: Wednesday, March 02, 2016 - 06:05 PM UTC
Hi Lars, I think your build looks really good for someone with rusty skills. Decals can be a pain that is for sure. I don't worry about what "rivet counters" think; some folks get a bit carried away with whole accuracy thing IMHO.
Ernest
Ernest
Twentecable
Overijssel, Netherlands
Joined: September 13, 2003
KitMaker: 339 posts
AeroScale: 244 posts
Joined: September 13, 2003
KitMaker: 339 posts
AeroScale: 244 posts
Posted: Wednesday, March 02, 2016 - 11:31 PM UTC
Hi Ernest I really feel that way too. I have super detailed models but just for me the looks and what I wanted to recreate. One of my all time favourites is a Tamiya OTB 70's Panzer II. Did a nice winter camo on it with pastel chalks, the figure got a little scarf and a one day beard... hell it really looks cold when I look at the vignette. Isnt that what we want to archieve?
gr TC
gr TC
Twentecable
Overijssel, Netherlands
Joined: September 13, 2003
KitMaker: 339 posts
AeroScale: 244 posts
Joined: September 13, 2003
KitMaker: 339 posts
AeroScale: 244 posts
Posted: Tuesday, March 15, 2016 - 12:08 AM UTC
Hey guys,
I am pondering if I will wash the top of the model or not. Also I am pondering on the shade. The thing is quite dark already so i am thinking of a light brown mix for the wash.
What do you think??
gr TC
I am pondering if I will wash the top of the model or not. Also I am pondering on the shade. The thing is quite dark already so i am thinking of a light brown mix for the wash.
What do you think??
gr TC
Joel_W
Associate Editor
New York, United States
Joined: December 04, 2010
KitMaker: 11,666 posts
AeroScale: 7,410 posts
Joined: December 04, 2010
KitMaker: 11,666 posts
AeroScale: 7,410 posts
Posted: Tuesday, March 15, 2016 - 02:05 AM UTC
Lars,
The Lt. brown wash should help blend the various colors a shade or so closer together. I would certainly go for it. I'm planning on doing exactly that on the B-25B
Joel
The Lt. brown wash should help blend the various colors a shade or so closer together. I would certainly go for it. I'm planning on doing exactly that on the B-25B
Joel
Twentecable
Overijssel, Netherlands
Joined: September 13, 2003
KitMaker: 339 posts
AeroScale: 244 posts
Joined: September 13, 2003
KitMaker: 339 posts
AeroScale: 244 posts
Posted: Tuesday, March 15, 2016 - 11:25 PM UTC
Joel.
thx I will do that.
Another question, does the wash and wipe technique also work with enemal colours?
gr TC
thx I will do that.
Another question, does the wash and wipe technique also work with enemal colours?
gr TC
Joel_W
Associate Editor
New York, United States
Joined: December 04, 2010
KitMaker: 11,666 posts
AeroScale: 7,410 posts
Joined: December 04, 2010
KitMaker: 11,666 posts
AeroScale: 7,410 posts
Posted: Wednesday, March 16, 2016 - 12:34 AM UTC
Quoted Text
Joel.
thx I will do that.
Another question, does the wash and wipe technique also work with enemal colours?
gr TC
Lars,
It works with all different bases. the trick is a heavily thinned wash applied to a really glossy surface so that the wash really doesn't stick all that well to it.
Joel
greif8
Bayern, Germany
Joined: January 17, 2006
KitMaker: 673 posts
AeroScale: 492 posts
Joined: January 17, 2006
KitMaker: 673 posts
AeroScale: 492 posts
Posted: Wednesday, March 16, 2016 - 01:41 AM UTC
Hi Lars, Joel's advice concerning an enamel wash is excellent. I usually wait around 45-60 minutes before I wipe the excess away. I always try to wipe across the panel lines as much as possible so as not to wipe out what I just put in.
Ernest
Ernest
Twentecable
Overijssel, Netherlands
Joined: September 13, 2003
KitMaker: 339 posts
AeroScale: 244 posts
Joined: September 13, 2003
KitMaker: 339 posts
AeroScale: 244 posts
Posted: Thursday, March 17, 2016 - 12:07 AM UTC
Ernest and Joe, thx for the advise. I wanted to use an oil paint wash but since drying times are much slower I will try te enemal variant.
Here also some progress pics. The underside of the plane I used a acryllic wash. In later stages I worked a bit more neatly but these are the effects. Here I applied the wash.
Using an in thinner dipped cotton stick to get exces away. Not the tiediest of results but I think it is fitting for the underside of a plane.
I still have 2 weeks for the show and still a couple of things to do. I guess there wont be alot of scratches and streaks on this bird...
Tommorow I will do the enemal was on the top side.
gr TC
Posted: Thursday, March 17, 2016 - 10:04 AM UTC
Nice work with the panel wash Lars! I struggle with that technique, I'm still working out something that works for me. I seem to actually wipe the wash right out of the panel lines which kind defeats the process.
heavyjagdpanzer
Georgia, United States
Joined: February 17, 2013
KitMaker: 173 posts
AeroScale: 108 posts
Joined: February 17, 2013
KitMaker: 173 posts
AeroScale: 108 posts
Posted: Thursday, March 17, 2016 - 05:45 PM UTC
I used an A K interactive wash. I try to let it run down the panel seems and then let it dry. In some places you will have to brush it on with a fine brush. I would use a Tamiya cotton applicator and scrub the excess off. This panel liner was applied over a clear gloss coat so the scrubbing really did not affect the paint.This left the wash in the panel lines and only took it off the surface.
Twentecable
Overijssel, Netherlands
Joined: September 13, 2003
KitMaker: 339 posts
AeroScale: 244 posts
Joined: September 13, 2003
KitMaker: 339 posts
AeroScale: 244 posts
Posted: Friday, March 18, 2016 - 01:27 AM UTC
Hi Bill and Chris.
Normally I use an oil colour wash. Whilst applying I use an extra brush and some terpentine at hand to clean up any "blotches". That method gives a very clean result but is very time consuming. Since I wanted to experiment and I am short on time due to the show next weekend I tried this method. It is fast but pretty dirty. Always make sure u cross a line with the cotton swap so you dont pull out all paint of the panel line.
On the top side I will try the enemal, paper towel method. I will post results asap.
gr TC
Twentecable
Overijssel, Netherlands
Joined: September 13, 2003
KitMaker: 339 posts
AeroScale: 244 posts
Joined: September 13, 2003
KitMaker: 339 posts
AeroScale: 244 posts
Posted: Friday, March 18, 2016 - 07:13 PM UTC
Hi guys,
maybe you can help me. I doubting the shade of the light brown wash for the top. I am now considering desert yellow and dark earth in a 2 to 1 ratio.
What do you guys think?
gr TC
maybe you can help me. I doubting the shade of the light brown wash for the top. I am now considering desert yellow and dark earth in a 2 to 1 ratio.
What do you guys think?
gr TC
Joel_W
Associate Editor
New York, United States
Joined: December 04, 2010
KitMaker: 11,666 posts
AeroScale: 7,410 posts
Joined: December 04, 2010
KitMaker: 11,666 posts
AeroScale: 7,410 posts
Posted: Friday, March 18, 2016 - 09:12 PM UTC
Lars,
for an overall wash that is more for dust or a blown earth effect, the darker wash would work that or even a lighter earth tone. I'm really not sure what the effect of the colors you're asking about would look like other then a lighter version of the dark earth tone.
Joel
for an overall wash that is more for dust or a blown earth effect, the darker wash would work that or even a lighter earth tone. I'm really not sure what the effect of the colors you're asking about would look like other then a lighter version of the dark earth tone.
Joel
Twentecable
Overijssel, Netherlands
Joined: September 13, 2003
KitMaker: 339 posts
AeroScale: 244 posts
Joined: September 13, 2003
KitMaker: 339 posts
AeroScale: 244 posts
Posted: Saturday, March 19, 2016 - 12:07 AM UTC
ok
joel what colour would you advise?
gr TC
Posted: Saturday, March 19, 2016 - 06:53 AM UTC
Depends on what you want to achieve Lars? For my Kawanishi Rex I used a dark brown to ensure that it didn't over exaggerate the panel lines against the dark green camo. Generally a lighter colour will stand out more against a dark back ground and vice versa. So do you want to your panel lines to stand out or recede into the background?
greif8
Bayern, Germany
Joined: January 17, 2006
KitMaker: 673 posts
AeroScale: 492 posts
Joined: January 17, 2006
KitMaker: 673 posts
AeroScale: 492 posts
Posted: Saturday, March 19, 2016 - 01:14 PM UTC
Lars, I generally uses brown tones for my panel line washes. I find these are not as stark as darker colors like black. I think a mid-brown tone would look good in conjunction with your pre-shading.
Joel_W
Associate Editor
New York, United States
Joined: December 04, 2010
KitMaker: 11,666 posts
AeroScale: 7,410 posts
Joined: December 04, 2010
KitMaker: 11,666 posts
AeroScale: 7,410 posts
Posted: Saturday, March 19, 2016 - 10:31 PM UTC
Quoted Text
ok
joel what colour would you advise?
gr TC
Lars,
Since you've already have applied most of the weathering including panel lines, I'd just go with a Earth tone Acrylic paint heavily thinned and apply is with a airbrush, light coat after light coat till you get effect you're looking for.
Joel
Twentecable
Overijssel, Netherlands
Joined: September 13, 2003
KitMaker: 339 posts
AeroScale: 244 posts
Joined: September 13, 2003
KitMaker: 339 posts
AeroScale: 244 posts
Posted: Sunday, March 20, 2016 - 02:44 AM UTC
Ok guys,
put on a light earth brown panel wash. Havent finished it yet but I like the effect. Post pics asap.
gr TC
put on a light earth brown panel wash. Havent finished it yet but I like the effect. Post pics asap.
gr TC
Joel_W
Associate Editor
New York, United States
Joined: December 04, 2010
KitMaker: 11,666 posts
AeroScale: 7,410 posts
Joined: December 04, 2010
KitMaker: 11,666 posts
AeroScale: 7,410 posts
Posted: Sunday, March 20, 2016 - 04:03 AM UTC
Quoted Text
Ok guys,
put on a light earth brown panel wash. Havent finished it yet but I like the effect. Post pics asap.
gr TC
Lars,
Looking forward to your pics.
Joel