

Torsten,
Outstanding camo paint scheme. Just as I expected it would be.
Joel
Hosted by Rowan Baylis
56th FG Operations/Black Widow
Joel_W

Joined: December 04, 2010
KitMaker: 11,666 posts
AeroScale: 7,410 posts
Posted: Sunday, September 18, 2016 - 03:40 AM UTC


BlackWidow

Joined: August 09, 2009
KitMaker: 1,732 posts
AeroScale: 1,336 posts
Posted: Tuesday, September 20, 2016 - 10:41 PM UTC
Thanks Gary and Joel!
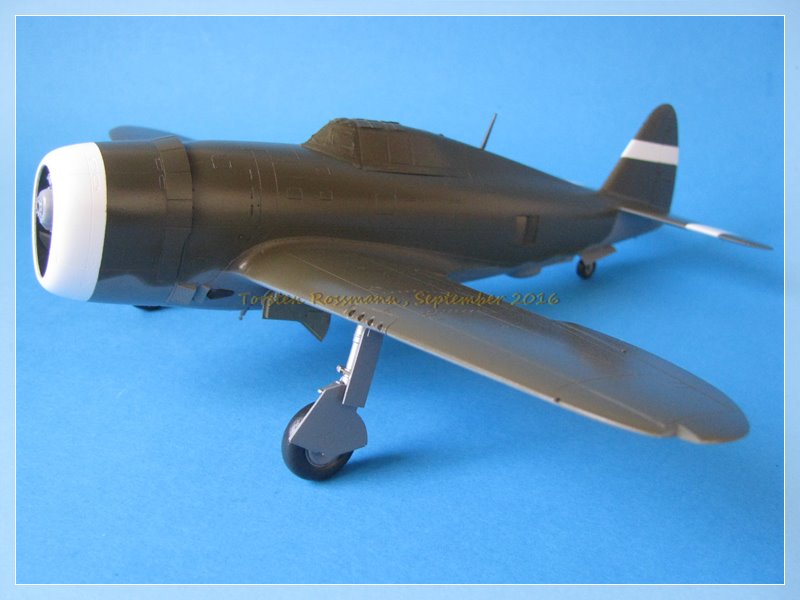
The Razorback also came out very well after demasking. Only a bit of spray fog had to be removed. Vallejo Olive Drab 71043 has become my favourite paint for OD. Just ordered a new bottle ....

For Neutral Grey I mostly take Medium Grey 43 from Revell ....

Just airbrushed landing gear and propellers. Hope to have glued all that stuff together by the coming weekend.
Torsten
The Razorback also came out very well after demasking. Only a bit of spray fog had to be removed. Vallejo Olive Drab 71043 has become my favourite paint for OD. Just ordered a new bottle ....
For Neutral Grey I mostly take Medium Grey 43 from Revell ....
Just airbrushed landing gear and propellers. Hope to have glued all that stuff together by the coming weekend.
Torsten

Joel_W
Joined: December 04, 2010
KitMaker: 11,666 posts
AeroScale: 7,410 posts
Posted: Wednesday, September 21, 2016 - 12:09 AM UTC
Torsten,
The jug really looks good. I do have one question. I've never been able to really get the wing tip lenses to fit well enough to leave them off till after completion. Do yours fit that well with a little work to install them that way?
Joel
The jug really looks good. I do have one question. I've never been able to really get the wing tip lenses to fit well enough to leave them off till after completion. Do yours fit that well with a little work to install them that way?
Joel

Merlin

#017


Joined: June 11, 2003
KitMaker: 17,582 posts
AeroScale: 12,795 posts

Posted: Wednesday, September 21, 2016 - 12:31 AM UTC
Nice job Torsten. 
How do you thin and spray your Vallejo acrylics? - for some reason I struggle with them. I bought loads years ago, but have never really got on with them very well (they've been great for detail brush-painting though).
All the best
Rowan
How do you thin and spray your Vallejo acrylics? - for some reason I struggle with them. I bought loads years ago, but have never really got on with them very well (they've been great for detail brush-painting though).
All the best
Rowan

BlackWidow
Joined: August 09, 2009
KitMaker: 1,732 posts
AeroScale: 1,336 posts
Posted: Wednesday, September 21, 2016 - 01:15 AM UTC
Joel, usually the position lights fit well to the wing tips. Sometimes I have to sand away a little mould seam but that is seldom. It's always the very last part I add to the model.
Rowan, I was often told that I don't need to thin Vallejo Model Air paints because they are ready made to use for airbrushing. That is nonsense!!! I've tested it that way and got some nice "orange peel skin" on the surface. First I tried to thin Vallejo with sole water which wasn't successful. After a while I've tested clear window cleaner (yes, window cleaner!) and that works perfect with Vallejo. I use only about 25 % Sidolin Window Cleaner. But it must be the clear one, I better don't test the blue liquid .... It also works with Revell Aqua paints generally but there I use a higher percentage (about 50 % ). But it only works with water based paints. If I use alcohol based paints like Gunze or Tamiya I take Isopropanol as thinner.
Torsten

AussieReg
#007

Joined: June 09, 2009
KitMaker: 8,156 posts
AeroScale: 3,756 posts
Posted: Wednesday, September 21, 2016 - 03:13 AM UTC
Impressive work on both builds Torsten, the scheme on your Bubbletop came up beautifully. Great choice of colours. The OD finish on the Razorback is very nice indeed, I like the tone and the sheen level. I have never used it, but I will definitely give the Vallejo a try using your thinning recommendation.
Thanks for sharing those warbird images as well, I am incredibly jealous that you have such an amazing array of aircraft so close at hand.
Looking forward to more progress.
Cheers, D
Thanks for sharing those warbird images as well, I am incredibly jealous that you have such an amazing array of aircraft so close at hand.
Looking forward to more progress.
Cheers, D

BlackWidow
Joined: August 09, 2009
KitMaker: 1,732 posts
AeroScale: 1,336 posts
Posted: Saturday, September 24, 2016 - 12:20 AM UTC
Damian, what OD brand did you use on your Razorback? Tamiya? Gunze? Just got a new Vallejo delivery on Friday and finally a new hose for my compressor. After 10 years of extensive use the old hose decided to retire and slowly broke to pieces .... Tomorrow will be the first day of action for the new one .... 
Yesterday I glued all that landing gear stuff to the T'bolts and now I just finished detail painting. So tomorrow they will get some Bodenglänzer (Future) all over and hopefully in the evening I can show you some new photos.
Damian, the Hahnweide is normally a quiet glider airfield but every 2 years old warbirds and other classic propeller aircraft take over the field for a weekend. These beautiful birds come from all over Europe, mainly Germany, France, Great Britain and Switzerland. The P-51 I showed is just a hop away from the Hahnweide, maybe 50 kilometers, based in Albstadt. I heared, this year about 300 aircraft attended the show and about 25000 visitors per day. It's one of the biggest oldtimer air shows in Europe.
Have a sunny Sunday!
Torsten
Merlin
#017
Joined: June 11, 2003
KitMaker: 17,582 posts
AeroScale: 12,795 posts
Posted: Saturday, September 24, 2016 - 12:37 AM UTC
Hi Torsten
Sorry - I missed your reply about using Vallejo paints, so please forgive my tardy response. Thanks very much for the tip. I'll try some clear window cleaning fluid on the paints I've got. I think most of mine are "standard", not Model Air, but I guess the formula is similar, so it'll be worth a try. I love using an armoury of different paints on projects, so it's always bugged me that I'm obviously not getting the best out of Vallejo's range.
All the best
Rowan
Sorry - I missed your reply about using Vallejo paints, so please forgive my tardy response. Thanks very much for the tip.
I'll try some clear window cleaning fluid on the paints I've got. I think most of mine are "standard", not Model Air, but I guess the formula is similar, so it'll be worth a try. I love using an armoury of different paints on projects, so it's always bugged me that I'm obviously not getting the best out of Vallejo's range. All the best
Rowan
BlackWidow
Joined: August 09, 2009
KitMaker: 1,732 posts
AeroScale: 1,336 posts
Posted: Saturday, September 24, 2016 - 06:03 PM UTC
No problem at all, Rowan. We share a great hobby but there are more important things in life. I also don't respond immediatly.
This is the window cleaner that I use. You sure get something similar where you live. Just noticed, that I need a new bottle soon ....

... and this is especially for Joel. It's one of the position lights on my earlier Tamiya Thunderbolt "Hawkeye", which you can see on page 1. Not all lights fit that well, but well enough for me ....

This is the window cleaner that I use. You sure get something similar where you live. Just noticed, that I need a new bottle soon ....
... and this is especially for Joel. It's one of the position lights on my earlier Tamiya Thunderbolt "Hawkeye", which you can see on page 1. Not all lights fit that well, but well enough for me ....
BlackWidow
Joined: August 09, 2009
KitMaker: 1,732 posts
AeroScale: 1,336 posts
Posted: Saturday, September 24, 2016 - 06:10 PM UTC
Just finished the Bodenglänzer session on both T'bolts. Now they look bright and shiny. I leave them to dry thoroughly until tomorrow evening and start decaling on the Bubbletop first.


And a fuzzy photo of the propellers ....

Torsten
And a fuzzy photo of the propellers ....
Torsten
Joel_W
Joined: December 04, 2010
KitMaker: 11,666 posts
AeroScale: 7,410 posts
Posted: Saturday, September 24, 2016 - 07:22 PM UTC
Torsten,
Progress with a Capital P.
Joel
Progress with a Capital P.
Joel
BlackWidow
Joined: August 09, 2009
KitMaker: 1,732 posts
AeroScale: 1,336 posts
Posted: Monday, October 03, 2016 - 11:25 PM UTC
It felt like adding 1000 stencils to the kit (black stencils over Insignia Blue .... ), especially on the fuselage, but now the Bubbletop is ready for the final coating. Everything should be done by tomorrow. I have my last expo 2016 next weekend, so at least this T'bolt will join the party ....

.... I'll start with the Razorback as soon as I can so that I can finish this campaign hopefully within the next week.
Torsten
), especially on the fuselage, but now the Bubbletop is ready for the final coating. Everything should be done by tomorrow. I have my last expo 2016 next weekend, so at least this T'bolt will join the party .... .... I'll start with the Razorback as soon as I can so that I can finish this campaign hopefully within the next week.
Torsten

GazzaS

#424
Joined: April 23, 2015
KitMaker: 4,648 posts
AeroScale: 1,938 posts

Posted: Tuesday, October 04, 2016 - 01:28 AM UTC
Torsten,
It looks excellent! When I built my first p-47, I was impressed with the large number of stencils used.
Best wishes,
Gaz
It looks excellent! When I built my first p-47, I was impressed with the large number of stencils used.
Best wishes,
Gaz
Joel_W
Joined: December 04, 2010
KitMaker: 11,666 posts
AeroScale: 7,410 posts
Posted: Tuesday, October 04, 2016 - 10:12 PM UTC
Torsten,
The bubble top really is coming together quite nicely.
Joel
The bubble top really is coming together quite nicely.
Joel
BlackWidow
Joined: August 09, 2009
KitMaker: 1,732 posts
AeroScale: 1,336 posts
Posted: Tuesday, October 04, 2016 - 10:33 PM UTC
Thanks Gaz and Joel!
It's already my Thunderbolts 4 and 5 I'm working on but I can't remember adding so many stencils to the Academy P-47 D and N ....
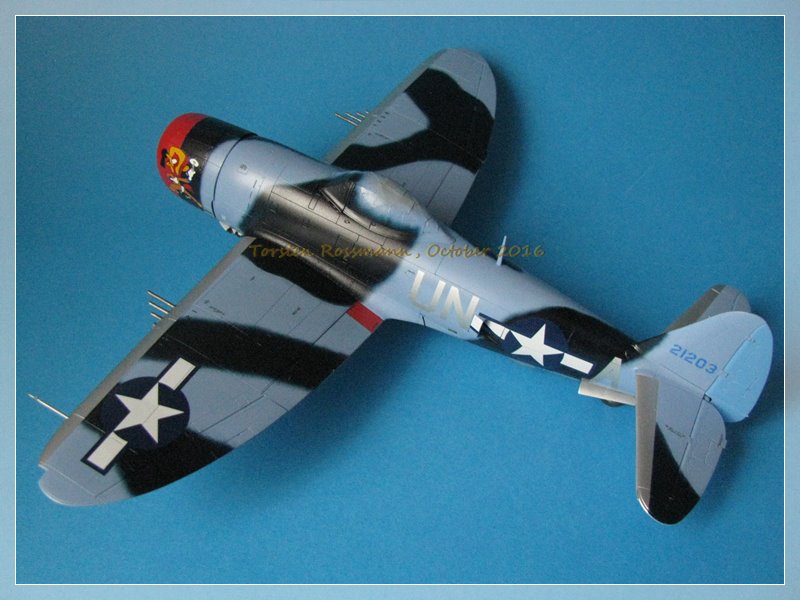
Well guys, I call this bird ready for take off and it sits already on my "shelf of pride" before flying to the Merchweiler Expo this coming weekend. Final coating was made with Matt Varnish from Marabu.
P-47 M, 63rd FS, 56th FG, Pilot: Lt. Eugene Andermatt


More and better photos of course soon in my Assembly Line Thread. Will start decaling the Razorback today.
Torsten
It's already my Thunderbolts 4 and 5 I'm working on but I can't remember adding so many stencils to the Academy P-47 D and N ....
Well guys, I call this bird ready for take off and it sits already on my "shelf of pride" before flying to the Merchweiler Expo this coming weekend. Final coating was made with Matt Varnish from Marabu.
P-47 M, 63rd FS, 56th FG, Pilot: Lt. Eugene Andermatt
More and better photos of course soon in my Assembly Line Thread. Will start decaling the Razorback today.
Torsten
GazzaS
#424
Joined: April 23, 2015
KitMaker: 4,648 posts
AeroScale: 1,938 posts
Posted: Tuesday, October 04, 2016 - 10:59 PM UTC
Torsten,
Very clean and very nice!
Gaz
Very clean and very nice!
Gaz
Joel_W
Joined: December 04, 2010
KitMaker: 11,666 posts
AeroScale: 7,410 posts
Posted: Tuesday, October 04, 2016 - 11:33 PM UTC
Torsten,
another Outstanding build for your miniature museum.
Joel
another Outstanding build for your miniature museum.
Joel
BlackWidow
Joined: August 09, 2009
KitMaker: 1,732 posts
AeroScale: 1,336 posts
Posted: Friday, October 07, 2016 - 01:39 AM UTC
Thanks Gaz and Joel! You know my style, I like them factory fresh with a dozen killmarks on the rudder. Just wait and have a look at them after 6 months on the shelf ....
The Razorback is making good progress. Most decals are on, I guess all work will be done by the end of next week.
Btw, I've added something on P-47 Heaven, you might be interested to have a look at ....
Have a nice weekend!
Torsten
The Razorback is making good progress. Most decals are on, I guess all work will be done by the end of next week.
Btw, I've added something on P-47 Heaven, you might be interested to have a look at ....
Have a nice weekend!
Torsten
GazzaS
#424
Joined: April 23, 2015
KitMaker: 4,648 posts
AeroScale: 1,938 posts
Posted: Friday, October 07, 2016 - 02:08 AM UTC
Torsten,
Thanks for the link! Those were some great looking Jugs.
Gaz
Thanks for the link! Those were some great looking Jugs.
Gaz
Joel_W
Joined: December 04, 2010
KitMaker: 11,666 posts
AeroScale: 7,410 posts
Posted: Friday, October 07, 2016 - 02:29 AM UTC
Torsten,
I checked out your link, and it's Jug heaven for sure. Every single model is extremely well done.
As for what a model looks like after seating on a display shelf for 6 months, it was always a loosing battle for me. The dust won every time. I eventually gave up and started to store all my built models in plastic storage containers. Now I'm using see through plastic storage bins turned upside down on 2 shelving units to keep my models free of dust and finger prints. One day I'll finally get around to building 2 glass display cases.
Joel
BlackWidow
Joined: August 09, 2009
KitMaker: 1,732 posts
AeroScale: 1,336 posts
Posted: Friday, October 07, 2016 - 04:35 PM UTC
I have two 6-stories-high shelfs (200 cm x 40 cm) with about 200 models resting on them (plus another +/- 300 still waiting in their boxes to be build ....  ) and take part in about 10 model expos each year in Germany, Switzerland and France. So I have my models quite often in my hands, always using cotton gloves. No chance for display cases. I don't fight the dust, it would be a loosing battle right from the beginning. That's what I call "natural weathering" On shows I clean them with a soft make up brush. It's no big deal.
Torsten
) and take part in about 10 model expos each year in Germany, Switzerland and France. So I have my models quite often in my hands, always using cotton gloves. No chance for display cases. I don't fight the dust, it would be a loosing battle right from the beginning. That's what I call "natural weathering" On shows I clean them with a soft make up brush. It's no big deal. Torsten
BlackWidow
Joined: August 09, 2009
KitMaker: 1,732 posts
AeroScale: 1,336 posts
Posted: Friday, October 07, 2016 - 11:07 PM UTC
Why?
I've be sitting over this beautiful, sh ty decal for over an hour to rescue, repair and breath life in it again. First thing that annoys me is, why is this decal not opaque? Should be easy to do that, using a white decal film instead of a clear one. But what really gave me panic attacks was that parts of this decal flipped over when I tried to bring it on the cowling. Most of the black lines flipped over, the feet, the word "Ole" and the last quotation mark .... As you can see, the clear decal film is not one part as it should be. That would make everything easier .... There are a few "holes" in the film. So I had to take it off again on my fingertip and tried to repair what happened wrong. Kind of emergency rescue. It took me now an hour to save the decal using buckets of water and this is the best I can do. 3 of the black lines were unrepairable so I had to cut them off. I think I will not paint the lines, because a) I don't have a brush that small and b) I sure won't be able to paint that thin without quiver. Futhermore the decal is not completly in the right place, should be a bit further up but I will leave it that way now. Or am I just too stupid to work with decals like these?

I've be sitting over this beautiful, sh
ty decal for over an hour to rescue, repair and breath life in it again. First thing that annoys me is, why is this decal not opaque? Should be easy to do that, using a white decal film instead of a clear one. But what really gave me panic attacks was that parts of this decal flipped over when I tried to bring it on the cowling. Most of the black lines flipped over, the feet, the word "Ole" and the last quotation mark .... As you can see, the clear decal film is not one part as it should be. That would make everything easier .... There are a few "holes" in the film. So I had to take it off again on my fingertip and tried to repair what happened wrong. Kind of emergency rescue. It took me now an hour to save the decal using buckets of water and this is the best I can do. 3 of the black lines were unrepairable so I had to cut them off. I think I will not paint the lines, because a) I don't have a brush that small and b) I sure won't be able to paint that thin without quiver. Futhermore the decal is not completly in the right place, should be a bit further up but I will leave it that way now. Or am I just too stupid to work with decals like these? GazzaS
#424
Joined: April 23, 2015
KitMaker: 4,648 posts
AeroScale: 1,938 posts
Posted: Saturday, October 08, 2016 - 01:54 AM UTC
Torsten,
Big decals are more difficult for certain. I've come to the thought that on future big decals, I might cut them into smaller pieces and put them in separately. I panic when they fold over.
Good luck,
Gaz
Maybe somebody else has a better idea?
Big decals are more difficult for certain. I've come to the thought that on future big decals, I might cut them into smaller pieces and put them in separately. I panic when they fold over.
Good luck,
Gaz
Maybe somebody else has a better idea?
Joel_W
Joined: December 04, 2010
KitMaker: 11,666 posts
AeroScale: 7,410 posts
Posted: Saturday, October 08, 2016 - 04:46 AM UTC
Torsten,
Your repair effort looks pretty good to me. I'm with Gary these days on cutting up large decals along lines so that they're easy to handle.
Joel
Your repair effort looks pretty good to me. I'm with Gary these days on cutting up large decals along lines so that they're easy to handle.
Joel
AussieReg
#007
Joined: June 09, 2009
KitMaker: 8,156 posts
AeroScale: 3,756 posts
Posted: Saturday, October 08, 2016 - 05:31 PM UTC
Hi Torsten. You have made some wonderful progress since my last visit! The Bubbletop looks really good, the colours you chose worked out just fine. With regard to the stencils, we need to remember that these aircraft were repainted in the field and without really good resource photos it is hard to confirm which, if any, of the stencils were re-applied after the camouflage. As with the colours themselves, as long as you are happy with the stencils, that is what matters.
I am also in total agreement with Gazza and Joel. With larger decals I tend to use a new blade and cut them along strategic lines to make the application less stressful. I hate getting to that stage of a build and striking such a frustrating thing as a curling decal that can't be straightened.
"Ole Cock" is coming along very well now also, looking forward to more progress.
Cheers, D
 |

WEB HOSTING BY


Copyright ©2021 AeroScale and Kitmaker Network, a subsidiary of Silver Star Enterprises
All Rights Reserved. Please read our Conditions of Use and Privacy Policy.
All Rights Reserved. Please read our Conditions of Use and Privacy Policy.