Revells 32 scale FW 190F-8
European Union
Joined: August 09, 2009
KitMaker: 1,732 posts
AeroScale: 1,336 posts
Posted: Monday, January 23, 2017 - 01:25 AM UTC
Terri, nice work on your "Schlächter" so far.
About the armour cowling ring, Thomas is right. It usually was a bit bigger than the cowling itself. If I may show you my last F-8 from Tamiya in 1/48, which I've build a while ago, you can see what I mean ....
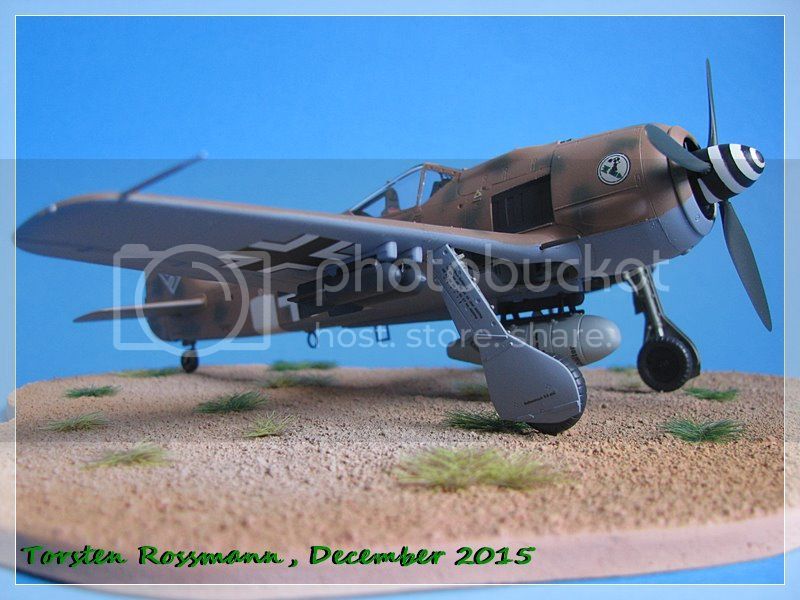
And here you can see the cowling of an A-8. I've build this aircraft also, just have a look in my assembly line thread if you like ....

Happy modelling!
Torsten

My campaigns for 2020:
MiGs - Done !
The Big Three - Done !
65 years Bundeswehr - Done !
40 years Leopard 2 - Done !
Land Lease - Done !
Joel_W
 Associate Editor
New York, United States
Joined: December 04, 2010
KitMaker: 11,666 posts
AeroScale: 7,410 posts
Posted: Monday, January 23, 2017 - 01:34 AM UTC
Torsten,
I'm as guilty as anyone as assuming the kit part was over sized.
Joel
On my Workbench:
Monogram 1/24 scale 427 Shelby Cobra
Just Completed:
Beemax 1/24 scale BMW M3 E30 1992 Evolution II
Alberta, Canada
Joined: January 19, 2008
KitMaker: 6,743 posts
AeroScale: 6,151 posts
Posted: Monday, January 23, 2017 - 05:27 AM UTC
Thanks guys ,
Joel , Yes assembling the seatbelts took a bit of time . They are PE items but when layering up in layers it can be difficult on getting them to bend . I don't care for the per-paint belts , sure it has a fabric effect , but even in 32 scale the detail of this is over scale .
Ja , I did spent a bit of time looking through ref's and online at pic's . But a 2.5 mm over lap going around the whole ring is to much for this scale . Once the join is cleaned up will have some pics up . Thanks for sharing your pic's .
Torsten , lovely job on the Tamiya kit . Still one left in stash . My last A-8 . Still have a few A-4 , A-6 , A-9 in the stash so that should last me for a bit ...NOT !
Terri
Joel_W
Associate Editor New York, United States
Joined: December 04, 2010
KitMaker: 11,666 posts
AeroScale: 7,410 posts
Posted: Monday, January 23, 2017 - 11:19 PM UTC
Terri,
You did a fantastic job on the Seatbelts and Harnesses. I just assumed that they're the fabric type one as they look that good.
1/32 scale sure agrees with you.
Joel
On my Workbench:
Monogram 1/24 scale 427 Shelby Cobra
Just Completed:
Beemax 1/24 scale BMW M3 E30 1992 Evolution II
Alberta, Canada
Joined: January 19, 2008
KitMaker: 6,743 posts
AeroScale: 6,151 posts
Posted: Tuesday, January 24, 2017 - 06:51 AM UTC
Thanks Joel , there is about 50 parts for those belts !
Not sure if 32 scale agrees with me , but that part of the stash seems to be gaining ground with the 48's in the stash .
Made a little progress on the clean up . Mostly filling the gap in the wing area . Once this part is finished will be able to spray some primer and see how things sit .
In the mean time , I got some bombs to glue up !
Terri
Niedersachsen, Germany
Joined: March 26, 2014
KitMaker: 844 posts
AeroScale: 630 posts
Posted: Tuesday, January 24, 2017 - 12:52 PM UTC
Nice work so far, Terri. your 190 is coming very nice along.
Hopefully the engine panels go well over the engine while everything is closed.
Joel_W
Associate Editor New York, United States
Joined: December 04, 2010
KitMaker: 11,666 posts
AeroScale: 7,410 posts
Posted: Wednesday, January 25, 2017 - 12:57 AM UTC
Quoted Text
Thanks Joel , there is about 50 parts for those belts !
Not sure if 32 scale agrees with me , but that part of the stash seems to be gaining ground with the 48's in the stash .
Made a little progress on the clean up . Mostly filling the gap in the wing area . Once this part is finished will be able to spray some primer and see how things sit .
In the mean time , I got some bombs to glue up !
Terri
Terri,
With my move to 1/32 scale for props and small 1st & 2nd generation jets, plus full retirement this coming Nov, I had to face reality and realize that my somewhat over jealous model spending habit needs to be drastically curtailed from that date on.
I've settled on a modified stash of a max of 6 1/48 scale kits and 6 1/32 scale kits. Once a kit hits the bench, then a replacement will be purchased some time during the build. Right now I've actually reached the max in both stashes and have half of the 1/32 scale kits in either Tamiya or ZM kits. At the rate I build these days, saving just $10 per week will easily let me keep that ratio plus paints, decals, and supplies. Well, at least that's the plan.
Joel
On my Workbench:
Monogram 1/24 scale 427 Shelby Cobra
Just Completed:
Beemax 1/24 scale BMW M3 E30 1992 Evolution II
Washington, United States
Joined: March 15, 2009
KitMaker: 3,670 posts
AeroScale: 833 posts
Posted: Wednesday, January 25, 2017 - 02:42 AM UTC
Quoted Text
....With my move to 1/32 scale for props and small 1st & 2nd generation jets, plus full retirement this coming Nov, I had to face reality and realize that my somewhat over jealous model spending habit needs to be drastically curtailed from that date on.
I've settled on a modified stash of a max of 6 1/48 scale kits and 6 1/32 scale kits. Once a kit hits the bench, then a replacement will be purchased some time during the build. Right now I've actually reached the max in both stashes and have half of the 1/32 scale kits in either Tamiya or ZM kits. At the rate I build these days, saving just $10 per week will easily let me keep that ratio plus paints, decals, and supplies. Well, at least that's the plan.
Joel
Joel,
Retiring in 2006, with a rather large stash, and then working in a LHS which increased my stash even more, I found myself in a similar fix. I recommend you see if a LHS will take kits in "trade". Or sell on eBay, this will reduce your stash to a reasonable size, and allow you to get some value out of the stash you have. I haven't purchased a bottle of paint or glue for a long time that way. I have a rule if a new kit comes out I want, I have to trade a few kits to get it. I too have "switched" to 1/32 kits , with only a few 1/72 (four engined bombers, all seaplanes and spacecraft) and a few selected 1/48 kits (mostly kits not offered in other scales). The target is to keep my stash under 150 kits of all types including ships and armor. That way when I'm gone, my kids won't have a lot to deal with, and I might actually be able to finish some! Retirement is great, but it does bring sacrifices and compromises. I'm watching the build of this FW190 with interest, as these builds help me decide if I want to trade or buy for kits like this-- I've been eying this 190-F8 for a while, and the price is just to good to pass up-- but I'd rather it had been a 190-A4-- oh well you can't have everyhthing!
VR, Russ

Joel_W
Associate Editor New York, United States
Joined: December 04, 2010
KitMaker: 11,666 posts
AeroScale: 7,410 posts
Posted: Wednesday, January 25, 2017 - 03:00 AM UTC
Quoted Text
Quoted Text
....With my move to 1/32 scale for props and small 1st & 2nd generation jets, plus full retirement this coming Nov, I had to face reality and realize that my somewhat over jealous model spending habit needs to be drastically curtailed from that date on.
I've settled on a modified stash of a max of 6 1/48 scale kits and 6 1/32 scale kits. Once a kit hits the bench, then a replacement will be purchased some time during the build. Right now I've actually reached the max in both stashes and have half of the 1/32 scale kits in either Tamiya or ZM kits. At the rate I build these days, saving just $10 per week will easily let me keep that ratio plus paints, decals, and supplies. Well, at least that's the plan.
Joel
Joel,
Retiring in 2006, with a rather large stash, and then working in a LHS which increased my stash even more, I found myself in a similar fix. I recommend you see if a LHS will take kits in "trade". Or sell on eBay, this will reduce your stash to a reasonable size, and allow you to get some value out of the stash you have. I haven't purchased a bottle of paint or glue for a long time that way. I have a rule if a new kit comes out I want, I have to trade a few kits to get it. I too have "switched" to 1/32 kits , with only a few 1/72 (four engined bombers, all seaplanes and spacecraft) and a few selected 1/48 kits (mostly kits not offered in other scales). The target is to keep my stash under 150 kits of all types including ships and armor. That way when I'm gone, my kids won't have a lot to deal with, and I might actually be able to finish some! Retirement is great, but it does bring sacrifices and compromises. I'm watching the build of this FW190 with interest, as these builds help me decide if I want to trade or buy for kits like this-- I've been eying this 190-F8 for a while, and the price is just to good to pass up-- but I'd rather it had been a 190-A4-- oh well you can't have everyhthing!
VR, Russ
Russ,
I'm actually looking forward to retiring. I'd have worked till I'm 70, that's more then long enough.
I've never been much of a stash/collector as I always felt that something newer and better that I'm interested in will come out, so I never worry about a kit or kits becoming scarce or at collector prices.
Like I said, I have only 12 kits, 6 1/48 scale kits which aren't available in 1/32 and most likely in my life time never be. And I have 6 1/32 scale kits, all personal favorites. My philosophy of build one replace one hopefully will work.
Only time will tell.
Terri, sorry about high jacking your build thread.
Joel
On my Workbench:
Monogram 1/24 scale 427 Shelby Cobra
Just Completed:
Beemax 1/24 scale BMW M3 E30 1992 Evolution II
Alberta, Canada
Joined: January 19, 2008
KitMaker: 6,743 posts
AeroScale: 6,151 posts
Posted: Wednesday, January 25, 2017 - 06:25 AM UTC
Not the first time I have been hijacked Joel

No worries mate .
Here is she stands right now . For the gaps in the wing root area on the underside of the wings in the flap area the gaps I back with scrap .5mm card so the putty would make a mess and further cleaning up needed . Valljeo putty was used and after a few minutes the excess was wipe way with a damp q-tip .
The cowling covers fitted rather well but on the side panels I did have to trim the tops of the rocker assemblies for this to fit .
Now I ready for some primer so my mistakes and jump out at me


Terri
Joel_W
Associate Editor New York, United States
Joined: December 04, 2010
KitMaker: 11,666 posts
AeroScale: 7,410 posts
Posted: Wednesday, January 25, 2017 - 06:34 AM UTC
Terri,
outstanding putty work. I love working with Vallejo White Acrylic putty for small and tight work.
Joel
On my Workbench:
Monogram 1/24 scale 427 Shelby Cobra
Just Completed:
Beemax 1/24 scale BMW M3 E30 1992 Evolution II
New Jersey, United States
Joined: February 06, 2015
KitMaker: 1,098 posts
AeroScale: 900 posts
Posted: Wednesday, January 25, 2017 - 07:11 AM UTC
Terri -
Beautiful job - watching with much admiration. Love the paintwork on the seat !
Richard

#424
Queensland, Australia
Joined: April 23, 2015
KitMaker: 4,648 posts
AeroScale: 1,938 posts
Posted: Wednesday, January 25, 2017 - 11:13 PM UTC
Terri,
You've really done some good work on this FW. The engine looks great, and the seat and seatbelts just fabulous!
Can't wait to see more!
Gaz
"Artillery adds dignity, to what would otherwise be an ugly brawl."
Frederick The Great
Alberta, Canada
Joined: January 19, 2008
KitMaker: 6,743 posts
AeroScale: 6,151 posts
Posted: Friday, January 27, 2017 - 05:30 AM UTC
Thanks guys , should be able to start airbrushing the camo this weekend . Won't be using Tamiya colours for the camo . Going to try Vallejo Air . I only used them for smaller items , but not full camo so I'm looking forward on trying them out for this .
Terri
#305
Christchurch, New Zealand
Joined: February 01, 2006
KitMaker: 1,673 posts
AeroScale: 1,517 posts
Posted: Friday, January 27, 2017 - 06:09 AM UTC
Hi Terri I used Vallejo exclusively for the first time on a Fw190A-8 funnily enough in 1/48 scale the colours seemed a tad dark to me but most everyone else thought the colours were good.

Joel_W
Associate Editor New York, United States
Joined: December 04, 2010
KitMaker: 11,666 posts
AeroScale: 7,410 posts
Posted: Friday, January 27, 2017 - 06:29 AM UTC
Terri,
Looking forward to your camo paint scheme with Vallejo paints. I'm just an old Tamiya man at heart, so I keep on going back to my comfort zone. Although I did buy 4 bottles of MRP paints for interior colors. Thought I'd live a little on the wild side.

Joel
On my Workbench:
Monogram 1/24 scale 427 Shelby Cobra
Just Completed:
Beemax 1/24 scale BMW M3 E30 1992 Evolution II
Alberta, Canada
Joined: January 19, 2008
KitMaker: 6,743 posts
AeroScale: 6,151 posts
Posted: Saturday, January 28, 2017 - 12:54 PM UTC
Shouldn't have to wait to much longer Joel . Just finished spraying the last part of the camo . This needs to dry over night . Will have pic's up tomorrow

Terri
Alberta, Canada
Joined: January 19, 2008
KitMaker: 6,743 posts
AeroScale: 6,151 posts
Posted: Saturday, January 28, 2017 - 09:33 PM UTC
Over the years I have gotten used to using Tamiya paints were it became second nature when thinning and spraying them . Past year I started Vallejo Air on smaller items so this was the perfect project on doing the camo using their paint .
The paint sprays really well even better with a drop or two with their airbrush thinner . The yellow band and the tail is Tamiya flat yellow with a few drops of red . I don't have RLM 04 in the Vallejo range yet . Clean up is really easy with a bit of water and a flushing with Vallejo airbrush cleaner which also works well for thinner too .


Terri , who is off to start clear coating for decals !
Joel_W
Associate Editor New York, United States
Joined: December 04, 2010
KitMaker: 11,666 posts
AeroScale: 7,410 posts
Posted: Saturday, January 28, 2017 - 09:47 PM UTC
Terri,
The camo paint scheme really looks quite good.
I'm just an old guy who loves Tamiya Acrylic paints. I've changed my thinning and shooting procedures some. Instead of 1:1 with their Yellow cap thinner, I've got to 2:3 and dropped the flow psi to 16 psi. Just super smooth results and almost no overspray.
Joel
On my Workbench:
Monogram 1/24 scale 427 Shelby Cobra
Just Completed:
Beemax 1/24 scale BMW M3 E30 1992 Evolution II
Alberta, Canada
Joined: January 19, 2008
KitMaker: 6,743 posts
AeroScale: 6,151 posts
Posted: Sunday, January 29, 2017 - 05:40 AM UTC
Thanks Joel . Started decaling this afternoon , but this will take a few days to get them all on .
One of the reason on why I love working with Tamya paints .
Terri
Niedersachsen, Germany
Joined: March 26, 2014
KitMaker: 844 posts
AeroScale: 630 posts
Posted: Sunday, January 29, 2017 - 05:13 PM UTC
Your progress is really straight forward, Terri. Good work so far and the paint job looks the part.
I am looking forward to your next post with decal on.
England - South West, United Kingdom
Joined: January 06, 2007
KitMaker: 3,661 posts
AeroScale: 369 posts
Posted: Sunday, January 29, 2017 - 05:57 PM UTC
Looking good Terri. Really like the mottling. Looking forward to decals. I love tamiya paints but have moved to life colour as they are a little more transparent and work better for my style of painting. Although if I don't have the right life colour i tend to cut me tamiya paint with screen wash. Still my favourite brand for ease of use and coverage
Support Our Troops! Hit the Yes button If you find reviews or features helpful.
Alberta, Canada
Joined: January 19, 2008
KitMaker: 6,743 posts
AeroScale: 6,151 posts
Posted: Wednesday, February 01, 2017 - 06:06 AM UTC
#305
Christchurch, New Zealand
Joined: February 01, 2006
KitMaker: 1,673 posts
AeroScale: 1,517 posts
Posted: Wednesday, February 01, 2017 - 07:29 AM UTC
Interesting decal application on the ordinance Terri I don't think I've ever seen a bomb with these particular markings. Hand written sentiments perhaps but nothing like that, just awesome!
Niedersachsen, Germany
Joined: March 26, 2014
KitMaker: 844 posts
AeroScale: 630 posts
Posted: Wednesday, February 01, 2017 - 10:07 AM UTC
Very nice work Terri.
It seems the decals worked pretty good, is your spiral around the spinner the decal ? Looks really good !


