
Air Campaigns
Want to start or join a group build? This is where to start.
Want to start or join a group build? This is where to start.
Hosted by Frederick Boucher, Michael Satin
OFFiCIAL: Six Day War 50th Anniv. Campaign

Bigrip74

Joined: February 22, 2008
KitMaker: 5,026 posts
AeroScale: 2,811 posts

Posted: Tuesday, June 27, 2017 - 09:07 PM UTC

SHAKY962

Joined: May 21, 2012
KitMaker: 765 posts
AeroScale: 316 posts

Posted: Tuesday, June 27, 2017 - 09:25 PM UTC
Let me know if it´s possible to build an Egyptian/Sirian Mig-15 UTI?
TIA
TIA

Bigrip74

Joined: February 22, 2008
KitMaker: 5,026 posts
AeroScale: 2,811 posts

Posted: Wednesday, June 28, 2017 - 06:01 AM UTC
MichaelSatin


Joined: January 19, 2008
KitMaker: 3,909 posts
AeroScale: 2,904 posts

Posted: Wednesday, June 28, 2017 - 04:41 PM UTC
Quoted Text
Let me know if it´s possible to build an Egyptian/Sirian Mig-15 UTI?
TIA
Jose; That would be fine, as long as it's in '67 markings.
Bob; Yeah, that's a pretty old mold. Good luck with it, I have faith in you!
Michael


Bigrip74

Joined: February 22, 2008
KitMaker: 5,026 posts
AeroScale: 2,811 posts

Posted: Wednesday, June 28, 2017 - 07:38 PM UTC
Quoted Text
Quoted TextLet me know if it´s possible to build an Egyptian/Sirian Mig-15 UTI?
TIA
Jose; That would be fine, as long as it's in '67 markings.
Bob; Yeah, that's a pretty old mold. Good luck with it, I have faith in you!
Michael
Michael, you probably have stock in a putty company
 . It will not be as bad as I thought, this Tamiy putty and the Liquitex are doing a great job.
Bob

Bigrip74

Joined: February 22, 2008
KitMaker: 5,026 posts
AeroScale: 2,811 posts

Posted: Friday, June 30, 2017 - 12:57 AM UTC

Bigrip74

Joined: February 22, 2008
KitMaker: 5,026 posts
AeroScale: 2,811 posts

Posted: Friday, June 30, 2017 - 09:30 AM UTC
MichaelSatin


Joined: January 19, 2008
KitMaker: 3,909 posts
AeroScale: 2,904 posts

Posted: Sunday, July 02, 2017 - 09:34 PM UTC
Coming along nicely Bob! More than I can say for the Eduard Mirage which is... behaving badly.
So, with a couple of months to go, I'm switching my build to the Dragon 1/32 M3A1 halftrack:
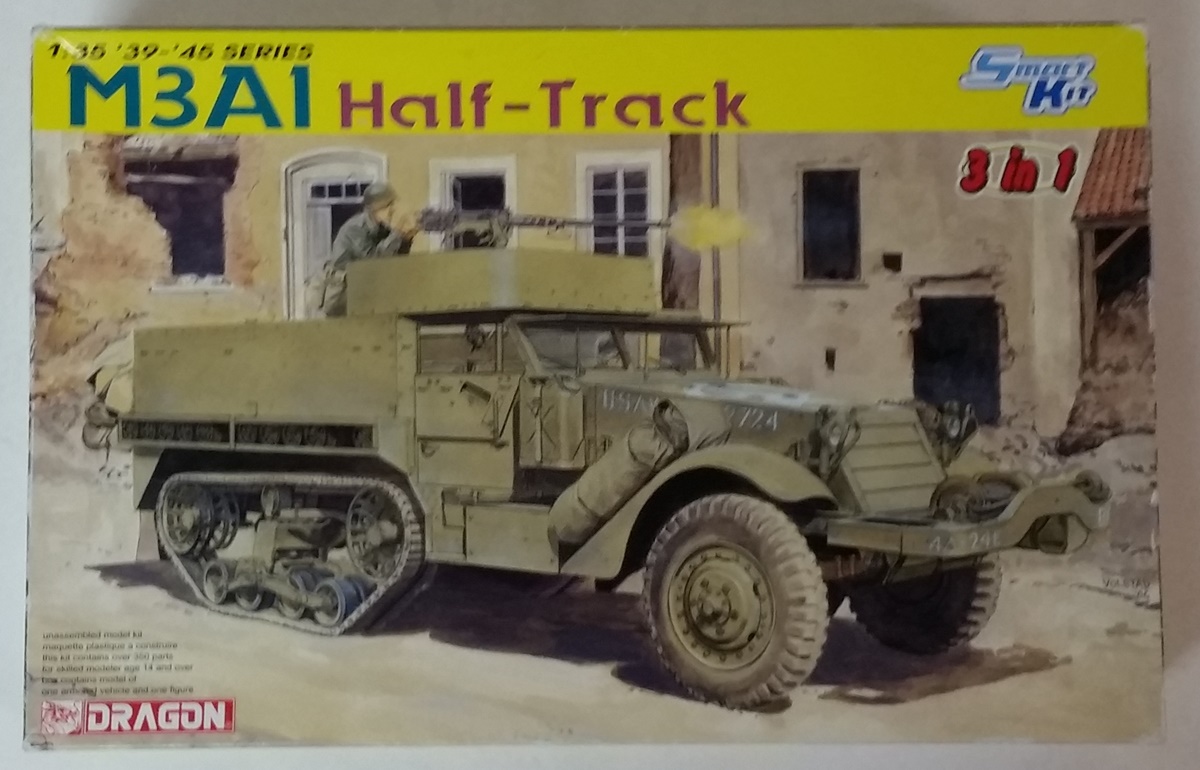
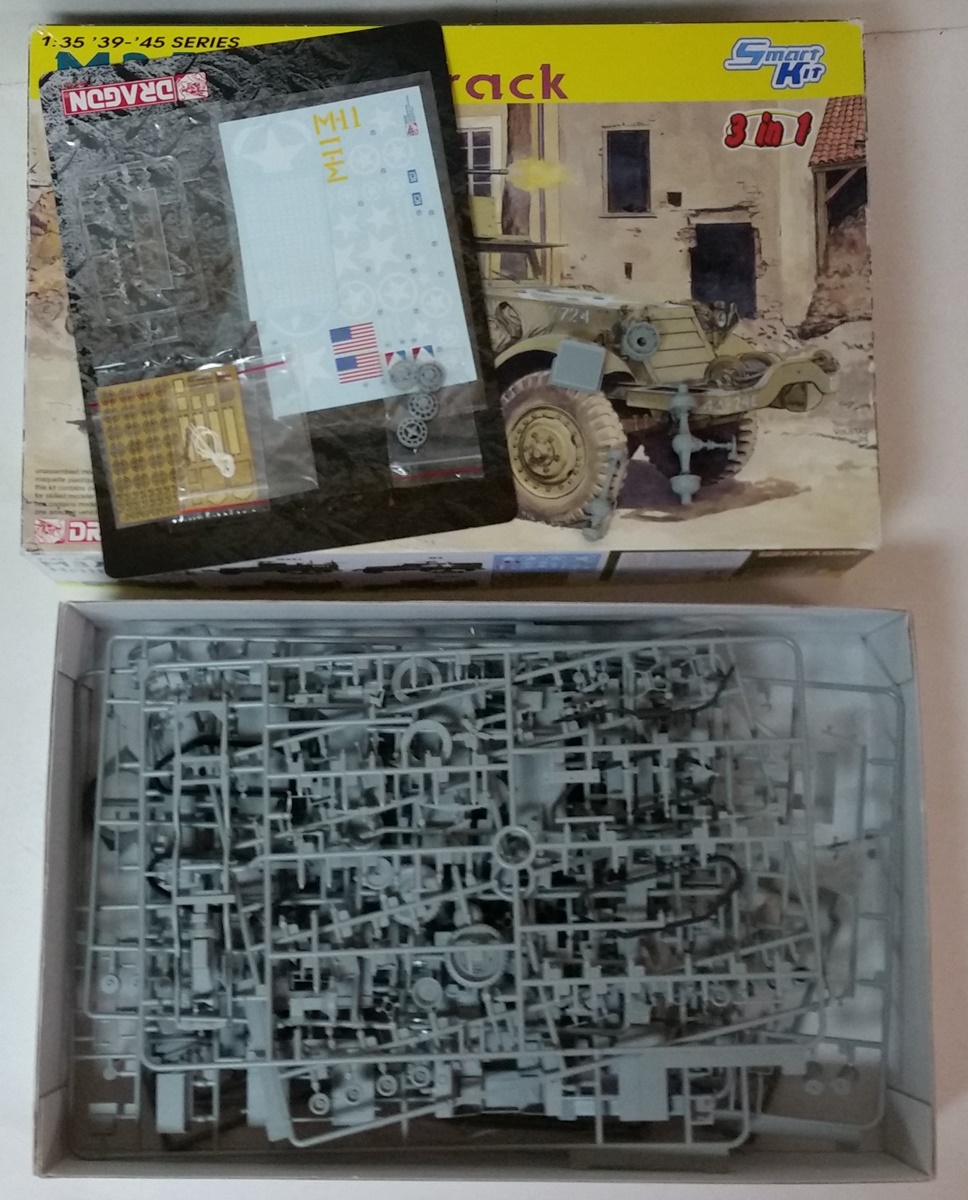
I have a small start on it, basically step 1, some of the front end parts and drive sprockets. Way less than 25%:
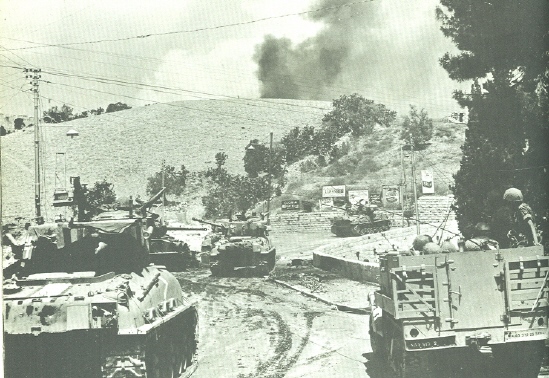
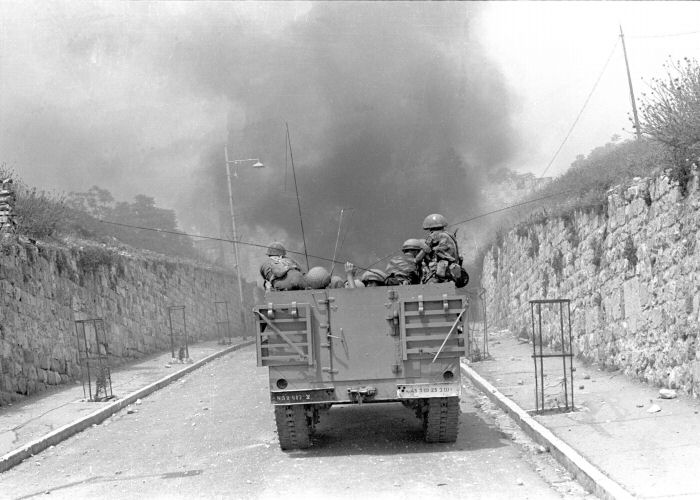
I'll be doing Col. Motta Gur's halftrack in the Battle for Jerusalem:
Hopefully this will go better.
Michael
So, with a couple of months to go, I'm switching my build to the Dragon 1/32 M3A1 halftrack:

I have a small start on it, basically step 1, some of the front end parts and drive sprockets. Way less than 25%:

I'll be doing Col. Motta Gur's halftrack in the Battle for Jerusalem:


Hopefully this will go better.
Michael

69mudbone

Joined: April 26, 2016
KitMaker: 362 posts
AeroScale: 42 posts

Posted: Monday, July 03, 2017 - 10:41 PM UTC

Bigrip74

Joined: February 22, 2008
KitMaker: 5,026 posts
AeroScale: 2,811 posts

Posted: Sunday, July 09, 2017 - 05:42 AM UTC
Quoted Text
Bob,
I'm afraid misrepresentations of IAF color schemes was an industry standard at one time.
According to my sources (IsraDecal and SAM), IAF S-58s (H-34s) were sourced from either the US or West Germany. The US machines were painted in standard IAF colors of RAL 5008 blue and FS30215 brown over RAL 7044 light gray. The German bought 'copters came in RAL6014 olive green and the Israelis overpainted that with FS30215 in a disruptive pattern. I think that was overall with no light grey undersides. I'm not sure if they stayed that way through the war.
In the pictures you have, number 27 would carry the olive/brown scheme. Examples of the blue/brown/gray scheme would be 13 or 15, neither of which had that framework or antenna array on the nose that 27 did. I don't think any would have three digit numbers in '67.
Hope this helps!
Michael
If I am reading this correctly then the following would OK schemes.

MichaelSatin


Joined: January 19, 2008
KitMaker: 3,909 posts
AeroScale: 2,904 posts

Posted: Sunday, July 09, 2017 - 06:05 AM UTC
Bob,
I believe so.
Michael
I believe so.
Michael

MichaelSatin


Joined: January 19, 2008
KitMaker: 3,909 posts
AeroScale: 2,904 posts

Posted: Sunday, July 09, 2017 - 06:55 PM UTC
Some progress on the Dragon M3A1 halftrack:
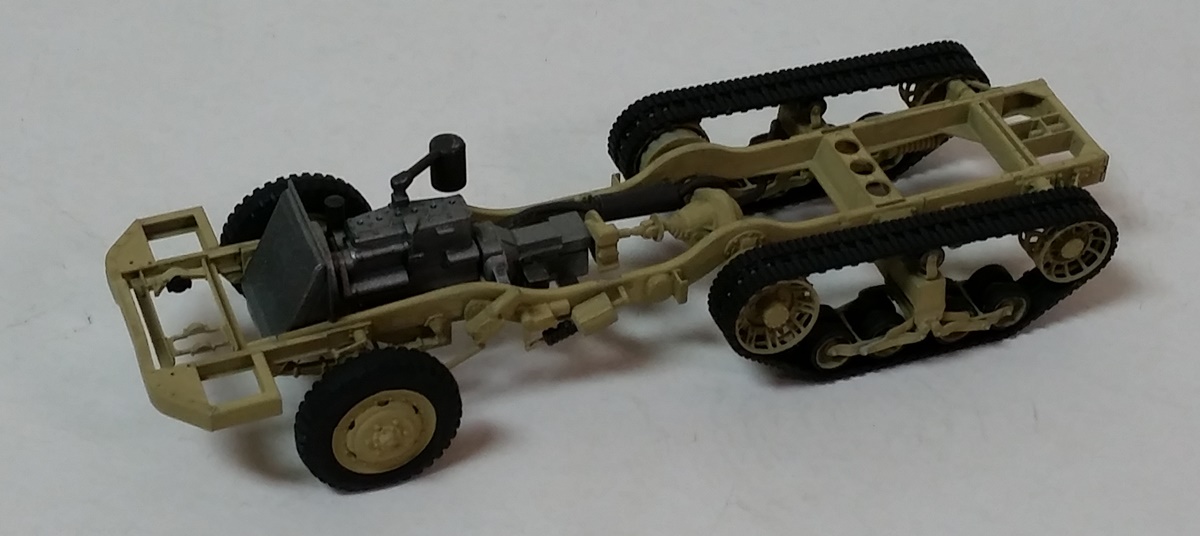
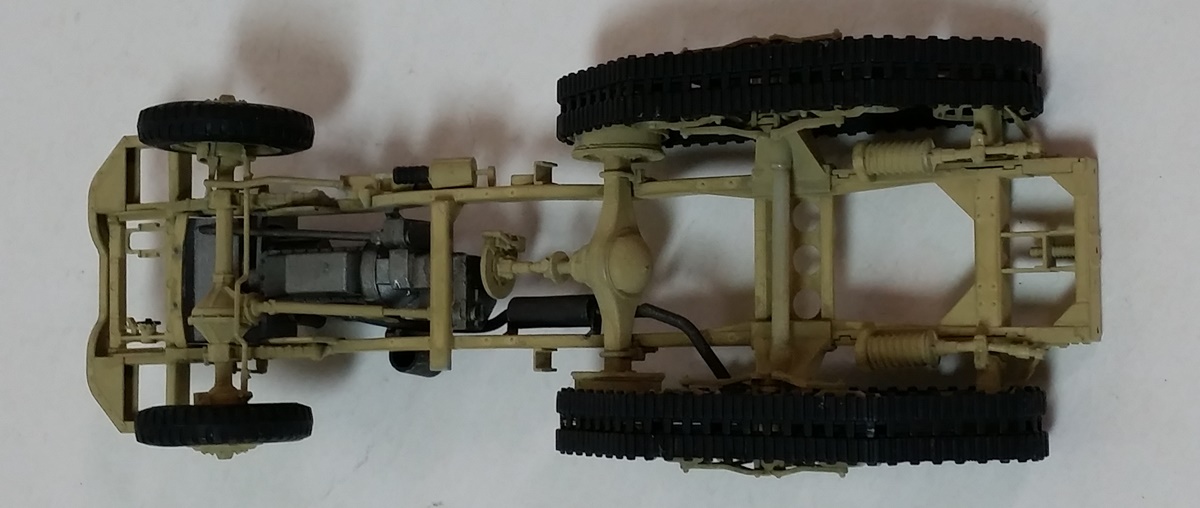
The tracks and running gear turned out to be something of a chore but I think I figured out a good sequence for getting them together. Let me know if you want me to post that.
Michael


The tracks and running gear turned out to be something of a chore but I think I figured out a good sequence for getting them together. Let me know if you want me to post that.
Michael

Posted: Sunday, July 09, 2017 - 07:05 PM UTC
Tips from the trenches always helpful, Michael! 


MichaelSatin


Joined: January 19, 2008
KitMaker: 3,909 posts
AeroScale: 2,904 posts

Posted: Monday, July 10, 2017 - 01:13 AM UTC
Clayton,
Well, OK, since you ask.
If you're building or planning to build the Dragon M2/3/etc. halftrack I've come up with what I think is a good way to tackle the tracks and running gear. The tracks on this kit are hard plastic and come in two halves for each side, an inside and outside part. The instructions on putting this all together are typical Dragon, a fairly large exploded assembly drawing with arrows but no clear order in which things should be done. By trial and error, I came up with this method:
Assemble chassis and power train, including axles for drive sprockets and idler wheels, as per the instructions.
Assemble the idler wheels and drive sprockets per the instructions, but shave off the locater pin inside the drive sprocket assemblies where they will attach to the axle. They aren't necessary and could interfere with fit later.
Assemble the bogie units as per instructions EXCEPT do not attach the return rollers to the top. Glue the roller units together, but DON’T add them to the bogie units yet.
DON’T glue the bogie units to the frame yet.
Glue the tracks together. Let everything set up tight.
Insert the drive sprocket and idler wheel into the tracks. Make sure the outsides of the wheels (the drive sprockets have bolt detail on the outside but not on the inside) are facing out on each side of the vehicle. Push them fully into place hard against the inside of the tracks and glue them there.
Insert the bogie units inside the tracks, do not glue them yet.
Assemble the entire track/running gear unit to the chassis, gluing the drive sprocket and idler wheel to their respective axles and lining up and gluing the bogie units to the frame and track.
Once all is set up, add the return rollers to the top of the bogie units and inside of tracks.
I tried doing it by putting the wheels and bogie units on, then sliding the inside track halves around them. This was a bad idea and nearly led to broken axles. Luckily the sprocket and idler wheels were still freshly enough glued to allow me to slide them off. The method above worked quite well for me once I'd figured it out. Hope it does for you as well!
Michael

Posted: Monday, July 10, 2017 - 02:21 AM UTC
That is worth trying on a LOT of tracked vehicles...great tip! 


Bigrip74

Joined: February 22, 2008
KitMaker: 5,026 posts
AeroScale: 2,811 posts

Posted: Tuesday, July 11, 2017 - 09:46 AM UTC

PasiAhopelto

Joined: October 01, 2016
KitMaker: 514 posts
AeroScale: 239 posts

Posted: Tuesday, July 11, 2017 - 09:38 PM UTC
Getting close to being completed:

Tracks, little paint, antenna and more weathering to do...

Tracks, little paint, antenna and more weathering to do...
Posted: Wednesday, July 12, 2017 - 02:58 AM UTC
Looking great, Pasi!

Bigrip74

Joined: February 22, 2008
KitMaker: 5,026 posts
AeroScale: 2,811 posts

Posted: Wednesday, July 12, 2017 - 05:34 AM UTC
Quoted Text
Looking great, Pasi!
I agree with Clayton.
Bob

Bigrip74

Joined: February 22, 2008
KitMaker: 5,026 posts
AeroScale: 2,811 posts

Posted: Thursday, July 13, 2017 - 02:11 AM UTC
Posted: Thursday, July 13, 2017 - 05:40 AM UTC
Looking great, Bob!

PasiAhopelto

Joined: October 01, 2016
KitMaker: 514 posts
AeroScale: 239 posts

Posted: Friday, July 14, 2017 - 12:14 AM UTC
Thanks Clayton and Bob.
I think this is now done:
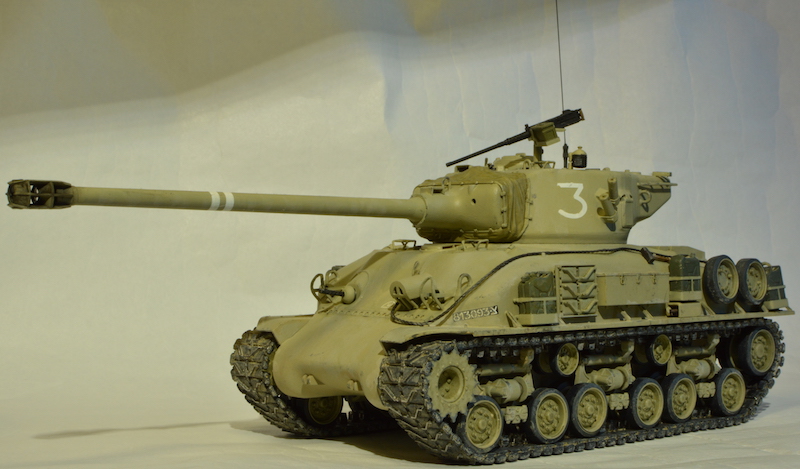
Friul tracks took about five hours to build; nevertheless they were lot easier to do than I anticipated (two part axles and two parts for each track link). Anyway, easy and fun kit. My only criticism to the kit is that headlight cages are on thick side, shackle mounting points are solid and some minor details are missing.
The are three other pictures in campaign gallery
Had fun following other builds in the campaign. Thanks for the campaign.
I think this is now done:

Friul tracks took about five hours to build; nevertheless they were lot easier to do than I anticipated (two part axles and two parts for each track link). Anyway, easy and fun kit. My only criticism to the kit is that headlight cages are on thick side, shackle mounting points are solid and some minor details are missing.
The are three other pictures in campaign gallery
Had fun following other builds in the campaign. Thanks for the campaign.
Posted: Friday, July 14, 2017 - 02:24 AM UTC
Beautiful work, Pasi!
Tobar

Joined: October 17, 2002
KitMaker: 192 posts
AeroScale: 70 posts

Posted: Friday, July 14, 2017 - 05:02 AM UTC
Pasi,.... I like your Tamiya ISherman... The metal tracks look a lot better then my rubber kit ones... My next AFV will have metal tracks...
Great work!
Great work!
MichaelSatin


Joined: January 19, 2008
KitMaker: 3,909 posts
AeroScale: 2,904 posts

Posted: Friday, July 14, 2017 - 08:19 PM UTC
Very nice, Pasi!
By the way, the Israelis never called it an "Isherman", just an M51. The only Sherman they referred to as a "Super-Sherman" was the M1 (their designation) which was essentially an M4A1E8 (76).
Thus endeth the lesson.
Michael (in a pedantic mood)
By the way, the Israelis never called it an "Isherman", just an M51. The only Sherman they referred to as a "Super-Sherman" was the M1 (their designation) which was essentially an M4A1E8 (76).
Thus endeth the lesson.
Michael (in a pedantic mood)

 |


