Love all the different projects. I learn something new every day!
Enjoy the modeling.
Air Campaigns
Want to start or join a group build? This is where to start.
Want to start or join a group build? This is where to start.
Hosted by Frederick Boucher, Michael Satin
OFFICIAL: ANZAC Campaign 2017
Posted: Tuesday, October 24, 2017 - 08:47 PM UTC
Posted: Wednesday, October 25, 2017 - 08:55 AM UTC
Here is the latest on my Kiwi M41 Bulldog
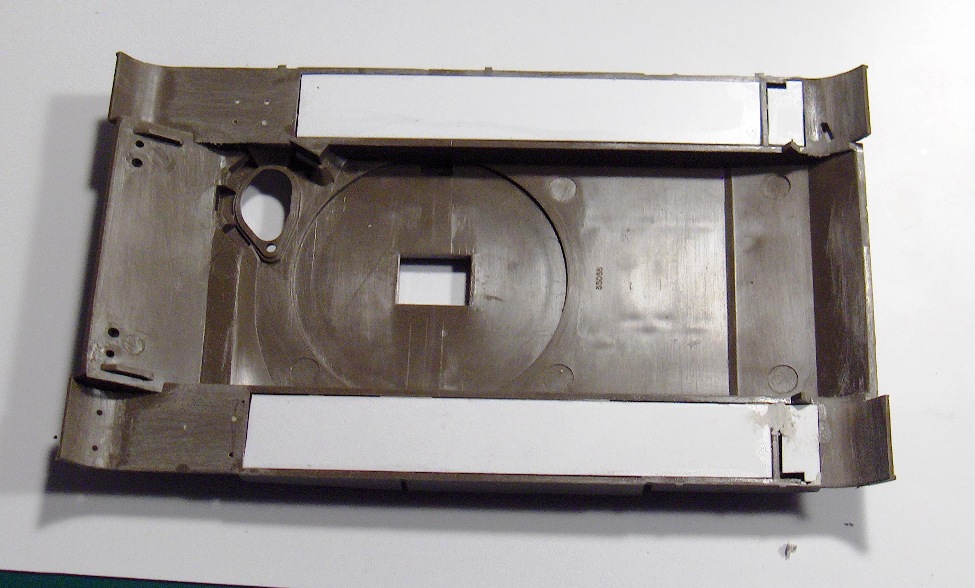
Closed over the open gaps above the treads
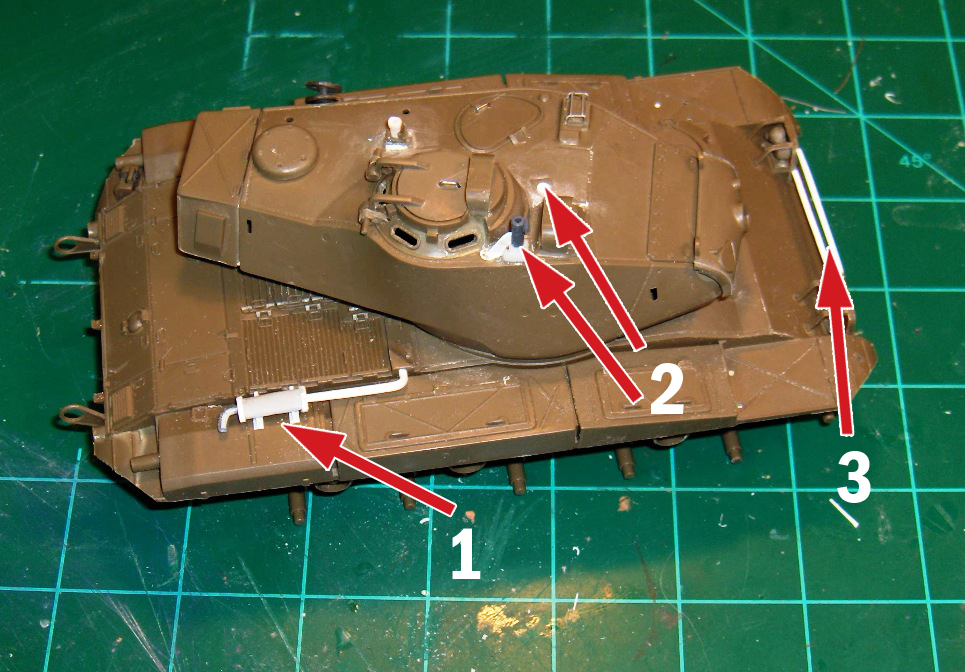
1: Added auxiliary generator exhaust and muffler.
2: Remove MG mount and placed new one at right of commander hatch.
3: Added stowage rails between the headlight guards.
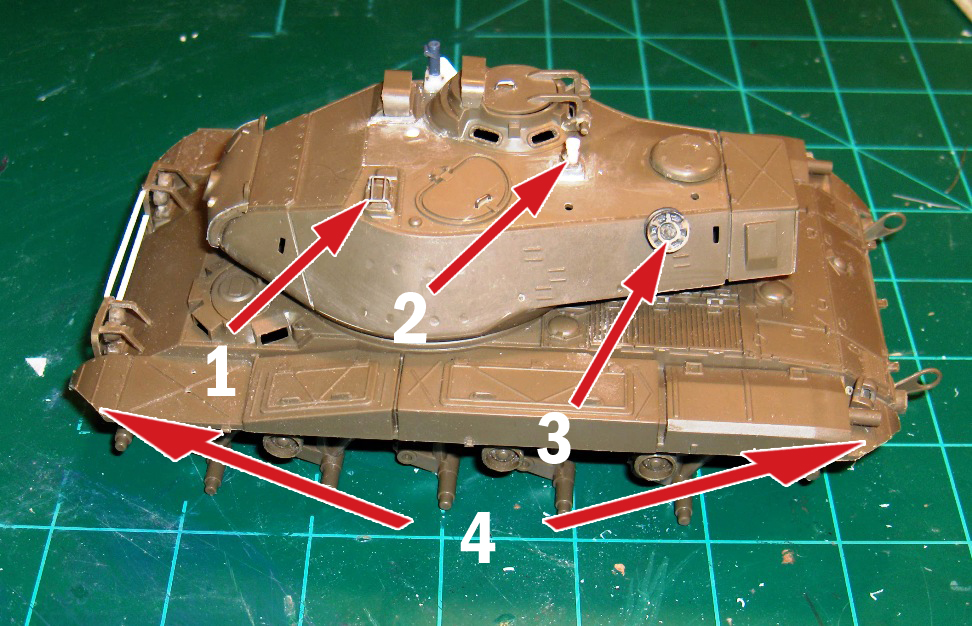
1. Added guard over view port.
2: Moved original MG mount behind and between both hatches.
3: Added cable drum reel.
4: Cut fenders to 45 degrees.
Closed over the open gaps above the treads
1: Added auxiliary generator exhaust and muffler.
2: Remove MG mount and placed new one at right of commander hatch.
3: Added stowage rails between the headlight guards.
1. Added guard over view port.
2: Moved original MG mount behind and between both hatches.
3: Added cable drum reel.
4: Cut fenders to 45 degrees.
Posted: Wednesday, October 25, 2017 - 07:40 PM UTC
Jeff, nice work on the Bulldog. Had no idea New Zealand used them. Did they see service in Korea or Vietnam?
This kit is so cheap and easy to find I might try it myself. Always interested to build something different.
Hoping to carry on with my figures over the weekend. Gotten more than a little preoccupied working on my Halloween costume the last couple of weeks, so serious modelling has been neglected.
This kit is so cheap and easy to find I might try it myself. Always interested to build something different.
Hoping to carry on with my figures over the weekend. Gotten more than a little preoccupied working on my Halloween costume the last couple of weeks, so serious modelling has been neglected.
Posted: Friday, October 27, 2017 - 01:10 AM UTC
Hi Damian nice to see a LAV make an appearance and aren't there always issues with Trumpeter kits? But the prices are always good!
Jeff great work on the bulldog! I'll keep an eye on your build as I have a couple in the stash I'll need to build.
Stephen to answer your question the Bulldog wasn't used by NZ Armoured forces outside of New Zealand. Here's a brief account of our "participation" in the Vietnam war
Jeff great work on the bulldog! I'll keep an eye on your build as I have a couple in the stash I'll need to build.
Stephen to answer your question the Bulldog wasn't used by NZ Armoured forces outside of New Zealand. Here's a brief account of our "participation" in the Vietnam war
Posted: Friday, October 27, 2017 - 11:02 AM UTC
Stephen,
Not sure they ever used them in combat or not.
But here is a good site I got some information on the looks and features from.
http://www.hobbyhavoc.com/oldhavoc/index.php?topic=925.0
Not sure they ever used them in combat or not.
But here is a good site I got some information on the looks and features from.
http://www.hobbyhavoc.com/oldhavoc/index.php?topic=925.0
Sleepwalker71

Joined: August 30, 2012
KitMaker: 265 posts
AeroScale: 72 posts

Posted: Friday, October 27, 2017 - 12:30 PM UTC
Hi Chris,
Yes, Trumpeter's ASLAV is sort of plagued with inaccuracies. Luckily most of them were pointed out in Armorama's excellent review - it is a real manual to go point by point. I have ordered Eduard's PE set which will deal with most of them - remaining have to be sorted out manually by scratchbuilding - especially hubs over front suspension mounting. Some details I was able to identify on the photos will be added too, like brakes lines.
Of course there is update resin kit available, but pricewise it is overkill comparing to kit's price.
Molds' quality is very nice and far away from older Trumpeter's issues where ejector pin marks were a real nightmare.
Cheers,
Damian
BTW. ASLAV-25 walkaround at Primeportal doesn't work, for me at least. Does any may share saved pictures?

BlackWidow

Joined: August 09, 2009
KitMaker: 1,732 posts
AeroScale: 1,336 posts

Posted: Saturday, October 28, 2017 - 05:32 PM UTC
Good progress here everyone!
Here's my weekly update. Done a few things on my Ventura. After painting Interior Green on the fuselage nose I noticed an ugly gap which I couldn't see before ....

.... filled, sanded and airbrushed again. Not perfect, but a lot better than before ....


.... de-icing rubbers are painted and masked with Tamiya Tape like everthing else needed is covered to throw some paint on it ....


.... first some white primer all over ....

.... the windy and rainy day today is perfect for some model building, so this morning I airbrushed the first colour, RAF Sky on the underside. It's Revell No. 59, the same as on my Defiant and Hurricane Mk. I ....

.... I decided to go for sharp edges between Sky and Dark Earth, so there's another masking orgy coming in the next days. More to come soon, so stay tuned ....
Have a nice Sunday!
Torsten
Here's my weekly update. Done a few things on my Ventura. After painting Interior Green on the fuselage nose I noticed an ugly gap which I couldn't see before ....


.... filled, sanded and airbrushed again. Not perfect, but a lot better than before ....


.... de-icing rubbers are painted and masked with Tamiya Tape like everthing else needed is covered to throw some paint on it ....


.... first some white primer all over ....

.... the windy and rainy day today is perfect for some model building, so this morning I airbrushed the first colour, RAF Sky on the underside. It's Revell No. 59, the same as on my Defiant and Hurricane Mk. I ....

.... I decided to go for sharp edges between Sky and Dark Earth, so there's another masking orgy coming in the next days. More to come soon, so stay tuned ....

Have a nice Sunday!
Torsten

Posted: Wednesday, November 01, 2017 - 05:46 AM UTC
Finished the main build.
Add mantle cover, tool rack and change to larger generator exhaust.
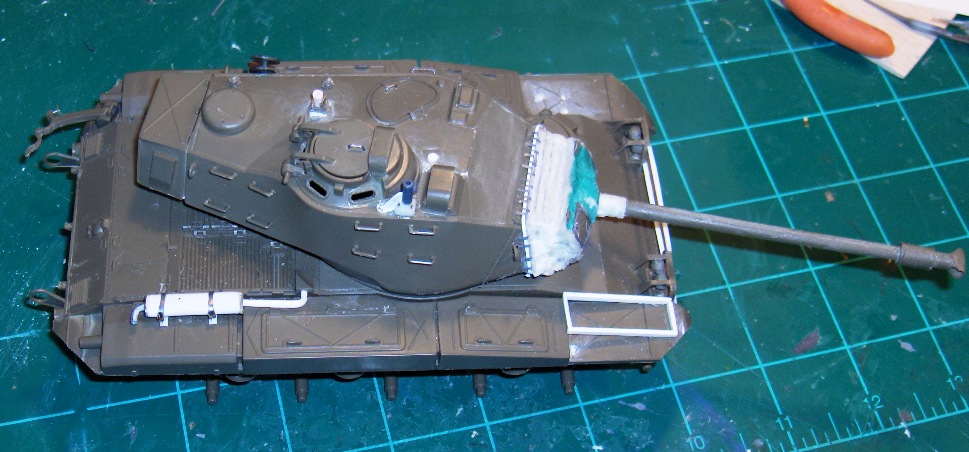
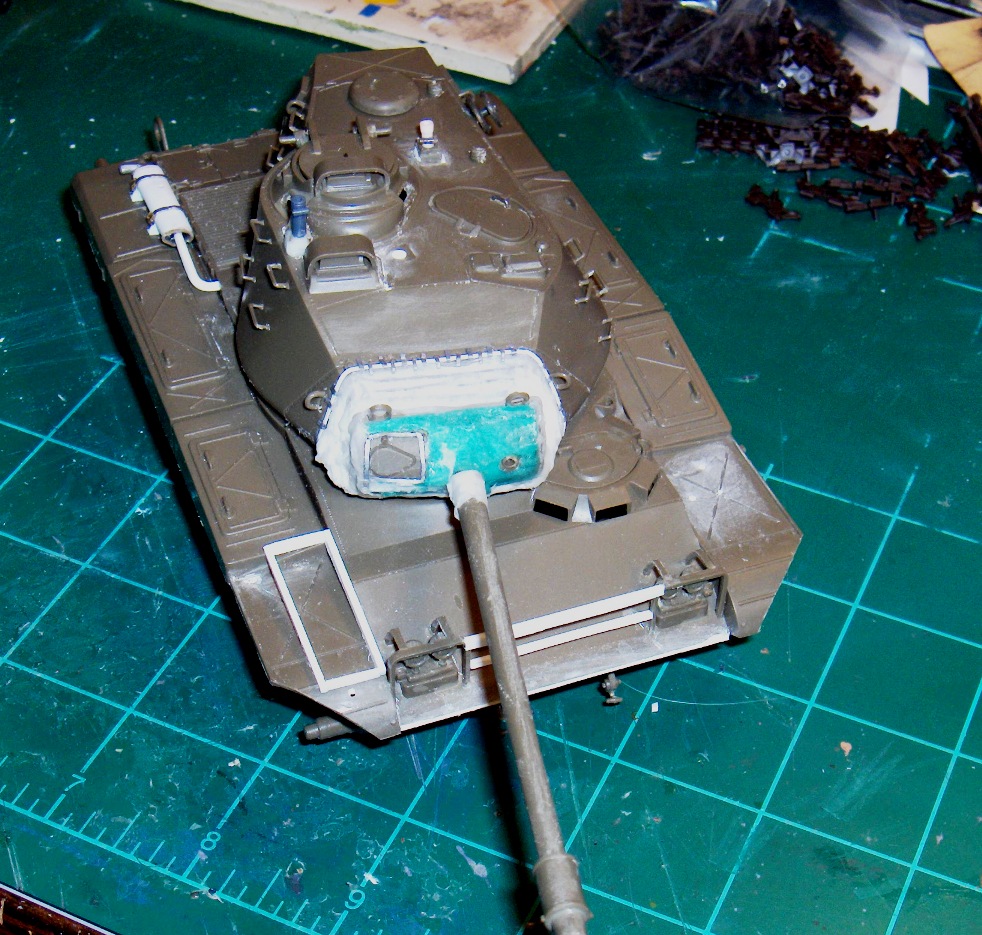
Add mantle cover, tool rack and change to larger generator exhaust.

BlackWidow

Joined: August 09, 2009
KitMaker: 1,732 posts
AeroScale: 1,336 posts

Posted: Saturday, November 04, 2017 - 06:35 PM UTC
Good progress on your M 41, Jeff. I think, the German Bundeswehr had also the M 41 in its very early years in the mid 1950's.
Here comes the weekly update on my Ventura. During the week I had a lot of fun with masking the underside ....

.... lots of masking ....

but then came the real fun. This is Dark Earth 82 from Revell Aqua all over the upperside ....

.... this morning it was raining cats and dogs over here, so a perfect day for working on the kit. This is Dark Green 71016 from Vallejo on the fuselage ....


.... Green is airbrushed free hand and the wings will follow soon.
Have a nice Sunday!
Torsten
Here comes the weekly update on my Ventura. During the week I had a lot of fun with masking the underside ....

.... lots of masking ....


but then came the real fun. This is Dark Earth 82 from Revell Aqua all over the upperside ....

.... this morning it was raining cats and dogs over here, so a perfect day for working on the kit. This is Dark Green 71016 from Vallejo on the fuselage ....


.... Green is airbrushed free hand and the wings will follow soon.
Have a nice Sunday!
Torsten

Posted: Thursday, November 09, 2017 - 02:50 PM UTC
I have been following the great builds and now realising I only have about two and half months to get something done I am giving up on my dio plan. I haven't been able to find all the elements I wanted i.e. normal civilians to fill the scene so I have shelved that idea and reverted to a less adventurous build.
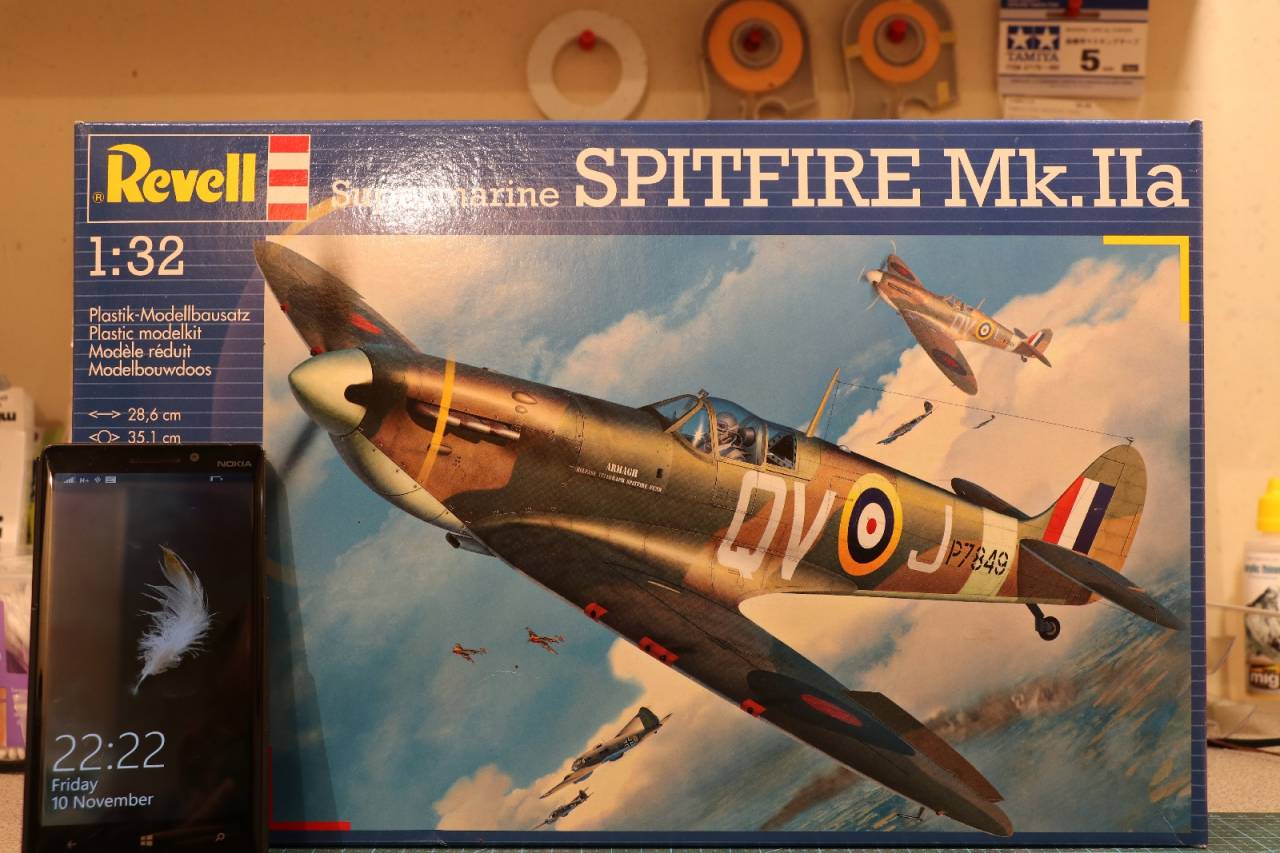
I know, another Spitfire. But I haven't built one in over 40 years so it should be fun.
Since it's an ANZAC theme, probably even more obvious, I will build Alan Deere's Mk 1a, K-LB, using Eagle Cals recent decals. The Kiwis will add a nice touch. Also because there have been a few comments about Revel's release I have bought some of Barracuda's correction sets.
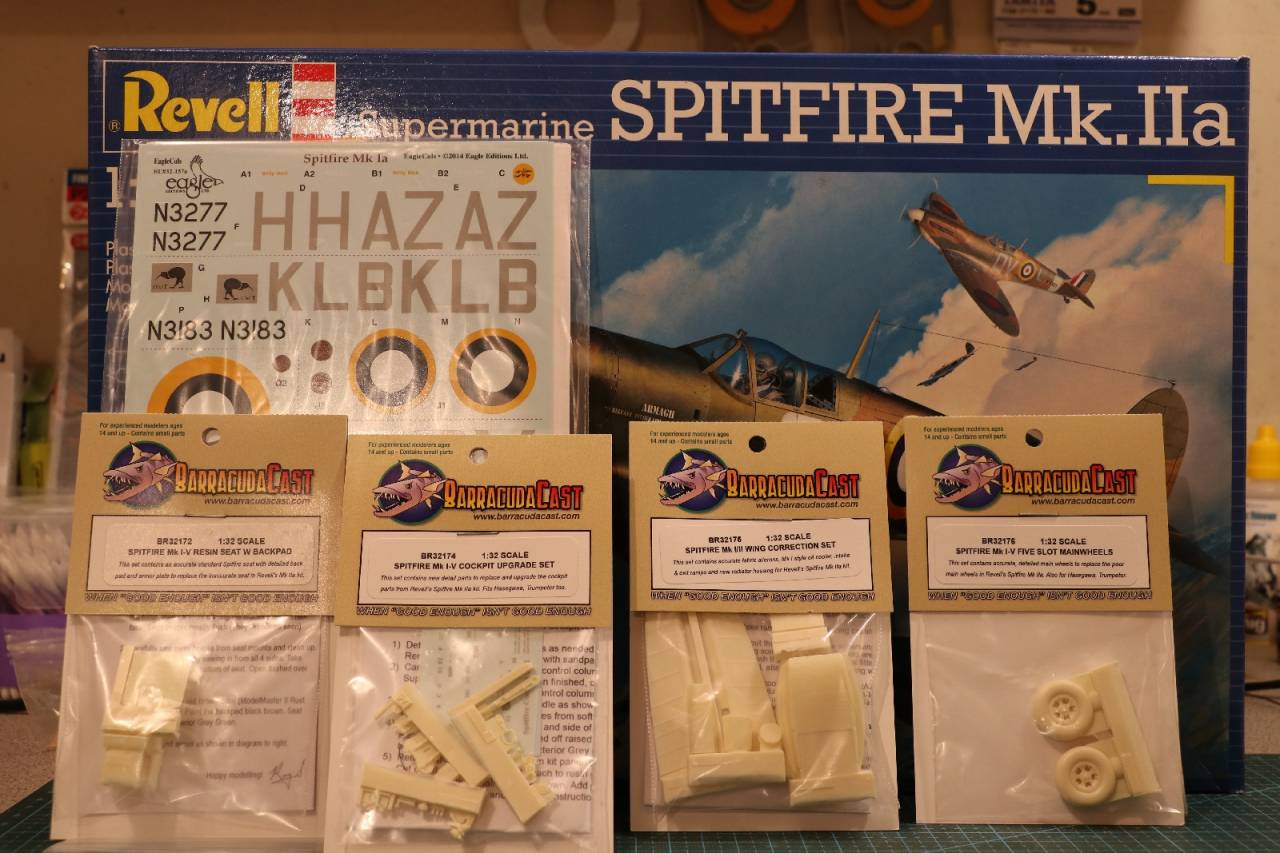
Hopefully I will make a start this weekend because I am running out of time.
cheers
Michael

I know, another Spitfire. But I haven't built one in over 40 years so it should be fun.
Since it's an ANZAC theme, probably even more obvious, I will build Alan Deere's Mk 1a, K-LB, using Eagle Cals recent decals. The Kiwis will add a nice touch. Also because there have been a few comments about Revel's release I have bought some of Barracuda's correction sets.

Hopefully I will make a start this weekend because I am running out of time.
cheers
Michael

BlackWidow

Joined: August 09, 2009
KitMaker: 1,732 posts
AeroScale: 1,336 posts

Posted: Saturday, November 11, 2017 - 03:34 PM UTC
Good luch with your build, Michael!
Another update of my Aussie Ventura. This week I finished the main painting with airbrushing Dark Green on the wings and doing some smaller correction with Dark Earth ....

.... yesterday I de-masked the undersides and discovered some areas which need a bit of paint correction, but that's no big deal. This is just for test fitting, no glue added ....


.... while Magnus has his Spits on sticks I have my Ventura on sticks .... Though some of the wheels belong to my upcoming BFG Land Rover ....

.... there's already someone waiting ....

.... work for today is to do some paint corrections on fuselage and wings and mask the props to get yellow tips. Still a way to go. Stay tuned.
Torsten
Another update of my Aussie Ventura. This week I finished the main painting with airbrushing Dark Green on the wings and doing some smaller correction with Dark Earth ....

.... yesterday I de-masked the undersides and discovered some areas which need a bit of paint correction, but that's no big deal. This is just for test fitting, no glue added ....


.... while Magnus has his Spits on sticks I have my Ventura on sticks ....
 Though some of the wheels belong to my upcoming BFG Land Rover ....
.... there's already someone waiting ....


.... work for today is to do some paint corrections on fuselage and wings and mask the props to get yellow tips. Still a way to go. Stay tuned.
Torsten

Posted: Monday, November 13, 2017 - 11:10 AM UTC
Michael welcome aboard and nice subject, I've wanted to see how this kit goes together.
Torsten great as usual buddy look forward to seeing her progress.
Torsten great as usual buddy look forward to seeing her progress.
Posted: Wednesday, November 15, 2017 - 07:21 AM UTC
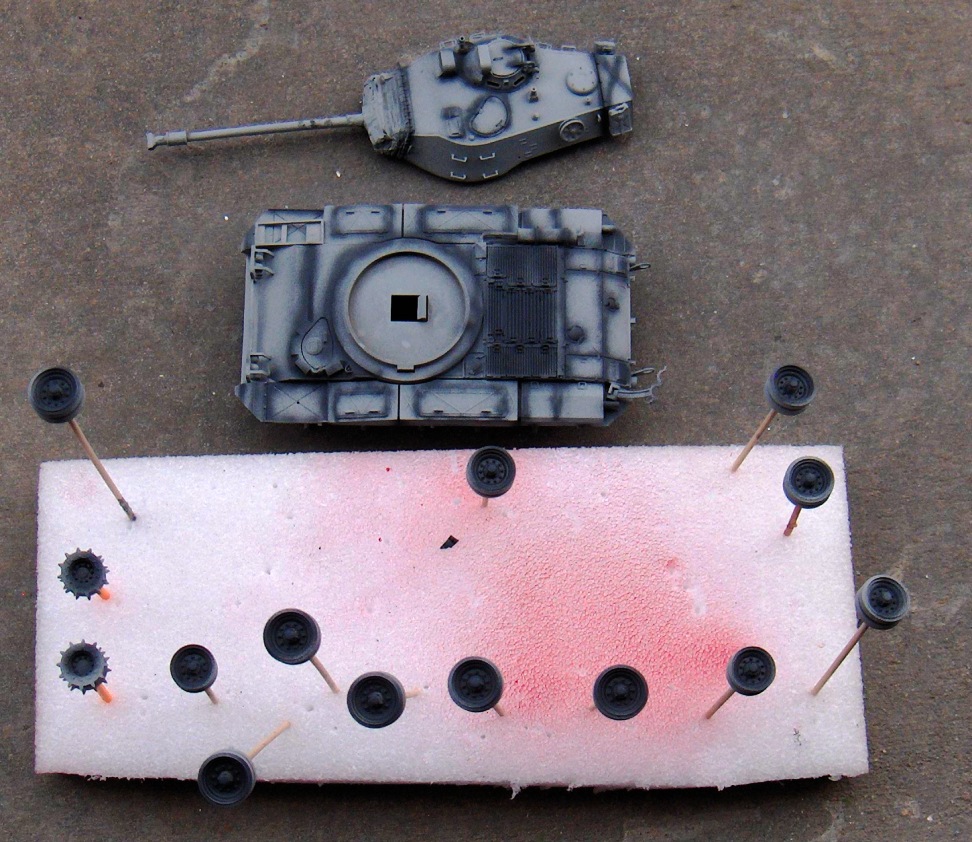
Here is an update of where I am at.
First image is base and preshading.
Next 2 are the camo pattern.
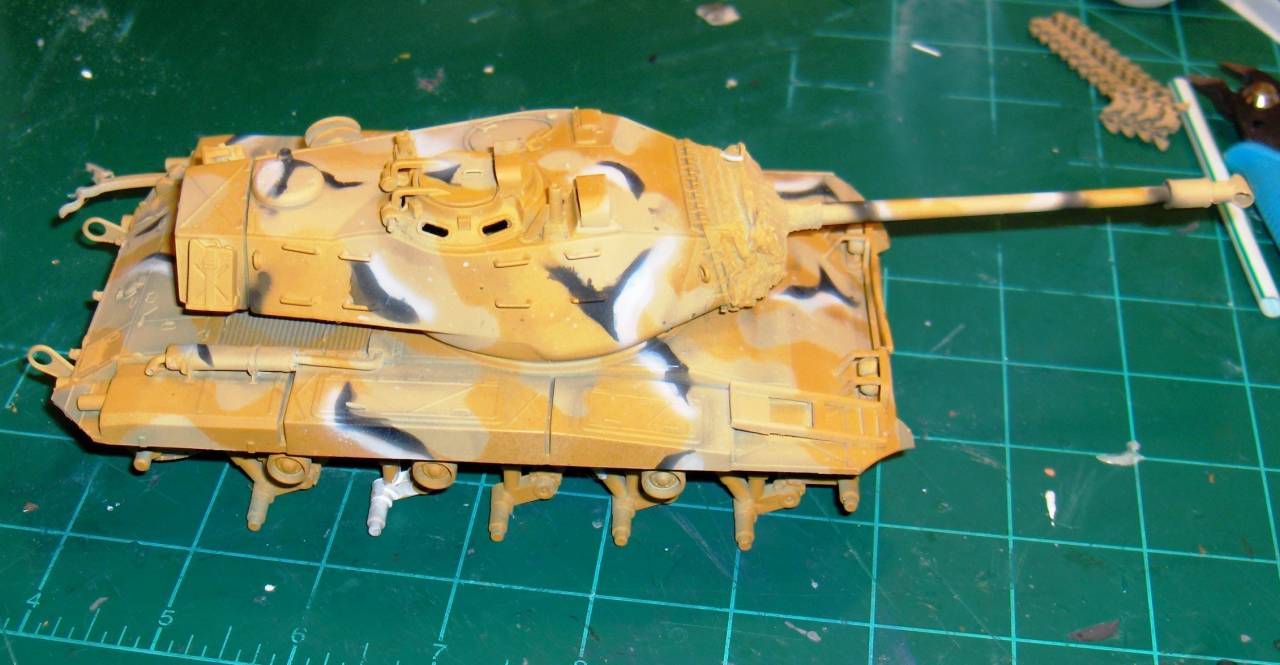
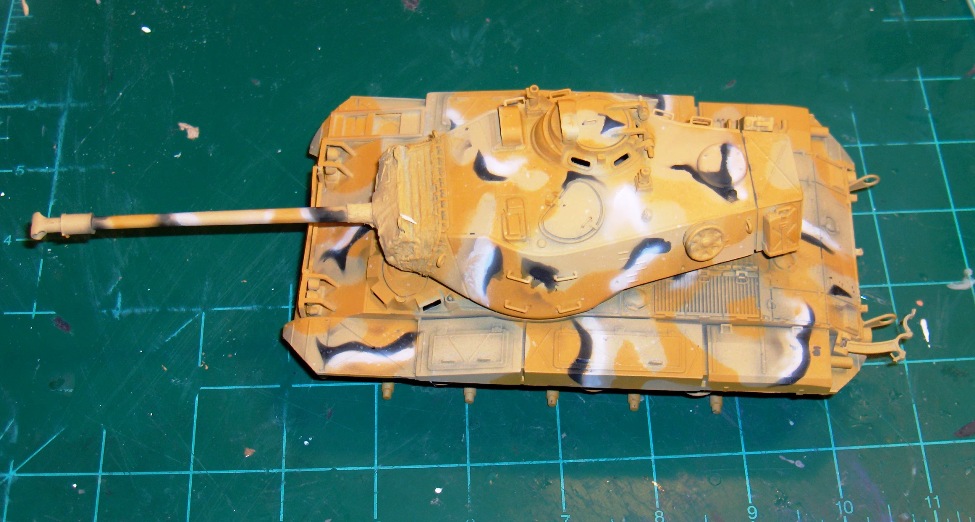
First image is base and preshading.
Next 2 are the camo pattern.
Posted: Wednesday, November 15, 2017 - 11:00 AM UTC
All I can say Jeff is ..... WOW! Fantastic build and I like the colour scheme!
Posted: Wednesday, November 15, 2017 - 08:02 PM UTC
That is a wicked camo!

BlackWidow

Joined: August 09, 2009
KitMaker: 1,732 posts
AeroScale: 1,336 posts

Posted: Saturday, November 25, 2017 - 03:30 PM UTC
That's a cool camo indeed, Jeff. Well done, looks great!
Well, there's a silver lining on the horizont for my Ventura. All parts are painted and glued together, except the top turret and the antenna. Still a few paint corrections have to be made with Sky. By the end of next week hopefully I have to decals on ....


Have a nice Sunday!
Torsten
Well, there's a silver lining on the horizont for my Ventura. All parts are painted and glued together, except the top turret and the antenna. Still a few paint corrections have to be made with Sky. By the end of next week hopefully I have to decals on ....


Have a nice Sunday!
Torsten

RivetCounter

Joined: October 26, 2012
KitMaker: 65 posts
AeroScale: 3 posts

Posted: Saturday, November 25, 2017 - 05:08 PM UTC
Hi all,
I've always wanted to do an Australian Matilda. I've even bought a conversion set eight years ago. So this is a perfect occasion to unpack all these boxes and start a new build.
This is a tank that I would like to do.

A Matilda CS from 2/9th Armored Regiment fighting on Tarakan Island.
And here are my starting photos.


I've always wanted to do an Australian Matilda. I've even bought a conversion set eight years ago. So this is a perfect occasion to unpack all these boxes and start a new build.
This is a tank that I would like to do.

A Matilda CS from 2/9th Armored Regiment fighting on Tarakan Island.
And here are my starting photos.


Posted: Sunday, November 26, 2017 - 11:11 AM UTC
Torsten your Ventura looks a treat as per usual! Looking forward to seeing decals on the Aussie bird!
Marek welcome! And that's a fantastic subject it looks like the close support version with 3 inch howitzer?
Marek welcome! And that's a fantastic subject it looks like the close support version with 3 inch howitzer?
Posted: Sunday, November 26, 2017 - 02:11 PM UTC
Torsten, the Ventura is indeed looking superb. I like the full bomb load and the overall camo looks very neat.
Jeff, the camo scheme on that Bulldog is amazing. I didn't know the NZ armed forces had it in them for something so interesting
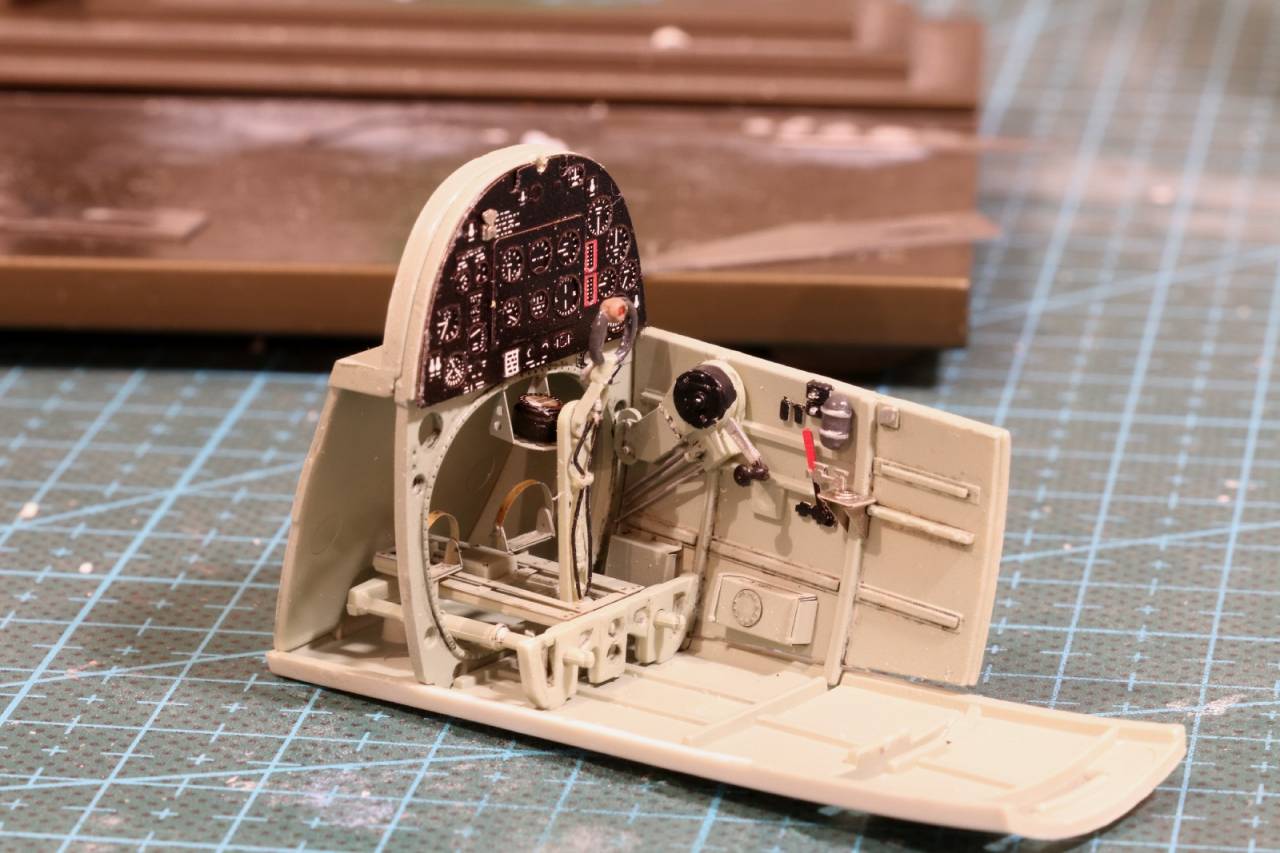
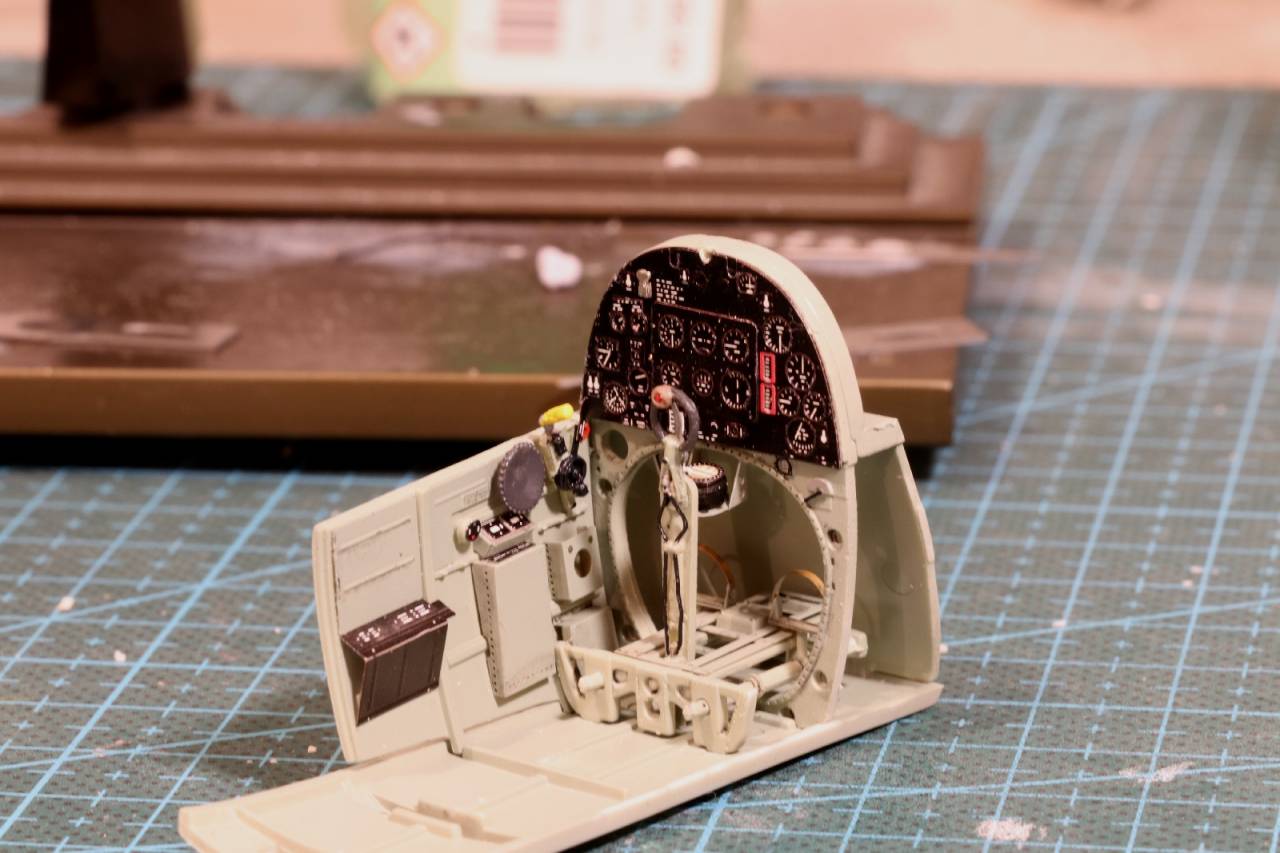
An update on the Spitfire. No surprises, I started with cockpit.
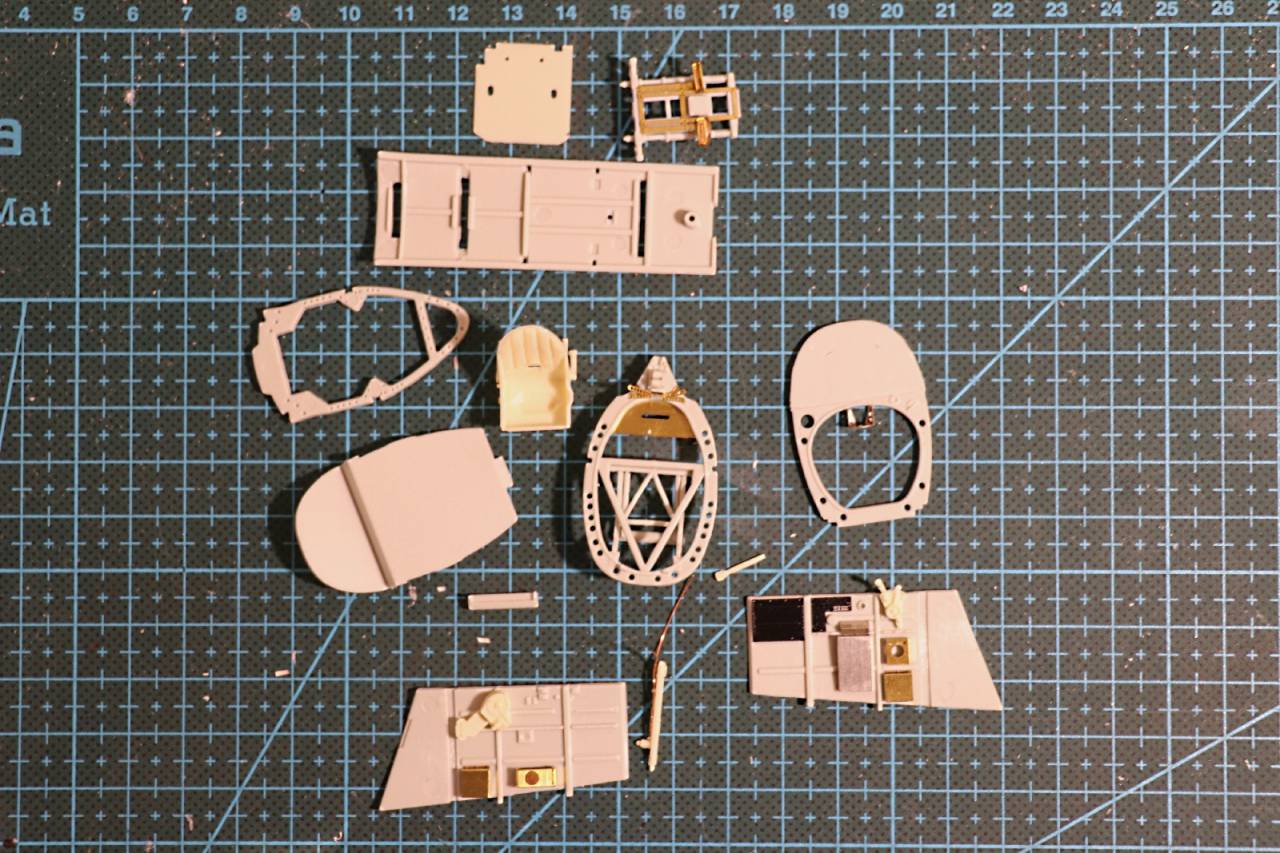
A mixture of the kit, resin and etch. The kit is fairly sparse so open to some enhancement.
For ease, its hard to go past a Eduard IP.
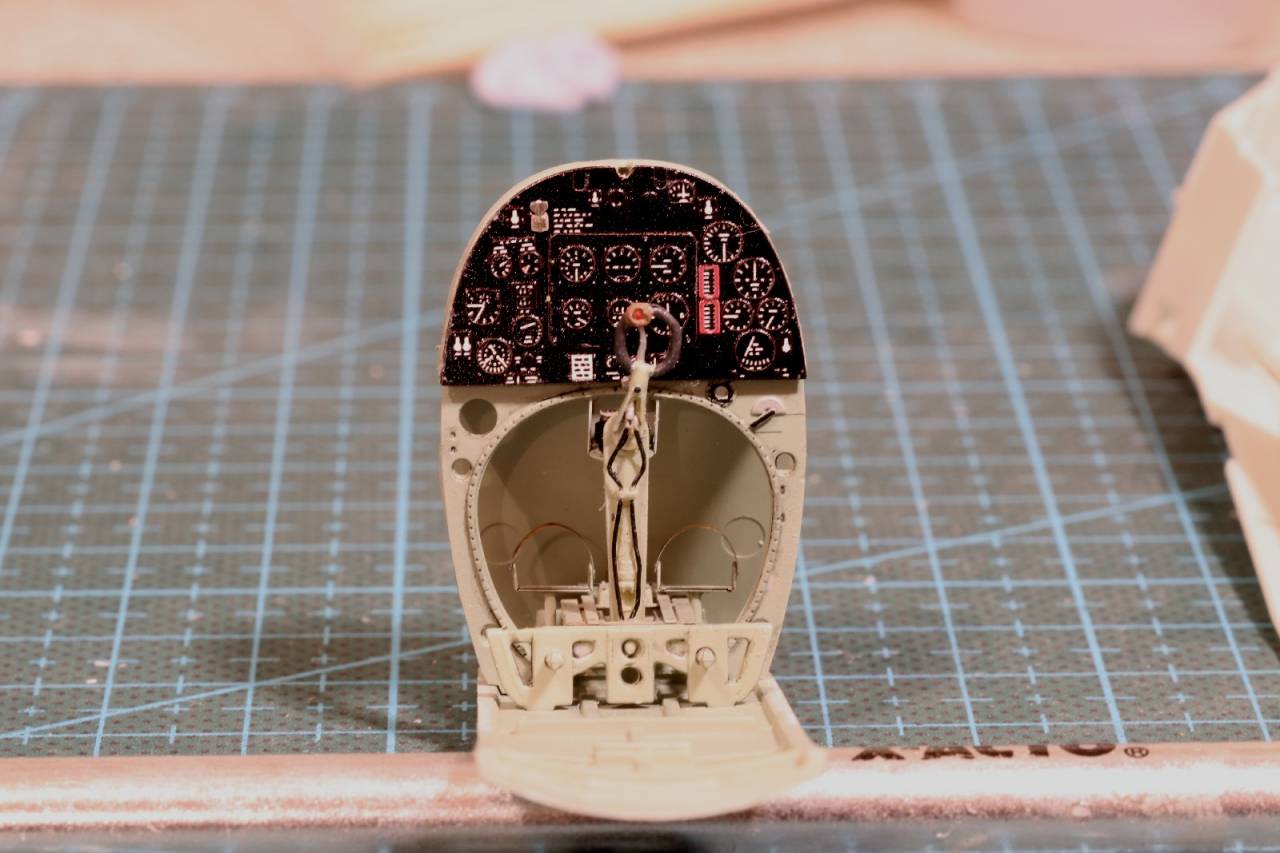
The column is from Barracuda and I added the wire.
The seat is also from Barracuda and I used the HGW belts.
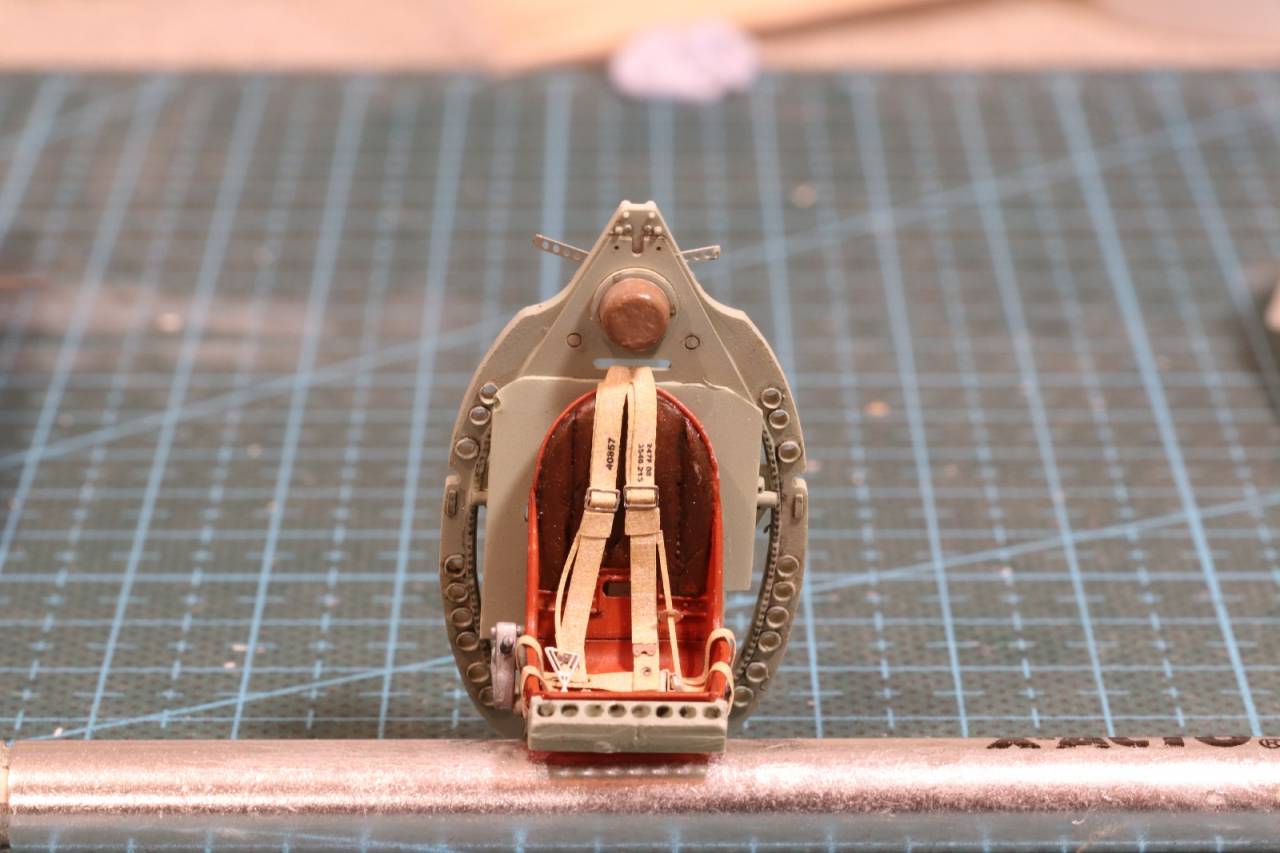
Right and left cockpit walls
And tacked in place on one side.
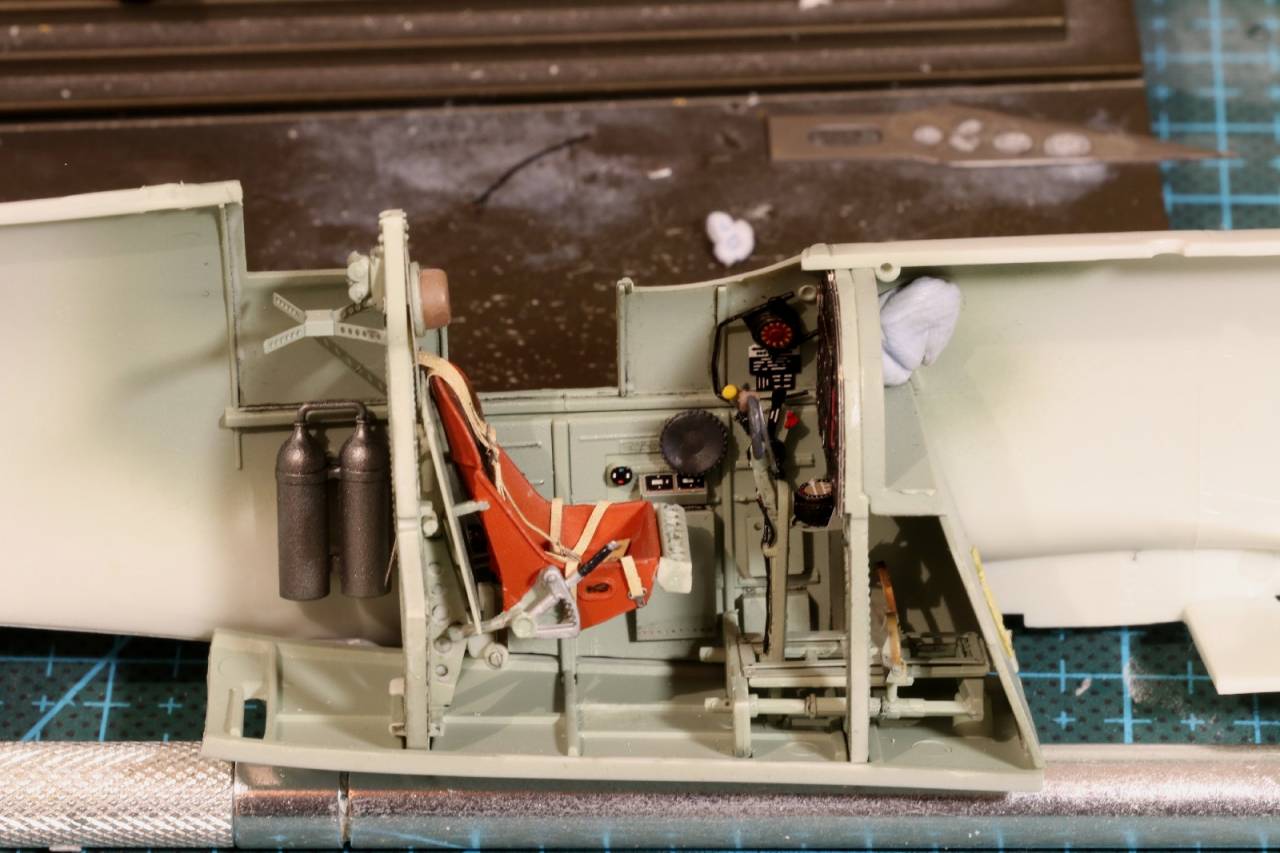
One comment, I don't know what I have done to the camera but all the colours looked washed out. The green is not that pale or the seat bright orange. Operator error somewhere.
cheers
Michael
Jeff, the camo scheme on that Bulldog is amazing. I didn't know the NZ armed forces had it in them for something so interesting

An update on the Spitfire. No surprises, I started with cockpit.

A mixture of the kit, resin and etch. The kit is fairly sparse so open to some enhancement.
For ease, its hard to go past a Eduard IP.

The column is from Barracuda and I added the wire.
The seat is also from Barracuda and I used the HGW belts.

Right and left cockpit walls


And tacked in place on one side.

One comment, I don't know what I have done to the camera but all the colours looked washed out. The green is not that pale or the seat bright orange. Operator error somewhere.
cheers
Michael
Posted: Sunday, November 26, 2017 - 02:31 PM UTC
Hi Michael awesome start! Gotta love the details resin can bring to the "office". If your camera is digital I would suggest calibrating your grey scale or alternatively were you using flash? Because if you're close that'll wash out colours too.
I'm still ummmming and ahhhhing over exactly what to build whether it be wingy thing or perhaps a little armour? I have a Staghound or 6pdr portee that I could well build as one of our own. Or even a Sherman or three???? One thing that did take my fancy was a recovery vehicle perked by the 19th armoured regiment in Italy from it's American owners who got it bogged down. Only to find it gone on their return and a group of Kiwi's who had no idea where it went.
I'm still ummmming and ahhhhing over exactly what to build whether it be wingy thing or perhaps a little armour? I have a Staghound or 6pdr portee that I could well build as one of our own. Or even a Sherman or three???? One thing that did take my fancy was a recovery vehicle perked by the 19th armoured regiment in Italy from it's American owners who got it bogged down. Only to find it gone on their return and a group of Kiwi's who had no idea where it went.
Posted: Thursday, November 30, 2017 - 02:49 AM UTC
Michael,
As Chris stated that is some awesome detail on the Spit office! It looks really good.
I will be back to my build this weekend...........
As Chris stated that is some awesome detail on the Spit office! It looks really good.
I will be back to my build this weekend...........
Posted: Thursday, November 30, 2017 - 04:13 AM UTC
It's gong to be a couple of weeks before I'm back at my ANZAC, gotta finish a Terrible Teen and an Airfix first.. 

Posted: Thursday, November 30, 2017 - 02:08 PM UTC
Thanks Chris and Jeff,
I too hope I can get some time in this weekend and get it close up.
cheers
Michael
I too hope I can get some time in this weekend and get it close up.
cheers
Michael

BlackWidow

Joined: August 09, 2009
KitMaker: 1,732 posts
AeroScale: 1,336 posts

Posted: Saturday, December 02, 2017 - 03:56 PM UTC
Michael, that Spit pit looks fine but you should do something with your camera. It looks all grey to me though it should look something grey-green, I guess.
Well folks, this is my last weekly update before my Aussie Ventura crosses the finishing line ....
Some layers of Bodenglänzer (the german equivalent to Future or Klear) to make everything shiny ....


.... the Ventura stands already on my shelf of pride with all decals on. National insignias are from the kits sheet while the markings SB-G are taken from Xtradecal No. X48097. The "G" on the right side is a bit more on the aft fuselage because otherwise it would be right over the window. That's my compromise to the build but it's barely visible anyway ....


... btw, from the kits decals it's also possible to build a machine from No. 487 Sqn RNZAF, so it would also qualify for this campaign. But I already have built a Kiwi Ventura. Next update will show the finished model. Now I have to paint the top turret ....
Torsten
Well folks, this is my last weekly update before my Aussie Ventura crosses the finishing line ....

Some layers of Bodenglänzer (the german equivalent to Future or Klear) to make everything shiny ....


.... the Ventura stands already on my shelf of pride with all decals on. National insignias are from the kits sheet while the markings SB-G are taken from Xtradecal No. X48097. The "G" on the right side is a bit more on the aft fuselage because otherwise it would be right over the window. That's my compromise to the build but it's barely visible anyway ....


... btw, from the kits decals it's also possible to build a machine from No. 487 Sqn RNZAF, so it would also qualify for this campaign. But I already have built a Kiwi Ventura. Next update will show the finished model. Now I have to paint the top turret ....
Torsten


BlackWidow

Joined: August 09, 2009
KitMaker: 1,732 posts
AeroScale: 1,336 posts

Posted: Tuesday, December 05, 2017 - 09:39 PM UTC
Okay folks, last update from me ....
The use of Eduard mask EX538 is essential because of the top turret, otherwise you'll get crazy ....

.... and when the turret is painted and put together ....

.... the big moment comes. I call this baby ready for take off ....
Lockheed Ventura Mk. II, SB-G, No. 464 Sqn. RAAF, Methwold/England, 1943


More and better photos soon in my Assembly Line Thread over at the WW2 Forum. Thanks for this campaign and good luck for all your builds!
Happy modelling!
Torsten
The use of Eduard mask EX538 is essential because of the top turret, otherwise you'll get crazy ....

.... and when the turret is painted and put together ....

.... the big moment comes. I call this baby ready for take off ....

Lockheed Ventura Mk. II, SB-G, No. 464 Sqn. RAAF, Methwold/England, 1943


More and better photos soon in my Assembly Line Thread over at the WW2 Forum. Thanks for this campaign and good luck for all your builds!
Happy modelling!
Torsten

 |


