World War II: Germany
Aircraft of Germany in WWII.
Hosted by Rowan Baylis
1/72 Eduard Bf 110G-4
thegirl
_VISITCOMMUNITY
Alberta, Canada
Joined: January 19, 2008
KitMaker: 6,743 posts
AeroScale: 6,151 posts
Posted: Saturday, March 24, 2018 - 07:20 AM UTC
My , that is looking sweet so far . Excellent job on the markings


Terri
RussellE
#306
_VISITCOMMUNITY
Victoria, Australia
Joined: June 27, 2010
KitMaker: 3,959 posts
AeroScale: 598 posts
Posted: Sunday, March 25, 2018 - 03:42 PM UTC
Magnus, amazing and inspiring work!
greif8
_VISITCOMMUNITY
Bayern, Germany
Joined: January 17, 2006
KitMaker: 673 posts
AeroScale: 492 posts
Posted: Monday, March 26, 2018 - 11:51 AM UTC
Hi Magnus, awesome work in a small scale my friend. You make 1/72 look like 1/32!

Ernest
magnusf
_VISITCOMMUNITY
Stockholm, Sweden
Joined: May 02, 2006
KitMaker: 1,953 posts
AeroScale: 1,902 posts
Posted: Wednesday, March 28, 2018 - 12:20 PM UTC
Friends! Thank you so much for all your kind comments! With a bit of luck I should be able to finish this one during Easter.

Ernest! Many years since I did anything in 1/32, I think it was the Matchbox 109E when I was 13 or something like that . I have been looking at the Special Hobby Tempest every now and then, it is tempting but I have managed to resist it. However, I know that SH will be at our competition here in Stockholm next weekend... "Hello, I'm Magnus and I'm a plastoholic..."


After finishing cleanup of the antennae (nicely cast but thin so they need to be handled carefully!) I painted them white and then used a neat trick I think I have invented myself (quite unique, I usually just shamelessly steal other people's ideas...). When I need to mask thin objects lite the antennae, I cut a thin slice of plastic eraser, drill or press holes through the slice and then cut it into small pieces with the hole in the center. These are then pushed onto the object that needs to be masked. Very thin bands can be masked using just one slice of eraser but then it needs to be cut with quite some precision. In this case, two slices with MicroMask in between did the trick!


After removing the masks (be careful so that the paint has hardened thoroughly since the eraser pieces need to be slid off over the fresh paint).


I've removed the cockpit masking and added the rest of the cockpit detail, I now see that the radio/radar panel needs a bit of paint around the edge where the etched brass is shining through.


There is also the rear gunner's cannon to paint and install before adding the canopy. I'm not fond of attaching the canopy after the rest of the paintwork but in this case I was worried about paint leakage so I decided upon this order anyway. We'll see how it all turns out with the canopy on later!


Magnus
Joel_W
Staff MemberAssociate Editor
AUTOMODELER
_VISITCOMMUNITY
New York, United States
Joined: December 04, 2010
KitMaker: 11,666 posts
AeroScale: 7,410 posts
Posted: Wednesday, March 28, 2018 - 06:55 PM UTC
Magnus,
Great idea for masking those small pieces. Another idea I'm going to be borrowing from you.

Have you test fitted the windscreen and canopy as yet?

Joel
RussellE
#306
_VISITCOMMUNITY
Victoria, Australia
Joined: June 27, 2010
KitMaker: 3,959 posts
AeroScale: 598 posts
Posted: Monday, April 02, 2018 - 05:01 PM UTC
Magnus this is looking great!

I'm sure with your skill the canopy will go on just right
Twentecable
_VISITCOMMUNITY
Overijssel, Netherlands
Joined: September 13, 2003
KitMaker: 339 posts
AeroScale: 244 posts
Posted: Monday, April 02, 2018 - 09:34 PM UTC
Really looking great.
Did those Antennas always had this red white pattern? I have to install some on my Fw night fighter...

Gr Tc
magnusf
_VISITCOMMUNITY
Stockholm, Sweden
Joined: May 02, 2006
KitMaker: 1,953 posts
AeroScale: 1,902 posts
Posted: Friday, April 06, 2018 - 01:56 AM UTC
Joel! For once I've been careful and checked fit early on in the project. Having done another of these earlier and the knowledge that Eduard usually can be trusted helps as well !

Russell! Thanks!

Lars! You'll need to check references on that one, what I can say for sure after checking lots of 110-photos is that all nightfighters did NOT have striped antennae. Kind of a mixed blessing, it adds a bit of interest but it is slightly tricky to paint !


Finally part of the canopy and the dreaded flame damper exhausts are on!


I airbrushed the stubs a rusty red and the rest of them a greyish black long ago. Then I gut stuck on what to do next with them !


After mounting them on the airframe using white glue (same for the clear parts) I went over them first with metal powder to give them a metallic sheen and then they got a dose of the different pigments I used for the exhaust patterns.


Some photos show quite a lot of staining so I went for that look. After all, weathering is great fun !


Magnus
Littorio
_VISITCOMMUNITY
England - South East, United Kingdom
Joined: September 15, 2004
KitMaker: 4,728 posts
AeroScale: 1,351 posts
Posted: Friday, April 06, 2018 - 02:03 PM UTC
Magnus, that exhaust staining looks so real great work
Nearly at the end and this has been a build to watch and inspire.
AussieReg
Staff MemberAssociate Editor
AUTOMODELER
#007
_VISITCOMMUNITY
Victoria, Australia
Joined: June 09, 2009
KitMaker: 8,156 posts
AeroScale: 3,756 posts
Posted: Friday, April 06, 2018 - 05:02 PM UTC
Excellent progress Magnus. The detailing and weathering are looking great, and the red/white antennae will definitely add a touch of interest.

Cheers, D
Joel_W
Staff MemberAssociate Editor
AUTOMODELER
_VISITCOMMUNITY
New York, United States
Joined: December 04, 2010
KitMaker: 11,666 posts
AeroScale: 7,410 posts
Posted: Friday, April 06, 2018 - 06:45 PM UTC
Magnus,
Exhausts have been my biggest nemesis since I got back into modeling. No matter what I did they just never looked realistically weathered. But yours really looks like the real deal.

Joel
RussellE
#306
_VISITCOMMUNITY
Victoria, Australia
Joined: June 27, 2010
KitMaker: 3,959 posts
AeroScale: 598 posts
Posted: Sunday, April 08, 2018 - 05:46 PM UTC
The exhausts look spot on Magnus and just the right amount of exhaust staining!
magnusf
_VISITCOMMUNITY
Stockholm, Sweden
Joined: May 02, 2006
KitMaker: 1,953 posts
AeroScale: 1,902 posts
Posted: Thursday, April 12, 2018 - 01:05 AM UTC
Luciano! Thanks, I'm glad to be able to offer some inspiration!


Damian! Whenever I post something on sticks I think of you 
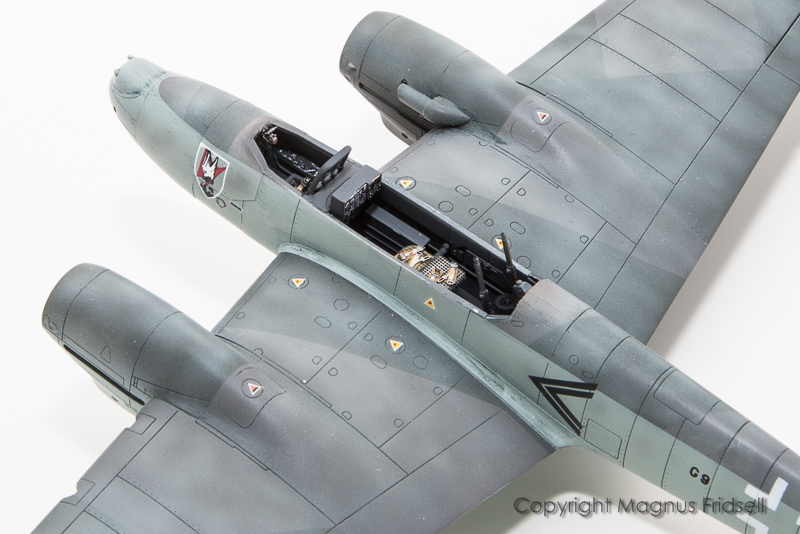
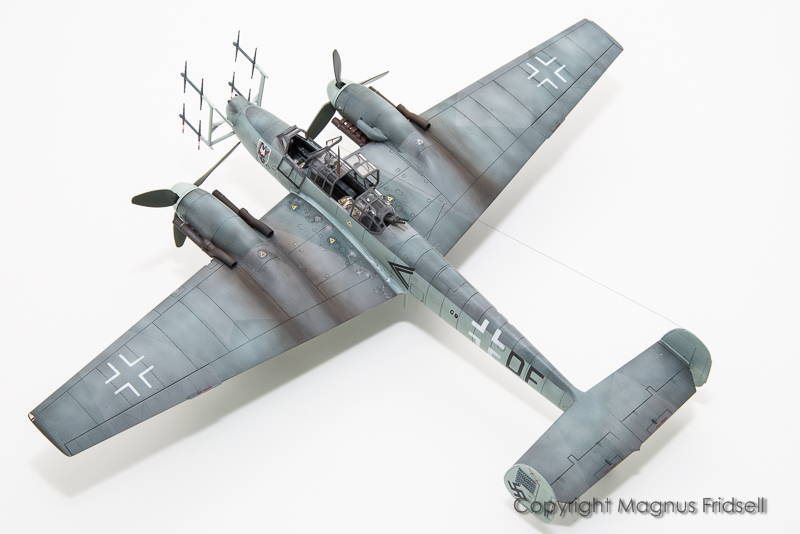
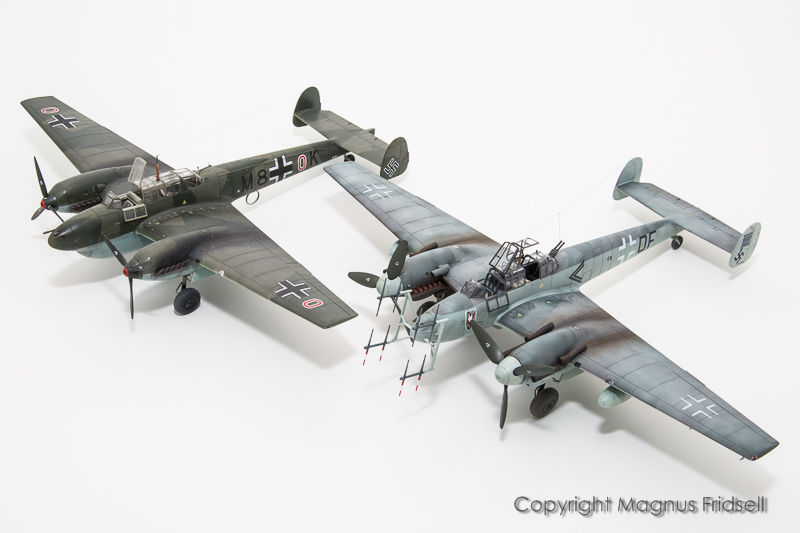
! I'll leave the antlers off until last minute, they're fragile...

Joel! Exhaust stains aren't my favourite either. I have always used my airbrush for them earlier but apart from the risk of ruining an almost finished model, the stains turned out far too monochrome for my taste. OK, could be fixed by adding further layers but I still found it difficult to control. This time I used dry pastels, see photo below!

Russell! Thanks!


Exhaust-staining-equipment! Pastels can be found in art stores, I have several different brands and they are all good. Some come in sets while others come "pick and mix". They aren't expensive and will last for ages! Be careful so that you get dry pastels and not oil pastels, they are smeary and I haven't (yet) found any modelling use for them 
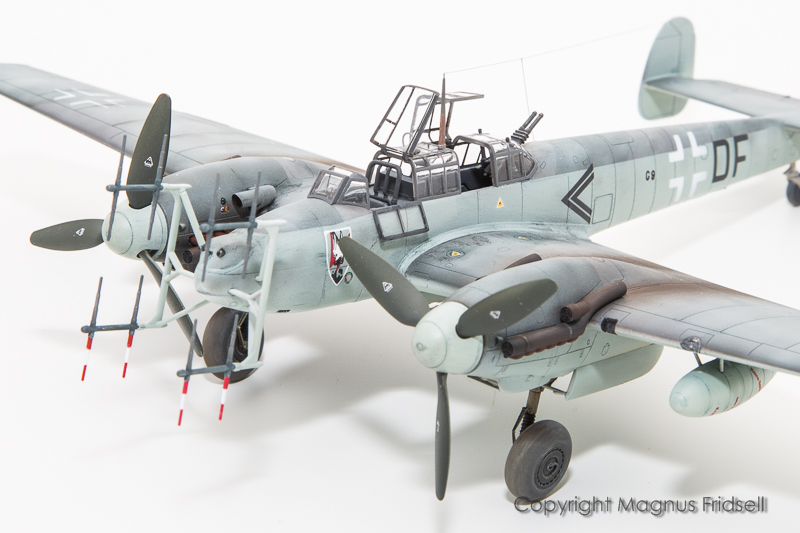
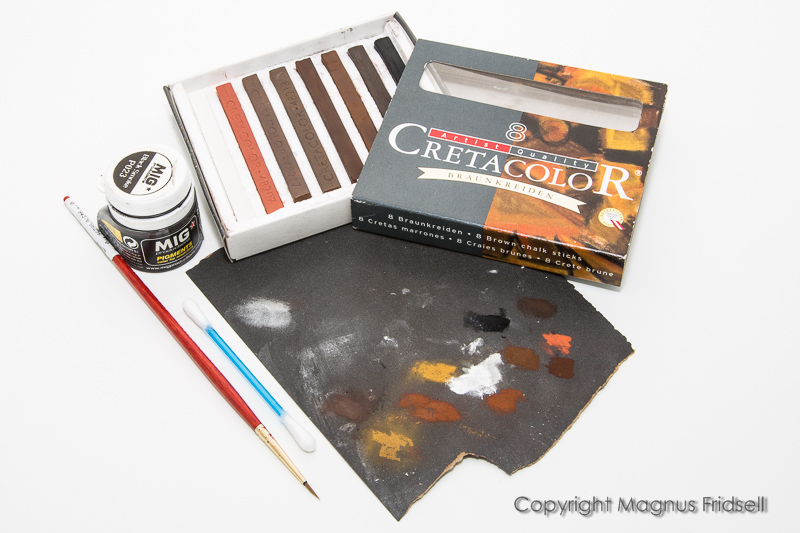
! The pot of pigments is MiG's "Black Smoke", I have found that they "bite" better inte the surface than the ground pastels, that's not always desirable though. I use an old paint brush (save your sable brushes for paint, the sand paper will kill them quickly!) to apply the pigments, the cotton swab comes in handy for adjusting and cleaning up the effects


Finishing touches... Most of the stuff in place, working on the weathering!


Magnus
Joel_W
Staff MemberAssociate Editor
AUTOMODELER
_VISITCOMMUNITY
New York, United States
Joined: December 04, 2010
KitMaker: 11,666 posts
AeroScale: 7,410 posts
Posted: Friday, April 13, 2018 - 07:40 AM UTC
Magnus,
I've got one bottle of Mig black weathering powder and a few sticks of pastel chalks. Going to get a set of natural earth tone chalks for the variation in colors.

Gotta say that your Bf 110G-4 is really looking quite good.

Joel
greif8
_VISITCOMMUNITY
Bayern, Germany
Joined: January 17, 2006
KitMaker: 673 posts
AeroScale: 492 posts
Posted: Friday, April 13, 2018 - 11:47 AM UTC
Hi Magnus, your 110 looks great, I really like both the faded look of the paint and the exhaust stains. I use Tamiya pastels to apply exhaust stains using much the same technique as you do. I find this gives me more control than with an airbrush as well.

Ernest
magnusf
_VISITCOMMUNITY
Stockholm, Sweden
Joined: May 02, 2006
KitMaker: 1,953 posts
AeroScale: 1,902 posts
Posted: Monday, April 16, 2018 - 01:21 AM UTC
Joel! Thanks! I love pastels since they are slow, subtle and safe. And cheap !

Ernest! Two souls - one thought !

With the last parts attached I'm calling this a day for now, it'll go to rest for a few weeks and then I might go back and add some more weathering or detail painting possibly.


Together with the 110C I built earlier. Even if they are both 110s, they are very different aircraft!

It has now happily moved on to the collection, leaving room for something even bigger and more complicated...

Thanks for following and commenting, blogging my builds and the interaction with you fellow modellers is a huge part of my enjoyment of this hobby!


Magnus
RussellE
#306
_VISITCOMMUNITY
Victoria, Australia
Joined: June 27, 2010
KitMaker: 3,959 posts
AeroScale: 598 posts
Posted: Monday, April 16, 2018 - 02:09 AM UTC
Magnus, congratulations on another fine build and excellent addition to The Collection

It is always great to see you bring your kits to life. The weathering looks spot on and the aerials out front came out top notch.

As always a very enjoyable ride and I look forward to following along with your next project
Joel_W
Staff MemberAssociate Editor
AUTOMODELER
_VISITCOMMUNITY
New York, United States
Joined: December 04, 2010
KitMaker: 11,666 posts
AeroScale: 7,410 posts
Posted: Monday, April 16, 2018 - 06:27 AM UTC
Magnus,
Nicely done. the pair really do compliment each other.

So what's next up on your assembly line?

Joel
BlackWidow
_VISITCOMMUNITY
European Union
Joined: August 09, 2009
KitMaker: 1,732 posts
AeroScale: 1,336 posts
Posted: Monday, April 16, 2018 - 03:06 PM UTC
Magnus, that looks awesome! Great finish on your 110! Another jewel left your assembly line. Congrats on that. I believe, the 110 looks now down from you shelf of pride with eagle eyes at the Lanc on your workbench, watching every move and sharping the knives ....

Torsten
Antilles
_VISITCOMMUNITY
Nordrhein-Westfalen, Germany
Joined: March 22, 2015
KitMaker: 671 posts
AeroScale: 614 posts
Posted: Monday, April 16, 2018 - 07:55 PM UTC
Magnus,
flawlessly built model and excellent presented. I am just trying to catch my breath. This is outstanding. Congrats!

Oliver
chrispap
_VISITCOMMUNITY
Thessaloniki, Greece / Ελλάδα
Joined: August 30, 2016
KitMaker: 62 posts
AeroScale: 60 posts
Posted: Tuesday, April 17, 2018 - 12:13 AM UTC
Absolutely magnificent build Magnus.Best wishes, Christos.
Littorio
_VISITCOMMUNITY
England - South East, United Kingdom
Joined: September 15, 2004
KitMaker: 4,728 posts
AeroScale: 1,351 posts
Posted: Tuesday, April 17, 2018 - 10:24 PM UTC
Well done Magnus, beautiful build and a pleasure to follow along, I’m now looking for pastels so I can have a go at the exhausts.

So you hint at a bigger build next, spill the beans we want to know what it is.
AussieReg
Staff MemberAssociate Editor
AUTOMODELER
#007
_VISITCOMMUNITY
Victoria, Australia
Joined: June 09, 2009
KitMaker: 8,156 posts
AeroScale: 3,756 posts
Posted: Wednesday, April 18, 2018 - 05:16 AM UTC
Beautiful build Magnus, congratulations on getting another little gem finished.


Quoted Text

Thanks for following and commenting, blogging my builds and the interaction with you fellow modellers is a huge part of my enjoyment of this hobby!


I totally agree, and having such a comprehensive build log thread as this is a huge help to all of us in seeing and learning new techniques and products.
Thanks for sharing so much of your work and in such great detail.

Cheers, D
magnusf
_VISITCOMMUNITY
Stockholm, Sweden
Joined: May 02, 2006
KitMaker: 1,953 posts
AeroScale: 1,902 posts
Posted: Thursday, April 19, 2018 - 12:08 AM UTC
Friends! Thank you so much for your kind comments!

I'm off to Moson in Hungary early tomorrow morning so I thought that I better tell you what's on next: It's a big bird, a Lancaster for the Bombers campaign. So, bean-spilling done, now I can take a few days off and go plastic crazy for the whole weekend !


Magnus
Joel_W
Staff MemberAssociate Editor
AUTOMODELER
_VISITCOMMUNITY
New York, United States
Joined: December 04, 2010
KitMaker: 11,666 posts
AeroScale: 7,410 posts
Posted: Thursday, April 19, 2018 - 12:56 AM UTC

Quoted Text

Friends! Thank you so much for your kind comments!

I'm off to Moson in Hungary early tomorrow morning so I thought that I better tell you what's on next: It's a big bird, a Lancaster for the Bombers campaign. So, bean-spilling done, now I can take a few days off and go plastic crazy for the whole weekend !


Magnus


Magnus,
have a great weekend.

I'll be following right along with your Lancaster build as usual.
Joel