World War II: Great Britain
Aircraft of Great Britain in WWII.
Hosted by Rowan Baylis
Eduard Spitfire Mk. I
Merlin
Staff MemberSenior Editor
AEROSCALE
#017
_VISITCOMMUNITY
United Kingdom
Joined: June 11, 2003
KitMaker: 17,582 posts
AeroScale: 12,795 posts
Posted: Wednesday, September 16, 2020 - 06:22 AM UTC
Hi Steve

Many thanks for your kind comments. I've cut a few corners to try to push this build along, so I can't claim it's my personal "finest hour" (sorry - the pun was irresistible with the BoB anniversary 
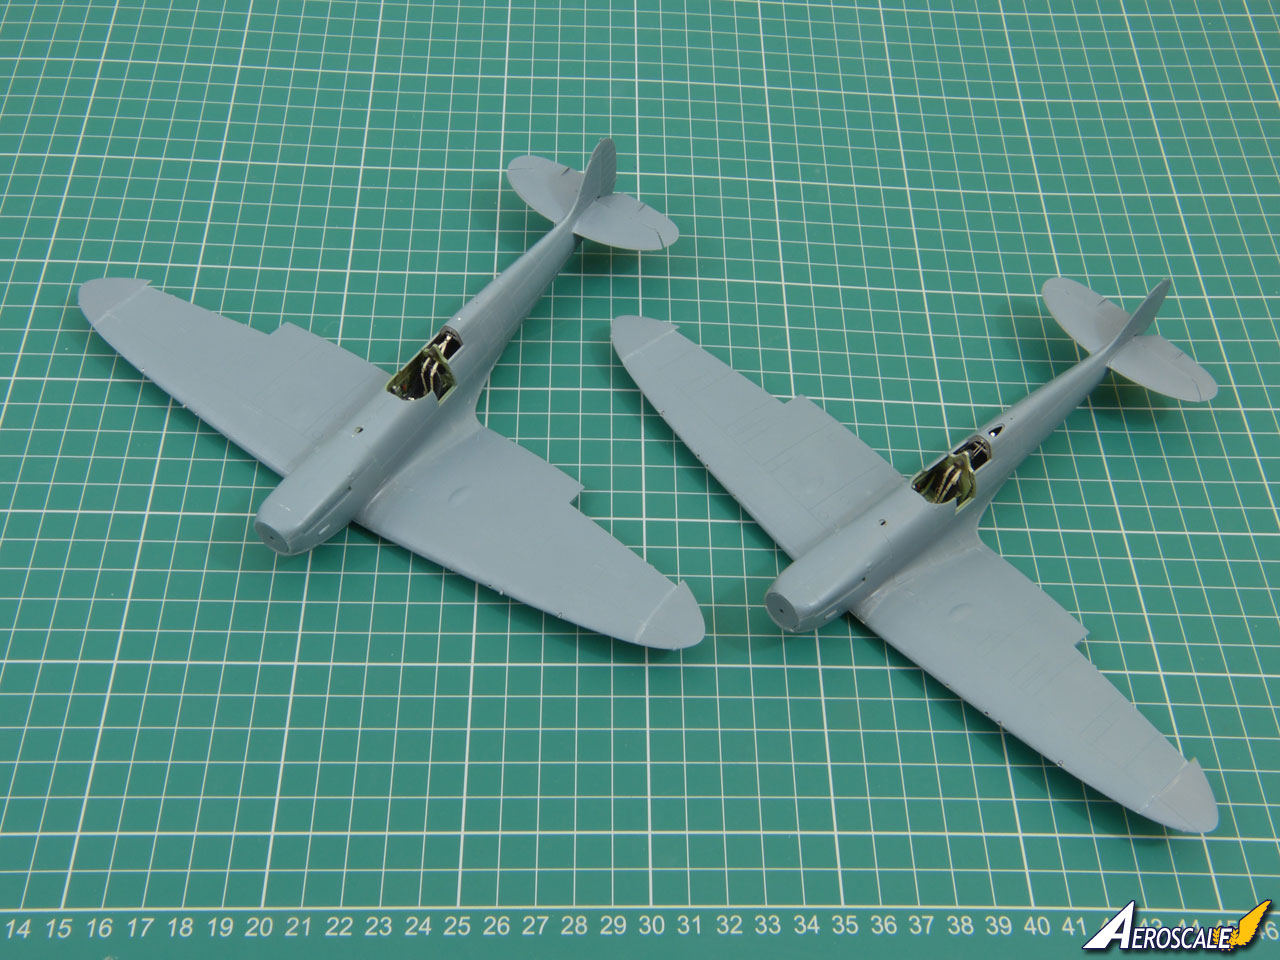
), but I'm really enjoying the build - and tackling two kits together theoretically offers some time-saving efficiency. Having said that, using two different Grey-Greens and not being happy with one of them probably undid any savings!

Plus - I can really notice the extra texture from the additional dusted-on coat of the lighter Grey-Green that I used to knock it back into the ball-park of what I'm comfortable with as a colour. But it's all a useful learning experience to carry forward to future builds.

So - onward and downward to today's update! 
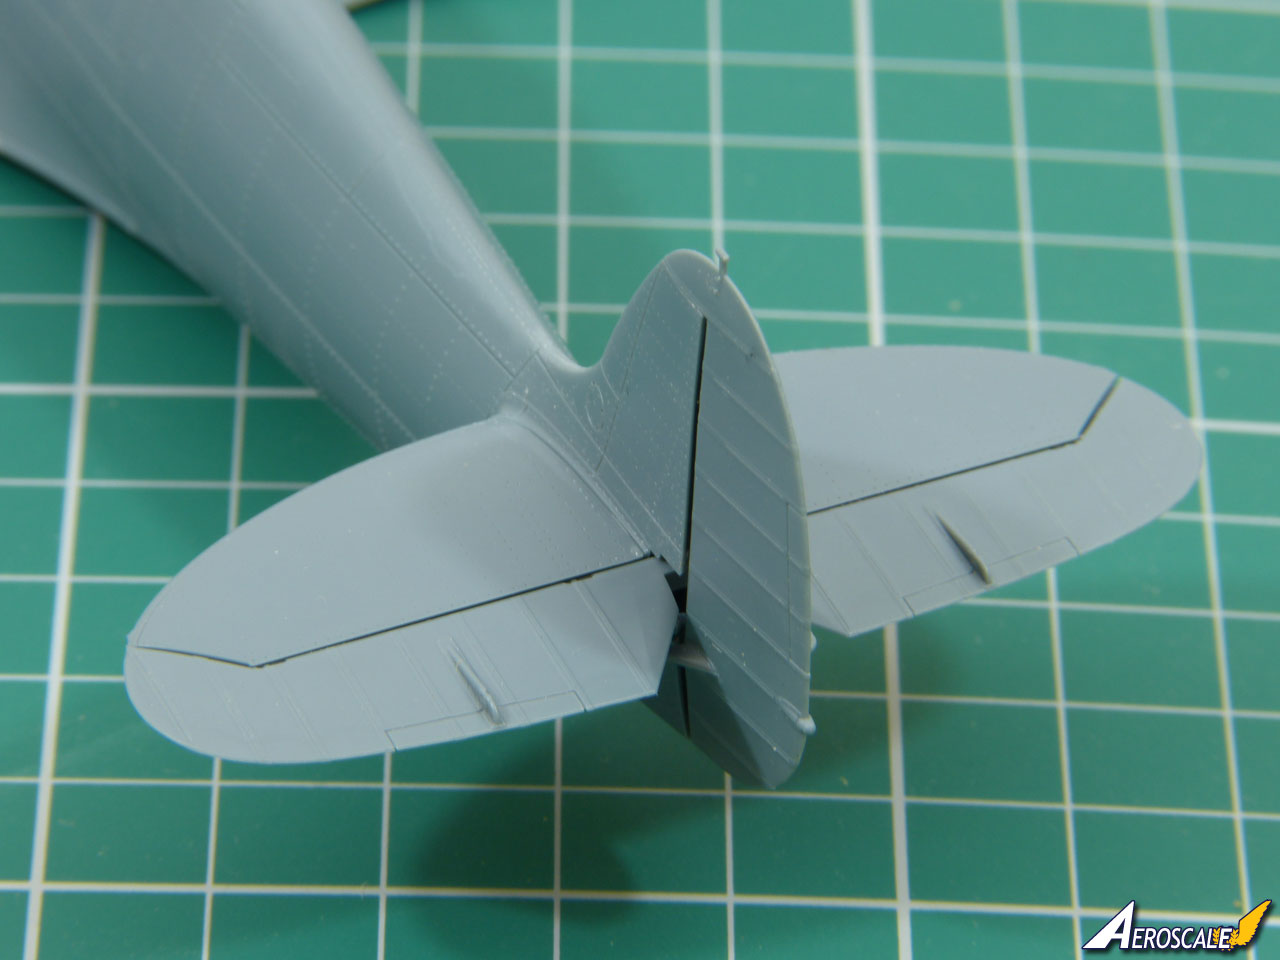
And it finally does feel like some tangible progress at last:


The wings are only dry-fitted - but I should get a decent day at the workbench tomorrow (barring an emergency call into work...) and my target is to get the two airframes essentially finished.

I'll pay close attention to the cowling tops, because the seam there was a real pain on Eduard's Mk. IX. I was talking with a friend about this when the new kit arrived and we realised we had a shared experience with the Mk. IX cowling - basically, every time you thought you'd beaten the seam, the b*gger would reappear when you applied a coat of paint!

More soon.

Take care and stay safe.

All the best

Rowan
M4A1Sherman
_VISITCOMMUNITY
New York, United States
Joined: May 02, 2013
KitMaker: 4,403 posts
AeroScale: 254 posts
Posted: Wednesday, September 16, 2020 - 11:47 PM UTC
Hello, Everyone!

Hoping you are all well!

Rowan- VERY NICE, indeed!
Re: Your Cockpit colors- Hindsight is always better than foresight once all the parts have been "bottled-up" within an/the assembled Fuselage(s). My own choice would have been the lighter color to begin with, as I mentioned back when you were "testing" your colors. But that's OK; these ARE YOUR KITS, so who am I to say..?

In any case, things are looking GREAT with your TWO Spitfires! More than likely, my "Early" Mk.I will be one with the "flat" Hood (No.19 Squadron?) and the Watts Airscrew. As I've mentione previously in this thread, my second EDUARD Mk.I will no doubt be one of Al Deere's "KIWI"s, with the Black/White/NMF Undersides, No.54 Squadron at Hornchurch. (Narrow-chord Rotol Airscrew) It's quite likely that I'll also be buying an additional EDUARD OVERTREES "Late" #82152X Mk.I, with a smattering of EDUARD A/M parts to supplement the kit with. Obviously, I'll have the Instructions from my "first-issue" Mk.Is to work with...

As to the EXTERIOR Colors, which paints will you be using..? I'm curious as to "your take" on the colors of the early WWII RAF Day Fighter colors...

VR, Dennis
M4A1Sherman
_VISITCOMMUNITY
New York, United States
Joined: May 02, 2013
KitMaker: 4,403 posts
AeroScale: 254 posts
Posted: Thursday, September 17, 2020 - 12:00 AM UTC
Hi, Rowan!

Re: The poor fit/Upper Seam problem of the Cowling Tops of the EDUARD Mk.IXs-

Not to be a "know-it-all", but why not just nip this problem in the bud by buying EDUARD's "BRASSIN" resin "single-piece" "Early" or "Late" Cowling Tops..? I did- Problem solved...

BTW, this should also work for EDUARD's Mk.VIII kits by using the "BRASSIN" "Late" Cowling Top...

VR, Dennis
Merlin
Staff MemberSenior Editor
AEROSCALE
#017
_VISITCOMMUNITY
United Kingdom
Joined: June 11, 2003
KitMaker: 17,582 posts
AeroScale: 12,795 posts
Posted: Thursday, September 17, 2020 - 03:39 AM UTC

Quoted Text

Not to be a "know-it-all", but why not just nip this problem in the bud by buying EDUARD's "BRASSIN" resin "single-piece" "Early" or "Late" Cowling Tops..? I did- Problem solved...


Hi Dennis

That would rather defeat the purpose of this OOB review-build, but I probably will do another one further down the line throwing a bunch of Brassin goodies at it.

(I might retro-fit Brassin wheels and exhausts once the build's finished, though... )

And, to be fair to Eduard, I haven't got to the stage where it's clear whether the seam will be a problem this time. I must say, though, I'd have preferred it if Eduard had designed the kit with the top cowl as a separate piece.

Moving on, the basic airframes are starting to take shape:


The way Eduard have designed the elevators is pretty fool-proof and works fine to ensure the tailplanes are lined-up horizontally:


What it fails to depict, though, is the characteristic droop of the early Spits' elevators unless the locks were fitted. So, I'll have a bit of a tinker there.

The great thing today has been that a real Spitfire has been flying overhead several times - perfect inspiration for the build!

All the best

Rowan
Merlin
Staff MemberSenior Editor
AEROSCALE
#017
_VISITCOMMUNITY
United Kingdom
Joined: June 11, 2003
KitMaker: 17,582 posts
AeroScale: 12,795 posts
Posted: Thursday, September 17, 2020 - 03:51 AM UTC

Quoted Text

Re: Your Cockpit colors- Hindsight is always better than foresight once all the parts have been "bottled-up" within an/the assembled Fuselage(s). My own choice would have been the lighter color to begin with, as I mentioned back when you were "testing" your colors. But that's OK; these ARE YOUR KITS, so who am I to say..? ... VR, Dennis


Hi Dennis

I think we might be talking at cross-purposes regarding hindsight in this case - the whole point was to try out two different manufacturers' paint and demonstrate the difference. If I hadn't done so, we wouldn't have known there was a "lighter one".

That's all part of the fun and excitement of building with an audience - things don't always work the way you expect or intend.

You'll have to wait and see what I use for the camouflage. Again, there'll be paints from a couple of different manufacturers, so it'll be fun to see how they compare.

All the best

Rowan
Jessie_C
_VISITCOMMUNITY
British Columbia, Canada
Joined: September 03, 2009
KitMaker: 6,965 posts
AeroScale: 6,247 posts
Posted: Thursday, September 17, 2020 - 04:13 AM UTC

Quoted Text

... basically, every time you thought you'd beaten the seam, the b*gger would reappear when you applied a coat of paint!


You have to know when to emulate a Dentist, break out the Dremel, gouge a trench and fill it with a piece of suitably sized stretched sprue to sand back flush.
Merlin
Staff MemberSenior Editor
AEROSCALE
#017
_VISITCOMMUNITY
United Kingdom
Joined: June 11, 2003
KitMaker: 17,582 posts
AeroScale: 12,795 posts
Posted: Thursday, September 17, 2020 - 08:00 AM UTC

Quoted Text

You have to know when to emulate a Dentist, break out the Dremel, gouge a trench and fill it with a piece of suitably sized stretched sprue to sand back flush.


Hi Jessie

Yep - stretched sprue as filler is a wonderful thing! Admittedly, I use a scriber to create a channel for it rather than a motor tool - but the principle is the same.

If truth be told, with the Spitfire cowl, I sorted it out easily enough with "Super-Filler" (Cyanoacrylate+talc) once I realised what was happening - but that doesn't make for nearly such a dramatic story.

A crucial problem with most commercial fillers is that they shrink as they cure - whereas stretched sprue and CA+talc are much more stable. I particularly like using the latter because it dries so quickly and you can get back to work faster.

All the best

Rowan
M4A1Sherman
_VISITCOMMUNITY
New York, United States
Joined: May 02, 2013
KitMaker: 4,403 posts
AeroScale: 254 posts
Posted: Friday, September 18, 2020 - 01:08 AM UTC
hi, Rowan!

Perhaps we misunderstand each other; my reference to your "paint-shade experimentation" was not meant to be anything derogatory. I was merely pointing out that I would have chosen the "LIGHTER" shade of the two Gray-Green paints for my RAF Cockpit-color to begin with. Nothing more, nothing less. Believe ME! I've experimented with so many different paint-shades for Interiors and Exteriors in my lifetime so that I could have written a book about it!

Glad to see that you've achieved results to your own statisfaction, and THAT'S what COUNTS!

VR, Dennis
M4A1Sherman
_VISITCOMMUNITY
New York, United States
Joined: May 02, 2013
KitMaker: 4,403 posts
AeroScale: 254 posts
Posted: Friday, September 18, 2020 - 01:55 AM UTC
Hello, Everyone!

A REAL SPITFIRE flying overhead!!! Honestly, you guys in Great Britain don't know how lucky you really are! Here in the 'States, we RARELY have any World War II ANYTHINGS flying around overhead. Unfortunately, this is due to utterly BLIND politicians. I will not elaborate...

OK, the only reason I posted about the EDUARD resin "BRASSIN" Spitfire Mk.IX "Early" and "Late" Engine Cowl Tops, was because the problem with the plastic 2-piece Mk.IX PLASTIC Cowl parts was brought up by SOMEONE ELSE; I merely put forth a quick and EASY solution to the problem, meaning to be helpful, and NOT to divert attention from the subject at hand. I've run into this problem, myself with my first EDUARD Spit Mk.IX. Most P-51 kits out there, (and quite a few others, I might add), share in this same malaise. Often, I've wished that plastic kit manufacturers would take this inherent problem in model aircraft kits to hand, and furnish their kits with SINGLE-PIECE PLASTIC Engine Top Cowl parts, in order to save aircraft modelers some time and frustration...

Thank You Jessie, for injecting a bit of humor into the somewhat wayward "Top Cowl" side-discussion.

On to Rowan's Spit Mk.Is- Very nice progress Rowan, and I can appreciate your pointing out the lack of "droop" in the kits' Elevators. I'll be either creating my own "droop", or who knows? Maybe EDUARD will see fit to "provide" us with "BRASSIN" resin "drooping" Elevators, someday..? One has to wonder if this is a "make-work" and/or a "buy more stuff" marketing strategy..?

More after-market "blues"... (sigh)

These Mk.Is are CERTAINLY beautiful kits, but they are NOT without their little "warts & foibles", it seems. Still, they look absolutely stupendous, and I am enthusiastically waiting to see how Rowan tackles his exterior detailing, painting and decaling of these Spitfires. I'm also very happy to see how Rowan is handling his build(s), in that he is virtually providing us with a nearly "step by step" format.

Many Thanks and KUDOS!
Merlin
Staff MemberSenior Editor
AEROSCALE
#017
_VISITCOMMUNITY
United Kingdom
Joined: June 11, 2003
KitMaker: 17,582 posts
AeroScale: 12,795 posts
Posted: Friday, September 18, 2020 - 08:05 AM UTC

Quoted Text

A REAL SPITFIRE flying overhead!!! Honestly, you guys in Great Britain don't know how lucky you really are!


Hi Dennis

We're particularly lucky here on the Isle of Wight, because a local company offers frequent flights in a 2-seater Spit around the area and out over The Needles where fierce fighting took place in 1940 and thereafter.

I was in "Spitfire Heaven" last summer when I was idly watching one of the regular flights as I got home from work and my ears pricked up at the sound of a second Merlin engine! Sure enough, another Spit roared in from the "back of the Wight" and the pair of them staged a mock dog-fight over the Solent!

I've no doubt WWII pilots would have scoffed at the display as being flown by a pair of pussies(!) - the RAF and Luftwaffe veterans tore the "dogfights" in the 1960s "Battle of Britain" movie to shreds! - but it was lump-in-the-throat time for the few of us lucky enough to witness it.

All the best

Rowan
M4A1Sherman
_VISITCOMMUNITY
New York, United States
Joined: May 02, 2013
KitMaker: 4,403 posts
AeroScale: 254 posts
Posted: Saturday, September 19, 2020 - 02:08 AM UTC
Hello, Rowan!

Thanks Much for answering to my "tale of woe"! Now, I'm DOUBLY-JEALOUS!!!

The last time I went to an Air Show/WWII Reenactment was the Mid-Atlantic Air Museum's "D-Day Weekend", which has always been put on around the D-Day, June 6, 1944 anniversary, near Reading, Pennsylvania. (We pronounce "Reading" as "Redding", here in the 'States)

This was back in 2006 with a couple of buddies of mine and their kids! There was always a "mock battle" between "U.S. Army GIs & British Ground Forces and Paratroopers" vs "German Heer Troops", ALL were in full WWII battle regalia. "SS" were sort of frowned-upon at this event, out of respect for people who may have objected to the mere SIGHT of SS uniforms.

Inevitably, this segment of the "festivities" was always put on as a somewhat fake-looking line of Allied Troops advancing and attacking the Germans, a la 18th & 19th Century "lines of Battle". The two sides clashed, with the Allies (of course) winning the engagement. Lots of noise and smoke-bombs contributed to the entire mess...

On the German side, there were BMW and Zuendapp Motorcycles, with and without "Beiwagen", (Sidecars, if you will), Kuebelwagen galore, a Schwimmwagen and a couple of Kaefer, a 3.5t Opel, several Mercedes Typ 170s, and a 3/4-scale Sd.Kfz 232 8-Rad A/C.

American and British Armor abound, with a multitude of Jeeps, a couple of Lloyd Universal Carriers, another multitude of GMC CCKW352 and CCKW353 2.5t 6x6 Trucks (Lorries, my Friend), Dodge WC-types, Canadian Fords & Chevrolets of various types, Chevrolet and Dodge Staff Cars, a 6pdr AT Gun, several 40mm Bofors, US 37mm, 57mm and 3-inch AT Guns, a half-dozen various marks of M4 Shermans, a WOLVERINE and M10 & M36 TDs, two M24s, an M26, a couple of M3 and M5 Stuarts and an M4 High Speed Artillery Tractor, complete with an 8-inch Howitzer.

There was always a 1940s-style dance band with a reasonable facsimile of the Andrews Sisters performing in the largest hangar, for most of the day and until about 10 PM. There were 1940s-style civilian and military girls about, dressed in period clothing and uniforms, with and without escorts, mostly in uniform. There were a myriad of displays of ALL the combatants in bivouac, and all types of displays of arms, uniforms, radios, etc. There were a lot of food concessionaires selling food of various "cuisines" to keep nearly everyone happily and amply fed. Also, there was always a flea-market, and other various concessionaires selling various REAL and reproduction WWII items and MODELS, which invariably, were over-priced!

As far as the static and flying WWII Aircraft displays were concerned, we were lucky to enjoy a veritable myriad of ground and air displays of a veritable "sky-full" of P-51s, a pair of P-47s, a Bf.109E, an Fw.190A, several B-25s, A-26Bs and Cs, C-47s, an LB-30 dressed up as a B-24, a LANCASTER, several Spitfire Mk.VIIIs & Mk.IXs, a Hurricane, a Yak-3 (where did HE come from?!? ), three B-17s in various camo and NMF schemes, a TBM-3 Avenger, an SBD-5 Dautless, an F4F-4 Wildcat, an F4U-5 Corsair (postwar, I know...), DOZENS of AT-6/T-6 Texans, a Grumman F3F-3, a half-dozen Stearman PT-17/NS-3s, a T-28D and an AD-6 Skyraider (Vietnam color schemes, for those last 2)), plus a lovely Beech 18 in Ivory White with Aqua trim. Modern stuff was there in force with the Blue Angels putting on their usual displays of aerial derring-do. Of interest, there was a "Pacific-theatre" aerial display, also. The Pearl Harbor Attack was represented with the heavily re-worked AT/T-6 Texans from the movie "TORA-TORA-TORA" of the late 1960s, which were converted to represent "Zeroes", a "Val" and a "Kate". AMAZING that these "HOLLYWOOD" aircraft have survived the test of time. Even "FAKER" than the "D-Day Allies vs Germans-Battle", was the lone US Infantryman who fired several shots from his M1911 .45 ACP Pistol at a retreating "Val", and making it "smoke" out of a badly-concealed Smoke-generator", simulating a "wounded" Japanese aircraft...

People laughed at that...

Nearly ALL of the WWII aircraft joined in the fake "ground-fracas" which in REAL HISTORY, didn't happen. can you possibly see three B-17s buzzing a WWII GROUND "Battle"??? (OH, NOOO!!!)

I absolutely loved the WWII fighters especially, and their wild cavorting all over the sky... COVID-19 has now managed to ruin EVERYTHING. Even "STEAMTOWN U.S.A." down in Scranton, Pennsylvania has curtailed many of their outside displays of American steam-era exhibits, their "Steam Excursion Run" and they've also closed several of their on-site museums and stores... Sad...

Didn't mean to ramble-on so...

Thanks for reading...

VR, Dennis

PS- I'm SURE the aerial displays at DUXFORD are more realistic!
Merlin
Staff MemberSenior Editor
AEROSCALE
#017
_VISITCOMMUNITY
United Kingdom
Joined: June 11, 2003
KitMaker: 17,582 posts
AeroScale: 12,795 posts
Posted: Monday, September 21, 2020 - 06:53 AM UTC
Hi again

Just a quick update. It's always a nice surprise when the easy solution works - and so it proved with the elevators. Basically - to get the characteristic droop... just remove the locating pins:


I recommend leaving the pins on initially so that you can use the elevators to ensure the stabilisers are lined-up correctly. Once they're removed, you can set the angle as you wish (the elevators are only taped in place in the photo):


I've also given the rather crisp and prominent rib-tapes a very light once-over with a fine nail-buffer to knock them back a bit. You probably could go a fair bit further for a true-to-scale look.

All the best

Rowan
Jessie_C
_VISITCOMMUNITY
British Columbia, Canada
Joined: September 03, 2009
KitMaker: 6,965 posts
AeroScale: 6,247 posts
Posted: Monday, September 21, 2020 - 08:41 AM UTC
Don't forget to take the opportunity to nudge the joystick into the full nose-down position otherwise Chiefy will need to chew out the erks who mis-rigged the controls
litespeed
Staff MemberNews Reporter
AEROSCALE
_VISITCOMMUNITY
England - North West, United Kingdom
Joined: October 15, 2009
KitMaker: 1,976 posts
AeroScale: 1,789 posts
Posted: Tuesday, September 22, 2020 - 01:56 AM UTC
Looks so much better with the relaxed looking elevators Rowan
T
Merlin
Staff MemberSenior Editor
AEROSCALE
#017
_VISITCOMMUNITY
United Kingdom
Joined: June 11, 2003
KitMaker: 17,582 posts
AeroScale: 12,795 posts
Posted: Tuesday, September 22, 2020 - 06:30 AM UTC

Quoted Text

Don't forget to take the opportunity to nudge the joystick into the full nose-down position otherwise Chiefy will need to chew out the erks who mis-rigged the controls


Hi Jessie

Absolutely! I've also got the grips on the grip on the top of each control column slightly displaced, ready to fit the ailerons a tad offset as I always think it adds a bit of "life" to a model. I would have done the same with the rudder pedals - but that would entail a bit of creative surgery and I was keen to keep things simple and move on.

Back to the build. Eduard's instructions show the IFF aerials for Option J in the colour schemes - which makes sense because the equipment was introduced towards the end of September 1940. By implication, you should remove the fuselage insulators and tail attachments for the earlier aircraft:


All the best

Rowan
Merlin
Staff MemberSenior Editor
AEROSCALE
#017
_VISITCOMMUNITY
United Kingdom
Joined: June 11, 2003
KitMaker: 17,582 posts
AeroScale: 12,795 posts
Posted: Wednesday, September 23, 2020 - 10:21 AM UTC
Hi all

I'm going to have to call a temporary halt to the build for a week (hopefully).

Totally out of the blue, I've had a call from builders who were set to work on my house just when everything ground to a halt with the UK lockdown in April to say they can now finally get started. It's a roof-job that was pretty urgent in the spring - and really needs doing before autumn bad weather really sets in!

Unfortunately, being at such short notice, it'll mean some major upheavals to get ready for them. I was all set for a good day at the workbench tomorrow, but that's gone out of the window and the next few days will be spent turning the place upside down instead.

I'll obviously grab any chance to make progress that I can - but, realistically, I don't expect to get much done until mid- next week.

All the best

Rowan
SteveAndrews
_VISITCOMMUNITY
England - South East, United Kingdom
Joined: August 16, 2010
KitMaker: 693 posts
AeroScale: 551 posts
Posted: Wednesday, September 23, 2020 - 06:43 PM UTC
Good luck with the re-roofing Rowan. I hope the fit is good and there are no seams to fill :-)
AussieReg
Staff MemberAssociate Editor
AUTOMODELER
#007
_VISITCOMMUNITY
Victoria, Australia
Joined: June 09, 2009
KitMaker: 8,156 posts
AeroScale: 3,756 posts
Posted: Thursday, September 24, 2020 - 12:45 PM UTC

Quoted Text

Good luck with the re-roofing Rowan. I hope the fit is good and there are no seams to fill :-)


Mental image of Rowan up on the roof with his Optivisor, a tube of Squadron putty and a 20/0 brush
M4A1Sherman
_VISITCOMMUNITY
New York, United States
Joined: May 02, 2013
KitMaker: 4,403 posts
AeroScale: 254 posts
Posted: Friday, September 25, 2020 - 01:09 AM UTC
Hello, Rowan!

UGH!!! ROOFING!!! Been there!

Best of LUCK, and a MINIMUM of HEADACHES with your experience!

VR, Dennis
cabasner
_VISITCOMMUNITY
Nevada, United States
Joined: February 12, 2012
KitMaker: 1,083 posts
AeroScale: 25 posts
Posted: Friday, September 25, 2020 - 11:35 AM UTC

Quoted Text

... I've also got the grips on the grip on the top of each control column slightly displaced, ready to fit the ailerons a tad offset as I always think it adds a bit of "life" to a model. I would have done the same with the rudder pedals - but that would entail a bit of creative surgery and I was keen to keep things simple and move on.


Hi Rowan,
I agree with you about the ailerons being offset a bit to bring a bit of 'life' to an aircraft build. I am not a pilot, but I thought that the stick being displaced to the left or right of center is what would move the ailerons. Perhaps this is not the case with a Spitfire generally, or a Mk. 1 specifically. Could I bother you to ask what the controls would look like to move the ailerons. Thanks if you can assist.
Jessie_C
_VISITCOMMUNITY
British Columbia, Canada
Joined: September 03, 2009
KitMaker: 6,965 posts
AeroScale: 6,247 posts
Posted: Friday, September 25, 2020 - 01:38 PM UTC

Quoted Text


Hi Rowan,
I agree with you about the ailerons being offset a bit to bring a bit of 'life' to an aircraft build. I am not a pilot, but I thought that the stick being displaced to the left or right of center is what would move the ailerons. Perhaps this is not the case with a Spitfire generally, or a Mk. 1 specifically. Could I bother you to ask what the controls would look like to move the ailerons. Thanks if you can assist.


Hi Curt, I can help you with that. Spitfires behave like any other airplane in this respect, with the exception that the side-to-side motion is hinged just below the hand grip rather than at the base due to the confined cockpit (The green portion of the joystick moves only fore and aft; the silver portion rotates left and right). Imagine that you're holding the joystick in the neutral position with your right hand and with your thumb pointing straight up. When you move the stick to make a bank (left or right), your thumb will point at the aileron which moves up. If your aircraft has a yoke, the same principal applies. Your thumb will point to the upwards moving aileron when you rotate the yoke. The other one, of course, moves downwards.

Push the stick (or yoke) forward (towards the instrument panel) and the elevators deflect downwards. Pull backwards (towards the seat) and the elevators deflect upwards.

Rudder pedals move the rudder towards the one which is pushed towards the nose. Step on the right rudder pedal and the rudder deflects right. Step on the left and the rudder goes left.

If you're going to animate your model's control surfaces, now you can pose the cockpit controls accordingly
cabasner
_VISITCOMMUNITY
Nevada, United States
Joined: February 12, 2012
KitMaker: 1,083 posts
AeroScale: 25 posts
Posted: Friday, September 25, 2020 - 04:14 PM UTC

Quoted Text

If you're going to animate your model's control surfaces, now you can pose the cockpit controls accordingly


Truly outstanding info, Jessie, THANK YOU SO MUCH!!! The photo helped a ton as well. Fantastic! Can I ask whether you know how far the circular yoke tilts in either direction for maximum deflection of the ailerons, and, for that matter, how far, in approximate degrees, the ailerons move, at maximum deflection? I know this is digging into the weeds, but just in case you may have this level of knowledge, it might be worth it in terms uf ultimate detail on the model. In addition, since the control surfaces are all manually linked to the cockpit controls, I presume that these controls could be positioned and left in those positions when the aircraft is sitting parked/idle; accurate?
M4A1Sherman
_VISITCOMMUNITY
New York, United States
Joined: May 02, 2013
KitMaker: 4,403 posts
AeroScale: 254 posts
Posted: Saturday, September 26, 2020 - 12:01 AM UTC
Hi, Jessie and everyone Else!

Thanks Much to Jessie for sharing that lovely photo of the Spitfire Cockpit, detailing especially the Control Column and the Control Yoke. The EDUARD parts in question are R52 for the Control Yoke and R54 for the Control Column. One only needs to orient part R52 to "Port" or "Starboard", and R54 to "Fore" or "Aft", dependent upon if you are modeling Early or late Mk.I Spitfire-types. Very simple, in "real-life" and much more complicated to explain in "text"...

"A photo is CERTAINLY" worth a thousand words", if I may paraphrase and old, but very true saying. THANKS AGAIN, Jessie!

VR, Dennis
M4A1Sherman
_VISITCOMMUNITY
New York, United States
Joined: May 02, 2013
KitMaker: 4,403 posts
AeroScale: 254 posts
Posted: Saturday, September 26, 2020 - 12:16 AM UTC
Hi, Rowan!

A question:

I'm curious as to the orientation of the Main Landing Gear Control Lever- Is there a certain POSITION this Lever should be oriented in when the Landing Gear is fully EXTENDED, or fully RETRACTED..?

I realize that it took a Spitfire Pilot a certain number of "pumps" in order to raise or lower the Landing Gear. "SPROGS" (fledgling Spitfire and Hurricane Pilots) were often the butt of merciless teasing and jokes from the more experienced Pilots, after the relatively uninitiated new Pilots having "pumped" BOTH the Landing Gear Lever AND the Control Column SIMULTANEOUSLY upon "take-off" and/or landing, resulting in a rather humorous display of Spitfires "porpoising" wildly (Oh, dear!) in either case.

Let's remember that in this early stage of World War II, most young fledgling Pilots trained on "fixed"-Landing Gear aircraft...

A VERY minor point, but one which a "detail nut" such as myself, might appreciate...

Thanks in Advance...

VR, Dennis
Merlin
Staff MemberSenior Editor
AEROSCALE
#017
_VISITCOMMUNITY
United Kingdom
Joined: June 11, 2003
KitMaker: 17,582 posts
AeroScale: 12,795 posts
Posted: Saturday, September 26, 2020 - 07:51 AM UTC

Quoted Text

Hi, Rowan!

A question:

I'm curious as to the orientation of the Main Landing Gear Control Lever- Is there a certain POSITION this Lever should be oriented in when the Landing Gear is fully EXTENDED, or fully RETRACTED..?

VR, Dennis


Hi Dennis

Going by photos of the early "pump-action" undercarriage control, the selector position is forward for lowered gear. This matches what Eduard have modelled.

Back to the build - the builders have confirmed a Monday start for the work on the roof - and are hoping to get it done in two days... So, I'm allowing for three - because sh*t always happens on big jobs like this (and we're talking UK coastal weather in autumn). The great thing is - we've had gales for the last couple of days, so they probably couldn't have got the job done, but the weather looks set to blow itself out just in time for them starting. (I know - I've tempted Fate badly there! )

But... all being well... I'll be back at the workbench on my next day off from work on Thursday...

All the best

Rowan